《深入理解android》学习:WMS(一)
《深入理解android》学习:WMS(一)1.WMS综述WMS是android中的一个重要的系统服务,用于窗口管理。从其内部实现来看,包含以下的一些功能窗口的添加与删除启动窗口窗口动画窗口大小窗口层级1.1 WMS的启动WMS的启动是在SysteServer中,先来看下其启动代码/frameworks/base/services/java/com/android/ser...
《深入理解android》学习:WMS(一)
1.WMS综述
WMS是android中的一个重要的系统服务,用于窗口管理。从其内部实现来看,包含以下的一些功能
- 窗口的添加与删除
- 启动窗口
- 窗口动画
- 窗口大小
- 窗口层级
1.1 WMS的启动
WMS的启动是在SysteServer中,先来看下其启动代码
本文中的代码若未特别说明,都是来自android P源码。
/frameworks/base/services/java/com/android/server/SystemServer.java
wm = WindowManagerService.main(context, inputManager,
                    mFactoryTestMode != FactoryTest.FACTORY_TEST_LOW_LEVEL,
                    !mFirstBoot, mOnlyCore, new PhoneWindowManager());
            ServiceManager.addService(Context.WINDOW_SERVICE, wm, /* allowIsolated= */ false,
                    DUMP_FLAG_PRIORITY_CRITICAL | DUMP_FLAG_PROTO);
这里先通过WindowManagerService的main方法将服务启动起来,再注册到ServiceManager当中。
我们再来看下WindowManagerService的main方法中的启动。
/frameworks/base/services/core/java/com/android/server/wm/WindowManagerService.java
 public static WindowManagerService main(final Context context, final InputManagerService im,
            final boolean haveInputMethods, final boolean showBootMsgs, final boolean onlyCore,
            WindowManagerPolicy policy) {
        DisplayThread.getHandler().runWithScissors(() ->
                sInstance = new WindowManagerService(context, im, haveInputMethods, showBootMsgs,
                        onlyCore, policy), 0);
        return sInstance;
    }
这里创建并返回了一个WindowManagerService的实例。
1.2 WMS,AMS和Activity之间的联系
书中从IPC通信和内部组织方式这两个角度来描述了这三者之间的关系。
1.2.1 IPC通信方式
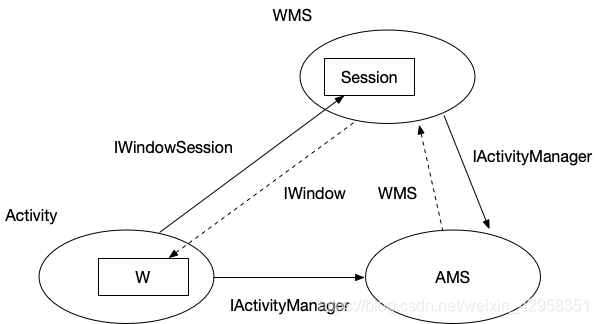
Activity运行在应用程序中,而AMS和WMS通过上面的描述可以知道是在SystemServer中启动的,所以这两个驻留在同一个进程当中。应用程序中获取AMS服务和WMS服务实际也都是通过Binder来实现。
下图描述了这三者之间的关系。(图来自书中)
1.2.2 内部组织方式
新的Activity在启动后都需要在AMS中进行注册,AMS会生成一个对应的ActivityRecord来记录对应的信息。同时由于Activity是进行UI显示的,因此在WMS中进行记录,WindowState保存了有关信息。下图展示了有关关系,图同样来自书中。

1.3 窗口属性
下面绘制了窗口属性这一小节的思维导图,大多是概念性的东西,不进行赘述。

1.4 窗口的添加过程
前面介绍过窗口分为系统窗口和应用程序的窗口,下面分别介绍这两种窗口的添加过程。
1.4.1 系统窗口添加
这里以StatusBar添加过程为案例进行描述。
/frameworks/base/packages/SystemUI/src/com/android/systemui/statusbar/phone/StatusBar.java
private void addStatusBarWindow() {
        makeStatusBarView();
        mStatusBarWindowManager = Dependency.get(StatusBarWindowManager.class);
        mRemoteInputManager.setUpWithPresenter(this, mEntryManager, this,
                new RemoteInputController.Delegate() {
                    public void setRemoteInputActive(NotificationData.Entry entry,
                            boolean remoteInputActive) {
                        mHeadsUpManager.setRemoteInputActive(entry, remoteInputActive);
                        entry.row.notifyHeightChanged(true /* needsAnimation */);
                        updateFooter();
                    }
                    public void lockScrollTo(NotificationData.Entry entry) {
                        mStackScroller.lockScrollTo(entry.row);
                    }
                    public void requestDisallowLongPressAndDismiss() {
                        mStackScroller.requestDisallowLongPress();
                        mStackScroller.requestDisallowDismiss();
                    }
                });
        mRemoteInputManager.getController().addCallback(mStatusBarWindowManager);
        mStatusBarWindowManager.add(mStatusBarWindow, getStatusBarHeight());
    }
这里先调用了makeStatusBarView方法来创建状态栏的控件树,该方法可以参考这篇文章中的讲解系统服务-System UI,然后通过StatusBarWindowManager来add到WMS中。
frameworks/base/packages/SystemUI/src/com/android/systemui/statusbar/phone/StatusBarWindowManager.java
 public void add(View statusBarView, int barHeight) {

        // Now that the status bar window encompasses the sliding panel and its
        // translucent backdrop, the entire thing is made TRANSLUCENT and is
        // hardware-accelerated.
        mLp = new WindowManager.LayoutParams(
                ViewGroup.LayoutParams.MATCH_PARENT, //宽度填满
                barHeight,
                WindowManager.LayoutParams.TYPE_STATUS_BAR, //类型为statusbar
                WindowManager.LayoutParams.FLAG_NOT_FOCUSABLE //不接受按键事件
                        | WindowManager.LayoutParams.FLAG_TOUCHABLE_WHEN_WAKING
                        | WindowManager.LayoutParams.FLAG_SPLIT_TOUCH
                        | WindowManager.LayoutParams.FLAG_WATCH_OUTSIDE_TOUCH
                        | WindowManager.LayoutParams.FLAG_DRAWS_SYSTEM_BAR_BACKGROUNDS,
                PixelFormat.TRANSLUCENT);
        mLp.token = new Binder();
        mLp.gravity = Gravity.TOP;
        mLp.softInputMode = WindowManager.LayoutParams.SOFT_INPUT_ADJUST_RESIZE;
        mLp.setTitle("StatusBar");
        mLp.packageName = mContext.getPackageName();
        mLp.layoutInDisplayCutoutMode = LAYOUT_IN_DISPLAY_CUTOUT_MODE_ALWAYS;
        mStatusBarView = statusBarView;
        mBarHeight = barHeight;
        mWindowManager.addView(mStatusBarView, mLp); //mWindowManager是一个WindowManager对象,最后还是调用WindowManager的addView方法来完成
        mLpChanged = new WindowManager.LayoutParams();
        mLpChanged.copyFrom(mLp);
    }
这里我本来想看下WindowManager的addView方法的实现。查看后发现WindowManager只是个接口类,其中也没有addView方法,而其定义又如下:
public interface WindowManager extends ViewManager {... ...}
因此会在ViewManager或其父类中。而前面在StatusBarWindowManager.java的add方法介绍中,涉及到一个mWindowManager对象,先看下这个对象是如何获取到的,也为后续的ViewManager分析进行铺垫。
frameworks/base/packages/SystemUI/src/com/android/systemui/statusbar/phone/StatusBarWindowManager.java
private final WindowManager mWindowManager;
... ...
mWindowManager = (WindowManager) context.getSystemService(Context.WINDOW_SERVICE);
在Context.java中只提供了getSysteService的接口,真正实现是在ContextImpl.java中。
frameworks/base/core/java/android/app/ContextImpl.java
 @Override
    public Object getSystemService(String name) {
        return SystemServiceRegistry.getSystemService(this, name);
    }
进一步调用了SystemServiceRegistry的方法:
frameworks/base/core/java/android/app/SystemServiceRegistry.java
 public static Object getSystemService(ContextImpl ctx, String name) {
        ServiceFetcher<?> fetcher = SYSTEM_SERVICE_FETCHERS.get(name);
        return fetcher != null ? fetcher.getService(ctx) : null;
    }
其中SYSTEM_SERVICE_FETCHERS是一个HashMap对象,保存常用的一些服务。P中的代码跟书中稍有出入,在SystemServiceRegistry.java中,ServiceFetcher只被定义成接口,并提供了抽象的getService方法,会被具体的子类实现。而子类的getService方法中,进一步调用了抽象的createService来返回服务。这些服务是在注册时确定的,在WINDOW_SERVICE的服务类型注册时,具体行为如下:
registerService(Context.WINDOW_SERVICE, WindowManager.class,
                new CachedServiceFetcher<WindowManager>() {
            @Override
            public WindowManager createService(ContextImpl ctx) {
                return new WindowManagerImpl(ctx);
            }});
可知,最后返回的是一个WindowManagerImpl的对象给上层使用。注意到WindowManagerImpl只是一个本地进程中的对象,并未与WMS进行通信。同时顾名思义,WindowManagerImpl应该是WindowManager的实现类,实际上也确实如此。而我们知道WindowManager只是一个接口类,它也没有与AMS发生联系。WindowManager的父类ViewManager同样如此。这三者之间的继承关系是十分清晰的,按照书中的描述,不同的接口负责不同的约束。ViewManager负责View相关的管理,而WindowManager负责窗口相关的管理,并最终都由WindowManagerImpl来实现具体的行为。附上书中的类图:

WindowManagerImpl的addView方法如下:
frameworks/base/core/java/android/view/WindowManagerImpl.java
 public void addView(@NonNull View view, @NonNull ViewGroup.LayoutParams params) {
        applyDefaultToken(params);
        mGlobal.addView(view, params, mContext.getDisplay(), mParentWindow);
    }
mGlobal是一个WindowManagerGlobal对象,是一个单实例。它的addView的方法如下:
/frameworks/base/core/java/android/view/WindowManagerGlobal.java
 public void addView(View view, ViewGroup.LayoutParams params,
            Display display, Window parentWindow) {
        if (view == null) {
            throw new IllegalArgumentException("view must not be null");
        }
        if (display == null) {
            throw new IllegalArgumentException("display must not be null");
        }
        if (!(params instanceof WindowManager.LayoutParams)) {
            throw new IllegalArgumentException("Params must be WindowManager.LayoutParams");
        }

        final WindowManager.LayoutParams wparams = (WindowManager.LayoutParams) params;
        if (parentWindow != null) {
            parentWindow.adjustLayoutParamsForSubWindow(wparams);
        } else {
            // If there's no parent, then hardware acceleration for this view is
            // set from the application's hardware acceleration setting.
            final Context context = view.getContext();
            if (context != null
                    && (context.getApplicationInfo().flags
                            & ApplicationInfo.FLAG_HARDWARE_ACCELERATED) != 0) {
                wparams.flags |= WindowManager.LayoutParams.FLAG_HARDWARE_ACCELERATED;
            }
        }

        ViewRootImpl root;
        View panelParentView = null;

        synchronized (mLock) {
            // Start watching for system property changes.
            if (mSystemPropertyUpdater == null) {
                mSystemPropertyUpdater = new Runnable() {
                    @Override public void run() {
                        synchronized (mLock) {
                            for (int i = mRoots.size() - 1; i >= 0; --i) {
                                mRoots.get(i).loadSystemProperties();
                            }
                        }
                    }
                };
                SystemProperties.addChangeCallback(mSystemPropertyUpdater);
            }

            int index = findViewLocked(view, false);
            if (index >= 0) {
                if (mDyingViews.contains(view)) {
                    // Don't wait for MSG_DIE to make it's way through root's queue.
                    mRoots.get(index).doDie();
                } else {
                    throw new IllegalStateException("View " + view
                            + " has already been added to the window manager.");
                }
                // The previous removeView() had not completed executing. Now it has.
            }

            // If this is a panel window, then find the window it is being
            // attached to for future reference.
            if (wparams.type >= WindowManager.LayoutParams.FIRST_SUB_WINDOW &&
                    wparams.type <= WindowManager.LayoutParams.LAST_SUB_WINDOW) {
                final int count = mViews.size();
                for (int i = 0; i < count; i++) {
                    if (mRoots.get(i).mWindow.asBinder() == wparams.token) {
                        panelParentView = mViews.get(i);
                    }
                }
            }

            root = new ViewRootImpl(view.getContext(), display);

            view.setLayoutParams(wparams);

            mViews.add(view);
            mRoots.add(root);
            mParams.add(wparams);

            // do this last because it fires off messages to start doing things
            try {
                root.setView(view, wparams, panelParentView);
            } catch (RuntimeException e) {
                // BadTokenException or InvalidDisplayException, clean up.
                if (index >= 0) {
                    removeViewLocked(index, true);
                }
                throw e;
            }
        }
    }
上面的代码段中先进行参数检查,然后调用了findViewLocked来检查是不是已经添加过这个view对象。有的话抛出异常,没有的话先构建一个ViewRootImpl对象,在将这个视图的view,root,wparams信息添加到mViews,mRoots,mParams这三个数组中。最后再调用root的setView方法来设置要添加的视图信息。值的注意的是,这里也是客户端和WMS“跨进程通信”的地方。
frameworks/base/core/java/android/view/ViewRootImpl.java
 public void setView(View view, WindowManager.LayoutParams attrs, View panelParentView) {
 ... ...
  // Schedule the first layout -before- adding to the window
                // manager, to make sure we do the relayout before receiving
                // any other events from the system.
                requestLayout();
                ... ...
                  try {
                    mOrigWindowType = mWindowAttributes.type;
                    mAttachInfo.mRecomputeGlobalAttributes = true;
                    collectViewAttributes();
                    res = mWindowSession.addToDisplay(mWindow, mSeq, mWindowAttributes,
                            getHostVisibility(), mDisplay.getDisplayId(), mWinFrame,
                            mAttachInfo.mContentInsets, mAttachInfo.mStableInsets,
                            mAttachInfo.mOutsets, mAttachInfo.mDisplayCutout, mInputChannel);
                } catch (RemoteException e) {...}
                ...
 }
WMS才是窗口管理系统,因而当应用程序新增了一个顶层的View时(ViewTree的根),是肯定需要通知WMS的。在将View树(在WMS看来,它是一个“Window”,由WindowState管理)注册到WMS前,需要注意什么呢?没错,必须先执行第一次layout,也就是调用requestLayout——WMS除了窗口管理外,还负责各种事件的派发,所以在向WMS“注册”前应用程序要确保这颗View树已经做好了接收事件的准备。
在本节一开始的时候,就描绘了WMS和Activity的IPC通信模型,这个实现也正是由ViewRoot来完成的。在上述的方法中,mWindowSession是一个IWindowSession对象。在ViewRootImpl初始化的时候,打开了一个与WMS的可用连接。
mWindowSession = WindowManagerGlobal.getWindowSession();
之后,在setView方法中通过它来发起一个服务请求。在IWindowSession的服务端实现(Session.java)中,函数addToDisplay的方法如下:
frameworks/base/services/core/java/com/android/server/wm/Session.java
 public int addToDisplay(IWindow window, int seq, WindowManager.LayoutParams attrs,
            int viewVisibility, int displayId, Rect outFrame, Rect outContentInsets,
            Rect outStableInsets, Rect outOutsets,
            DisplayCutout.ParcelableWrapper outDisplayCutout, InputChannel outInputChannel) {
        return mService.addWindow(this, window, seq, attrs, viewVisibility, displayId, outFrame,
                outContentInsets, outStableInsets, outOutsets, outDisplayCutout, outInputChannel);
    }
最后通过mService@addWindow方法来添加的,而mService就是一个WindowManagerService对象。
final WindowManagerService mService;
需要注意的是,WMS并不关系View的具体内容,它只关系各个应用进程现实的界面的大小、”层级值“,而这些内容都包含在WindowManager.LayoutParams中。而在WMS中,addWindow的方法如下:
frameworks/base/services/core/java/com/android/server/wm/WindowManagerService.java
 public int addWindow(Session session, IWindow client, int seq,
            LayoutParams attrs, int viewVisibility, int displayId, Rect outFrame,
            Rect outContentInsets, Rect outStableInsets, Rect outOutsets,
            DisplayCutout.ParcelableWrapper outDisplayCutout, InputChannel outInputChannel){
	int[] appOp = new int[1];
    int res = mPolicy.checkAddPermission(attrs, appOp); //权限检查
    ...
      synchronized(mWindowMap) {

		if (mWindowMap.containsKey(client.asBinder())) { //避免重复添加
                Slog.w(TAG_WM, "Window " + client + " is already added");
                return WindowManagerGlobal.ADD_DUPLICATE_ADD;
            }
	    if (type >= FIRST_SUB_WINDOW && type <= LAST_SUB_WINDOW) { //子窗口
              parentWindow = windowForClientLocked(null, attrs.token, false);//寻找父窗口
               if (parentWindow == null) {
                   Slog.w(TAG_WM, "Attempted to add window with token that is not a window: "
                         + attrs.token + ".  Aborting.");
                   return WindowManagerGlobal.ADD_BAD_SUBWINDOW_TOKEN;
               }
               if (parentWindow.mAttrs.type >= FIRST_SUB_WINDOW
                       && parentWindow.mAttrs.type <= LAST_SUB_WINDOW) {
                   Slog.w(TAG_WM, "Attempted to add window with token that is a sub-window: "
                           + attrs.token + ".  Aborting.");
                   return WindowManagerGlobal.ADD_BAD_SUBWINDOW_TOKEN;
               }
          }

         AppWindowToken atoken = null;
            final boolean hasParent = parentWindow != null;
            // Use existing parent window token for child windows since they go in the same token
            // as there parent window so we can apply the same policy on them.
            WindowToken token = displayContent.getWindowToken(
                    hasParent ? parentWindow.mAttrs.token : attrs.token);
            // If this is a child window, we want to apply the same type checking rules as the
            // parent window type.
            final int rootType = hasParent ? parentWindow.mAttrs.type : type;

           if (token == null) {......}  //检查token是否有效

           //创建新的WindowState来记录这个新增的窗口
           final WindowState win = new WindowState(this, session, client, token, parentWindow,
                  appOp[0], seq, attrs, viewVisibility, session.mUid,
                  session.mCanAddInternalSystemWindow);
                  ... ...
                  mWindowMap.put(client.asBinder(), win);
                  ... ...
                  win.mToken.addWindow(win);
                  ... ...
	}
}
WindowState构造函数中的几个参数:this代表WMS自身,Session是WMS提供给窗口使用的IWindowSession,client是IWindow,是窗口使用者提供给WMS的访问通道;token是WindowToken对象。
变量mWidowMap是一个<IBinder, WindowState>类型的HashMap,前面的IBinder代表IWindow,所以mWindowMap是WMS中与此IWindow相对应的WindowState的映射。
1.4.2 Activity窗口的添加
这里主要介绍下Actiivty添加窗口的时机,其他的细节还需要进一步的了解。Activity因为本身就用于UI的显示,因而需要WMS的支持才能正常运行。Activity在启动后会经过onCreate,onStart,onResume几个阶段,而ActivityThread就是在handleResumeActivity方法中调用了addView这个方法。
frameworks/base/core/java/android/app/ActivityThread.java
public void handleResumeActivity(IBinder token, boolean finalStateRequest, boolean isForward,
            String reason) {
            ... ...
             if (a.mVisibleFromClient) {
                if (!a.mWindowAdded) {
                    a.mWindowAdded = true;
                    wm.addView(decor, l); //添加窗口
                } else {
                 ... ...
                }
            }
}

为开发者提供学习成长、分享交流、生态实践、资源工具等服务,帮助开发者快速成长。
更多推荐


 3
3 0
0- 0


 已为社区贡献1条内容

所有评论(0)