
springboot+ShardingJDBC+mySql分库分表以及不分库分表操作
数据量达到一定程度的话可能就会进行分库分表,所以最近研究了一个分库分表的插件ShardingJDBC,因为myCat或者其他的开源插件都已经不维护了或者停止更新,目前ShardingJDBC比较活跃,而且不用进行单独部署工作,这点还是比较好的。那么接下来就贴一下代码,看怎么使用它。1.先把表结构贴出来,我的数据库一个部署在linux的腾讯云上,一个部署在本机上第一个数据库是mall...
数据量达到一定程度的话可能就会进行分库分表,所以最近研究了一个分库分表的插件ShardingJDBC,因为myCat或者其他的开源插件都已经不维护了或者停止更新,目前ShardingJDBC比较活跃,而且不用进行单独部署工作,这点还是比较好的。那么接下来就贴一下代码,看怎么使用它。
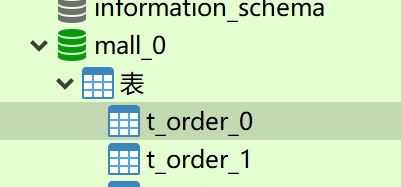
1.先把表结构贴出来,我的数据库一个部署在linux的腾讯云上,一个部署在本机上第一个数据库是mall_0,表为t_order_0,t_order_1。第二个数据库是mall_1表为t_order_0,t_order_1。稍后在后边附带数据库脚本。

2.首先需要在pom.xml里添加jar包,必然要放的呀~
      <!-- 我的springboot版本-->
       <parent>
           <groupId>org.springframework.boot</groupId>
           <artifactId>spring-boot-starter-parent</artifactId>
           <version>2.1.4.RELEASE</version>
           <relativePath/> <!-- lookup parent from repository -->
       </parent>

       <!-- MySQL的JDBC驱动包,操作mysql,必然需要mysql啊 -->
        <dependency>
            <groupId>mysql</groupId>
            <artifactId>mysql-connector-java</artifactId>
            <scope>runtime</scope>
        </dependency>

        <!-- shardingjdbc,主角登场 -->
        <dependency>
            <groupId>io.shardingjdbc</groupId>
            <artifactId>sharding-jdbc-core</artifactId>
            <version>2.0.3</version>
        </dependency>

        <!-- druid数据库连接池 -->
        <dependency>
            <groupId>com.alibaba</groupId>
            <artifactId>druid</artifactId>
            <version>1.1.6</version>
        </dependency>
3.jar包下载完毕,就需要写配置文件喽,需要配置数据库连接信息
server:
  port: 9999
spring:
  application:
    name: sharding-jdbc
  jackson:
    time-zone: GMT+8
    date-format: yyyy-MM-dd HH:mm:ss
    default-property-inclusion: non_null
  datasource:
    type: com.alibaba.druid.pool.DruidDataSource
    ds0:
      url: jdbc:mysql://localhost:3306/mall_0?serverTimezone=UTC
      driverClassName: com.mysql.cj.jdbc.Driver
      username: root
      password: root
    ds1:
      url: jdbc:mysql://xxx:3307/mall_1?serverTimezone=UTC
      driverClassName: com.mysql.cj.jdbc.Driver
      username: root
      password: root
4.就需要启动注入方式将分库分表规则写入,再把dataSorce连接加入规则,添加类ShardingConfig
package com.itdf.config;

import java.sql.SQLException;
import java.util.HashMap;
import java.util.Map;
import java.util.Properties;
import java.util.concurrent.ConcurrentHashMap;
import javax.sql.DataSource;


import io.shardingjdbc.core.api.ShardingDataSourceFactory;
import io.shardingjdbc.core.api.config.ShardingRuleConfiguration;
import io.shardingjdbc.core.api.config.TableRuleConfiguration;
import io.shardingjdbc.core.api.config.strategy.InlineShardingStrategyConfiguration;
import org.springframework.beans.factory.annotation.Autowired;
import org.springframework.beans.factory.annotation.Qualifier;
import org.springframework.beans.factory.annotation.Value;
import org.springframework.context.annotation.Bean;
import org.springframework.context.annotation.Configuration;
import com.alibaba.druid.filter.Filter;
import com.alibaba.druid.filter.stat.StatFilter;
import com.alibaba.druid.pool.DruidDataSource;
import com.google.common.collect.Lists;

import org.springframework.context.annotation.Primary;

/**
 * 配置分库分表操作
 * 首先第一步,先到配置文件去获取两个数据源的连接信息
 * 第二步设置分库分表的规则
 * 第三步将规则放入ShardingJDBC配置里,然后可以设置分库分表的sql显示等等
 * 之后将数据源信息都分库分表信息全部传入ShardingJDBC配置,返回给我们DataSource资源
 * @Author df
 * @Date 2019/8/28 14:17
 * @Version 1.0
 */
@Configuration
public class ShardingConfig {

    @Value("${spring.datasource.ds0.url}")
    private String ds0_url;

    @Value("${spring.datasource.ds0.driverClassName}")
    private String ds0_driverClassName;

    @Value("${spring.datasource.ds0.username}")
    private String ds0_username;

    @Value("${spring.datasource.ds0.password}")
    private String ds0_password;


    @Value("${spring.datasource.ds1.url}")
    private String ds1_url;

    @Value("${spring.datasource.ds1.driverClassName}")
    private String ds1_driverClassName;

    @Value("${spring.datasource.ds1.username}")
    private String ds1_username;

    @Value("${spring.datasource.ds1.password}")
    private String ds1_password;

    /**
     * shardingjdbc数据源
     *
     * @return
     */
    @Bean
    @Primary
    public DataSource dataSource() throws SQLException {
        // 封装dataSource
        Map<String, DataSource> dataSourceMap = new HashMap<>();
        DruidDataSource dataSource0 = createDb0();
        dataSourceMap.put("ds0", dataSource0);
        DruidDataSource dataSource1 = createDb1();
        dataSourceMap.put("ds1", dataSource1);
        // 设置分库分表规则
        TableRuleConfiguration tableRuleConf = getUserTableRuleConfiguration();
        // 将规则写入ShardingDataSource
        ShardingRuleConfiguration shardingRuleConf = new ShardingRuleConfiguration();
        shardingRuleConf.getTableRuleConfigs().add(tableRuleConf);
        Properties p = new Properties();
        p.setProperty("sql.show", Boolean.TRUE.toString());
        // 获取数据源对象
        try {
            return ShardingDataSourceFactory.createDataSource(dataSourceMap, shardingRuleConf, new ConcurrentHashMap(), p);
        } catch (SQLException e) {
            e.printStackTrace();
        }
        return null;
    }

    /**
     * 设置表的node
     *
     * @return
     */
    private TableRuleConfiguration getUserTableRuleConfiguration() {
        TableRuleConfiguration tableRuleConfiguration = new TableRuleConfiguration();
        // 设置逻辑表 如:t_user
        tableRuleConfiguration.setLogicTable("t_order_");
        // 设置数据节点 数据源从ds0-ds1 数据表从t_user0-t_user1
        /**
         * 分库分表设置ds${0..1}.t_user${0..1}
         * 分表设置ds0.t_order_${0..1} 因为要指定具体的库么
         */
        tableRuleConfiguration.setActualDataNodes("ds${0..1}.t_order_${0..1}");
        // 设置纵列名称 如:id
        tableRuleConfiguration.setKeyGeneratorColumnName("order_id");
        /**
         * 设置分库策略,根据哪个字段进行分库操作。
         * 如果织只进行分表,可以注释分库或者不写分库
         * 分库原则:字段%2为1进编号1库,字段%2为0进编号0库
         */
         tableRuleConfiguration.setDatabaseShardingStrategyConfig(new InlineShardingStrategyConfiguration("order_id", "ds${order_id%2}"));
        /**
         *设置分表策略,根据哪个字段进行分表操作,分表原则:字段%2为1进编号1库,字段%2为0进编号0库
         */
        tableRuleConfiguration.setTableShardingStrategyConfig(new InlineShardingStrategyConfiguration("user_id", "t_order_${user_id%2}"));
        return tableRuleConfiguration;
    }

    /**
     * 注入第一个数据源
     *
     * @return
     */
    private DruidDataSource createDb0() {
        // 配置第一个数据源
        DruidDataSource dataSource = new DruidDataSource();
        dataSource.setDriverClassName(ds0_driverClassName);
        dataSource.setUrl(ds0_url);
        dataSource.setUsername(ds0_username);
        dataSource.setPassword(ds0_password);
        dataSource.setProxyFilters(Lists.newArrayList(statFilter()));
        // 每个分区最大的连接数
        dataSource.setMaxActive(20);
        // 每个分区最小的连接数
        dataSource.setMinIdle(5);
        return dataSource;
    }

    /**
     * 注入第二个数据源
     *
     * @return
     */
    private DruidDataSource createDb1() {
        // 配置第一个数据源
        DruidDataSource dataSource = new DruidDataSource();
        dataSource.setDriverClassName(ds1_driverClassName);
        dataSource.setUrl(ds1_url);
        dataSource.setUsername(ds1_username);
        dataSource.setPassword(ds1_password);
        dataSource.setProxyFilters(Lists.newArrayList(statFilter()));
        // 每个分区最大的连接数
        dataSource.setMaxActive(20);
        // 每个分区最小的连接数
        dataSource.setMinIdle(5);
        return dataSource;
    }

    @Bean
    public Filter statFilter() {
        StatFilter filter = new StatFilter();
        filter.setSlowSqlMillis(5000);
        filter.setLogSlowSql(true);
        filter.setMergeSql(true);
        return filter;
    }

}
5.这样配置就可以了,直接该怎么写就怎么写插入查询语句,还按照一个表一样查询就可以了,我先贴入我的service
public interface userService {
    public void testInsert(String name, int cityId, int sex) throws SQLException;
    public List getAll() throws SQLException;

}
6.userService实现类,添加和查询接口
 @Override
    public void testInsert1(int userid, String status) throws SQLException {
        Connection connection = shardingConfig.dataSource().getConnection();
        // t_order_逻辑表
        PreparedStatement preparedStatement = connection.prepareStatement("insert into   t_order_(user_id,status) values(" + userid + ",'" + status + "')");
        preparedStatement.executeUpdate();
        preparedStatement.close();
        connection.close();
    }

 @Override
    public List getAllt_order() throws SQLException {
        PreparedStatement pstmt = shardingConfig.dataSource().getConnection().prepareStatement("select * from t_order_ ");
        ResultSet resultSet = pstmt.executeQuery();
        List list = new ArrayList();
        while (resultSet.next()) {
            Map map = new HashMap();
            map.put("order_id", resultSet.getLong("order_id"));
            map.put("user_id", resultSet.getLong("user_id"));
            map.put("status", resultSet.getString("status"));
            list.add(map);
            // System.out.println(resultSet.getLong("order_id") + ":" + resultSet.getLong("user_id"));
        }
        resultSet.close();
        shardingConfig.dataSource().getConnection().close();
        return list;
    }
7.controller里外部调用测试分库分表ok不,创建shardingController类
    @RequestMapping("/add1")
    @ResponseBody
    public String add(int userid, String status) {
        try {
            userService.testInsert1(userid, status);
        } catch (SQLException e) {
            e.printStackTrace();
        }
        return "success";
    }

    @RequestMapping("/getAll_order")
    @ResponseBody
    public List getAll_order() {
        try {
            return userService.getAllt_order();
        } catch (SQLException e) {
            e.printStackTrace();
        }
        return null;
    }
8.然后就可以进行测试了,访问接口添加

9.查看数据库,规则是根据主键id分库,id是主键生成分布式id,这个id%2为0所以进入第0个库也就是mall_0,根据userid进行分表,我添加的是1那么1%2=1所以被分到mall_0的1表也就是t_order_1

10.然后我们查询一下,查询出来了,很简单把!

11.接下来我不想分库只想分表怎么办,把上方的代码修改一下就可以了,将之前的方法里getUserTableRuleConfiguration修改一下就好了, tableRuleConfiguration.setActualDataNodes("ds0.t_order_${0..1}");这里就指定第一个数据源库了,因为不分库了,然后将分库策略注释调就ok了
 private TableRuleConfiguration getUserTableRuleConfiguration() {
        TableRuleConfiguration tableRuleConfiguration = new TableRuleConfiguration();
        // 设置逻辑表 如:t_user
        tableRuleConfiguration.setLogicTable("t_order_");
        // 设置数据节点 数据源从ds0-ds1 数据表从t_user0-t_user1
        /**
         * 分库分表设置ds${0..1}.t_user${0..1}
         * 分表设置ds0.t_order_${0..1} 因为要指定具体的库么
         */
        tableRuleConfiguration.setActualDataNodes("ds0.t_order_${0..1}");
        // 设置纵列名称 如:id
        tableRuleConfiguration.setKeyGeneratorColumnName("order_id");
        /**
         * 设置分库策略,根据哪个字段进行分库操作。
         * 如果织只进行分表,可以注释分库或者不写分库
         * 分库原则:字段%2为1进编号1库,字段%2为0进编号0库
         */
         //tableRuleConfiguration.setDatabaseShardingStrategyConfig(new InlineShardingStrategyConfiguration("order_id", "ds${order_id%2}"));
        /**
         *设置分表策略,根据哪个字段进行分表操作,分表原则:字段%2为1进编号1库,字段%2为0进编号0库
         */
        tableRuleConfiguration.setTableShardingStrategyConfig(new InlineShardingStrategyConfiguration("user_id", "t_order_${user_id%2}"));
        return tableRuleConfiguration;
    }
之后就自己测试把,我这边测试是ok的,由于时间有限,那么根据时间分库分表查询就留到下一章节把
差点忘了把数据库脚本给你们
SET NAMES utf8mb4;
SET FOREIGN_KEY_CHECKS = 0;

DROP TABLE IF EXISTS `t_order_0`;
CREATE TABLE `t_order_0`  (
  `order_id` bigint(20) NOT NULL,
  `user_id` int(11) NOT NULL,
  `status` varchar(50) CHARACTER SET utf8mb4 COLLATE utf8mb4_unicode_ci NULL DEFAULT NULL,
  PRIMARY KEY (`order_id`) USING BTREE
) ENGINE = InnoDB CHARACTER SET = utf8mb4 COLLATE = utf8mb4_unicode_ci ROW_FORMAT = Dynamic;


DROP TABLE IF EXISTS `t_order_1`;
CREATE TABLE `t_order_1`  (
  `order_id` bigint(20) NOT NULL,
  `user_id` int(11) NOT NULL,
  `status` varchar(50) CHARACTER SET utf8mb4 COLLATE utf8mb4_unicode_ci NULL DEFAULT NULL,
  PRIMARY KEY (`order_id`) USING BTREE
) ENGINE = InnoDB CHARACTER SET = utf8mb4 COLLATE = utf8mb4_unicode_ci ROW_FORMAT = Dynamic;


SET FOREIGN_KEY_CHECKS = 1;

瓜分20万奖金 获得内推名额 丰厚实物奖励 易参与易上手
更多推荐

 0
0 0
0- 0


 已为社区贡献2条内容

所有评论(0)