

In my previous post, about exporting data to Excel from api using React, there were comments like how to add custom header and style to the sheet!?. So considering these comments, in this post I decided to show solution for first issue which is adding custom headers to your Excel sheet.
In this post two ways of adding custom headers will be shown
First way
Setup
Create a new project
npx create-react-app react-data-to-excel
Run project locally
npm start

Let's dive into next step.
Install libraries
For this project we need to install following libraries:
npm install xlsx file-saver axios
xlsx - library for parsing and writing various spreadsheet formats
file-saver - library for saving files on the client-side
axios - promise based HTTP client for the browser and node.js. We will use it for fetching data from server
Components
Inside your project create component ExportToExcel.js
import React from 'react'
import * as FileSaver from "file-saver";
import * as XLSX from "xlsx";

export const ExportToExcel = ({ apiData, fileName }) => {
  const fileType =
    "application/vnd.openxmlformats-officedocument.spreadsheetml.sheet;charset=UTF-8";
  const fileExtension = ".xlsx";

  const exportToCSV = (apiData, fileName) => {
    const ws = XLSX.utils.json_to_sheet(apiData);
    const wb = { Sheets: { data: ws }, SheetNames: ["data"] };
    const excelBuffer = XLSX.write(wb, { bookType: "xlsx", type: "array" });
    const data = new Blob([excelBuffer], { type: fileType });
    FileSaver.saveAs(data, fileName + fileExtension);
  };

  return (
    <button onClick={(e) => exportToCSV(apiData, fileName)}>Export</button>
  );
};
Update your App.js
import React from 'react'
import axios from 'axios'
import './App.css';

import {ExportToExcel} from './ExportToExcel'

function App() {
  const [data, setData] = React.useState([])
  const fileName = "myfile"; // here enter filename for your excel file

  React.useEffect(() => {
    const fetchData = () =>{
     axios.get('https://jsonplaceholder.typicode.com/posts').then(postData => {

     // reshaping the array
     const customHeadings = postData.data.map(item=>({
       "Article Id": item.id,
       "Article Title": item.title
     }))

      setData(customHeadings)
     })
    }
    fetchData()
  }, [])

  return (
    <div className="App">
      <ExportToExcel apiData={data} fileName={fileName} />
    </div>
  );
}

export default App;
According to official SheetJS CE docs. By default, json_to_sheet creates a worksheet with a header row.
This way of adding header is reshaping array to object, based on our needs. Since the headers for Excel file come from the object keys we defined.
In our case headers will be "Article Id" and "Article Title".
Run project
npm start

Once project started successfully, click to button to download Excel file.

Result

Second way
No need to reshape array inside App.js. Just need to add this code
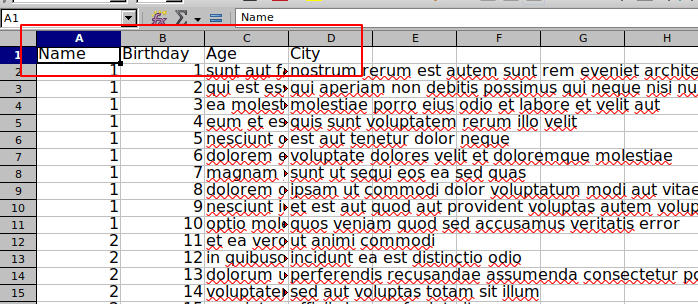
XLSX.utils.sheet_add_aoa(ws, [["Name", "Birthday", "Age", "City"]], { origin: "A1" });
inside your ExportToExcel.js file
  const exportToCSV = (apiData, fileName) => {
    const ws = XLSX.utils.json_to_sheet(apiData);
    /* custom headers */
    XLSX.utils.sheet_add_aoa(ws, [["Name", "Birthday", "Age", "City"]], { origin: "A1" });
    const wb = { Sheets: { data: ws }, SheetNames: ["data"] };
    const excelBuffer = XLSX.write(wb, { bookType: "xlsx", type: "array" });
    const data = new Blob([excelBuffer], { type: fileType });
    FileSaver.saveAs(data, fileName + fileExtension);
  };
Result
Source code links
1st way
2nd way


 已为社区贡献7744条内容

所有评论(0)