The ZEIT Now WordPress builder has been officially deprecated, and ZEIT cannot guarantee the performance/reliability of the Now PHP community builder.
Want to deploy WordPress 5.0 on the Now platform by ZEIT? Our friends over at ZEIT's Now global serverless deployment platform whipped up a great tutorial for WordPress5-on-Now using cheap MySQL hosting instances from ScaleGrid. With such strong interest in this installation, we decided to write up the steps to configure your MySQL database on the ScaleGrid side to get you up and running ever faster with Wordpress on Now.
So, why do you need MySQL hosting with ZEIT Now for WordPress? Now focuses on being the best platform for serverless hosting, but you need to find a way to store your data permanently. That's where ScaleGrid comes in. You can setup fully managed MySQL on Azure for as little as $8/month for management-only, or $18/month with hosting included on dedicated servers.
The best part is all you need to do is set it up, and then your MySQL database runs on autopilot so you can keep your development efforts focused on product vs. those time-consuming database operations. Let's get started!
Setting Up Your MySQL Database for WordPress on ZEIT Now
Create a MySQL Database in ScaleGrid
- Sign up for a free 30-day trial on the ScaleGrid console.
- Create your first MySQL cluster. Make sure to create it in a region that matches your Now deployment region. We support two different MySQL DBaaS plans (compare MySQL plans):
- Dedicated MySQL Cluster - hosted through your ScaleGrid account.
- BYOC MySQL Cluster - Hosted through your own Azure account.
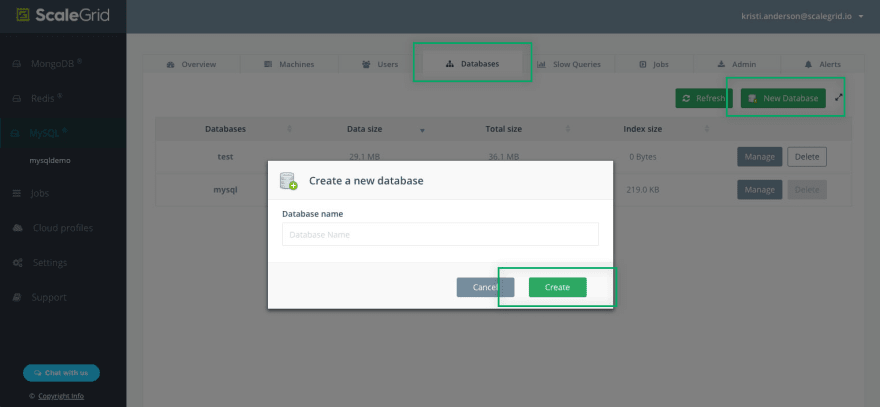
- Once your cluster is set up, go to your MySQL Cluster Details page, select the ‘Databases’ tab, and click the green 'New Database' button.
- In the 'Create a new database' window that pops up, simply enter a name for your database and click 'Create'.

- Your database will now be created! You can access it anytime under the 'Databases' tab of your MySQL cluster. Jot down your database name so you can use it in our later steps with ZEIT Now.
Create a New User for Your MySQL Database
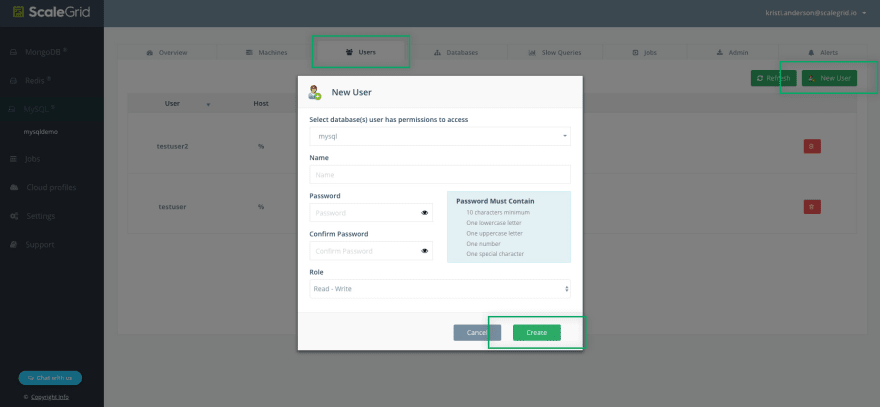
- Go to your MySQL Cluster Details page, select the ‘Users‘ tab, and click the ‘New User’ button.
- In the 'New User' window, choose the database you just created from the 'Select databases(s) user has permissions to access' dropdown.
- Enter a 'Name' and 'Password' for the new user.
- In the 'Role' dropdown, make sure to select 'Read - Write' as the role so the new user has full write permissions on this database.

- Click 'Create' and your new user will be created! Jot down your new database user name and password so you can use it when setting up ZEIT Now on WordPress.
Grab The Hostname of Your MySQL Deployment
- Go to your MySQL Cluster Details page and select the ‘Overview’ tab.
- Find the Command Line Syntax section at the bottom of the page to see the command that can be used to connect your MySQL deployment through mysql client.

- The server name following the ‘-h’ option is the hostname of your MySQL deployment, and in this particular case, it is ‘SG-help-1-master.devservers.scalegrid.io’.
- Jot down your MySQL hostname to use in our next steps with ZEIT Now and WordPress.
Downloading Your ca.pem File
- Go to your MySQL Cluster Details page and select the ‘Overview’ tab.
- If your MySQL deployment is SSL enabled, then you will see a section ‘SSL Certificate’
- Click on the 'Get SSL CA cert' link to see the contents of your CA certificate, and copy those contents to your ca.pem file.

You now have everything you need to setup your WordPress on ZEIT Now with MySQL instances! The steps outlined in the tutorial below was developed by ZEIT Now, and you can read the original instructions here at WordPress5-on-Now or follow below.
Setting Up WordPress 5 on ZEIT Now
Install Now. npm i -g now if short on time. Set up a database in a cloud SQL hosting provider like ScaleGrid. Make sure you pick a location that matches a Now deployment region. Create a wp-config.php file and a now.json file. Your now.json file will set up the @now/wordpress builder and a few routes:
{
  "version": 2,
  "builds": [
    { "src": "wp-config.php", "use": "@now/wordpress" }
  ],
  "routes": [
    { "src": "/wp-admin/?", "dest": "index.php" },
    { "src": ".*\\.php$", "dest": "index.php" }
  ],
  "env": {
    "DB_NAME": "@wordpress_db_name",
    "DB_USER": "@wordpress_db_user",
    "DB_PASSWORD": "@wordpress_db_password",
    "DB_HOST": "@wordpress_db_host"
  }
}
Notice that it’s referring to a few secrets like @wordpress_db_name. You can create these with now secret add. My wp-config.php looks like follows. Notice we use MySQL over TLS for security reasons.
<?php
/**
 * The base configuration for WordPress
 *
 * The wp-config.php creation script uses this file during the
 * installation. You don't have to use the web site, you can
 * copy this file to "wp-config.php" and fill in the values.
 *
 * This file contains the following configurations:
 *
 * * MySQL settings
 * * Secret keys
 * * Database table prefix
 * * ABSPATH
 *
 * @link https://codex.wordpress.org/Editing_wp-config.php
 *
 * @package WordPress
 */

// ** MySQL settings - You can get this info from your web host ** //
/** The name of the database for WordPress */
define('DB_NAME', $_ENV['DB_NAME']);

/** MySQL database username */
define('DB_USER', $_ENV['DB_USER']);

/** MySQL database password */
define('DB_PASSWORD', $_ENV['DB_PASSWORD']);

/** MySQL hostname */
define('DB_HOST', $_ENV['DB_HOST']);

/** Database Charset to use in creating database tables. */
define('DB_CHARSET', 'utf8');

/** The Database Collate type. Don't change this if in doubt. */
define('DB_COLLATE', '');

/**#@+
 * Authentication Unique Keys and Salts.
 *
 * Change these to different unique phrases!
 * You can generate these using the {@link https://api.wordpress.org/secret-key/1.1/salt/ WordPress.org secret-key service}
 * You can change these at any point in time to invalidate all existing cookies. This will force all users to have to log in again.
 *
 * @since 2.6.0
 */
define('AUTH_KEY',         'WPSALT');
define('SECURE_AUTH_KEY',  'WPSALT');
define('LOGGED_IN_KEY',    'WPSALT');
define('NONCE_KEY',        'WPSALT');
define('AUTH_SALT',        'WPSALT');
define('SECURE_AUTH_SALT', 'WPSALT');
define('LOGGED_IN_SALT',   'WPSALT');
define('NONCE_SALT',       'WPSALT');

/**#@-*/

/**
 * WordPress Database Table prefix.
 *
 * You can have multiple installations in one database if you give each
 * a unique prefix. Only numbers, letters, and underscores please!
 */
$table_prefix  = 'wp_';

/**
 * For developers: WordPress debugging mode.
 *
 * Change this to true to enable the display of notices during development.
 * It is strongly recommended that plugin and theme developers use WP_DEBUG
 * in their development environments.
 *
 * For information on other constants that can be used for debugging,
 * visit the Codex.
 *
 * @link https://codex.wordpress.org/Debugging_in_WordPress
 */
define('WP_DEBUG', false);

define( 'WP_SITEURL', 'https://' . $_SERVER['HTTP_HOST'] );
define( 'WP_HOME', 'https://' . $_SERVER['HTTP_HOST'] );
define( 'WP_CONTENT_URL', 'https://' . $_SERVER['HTTP_HOST'] . '/wp-content' );

/* That's all, stop editing! Happy blogging. */

/** Absolute path to the WordPress directory. */
if ( !defined('ABSPATH') )
        define('ABSPATH', dirname(__FILE__) . '/');

define( 'MYSQL_SSL_CA', ABSPATH . 'ca.pem' );
define( 'MYSQL_CLIENT_FLAGS', MYSQLI_CLIENT_SSL );

/** Sets up WordPress vars and included files. */
require_once(ABSPATH . 'wp-settings.php');
Make sure to change your WPSALT$_ENV. Finally we created a ca.pem file downloaded from ScaleGrid. This is necessary only when using MySQL over TLS. That’s it! Then run now to deploy or git push if you configured Now + GitHub.
If there are any other scenarios where you'd like to use ZEIT with ScaleGrid's MySQL, MongoDB, Redis, or PostgreSQL hosting and management plans, leave us a comment below and we'd be happy to write them up! Also, share any questions in our comments or on Twitter at @scalegridio and we'll follow up to help.


 已为社区贡献23584条内容

所有评论(0)