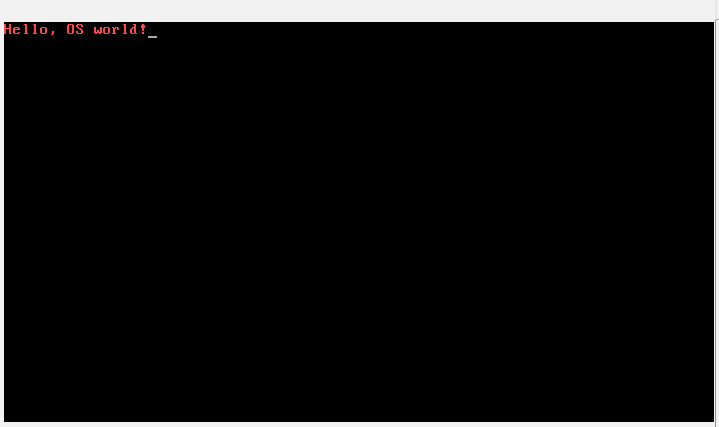
1.最简单的操作系统(linux版)(一)运行效果
大部分内容来自WB. YANG的一本书,书名忘记了 1.linux所需要的安装的工具vim, virtualbox,g++ 2.编写自己的操作系统,懒得在linux上装个输入法,只好用蹩脚的英文写的注释,阅读时请自带避雷针系统引导程序:boot.S1 .code16#使用16位模式汇编2 .text#代码段开始3
1.linux所需要的安装的工具
vim, virtualbox,g++
2.编写自己的操作系统,懒得在linux上装个输入法,只好用蹩脚的英文写的注释,阅读时请自带避雷针
系统引导程序:boot.S
  1 .code16							#使用16位模式汇编
  2 .text							#代码段开始
  3         mov     %cs, %ax		#初始化栈寄存器、数据段寄存器和通用段寄存器
  4         mov     %ax, %ds
  5         mov     %ax, %es
  6         call    DispStr         #调用字符串显示函数,call function to display string
  7         jmp    .               #while(1),无限循环
  8 DispStr:						#字符串显示函数
  9         mov     $BootMessage, %ax
 10         mov     %ax, %bp        #ES:BP = address of string
 11         mov     $16, %cx        #CX = length of string
 12         mov     $0x1301, %ax    #AH = 13, AL = 01h
 13         mov     $0x00c, %bx     #page number = BH=0, word color = BL = 0Ch
 14         mov     $0, %dl
 15         int     $0x10            #进入中段10h is interrupt number
 16         ret						#返回
 17 BootMessage:.ascii "Hello, OS world!"
 18 .org 510                        #fill 0 in first 510 BYTE
 19 .word 0xaa55                    #end with 0xaa55
连接脚本:wind_x86.ld
  1 SECTIONS
  2 {
  3     . = 0x7c00;
  4     .text :
  5     {
  6         _ftext = .; /*program will be loeaded to 0x7c00*/
  7     } = 0
  8 }
编译连接文本Makefile
  1 CC=g++
  2 Ld=ld
  3 LDFILE=wind_x86.ld
  4 OBJCOPY=objcopy
  5
  6 all:boot.img
  7
  8 #Step 1:g++ call as, boot.S -> boot.o
  9 boot.o:boot.S
 10     $(CC) -c boot.S
 11
 12 #Step 2:ld call link script, boot.o -> boot.elf
 13 boot.elf:boot.o
 14     $(LD) boot.o -o boot.elf -e c -T$(LDFILE)
 15
 16 #Step 3:objcopy remove the useless section(such as .pdr, .commemnt, .node) i    n boot.efl,
 17 #		strip all signal information, the output is boot.bin
 18 boot.bin:boot.elf
 19     @$(OBJCOPY) -R .pdr -R .comment -R .note -S -O binary boot.elf boot.bin
 20
 21 #Step 4:generate bootable software image
 22 boot.img:boot.bin
 23 	@dd if=boot.bin of=boot.img bs=512 count=1   	#用 boot.bin 生成镜像文件第一个扇区
 24 	# 在 bin 生成的镜像文件后补上空白,最后成为合适大小的软盘镜像
 25 	@dd if=/dev/zero of=boot.img skip=1 seek=1 bs=512 count=2879
 26
 27 clean:
 28 	@rm -rf boot.o boot.elf boot.bin boot.img
boot.S -> boot.o -> boot.elf -> boot.bin ->boot.img
3.生成os的镜像文件
把以上三个文件放在同一个目录,并输入make,则在同一目录生成boot.img
4.加载和运行
运行virtualbox
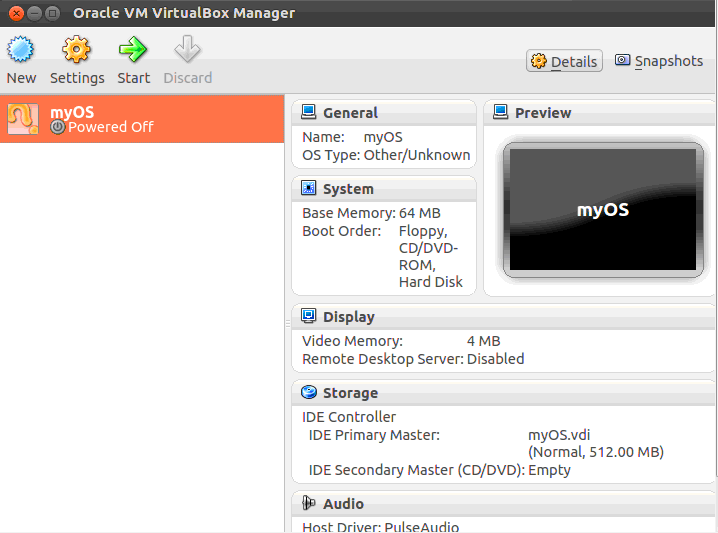
new一个新的操作系统
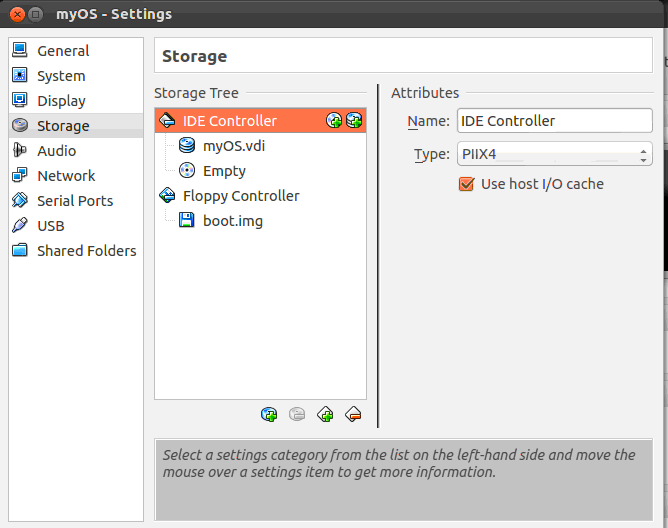
setting->storage->Add controller->Add floopy controller->add floopy deviec->choose disk->导入上一步中生成的boot.img
start
5.相关链接:
运行自己的操作系统-开发环境说明 http://blog.csdn.net/mishifangxiangdefeng/article/details/45749109
运行自己的操作系统 -0.01 (二)makefile http://blog.csdn.net/mishifangxiangdefeng/article/details/45749417
运行自己的操作系统 -0.01 (三)链接脚本 http://blog.csdn.net/mishifangxiangdefeng/article/details/45766503
运行自己的操作系 -0.01 (四)boot.S http://blog.csdn.net/mishifangxiangdefeng/article/details/45768167
本文中的内容,主要来自于WB. YANG的一本书,书名《writeos-1.0-2-weekly》,
提供链接http://download.csdn.net/detail/mishifangxiangdefeng/5869801
更多推荐
 已为社区贡献3条内容


所有评论(0)