使用 FT232H 在树莓派 4 上使用 JTAG + UART 设置 OpenOCD
大家好。在今天的博客中,我将告诉您如何在 Raspberry pi 4B 上设置 JTAG + Serial 连接并配置 OpenOCD 以调试 RPi4b。请务必遵循每一行,否则您可能会遇到问题;)
必备材料
硬件
-
Raspberry Pi 4B [我们当然需要它;)]
-
基于FT232H的FTDI模块
-
CH340G 模块或任何其他具有串行能力的模块
-
跳线
-
USB 扩展如果你没有很多 USB 端口 [ 像我一样 :( ]
软件
-
Minicom, picocom, tio, screen 或任何其他可以访问串口设备的终端仿真器
-
OpenOCD 用于访问目标和接口
-
GDB,最好是
aarch64-none-elf-gdbgdb -
telnet [我们回到了石器时代的boizz ]
使用 CH340G USB 转 TTL 模块设置串行连接
CH340G 是一款便宜的 USB 转 TTL 模块,支持 50 到2000000 bps 的波特率。你可以在全球速卖通或当地的电子商店以大约 2 美元的价格买到它。尽管请记住,该模块没有 DTR 引脚,但有一点点 hack,您可以添加一个。阅读更多关于它这里。
树莓派有两个内置的UART,如下:
-
PL011
-
迷你串口
我们将使用 PL011 代替主要的 mini-UART,原因如下: Mini UART 使用与 GPU 核心频率相关的频率,因此每当 GPU 频率发生变化时,UART 波特率也会发生变化。这使得 mini UART 不稳定,可能导致数据丢失或损坏。另一方面,PL011 UART 具有固定的固定频率,不会改变。虽然 mini-UART 的频率可以通过在 config.txt 中添加gpu_freq = 250 or 500来固定。 PL011 是与 16650 兼容的 UART,该控制器还包括 mini UART 控制器中不存在的其他功能,例如帧错误检测、中断检测、接收超时中断和奇偶校验位支持。
在树莓派 4B 上启用串行连接
打开 SD 卡引导分区中的 config.txt 文件,并在底部附加以下内容。
dtoverlay = disable-bt
enable_uart=1
在 SD 卡的引导分区中打开 cmdline.txt 文件,并在行首附加以下内容。记住空间。
console=serial0,115200 console=tty1
连接
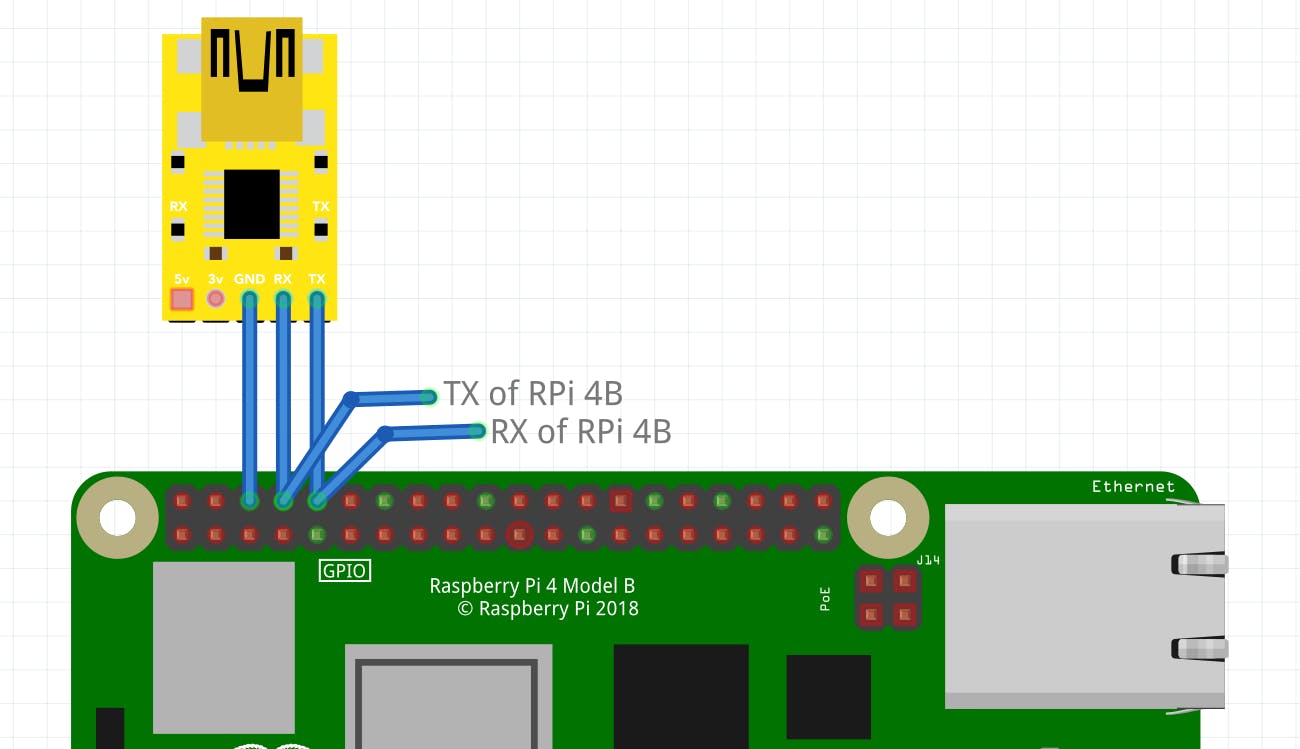
串行连接来自:
CH340G TX<->GPIO 15 (RX)
CH340G RX<->GPIO 14 (RX)
GND<->GND
 注意:这是一个通用的 img,我可以找到类似于 CH340G
连接到终端
您可以使用lsusb检查 USB 是否已连接。它应该显示如下内容:
...
Bus 001 Device 007: ID 1a86:7523 QinHeng Electronics HL-340 USB-Serial adapter
...
为了检查您的串行设备连接到哪个端口,我们可以使用dmesg。它应该显示如下内容
...
[ 2027.884884] ch341 1-3:1.0: ch341-uart converter detected
[ 2027.885573] usb 1-3: ch341-uart converter now attached to ttyUSB0
就我而言,它是/dev/ttyUSB0,所以现在我将使用 screen、picocom、tio 或您选择的任何一个将我的终端与串行连接。
sudo screen /dev/ttyUSB0 115200
               or
sudo picocom -b 115200 /dev/ttyUSB0
               or
sudo tio -b 115200 /dev/ttyUSB0
使用 FT232H 模块建立 JTAG 连接。
FTDI 的这款芯片类似于他们的 USB 到串行转换器芯片,但增加了一个“多协议同步串行引擎 (MPSSE)”,使其能够使用许多常见协议,如 SPI、I2C、串行 UART、JTAG 等等。甚至还有一些额外的数字 GPIO 引脚可供您读取和写入,以执行闪光灯 LED、读取开关或按钮等操作。在这里,我们只关注 JTAG (MPSSE) 模式。我将使用一个通用的 CJMCU FT232H 模块,我从当地电子商店以大约 15 美元的价格购买了它。
您可能想知道电源 LED 附近的这些 LED 会做什么,即使它们没有闪烁。这些 LED 需要先设置才能看到它们闪烁。这些用于异步通信,如串行协议。您可以在shukran github 页面上获得有关此板的更多信息。
在树莓派 4B 上启用 JTAG
Raspberry Pi 4 没有专用的 JTAG 引脚。相反,您必须配置 GPIO 引脚 (GPIO22-GPIO27) 以激活 JTAG 功能。 RPi 4 文档将此称为这些引脚的 Alt4 功能。 Alt5 也确实存在,它来自 GPIO4、5、6、12 和 13。您可以从pinout.xyz或eLinux中检查出来。最后,您应该会看到这样的屏幕。
根据 BCM2711 文档(参见),在使用 Raspberry pi 4B 的 JTAG 上要注意的另一件事是,默认情况下,所有 GPIO 引脚都被拉低。因此,为了让数据自由流动,我们将不得不禁用它们。在 SD 卡启动分区的 config.txt 中,在底部追加以下内容。
# Disable pull downs
gpio=22-27=np

# Enable jtag pins (i.e. GPIO22-GPIO27)
enable_jtag_gpio=1
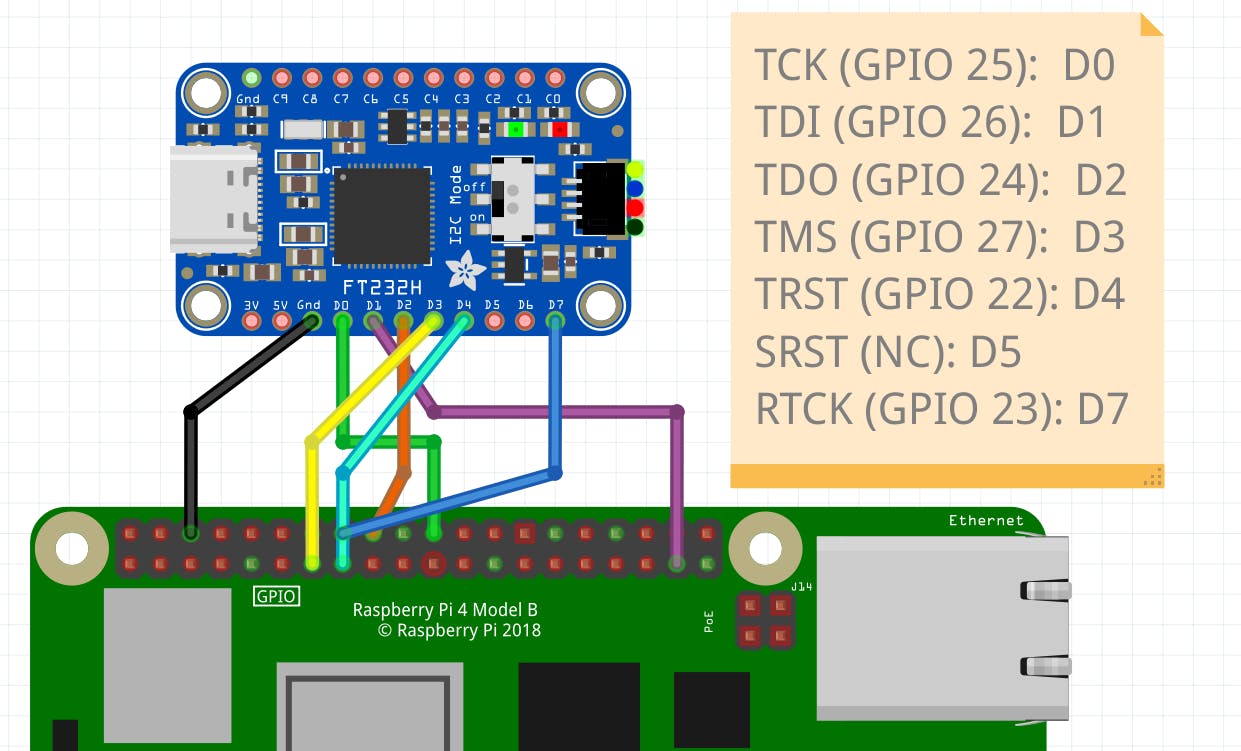
连接
TCK (GPIO 25)<->D0
TDI (GPIO 26)<->D1
TDO (GPIO 24)<->D2
TMS (GPIO 27)<->D3
TRST (GPIO 22)<->D4
SRST (NC)<->NC
RTCK (GPIO 23)<->D7

注:D0-D7指FT232H文档中的ADBUS0-ADBUS7
注意:我找不到CJMCU FT232H模块,但是adafruit FT232H和那个类似
您可以通过lsusb检查 USB 是否已连接它应该显示如下内容:
...
Bus 001 Device 009: ID 0403:6014 Future Technology Devices International, Ltd FT232H Single HS USB-UART/FIFO IC
...
使用 OpenOCD 附加
安装 OpenOCD
为了构建 OpenOCD,我建议按照本指南中给出的步骤进行操作。
OpenOCD 配置
对于 FT232H,我会推荐以下配置。这可以存储在interface文件夹下或您想要的任何位置。
# config file for generic FT232H based USB-serial adaptor
# TCK:  D0
# TDI:  D1
# TDO:  D2
# TMS:  D3
# TRST: D4
# SRST: D5
# RTCK: D7

adapter speed 3000

# Setup driver type
adapter driver ftdi

# Common PID for FT232H
ftdi vid_pid 0x0403 0x6014

ftdi layout_init 0x0078 0x017b

# Set sampling to allow higher clock speed
ftdi_tdo_sample_edge falling

ftdi layout_signal nTRST -ndata 0x0010 -noe 0x0040
ftdi layout_signal nSRST -ndata 0x0020 -noe 0x0040

# change this to 'transport select swd' if required
transport select jtag

# references
# http://sourceforge.net/p/openocd/mailman/message/31617382/
# http://www.baremetaldesign.com/index.php?section=hardware&hw=jtag
对于树莓派 4B 配置,我建议使用 OpenOCD 附带的默认配置。这存储在target文件夹下。
# SPDX-License-Identifier: GPL-2.0-or-later

# The Broadcom BCM2711 used in Raspberry Pi 4
# No documentation was found on Broadcom website

# Partial information is available in raspberry pi website:
# https://www.raspberrypi.org/documentation/hardware/raspberrypi/bcm2711/

if { [info exists CHIPNAME] } {
    set  _CHIPNAME $CHIPNAME
} else {
    set  _CHIPNAME bcm2711
}

if { [info exists CHIPCORES] } {
    set _cores $CHIPCORES
} else {
    set _cores 4
}

if { [info exists USE_SMP] } {
    set _USE_SMP $USE_SMP
} else {
    set _USE_SMP 0
}

if { [info exists DAP_TAPID] } {
    set _DAP_TAPID $DAP_TAPID
} else {
    set _DAP_TAPID 0x4ba00477
}

jtag newtap $_CHIPNAME cpu -expected-id $_DAP_TAPID -irlen 4
adapter speed 3000

dap create $_CHIPNAME.dap -chain-position $_CHIPNAME.cpu

# MEM-AP for direct access
target create $_CHIPNAME.ap mem_ap -dap $_CHIPNAME.dap -ap-num 0

# these addresses are obtained from the ROM table via 'dap info 0' command
set _DBGBASE {0x80410000 0x80510000 0x80610000 0x80710000}
set _CTIBASE {0x80420000 0x80520000 0x80620000 0x80720000}

set _smp_command "target smp"

for { set _core 0 } { $_core < $_cores } { incr _core } {
    set _CTINAME $_CHIPNAME.cti$_core
    set _TARGETNAME $_CHIPNAME.cpu$_core

    cti create $_CTINAME -dap $_CHIPNAME.dap -ap-num 0 -baseaddr [lindex $_CTIBASE $_core]
    target create $_TARGETNAME aarch64 -dap $_CHIPNAME.dap -ap-num 0 -dbgbase [lindex $_DBGBASE $_core] -cti $_CTINAME

    set _smp_command "$_smp_command $_TARGETNAME"
}

if {$_USE_SMP} {
    eval $_smp_command
}

# default target is cpu0
targets $_CHIPNAME.cpu0
将 JTAG 电缆连接到台式计算机。在 Linux 上,您应该使用带有 sudo 的 openocd,或者调整 udev 规则以在不使用 sudo 的情况下访问设备。我将它与 sudo 一起使用。 OpenOCD 需要 2 个 -f 参数,一个用于目标设备,一个用于接口设备。通过调用 OpenOCD
sudo openocd -f interface/ftdi/cjmcu-ft232h.cfg -f target/bcm2711.cfg
连接成功后,您将看到如下屏幕:
Open On-Chip Debugger 0.11.0+dev-00698-gcc8b49185 (2022-06-01-19:06)
Licensed under GNU GPL v2
For bug reports, read
    http://openocd.org/doc/doxygen/bugs.html
jtag
Info : Listening on port 6666 for tcl connections
Info : Listening on port 4444 for telnet connections
Info : clock speed 3000 kHz
Info : JTAG tap: bcm2711.cpu tap/device found: 0x4ba00477 (mfg: 0x23b (ARM Ltd), part: 0xba00, ver: 0x4)
Info : bcm2711.cpu0: hardware has 6 breakpoints, 4 watchpoints
Info : bcm2711.cpu1: hardware has 6 breakpoints, 4 watchpoints
Info : bcm2711.cpu2: hardware has 6 breakpoints, 4 watchpoints
Info : bcm2711.cpu3: hardware has 6 breakpoints, 4 watchpoints
Info : gdb port disabled
Info : starting gdb server for bcm2711.cpu0 on 3333
Info : Listening on port 3333 for gdb connections
Info : starting gdb server for bcm2711.cpu1 on 3334
Info : Listening on port 3334 for gdb connections
Info : starting gdb server for bcm2711.cpu2 on 3335
Info : Listening on port 3335 for gdb connections
Info : starting gdb server for bcm2711.cpu3 on 3336
Info : Listening on port 3336 for gdb connections
用 telnet 连接 OpenOCD
一旦我们知道我们已经成功启动并运行了 OpenOCD,我们就可以远程登录到它的 CLI 界面来运行各种 JTAG 命令或预定义的例程。
telnet 127.0.0.1 4444
运行scan_chain是检查您是否通过 JTAG TAP 获得任何通信的一种快速而简单的方法。连接成功后,您将看到如下内容:
Trying 127.0.0.1...
Connected to 127.0.0.1.
Escape character is '^]'.
Open On-Chip Debugger
> scan_chain
    TapName             Enabled  IdCode     Expected   IrLen IrCap IrMask
-- ------------------- -------- ---------- ---------- ----- ----- ------
 0 auto0.tap              Y     0x4ba00477 0x4ba00477     4 0x01  0x03
GDB 与 OpenOCD
您可以通过aarch64-rtems6-gdb使用 openOCD 启动 gdb 会话,然后在 GDB 会话中添加target ext :3333。通过使用它,您将看到类似这样的配置。
GNU gdb (GDB) 11.2
Copyright (C) 2022 Free Software Foundation, Inc.
License GPLv3+: GNU GPL version 3 or later <http://gnu.org/licenses/gpl.html>
This is free software: you are free to change and redistribute it.
There is NO WARRANTY, to the extent permitted by law.
Type "show copying" and "show warranty" for details.
This GDB was configured as "--host=x86_64-linux-gnu --target=aarch64-rtems6".
Type "show configuration" for configuration details.
For bug reporting instructions, please see:
<https://www.gnu.org/software/gdb/bugs/>.
Find the GDB manual and other documentation resources online at:
    <http://www.gnu.org/software/gdb/documentation/>.

For help, type "help".
--Type <RET> for more, q to quit, c to continue without paging--
Type "apropos word" to search for commands related to "word".
(gdb) target ext :3333
Remote debugging using :3333
warning: No executable has been specified and target does not support
determining executable automatically.  Try using the "file" command.
0xffffffc010ad283c in ?? ()
(gdb)
故障排除
如果您发现串行接口缺少很多字符并且感觉很慢。这可能是由于 CH340G 和 RPi4 之间的非屏蔽跳线捕获了干扰。它也可能由于长跨接线 (>50cm) 或未屏蔽的 USB 延长线而发生。解决干扰问题的方法是将设置远离正在振荡的物体(例如风扇、压缩机、电机、CRT、微波炉、无线电设备)。如果可能,还建议将暴露的 RPi4 保持在抗静电哑光和/或接地上,以防止静电放电造成干扰或损坏。
如果您在 OpenOCD 中得到类似下面的内容。
Open On-Chip Debugger 0.11.0+dev-00698-gcc8b49185 (2022-06-01-19:06)
Licensed under GNU GPL v2
For bug reports, read
    http://openocd.org/doc/doxygen/bugs.html
jtag
Info : Listening on port 6666 for tcl connections
Info : Listening on port 4444 for telnet connections
Info : clock speed 10000 kHz
Error: JTAG scan chain interrogation failed: all ones
Error: Check JTAG interface, timings, target power, etc.
Error: Trying to use configured scan chain anyway...
Error: bcm2711.cpu: IR capture error; saw 0x0f not 0x01
Warn : Bypassing JTAG setup events due to errors
Error: Invalid ACK (7) in DAP response
Error: JTAG-DP STICKY ERROR
这通常是由于干扰、未正确连接设备或 Pi 未正确启动造成的。检查串行以检查 pi 是否正在启动。仔细检查您的连接并使用尽可能短的电线(我只使用了 10 厘米的电线)。如果不确定引脚排列,请查看pinout.xyz。
结论
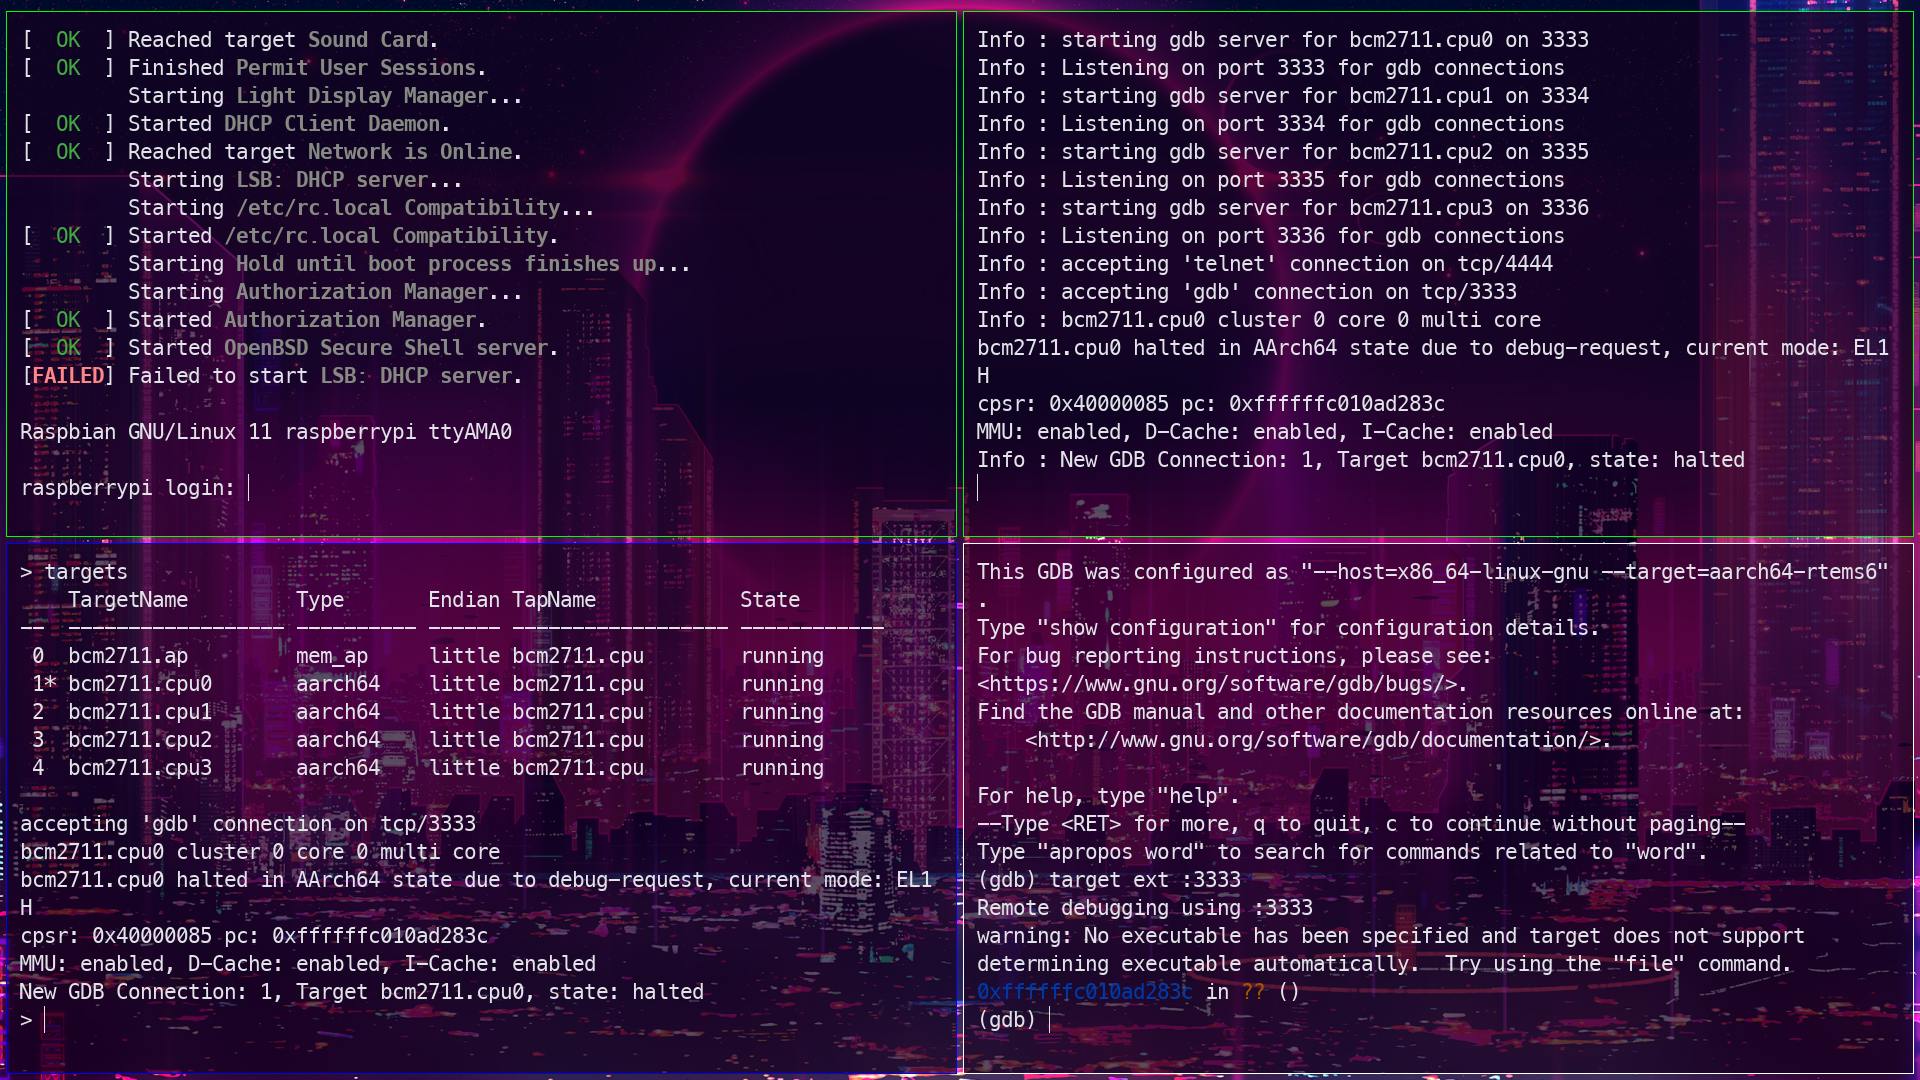
在这篇博客中,我们学习了如何将树莓派 4B 与串口模块连接、设置 JTAG 连接、FT232H 模块的 OpenOCD 配置以及如何将 OpenOCD 与 GDB 连接。收集所有这些信息花了我一些时间,有很多关于如何使用 FT2322H 设置树莓派的指南,但没有这个。最后你会看到这样的画面。希望以后有人会发现这对您有所帮助;)喜欢,评论,订阅并与您的朋友分享(。•̀ᴗ-)✧
 如果您对本文有任何问题或想法,请在下方留言。我会尽快回复你。
更多推荐
 已为社区贡献12493条内容


所有评论(0)