In the previous article of the "How to Add Contact Forms Using Plugin" series, we've learned what a contact form is and how to use Contact Form 7 plugin. As promised, I wrote another tutorial with WPForms and I'm going to show you in this article.
WPForms is a freemium drag-and-drop contact form plugin with a real-time preview. In my experience, it's easy and convenient to work with this plugin.
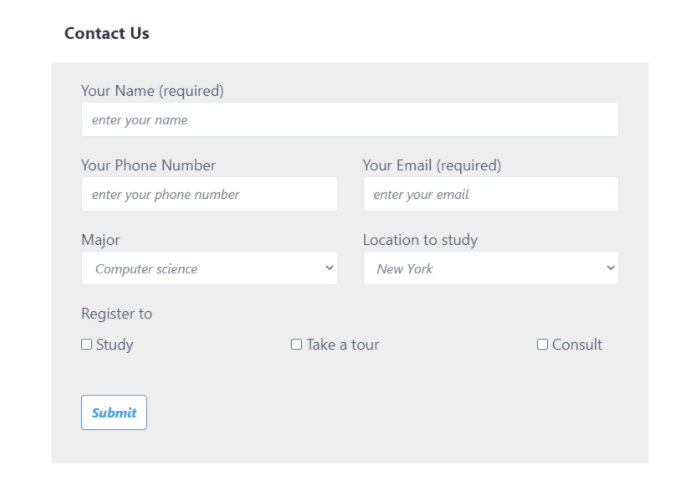
Do you remember this university registration form sample that we've created in part 1 of this series? Now, we're going to create the same one with WPForms.
Step 1: Install and Activate WPForms Plugin
This plugin has a free version on wordpress.org, so you just need to install and activate the plugin right on the Admin Dashboard.

Step 2: Create a New Contact Form and Choose a Template
On your Admin Dashboard, go to WPForms > Add New.
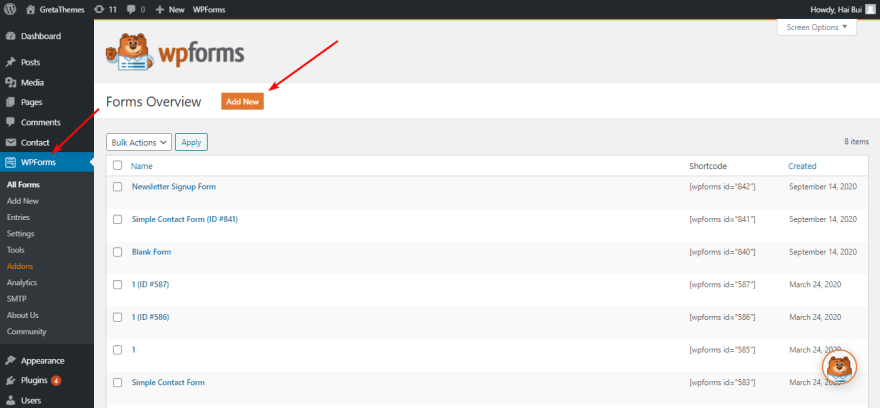
Here is the interface that you have to work with:
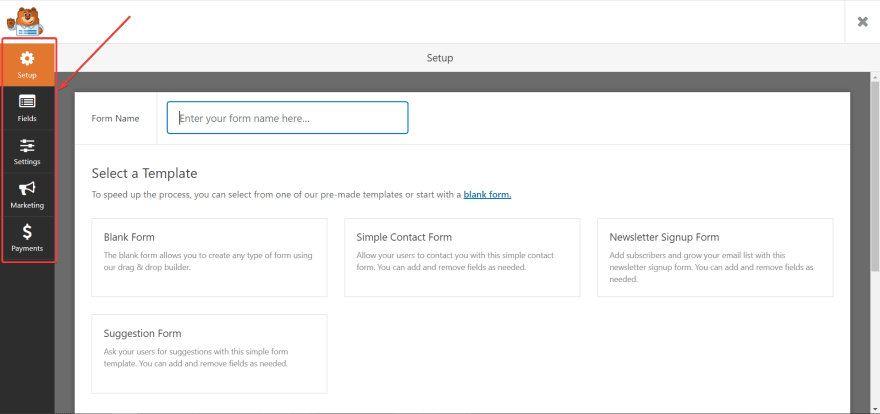
In the left sidebar, you can see 5 sections:
- Setup: Name the contact form and choose its template.
- Fields: Add and customize fields for the contact form.
- Settings: Configure the notifications, confirmations, and general settings.
- Marketing: Link with email marketing tools such as Constant Contact, Campaign Monitor, Mailchimp, ...
- Payments: Add payment from PayPal Standard, Stripe, and Authorize.Net.
Note: I don't run any email marketing campaign and my form doesn't require payment information. Therefore, I don't need the Marketing and Payments sections.
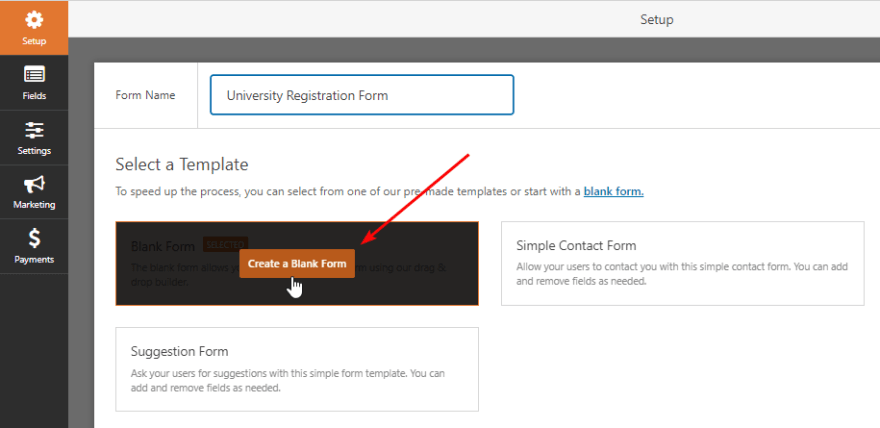
In the Setup section, enter your form name and select your desired template.
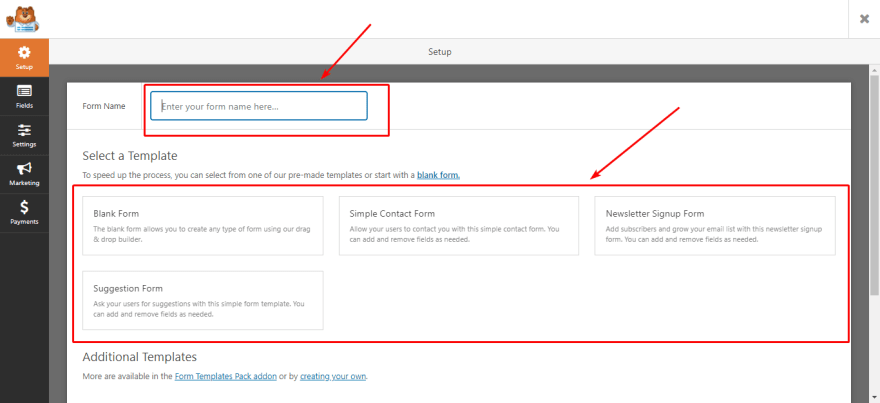
There are four default templates:
- Simple Contact Form
- Newsletter Signup Form
- Suggestion For
- Blank Form
Excluding Blank Form, other templates have their own pre-built fields that you can utilize to build contact forms faster. In addition, you can install WPForms addons (only available on paid versions) to get more templates.
In this article, I choose the Blank Form template to build a contact form step by step from the beginning. This will help you understand everything more easily and deeply.
Step 3: Add Fields for the Contact Form
Add Fields
After choosing the Blank Form template in step 2, you'll be moved to the Fields section.
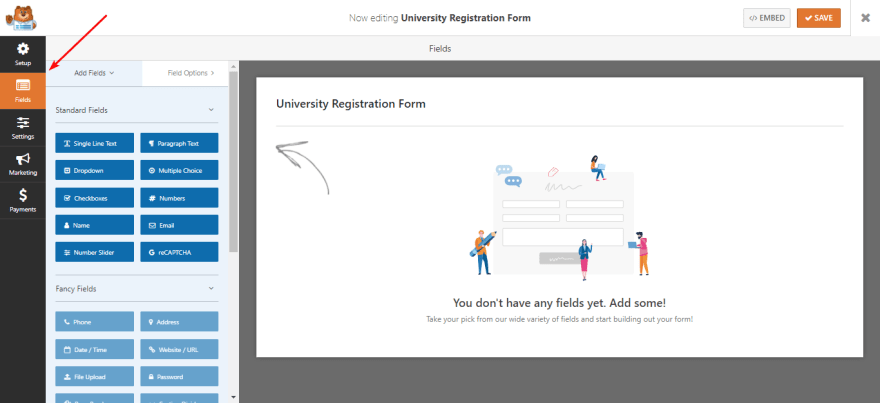
To add fields for your contact form, drag the desired fields from the Add Fields tab and drop them into the contact form.

Next, to customize a field, click it, and then edit its parameters in the Fields Options tab.
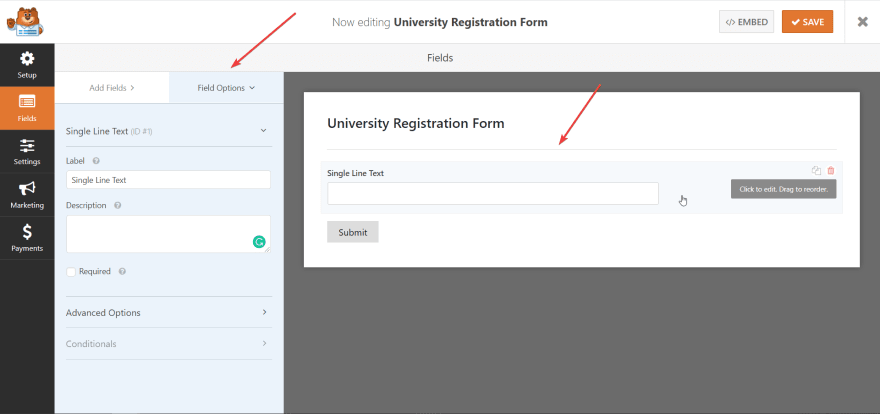
Besides, you can delete or duplicate a field by hovering over it and click the desired buttons.
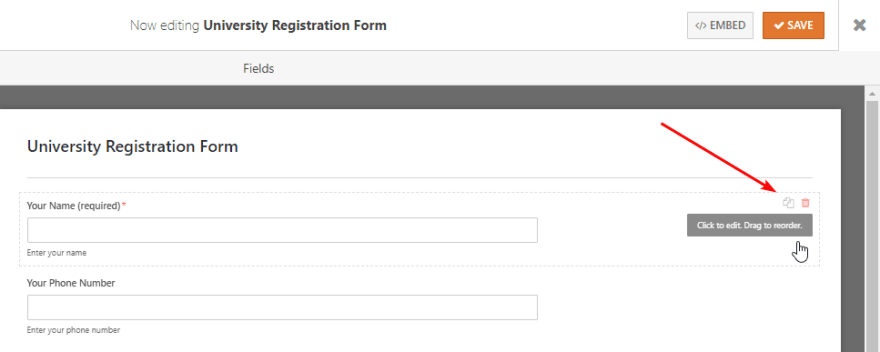
In this article, I need to add the following fields:
| Field name | Field type |
| Your Name | Single Line Text |
| Your Phone Number | Numbers |
| Your Email | |
| Location to Study | Dropdown |
| Major | Dropdown |
| Register to | Checkboxes |
After adding all these fields, you need to customize each field in the next steps.
Customize General Options for Each Field
In general, there are two kinds of option to customize each field:
Basic options: all fields contain these options and you should absolutely work with them to make your contact form clear and understandable.
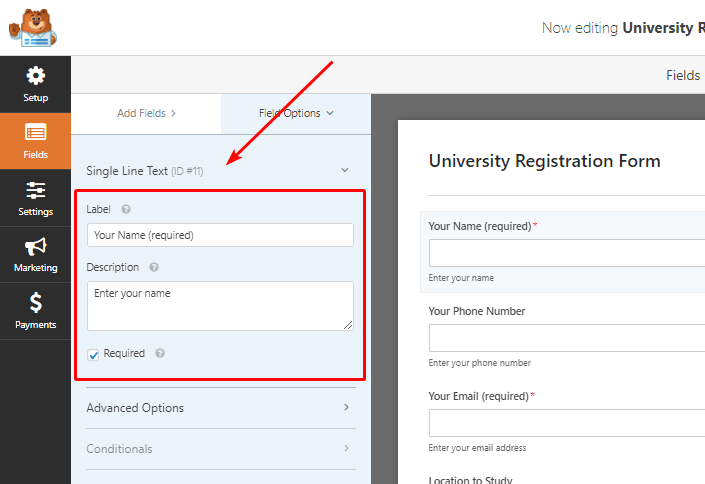
- Label: Enter the field name that you want to display.
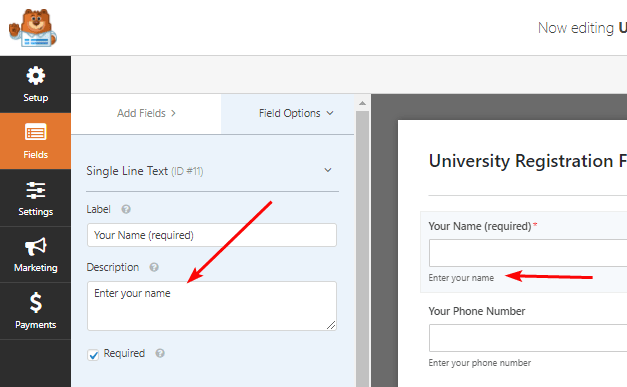
- Description: This is the text display below the field to tell users what to do.
- Required: It's optional! Tick it to make this field compulsory to be filled.
In the next steps, when I mention "basic information", it means you need to deal with these basic options.
Advanced options: there are some advanced features for each field. It's optional for you to deal with them, but there are some important things you should look at:
- Placeholder text: Display a text inside the fields before users enter data. This text can be used as a guide or example to help users easily understand what they need to fill in. For example, you can set the Placeholder text of the email field as "Enter your email".
- Default value: If there're many people who have the same answer, you can set a default answer to save time and effort of users. For example, you make a contact form for people who live in New York, so you can enter a default value of "New York" in the "Location" field.
- CSS Classes: Enter CSS classes in this box to style the field. In the next step, I will include code in this section to style the contact form.
Note:
- In Contact Form 7, you can use the default value as the placeholder text. But it's more convenient in WPForms because you have the separated Placeholder Text section. Besides, WPForms has the Description section that displays the text under the field. I use this way because it makes my contact form look better.
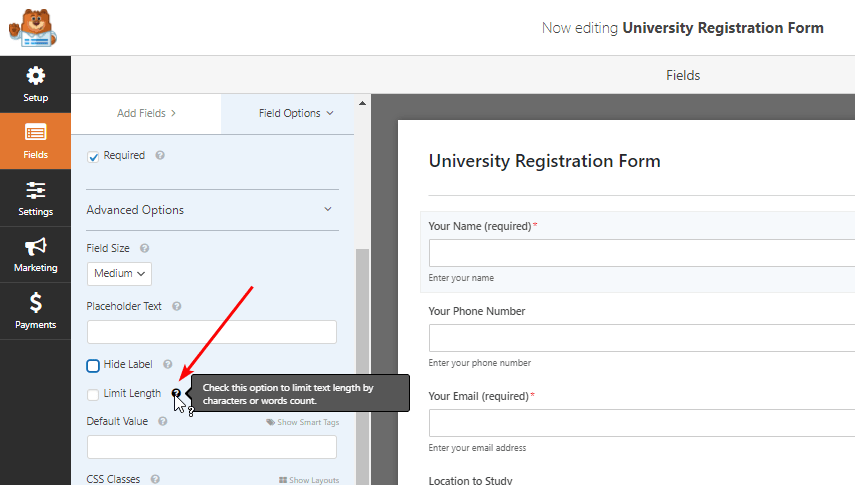
- You can click the question mark button beside the options / fields to read the instruction of WPForms for them.
Additionally, there are some different options depending on each field. Let's find out what they are!
Customize "Your Name" Field
Select the Simple Line Text field and just fill in the basic information:
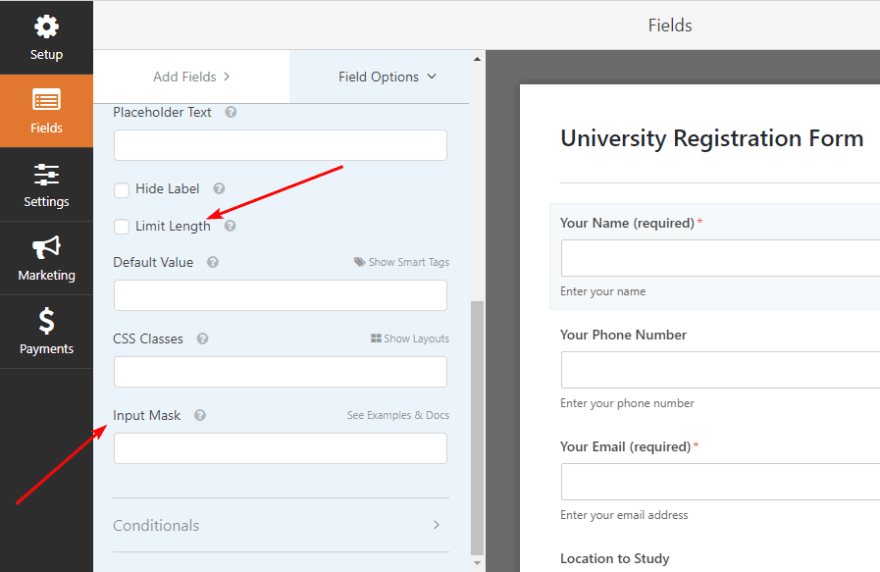
In this field, there are 2 more options in the Advanced Options section:
- Limit length: Check it to choose a limit for the maximum of characters that can be entered in the field.
- Input Mask: Enter input masks to require specific formats for the field. Read more details here.
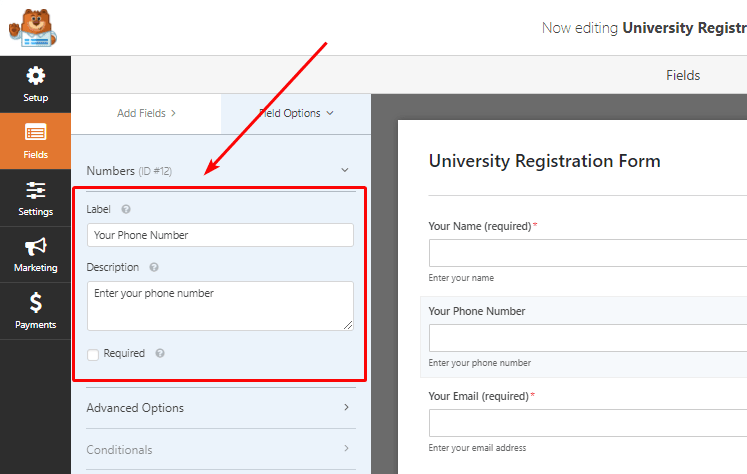
Customize "Your Phone Number" Field
This field has nothing special. Just select the Numbers field and fill in the basic information:
Customize "Your Email" Field
Select the Email field and fill in the basic information for the field:
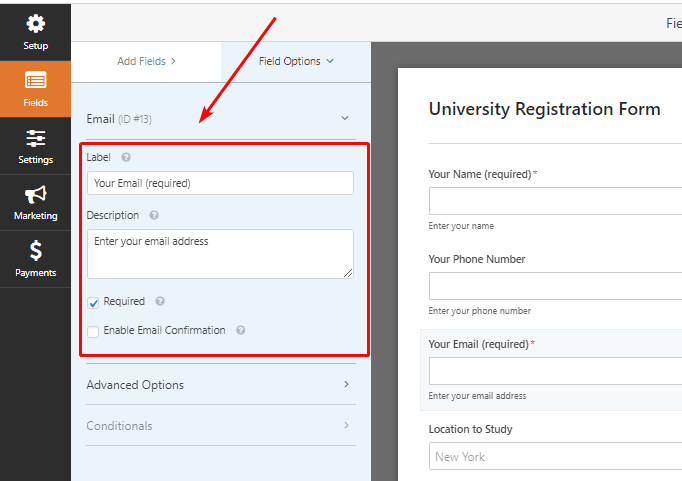
This field has one more basic option: Enable Email Confirmation. You can check it to ask users to provide their email address twice. This makes sure that their email is correct.
Customize "Location to Study" and "Major" Fields
First, choose the Dropdown field. In the Choices section, enter the options for the field. You can click (+) (-) to add / remove choices.
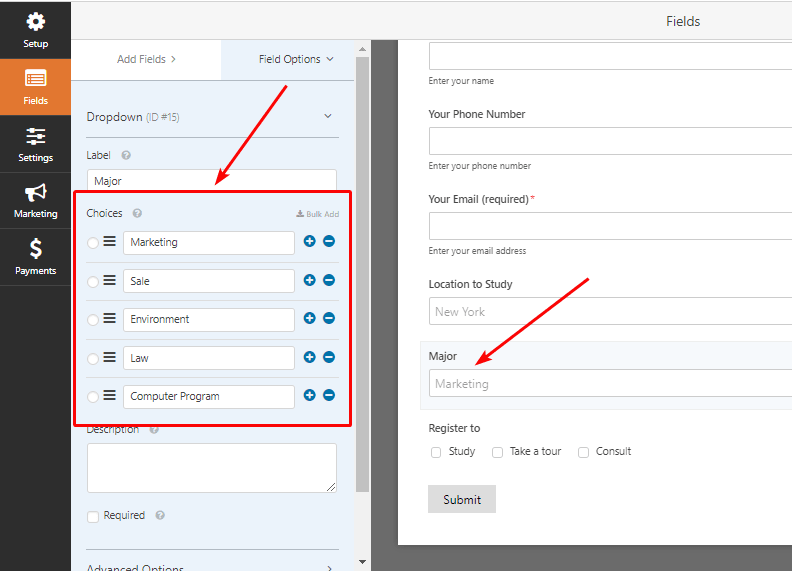
In addition, you can also click the Bulk Add button to add many choices at once. In the Add Choices box, fill in the choices in the desired order (each choice is a line) and then click Add New Choices.
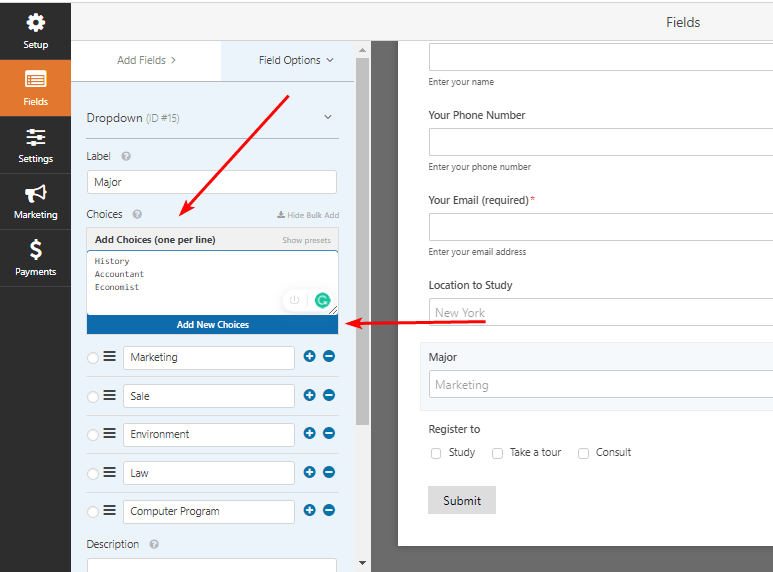
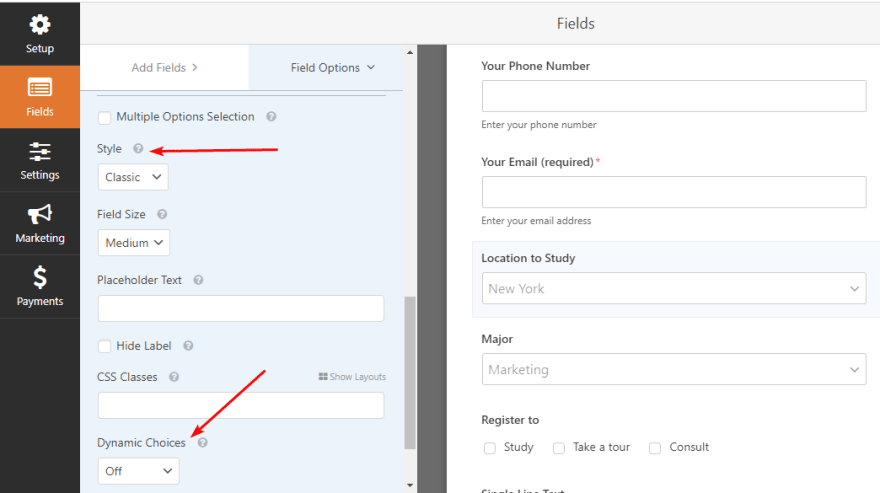
In addition, in this field, there are 2 advanced options that you should care about:
- Style: You can style your drop-down menu with two options: classic and modern. The modern style allows you to search by keywords. Therefore, it works well on menus with a lot of options (more than 10 options).
- Dynamic Choices: Allow users to select choices from post types or taxonomies. For example, if you choose Dynamic Post Type Source as Posts, each choice in the drop-down menu is a post on your website.
Customize "Register to" Field
Select the Checkboxes fields and enter choices like the Dropdown fields.

In this field, there are 2 advanced options that you should care about:
- Use image choices: You can use it to illustrate your choices and make your contact form more attractive and visualized.
- Random Choices: This can avoid people from choosing a choice only because it's the first one.
Step 4: Configure the Contact Form
After creating a contact form, we need to configure it. In the free version of WPForms, you can configure three sections below:
Configure General Settings
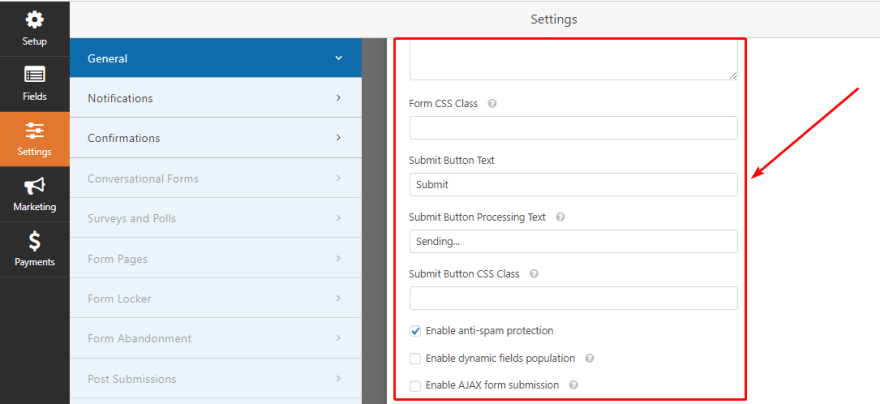
WPForms plugin has specific instructions for each option in this part. You should click the question mark button, read it carefully, and pay attention to these fields:
- Submit Button Text: In Contact Form 7, you have to create the Submit field. But in WPForms, the submit button is built-in. You can change the text of this button in this section to whatever you want, such as Register to, Send Email, ...
- Enable anti-spam protection: Sometimes spammers may bother you through tons of "trash form". In that case, you should turn on this feature of anti-spam.
Configure the Notifications
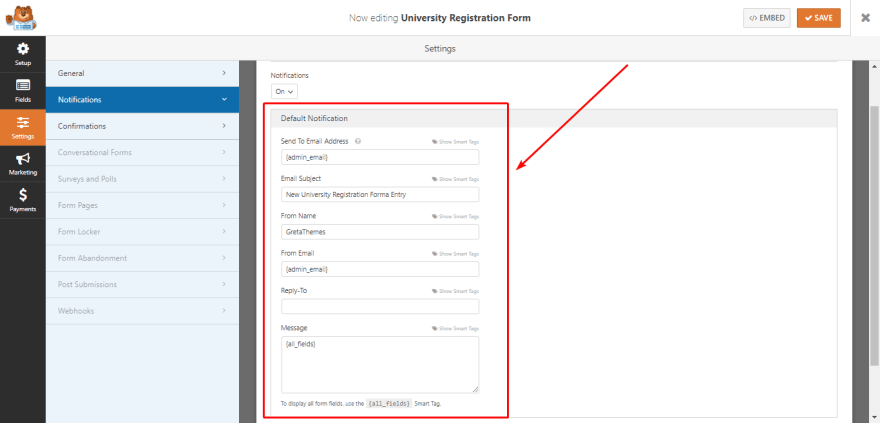
If you want to receive an email notification whenever a user submits a contact form, move to Settings > Notifications.
You can add "smart tags" or text to the fields in this section to manage the email you receive when a user submits a contact form more easily.
Note: Smart tags can add information to your contact form notifications automatically.
This is an example of my settings:
Configure the Confirmations
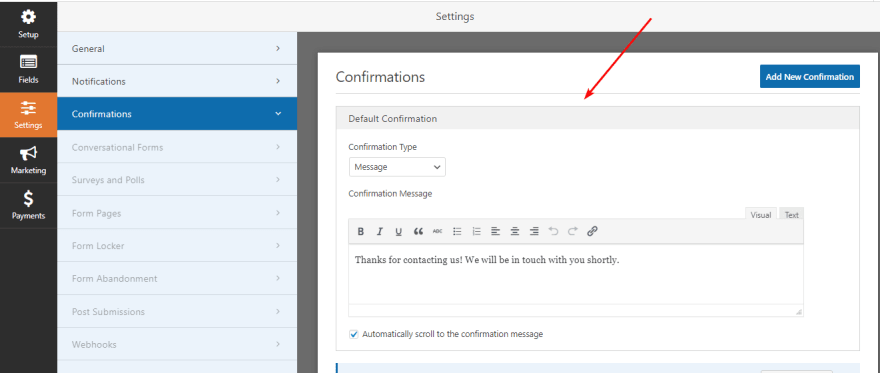
In the Confirmation section, you can configure the messages that users receive after they submit contact forms.
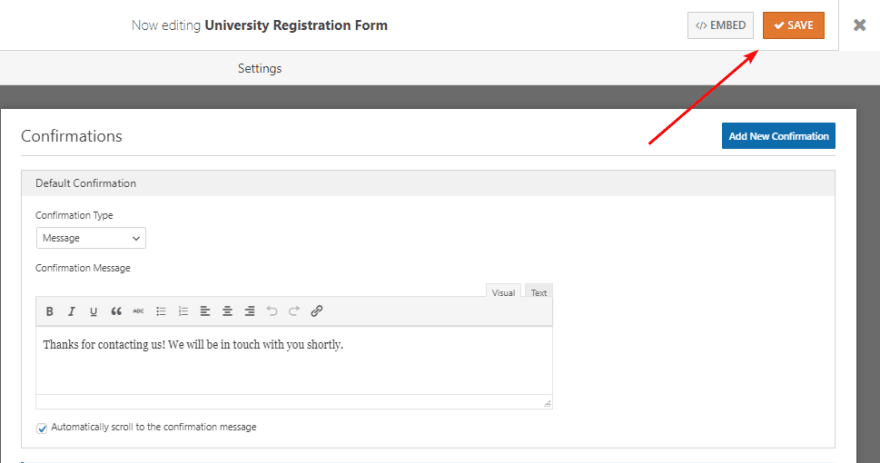
When you finish all the configuration, just click Save.
Step 5: Display the Form on Pages / Posts
To display your forms on pages / posts, there are 2 ways.
The first way is clicking Embed to display your form on a page:
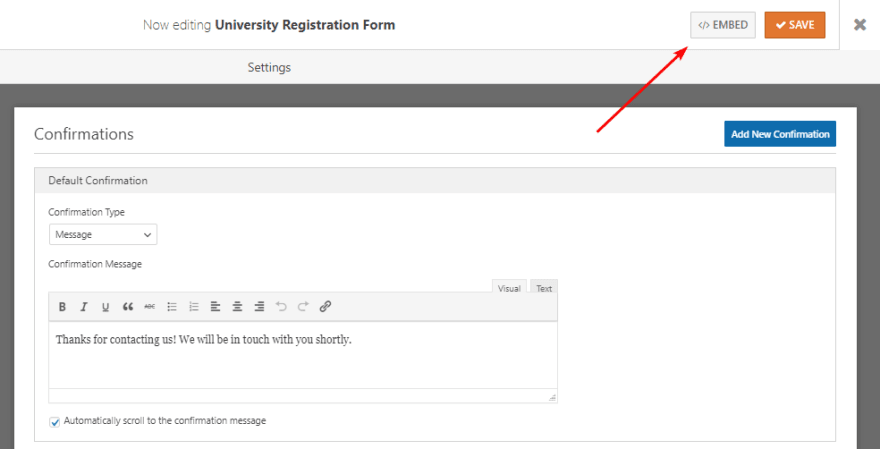
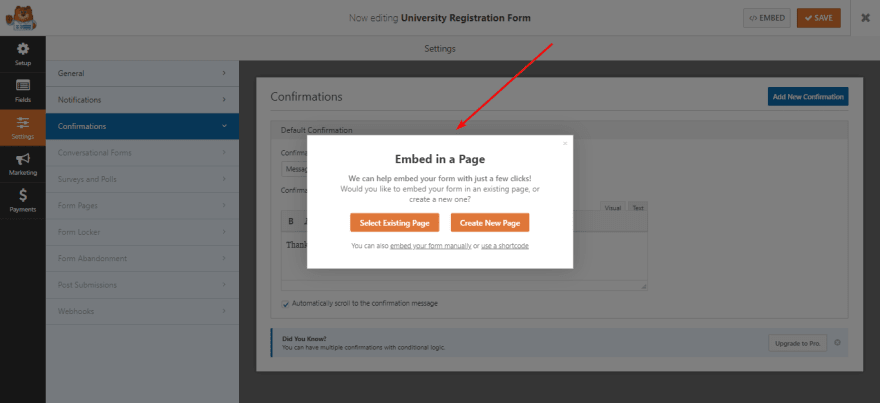
After that, embed the contact form in a new page or an existing page on your site.
The second way is inserting the shortcode of the contact form to pages / posts. I recommend that you should choose the second way because it can display the contact form both on posts and pages. To do it, on the Admin Dashboard, go to WPForms > All Forms, find your contact form, and copy its shortcode.
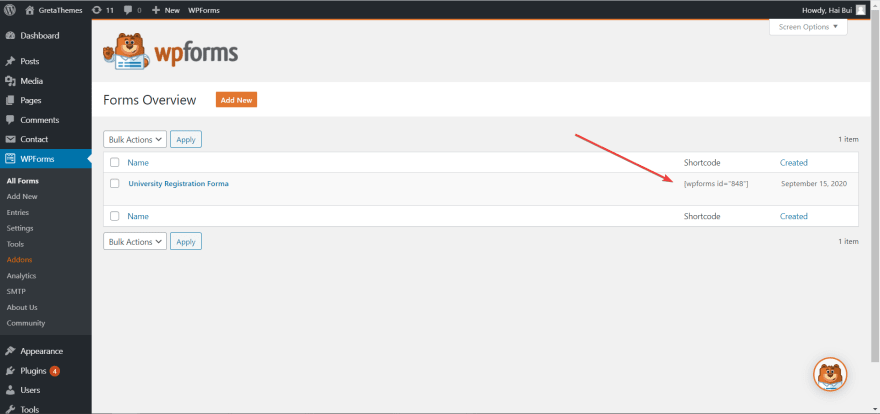
Next, paste this shortcode to the desired posts / pages.
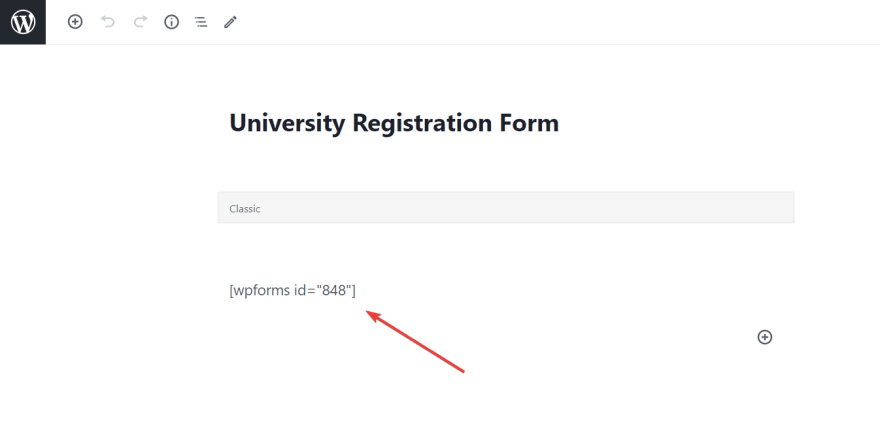
And here is the result:
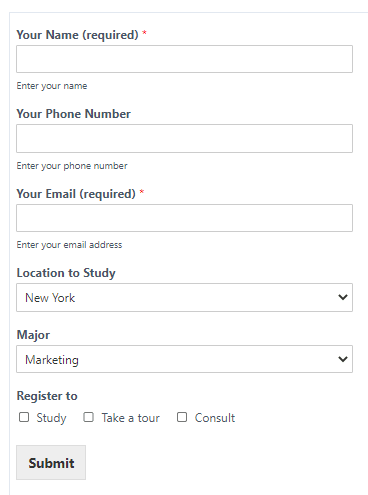
It doesn't look like the contact form sample yet, so I have to style it a bit.
Step 6: Style the Form
On the Admin Dashboard, head to WPForms > All Forms, find your contact form and then click Edit.
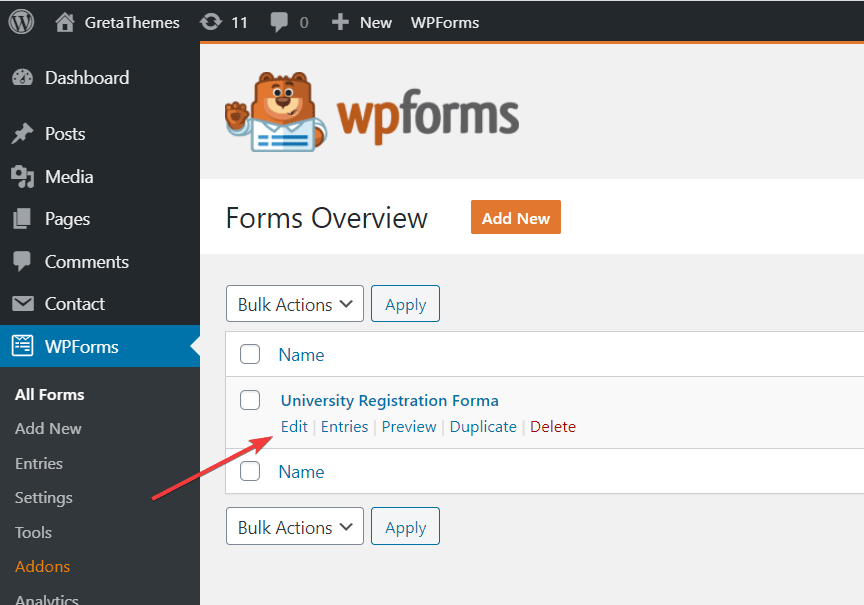
Now, click each field, go to Advanced Options > CSS Classes, and add the following values:
- Your Name and Register to:
ip-100 - Your Phone Number, Email, Location to Study, Major:
ip-50
Next, go to Customizer > Addition CSS, add this code:
.wpforms-field-container {

    display: flex;

    flex-wrap: wrap;

justify-content: space-between

}

.ip-50 {

    width: 48%!important;

}

.ip-100{

width: 100%!important;

}

div.wpforms-container-full .wpforms-form input.wpforms-field-medium,

div.wpforms-container-full .wpforms-form select.wpforms-field-medium {

max-width: 100%;

}

.ip-100 ul {

display: flex;

justify-content: space-between;

}

div.wpforms-container-full {

    margin-bottom: 24px;

    background: #eeeeee;

    padding: 20px;

}
Finally, click Publish.
And here's the final result:

The contact form looks better now, isn't it? Well, we have just finished the last steps to have a completely similar form to my sample.
Last Words
In my experience, using the drag-and-drop interface like in WPForms is easier and faster than using Contact Form 7. Besides, it has the pre-built submit button and 2 more useful sections as Placeholder Text and Description. The live preview is also very convenient. It helps me to detect mistakes more easily when creating and customizing the form.
To learn how to use more contact form plugins, follow our upcoming article of this series! If you have any questions about WPForms or suggest any contact form plugin, feel free to leave it in the comment section.
--- --- ---
The publication at GretaThemes.


 已为社区贡献3634条内容

所有评论(0)