Serverless WebSocket API with AWS IoT Core and AWS Lambda
The Simplest Synchronous Serverless AWS IoT Dashboard
This article is a piece of my graduation project that I want to share with the dev community.
For simplicity, I will split this article into two parts, the next part we will create the dashboard.
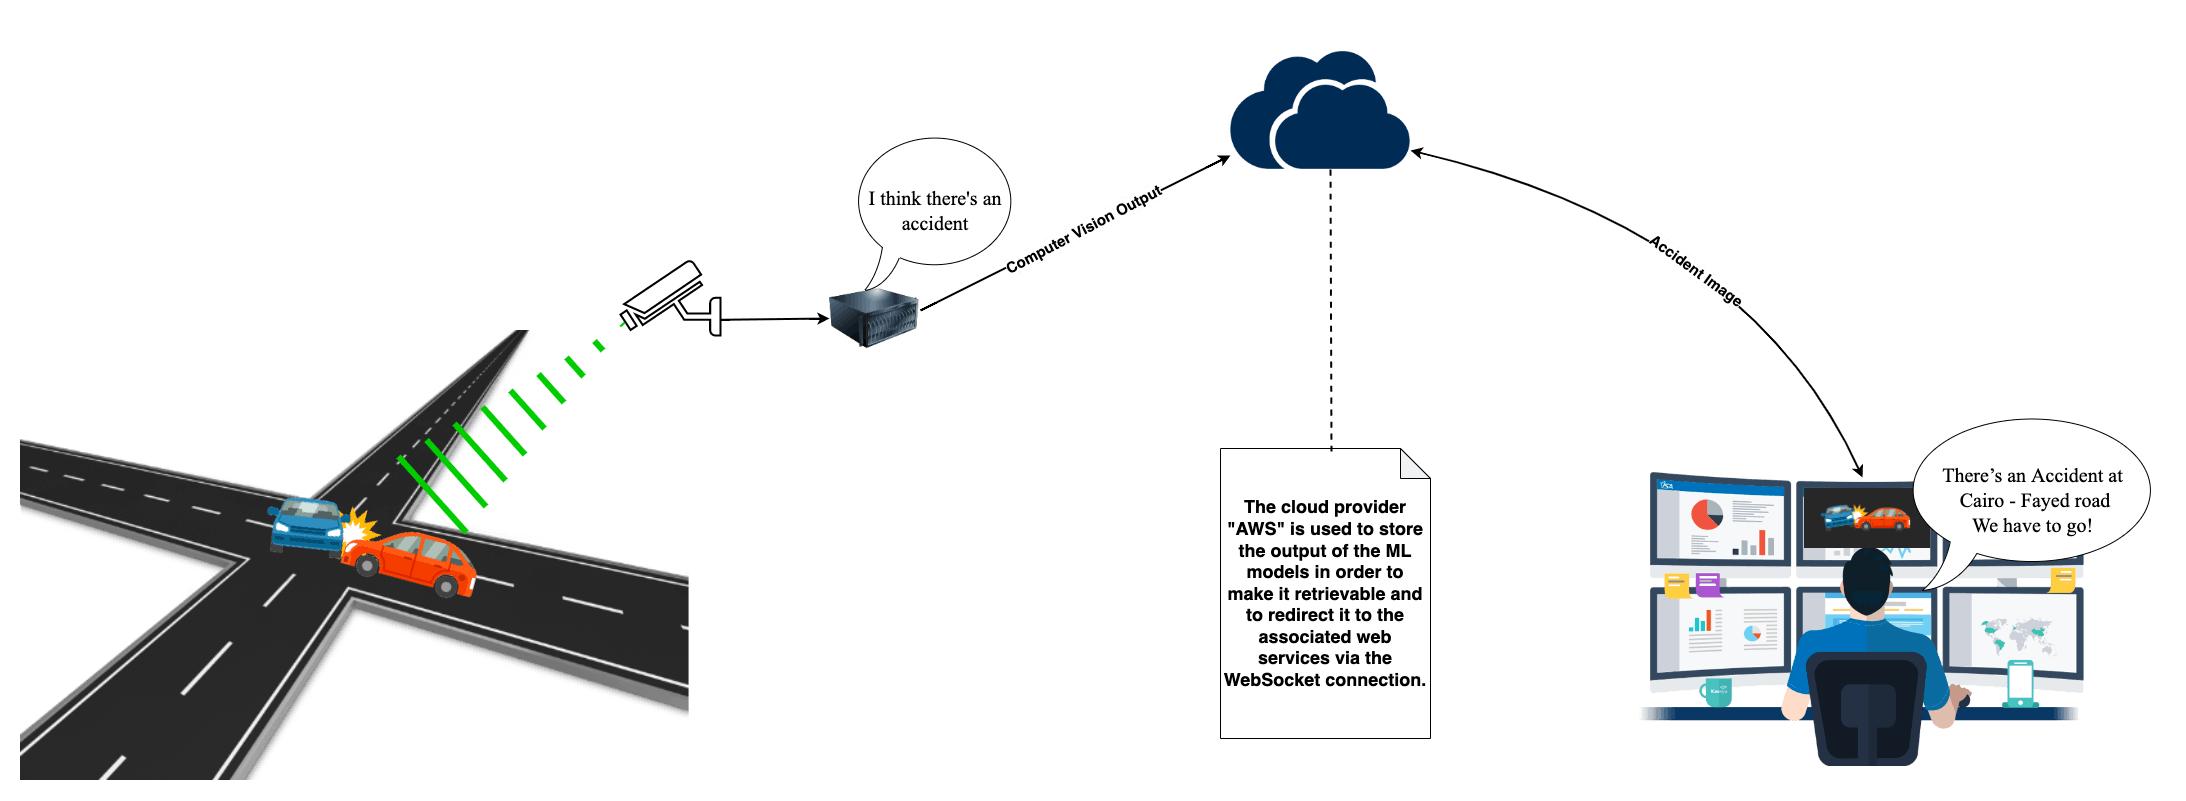
Our case in UVISION was that we have ML models that are deployed on a computing machine (an edge device). This computing machine generates a huge amount of data every minute, and of course, we need this data to be read in real time (or something like that). Let’s say "near real-time". To imagine, look at this figure.
There were a few options to do what we needed.
- use AWS AppSync.
- create a WebSocket API.
Cons of AWS AppSync
As everything is handled and resolved by AWS itself, debugging your code can give you nightmares. If you love coding for the back-end of your application, AppSync is not something you will be excited about.
Pros of serverless WebSocket
They make your app more dynamic and engaging, with your front end representing the state of your backend instantly and at all times.
It's known that WebSockets reducing the need for the front end to poll the backend continually, reducing bandwidth and client and server load.
No matter how many times your client connects to the backed or if they are working on a shared application all clients see the same state at the same time.
Services that we are going to use
- Amazon API Gateway – WebSocket and HTTP gateway
- AWS Lambda – API Gateway routes to our Lambdas
- Amazon DynamoDB – persists our client connections
Time flies over us! Let's deep dive into work. But after we go, I want to show you the whole architecture, as shown below: 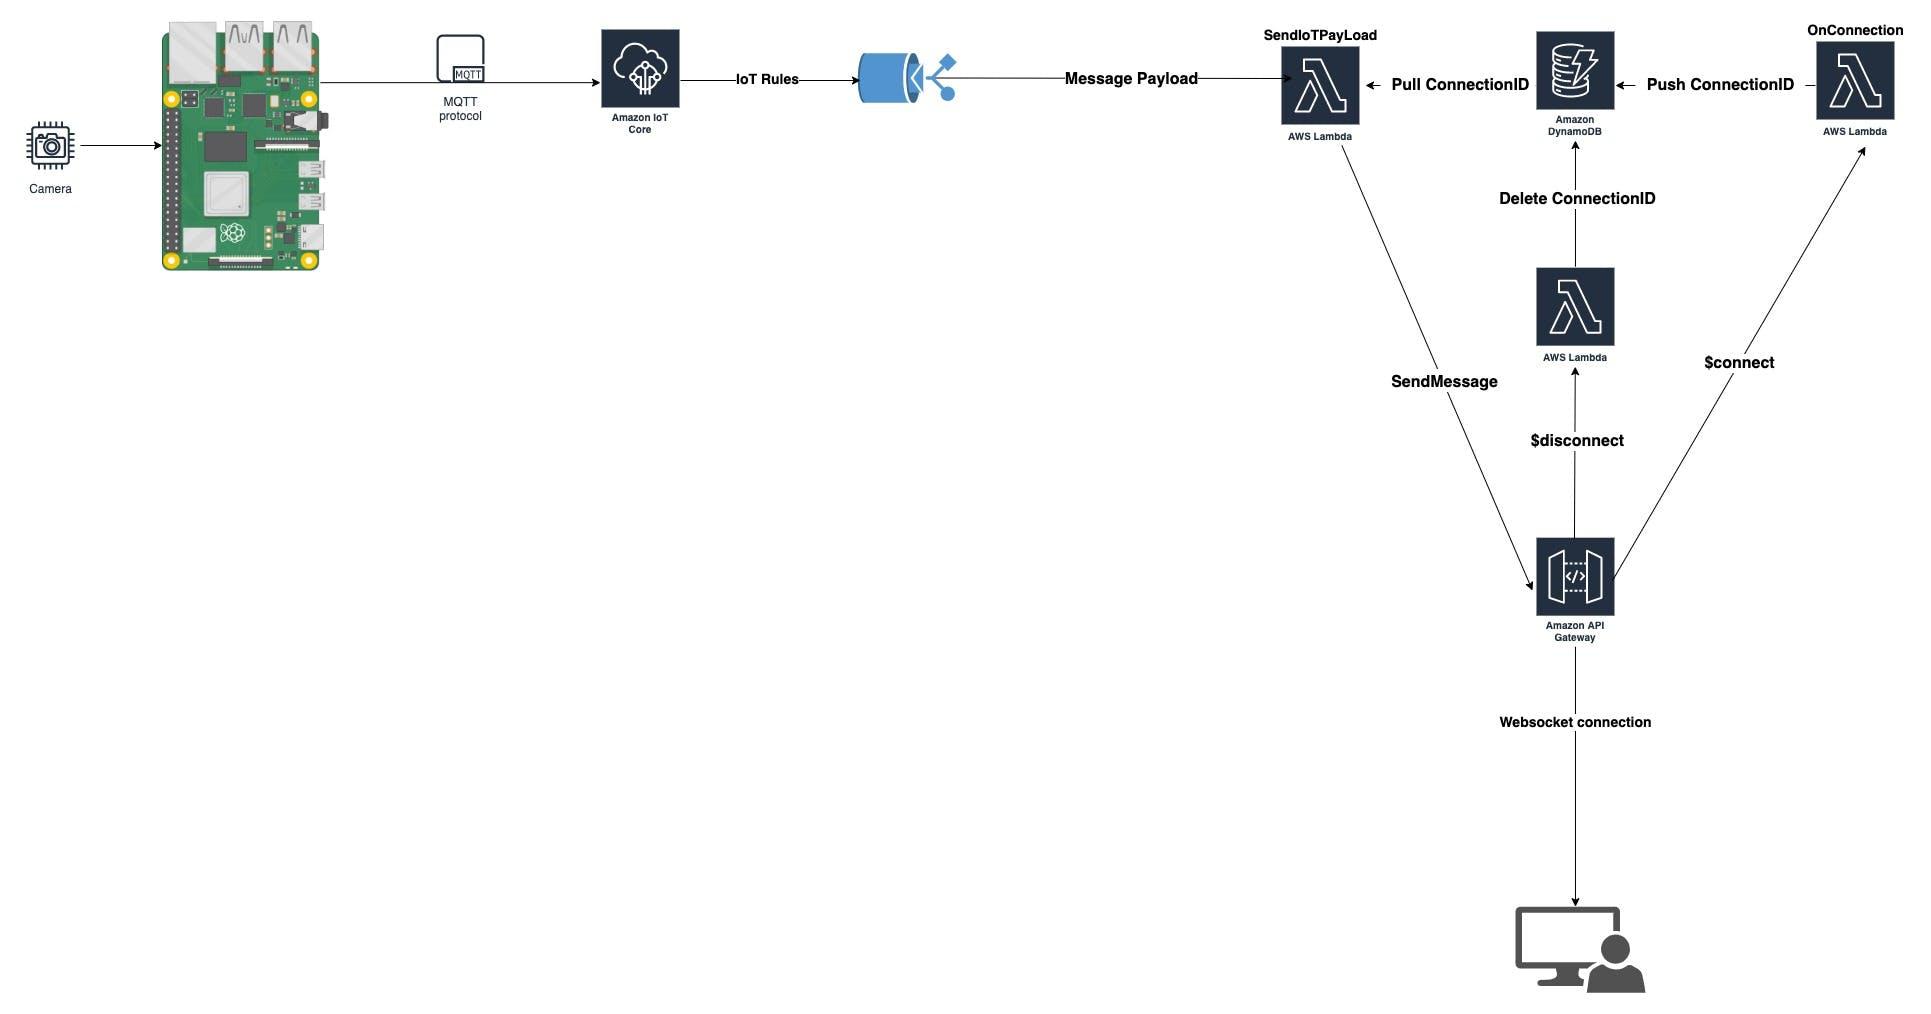
Part 1
Creating the Lambda Functions
As we know, the WebSocket is a stateful protocol. In other words, I have to know who is connected to my API, so every client that is connected to my API will have a unique ID. In this way, I can distinguish between users. We will need three lambda functions to achieve our goal.
The first Lambda function connection
This lambda function receives the connection ID from the website host via the $connect route and then stores the ID in the DynamoDB as a string variable. The $connect route on API Gateway is mapped to this lambda.
Navigate to Lambda and create a new Lambda function in Node.js. Call it something like MyConnection. You can also choose your own name. We will be using the Node.js V. 14 runtime.
const AWS = require('aws-sdk');
const ddb = new AWS.DynamoDB.DocumentClient({ apiVersion: '2012-08-10', region: process.env.AWS_REGION });
exports.handler = async event => {
  console.log("Event " + JSON.stringify(event));
  const putParams = {
    TableName: process.env.TABLE_NAME,
    Item: {
      ConnectionID: event.requestContext.connectionId
    }
  };
  try {
    console.log("Inserting into table " + putParams.TableName + " item " + putParams.Item.ConnectionID);
    await ddb.put(putParams).promise();
  } catch (err) {
    return { statusCode: 500, body: 'Failed to connect: ' + JSON.stringify(err) };
  }
  return { statusCode: 200, body: 'Connected.' };
};
But in order to use it in the perfect way, we first create a DynamoDB table called WEBSOCKET_CONNECTIONS. And set an environment variable called TABLE_NAME == WEBSOCKET_CONNECTION
Now, we aren't done with our connection lambda yet. We still need to add the necessary permission so that our lambda function has the ability to write to the table in the AWS DyanmoDB. To accomplish this, navigate to IAM by going to The configuration tab → Permissions tab→ Role name → and then open your role up to get to AWS IAM.
Within IAM, we need to add an inline policy. Click “Add inline policy” on the right-hand side of the screen.
We will add our table permission, which is in the “DynamoDB” service. To add this permission, search for it by typing in "Dynamo" in the policy search box until "DynamoDB" comes up, and then grant it all access and all resource permissions. Now click “Review Policy” and give your policy a name like “DynamoDBconnection” and then click "Create Policy." Now that we are done assigning the needed DynamoDB permissions for our policy, we it’s time to create our second Lambda function.
The second Lambda function sendIoTData
This Lambda function will forward our IoT data to our website through the "message" route in API Gateway. We will need both the lambda mapped "message" route and the ability to execute an API Gateway function to achieve bi-directional data transfer capabilities with API Gateway mediating the data pipe between our Lambda function and our website. We will also use an API from DynamoDB to retrieve the connection ID that was written from our connection lambda function.
Navigate back to Lambda and create a new Lambda function in Node.js V. 14 runtime . Call it something like sendIoTData. You can also choose your own name.
const AWS = require('aws-sdk');
const ddb = new AWS.DynamoDB.DocumentClient({ apiVersion: '2012-08-10', region: process.env.AWS_REGION });
const { TABLE_NAME } = process.env;
exports.handler = async event => {
  console.log("Event " + JSON.stringify(event));
  let connectionData;

  try {
    connectionData = await ddb.scan({ TableName: TABLE_NAME, ProjectionExpression: 'ConnectionID' }).promise();
    console.log("Found connection data " + JSON.stringify(connectionData));
  } catch (e) {
    return { statusCode: 500, body: e.stack };
  }

  const apigwManagementApi = new AWS.ApiGatewayManagementApi({
    apiVersion: '2018-11-29',
    endpoint: 'https://sgbnt474rf.execute-api.eu-west-2.amazonaws.com/production'
  });

  const IoTData = JSON.stringify(event);


  const postCalls = connectionData.Items.map(async ({ ConnectionID }) => {
    let connectionId = ConnectionID;
    console.log("connectionId " + connectionId);
    try {
      await apigwManagementApi.postToConnection({ ConnectionId: connectionId, Data: IoTData }).promise();
    } catch (e) {
      if (e.statusCode === 410) {
        console.log(`Found stale connection, deleting ${connectionId}`);
        await ddb.delete({ TableName: TABLE_NAME, Key: { connectionId } }).promise();
      } else {
        throw e;
      }
    }
  });

  try {
    await Promise.all(postCalls);
  } catch (e) {
    return { statusCode: 500, body: e.stack };
  }
  return { statusCode: 200, body: 'Data sent.' };
};
And we set an environment variable here called TABLE_NAME == WEBSOCKET_CONNECTIONS.
Bad news, Adding permissions to our connection lambda function. We have to add two extra permissions for this Lambda function to integrate it with our complete design flow. Good news! You already know how to do this from our previous step. The two permissions we will add are “DynamoDB” and “ExecuteAPI.”
To add the "DynamoDB" permission policy to give access to the parameter store, simply follow the same instructions from the previous lambda permissions.
To find the "ExecuteAPI" permissions policy, just search for "execute" in the policies search box. Duplicating the same process as before, you can give access to all resources to make things easy or narrow the permissions down to your lambda ARN if you have to be pedantic or are on a shared AWS account. Now you are ready to move to the next step.
You should now have three policies for this lambda: default execution role, Systems Manager, and ExecuteAPI. Finally, note that we need to "ExecuteAPI" in the sendIoTdata lambda function. The ExecuteAPI permission policy allows our lambda function to 'execute' the internal https endpoint via the API Gateway 'client'. We will be creating our internal and external WebSocket endpoints in the next section in AWS API Gateway.
The last Lambda function Disconnect
This lambda function deletes the connection ID from the DynamoDB table that we created earlier. We setup an environment variable here called TABLE_NAME == WEBSOCKET_CONNECTIONS
const AWS = require('aws-sdk');
const ddb = new AWS.DynamoDB.DocumentClient({ apiVersion: '2012-08-10', region: process.env.AWS_REGION });
exports.handler = async event => {
  console.log("Event " + JSON.stringify(event));
  const deleteParams = {
    TableName: process.env.TABLE_NAME,
    Key: {
      ConnectionID: event.requestContext.connectionId
    }
  };
  try {
    console.log("Deleting from table " + deleteParams.TableName + " item " + deleteParams.Key.ConnectionID);
    await ddb.delete(deleteParams).promise();
  } catch (err) {
    return { statusCode: 500, body: 'Failed to disconnect: ' + JSON.stringify(err) };
  }
  return { statusCode: 200, body: 'Disconnected.' };
};
Now, we aren't done with our connection lambda yet. We still need to add the necessary permission so that our lambda function has the ability to read from the table in the AWS DyanmoDB. just the same as we did before.
setup the AWS API Gateway
So, WebSockets form a direct connection with your website host and, thus, they need a URL that directs both the website and the lambda function as to where to direct their data exchange. API Gateway provides these endpoints for this exchange just as it would for a normal REST API.
We will be obtaining two WebSocket endpoints from our creation process in API Gateway. One internal endpoint (HTTPS) for use in the lambda function and one external endpoint (WSS) for use on our webpage.
-
External WebSocket endpoint: this is the URL with a WSS prefix. This is the AWS WebSockets endpoint needed in our JavaScript code on our website to communicate with API Gateway, and in turn, communicate with our lambda functions.
-
Internal WebSocket Endpoint: this is the URL with an "HTTPS" prefix. This is the AWS WebSocket endpoint needed in our 'sendIoTdata' lambda function to communicate with API Gateway through the post_to_connection() function, and in turn, communicate with our web page.
You should now create your own API Gateway WebSocket endpoints and routes by navigating to API Gateway –> Create API and choosing to build a Websocket API.
Select a name for your WebSocket API and then type “request.body.action” in the box for Route Selection Expression. This is the standard path to designate a WebSocket action like “message”, “join”, or “send”.
Choose the “Next” button and then, on the next screen, we will select one pre-made macro route and one custom route. The one route that we need is the connection route. Select to add a connection route with:
- The macro called
$connectto route ourconnectionlambda function. - The second route we will designate is a custom route we will call
messageto route oursendIoTData - The macro called
$disconnectto route ourDisconnectlambda function
Now we have to link our WebSockets API routes with our three previously created lambdas. You may see why we created the lambdas first even though it is counterintuitive to our design. This is typical for IoT design flows, as we often have to work backward. To link our lambdas to our two routes, just select the lambda functions you just created and link them to the appropriate route key of similar names. Select “Next” then leave the stage name as “production” select “Next” again, and then finally “create and deploy.”
Now to view the WebSocket endpoints, go to the tab “stages” on the left of your screen. Click on your only stage, which should be in blue and called “production.” After selecting it, you should now see your two WebSocket endpoints at the top of your screen. Leave this screen open as we will need both endpoints.
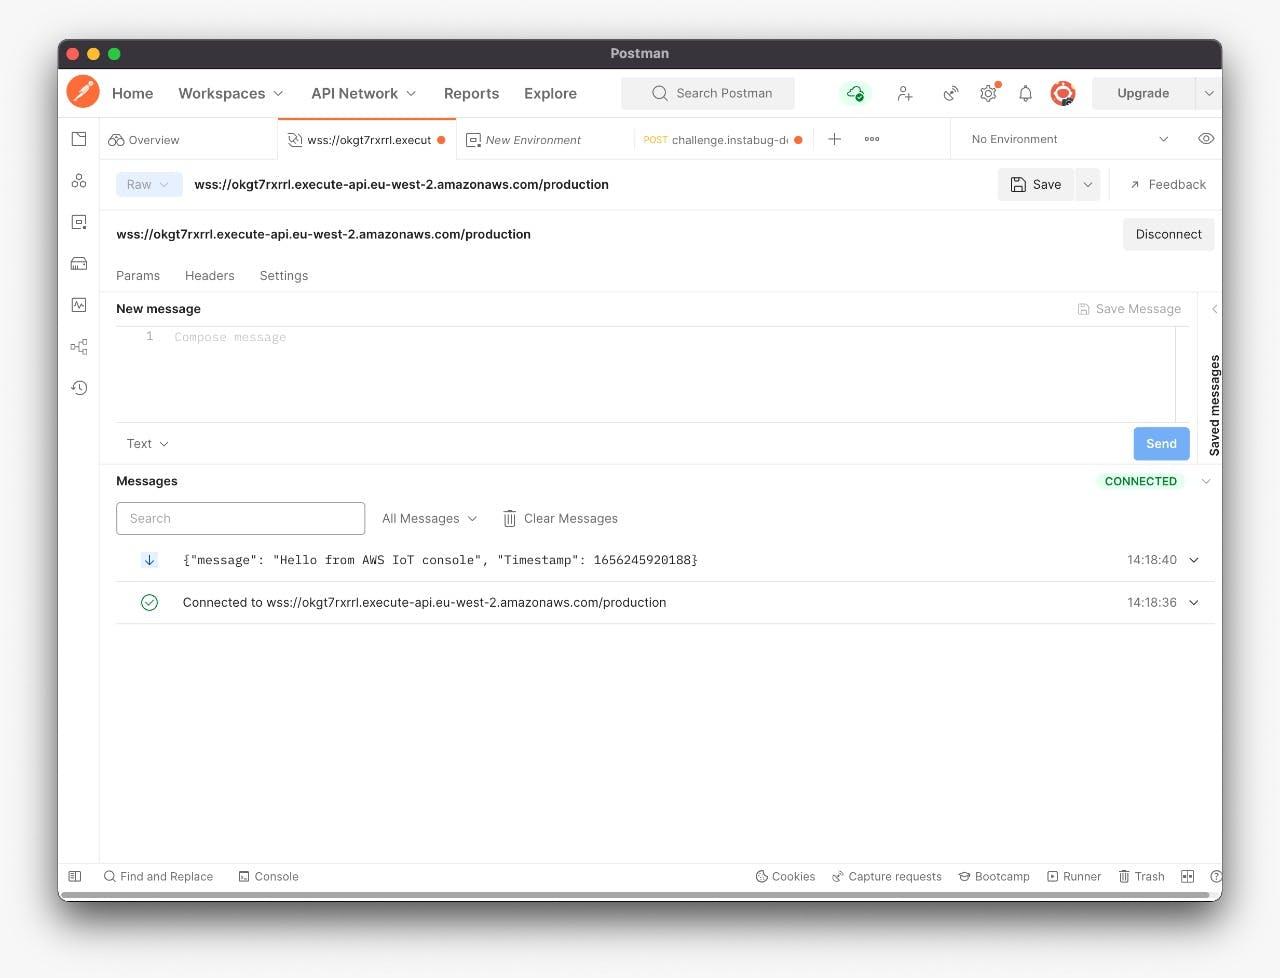
Now it’s time to test our WebSocket

云原生社区为您提供最前沿的新闻资讯和知识内容
更多推荐
 0
0 0
0- 0


 已为社区贡献35528条内容

所有评论(0)