在 Docker 和 Portainer 中使用 Prometheus 和 Grafana 进行服务器监控
我-介绍
Portainer 是一款免费的 Docker Container 管理工具,体积小巧,管理界面直观,部署和使用简单,让用户可以轻松管理 Docker 主机或 Swarm 集群。该工具适用于部署在 Docker 引擎上的容器。
Grafana 是领先的时间序列,一个用于可视化和监控的开源平台。它允许您查询、可视化、设置警报和了解指标,无论它们存储在哪里。您可以在 Grafana 中创建令人惊叹的仪表板来可视化和监控指标。
Prometheus 是一个开源时间序列监控系统,用于以机器为中心和高度动态的面向服务的架构。它可以从字面上监控一切。它与 Grafana 的集成非常顺利,因为 Grafana 还提供 Prometheus 作为其数据源之一。
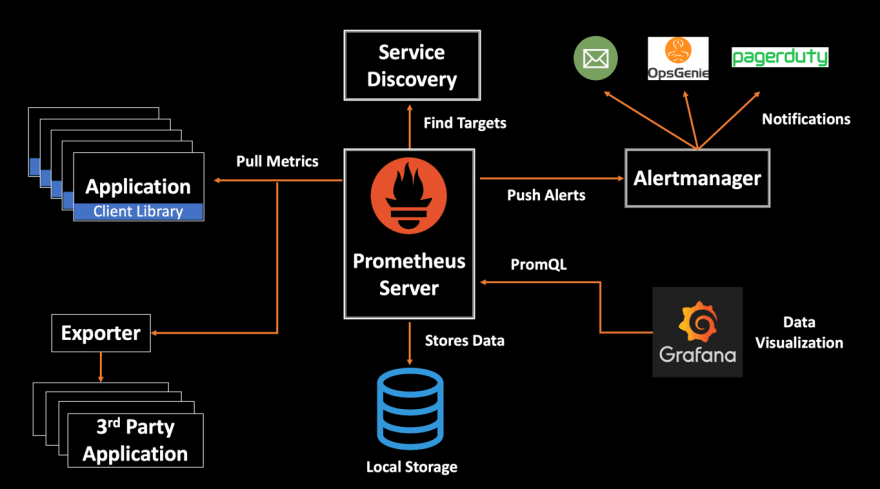
Prometheus 架构:在其核心,Prometheus 有一个名为 Prometheus Server 的主要组件,负责实际的监控工作。
[ ](https://res.cloudinary.com/practicaldev/image/fetch/s--V9Nikrzr--/c_limit%2Cf_auto%2Cfl_progressive%2Cq_auto%2Cw_880/https://dev-to- uploads.s3.amazonaws.com/uploads/articles/6ixgz35no17vaq7ui4bh.png)
Prometheus 服务器包括:
-
时间序列数据库,存储所有指标数据,如当前 CPU 使用情况、内存使用情况等。
-
Data Retrieval Worker 负责从应用程序、服务、服务器等所有数据拉取活动并将它们推送到数据库中。
-
HTTP 服务器 API 用于接受对存储数据的查询。服务器 API 用于在仪表板或 Web UI 中显示数据。
II-在 Linux 上使用 Docker Swarm 安装 Portainer
1\。介绍
Portainer 可以部署在任何 K8s、Docker 或 Swarm 环境之上。它在云端、本地和边缘无缝运行,为您提供所有容器的统一视图。
Portainer 由两个元素组成,Portainer 服务器和 Portainer 代理。这两个元素在 Docker 引擎上作为轻量级 Docker 容器运行。本文档将帮助您在 Linux 环境中部署 Portainer 服务器和代理容器。要将新的 Linux Swarm 环境添加到现有的 Portainer Server 安装,请参阅Portainer Agent 安装说明。
要开始,您将需要:
-
最新版本的 Docker 已安装并正在运行
-
Swarm 模式启用并工作,包括用于 swarm 服务通信的覆盖网络
-
sudo 访问您的 swarm 集群的管理器节点
-
默认情况下,Portainer 将通过端口 9443 公开 UI,并通过端口 8000 公开 TCP 隧道服务器。
-
管理节点和工作节点必须能够通过端口 9001 相互通信。
2\。部署
Portainer 可以直接部署为 Docker 集群中的服务。请注意,此方法将自动部署 Portainer 服务器的单个实例,并将 Portainer 代理部署为集群中每个节点上的全局服务。
首先,检索堆栈 YML 清单:
curl -L https://downloads.portainer.io/portainer-agent-stack.yml \
    -o portainer-agent-stack.yml
进入全屏模式 退出全屏模式
然后使用下载的 YML 清单来部署您的堆栈:
docker stack deploy -c portainer-agent-stack.yml portainer
进入全屏模式 退出全屏模式
现在已经安装了 Portainer 服务器和代理。您可以通过运行docker ps检查 Portainer Server 和 Agent 容器是否已启动:
root@manager01:~# docker ps
CONTAINER ID   IMAGE                           COMMAND                  CREATED              STATUS              PORTS                NAMES
59ee466f6b15   portainer/agent:2.11.1          "./agent"                About a minute ago   Up About a minute                        portainer_agent.xbb8k6r7j1tk9gozjku7e43wr.5sa6b3e8cl6hyu0snlt387sgv
2db7dd4bfba0   portainer/portainer-ce:2.11.1   "/portainer -H tcp:/…"   About a minute ago   Up About a minute   8000/tcp, 9443/tcp   portainer_portainer.1.gpuvu3pqmt1m19zxfo44v7izx
进入全屏模式 退出全屏模式
3\。在登录
现在安装已完成,您可以通过打开 Web 浏览器并转到以下位置登录到您的 Portainer 服务器实例:
https://localhost:9443
进入全屏模式 退出全屏模式
进入Portainer的dashboard页面,在设置成功后的第一个界面,用户会看到连接成功的endpoint信息:栈数、容器数、卷数、镜像数以及一个Docker和主机信息。
...阅读更多...
III-在 Docker 和 Portainer 中使用 Prometheus 和 Grafana 进行服务器监控
参考
1\。部署 Prometheus 和 Grafana
创建一个新堆栈,并在一个盒子 Web 编辑器中定义或粘贴 docker-compose 文件的内容。
图像1
我们需要部署 Prometheus 和 Grafana,所以 docker-compose 的全部内容如下所示:
version: '3'

volumes:
  prometheus-data:
    driver: local
  grafana-data:
    driver: local

services:
  prometheus:
    image: prom/prometheus:latest
    container_name: prometheus
    ports:
      - "9090:9090"
    volumes:
      - /etc/prometheus:/etc/prometheus
      - prometheus-data:/prometheus
    restart: unless-stopped
    command:
      - "--config.file=/etc/prometheus/prometheus.yml"

  grafana:
    image: grafana/grafana:latest
    container_name: grafana
    ports:
      - "3000:3000"
    volumes:
      - grafana-data:/var/lib/grafana
    restart: unless-stopped
进入全屏模式 退出全屏模式
2\。配置普罗米修斯
配置 Prometheus 以监控自身
$sudo mkdir /etc/prometheus

sudo vim /etc/prometheus/prometheus.yml
进入全屏模式 退出全屏模式
global:
  scrape_interval:     15s # By default, scrape targets every 15 seconds.

  # Attach these labels to any time series or alerts when communicating with
  # external systems (federation, remote storage, Alertmanager).
  # external_labels:
  #  monitor: 'codelab-monitor'

# A scrape configuration containing exactly one endpoint to scrape:
# Here it's Prometheus itself.
scrape_configs:
  # The job name is added as a label `job=<job_name>` to any timeseries scraped from this config.
  - job_name: 'prometheus'
    # Override the global default and scrape targets from this job every 5 seconds.
    scrape_interval: 5s
    static_configs:
      - targets: ['localhost:9090']
进入全屏模式 退出全屏模式
3\。第三方出口商
Node_exporter 是帮助 prometheus 收集要监控的机器的指标并安装在目标机器(被监控的机器)上的导出之一。
cAdvisor 用于分析容器应用程序的使用情况、性能和许多其他指标,为用户提供所有正在运行的容器的概览。
在堆栈监控中,我们需要将 cadvisor 和 node_exporter 的内容配置添加到 docker-compose 文件中,然后更新堆栈。
  node_exporter:
    image: quay.io/prometheus/node-exporter:latest
    container_name: node_exporter
    command:
      - '--path.rootfs=/host'
    pid: host
    restart: unless-stopped
    volumes:
      - '/:/host:ro,rslave'

  cadvisor:
    image: google/cadvisor:latest
    container_name: cadvisor
    # ports:
    #   - "8080:8080"
    volumes:
      - /:/rootfs:ro
      - /var/run:/var/run:ro
      - /sys:/sys:ro
      - /var/lib/docker/:/var/lib/docker:ro
      - /dev/disk/:/dev/disk:ro
    devices:
      - /dev/kmsg
    restart: unless-stopped
进入全屏模式 退出全屏模式
在 Prometheus 配置文件中,我们需要将 node-exporter 和 cadvisor 添加到 scrape 配置中,如下所示:
 # Example job for node_exporter
  - job_name: 'node_exporter'
    static_configs:
      - targets: ['node_exporter:9100']

  # Example job for cadvisor
  - job_name: 'cadvisor'
    static_configs:
      - targets: ['cadvisor:8080']
进入全屏模式 退出全屏模式
4\。使用 Grafana 可视化数据
在我们上面在localhost:3000处构建的 Grafana 页面中
在这里,我们以管理员身份使用用户名和密码登录。
[ ](https://res.cloudinary.com/practicaldev/image/fetch/s--YqYGg0OO--/c_limit%2Cf_auto%2Cfl_progressive%2Cq_auto%2Cw_880/https://dev-to- uploads.s3.amazonaws.com/uploads/articles/vf1gnxbk0ix7wj47fn30.png)
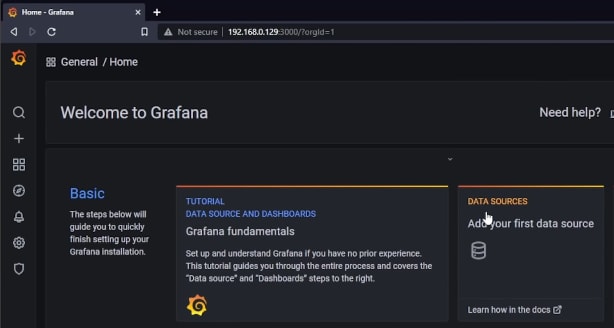
在 Home 主页,我们需要添加数据源,这里我们将添加来自 Prometheus 的数据源,因为我们需要做的是在 Grafana 仪表板上进行可视化,以接收从 Prometheus 灌入的数据。
[ ](https://res.cloudinary.com/practicaldev/image/fetch/s--yG39JLHj--/c_limit%2Cf_auto%2Cfl_progressive%2Cq_auto%2Cw_880/https://dev-to- uploads.s3.amazonaws.com/uploads/articles/4l9sreoctji37pndv1s0.png)
[ ](https://res.cloudinary.com/practicaldev/image/fetch/s--fco8Vs0o--/c_limit%2Cf_auto%2Cfl_progressive%2Cq_auto%2Cw_880/https://dev-to- uploads.s3.amazonaws.com/uploads/articles/uuxwe5rs035lwr3w6u1m.png)
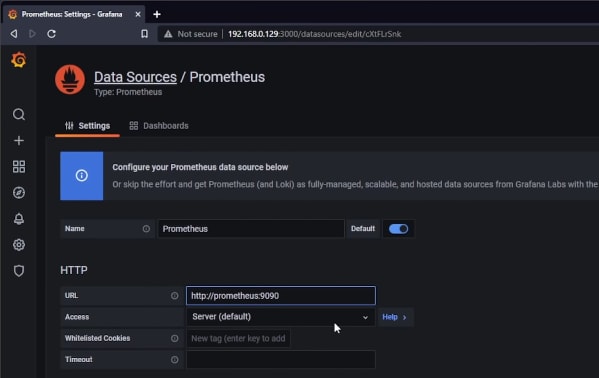
在设置我们需要重新配置 HTTP 选项卡的 URL 是http://prometheus:9090
[ ](https://res.cloudinary.com/practicaldev/image/fetch/s---5Ow5i6X--/c_limit%2Cf_auto%2Cfl_progressive%2Cq_auto%2Cw_880/https://dev-to -uploads.s3.amazonaws.com/uploads/articles/vjz3z94v1lolh6iidf79.png)
连接您的数据源后,我们在主页创建一个新仪表板 u003d> 添加一个空面板。
[ ](https://res.cloudinary.com/practicaldev/image/fetch/s--iWGrFZb6--/c_limit%2Cf_auto%2Cfl_progressive%2Cq_auto%2Cw_880/https://dev-to- uploads.s3.amazonaws.com/uploads/articles/csoo7nrfv7xusye7j6sw.png)
Metrics 浏览器帮助我们查询数据以进行可视化。
[ ](https://res.cloudinary.com/practicaldev/image/fetch/s---5tVyC-p--/c_limit%2Cf_auto%2Cfl_progressive%2Cq_auto%2Cw_880/https://dev -to-uploads.s3.amazonaws.com/uploads/articles/6txj8d9sx3h8btzw6v9e.png)
5\。导入 Grafana 仪表板
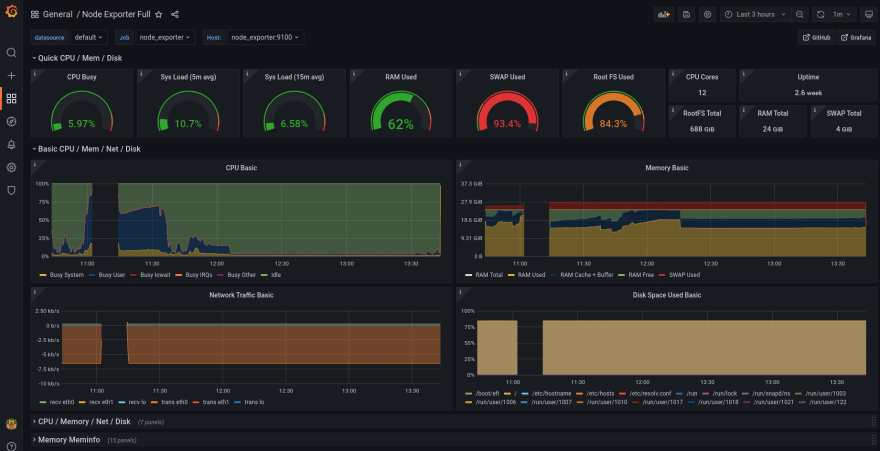
在 Grafana 主页https://grafana.com的 Dashboards 选项卡中,我们将看到有许多仪表板。在本文中,我们将了解节点导出器和 cadvisor。
[ ](https://res.cloudinary.com/practicaldev/image/fetch/s--gCXT9i_r--/c_limit%2Cf_auto%2Cfl_progressive%2Cq_auto%2Cw_880/https://dev-to- uploads.s3.amazonaws.com/uploads/articles/3xcsa3kvf41ii06tdgnj.png)
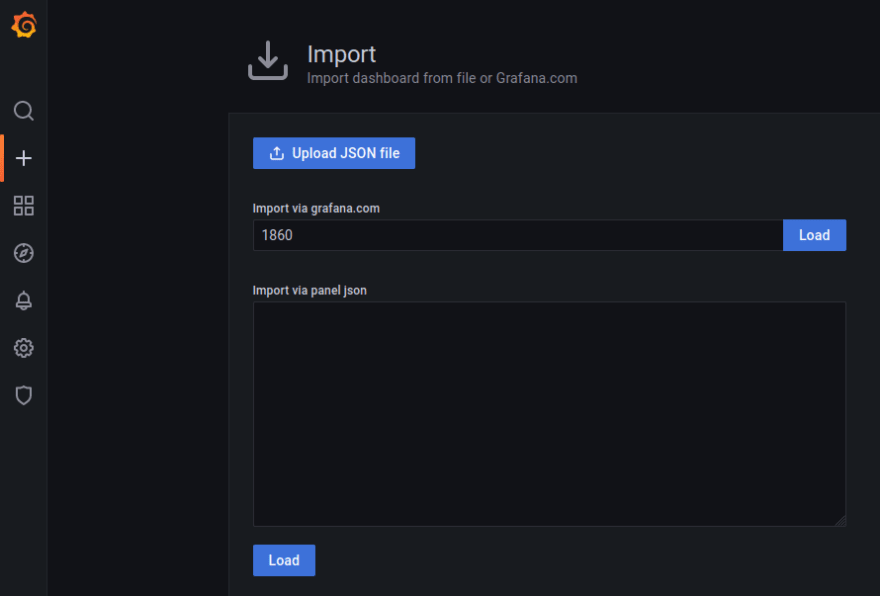
通过复制 ID 并将其粘贴到我们构建的仪表板服务器中来获取完整的节点导出器。
[ ](https://res.cloudinary.com/practicaldev/image/fetch/s--PaY7CqLE--/c_limit%2Cf_auto%2Cfl_progressive%2Cq_auto%2Cw_880/https://dev-to- uploads.s3.amazonaws.com/uploads/articles/wefoxcm9h202igwpvni2.png)
[ ](https://res.cloudinary.com/practicaldev/image/fetch/s--UPDWKlmc--/c_limit%2Cf_auto%2Cfl_progressive%2Cq_auto%2Cw_880/https://dev-to- uploads.s3.amazonaws.com/uploads/articles/cgttisbwvxlxlx2x667o.png)
[ ](https://res.cloudinary.com/practicaldev/image/fetch/s--b8IFhV1i--/c_limit%2Cf_auto%2Cfl_progressive%2Cq_auto%2Cw_880/https://dev-to- uploads.s3.amazonaws.com/uploads/articles/qswxdmwv19qa5nmydlsr.png)
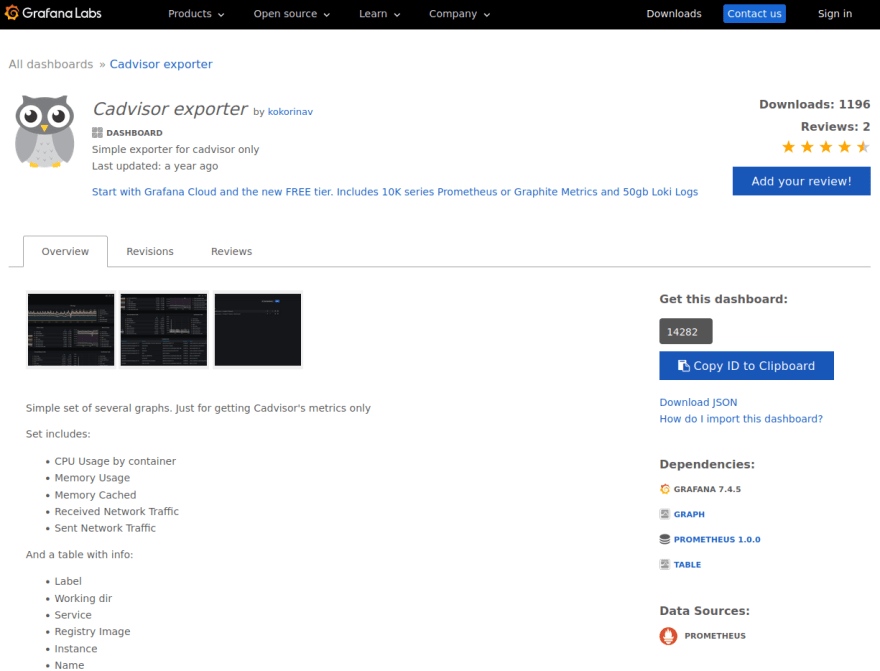
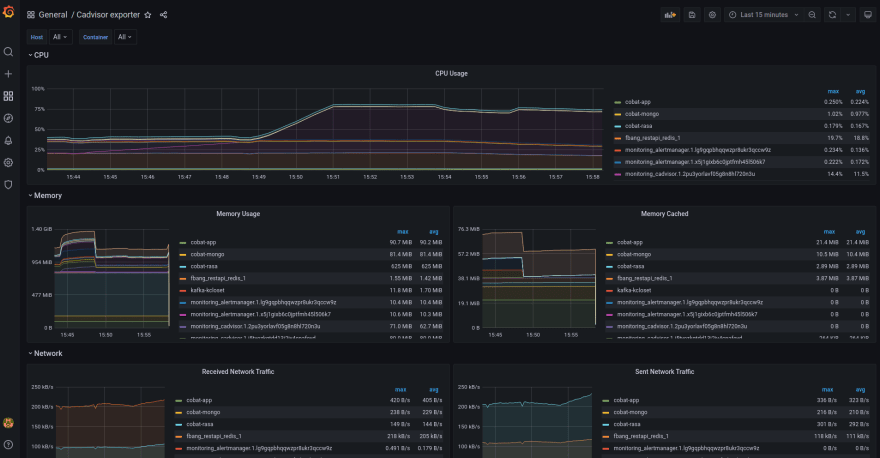
通过复制 ID 并将其粘贴到我们构建的仪表板服务器中来获取 Cadvisor 导出器。
[ ](https://res.cloudinary.com/practicaldev/image/fetch/s--m8uoa_r8--/c_limit%2Cf_auto%2Cfl_progressive%2Cq_auto%2Cw_880/https://dev-to- uploads.s3.amazonaws.com/uploads/articles/egxdg18lpwdgpvs4lj7h.png)
[ ](https://res.cloudinary.com/practicaldev/image/fetch/s--6jU-F_1K--/c_limit%2Cf_auto%2Cfl_progressive%2Cq_auto%2Cw_880/https://dev- to-uploads.s3.amazonaws.com/uploads/articles/lcpgdzs0asjfypypshwm.png)
[ ](https://res.cloudinary.com/practicaldev/image/fetch/s--x9ocsYHo--/c_limit%2Cf_auto%2Cfl_progressive%2Cq_auto%2Cw_880/https://dev-to- uploads.s3.amazonaws.com/uploads/articles/j7wmm25vfwooc1nmgkll.png)
IV-Alertmanager with Slack
1.简介
Alertmanager 处理由 Prometheus 服务器等客户端应用程序发送的警报。它负责对它们进行重复数据删除、分组并将它们路由到正确的接收器集成,例如电子邮件、PagerDuty 或 OpsGenie。它还负责警报的静音和抑制。
阅读更多...
结论
非常感谢您花时间阅读本文。我非常感谢评论部分的任何评论。
享受🎉
更多推荐
 已为社区贡献35528条内容


所有评论(0)