
一文让你明白mybatis如何往spring容器中注册Mapper的代理类实例
背景介绍
前面我们在一文带你掌握spring框架中import注解的作用中讲到了@import注解的作用,那么它和我们今天要讲的主题之间有什么联系呢?
今天我们我们这边文章主要是为了解决一个问题:“mybatis是如何将Mapper接口的代理类实例注册到spring容器中的?”。实际上mybatis批量注册Mapper的代理对象就使用了@import注解,下面我将手把手带大家看源码,帮助大家了解mybatis批量注册Mapper接口代理对象到spring容器中背后的原理。
Mybatis批量注册代理bean的原理
相信经常使用springboot开发项目的小伙伴对下面这段代码应该不陌生:
@SpringBootApplication
@MapperScan(basePackages = "com.lizemin.importcase.mapper")
public class ImportCaseApplication {

    public static void main(String[] args) {
        SpringApplication.run(ImportCaseApplication.class, args);
    }
}
我们正是通过@MapperScan(basePackages = "com.lizemin.importcase.mapper")将Mapper接口的代理对象注册到spring容器中,后面就能直接通过@Autowired使用Mapper代理对象了。那么为什么这个注解就能实现批量注册Mapper代理对象呢?我们点击去看这个注解:
@Retention(RetentionPolicy.RUNTIME)
@Target(ElementType.TYPE)
@Documented
@Import(MapperScannerRegistrar.class) // 这个是核心部分
@Repeatable(MapperScans.class)
public @interface MapperScan {

  @AliasFor("basePackages")
  String[] value() default {};

  /**
   * 设置包扫描
   */
  @AliasFor("value")
  String[] basePackages() default {};

	// 指定创建代理bean的FactoyBean,默认是MapperFactoryBean
  Class<? extends MapperFactoryBean> factoryBean() default MapperFactoryBean.class;
}
可以看到该注解上方用到了@Import(MapperScannerRegistrar.class),接下来就要用到之前我们在一文带你掌握spring框架中import注解的作用中讲到的知识了。mybatis将通过这个MapperScannerRegistrar来往spring容器中添加BeanDefinition,我们看下这个类的源码,可以看到它实现了ImportBeanDefinitionRegistrar接口:
public class MapperScannerRegistrar implements ImportBeanDefinitionRegistrar, ResourceLoaderAware {

	/**
	 * 添加BeanDefinition
	 */
	@Override
	public void registerBeanDefinitions(AnnotationMetadata importingClassMetadata, BeanDefinitionRegistry registry) {
	  var mapperScanAttrs = AnnotationAttributes
	      .fromMap(importingClassMetadata.getAnnotationAttributes(MapperScan.class.getName()));
	  if (mapperScanAttrs != null) {
	    registerBeanDefinitions(importingClassMetadata, mapperScanAttrs, registry,
	        generateBaseBeanName(importingClassMetadata, 0));
	  }
	}
}
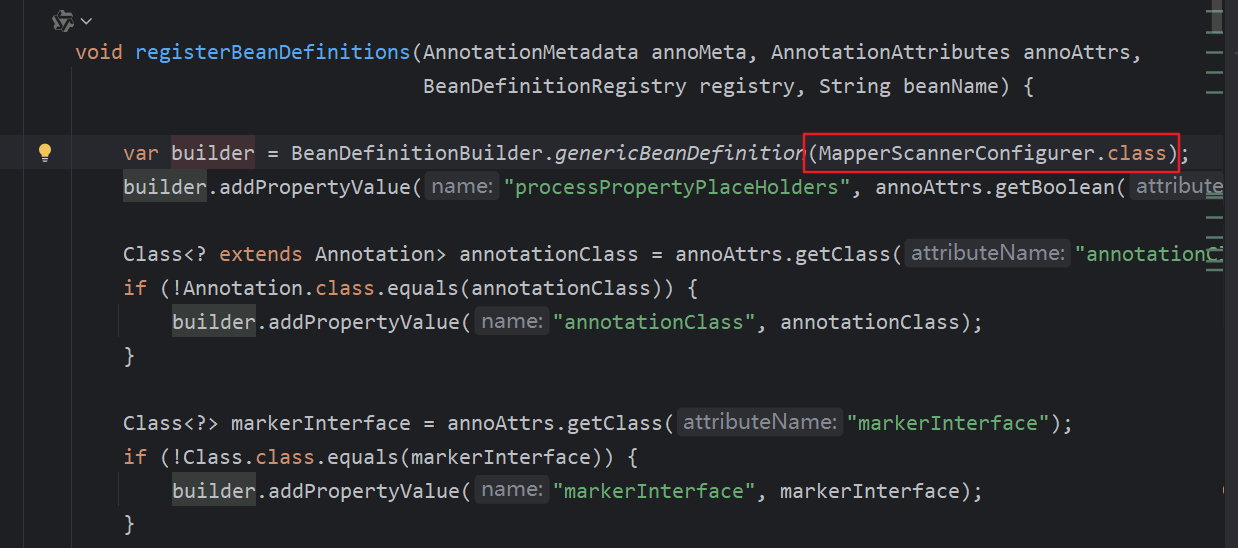
所以我们重点看上面registerBeanDefinitions这个方法,看mybatis注册了哪个类的BeanDefinition,只要我们认真看,就会发现mybatis注册的是org.mybatis.spring.mapper.MapperScannerConfigurer类的BeanDefinition,如下图所示:
然后我们点进去看这个类:
public class MapperScannerConfigurer
    implements BeanDefinitionRegistryPostProcessor, InitializingBean, ApplicationContextAware, BeanNameAware {

 /**
  * 添加BeanDefinition
  */
  @Override
  public void postProcessBeanDefinitionRegistry(BeanDefinitionRegistry registry) {
    if (this.processPropertyPlaceHolders) {
      processPropertyPlaceHolders();
    }

    var scanner = new ClassPathMapperScanner(registry, getEnvironment());
    scanner.setAddToConfig(this.addToConfig);
    scanner.setAnnotationClass(this.annotationClass);
    scanner.setMarkerInterface(this.markerInterface);
    scanner.setExcludeFilters(this.excludeFilters = mergeExcludeFilters());
    scanner.setSqlSessionFactory(this.sqlSessionFactory);
    scanner.setSqlSessionTemplate(this.sqlSessionTemplate);
    scanner.setSqlSessionFactoryBeanName(this.sqlSessionFactoryBeanName);
    scanner.setSqlSessionTemplateBeanName(this.sqlSessionTemplateBeanName);
    scanner.setResourceLoader(this.applicationContext);
    scanner.setBeanNameGenerator(this.nameGenerator);

	// 这段代码非常关键,这里
    scanner.setMapperFactoryBeanClass(this.mapperFactoryBeanClass);
    if (StringUtils.hasText(lazyInitialization)) {
      scanner.setLazyInitialization(Boolean.parseBoolean(lazyInitialization));
    }
    if (StringUtils.hasText(defaultScope)) {
      scanner.setDefaultScope(defaultScope);
    }
    scanner.registerFilters();

    // 开始进行包扫描,扫描MapperScan中指定的包下的Mapper接口
    scanner.scan(
        StringUtils.tokenizeToStringArray(this.basePackage, ConfigurableApplicationContext.CONFIG_LOCATION_DELIMITERS));
  }
}
上面是我贴出来的关键代码,这个类实现了org.springframework.beans.factory.support.BeanDefinitionRegistryPostProcessor接口,这个接口的作用我在之前的一文带你快速了解spring的扩展点之beanFactoryPostProcessor文章中也讲过,主要就是往spring容器中动态添加BeanDefinition。在上面这段代码中,创建了一个org.mybatis.spring.mapper.ClassPathMapperScanner对象,扫描@MapperScan注解中指定的包下的Mapper接口。
  @Override
  public Set<BeanDefinitionHolder> doScan(String... basePackages) {
    // 继承了spring的ClassPathBeanDefinitionScanner,拿到了所有Mapper接口的BeanDefinition
    var beanDefinitions = super.doScan(basePackages);

    if (beanDefinitions.isEmpty()) {
      if (printWarnLogIfNotFoundMappers) {
        LOGGER.warn(() -> "No MyBatis mapper was found in '" + Arrays.toString(basePackages)
            + "' package. Please check your configuration.");
      }
    } else {
      // 这段代码是关键,用来创建Mapper接口对应的MapperFactoryBean BeanDefinition
      processBeanDefinitions(beanDefinitions);
    }

    return beanDefinitions;
  }
在这个doScan方法中,主要做了两件事:
- 扫描basePackage下的所有mapper接口,得到对应的Mapper BeanDefinition。
- 执行
processBeanDefinitions(beanDefinitions);方法,用来创建Mapper接口对应的MapperFactoryBean BeanDefinition,而MapperFactoryBean正是用来给Mapper接口创建代理对象的。所以,接下来我们重点看下这个方法。
这个方法很长,我只保留关键代码,如下所示:
private void processBeanDefinitions(Set<BeanDefinitionHolder> beanDefinitions) {
  AbstractBeanDefinition definition;
  var registry = getRegistry();
  for (BeanDefinitionHolder holder : beanDefinitions) {
    definition = (AbstractBeanDefinition) holder.getBeanDefinition();
    var beanClassName = definition.getBeanClassName();
    // 为MapperFactoryBean设置mapperInterface
    definition.getConstructorArgumentValues().addGenericArgumentValue(beanClassName);
    // 这段代码非常关键,它将Mapper BeanDefinition变成了MapperFactoryBean的BeanDefinition
    definition.setBeanClass(this.mapperFactoryBeanClass);
  }
}
这段代码很有趣,它修改了原始的Mapper BeanDefinition,弄了一出狸猫换太子的好戏,通过definition.setBeanClass(this.mapperFactoryBeanClass);这行代码将Mapper BeanDefinition变成了MapperFactoryBean的BeanDefinition,也就是说:mybatis并不是直接注入Mapper接口的Bean Definition,而是先注入其对应的MapperFactoryBean的BeanDefinition。为什么要这样做呢?我们看下MapperFactoryBean这个类就知道了,代码如下:
public class MapperFactoryBean<T> extends SqlSessionDaoSupport implements FactoryBean<T> {

	private Class<T> mapperInterface;

  public MapperFactoryBean(Class<T> mapperInterface) {
    this.mapperInterface = mapperInterface;
  }

 /*
  * Mybatis正是通过这个方法为Mapper接口创建代理对象,并将生成的代理对象注册到spring容器中
  */
  @Override
  public T getObject() throws Exception {
    return getSqlSession().getMapper(this.mapperInterface);
  }
}
至于为什么mybatis要使用FactoryBean来注册Mapper接口的代理对象,我在一文带你快速了解spring的FactoryBean中有讲过,主要还是跟springboot的自动化配置有关,因为mybatis依赖自动化配置创建出来的sqlSessionTemplate和sqlSessionFactory。
实际上到这里,我们已经基本上解决我们在一开始想要解决的问题,那就是mybatis是如何通过@MapperScan将Mapper接口的代理bean注册到spring容器中的。
接下来我们继续往下看,了解mybatis是如何创建代理对象的,这里就涉及到反射相关的知识了。到了这一步,剩下的内容就很简单了。
mybatis如何创建Mapper的代理bean对象
接下来我们顺腾摸瓜,看看org.mybatis.spring.SqlSessionTemplate#getMapper方法
@Override
public <T> T getMapper(Class<T> type) {
  return getConfiguration().getMapper(type, this);
}
这段没什么,我们继续往下看org.apache.ibatis.session.Configuration#getMapper方法:
public <T> T getMapper(Class<T> type, SqlSession sqlSession) {
  return mapperRegistry.getMapper(type, sqlSession);
}
这段没什么,我们继续往下看org.apache.ibatis.binding.MapperRegistry#getMapper方法:
public <T> T getMapper(Class<T> type, SqlSession sqlSession) {
  final MapperProxyFactory<T> mapperProxyFactory = (MapperProxyFactory<T>) knownMappers.get(type);
  try {
    // 这个方法是重点,用来返回Mapper接口的代理对象
    return mapperProxyFactory.newInstance(sqlSession);
  } catch (Exception e) {
    throw new BindingException("Error getting mapper instance. Cause: " + e, e);
  }
}
接下来我们重点看下return mapperProxyFactory.newInstance(sqlSession); ,这段代码会返回Mapper接口的代理对象,于是我们继续往下看org.apache.ibatis.binding.MapperProxyFactory#newInstance(org.apache.ibatis.session.SqlSession)方法:
/**
 * 答案在这里,mybatis通过JDK反射创建了代理对象
 */
protected T newInstance(MapperProxy<T> mapperProxy) {
  return (T) Proxy.newProxyInstance(mapperInterface.getClassLoader(), new Class[] { mapperInterface }, mapperProxy);
}

public T newInstance(SqlSession sqlSession) {
  final MapperProxy<T> mapperProxy = new MapperProxy<>(sqlSession, mapperInterface, methodCache);
  return newInstance(mapperProxy);
}
如果我们还想继续了解mybatis是如何执行Mapper接口中的方法,如何查询数据库,并将查到的数据封装为对象的,就需要看org.apache.ibatis.binding.MapperProxy中的invoke方法了,代码如下:
@Override
public Object invoke(Object proxy, Method method, Object[] args) throws Throwable {
  try {
    if (Object.class.equals(method.getDeclaringClass())) {
      return method.invoke(this, args);
    }
    // 这一段是关键,mybatis如何处理Mapper中每个方法的逻辑全在这里面
    return cachedInvoker(method).invoke(proxy, method, args, sqlSession);
  } catch (Throwable t) {
    throw ExceptionUtil.unwrapThrowable(t);
  }
}
上面的代码中我们重点看return cachedInvoker(method).invoke(proxy, method, args, sqlSession);这段代码,尤其是cachedInvoker这个方法,点进去可以看到:
private MapperMethodInvoker cachedInvoker(Method method) throws Throwable {
   try {
     return MapUtil.computeIfAbsent(methodCache, method, m -> {
       if (!m.isDefault()) {
         return new PlainMethodInvoker(new MapperMethod(mapperInterface, method, sqlSession.getConfiguration()));
       }
       try {
         if (privateLookupInMethod == null) {
           return new DefaultMethodInvoker(getMethodHandleJava8(method));
         }
         return new DefaultMethodInvoker(getMethodHandleJava9(method));
       } catch (IllegalAccessException | InstantiationException | InvocationTargetException
           | NoSuchMethodException e) {
         throw new RuntimeException(e);
       }
     });
   } catch (RuntimeException re) {
     Throwable cause = re.getCause();
     throw cause == null ? re : cause;
   }
 }
这里mybatis针对各种情况做了兼容,我们重点看下return new PlainMethodInvoker(new MapperMethod(mapperInterface, method, sqlSession.getConfiguration()));这段代码,如下所示:
private static class PlainMethodInvoker implements MapperMethodInvoker {
  private final MapperMethod mapperMethod;

  public PlainMethodInvoker(MapperMethod mapperMethod) {
    this.mapperMethod = mapperMethod;
  }

 /**
  * 这段代码是关键,也是mybatis执行sql查询数据,并将数据封装为对象的关键实现
  */
  @Override
  public Object invoke(Object proxy, Method method, Object[] args, SqlSession sqlSession) throws Throwable {
    return mapperMethod.execute(sqlSession, args);
  }
}
接下来我们重点看下mapperMethod.execute(sqlSession, args);的逻辑,里面包含了mybatis执行sql查询数据,并将数据封装为对象的关键实现!
public Object execute(SqlSession sqlSession, Object[] args) {
  Object result;
  switch (command.getType()) {
    case INSERT: {
      Object param = method.convertArgsToSqlCommandParam(args);
      result = rowCountResult(sqlSession.insert(command.getName(), param));
      break;
    }
    case UPDATE: {
      Object param = method.convertArgsToSqlCommandParam(args);
      result = rowCountResult(sqlSession.update(command.getName(), param));
      break;
    }
    case DELETE: {
      Object param = method.convertArgsToSqlCommandParam(args);
      result = rowCountResult(sqlSession.delete(command.getName(), param));
      break;
    }
    case SELECT:
      if (method.returnsVoid() && method.hasResultHandler()) {
        executeWithResultHandler(sqlSession, args);
        result = null;
      } else if (method.returnsMany()) {
        result = executeForMany(sqlSession, args);
      } else if (method.returnsMap()) {
        result = executeForMap(sqlSession, args);
      } else if (method.returnsCursor()) {
        result = executeForCursor(sqlSession, args);
      } else {
        Object param = method.convertArgsToSqlCommandParam(args);
        result = sqlSession.selectOne(command.getName(), param);
        if (method.returnsOptional() && (result == null || !method.getReturnType().equals(result.getClass()))) {
          result = Optional.ofNullable(result);
        }
      }
      break;
    case FLUSH:
      result = sqlSession.flushStatements();
      break;
    default:
      throw new BindingException("Unknown execution method for: " + command.getName());
  }
  if (result == null && method.getReturnType().isPrimitive() && !method.returnsVoid()) {
    throw new BindingException("Mapper method '" + command.getName()
        + "' attempted to return null from a method with a primitive return type (" + method.getReturnType() + ").");
  }
  return result;
}
到这里,mybatis如何创建代理对象,以及Mapper代理对象中的方法如何执行sql的代码逻辑也讲完了。
最后的总结
今天这篇文章我们主要讲了mybatis如何往spring容器中注册Mapper的代理类实例,以及mybatis是如何创建代理对象的,以及mybatis如何通过反射的方式执行sql,并且查到的结果封装为对象。
觉得有收获的朋友可以点个赞,您的鼓励就是我最大的动力!
更多推荐


 25
25 0
0- 0


 已为社区贡献1条内容

所有评论(0)