
Ubuntu安装Docker、Harbor,并成功推送yudao-cloud项目镜像
摘要
在Ubuntu上,先介绍如何安装Docker,再基于Docker安装Harbor,最后以热门开源项目yudao-cloud为例,阐述如何上传本地Docker镜像到Harbor。
一、安装Docker
请注意,在Ubuntu中可以使用docker-desktop-amd64.deb安装Docker Desktop,这个有图形化界面,非常适合新手。但是,一般在服务器上习惯使用命令,所以本文仅仅安装docker-ce docker-ce-cli containerd.io。并且,在Vmware中,基于Ubuntu安装Docker Desktop可能会出现以下问题,解决起来比较麻烦。
checking HostHasVirtualizationSupport: stat /dev/kvm: no such file or directory
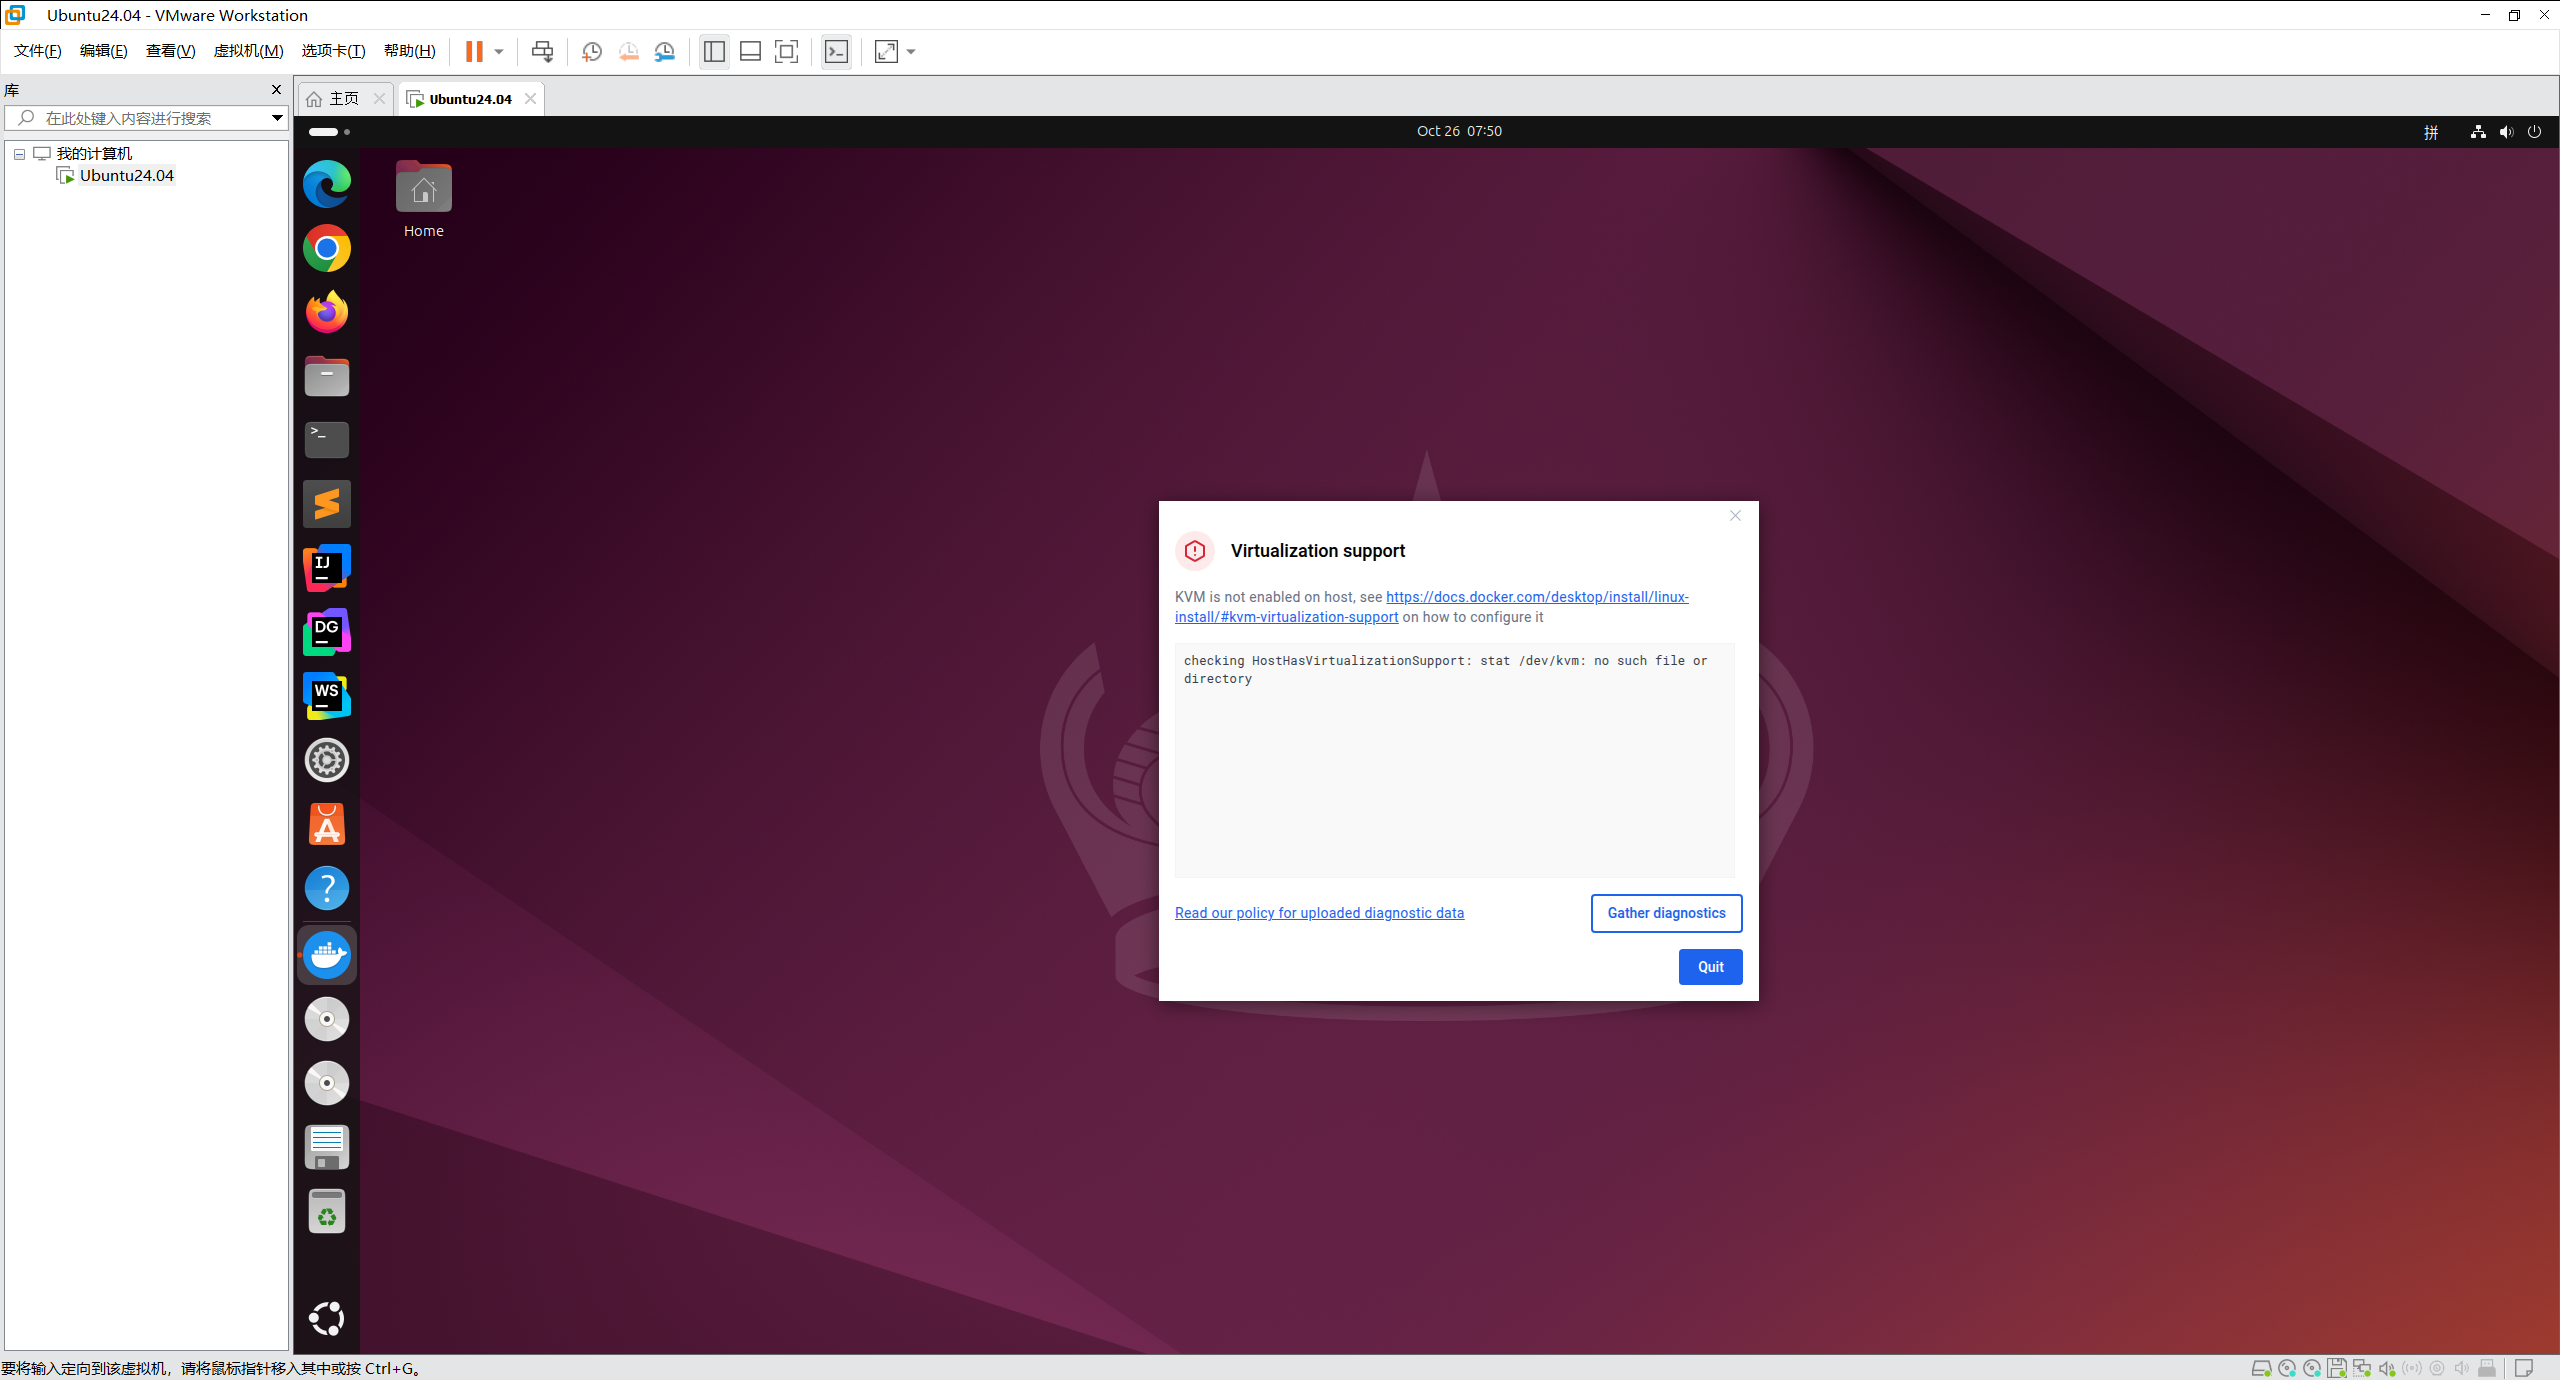
如果要在Ubuntu上安装docker-desktop-amd64.deb,可以参考https://blog.csdn.net/Lakers32/article/details/152453987。
另外,如果想使用官网脚本快捷安装docker,可以先看看本节第二部分【后记】。
1.1、更新系统包索引
sudo apt update1.2、安装依赖包
sudo apt install apt-transport-https ca-certificates curl software-properties-common1.3、添加Docker官方GPG密钥
curl -fsSL https://mirrors.aliyun.com/docker-ce/linux/ubuntu/gpg | sudo gpg --dearmor -o /usr/share/keyrings/docker-archive-keyring.gpg1.4、添加Docker稳定版仓库
echo "deb [arch=amd64 signed-by=/usr/share/keyrings/docker-archive-keyring.gpg] https://mirrors.aliyun.com/docker-ce/linux/ubuntu $(lsb_release -cs) stable" | sudo tee /etc/apt/sources.list.d/docker.list > /dev/null1.5、再次更新并安装Docker Engine
sudo apt update
sudo apt install docker-ce docker-ce-cli containerd.io1.6、将当前用户 jack 加入docker组,避免每次都用sudo
# 将当前用户加入 docker 用户组
sudo usermod -aG docker $USER  # -aG:追加到用户组

# 立即激活组权限变更
newgrp docker  # 刷新用户组会话

# 验证组成员身份
groups
# 输出docker adm cdrom sudo dip plugdev lpadmin lxd sambashare 当前用户用户名1.7、验证安装
docker --version
# 重新登录后,运行以下命令,不报错即说明成功
docker ps1.8、修改默认配置
1.8.1、查看默认存储位置
# 获取 Docker 根目录信息
docker info | grep "Docker Root Dir"

# 典型输出:
# Docker Root Dir: /var/lib/docker
1.8.2、创建自定义存储目录
# 在用户目录创建 docker 数据存储文件夹
mkdir -p ~/docker-data  # -p 确保父目录存在
1.8.3、修改配置文件
# 新建或修改以下文件
sudo vim /etc/docker/daemon.json

# 填写以下内容:设置镜像存储位置以及docker hub国内镜像
{
    "builder": {
        "gc": {
            "defaultKeepStorage": "100GB",
            "enabled": true
        }
    },
    "data-root": "/home/Software/Docker",
    "experimental": false,
    "registry-mirrors": [
        "https://docker.1ms.run",
        "https://docker.m.daocloud.io",
        "https://hub-mirror.c.163.com",
        "https://mirror.ccs.tencentyun.com"
    ]
}1.8.4、迁移现有数据(可选)
# 停止 Docker 服务
sudo systemctl stop docker

# 使用 rsync 同步数据
sudo rsync -av /var/lib/docker/ ~/docker-data/

# 参数说明:
# -a:归档模式(保留权限、属性)
# -v:显示详细过程

# 原文件可以删除1.8.5、验证镜像存储位置
# 检查存储位置是否生效
docker info | grep "Docker Root Dir"

# 预期输出:
# Docker Root Dir: /home/user/docker-data
1.8.6、服务控制
# 启动 Docker 服务
sudo systemctl start docker

# 重启服务(应用配置变更后必须执行)
sudo systemctl restart docker

# 停止服务(维护时使用)
sudo systemctl stop docker
2、后记
上述安装办法是在X86架构的CPU机器上运行的,但是在按照上述操作流程在ARM架构的CPU机器上安装docker的时候,发现出现以下错误:
you@me:~$ sudo apt install docker-ce docker-ce-cli containerd.io
Reading package lists... Done
Building dependency tree... Done
Reading state information... Done
Some packages could not be installed. This may mean that you have
requested an impossible situation or if you are using the unstable
distribution that some required packages have not yet been created
or been moved out of Incoming.
The following information may help to resolve the situation:

The following packages have unmet dependencies:
 containerd.io:amd64 : Depends: libc6:amd64 (>= 2.38) but it is not installable
                       Depends: libseccomp2:amd64 (>= 2.5.0) but it is not installable
 docker-ce:amd64 : Depends: nftables:amd64 but it is not installable
                   Depends: libc6:amd64 (>= 2.34) but it is not installable
                   Depends: libnftables1:amd64 (>= 1.0.2) but it is not installable
                   Depends: libsystemd0:amd64 but it is not installable
                   Recommends: apparmor:amd64 but it is not installable
                   Recommends: docker-ce-rootless-extras:amd64 but it is not going to be installed
                   Recommends: pigz:amd64 but it is not installable
 docker-ce-cli:amd64 : Depends: libc6:amd64 (>= 2.34) but it is not installable
                       Recommends: docker-buildx-plugin:amd64 but it is not going to be installed
                       Recommends: docker-compose-plugin:amd64 but it is not going to be installed
E: Unable to correct problems, you have held broken packages.后经过查询,发现Docker有官方安装脚本,实测可以安装。需要注意的是,下载脚本命令需要科学上网。于是,在这里提供以下https://download.csdn.net/download/Lakers32/92374359?spm=1001.2101.3001.9499
# 下载并运行 Docker 官方安装脚本
curl -fsSL https://get.docker.com -o get-docker.sh
sudo sh get-docker.sh

# 将当前用户添加到 docker 组
sudo usermod -aG docker $USER

# 重新登录或执行以下命令
newgrp docker
二、安装Harbor
Harbor是一个开源的企业级Docker Registry服务,它提供了一个安全、可信赖的仓库来存储和管理Docker镜像,提供类似Docker Hub的服务。
2.1、下载Harbor
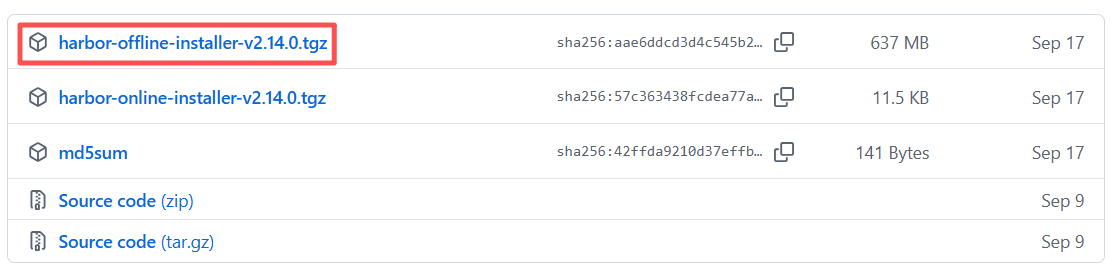
2.1.1、通过 Linux 命令下载
https://github.com/goharbor/harbor/releases/download/v2.14.0/harbor-offline-installer-v2.14.0.tgz2.1.2、GitHub下载
下载地址:https://github.com/goharbor/harbor/releases
2.1.3、解压
tar -zxvf harbor-offline-installer-v2.14.0.tgz2.2、启动 Harbor
2.2.1、修改配置文件
复制 harbor.yml.tmpl 文件并重命令为 harbor.yml 修改此配置文件,需要设置 hostname、端口、数据库密码登。
# 拷贝
cp harbor.yml.tmpl harbor.yml

# 编辑
vim harbor.yml
示例如下,特别注意hostname、http.port、harbor_admin_password、database.password、data_volume等等,需要修改成自己环境中的数值。
# Configuration file of Harbor

# The IP address or hostname to access admin UI and registry service.
# DO NOT use localhost or 127.0.0.1, because Harbor needs to be accessed by external clients.
hostname: 0.0.0.0

# http related config
http:
  # port for http, default is 80. If https enabled, this port will redirect to https port
  port: 8080

# https related config
#https:
  # https port for harbor, default is 443
  #port: 443
  # The path of cert and key files for nginx
  #certificate: /your/certificate/path
  #private_key: /your/private/key/path
  # enable strong ssl ciphers (default: false)
  # strong_ssl_ciphers: false

# # Harbor will set ipv4 enabled only by default if this block is not configured
# # Otherwise, please uncomment this block to configure your own ip_family stacks
# ip_family:
#   # ipv6Enabled set to true if ipv6 is enabled in docker network, currently it affected the nginx related component
#   ipv6:
#     enabled: false
#   # ipv4Enabled set to true by default, currently it affected the nginx related component
#   ipv4:
#     enabled: true

# # Uncomment following will enable tls communication between all harbor components
# internal_tls:
#   # set enabled to true means internal tls is enabled
#   enabled: true
#   # put your cert and key files on dir
#   dir: /etc/harbor/tls/internal


# Uncomment external_url if you want to enable external proxy
# And when it enabled the hostname will no longer used
# external_url: https://reg.mydomain.com:8433

# The initial password of Harbor admin
# It only works in first time to install harbor
# Remember Change the admin password from UI after launching Harbor.
harbor_admin_password: admin@123

# Harbor DB configuration
database:
  # The password for the user('postgres' by default) of Harbor DB. Change this before any production use.
  password: admin@123
  # The maximum number of connections in the idle connection pool. If it <=0, no idle connections are retained.
  max_idle_conns: 100
  # The maximum number of open connections to the database. If it <= 0, then there is no limit on the number of open connections.
  # Note: the default number of connections is 1024 for postgres of harbor.
  max_open_conns: 900
  # The maximum amount of time a connection may be reused. Expired connections may be closed lazily before reuse. If it <= 0, connections are not closed due to a connection's age.
  # The value is a duration string. A duration string is a possibly signed sequence of decimal numbers, each with optional fraction and a unit suffix, such as "300ms", "-1.5h" or "2h45m". Valid time units are "ns", "us" (or "µs"), "ms", "s", "m", "h".
  conn_max_lifetime: 5m
  # The maximum amount of time a connection may be idle. Expired connections may be closed lazily before reuse. If it <= 0, connections are not closed due to a connection's idle time.
  # The value is a duration string. A duration string is a possibly signed sequence of decimal numbers, each with optional fraction and a unit suffix, such as "300ms", "-1.5h" or "2h45m". Valid time units are "ns", "us" (or "µs"), "ms", "s", "m", "h".
  conn_max_idle_time: 0

# The default data volume
data_volume: /home/Data/Docker/harbor

# Harbor Storage settings by default is using /data dir on local filesystem
# Uncomment storage_service setting If you want to using external storage
# storage_service:
#   # ca_bundle is the path to the custom root ca certificate, which will be injected into the truststore
#   # of registry's containers.  This is usually needed when the user hosts a internal storage with self signed certificate.
#   ca_bundle:

#   # storage backend, default is filesystem, options include filesystem, azure, gcs, s3, swift and oss
#   # for more info about this configuration please refer https://distribution.github.io/distribution/about/configuration/
#   # and https://distribution.github.io/distribution/storage-drivers/
#   filesystem:
#     maxthreads: 100
#   # set disable to true when you want to disable registry redirect
#   redirect:
#     disable: false

# Trivy configuration
#
# Trivy DB contains vulnerability information from NVD, Red Hat, and many other upstream vulnerability databases.
# It is downloaded by Trivy from the GitHub release page https://github.com/aquasecurity/trivy-db/releases and cached
# in the local file system. In addition, the database contains the update timestamp so Trivy can detect whether it
# should download a newer version from the Internet or use the cached one. Currently, the database is updated every
# 12 hours and published as a new release to GitHub.
trivy:
  # ignoreUnfixed The flag to display only fixed vulnerabilities
  ignore_unfixed: false
  # skipUpdate The flag to enable or disable Trivy DB downloads from GitHub
  #
  # You might want to enable this flag in test or CI/CD environments to avoid GitHub rate limiting issues.
  # If the flag is enabled you have to download the `trivy-offline.tar.gz` archive manually, extract `trivy.db` and
  # `metadata.json` files and mount them in the `/home/scanner/.cache/trivy/db` path.
  skip_update: false
  #
  # skipJavaDBUpdate If the flag is enabled you have to manually download the `trivy-java.db` file and mount it in the
  # `/home/scanner/.cache/trivy/java-db/trivy-java.db` path
  skip_java_db_update: false
  #
  # The offline_scan option prevents Trivy from sending API requests to identify dependencies.
  # Scanning JAR files and pom.xml may require Internet access for better detection, but this option tries to avoid it.
  # For example, the offline mode will not try to resolve transitive dependencies in pom.xml when the dependency doesn't
  # exist in the local repositories. It means a number of detected vulnerabilities might be fewer in offline mode.
  # It would work if all the dependencies are in local.
  # This option doesn't affect DB download. You need to specify "skip-update" as well as "offline-scan" in an air-gapped environment.
  offline_scan: false
  #
  # Comma-separated list of what security issues to detect. Possible values are `vuln`, `config` and `secret`. Defaults to `vuln`.
  security_check: vuln
  #
  # insecure The flag to skip verifying registry certificate
  insecure: false
  #
  # timeout The duration to wait for scan completion.
  # There is upper bound of 30 minutes defined in scan job. So if this `timeout` is larger than 30m0s, it will also timeout at 30m0s.
  timeout: 5m0s
  #
  # github_token The GitHub access token to download Trivy DB
  #
  # Anonymous downloads from GitHub are subject to the limit of 60 requests per hour. Normally such rate limit is enough
  # for production operations. If, for any reason, it's not enough, you could increase the rate limit to 5000
  # requests per hour by specifying the GitHub access token. For more details on GitHub rate limiting please consult
  # https://docs.github.com/rest/overview/resources-in-the-rest-api#rate-limiting
  #
  # You can create a GitHub token by following the instructions in
  # https://help.github.com/en/github/authenticating-to-github/creating-a-personal-access-token-for-the-command-line
  #
  # github_token: xxx

jobservice:
  # Maximum number of job workers in job service
  max_job_workers: 10
  # Maximum hours of task duration in job service, default 24
  max_job_duration_hours: 24
  # The jobLoggers backend name, only support "STD_OUTPUT", "FILE" and/or "DB"
  job_loggers:
    - STD_OUTPUT
    - FILE
    # - DB
  # The jobLogger sweeper duration (ignored if `jobLogger` is `stdout`)
  logger_sweeper_duration: 1 #days

notification:
  # Maximum retry count for webhook job
  webhook_job_max_retry: 3
  # HTTP client timeout for webhook job
  webhook_job_http_client_timeout: 3 #seconds

# Log configurations
log:
  # options are debug, info, warning, error, fatal
  level: info
  # configs for logs in local storage
  local:
    # Log files are rotated log_rotate_count times before being removed. If count is 0, old versions are removed rather than rotated.
    rotate_count: 50
    # Log files are rotated only if they grow bigger than log_rotate_size bytes. If size is followed by k, the size is assumed to be in kilobytes.
    # If the M is used, the size is in megabytes, and if G is used, the size is in gigabytes. So size 100, size 100k, size 100M and size 100G
    # are all valid.
    rotate_size: 200M
    # The directory on your host that store log
    location: /var/log/harbor

  # Uncomment following lines to enable external syslog endpoint.
  # external_endpoint:
  #   # protocol used to transmit log to external endpoint, options is tcp or udp
  #   protocol: tcp
  #   # The host of external endpoint
  #   host: localhost
  #   # Port of external endpoint
  #   port: 5140

#This attribute is for migrator to detect the version of the .cfg file, DO NOT MODIFY!
_version: 2.14.0

# Uncomment external_database if using external database.
# external_database:
#   harbor:
#     host: harbor_db_host
#     port: harbor_db_port
#     db_name: harbor_db_name
#     username: harbor_db_username
#     password: harbor_db_password
#     ssl_mode: disable
#     max_idle_conns: 2
#     max_open_conns: 0

# Uncomment redis if need to customize redis db
# redis:
#   # db_index 0 is for core, it's unchangeable
#   # registry_db_index: 1
#   # jobservice_db_index: 2
#   # trivy_db_index: 5
#   # it's optional, the db for harbor business misc, by default is 0, uncomment it if you want to change it.
#   # harbor_db_index: 6
#   # it's optional, the db for harbor cache layer, by default is 0, uncomment it if you want to change it.
#   # cache_layer_db_index: 7

# Uncomment external_redis if using external Redis server
# external_redis:
#   # support redis, redis+sentinel
#   # host for redis: <host_redis>:<port_redis>
#   # host for redis+sentinel:
#   #  <host_sentinel1>:<port_sentinel1>,<host_sentinel2>:<port_sentinel2>,<host_sentinel3>:<port_sentinel3>
#   host: redis:6379
#   password:
#   # Redis AUTH command was extended in Redis 6, it is possible to use it in the two-arguments AUTH <username> <password> form.
#   # there's a known issue when using external redis username ref:https://github.com/goharbor/harbor/issues/18892
#   # if you care about the image pull/push performance, please refer to this https://github.com/goharbor/harbor/wiki/Harbor-FAQs#external-redis-username-password-usage
#   # username:
#   # sentinel_master_set must be set to support redis+sentinel
#   #sentinel_master_set:
#   # tls configuration for redis connection
#   # only server-authentication is supported
#   # mtls for redis connection is not supported
#   # tls connection will be disable by default
#   tlsOptions:
#     enable: false
#   # if it is a self-signed ca, please set the ca path specifically.
#     rootCA:
#   # db_index 0 is for core, it's unchangeable
#   registry_db_index: 1
#   jobservice_db_index: 2
#   trivy_db_index: 5
#   idle_timeout_seconds: 30
#   # it's optional, the db for harbor business misc, by default is 0, uncomment it if you want to change it.
#   # harbor_db_index: 6
#   # it's optional, the db for harbor cache layer, by default is 0, uncomment it if you want to change it.
#   # cache_layer_db_index: 7

# Uncomment uaa for trusting the certificate of uaa instance that is hosted via self-signed cert.
# uaa:
#   ca_file: /path/to/ca

# Global proxy
# Config http proxy for components, e.g. http://my.proxy.com:3128
# Components doesn't need to connect to each others via http proxy.
# Remove component from `components` array if want disable proxy
# for it. If you want use proxy for replication, MUST enable proxy
# for core and jobservice, and set `http_proxy` and `https_proxy`.
# Add domain to the `no_proxy` field, when you want disable proxy
# for some special registry.
proxy:
  http_proxy:
  https_proxy:
  no_proxy:
  components:
    - core
    - jobservice
    - trivy

# metric:
#   enabled: false
#   port: 9090
#   path: /metrics

# Trace related config
# only can enable one trace provider(jaeger or otel) at the same time,
# and when using jaeger as provider, can only enable it with agent mode or collector mode.
# if using jaeger collector mode, uncomment endpoint and uncomment username, password if needed
# if using jaeger agetn mode uncomment agent_host and agent_port
# trace:
#   enabled: true
#   # set sample_rate to 1 if you wanna sampling 100% of trace data; set 0.5 if you wanna sampling 50% of trace data, and so forth
#   sample_rate: 1
#   # # namespace used to differentiate different harbor services
#   # namespace:
#   # # attributes is a key value dict contains user defined attributes used to initialize trace provider
#   # attributes:
#   #   application: harbor
#   # # jaeger should be 1.26 or newer.
#   # jaeger:
#   #   endpoint: http://hostname:14268/api/traces
#   #   username:
#   #   password:
#   #   agent_host: hostname
#   #   # export trace data by jaeger.thrift in compact mode
#   #   agent_port: 6831
#   # otel:
#   #   endpoint: hostname:4318
#   #   url_path: /v1/traces
#   #   compression: false
#   #   insecure: true
#   #   # timeout is in seconds
#   #   timeout: 10

# Enable purge _upload directories
upload_purging:
  enabled: true
  # remove files in _upload directories which exist for a period of time, default is one week.
  age: 168h
  # the interval of the purge operations
  interval: 24h
  dryrun: false

# Cache layer configurations
# If this feature enabled, harbor will cache the resource
# `project/project_metadata/repository/artifact/manifest` in the redis
# which can especially help to improve the performance of high concurrent
# manifest pulling.
# NOTICE
# If you are deploying Harbor in HA mode, make sure that all the harbor
# instances have the same behaviour, all with caching enabled or disabled,
# otherwise it can lead to potential data inconsistency.
cache:
  # not enabled by default
  enabled: false
  # keep cache for one day by default
  expire_hours: 24

# Harbor core configurations
# Uncomment to enable the following harbor core related configuration items.
# core:
#   # The provider for updating project quota(usage), there are 2 options, redis or db,
#   # by default is implemented by db but you can switch the updation via redis which
#   # can improve the performance of high concurrent pushing to the same project,
#   # and reduce the database connections spike and occupies.
#   # By redis will bring up some delay for quota usage updation for display, so only
#   # suggest switch provider to redis if you were ran into the db connections spike around
#   # the scenario of high concurrent pushing to same project, no improvement for other scenes.
#   quota_update_provider: redis # Or db
2.2.2、启动
配置文件修改成功后,在harbor目录下执行 install.sh 脚本进行安装 harbor
sudo ./install.sh改版本的harbor一共有5个步骤,看到以下就表明安装成功。
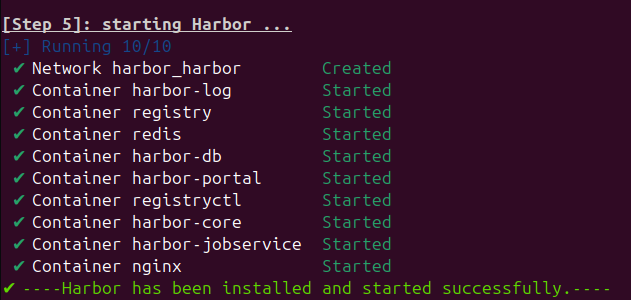
从上面harbor.yml配置和启动日志中,可以看出,harbor是基于registry,利用PostgreSQL和Redis做数据存储,用Nginx作页面做方向代理,以及其他组件密切配合,形成的docker镜像仓库管理的系统。
2.2.3、查看页面
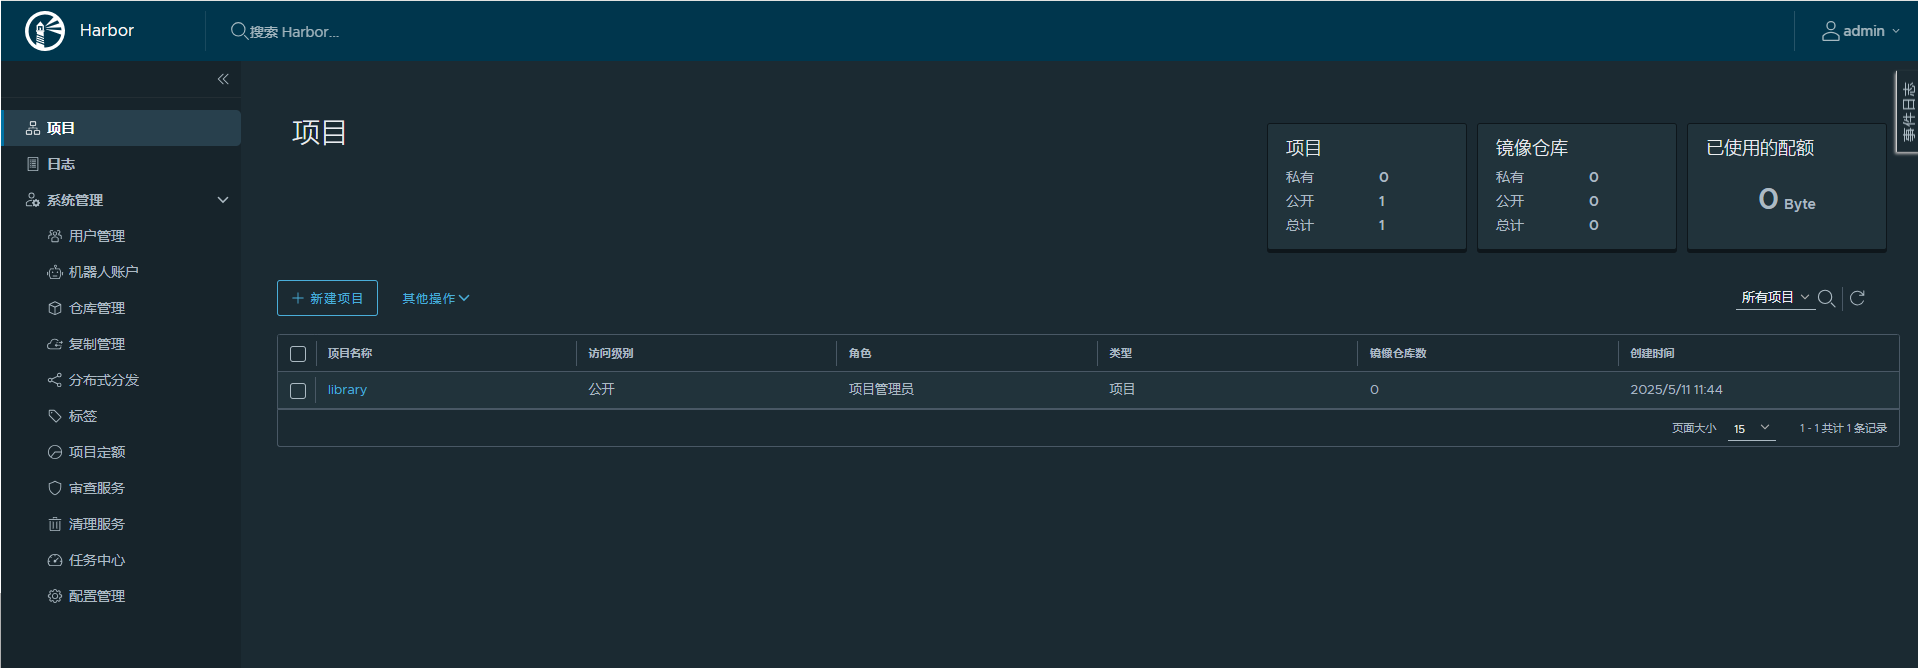
访问在harbor.yml配置的页面,例如,在上面例子中,访问http://localhost:8080/,输入账号admin 和密码admin@123,就可以进入首页。
三、提交代码带Harbor
以热门的开源项目yudao-cloud(https://gitee.com/zhijiantianya/yudao-cloud.git)为例,演示如何在本地生成镜像、打tag、上传操作。
3.1、构建本地镜像
这里可以参考Docker 部署 | yudao-cloud 开发指南。进入项目目录,进行构建。请注意,命令后面有一个英文点.
cd /work/projects/system-server
docker build -t system-server .
3.2、给镜像打tag
在给镜像打tag之前,先在Harbor页面中新建项目“yudao-cloud”。
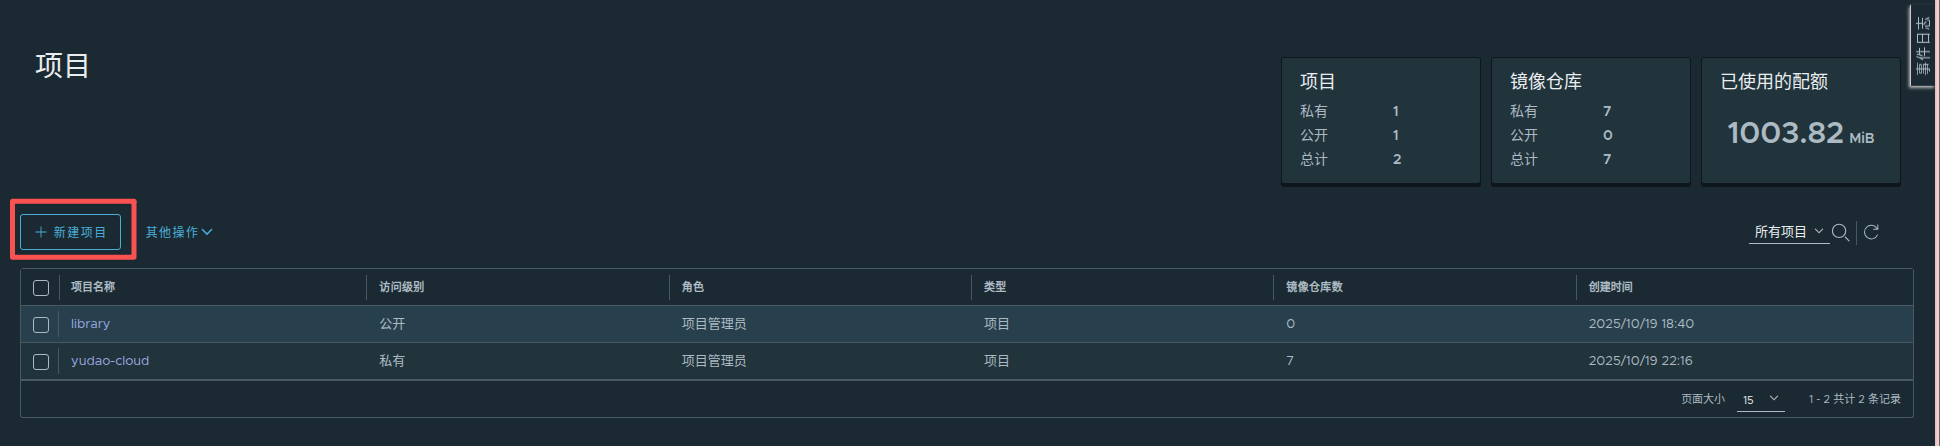
然后,执行以下命令,将gateway-server的最新镜像打成目标harbor项目的1.0版本:
docker tag gateway-server:latest localhost:8080/yudao-cloud/gateway-server:1.03.2、上传镜像到Harbor
推送到Harbor
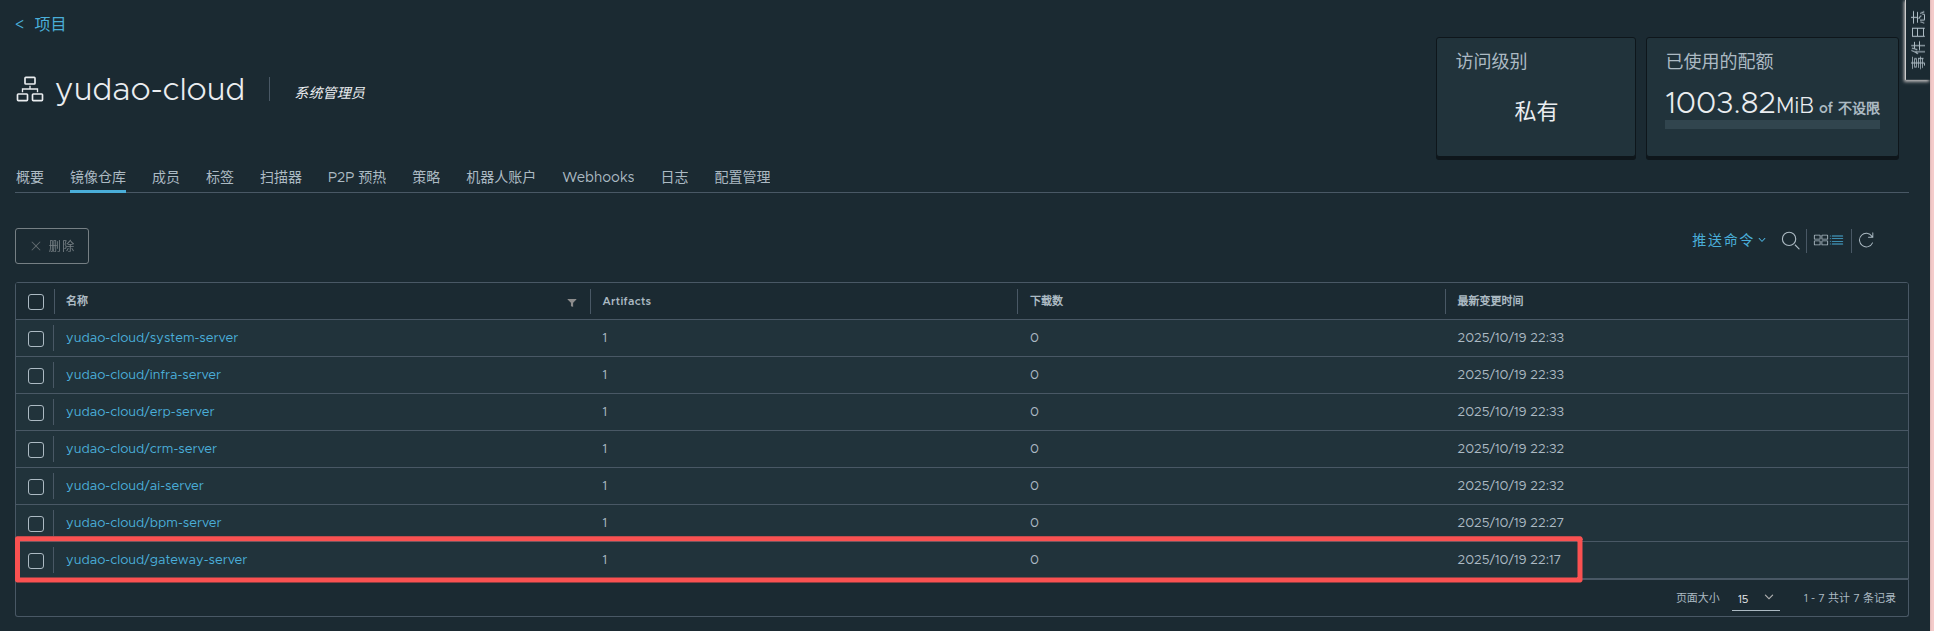
docker push localhost:8080/yudao-cloud/gateway-server:1.0回到harbor页面,可以到页面项目yudao-cloud下看到镜像。以此类推,将yudao-cloud其他模块镜像上传到Harbor。
更多推荐

 10
10 0
0- 0


 已为社区贡献2条内容

所有评论(0)