
深度学习step5
提示:日暮酒醒人已远 满天风雨下西楼。
这里若是你要写论文用到这篇文章,你使用的技术主要包括深度学习框架PyTorch ,Web框架:Flask,图像处理:PIL,Numpy,机器学习算法:KNN,前端:HTML,CSS,JavaScript。
七 前端
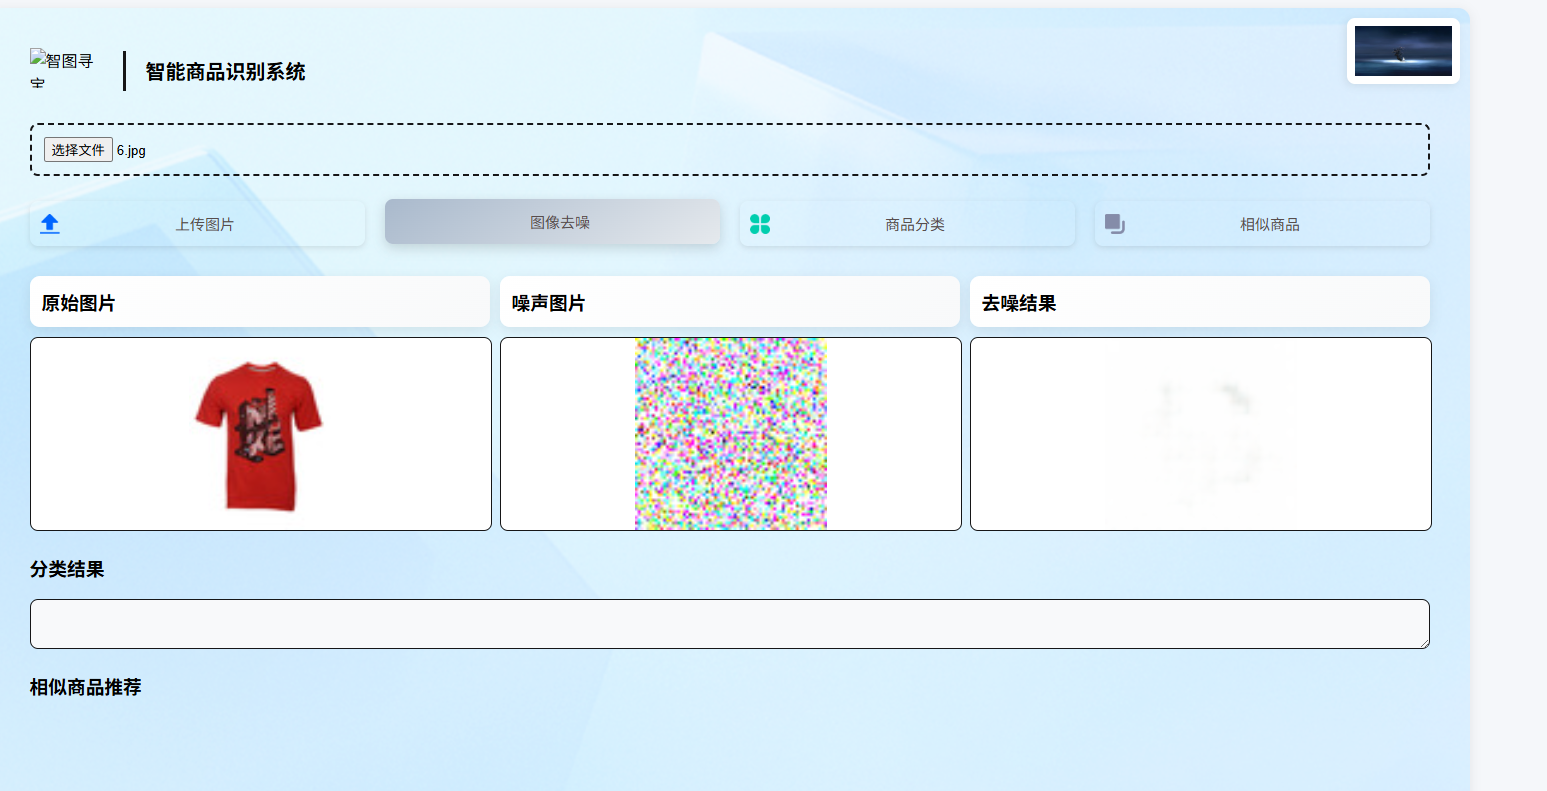
这里实现的就是我们这个项目的最后一个模块,也就是实现一个项目的前端和后端的交互,首先我们来看我们是如何要实现界面是怎样的一个界面
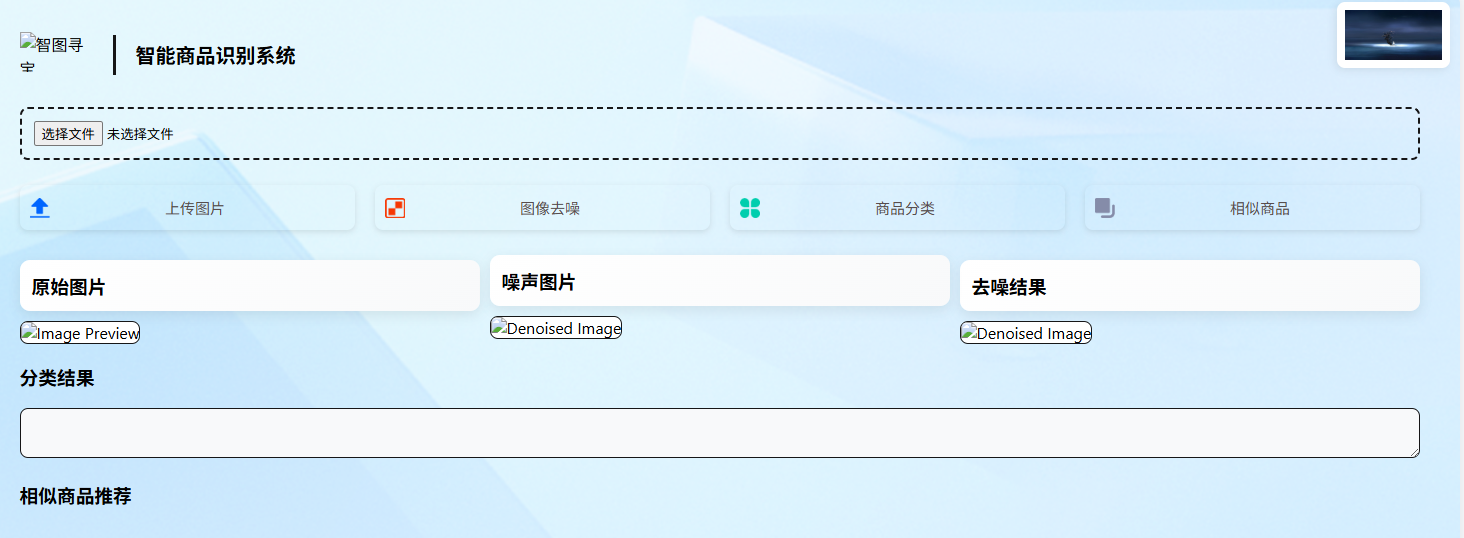
这个项目的主要功能就是图片的去噪,图片的分类,找此图片的相似图片。
# 导入必要的库
from flask import Flask, request, json, render_template, jsonify  # Flask Web框架相关
import torch  # PyTorch深度学习框架
import numpy as np  # 数值计算库
from io import BytesIO
import base64
from image_denoising import denoising_config
from image_denoising import denoising_model
from image_classification import classification_config
from image_classification import classification_model
from image_similarity import similarity_config  # 配置文件
from image_similarity import similarity_model  # 自定义模型模块
from flask import send_from_directory

# 导入图像处理和相似性计算相关库
from sklearn.neighbors import NearestNeighbors  # K近邻算法
import torchvision.transforms as T  # 图像预处理工具
import os  # 操作系统接口库
from PIL import Image  # PIL图像处理库


# 创建Flask应用实例,设置静态文件夹为'dataset'
app = Flask(__name__, static_folder='../common/dataset')

# 添加一个新的路由来提供Logo文件
@app.route('/logo/<filename>')
def serve_logo(filename):
    # 从logo目录中提供文件
    return send_from_directory('./logo', filename)

@app.route('/pictures/<filename>')
def serve_pictures(filename):
    return send_from_directory('./pictures', filename)

# 打印启动信息
print("启动应用")

# 设备检测与设置(优先使用GPU)
device = torch.device("cuda") if torch.cuda.is_available() else torch.device("cpu")

print("正在加载去噪模型")
denoiser = denoising_model.ConvDenoiser()
denoiser.load_state_dict(torch.load(
    os.path.join('../image_denoising', denoising_config.DENOISER_MODEL_NAME), map_location=device))
denoiser.to(device)
print("去噪模型加载完毕")

print("正在加载分类模型")
classifier = classification_model.Classifier()
classifier.load_state_dict(torch.load(
    os.path.join('../image_classification', classification_config.CLASSIFIER_MODEL_NAME), map_location=device))
classifier.to(device)
print("分类模型加载完毕")

# 在启动服务器之前加载模型
print("正在加载嵌入模型")
encoder = similarity_model.ConvEncoder()  # 初始化编码器
# 加载编码器的预训练权重(自动处理设备映射)
encoder.load_state_dict(
    torch.load(
        os.path.join(
            '..',
            similarity_config.PACKAGE_NAME, similarity_config.ENCODER_MODEL_NAME),
        map_location=device))
encoder.to(device)  # 将模型移动到指定设备
print("嵌入模型加载完毕")

print("正在加载向量数据库")
# 加载预存嵌入矩阵
embedding = np.load(os.path.join(
    '..',
    similarity_config.PACKAGE_NAME,
    similarity_config.EMBEDDING_NAME)
)
print("向量数据库加载完毕")

def compute_similar_images(image_tensor, num_images, embedding, device):
    """
    给定一张图像和要生成的相似图像的数量。
    返回 num_images 张最相似的图像列表

    参数:
    - image_tenosr: 通过 PIL 将图像转换成的张量 image_tensor ,需要寻找和 image_tensor 相似的图像。
    - num_images: 要寻找的相似图像的数量。
    - embedding : 一个 (num_images, embedding_dim) 元组,是从自编码器学到的图像的嵌入。
    - device : "cuda" 或者 "cpu" 设备。
    """

    image_tensor = image_tensor.to(device)  # 将图像张量移动到指定设备

    with torch.no_grad():  # 禁用梯度计算
        # 通过编码器生成图像的嵌入表示
        image_embedding = encoder(image_tensor).cpu().detach().numpy()

    # 将嵌入展平为二维(样本数 x 特征维度)
    flattened_embedding = image_embedding.reshape((image_embedding.shape[0], -1))

    # 使用KNN算法寻找最近邻的图像
    knn = NearestNeighbors(n_neighbors=num_images, metric="cosine")
    knn.fit(embedding)  # 在预存嵌入矩阵上拟合

    # 执行KNN查询(返回距离和索引)
    _, indices = knn.kneighbors(flattened_embedding)
    indices_list = indices.tolist()  # 转换为Python列表格式
    return indices_list


# 首页路由
@app.route("/")
def index():
    # 渲染首页模板
    return render_template('index.html')


# 示例路由:返回JSON包含所有图片数据
@app.route('/denoising', methods=['POST'])
def get_denoised_image():
    # 从请求中获取图像文件
    image = request.files["image"]
    # 打开图像并转换为PIL格式
    image = Image.open(image.stream).convert("RGB")
    # 定义图像预处理流程
    t = T.Compose([T.Resize((68, 68)), T.ToTensor()])
    # 应用预处理并转换为张量
    image_tensor = t(image)

    ## 向输入图像添加随机噪声
    # 生成与 tensor_image 形状相同的随机噪声,乘以噪声因子 noise_factor
    noisy_img = image_tensor + denoising_config.NOISE_FACTOR * torch.randn(*image_tensor.shape)
    # 将图像像素值裁剪到 [0, 1] 范围内,避免超出有效范围
    noisy_img = torch.clip(noisy_img, 0., 1.)

    # 增加批次维度
    noisy_img = noisy_img.unsqueeze(0)


    with torch.no_grad():
        # 模型推理
        noisy_img = noisy_img.to(device)
        denoised_image = denoiser(noisy_img)

    # 后处理
    denoised_image = denoised_image.squeeze(0).cpu()  # 移除批次维度
    denoised_image = denoised_image.permute(1, 2, 0).numpy() * 255  # CHW -> HWC并转换到0-255范围
    noisy_img = noisy_img.squeeze(0).cpu()
    noisy_img = noisy_img.permute(1, 2, 0).numpy() * 255

    # denoised_image = np.moveaxis(denoised_image.detach().cpu().numpy(), 1, -1)
    # print("denoised_image shape: ", denoised_image.shape)
    #
    # plt.imshow(denoised_image[0])
    # plt.show()

    # 转换为PIL图像
    denoised_image = Image.fromarray(denoised_image.astype('uint8'))
    noisy_img = Image.fromarray(noisy_img.astype('uint8'))

    def encode_image(img):
        buffered = BytesIO()
        img.save(buffered, format="PNG")
        return base64.b64encode(buffered.getvalue()).decode('utf-8')

    return (
        json.dumps(
            {
                "noisy_img": encode_image(noisy_img),
                "denoised_image": encode_image(denoised_image)
            }),
        200,
        {"ContentType": "application/json"},
    )

@app.route("/classification", methods=["POST"])
def classification():
    # 从请求中获取图像文件
    image = request.files["image"]
    # 打开图像并转换为PIL格式
    image = Image.open(image.stream).convert("RGB")
    # 定义图像预处理流程
    t = T.Compose([T.Resize((64, 64)), T.ToTensor()])
    # 应用预处理并转换为张量
    image_tensor = t(image)
    # 增加批次维度
    image_tensor = image_tensor.unsqueeze(0)
    # 模型推理
    with torch.no_grad():
        image_tensor = image_tensor.to(device)
        classification = classifier(image_tensor)

    return "您搜索的商品类型是:" + classification_config.classification_names[np.argmax(classification.cpu().detach().numpy())]

# 相似图像计算路由(POST请求)
@app.route("/simimages", methods=["POST"])
def simimages():
    # 从请求中获取图像文件
    image = request.files["image"]
    # 打开图像并转换为PIL格式
    image = Image.open(image.stream).convert("RGB")
    # 定义图像预处理流程
    t = T.Compose([T.Resize((64, 64)), T.ToTensor()])
    # 应用预处理并转换为张量
    image_tensor = t(image)
    # 增加批次维度
    image_tensor = image_tensor.unsqueeze(0)
    # 计算相似图像索引
    indices_list = compute_similar_images(
        image_tensor, num_images=5, embedding=embedding, device=device
    )
    # 返回JSON格式的响应
    return (
        json.dumps({"indices_list": indices_list[0]}),
        200,
        {"ContentType": "application/json"},
    )


# 主程序入口
if __name__ == "__main__":
    # 启动Flask应用,禁用调试模式,监听9000端口
    app.run(debug=True, host='0.0.0.0', port=9000)
还有一个就是html文件
<!DOCTYPE html>
<html lang="zh-CN">
<head>
    <meta charset="UTF-8">
    <meta name="viewport" content="width=device-width, initial-scale=1.0">
    <title>智图寻宝</title>
    <style>
        :root {
            --primary-color: #e5e9ed;
            --success-color: #67C23A;
            --warning-color: #E6A23C;
            --danger-color: #F56C6C;
            --text-color: #303133;
            --border-color: #161617;
            --container-padding: 40px;
        }

        html, body {
            height: 100%;
            margin: 0;
            padding: 0;
            background: #f5f7fa;
        }

        body {
            font-family: 'Segoe UI', 'Helvetica Neue', Arial, sans-serif;
            padding: 20px;
            min-height: 100vh;
        }

        .company-logo {
            position: absolute;
            top: 10px; /* 距离容器顶部间距 */
            right: 10px; /* 距离容器右侧间距 */
            height: 50px;
            z-index: 100;
            padding: 8px;
            background: white;
            border-radius: 8px 8px 8px 8px;
            box-shadow: -2px 2px 8px rgba(0, 0, 0, 0.08);
            /* 移除旧定位属性 */
        }

        .container {
            max-width: 1400px;
            width: 100%;
            margin: 30px auto 0;
            background: white;
            padding: var(--container-padding);
            border-radius: 12px;
            box-shadow: 0 2px 12px rgba(0, 0, 0, 0.08);
            min-height: calc(100vh - 100px);
            position: relative;
            background-image: url("../pictures/bg.png");
        }

        .title-container {
            display: flex;
            align-items: center;
            gap: 20px;
            margin-bottom: 30px;
            width: 100%;
        }

        .title-logo {
            height: 40px; /* 根据你的图片调整高度 */
            margin-bottom: 5px;
            display: block;
        }

        .title-divider {
            height: 40px;
            width: 3px;
            background-color: var(--border-color);
        }

        h1 {
            font-size: 20px;
            margin: 0 0 0 0;
            padding-bottom: 0;
            border-bottom: 0 solid var(--primary-color);
            display: inline-block;
            width: 100%;
        }

        .button-group {
            display: flex;
            justify-content: space-between;
            gap: 20px;
            margin-bottom: 30px;
            flex-wrap: wrap;
            width: 100%;
        }

        .upload_button {
            background-image: url('../pictures/upload-icon.png');
            background-size: 20px;
            background-repeat: no-repeat;
            background-position: 10px center;
            padding-left: 40px;
        }

        .denoising_button {
            background-image: url('../pictures/denoise-icon.png');
            background-size: 20px;
            background-repeat: no-repeat;
            background-position: 10px center;
            padding-left: 40px;
        }

        .classification_button {
            background-image: url('../pictures/classify-icon.png');
            background-size: 20px;
            background-repeat: no-repeat;
            background-position: 10px center;
            padding-left: 40px;
        }

        .similarity_button {
            background-image: url('../pictures/similarity-icon.png');
            background-size: 20px;
            background-repeat: no-repeat;
            background-position: 10px center;
            padding-left: 40px;
        }

        /* 确保所有按钮变体都有背景 */
        .upload_button,
        .denoising_button,
        .classification_button,
        .similarity_button {
            /*background-image: linear-gradient(145deg, var(--primary-color), #a9b9cc);*/
            color: #574d4d;
        }

        button {
            padding: 12px 24px;
            border-radius: 8px;
            font-size: 15px;
            transition: all 0.2s cubic-bezier(0.4, 0, 0.2, 1);
            box-shadow: 0 2px 6px rgba(0, 0, 0, 0.1);
            border: none; /* 移除边框 */
            /* 设置背景色 */
            flex: 1; /* 让按钮均匀分布 */
            min-width: 120px; /* 设置最小宽度 */
            text-align: center;
            background: linear-gradient(145deg, var(--primary-color), #314a67);
        }

        button:hover {
            transform: translateY(-2px);
            box-shadow: 0 4px 12px rgba(0, 0, 0, 0.15);
            background: linear-gradient(145deg, #a9b9cc, var(--primary-color));
        }

        .preview-container {
            display: grid;
            grid-template-columns: repeat(auto-fit, minmax(320px, 1fr));
            gap: 10px;
            margin: 10px 0;
        }

        .preview-card h3 {
            margin-top: 0;
            margin-bottom: 10px;
            padding: 12px;
            border-radius: 10px;
            background: linear-gradient(145deg, #ffffff, #f8f9fa);
            box-shadow: 0 4px 12px rgba(0, 0, 0, 0.08);
            transition: transform 0.3s ease;
        }

        .preview-card:hover {
            transform: translateY(-5px);
        }

        .preview-image,
        .noised-image,
        .denoising-image {
            width: 100%;
            height: 192px;
            border-radius: 8px;
            border: 1px solid var(--border-color);
            background: white;
            object-fit: contain;
            margin-bottom: 0;
        }

        #image-upload {
            box-sizing: border-box;
            width: 100%;
            padding: 12px;
            border: 2px dashed var(--border-color);
            border-radius: 8px;
            margin-bottom: 25px;
            transition: border-color 0.3s;
        }


        #image-upload:hover {
            border-color: #ed8308;
        }

        #result-text {
            box-sizing: border-box;
            width: 100%;
            padding: 15px;
            border: 1px solid var(--border-color);
            border-radius: 8px;
            font-size: 16px;
            min-height: 20px;
            background: #f8f9fa;
        }

        .similar-images {
            display: grid;
            grid-template-columns: repeat(5, 1fr);
            justify-content: space-between;
            gap: 15px;
            width: 100%;
        }

        .similar-images img {
            width: 100%;
            height: 160px;
            object-fit: contain;
            border-radius: 6px;
        }

    </style>
</head>
<body>

<div class="container">
    <img src="{{ url_for('serve_logo', filename='logo.jpg') }}" alt="Company Logo" class="company-logo">

    <div class="title-container">
        <img src="{{ url_for('serve_pictures', filename='智图寻宝.png') }}"
             alt="智图寻宝"
             class="title-logo">
        <div class="title-divider"></div>
        <h1>智能商品识别系统</h1>
    </div>

    <input type="file" id="image-upload" accept="image/*">

    <div class="button-group">
        <button id="upload_button" class="upload_button">上传图片</button>
        <button id="denoising_button" class="denoising_button">图像去噪</button>
        <button id="classification_button" class="classification_button">商品分类</button>
        <button id="similarity_button" class="similarity_button">相似商品</button>
    </div>

    <div class="preview-container">
        <div class="preview-card">
            <h3>原始图片</h3>
            <img class="preview-image" id="image-preview" src="" alt="Image Preview">
        </div>
        <div class="preview-card">
            <h3>噪声图片</h3>
            <img class="noised-image" id="image-noised" src="" alt="Denoised Image">
        </div>
        <div class="preview-card">
            <h3>去噪结果</h3>
            <img class="denoising-image" id="image-denoising" src="" alt="Denoised Image">
        </div>
    </div>

    <div>
        <h3>分类结果</h3>
        <textarea id="result-text" rows="1" readonly></textarea>
    </div>

    <h3>相似商品推荐</h3>
    <div class="similar-images" id="similar-images"></div>
</div>

<!-- 原script内容保持不变 -->

<script>
    const fileInput = document.getElementById('image-upload');
    const imagePreview = document.getElementById('image-preview');
    const imageNoised = document.getElementById('image-noised'); // 新增去噪图片引用
    const imageDenoising = document.getElementById('image-denoising'); // 新增去噪图片引用
    const similarImagesDiv = document.getElementById('similar-images');

    document.getElementById('upload_button').onclick = function () {

        if (fileInput.files.length === 0) {
            alert("请先选择一张图片!");
            return;
        }

        const reader = new FileReader();
        reader.onload = function (e) {
            imagePreview.src = e.target.result;
        };
        reader.readAsDataURL(fileInput.files[0]);
    }

    document.getElementById('denoising_button').onclick = function () {
        console.log('=============> 去噪 <=============');

        if (!imagePreview.src.startsWith("data:image")) {
            alert("请先选择一张图片!");
            return;
        }


        fetch(imagePreview.src)
            .then(response => response.blob())
            .then(blob => {
                const formData = new FormData();
                formData.append('image', blob);

                // 发送请求
                fetch('/denoising', {
                    method: 'POST',
                    body: formData,
                })
                    .then(response => response.json())
                    .then(data => {
                        // 更新去噪图片的src
                        imageNoised.src = `data:image/png;base64,${data.noisy_img}`;
                        imageDenoising.src = `data:image/png;base64,${data.denoised_image}`;
                    })
                    .catch(error => {
                        console.error('错误:', error);
                    });
            });
    };

    document.getElementById('classification_button').onclick = function () {
        console.log('=============> 分类 <=============');

        if (!imageDenoising.src.startsWith("data:image")) {
            alert("请先去噪!");
            return;
        }

        fetch(imageDenoising.src)
            .then(response => response.blob())
            .then(blob => {
                const formData = new FormData();
                formData.append('image', blob);
                fetch('/classification', {
                    method: 'POST',
                    body: formData,
                })
                    .then(response => response.text())
                    .then(text => {
                        document.getElementById('result-text').value = text;
                    })
                    .catch(error => {
                        console.error('错误:', error);
                    });
            });
    };

    document.getElementById('similarity_button').onclick = function () {

        console.log('=============> 相似度检索 <=============');


        if (!imageDenoising.src.startsWith("data:image")) {
            alert("请先去噪!");
            return;
        }

        // 将 imageDenoising.src 转换为 Blob
        fetch(imageDenoising.src)
            .then(response => response.blob())
            .then(blob => {
                const formData = new FormData();
                formData.append('image', blob);

                // 发送请求到后端
                fetch('/simimages', {
                    method: 'POST',
                    body: formData,
                })
                    .then(response => response.json())
                    .then(data => {
                        // 清空之前的相似图片
                        similarImagesDiv.innerHTML = '';

                        // 显示相似的图片
                        console.log(data.indices_list);
                        data.indices_list.forEach(index => {
                            const img = document.createElement('img');
                            img.src = `dataset/${index}.jpg`;  // 假设输出图片的命名规则为 index.jpg
                            similarImagesDiv.appendChild(img);
                        });
                    })
                    .catch(error => {
                        console.error('错误:', error);
                    });
            })
            .catch(error => {
                console.error('错误:', error);
            });
    };
</script>
</body>
</html>
7.1上传部分
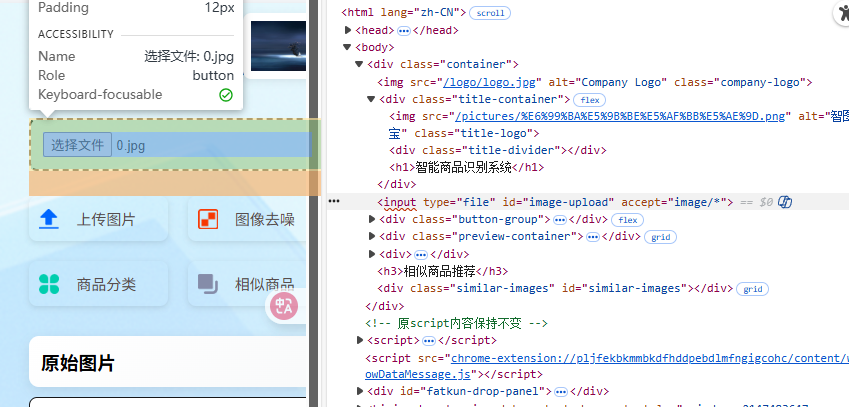
接下来我们来分析这两个部分的代码,前面的css进行渲染的部分,我们直接跳过,我们主要看这个数据走向部分,我们整个html就是一个文档,这里很多元素都定义了一个id,我们根据这个id来得到每一个数据,
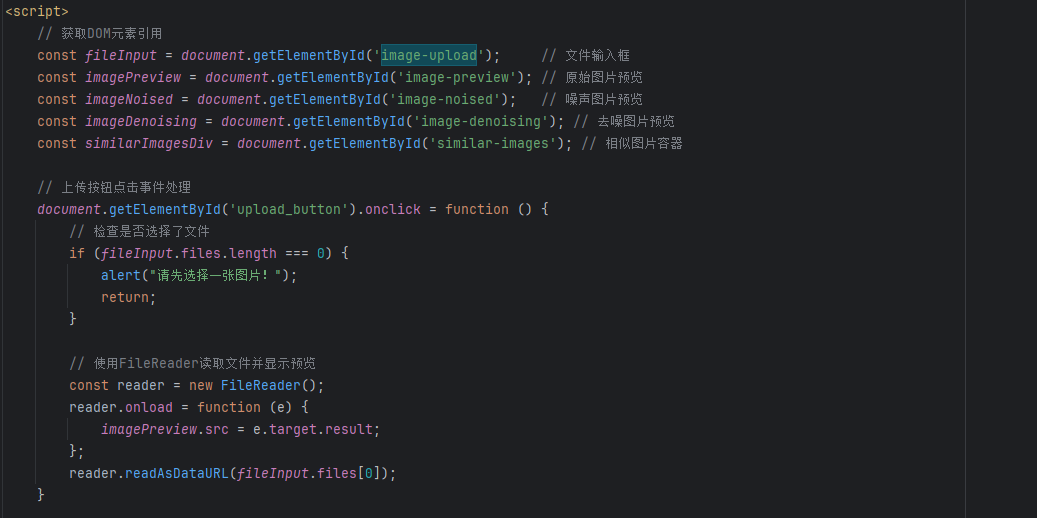
比如这里的image-upload,通过元素检查,可以看到其实这个image-uploa对应的是选择文件这一块,所以若是我们上传一个图片文件,此时这个文件就会被赋值给fileInput,接下来进行判断,此时这个fileInput是否是空,若是空则给出一个提示(请另外选择图片) ,若是有图片则将其赋值给imagePreview,然后进行预览,至于为什么是files[0]是因为我们这里选择文件的时候可以选择多个文件,而我们只需要第一个便可,
7.3 去噪部分
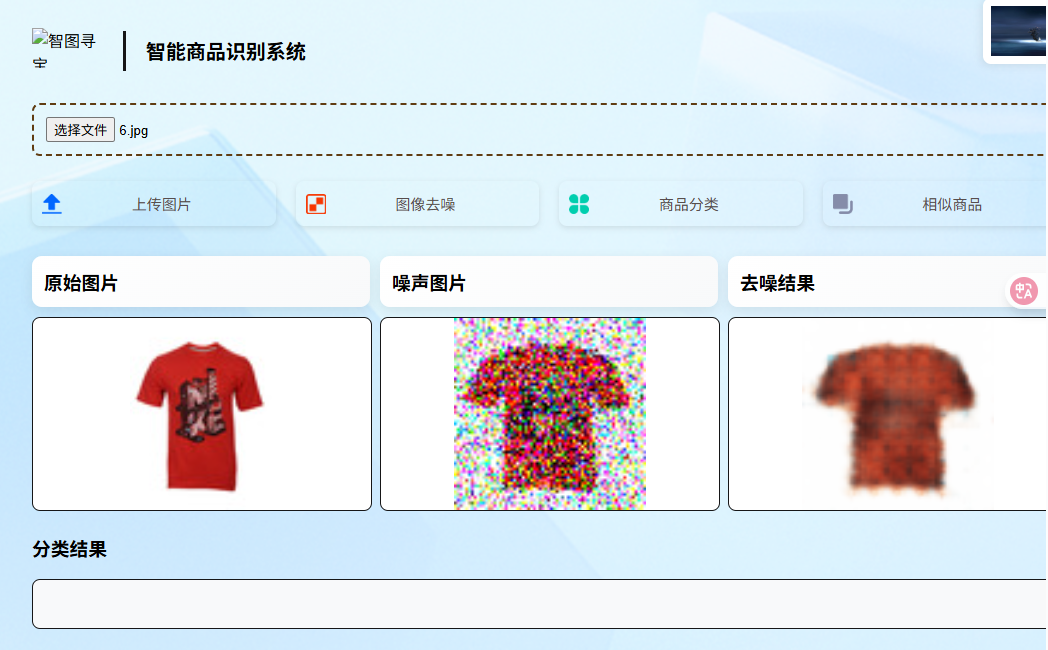
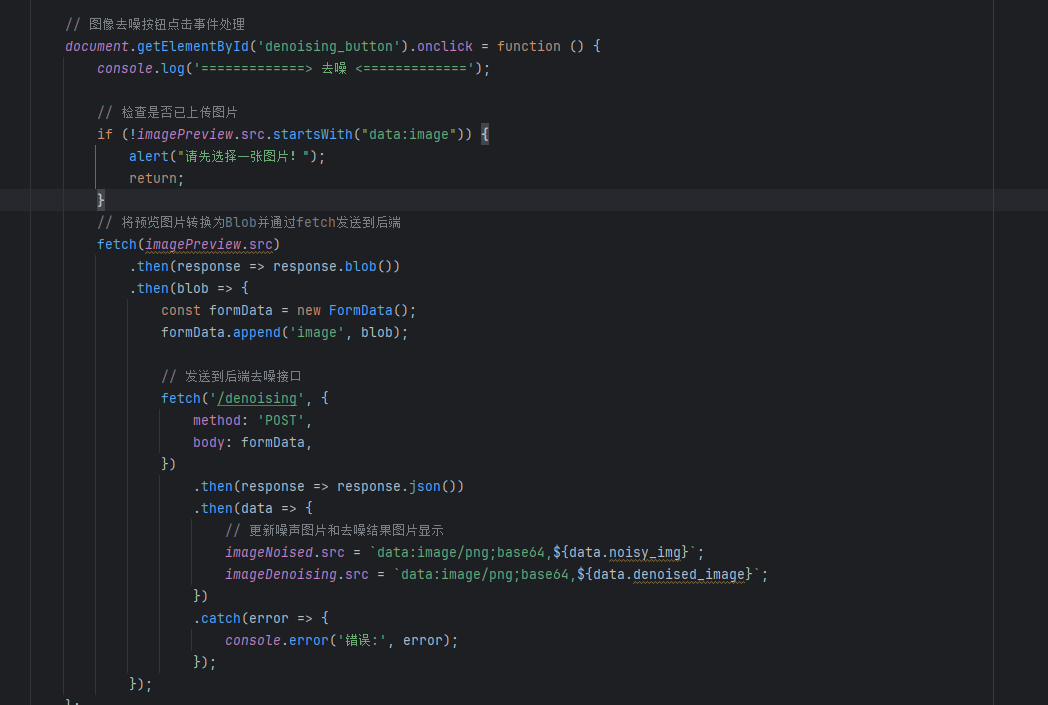
首先先进行判断,若是没有imagePreview也就不能去噪,所以要先进行判断,若是有则直接使用fetch获取当前页面的imagePreview.src.然后会得到一个响应response,拿到这个图片之后就去发请求,而发送这个请求也就需要一个url,这个url也就是/denoising ,当前的method方式是POST,然后依然是得到它的响应,这个响应就是web_app给他的返回的,给他返回的数据是什么样子的,就解析这个返回,这个返回主要是包括两个部分一个是noisy_img和另外一个denoised_image,这两个也就是噪音图片和去噪音的图片,然后保存到imageNoised.src和imageDenoising.src中,
然后我们来看 这个数据的处理流程,一开始url是什么都没有的,所以直接返回一个index界面,若是是/denoising,并且此时对应的就是POST,也就直接走get_denoised_image()方法,虽然这个函数没有传入参数,但是有一个request,从此可以得到图片,接下来的步骤和之前几乎一样了,这里需要一个增加维度的操作,因为我们一次是上传一个图片,但是我们做前向传输需要的是一个批次数据,所以这里需要增加一个维度,然后使用我们之前加载的模型,也就是对应文章的这个所提供代码的这一块,
denoiser = denoising_model.ConvDenoiser()
denoiser.load_state_dict(torch.load(
    os.path.join('../image_denoising', denoising_config.DENOISER_MODEL_NAME), map_location=device))
denoiser.to(device)
print("去噪模型加载完毕")
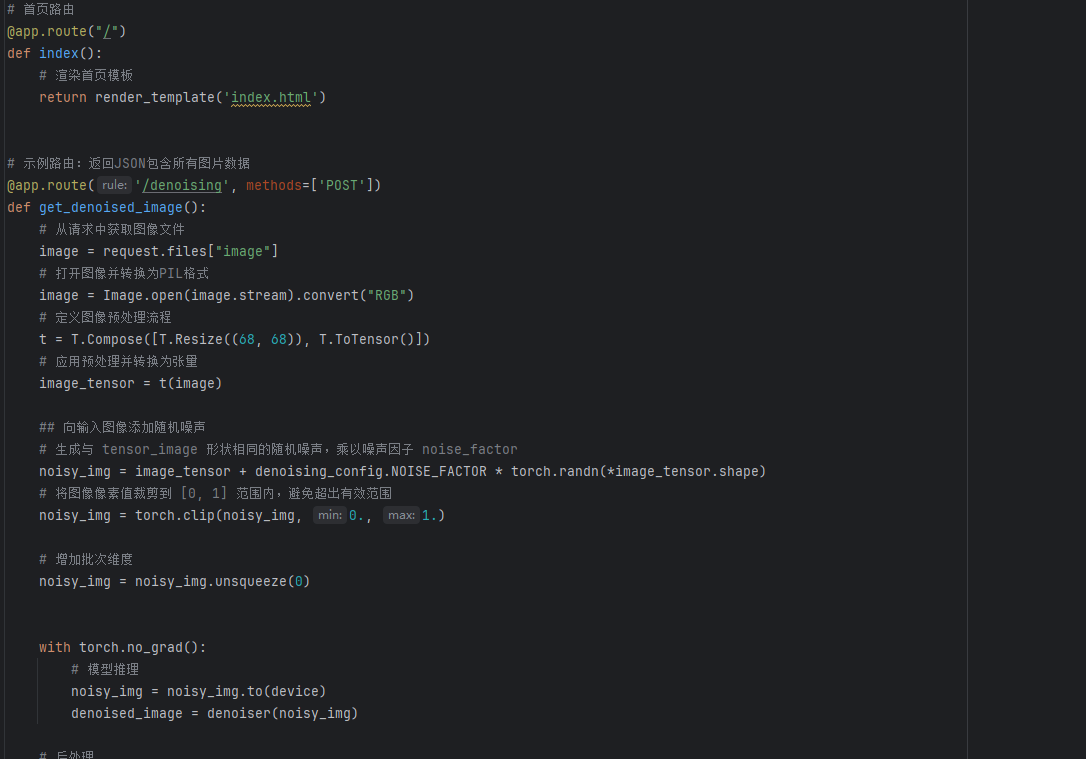
在神经网络中是一个tensor类型的数据,所以要想将其画出也就是需要将其转化为ndarry格式的图片,所以首先去除批次维度,然后进行维度调整(在神经网络中需要是CHW,而要呈现出来则是HWC),而ndarry格式在网络中是无法进行传输的,所以一般若是我们进行传输的话,一般是包装成为json格式的,而json一般是k-v结构,k一般每一个图片给一个名称,而这个v一般要进行格式化的转化,这里是转化成为imagefile ,转化成imagefile的作用,image就可以调用save方法了,也就可以保存成为相应格式的图片,bytestIO就是相当于在内存中开辟了一片缓冲区,将这个缓冲区当成文件来写入,然后进行base64编码,也就是将这个图片转化成为只有64个字符编码,return返回的就是这样一个response,而我们的前端拿到的就是这两个

最后往前端去传,前端拿到之后给了这个src,然后画出,
7.4 分类部分

这个模块是分类模块,先判断是否去噪,若是没有去噪则先去噪,然后对这个去噪的图片进行分类,这里获取的是去噪之后的图片,imageDenoising ,当然这里可以选择直接用原始图片来进行分类,然后得到这个图片之后就是请求路由,也就是classification ,然后是将我们要做分类的图片,作为一个POST请求发出,然后等待响应,可以看出响应回来的就是一个test文本,
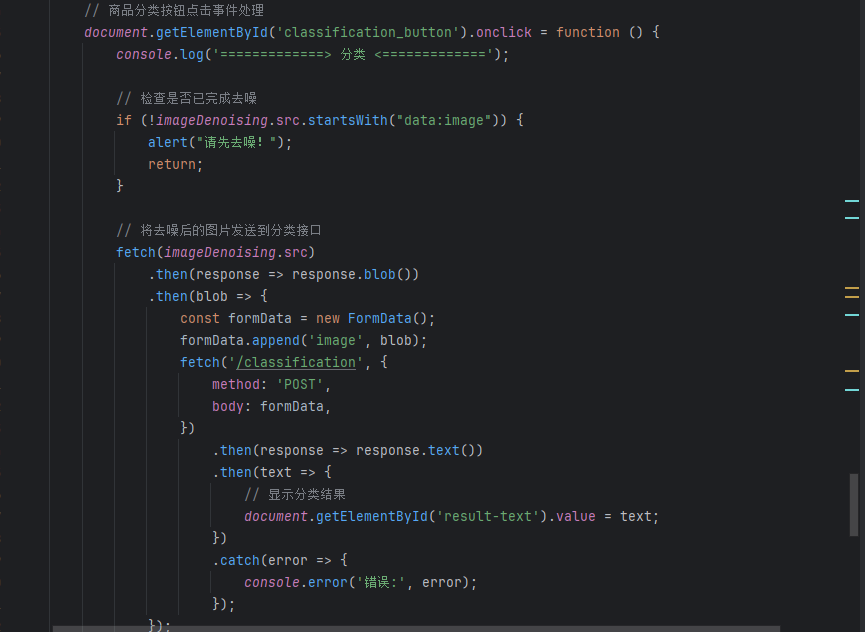
接下来我们去web_app去看我们返回的是什么,首先从request中拿到一个图片,然后打开,将其转化为张量使用神经网络处理,最后将这个分类的结果使用字典对应发出,返回便可
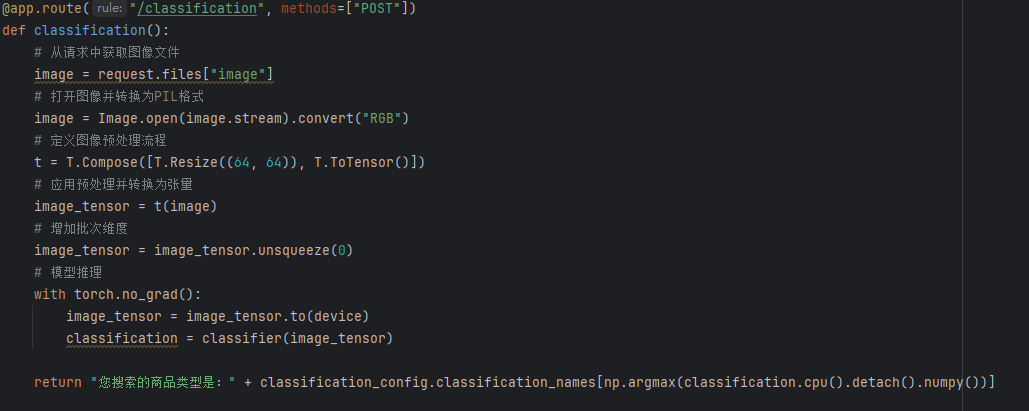
7.5 相似图片检索
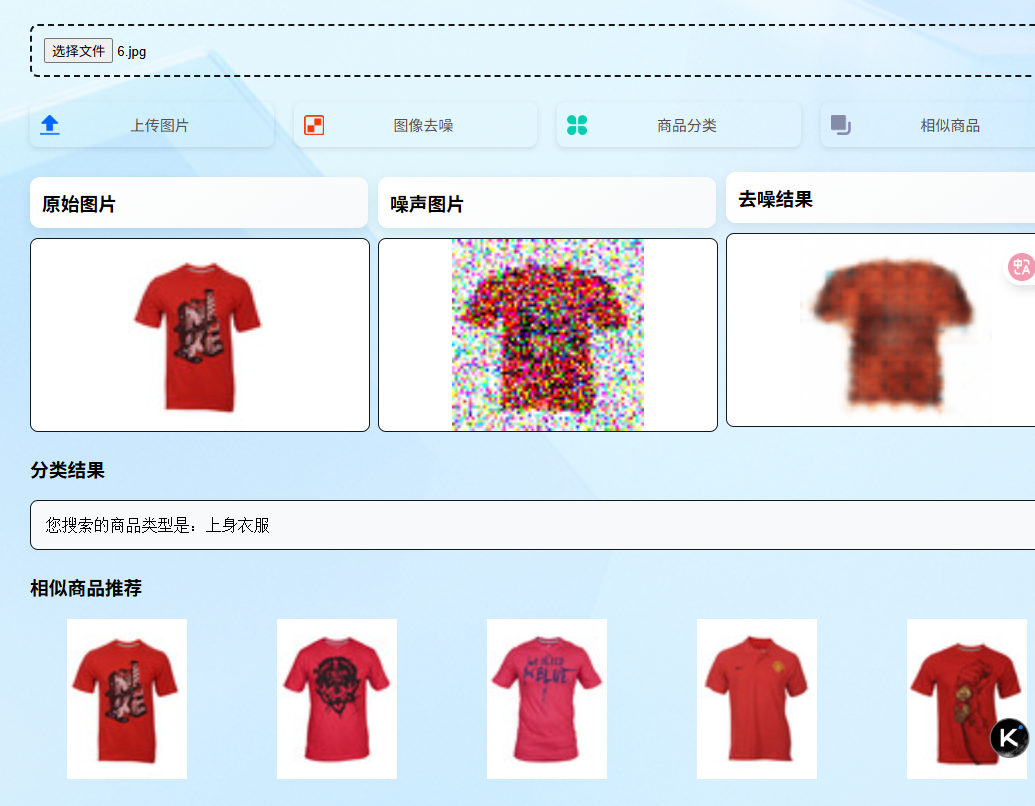
这里依然是使用imageDenoising来放入到神经网络中,其实也是可以直接使用原始图片放入到原始图片,前面发送和前面几乎一致,这里多了一个相似图片清除,将上一个相似图片列表清空,遍历列表,列表中存储的是图片的名称,得到图片的名称之后,直接去图片集中找对应名称的图片,
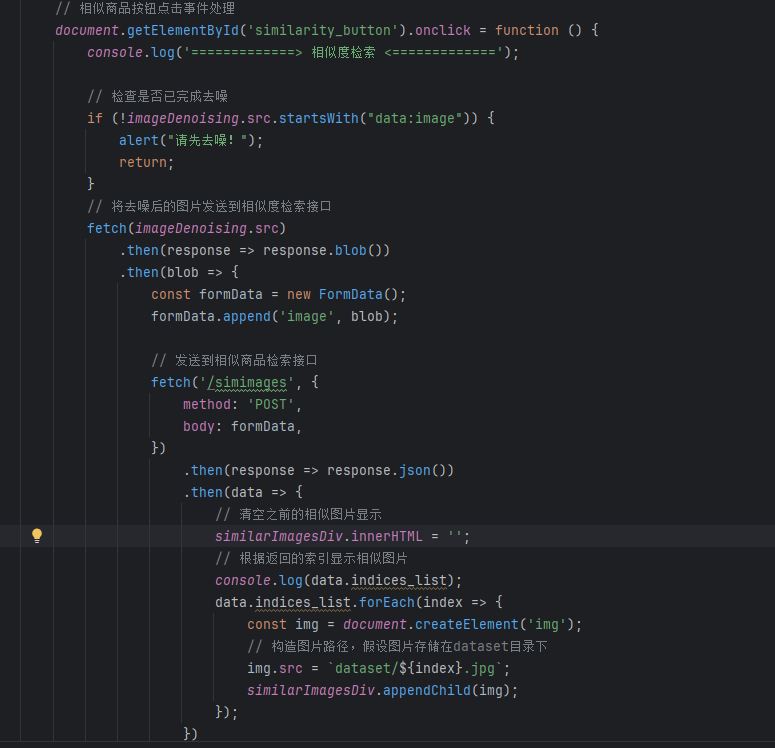
接下来看web_app 。
前面依然是一样,得到这样要给路由请求,进行转化成tensor,
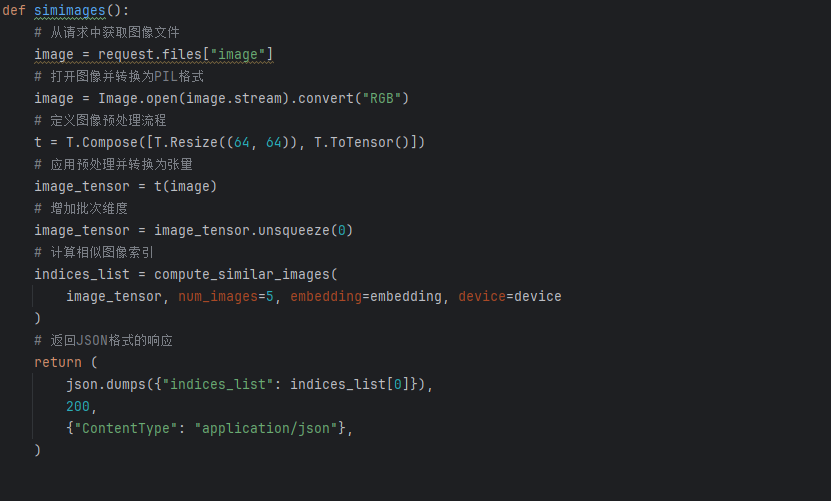
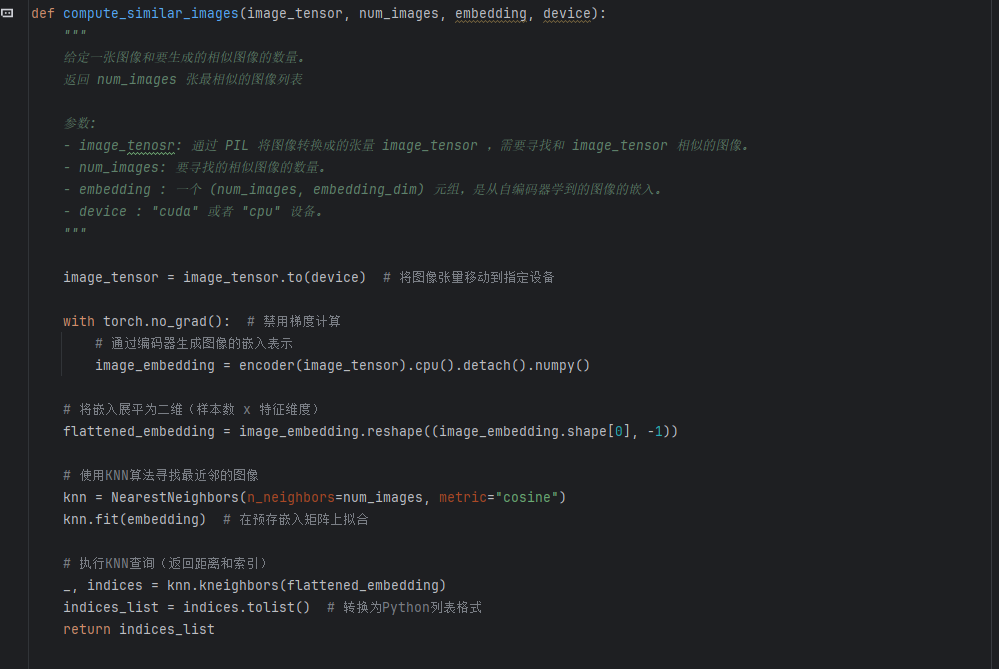
将这个tensor通过神经网络,得到一个嵌入表达,而我们存储的每一个图片其实是一个1*n维度的一个数据,所以这里我们也需要扁平化处理,然后使用cosine选择每一个图片相似的num_image个图片,调用的knn.kneighbors,返回两个值,第一个值是距离,第二个值是索引
至此这个项目完全写完,这个项目的全部代码请关注公众号“Sun小明同学获取”
更多推荐

 5
5 0
0- 0


 已为社区贡献7条内容

所有评论(0)