
Spring5基础教程(1)-- 控制反转(IoC)/自动装配(@Autowired)/Bean容器配置
视频参考链接:【狂神说Java】Spring5最新完整教程IDEA版通俗易懂 p1-16
1.1、简介
- Spring:春天–>给软件行业带来了春天!
- 2002年,首次推出了Spring框架的雏形:Interface21框架
- Spring框架即以Interface21框架为基础,经过重新设计,并不断丰富其内涵,于2004年3月24日,发布了1.0正式版。
- [Rod Johnson](https://baike.baidu.com/item/Rod Johnson/1423612?fromModule=lemma_inlink),Spring Framework创始人,拥有悉尼大学音乐学博士学位。
- Spring理念:使现有的技术更加容易使用,本身是一个大杂烩,整合了现有的技术框架!
- SSH: Struct2 + Spring + Hibernate
- SSM: SpringMVC + Spring + Mybatis
官网:https://spring.io/projects/spring-framework
官方下载地址:http://repo.spring.io/release/org/springframework/spring
Github地址: https://github.com/spring-projects/spring-framework
<!-- https://mvnrepository.com/artifact/org.springframework/spring-webmvc -->
<dependency>
    <groupId>org.springframework</groupId>
    <artifactId>spring-webmvc</artifactId>
    <version>5.2.0.RELEASE</version>
</dependency>

<!-- https://mvnrepository.com/artifact/org.springframework/spring-jdbc -->
<dependency>
    <groupId>org.springframework</groupId>
    <artifactId>spring-jdbc</artifactId>
    <version>5.2.0.RELEASE</version>
</dependency>
1.2、优点
- Spring是一个开源的免费的框架(容器)
- Spring是一个轻量级的、非入侵式的框架!
- 控制反转(IOC),面向切面编程(AOP)
- 支持事务的处理,对框架整合的支持!
总结一句话:Spring就是一个轻量级的控制反转(IOC)和面向切面编程(AOP)的框架!
1.3、组成
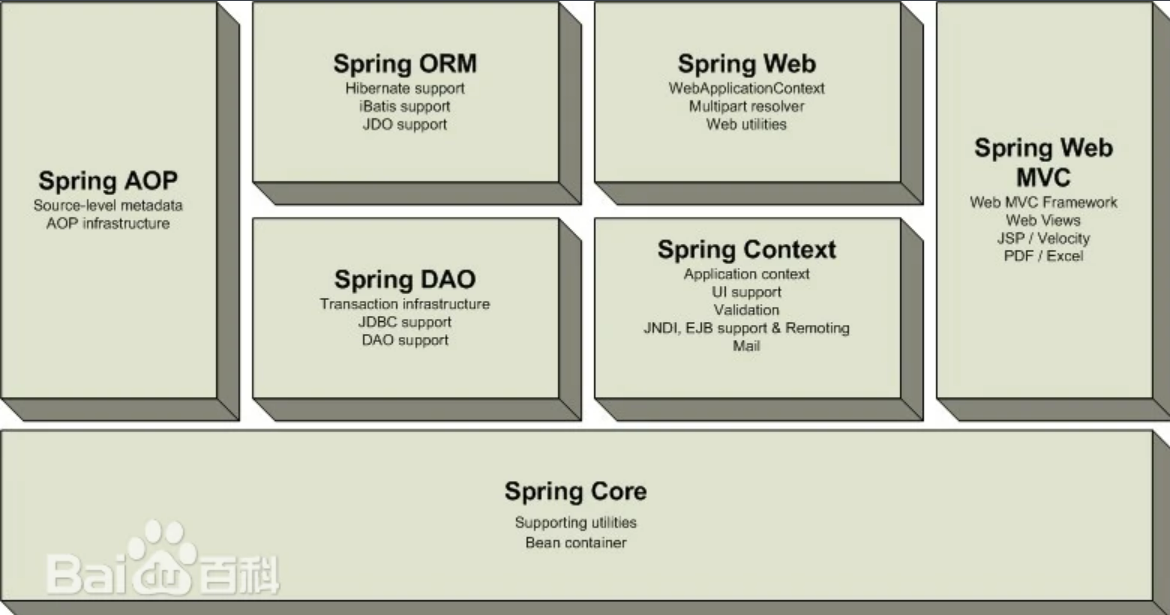
1.4、拓展
在Spring官网有这样的介绍:现代化Java的开发!说白了就是基于Spring的开发!
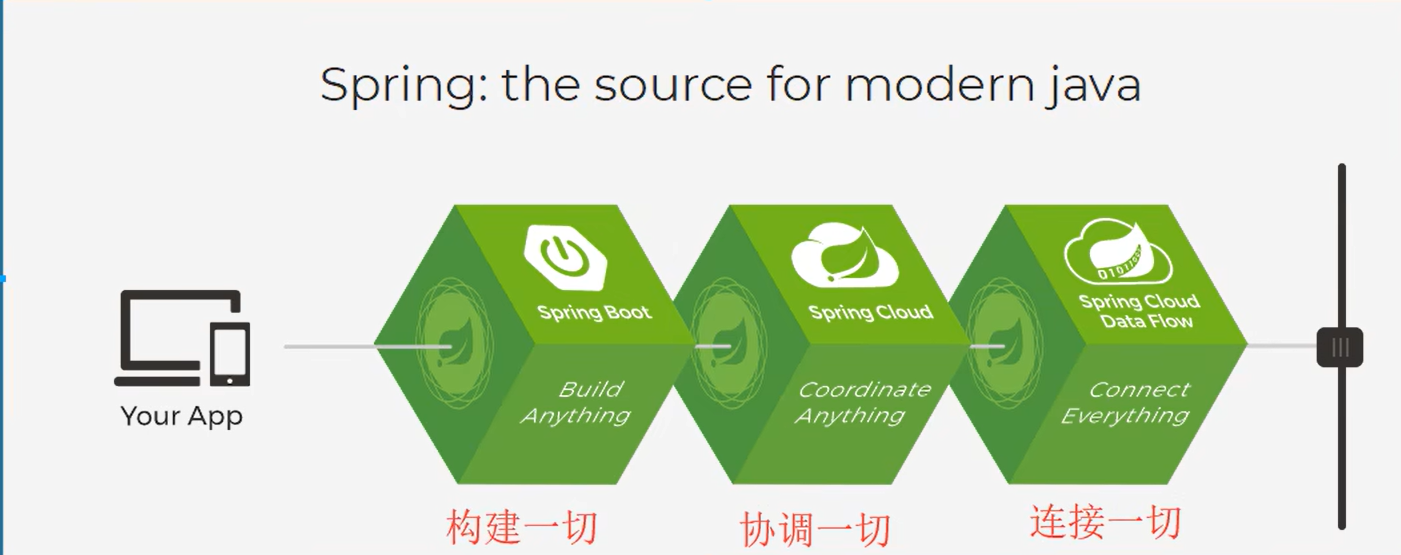
- Springboot
- 一个快速开发的脚手架。
- 基于Springboot可以快速的开发单个微服务。
- 约定大于配置!
- SpringCloud
- SpringCloud是基于SpringBoot实现的。
因为现在大多数公司都在使用SpringBoot进行快速开发,学习SpringBoot的前提,需要完全掌握Spring以及SpringMVC!承上启下的作用!
弊端:发展了太久之后,违背了原来的理念!配置十分繁琐,人称:“配置地狱!”
2、IOC理论推导
-
UserDao接口
public interface UserDao { void getUser(); } -
UserDaoImpl实现类
public class UserDaoImpl implements UserDao{ @Override public void getUser() { System.out.println("默认获取用户的数据!"); } } -
UserService业务接口
public interface UserService { void getUser(); } -
UserServiceImpl业务实现类
public class UserServiceImpl implements UserService {

    private UserDao userDao = new UserDaoImpl();
    //若UserDao接口因用户需求改变增加其他实现类,例如用户想要有不同的数据库实现类,当需求不同时这一行代码就会不同
    //如:
    //private UserDao userDao = new UserDaoMysqlImpl();
    //private UserDao userDao = new UserDaoOracleImpl();
    //private UserDao userDao = new UserDaoSqlserverImpl();
	//...

    @Override
    public void getUser() {
        userDao.getUser();
    }
}
在我们之前的业务中,用户的需求可能会影响我们原来的代码,我们需要根据用户的需求去修改原代码!如果程序代码量十分大,修改一次的成本代价十分昂贵!
我们使用一个Set接口实现,已经发生了革命性的变化!
    private UserDao userDao;

    //利用setter进行动态实现值的注入!
    public void setUserDao(UserDao userDao) {
        this.userDao = userDao;
    }
- 之前,程序是主动创建对象!控制权在程序员手上!
- 使用了set注入后,程序不再具有主动性,而是变成了被动的接收对象!
这种思想,从本质上解决了问题,我们程序员不用再去管理对象的创建了。系统的耦合性大大降低!可以更加专注地在业务的实现上!这是IOC的原型!
IOC前后的主动权区别
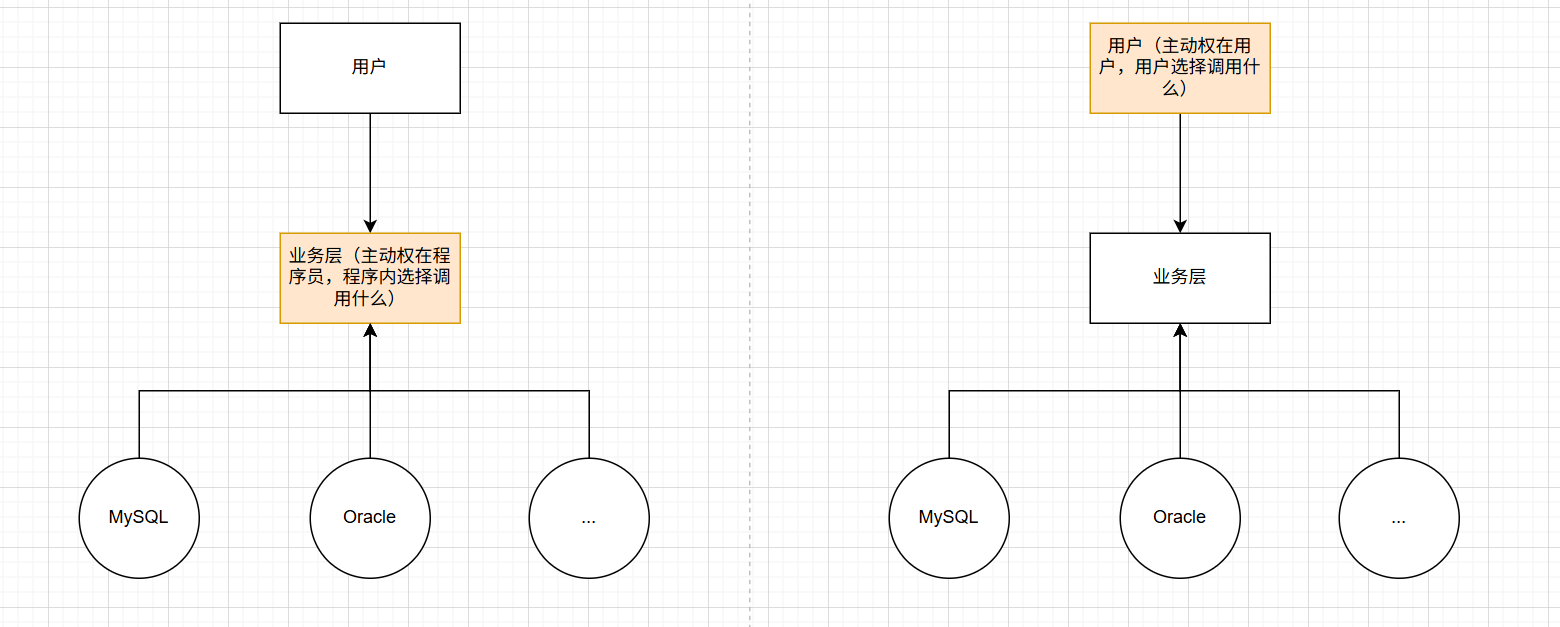
IOC的本质
**控制反转IoC(lnversion of Control),是一种设计思想,DI(依赖注入)是实现IoC的一种方法,**也有人认为DI只是IoC的另一种说法。没有IoC的程序中,我们使用面向对象编程,对象的创建与对象间的依赖关系完全硬编码在程序中,对象的创建由程序自己控制,控制反转后将对象的创建转移给第三方,个人认为所谓控制反转就是:获得依赖对象的方式反转了。
采用XML方式配置Bean的时候,Bean的定义信息是和实现分离的,而采用注解的方式可以把两者合为一体,Bean的定义信息直接以注解的形式定义在实现类中,从而达到了零配置的目的。
控制反转是一种通过描述(XML或注解)并通过第三方去生产或获取特定对象的方式。在Spring中实现控制反转的是loC容器,其实现方法是依赖注入(DependencyInjection,Dl)。
3、HelloSpring
3.1、导入Jar包
<!-- https://mvnrepository.com/artifact/org.springframework/spring-webmvc -->
<dependency>
    <groupId>org.springframework</groupId>
    <artifactId>spring-webmvc</artifactId>
    <version>5.2.0.RELEASE</version>
</dependency>
3.2、编写代码
- 编写一个Hello实体类
public class Hello {
    private String str;

    @Override
    public String toString() {
        return "Hello{" +
                "str='" + str + '\'' +
                '}';
    }

    public String getStr() {
        return str;
    }

    public void setStr(String str) {
        this.str = str;
    }
}
- 编写一个Spring配置文件,命名为beans.xml
<?xml version="1.0" encoding="UTF-8"?>
<beans xmlns="http://www.springframework.org/schema/beans"
       xmlns:xsi="http://www.w3.org/2001/XMLSchema-instance"
       xsi:schemaLocation="http://www.springframework.org/schema/beans
        https://www.springframework.org/schema/beans/spring-beans.xsd">

    <!--使用Spring来创建对象,在Spring中这些都称为Bean

    bean = 对象         new Hello();

    类型 变量名 = new 类型();
    Hello hello = new Hello();

    id = 变量名
    class = new 的对象;
    property 相当于给对象中的属性设置一个值!
    -->
    <bean id="hello" class="com.lingbo.pojo.Hello">
        <property name="str" value="Spring"/>
    </bean>

</beans>
元数据的配置文件基本格式可以在官方文档获取:https://docs.spring.io/spring-framework/docs/5.2.0.RELEASE/spring-framework-reference/core.html#beans-factory-metadata
- 测试
public class MyTest {
    public static void main(String[] args) {
        //获取Spring的上下文对象!
        ApplicationContext context = new ClassPathXmlApplicationContext("beans.xml");
        //我们的对象现在都在Spring中管理了,我们要使用,直接去里面取出来就可以!
        Hello hello = (Hello) context.getBean("hello");
        System.out.println(hello.toString());
    }
}
3.3、思考问题
-
Hello 对象是谁创建的 ?
Hello 对象是由Spring创建的
-
Hello 对象的属性是怎么设置的 ?
Hello 对象的属性是由Spring容器设置的
这个过程就叫控制反转 :
控制 : 谁来控制对象的创建 , 传统应用程序的对象是由程序本身控制创建的 , 使用Spring后 , 对象是由Spring来创建的。
反转 : 程序本身不创建对象 , 而变成被动的接收对象。
依赖注入 : 就是利用set方法来进行注入的。
IOC是一种编程思想,由主动的编程变成被动的接收。
可以通过new ClassPathXmlApplicationContext去浏览一下底层源码。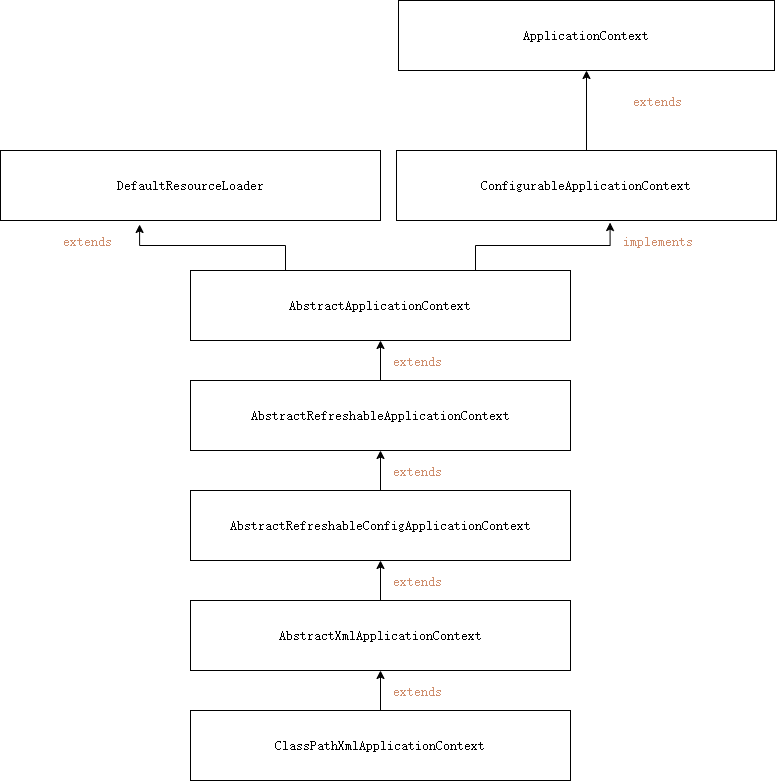
OK,到了现在,我们彻底不用再去程序中去改动了,要实现不同的操作,只需要在xml配置文件中进行修改,所谓的IoC,一句话搞定:对象由Spring来创建,管理,装配!
4、IOC创建对象的方式
-
使用无参构造创建对象
<!--property标签在此处相当于调用一个set方法--> <bean id="user" class="com.lingbo.pojo.User"> <property name="name" value="绫波"/> </bean> -
假设要使用有参构造创建对象。
-
下标赋值
<!--第一种,下标赋值--> <bean id="user" class="com.lingbo.pojo.User"> <constructor-arg index="0" value="绫波"/> </bean> -
通过类型创建
<!--第二种方式,通过类型创建,不建议使用--> <bean id="user" class="com.lingbo.pojo.User"> <constructor-arg type="java.lang.String" value="绫波"/> </bean> -
通过参数名设置
<!--第三种,直接通过参数名来设置-->
<bean id="user" class="com.lingbo.pojo.User">
    <constructor-arg name="name" value="绫波"/>
</bean>
-
//测试代码
public static void main(String[] args) {

    //Spring容器
    ApplicationContext context = new ClassPathXmlApplicationContext("beans.xml");

    User user = (User)context.getBean("user");
    User user2 = (User)context.getBean("user");

    System.out.println(user2==user);
}
总结:在配置文件加载的时候,容器中管理的对象就已经初始化了!
5、Spring配置
5.1、别名
<!--别名,如果添加了别名,我们也可以使用别名获取到这个对象-->
<alias name="user" alias="userNew"/>
//Spring容器
ApplicationContext context = new ClassPathXmlApplicationContext("beans.xml");

User user = (User)context.getBean("userNew");

user.show();
5.2、Bean的配置
    <!--
    id: bean的唯一标识符,也就是相当于我们学的对象名
    class: bean 对象所对应的全限定名:包名+类型
    name: 也是别名,而且name可以同时取多个别名
    -->
    <bean id="userT" class="com.lingbo.pojo.UserT" name="user2 u2,u3;u4">
        <property name="name" value="绫波"/>
    </bean>
5.3、Import
import,一般用于团队开发使用,他可以将多个配置文件,导入合并为一个。
假设现在项目中有多个人开发,这三个人负责不同的类开发,不同的类需要注册在不同的bean中,我们可以利用import,将所有人的beans.xml合并为一个总的!
- 张三
- 李四
- 王五
- applicationContext.xml
    <import resource="beans.xml"/>
    <import resource="beans2.xml"/>
    <import resource="beans3.xml"/>
使用的时候,直接使用总的配置就可以了。
- 如果import标签中配置的文件与主配置中的id重名,则将调用主配置中的id;
- 多个import中配置的id如果重名,调用最后import中配置的id,即在实例中
beans3.xml将覆盖掉beans.xml和beans2.xml中配置的id=userT的配置项。
6、DI依赖注入
6.1、构造器注入
在上文中已经提及,这里不再做过多解释。
<!--构造器注入的官方示例-->
<beans>
    <bean id="beanOne" class="x.y.ThingOne">
        <constructor-arg ref="beanTwo"/>
        <constructor-arg ref="beanThree"/>
    </bean>

    <bean id="beanTwo" class="x.y.ThingTwo"/>

    <bean id="beanThree" class="x.y.ThingThree"/>
</beans>
6.2、Set方式注入【重点】
- 依赖注入:Set注入!
- 依赖:bean对象的创建依赖于容器!
- 注入:bean对象中的所有属性,由容器来注入!
【环境搭建】
-
复杂类型
public class Address { private String address; public String getAddress() { return address; } public void setAddress(String address) { this.address = address; } } -
真实测试对象
public class Student { private String name; private Address address; private String[] books; private List<String> hobbies; private Map<String,String> card; private Set<String> games; private String wife; private Properties info; } -
beans.xml
<?xml version="1.0" encoding="UTF-8"?> <beans xmlns="http://www.springframework.org/schema/beans" xmlns:xsi="http://www.w3.org/2001/XMLSchema-instance" xsi:schemaLocation="http://www.springframework.org/schema/beans https://www.springframework.org/schema/beans/spring-beans.xsd"> <bean id="student" class="com.lingbo.pojo.Student"> <!-- 第一种,普通值注入,value --> <property name="name" value="绫波"/> </bean> </beans> -
测试类
public class MyTest {
    public static void main(String[] args) {
        ApplicationContext context = new ClassPathXmlApplicationContext("beans.xml");
        Student student = (Student) context.getBean("student");
        System.out.println(student.getName());

    }
}
完善注入信息
<bean id="address" class="com.lingbo.pojo.Address">
    <property name="address" value="长安街"/>
</bean>

<bean id="student" class="com.lingbo.pojo.Student">
    <!--   第一种,普通值注入,value    -->
    <property name="name" value="绫波"/>

    <!--   第二种,Bean注入,ref    -->
    <property name="address" ref="address"/>

    <!--   第三种,数组注入    -->
    <property name="books">
        <array>
            <value>教父</value>
            <value>在轮下</value>
            <value>悉达多</value>
            <value>德米安</value>
        </array>
    </property>

    <!--   第四种,list注入    -->
    <property name="hobbies">
        <list>
            <value>看书</value>
            <value>看电影</value>
            <value>听音乐</value>
        </list>
    </property>

    <!--   第五种,map注入    -->
    <property name="card">
        <map>
            <entry key="身份证" value="110101199912128888"/>
            <entry key="银行卡" value="68547568456823"/>
        </map>
    </property>


    <!--   第六种,set注入    -->
    <property name="games">
        <set>
            <value>LOL</value>
            <value>COC</value>
            <value>BOB</value>
            <value>WOW</value>
        </set>
    </property>


    <!--   第七种,null注入    -->
    <property name="wife">
      <null/>
    </property>

    <!--   第八种,Properties注入    -->
    <property name="info">
      <props>
          <prop key="学号">1261005301</prop>
          <prop key="姓名">小绿</prop>
      </props>
    </property>


</bean>
6.3、拓展方式注入
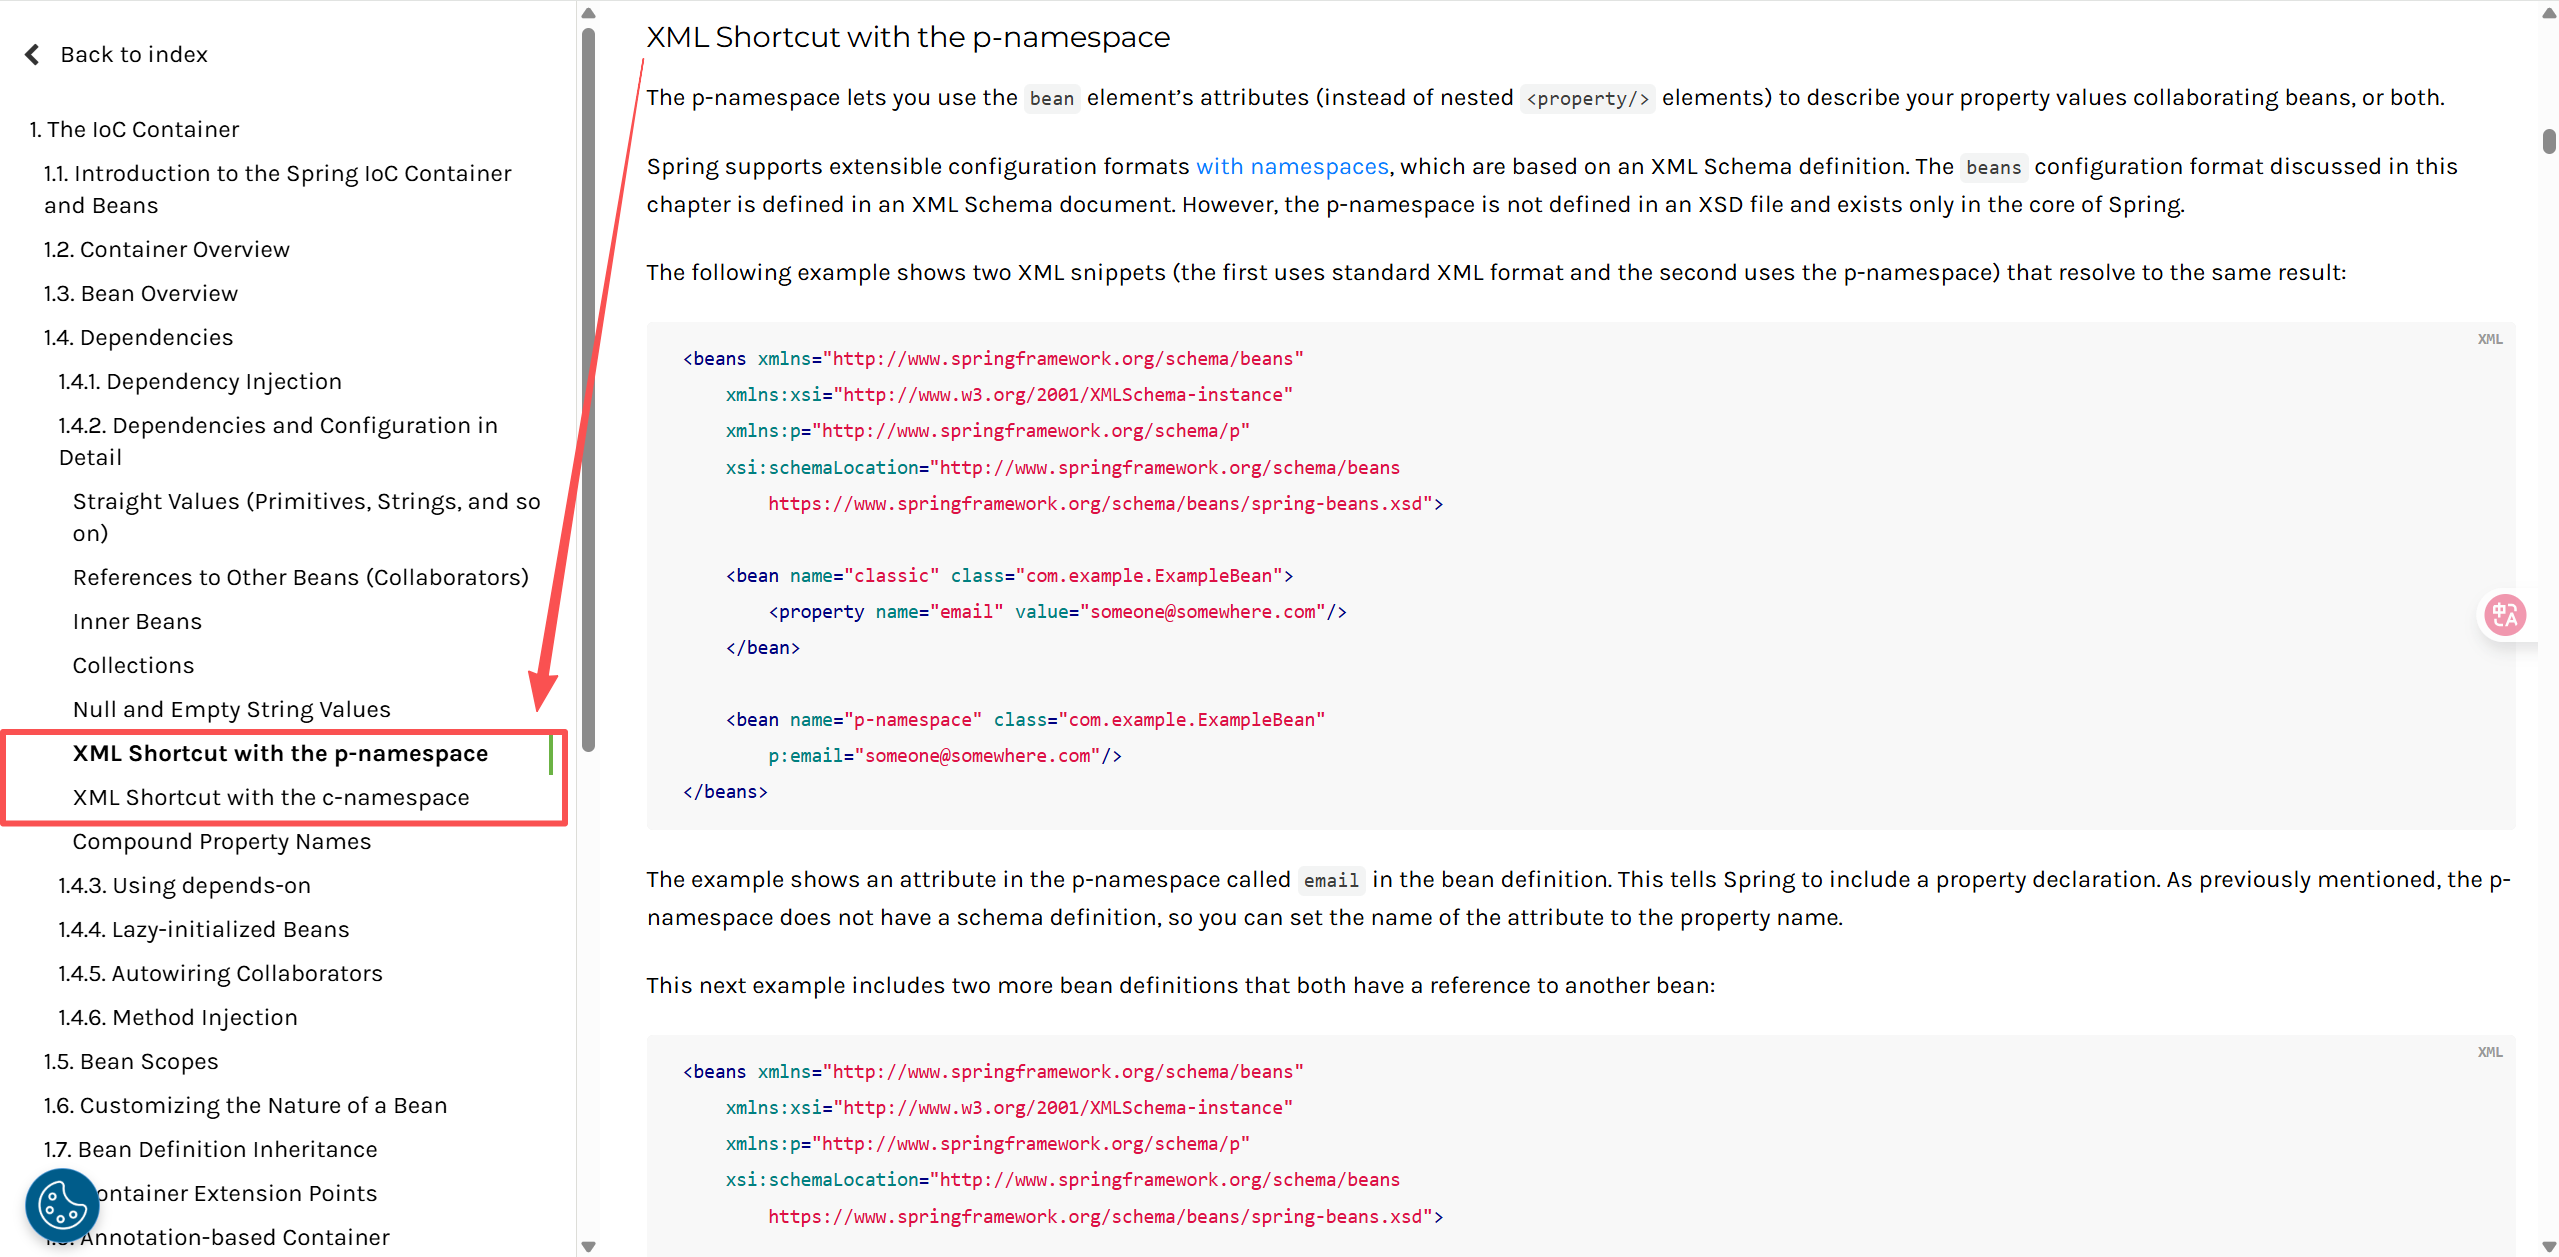
我们可以使用 p命名空间和c命名空间进行快捷注入
注意:
-
p命名空间等价于<property/>标签元素 -
c命名空间等价于<constructor-arg/>标签元素 -
p命名空间和c命名空间不能直接使用,需要导入xml约束!
xmlns:p="http://www.springframework.org/schema/p"
xmlns:c="http://www.springframework.org/schema/c"
官方解释:
<?xml version="1.0" encoding="UTF-8"?>
<beans xmlns="http://www.springframework.org/schema/beans"
       xmlns:xsi="http://www.w3.org/2001/XMLSchema-instance"
       xmlns:p="http://www.springframework.org/schema/p"
       xmlns:c="http://www.springframework.org/schema/c"
       xsi:schemaLocation="http://www.springframework.org/schema/beans
        https://www.springframework.org/schema/beans/spring-beans.xsd">

    <!--p命名空间注入,可以直接注入属性的值:property-->
    <bean id="user" class="com.lingbo.pojo.User" p:name="绫波" p:age="18"/>

    <!--c命名空间注入,通过构造器注入:construct-args-->
    <bean id="user2" class="com.lingbo.pojo.User" c:age="19" c:name="绫波123"/>

</beans>
测试代码:
@Test
public void test() {
    ApplicationContext context = new ClassPathXmlApplicationContext("userbeans.xml");
    User user = context.getBean("user2", User.class);

    System.out.println(user);

}
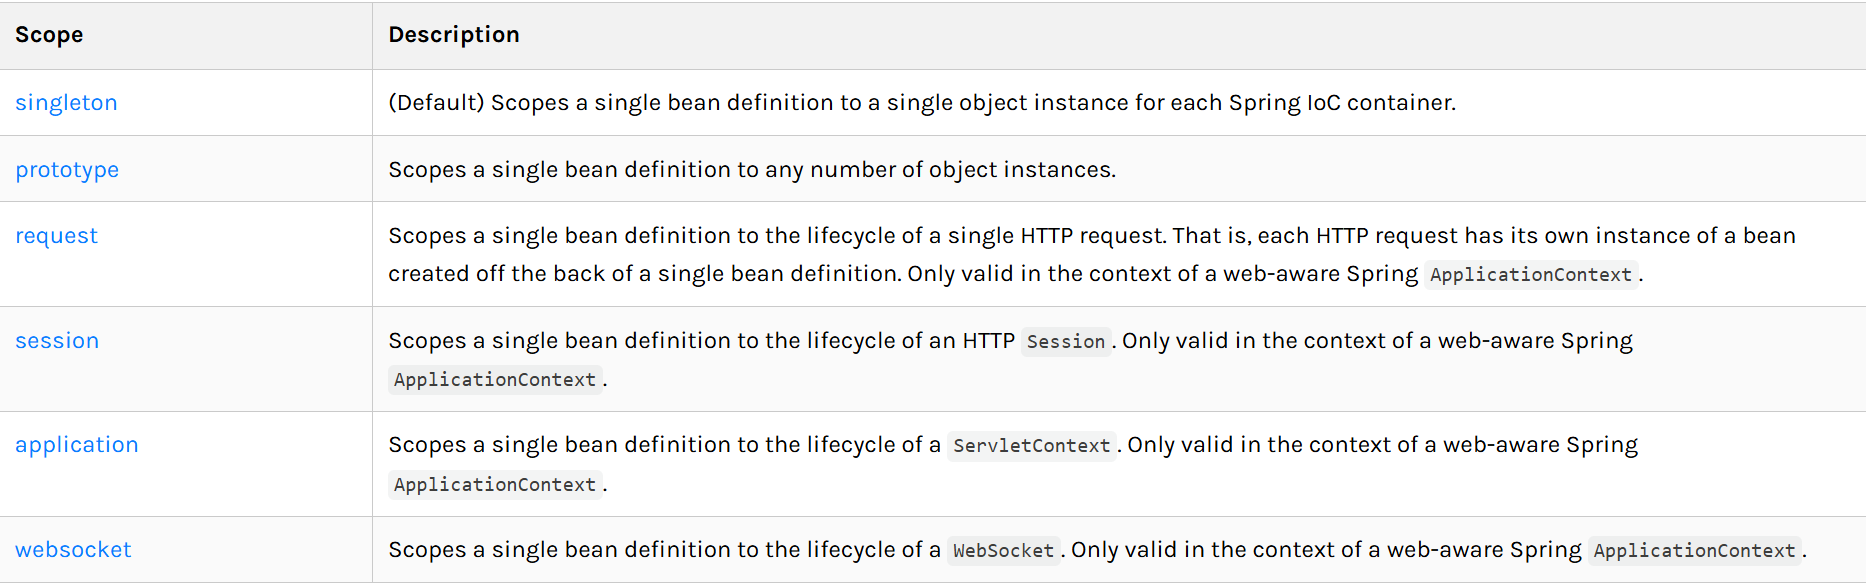
6.4、bean的作用域
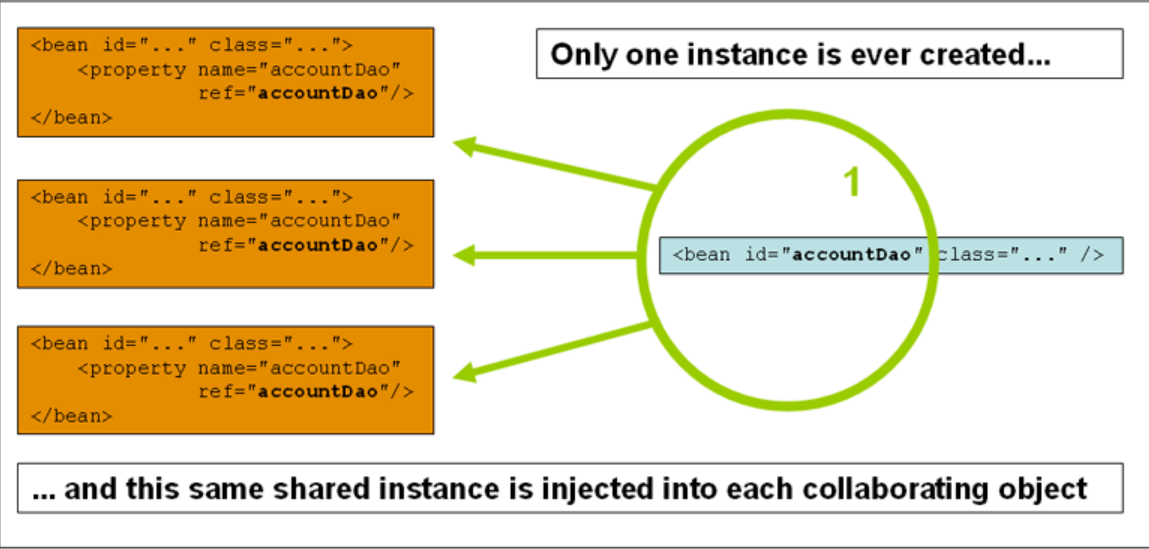
- 单例模式(Spring的默认机制)
<bean id="user2" class="com.lingbo.pojo.User" c:age="19" c:name="绫波123" scope="singleton"/>
- 原型模式:每次从容器中get的时候,都会产生一个新对象!
<bean id="user2" class="com.lingbo.pojo.User" c:age="19" c:name="绫波123" scope="prototype"/>
- 其余的request、session、application,这些作用域只能在web开发中使用!
7、Bean的自动装配
- 自动装配是Spring满足bean依赖的一种方式!
- Spring会在上下文中自动寻找,并自动给bean装配属性!
在Spring中,有三种装配的方式
- 在xml中显式配置
- 在java中显式配置
- 隐式的自动装配bean 【重要】
7.1、测试
环境搭建
- 一个人有两个宠物!
7.2、ByName自动装配
<!--
byName:会自动在容器上下文中查找,和自己对象set方法后面的值对应的beanid!
-->
<bean id="person" class="com.lingbo.pojo.Person" autowire="byName">
    <property name="name" value="绫波"/>
</bean>
7.3、ByType自动装配
<bean class="com.lingbo.pojo.Cat"/>
<bean class="com.lingbo.pojo.Dog"/>
<!--
byName:会自动在容器上下文中查找,和自己对象set方法后面的值对应的beanid!
byType:会自动在容器上下文中查找,和自己对象属性类型相同的bean!可以省略id。
-->
<bean id="person" class="com.lingbo.pojo.Person" autowire="byType">
    <property name="name" value="绫波"/>
</bean>
小结:
- byName的时候,需要保证所有bean的id唯一,并且这个bean需要和自动注入的属性set方法一致!
- byType的时候,需要保证所有bean的class唯一,并且这个bean需要和自动注入的属性的类型一致!
7.4、使用注解完成自动装配
JDK1.5开始支持注解,Spring从2.5版本开始支持注解。
The introduction of annotation-based configuration raised the question of whether this approach is “better” than XML.
基于注解的配置方式的诞生,让人们不禁思考注解配置是否要比XML文件配置“更好”呢?
要使用注解须知:
-
导入约束,context约束
-
配置注解的支持:
<context:annotation-config/>【重要!】<?xml version="1.0" encoding="UTF-8"?> <beans xmlns="http://www.springframework.org/schema/beans" xmlns:xsi="http://www.w3.org/2001/XMLSchema-instance" xmlns:context="http://www.springframework.org/schema/context" xsi:schemaLocation="http://www.springframework.org/schema/beans https://www.springframework.org/schema/beans/spring-beans.xsd http://www.springframework.org/schema/context https://www.springframework.org/schema/context/spring-context.xsd"> <context:annotation-config/> </beans>
@Autowired
直接在属性字段上使用即可!也可以在set方法上使用!
使用Autowired之后,可以不用再编写set方法了,前提是我们的自动装配的属性在IoC(Spring)容器中存在,且符合名字byName!
科普:
@Nullable //字段标注了这个注解,说明这个字段可以为Null;
public @interface Autowired {
boolean required() default true;
}
public class Person {
//如果显式的定义了Autowired的required属性为false,说明这个对象可以为Null,否则不允许为空。
@Autowired(required=false)
@Qualifier(value = "cat111")
private Cat cat;
@Autowired
@Qualifier(value = "dog222")
private Dog dog;
private String name;
}
如果@Autowired自动装配的环境比较复杂,自动装配无法通过一个注解【@Autowired】完成的时候,我们可以使用@Qualifier(value = “xxx”)去配合@Autowired的使用,指定唯一的bean对象注入!
@Resource注解
public class Person {
@Resource(name = "cat2")
private Cat cat;
@Resource(name = "dog1")
private Dog dog;
private String name;
}
小结:
@Resource和@Autowired的区别:
- 都是用来自动装配的,都可以放在属性字段上
- @Autowired 通过byType的方式实现,而且必须要求这个对象存在!【常用】
- @Resource 默认通过byName的方式实现,如果找不到名字,则通过byType实现!如果两个都无法匹配,则报错!【常用】
- 执行顺序不同:
- @Autowired 通过byType的方式实现。
- @Resource 默认通过byName的方式实现
8、使用注解开发
在Spring4之后,要使用注解开发,必须要保证AOP的包导入了。
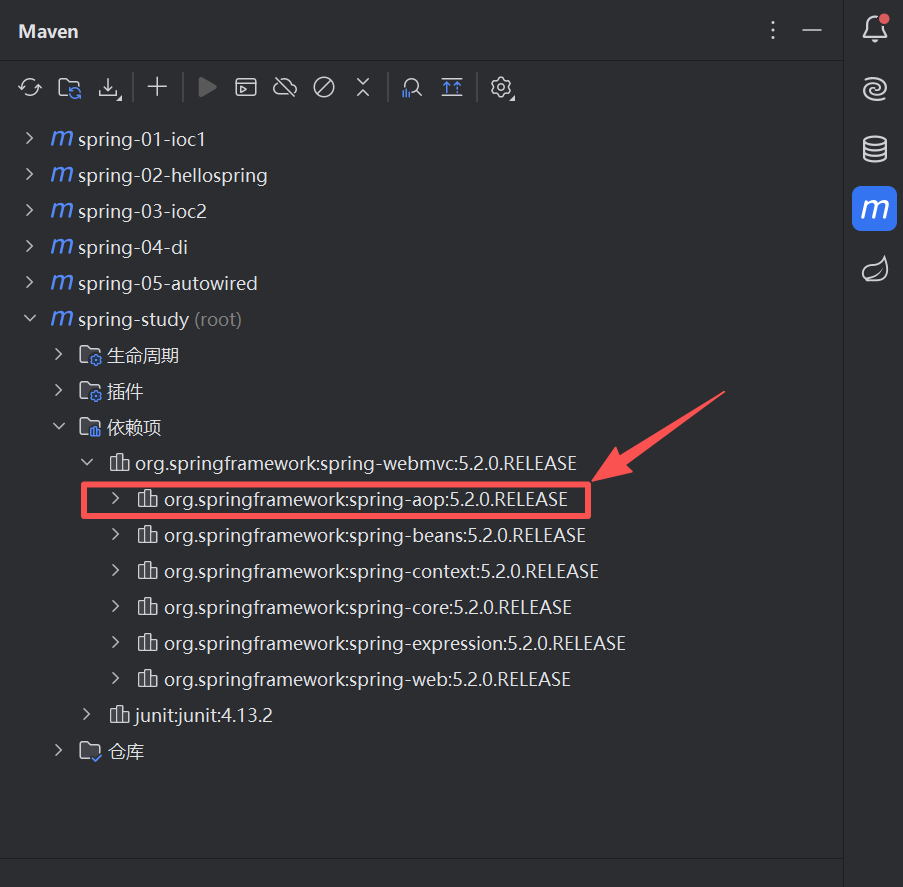
使用注解需要导入context约束,增加注解支持!
<?xml version="1.0" encoding="UTF-8"?>
<beans xmlns="http://www.springframework.org/schema/beans"
    xmlns:xsi="http://www.w3.org/2001/XMLSchema-instance"
    xmlns:context="http://www.springframework.org/schema/context"
    xsi:schemaLocation="http://www.springframework.org/schema/beans
        https://www.springframework.org/schema/beans/spring-beans.xsd
        http://www.springframework.org/schema/context
        https://www.springframework.org/schema/context/spring-context.xsd">

    <context:annotation-config/>

</beans>
-
bean
-
属性如何注入
@Component public class User { public String name; //相当于 <property name="name" value="lingbo"/> @Value("lingbo") public void setName(String name) { this.name = name; } } -
衍生的注解
@Component 有几个衍生注解,我们在web开发中,会按照MVC三层架构分层!
-
dao 【@Repository】
-
service 【@Service】
-
controller 【@Controller】
这四个注解功能都是一样的,都是代表将某个类注册到Spring容器中,装配Bean
-
-
自动装配的注解
- @Autowired:自动装配通过类型,名字
- 如果Autowired不能唯一自动装配上属性,则需要通过一个@Qualifier(value = “xxx”)
- @Resource:自动装配通过名字,类型
- @Nullable 注解标记了某个字段,说明这个字段可以为null。
- @Autowired:自动装配通过类型,名字
-
作用域
@Component @Scope("singleton") public class User { public String name; //相当于 <property name="name" value="lingbo"/> @Value("lingbo") public void setName(String name) { this.name = name; } } -
小结
xml与注解:
- xml更加万能,适用于任何场合!维护简单方便
- 注解不是自己的类是用不了,维护相对复杂!
xml与注解的最佳实践:
-
xml用来管理bean;
-
注解只负责完成属性的注入;
-
在使用的过程中,只需要注意一个问题:必须让注解生效,就需要开启注解的支持。
<!--指定要扫描的包,这个包下的注解就会生效-->
<context:component-scan base-package="com.lingbo"/>
<context:annotation-config/>
9、使用Java的方式配置Spring
抛开Spring的xml配置,可以全权交给Java来做Spring配置!
JavaConfig是Spring的一个子项目,在Spring 4 之后,它成为了一个核心功能!
实体类
//这里@Component注解的意思,就是说明这个类被Spring接管了,注册到了容器中。
@Component
public class User {
    private String name;

    @Override
    public String toString() {
        return "User{" +
                "name='" + name + '\'' +
                '}';
    }

    public String getName() {
        return name;
    }

    @Value("LINGBO") //属性注入值
    public void setName(String name) {
        this.name = name;
    }
}
配置文件
//@Configuration也会被Spring容器托管,注册到容器中,因为他本来就是一个@Component。
//@Configuration代表这是一个配置类,就和之前看的beans.xml是一样的
@Configuration
@ComponentScan("com.lingbo.pojo")
@Import({MyConfig2.class})
public class MyConfig {

    //注册一个bean,就相当于之前在xml文件写的bean标签
    //这个方法的名字,就相当于bean标签中的id属性
    //这个方法的返回值,就相当于bean标签中的class属性
    @Bean
    public User user() {
        return new User(); //就是返回要注入到bean的对象!
    }

}
@Configuration
public class MyConfig2 {


}
测试类
public class MyTest {
    public static void main(String[] args) {
        //如果完全使用了配置类方式去做,我们就只能通过AnnotationConfig上下文来获取容器,通过配置类的class对象加载!
        ApplicationContext context = new AnnotationConfigApplicationContext(MyConfig.class);
        User user = (User) context.getBean("user");

        System.out.println(user.getName());
    }
}
这种纯Java的配置方式,在SpringBoot中随处可见!
更多推荐

 7
7 0
0- 0


 已为社区贡献6条内容

所有评论(0)