
NS3仿真——fifth
·
fifth引入了tcp的newreno模型,以及信道错误概率,对于tcp拥塞控制的研究,可以后期在此基础上进行更改
1. 文件头注释
/* GPL许可证声明 */
#include "tutorial-app.h"  // 关键:自定义应用头文件
#include "ns3/applications-module.h"  // 应用层模块
#include "ns3/core-module.h"          // 核心模块
#include "ns3/internet-module.h"      // 网络层模块
#include "ns3/network-module.h"       // 网络模块
#include "ns3/point-to-point-module.h" // 点对点链路模块
#include <fstream>
为什么需要自定义应用:
问题1:OnOff应用的socket在启动时才创建,无法在配置时连接跟踪点
问题2:即使能在启动后连接,socket不是public的,无法访问
解决方案:创建自定义的简单应用
2. TCP参数配置
设置拥塞策略为tcpnewreno,类似的还有cubic等;
初始拥塞窗口以及窗口恢复机制同样可以设置
Config::SetDefault("ns3::TcpL4Protocol::SocketType", StringValue("ns3::TcpNewReno"));
Config::SetDefault("ns3::TcpSocket::InitialCwnd", UintegerValue(1));  // 初始拥塞窗口=1包
Config::SetDefault("ns3::TcpL4Protocol::RecoveryType",
                   TypeIdValue(TypeId::LookupByName("ns3::TcpClassicRecovery")));
3、网络建立过程
步骤1:创建节点和链路
NodeContainer nodes;
nodes.Create(2);  // 创建2个节点

PointToPointHelper pointToPoint;
pointToPoint.SetDeviceAttribute("DataRate", StringValue("5Mbps"));
pointToPoint.SetChannelAttribute("Delay", StringValue("2ms"));

NetDeviceContainer devices;
devices = pointToPoint.Install(nodes);
步骤2:配置错误模型
Ptr<RateErrorModel> em = CreateObject<RateErrorModel>();
em->SetAttribute("ErrorRate", DoubleValue(0.00001));  // 0.001%错误率
devices.Get(1)->SetAttribute("ReceiveErrorModel", PointerValue(em));
步骤3:安装协议栈和IP地址
InternetStackHelper stack;
stack.Install(nodes);  // 安装TCP/IP协议栈

Ipv4AddressHelper address;
address.SetBase("10.1.1.0", "255.255.255.252");  // 30位掩码
Ipv4InterfaceContainer interfaces = address.Assign(devices);
步骤4:创建接收端应用
uint16_t sinkPort = 8080;
Address sinkAddress(InetSocketAddress(interfaces.GetAddress(1), sinkPort));
PacketSinkHelper packetSinkHelper("ns3::TcpSocketFactory",
                                  InetSocketAddress(Ipv4Address::GetAny(), sinkPort));
ApplicationContainer sinkApps = packetSinkHelper.Install(nodes.Get(1));
sinkApps.Start(Seconds(0.));
sinkApps.Stop(Seconds(20.));
步骤5:关键部分 - 创建socket并连接跟踪点
Ptr<Socket> ns3TcpSocket = Socket::CreateSocket(nodes.Get(0), TcpSocketFactory::GetTypeId());
ns3TcpSocket->TraceConnectWithoutContext("CongestionWindow", MakeCallback(&CwndChange));
步骤6:创建自定义发送应用
Ptr<TutorialApp> app = CreateObject<TutorialApp>();
app->Setup(ns3TcpSocket, sinkAddress, 1040, 1000, DataRate("1Mbps"));
nodes.Get(0)->AddApplication(app);
app->SetStartTime(Seconds(1.));
app->SetStopTime(Seconds(20.));
步骤7:连接丢包跟踪点
devices.Get(1)->TraceConnectWithoutContext("PhyRxDrop", MakeCallback(&RxDrop));
4、回调函数分析
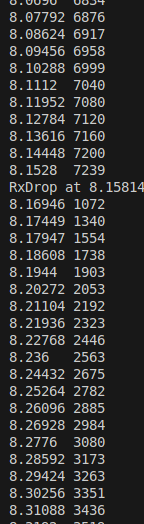
1. 拥塞窗口变化回调
static void CwndChange(uint32_t oldCwnd, uint32_t newCwnd)
{
    NS_LOG_UNCOND(Simulator::Now().GetSeconds() << "\t" << newCwnd);
}
2. 接收丢包回调
static void RxDrop(Ptr<const Packet> p)
{
    NS_LOG_UNCOND("RxDrop at " << Simulator::Now().GetSeconds());
}
部分运行截图
更多推荐
 1
1 0
0- 0


 已为社区贡献4条内容

所有评论(0)