
Spring AI快速接入大模型入门指南
🎯 阅读指南
⭐ 温馨提示:
- 新手推荐:从头到尾按顺序阅读,理解每个概念和步骤
- 老手速通:直接跳到「快速上手」章节,5分钟搞定接入
- 实战派:重点关注「实际应用场景」和「代码示例」
💡 为什么需要 Spring AI?
场景一:智能客服系统
想象一下,你正在开发一个电商平台的客服系统。传统方式需要:
- 编写大量 if-else 规则
- 维护复杂的对话流程
- 手动处理各种用户问题
有了 Spring AI 后:
// 就这么简单!
String answer = chatClient.prompt()
    .user("用户:我想退货")
    .call()
    .content();
// AI 自动理解用户意图,生成专业回复
场景二:知识库问答系统
你的公司有大量内部文档(产品手册、技术文档、FAQ),员工每次都要翻文档找答案,效率低下。
有了 Spring AI + RAG:
- 上传文档到知识库
- 用户提问时,AI 自动检索相关文档片段
- 基于文档内容生成准确回答
示例:
- 企业内训系统:员工问"如何申请年假?",AI 自动从 HR 手册中找到答案
- 技术支持平台:用户问"如何重置密码?",AI 从技术文档中提取步骤
- 产品咨询助手:客户问"这个功能怎么用?",AI 基于产品文档回答
场景三:代码生成助手
开发过程中,经常需要:
- 生成单元测试代码
- 解释复杂代码逻辑
- 重构代码优化建议
有了 Spring AI:
String code = chatClient.prompt()
    .system("你是一个 Java 专家")
    .user("帮我生成一个用户登录的单元测试")
    .call()
    .content();
🤔 Spring AI 是什么?
官方定义
Spring AI 是 Spring 官方推出的 AI 应用开发框架,旨在简化 Java 开发者接入大模型的过程。它提供了统一的 API,让你可以用同样的代码调用不同的 AI 模型(OpenAI、DashScope、本地模型等)。
简单理解
Spring AI = Spring 生态 + AI 能力
就像 Spring Data JPA 让你不用写 SQL 就能操作数据库一样,Spring AI 让你不用写复杂的 HTTP 请求就能调用大模型。
传统方式(原生 API 调用):
// 需要手动构建 HTTP 请求
HttpClient client = HttpClient.newHttpClient();
HttpRequest request = HttpRequest.newBuilder()
    .uri(URI.create("https://api.openai.com/v1/chat/completions"))
    .header("Authorization", "Bearer " + apiKey)
    .header("Content-Type", "application/json")
    .POST(HttpRequest.BodyPublishers.ofString(jsonBody))
    .build();
HttpResponse<String> response = client.send(request,
    HttpResponse.BodyHandlers.ofString());
// 还要手动解析 JSON 响应...
Spring AI 方式:
// 一行代码搞定!
String answer = chatClient.prompt()
    .user("你好")
    .call()
    .content();
核心优势
- 统一接口:一套代码,支持多种模型(OpenAI、DashScope、本地模型)
- 开箱即用:Spring Boot 自动配置,无需手动管理连接
- 流式支持:原生支持流式响应,适合实时对话场景
- Spring 生态:完美集成 Spring Boot、Spring WebFlux 等
🚀 快速上手:5分钟接入大模型
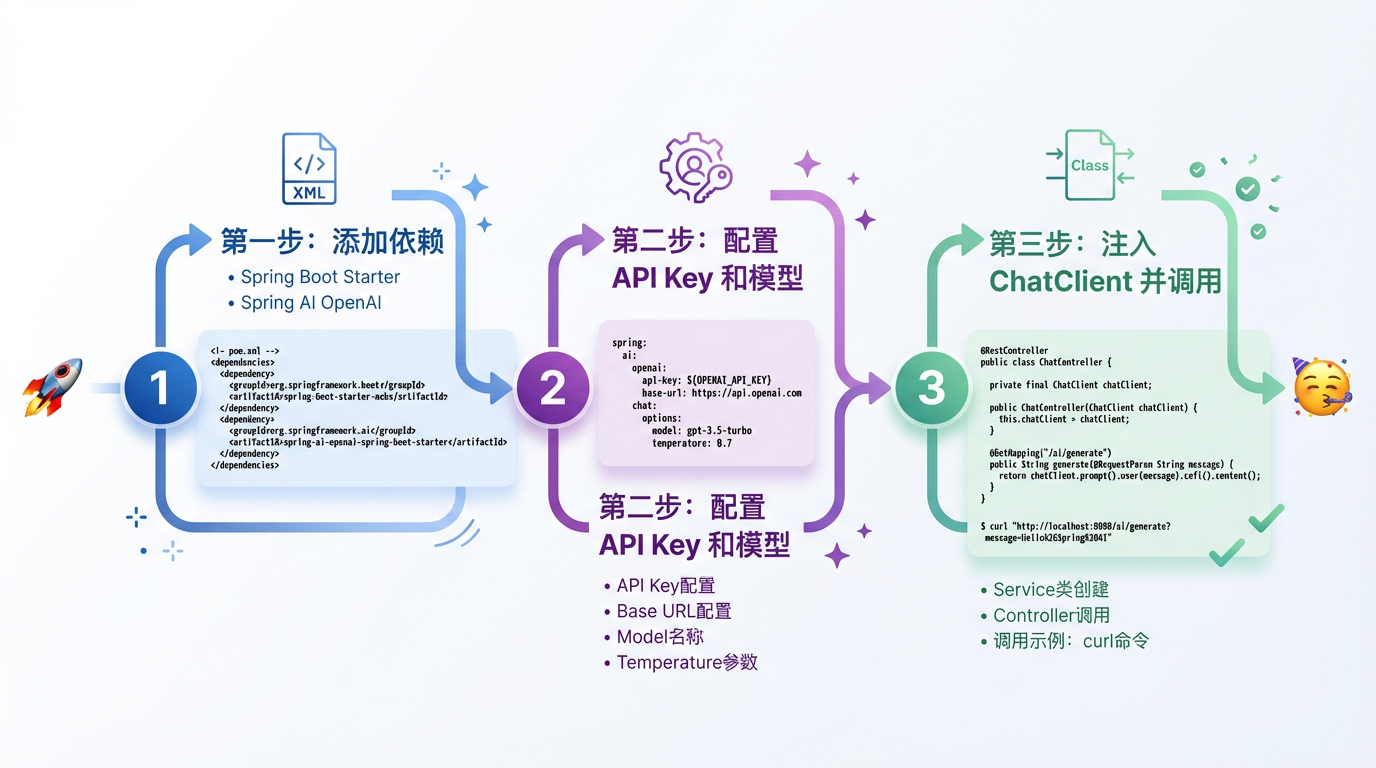
第一步:添加依赖
在 pom.xml 中添加 Spring AI 依赖:
<dependencies>
    <!-- Spring Boot Starter -->
    <dependency>
        <groupId>org.springframework.boot</groupId>
        <artifactId>spring-boot-starter-webflux</artifactId>
    </dependency>

    <!-- Spring AI OpenAI(支持 OpenAI 兼容接口) -->
    <dependency>
        <groupId>org.springframework.ai</groupId>
        <artifactId>spring-ai-openai-spring-boot-starter</artifactId>
        <version>1.0.0-M4</version>
    </dependency>
</dependencies>
💡 小贴士:
spring-ai-openai-spring-boot-starter不仅支持 OpenAI,还支持所有 OpenAI 兼容的接口(如 DashScope、DeepSeek 等)- 使用
webflux而非web,因为 Spring AI 基于响应式编程,支持流式处理
第二步:配置 API Key 和模型
在 application.yml 中配置:
spring:
  ai:
    openai:
      # 你的 API Key(这里以 DashScope 为例)
      api-key: sk-your-api-key-here
      # API 地址(DashScope 使用兼容模式)
      base-url: https://dashscope.aliyuncs.com/compatible-mode
      chat:
        options:
          # 模型名称(DashScope 使用 qwen1.5-110b-chat)
          model: qwen1.5-110b-chat
          # 温度参数(0.0-2.0,越高越随机)
          temperature: 0.7
🔑 获取 API Key:
- DashScope(通义千问):访问 阿里云 DashScope 注册并获取 API Key
- OpenAI:访问 OpenAI Platform 获取 API Key
- DeepSeek:访问 DeepSeek 获取 API Key
第三步:注入 ChatClient 并调用
创建一个 Service 类:
@Service
public class AiService {

    private final ChatClient chatClient;

    // Spring 自动注入 ChatClient
    public AiService(ChatClient chatClient) {
        this.chatClient = chatClient;
    }

    // 最简单的调用方式
    public String chat(String userMessage) {
        return chatClient.prompt()
                .user(userMessage)  // 用户消息
                .call()             // 调用大模型
                .content();          // 提取回答内容
    }
}
🎉 就这么简单! 现在你可以在 Controller 中使用了:
@RestController
public class ChatController {

    @Autowired
    private AiService aiService;

    @GetMapping("/chat")
    public String chat(@RequestParam String message) {
        return aiService.chat(message);
    }
}
测试一下:
curl "http://localhost:8080/chat?message=你好"
如果返回 AI 的回答,说明接入成功!🎊
📚 进阶用法
1. 带系统提示词(System Prompt)
系统提示词用于设定 AI 的角色和行为:
public String chatWithRole(String userMessage) {
    return chatClient.prompt()
            .system("你是一个专业的 Java 开发工程师,擅长解释代码和技术问题。")
            .user(userMessage)
            .call()
            .content();
}
应用场景:
- 代码审查助手:
system("你是一个代码审查专家,专注于代码质量和最佳实践") - 技术文档生成:
system("你是一个技术文档编写专家,擅长编写清晰、准确的技术文档") - 客服机器人:
system("你是一个友好的客服助手,总是耐心、专业地回答用户问题")
2. 带对话历史(上下文记忆)
让 AI 记住之前的对话内容:
public String chatWithHistory(String userMessage, String history) {
    return chatClient.prompt()
            .system("以下是对话历史:\n" + history)
            .user(userMessage)
            .call()
            .content();
}
实际应用:
// 第一次对话
String answer1 = chatClient.prompt()
    .user("我叫张三")
    .call()
    .content();

// 第二次对话(带历史)
String history = "用户:我叫张三\n助手:你好,张三!";
String answer2 = chatClient.prompt()
    .system("以下是对话历史:\n" + history)
    .user("我刚才说我叫什么?")
    .call()
    .content();
// AI 会回答:你叫张三
3. 流式响应(实时输出)
流式响应让 AI 的回答可以实时显示,就像 ChatGPT 那样一个字一个字地输出:
public Flux<String> streamChat(String userMessage) {
    return chatClient.prompt()
            .user(userMessage)
            .stream()    // 流式调用
            .content();  // 返回 Flux<String>
}
在 Controller 中使用(SSE):
@GetMapping(value = "/chat/stream", produces = MediaType.TEXT_EVENT_STREAM_VALUE)
public Flux<ServerSentEvent<String>> streamChat(@RequestParam String message) {
    return aiService.streamChat(message)
            .map(chunk -> ServerSentEvent.<String>builder()
                    .data(chunk)
                    .build())
            .concatWith(Flux.just(ServerSentEvent.<String>builder()
                    .data("[DONE]")
                    .build()));
}
前端调用(EventSource):
const eventSource = new EventSource(
    `http://localhost:8080/chat/stream?message=你好`
);

eventSource.onmessage = (event) => {
    if (event.data === '[DONE]') {
        eventSource.close();
    } else {
        // 实时显示 AI 回答
        console.log(event.data);
    }
};
4. 完整示例:带历史记录的流式对话
@Service
public class AiService {

    private final ChatClient chatClient;

    public AiService(ChatClient chatClient) {
        this.chatClient = chatClient;
    }

    /**
     * 流式对话(带历史记录)
     */
    public Flux<String> streamChat(String userMessage, String history) {
        if (history != null && !history.isEmpty()) {
            return chatClient.prompt()
                    .system("以下是对话历史:\n" + history)
                    .user(userMessage)
                    .stream()
                    .content();
        } else {
            return chatClient.prompt()
                    .user(userMessage)
                    .stream()
                    .content();
        }
    }

    /**
     * 同步对话(带历史记录)
     */
    public String chat(String userMessage, String history) {
        if (history != null && !history.isEmpty()) {
            return chatClient.prompt()
                    .system("以下是对话历史:\n" + history)
                    .user(userMessage)
                    .call()
                    .content();
        } else {
            return chatClient.prompt()
                    .user(userMessage)
                    .call()
                    .content();
        }
    }
}
🎨 实际项目中的应用
场景一:智能对话系统
需求: 用户发送消息,AI 实时回复,并记住对话历史。
实现:
@RestController
@RequestMapping("/api/chat")
public class ChatController {

    @Autowired
    private AiService aiService;
    @Autowired
    private MessageRepository messageRepository;

    /**
     * 流式对话接口
     */
    @PostMapping("/conversations/{conversationId}/stream")
    public Flux<ServerSentEvent<String>> streamChat(
            @PathVariable Long conversationId,
            @RequestParam String message) {

        // 1. 保存用户消息
        Message userMsg = new Message();
        userMsg.setConversationId(conversationId);
        userMsg.setRole("user");
        userMsg.setContent(message);
        messageRepository.save(userMsg);

        // 2. 获取历史消息
        List<Message> history = messageRepository
            .findByConversationIdOrderByCreatedAtAsc(conversationId);
        String historyText = history.stream()
            .limit(10)  // 只取最近 10 条
            .map(msg -> msg.getRole() + ": " + msg.getContent())
            .collect(Collectors.joining("\n"));

        // 3. 流式调用 AI
        StringBuilder fullResponse = new StringBuilder();
        return aiService.streamChat(message, historyText)
                .doOnNext(chunk -> fullResponse.append(chunk))
                .map(chunk -> ServerSentEvent.<String>builder()
                        .data(chunk)
                        .build())
                .concatWith(Flux.just(ServerSentEvent.<String>builder()
                        .data("[DONE]")
                        .build()))
                .doOnComplete(() -> {
                    // 4. 保存 AI 回答
                    Message assistantMsg = new Message();
                    assistantMsg.setConversationId(conversationId);
                    assistantMsg.setRole("assistant");
                    assistantMsg.setContent(fullResponse.toString());
                    messageRepository.save(assistantMsg);
                });
    }
}
场景二:RAG 知识库问答
需求: 基于上传的文档回答问题。
实现思路:
- 用户上传文档,系统解析并切分
- 对每个文档片段生成向量(Embedding)
- 用户提问时,将问题转换为向量
- 在向量数据库中检索相似文档片段
- 将检索到的片段作为上下文,调用 AI 生成回答
核心代码:
@Service
public class RagService {

    @Autowired
    private AiService aiService;
    @Autowired
    private EmbeddingService embeddingService;
    @Autowired
    private DocumentRepository documentRepository;

    /**
     * RAG 问答
     */
    public String ragChat(String query, int topK) {
        // 1. 将问题转换为向量
        float[] queryEmbedding = embeddingService.embedText(query);
        String queryVector = embeddingService.toVectorString(queryEmbedding);

        // 2. 检索相似文档片段
        List<DocumentChunk> similarChunks = documentRepository
            .findSimilarChunks(queryVector, topK);

        // 3. 构建上下文
        StringBuilder context = new StringBuilder();
        context.append("以下是与问题相关的文档片段:\n\n");
        for (int i = 0; i < similarChunks.size(); i++) {
            context.append("片段 ").append(i + 1).append(":\n");
            context.append(similarChunks.get(i).getContent()).append("\n\n");
        }
        context.append("请基于以上文档内容回答问题:").append(query);

        // 4. 调用 AI 生成回答
        return aiService.chat(query, context.toString());
    }
}
🔧 高级配置
自定义 ChatClient
如果需要更精细的控制,可以手动配置 ChatClient:
@Configuration
public class AiConfig {

    @Bean
    public ChatClient chatClient(ChatModel chatModel) {
        return ChatClient.builder(chatModel)
                .defaultSystem("你是一个专业的 AI 助手")
                .defaultFunctions("weather", "calculator")  // 函数调用
                .build();
    }
}
多模型支持
如果你的项目需要同时使用多个模型:
@Configuration
public class MultiModelConfig {

    // OpenAI 模型
    @Bean
    @Primary
    public ChatModel openAiModel() {
        OpenAiApi api = new OpenAiApi("https://api.openai.com", "sk-xxx");
        return new OpenAiChatModel(api, OpenAiChatOptions.builder()
                .withModel("gpt-4")
                .build());
    }

    // DashScope 模型
    @Bean
    public ChatModel dashScopeModel() {
        OpenAiApi api = new OpenAiApi(
            "https://dashscope.aliyuncs.com/compatible-mode",
            "sk-xxx"
        );
        return new OpenAiChatModel(api, OpenAiChatOptions.builder()
                .withModel("qwen1.5-110b-chat")
                .build());
    }

    // 为不同模型创建不同的 ChatClient
    @Bean
    public ChatClient openAiClient(@Qualifier("openAiModel") ChatModel model) {
        return ChatClient.builder(model).build();
    }

    @Bean
    public ChatClient dashScopeClient(@Qualifier("dashScopeModel") ChatModel model) {
        return ChatClient.builder(model).build();
    }
}
🎯 结果演示
测试 1:基础对话
请求:
curl "http://localhost:8080/chat?message=你好"
响应:
你好!很高兴为你服务。有什么我可以帮助你的吗?
测试 2:带系统提示词
代码:
String answer = chatClient.prompt()
    .system("你是一个 Java 专家")
    .user("解释一下 Spring Boot 的自动配置原理")
    .call()
    .content();
响应:
Spring Boot 的自动配置原理基于条件注解和配置类...

(AI 会生成专业的 Java 技术解释)
测试 3:流式响应
前端代码:
const eventSource = new EventSource(
    'http://localhost:8080/chat/stream?message=写一首关于春天的诗'
);

eventSource.onmessage = (event) => {
    if (event.data !== '[DONE]') {
        // 实时显示:春、天、的、阳、光...
        document.getElementById('answer').innerText += event.data;
    }
};
效果:
春
春天
春天的
春天的阳
春天的阳光
春天的阳光洒
春天的阳光洒在
...
就像 ChatGPT 那样,一个字一个字地实时显示!
🐛 常见问题
Q1:API Key 配置后还是报错?
检查清单:
- ✅ API Key 是否正确(注意不要有多余空格)
- ✅
base-url是否正确(DashScope 使用兼容模式) - ✅ 模型名称是否正确(
qwen1.5-110b-chat而非qwen) - ✅ 网络是否通畅(可以先用 curl 测试 API)
Q2:流式响应不工作?
可能原因:
- 前端未正确处理 SSE 格式
- 后端未设置正确的
Content-Type(TEXT_EVENT_STREAM_VALUE) - 浏览器缓存问题(尝试硬刷新)
解决方案:
@GetMapping(value = "/chat/stream",
            produces = MediaType.TEXT_EVENT_STREAM_VALUE)  // ⚠️ 必须设置
public Flux<ServerSentEvent<String>> streamChat(...) {
    // ...
}
Q3:如何切换不同的模型?
方法一:修改配置
spring:
  ai:
    openai:
      chat:
        options:
          model: gpt-4  # 切换到 GPT-4
方法二:代码中指定
// 需要在 ChatClient 构建时指定,或使用不同的 ChatModel Bean
Q4:响应速度慢怎么办?
优化建议:
- 使用更快的模型:
qwen1.5-7b-chat比qwen1.5-110b-chat快 - 降低 temperature:
temperature: 0.3比0.7快 - 使用流式响应:虽然总时间相同,但用户感知更快
- 缓存常见问题:对常见问题缓存回答
📖 总结
核心要点
- Spring AI 让 AI 接入变得简单:几行配置 + 几行代码就能接入大模型
- 统一接口:一套代码支持多种模型(OpenAI、DashScope、DeepSeek 等)
- 流式支持:原生支持流式响应,适合实时对话场景
- Spring 生态:完美集成 Spring Boot,开箱即用
快速回顾
// 1. 配置 application.yml
spring:
  ai:
    openai:
      api-key: sk-xxx
      base-url: https://dashscope.aliyuncs.com/compatible-mode
      chat:
        options:
          model: qwen1.5-110b-chat

// 2. 注入 ChatClient
@Autowired
private ChatClient chatClient;

// 3. 调用
String answer = chatClient.prompt()
    .user("你好")
    .call()
    .content();
就这么简单! 🎉
下一步学习
- RAG 知识库:将文档向量化,实现基于文档的问答(
- Agent 智能体:让 AI 能够调用工具(函数调用)
- 多模态:支持图片理解、图片生成
- 流式优化:优化流式响应的性能和用户体验
- (可以去看博主的上一篇文章哟)
📚 相关资源
- Spring AI 官方文档:Spring AI Reference
- DashScope 文档:阿里云 DashScope
- 项目示例:本文所有代码均来自实际项目,可直接使用
如果这篇文章对你有帮助,欢迎点赞、收藏、关注! ⭐
如有问题或建议,欢迎在评论区讨论! 💬
更多推荐
 32
32 0
0- 0


 已为社区贡献1条内容

所有评论(0)