
03-学习笔记尚硅谷数仓搭建-Hadoop安装配置及集群启动脚本
目录
一、创建xcall脚本----用于一条命令在3台主机同时执行
备注:没有特别说明的命令默认在hadoop102上执行,其中的“其它主机”是指hadoop103和hadoop104
备注:没有特别说明都在atguigu用户执行命令
一、创建xcall脚本----用于一条命令在3台主机同时执行
在hadoop102输入下面命令:
su - atguigu
cd /home/atguigu/bin
vim xcall
添加下面脚本内容:
#! /bin/bash
for i in hadoop102 hadoop103 hadoop104
do
echo --------- $i ----------
ssh $i "$*"
done
添加脚本权限:(hadoop102执行下面命令)
chmod 777 xcall
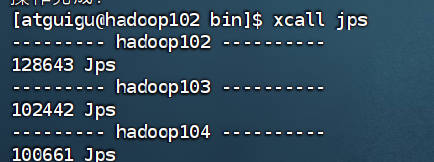
验证脚本:(hadoop102执行下面命令)
xcall jps结果如图:
二、Hadoop安装
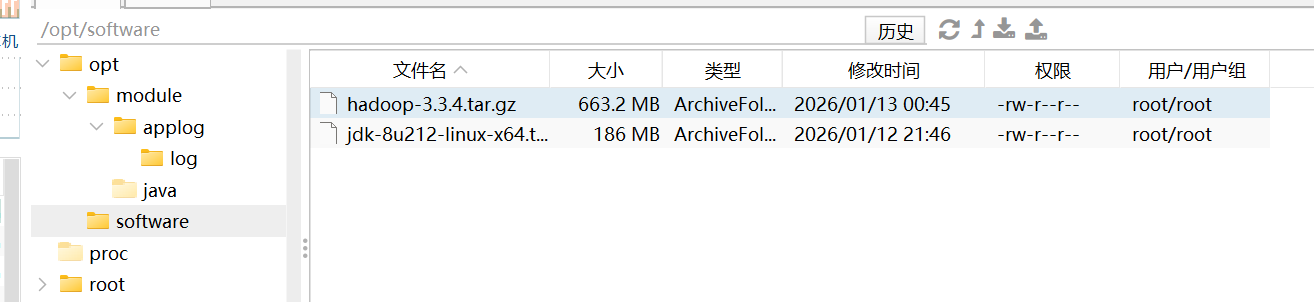
1.进入目录,输入下面命令(hadoop102执行下面命令)
cd /opt/software/
将资源中的Hadoop上传到上面的目录下,如图:
资源链接:在2.hadoop目录下01-学习笔记尚硅谷数仓搭建-基础Linux环境搭建(使用3台主机模拟Hadoop集群)-CSDN博客
将文件解压至module,并重命名,输入下面的命令(hadoop102执行下面命令)
# 解压
tar -zxvf hadoop-3.3.4.tar.gz -C /opt/module/
# 查看是否成功
ls /opt/module/
# 重命名为hadoop
cd /opt/module
mv hadoop-3.3.4 hadoop
2.配置Hadoop环境
输入命令:(hadoop102执行下面命令)
sudo vim /etc/profile.d/my_env.sh添加下面的内容:
#HADOOP_HOME
export HADOOP_HOME=/opt/module/hadoop
export PATH=$PATH:$HADOOP_HOME/bin
export PATH=$PATH:$HADOOP_HOME/sbin
将环境分发到其它主机,输入下面的命令:(hadoop102执行下面命令)
su - atguigu
sudo /home/atguigu/bin/xsync /etc/profile.d/my_env.sh
分发完成后在每个主机运行下面的命令,刷新环境:(3台主机都要执行下面命令)
source /ect/profile.d/my_env.sh
三、Hadoop配置
下面的配置可以进入相应的目录,使用vim修改,也可以使用软件(finalshell)自带的编辑器修改(推荐使用软件自带编辑器更方便)
/opt/module/hadoop/etc/hadoop/core-site.xml(hadoop102执行下面命令)
vim /opt/module/hadoop/etc/hadoop/core-site.xml修改后完整内容:
<?xml version="1.0" encoding="UTF-8"?>
<?xml-stylesheet type="text/xsl" href="configuration.xsl"?>
<!--
  Licensed under the Apache License, Version 2.0 (the "License");
  you may not use this file except in compliance with the License.
  You may obtain a copy of the License at

    http://www.apache.org/licenses/LICENSE-2.0

  Unless required by applicable law or agreed to in writing, software
  distributed under the License is distributed on an "AS IS" BASIS,
  WITHOUT WARRANTIES OR CONDITIONS OF ANY KIND, either express or implied.
  See the License for the specific language governing permissions and
  limitations under the License. See accompanying LICENSE file.
-->

<!-- Put site-specific property overrides in this file. -->

<configuration>
    <!-- 指定NameNode的地址 -->
    <property>
        <name>fs.defaultFS</name>
        <value>hdfs://hadoop102:8020</value>
    </property>

    <!-- 指定hadoop数据的存储目录 -->
    <property>
        <name>hadoop.tmp.dir</name>
        <value>/opt/module/hadoop/data</value>
    </property>

    <!-- 配置HDFS网页登录使用的静态用户为atguigu -->
    <property>
        <name>hadoop.http.staticuser.user</name>
        <value>atguigu</value>
    </property>

    <!-- 配置该atguigu(superUser)允许通过代理访问的主机节点 -->
    <property>
        <name>hadoop.proxyuser.atguigu.hosts</name>
        <value>*</value>
    </property>

    <!-- 配置该atguigu(superUser)允许通过代理用户所属组 -->
    <property>
        <name>hadoop.proxyuser.atguigu.groups</name>
        <value>*</value>
    </property>
    <!-- 配置该atguigu(superUser)允许通过代理的用户 -->
    <property>
        <name>hadoop.proxyuser.atguigu.users</name>
        <value>*</value>
    </property>
</configuration>
/opt/module/hadoop/etc/hadoop/hdfs-site.xml(hadoop102执行下面命令)
vim /opt/module/hadoop/etc/hadoop/hdfs-site.xml修改后完整内容:
<?xml version="1.0" encoding="UTF-8"?>
<?xml-stylesheet type="text/xsl" href="configuration.xsl"?>
<!--
  Licensed under the Apache License, Version 2.0 (the "License");
  you may not use this file except in compliance with the License.
  You may obtain a copy of the License at

    http://www.apache.org/licenses/LICENSE-2.0

  Unless required by applicable law or agreed to in writing, software
  distributed under the License is distributed on an "AS IS" BASIS,
  WITHOUT WARRANTIES OR CONDITIONS OF ANY KIND, either express or implied.
  See the License for the specific language governing permissions and
  limitations under the License. See accompanying LICENSE file.
-->

<!-- Put site-specific property overrides in this file. -->

<configuration>
    <!-- nn web端访问地址 -->
    <property>
        <name>dfs.namenode.http-address</name>
        <value>hadoop102:9870</value>
    </property>

    <!-- 2nn web端访问地址 -->
    <property>
        <name>dfs.namenode.secondary.http-address</name>
        <value>hadoop104:9868</value>
    </property>

    <!-- 测试环境指定HDFS副本的数量1 -->
    <property>
        <name>dfs.replication</name>
        <value>1</value>
    </property>
</configuration>
/opt/module/hadoop/etc/hadoop/yarn-site.xml(hadoop102执行下面命令)
vim /opt/module/hadoop/etc/hadoop/yarn-site.xml修改后完整内容:
<?xml version="1.0"?>
<!--
  Licensed under the Apache License, Version 2.0 (the "License");
  you may not use this file except in compliance with the License.
  You may obtain a copy of the License at

    http://www.apache.org/licenses/LICENSE-2.0

  Unless required by applicable law or agreed to in writing, software
  distributed under the License is distributed on an "AS IS" BASIS,
  WITHOUT WARRANTIES OR CONDITIONS OF ANY KIND, either express or implied.
  See the License for the specific language governing permissions and
  limitations under the License. See accompanying LICENSE file.
-->
<configuration>
    <!-- 指定MR走shuffle -->
    <property>
        <name>yarn.nodemanager.aux-services</name>
        <value>mapreduce_shuffle</value>
    </property>

    <!-- 指定ResourceManager的地址 -->
    <property>
        <name>yarn.resourcemanager.hostname</name>
        <value>hadoop103</value>
    </property>

    <!-- 环境变量的继承 -->
    <property>
        <name>yarn.nodemanager.env-whitelist</name>
        <value>JAVA_HOME,HADOOP_COMMON_HOME,HADOOP_HDFS_HOME,HADOOP_CONF_DIR,CLASSPATH_PREPEND_DISTCACHE,HADOOP_YARN_HOME,HADOOP_MAPRED_HOME</value>
    </property>

    <!-- yarn单个容器允许分配的最大最小内存 -->
    <property>
        <name>yarn.scheduler.minimum-allocation-mb</name>
        <value>512</value>
    </property>

    <property>
        <name>yarn.scheduler.maximum-allocation-mb</name>
        <value>4096</value>
    </property>

    <!-- yarn容器允许管理的物理内存大小 -->
    <property>
        <name>yarn.nodemanager.resource.memory-mb</name>
        <value>4096</value>
    </property>

    <!-- 关闭yarn对物理内存和虚拟内存的限制检查 -->
    <property>
        <name>yarn.nodemanager.pmem-check-enabled</name>
        <value>true</value>
    </property>

    <property>
        <name>yarn.nodemanager.vmem-check-enabled</name>
        <value>false</value>
    </property>
</configuration>
/opt/module/hadoop/etc/hadoop/mapred-site.xml(hadoop102执行下面命令)
vim /opt/module/hadoop/etc/hadoop/mapred-site.xml修改后完整内容:
<?xml version="1.0"?>
<?xml-stylesheet type="text/xsl" href="configuration.xsl"?>
<!--
  Licensed under the Apache License, Version 2.0 (the "License");
  you may not use this file except in compliance with the License.
  You may obtain a copy of the License at

    http://www.apache.org/licenses/LICENSE-2.0

  Unless required by applicable law or agreed to in writing, software
  distributed under the License is distributed on an "AS IS" BASIS,
  WITHOUT WARRANTIES OR CONDITIONS OF ANY KIND, either express or implied.
  See the License for the specific language governing permissions and
  limitations under the License. See accompanying LICENSE file.
-->

<!-- Put site-specific property overrides in this file. -->
<configuration>
    <!-- 指定MapReduce程序运行在Yarn上 -->
    <property>
        <name>mapreduce.framework.name</name>
        <value>yarn</value>
    </property>
</configuration>
修改/opt/module/hadoop/etc/hadoop/workers为下面内容,把原本内容删除(hadoop102执行下面操作)
hadoop102
hadoop103
hadoop104
在/opt/module/hadoop/etc/hadoop/mapred-site.xml中新增下面配置(hadoop102执行下面命令)
vim /opt/module/hadoop/etc/hadoop/mapred-site.xml在对应位置增加下面内容:
<!-- 历史服务器端地址 -->
    <property>
        <name>mapreduce.jobhistory.address</name>
        <value>hadoop102:10020</value>
    </property>

    <!-- 历史服务器web端地址 -->
    <property>
        <name>mapreduce.jobhistory.webapp.address</name>
        <value>hadoop102:19888</value>
    </property>
新增后完整代码:
<?xml version="1.0"?>
<?xml-stylesheet type="text/xsl" href="configuration.xsl"?>
<!--
  Licensed under the Apache License, Version 2.0 (the "License");
  you may not use this file except in compliance with the License.
  You may obtain a copy of the License at

    http://www.apache.org/licenses/LICENSE-2.0

  Unless required by applicable law or agreed to in writing, software
  distributed under the License is distributed on an "AS IS" BASIS,
  WITHOUT WARRANTIES OR CONDITIONS OF ANY KIND, either express or implied.
  See the License for the specific language governing permissions and
  limitations under the License. See accompanying LICENSE file.
-->

<!-- Put site-specific property overrides in this file. -->
<configuration>
    <!-- 指定MapReduce程序运行在Yarn上 -->
    <property>
        <name>mapreduce.framework.name</name>
        <value>yarn</value>
    </property>
    <!-- 历史服务器端地址 -->
    <property>
        <name>mapreduce.jobhistory.address</name>
        <value>hadoop102:10020</value>
    </property>

    <!-- 历史服务器web端地址 -->
    <property>
        <name>mapreduce.jobhistory.webapp.address</name>
        <value>hadoop102:19888</value>
    </property>
</configuration>
在/opt/module/hadoop/etc/hadoop/yarn-site.xml中新增下面配置(hadoop102执行下面命令)
vim /opt/module/hadoop/etc/hadoop/yarn-site.xml
增加下面内容:
 <!-- 开启日志聚集功能 -->
    <property>
        <name>yarn.log-aggregation-enable</name>
        <value>true</value>
    </property>

    <!-- 设置日志聚集服务器地址 -->
    <property>
        <name>yarn.log.server.url</name>
        <value>http://hadoop102:19888/jobhistory/logs</value>
    </property>

    <!-- 设置日志保留时间为7天 -->
    <property>
        <name>yarn.log-aggregation.retain-seconds</name>
        <value>604800</value>
    </property>
更新后完整代码:
<?xml version="1.0"?>
<!--
  Licensed under the Apache License, Version 2.0 (the "License");
  you may not use this file except in compliance with the License.
  You may obtain a copy of the License at

    http://www.apache.org/licenses/LICENSE-2.0

  Unless required by applicable law or agreed to in writing, software
  distributed under the License is distributed on an "AS IS" BASIS,
  WITHOUT WARRANTIES OR CONDITIONS OF ANY KIND, either express or implied.
  See the License for the specific language governing permissions and
  limitations under the License. See accompanying LICENSE file.
-->
<configuration>
    <!-- 指定MR走shuffle -->
    <property>
        <name>yarn.nodemanager.aux-services</name>
        <value>mapreduce_shuffle</value>
    </property>

    <!-- 指定ResourceManager的地址 -->
    <property>
        <name>yarn.resourcemanager.hostname</name>
        <value>hadoop103</value>
    </property>

    <!-- 环境变量的继承 -->
    <property>
        <name>yarn.nodemanager.env-whitelist</name>
        <value>JAVA_HOME,HADOOP_COMMON_HOME,HADOOP_HDFS_HOME,HADOOP_CONF_DIR,CLASSPATH_PREPEND_DISTCACHE,HADOOP_YARN_HOME,HADOOP_MAPRED_HOME</value>
    </property>

    <!-- yarn单个容器允许分配的最大最小内存 -->
    <property>
        <name>yarn.scheduler.minimum-allocation-mb</name>
        <value>512</value>
    </property>

    <property>
        <name>yarn.scheduler.maximum-allocation-mb</name>
        <value>4096</value>
    </property>

    <!-- yarn容器允许管理的物理内存大小 -->
    <property>
        <name>yarn.nodemanager.resource.memory-mb</name>
        <value>4096</value>
    </property>

    <!-- 关闭yarn对物理内存和虚拟内存的限制检查 -->
    <property>
        <name>yarn.nodemanager.pmem-check-enabled</name>
        <value>true</value>
    </property>

    <property>
        <name>yarn.nodemanager.vmem-check-enabled</name>
        <value>false</value>
    </property>

    <!-- 开启日志聚集功能 -->
    <property>
        <name>yarn.log-aggregation-enable</name>
        <value>true</value>
    </property>

    <!-- 设置日志聚集服务器地址 -->
    <property>
        <name>yarn.log.server.url</name>
        <value>http://hadoop102:19888/jobhistory/logs</value>
    </property>

    <!-- 设置日志保留时间为7天 -->
    <property>
        <name>yarn.log-aggregation.retain-seconds</name>
        <value>604800</value>
    </property>
</configuration>
将配置完成后的Hadoop分发到其它主机,输入下面命令(hadoop102执行下面命令)
xsync /opt/module/hadoop/四、启动Hadoop集群
在hadoop102输入下面的命令进行格式化:
cd /opt/module/hadoop/
# 如果是第一次启动要先执行下面命令,格式化namenode节点
bin/hdfs namenode -format
在hadoop102输入下面命令启动hdf集群:
sbin/start-dfs.sh在hadoop103输入下面命令启动yarn(!!!注意这里不是hadoop102执行了)
 cd /opt/module/hadoop/
 sbin/start-yarn.sh
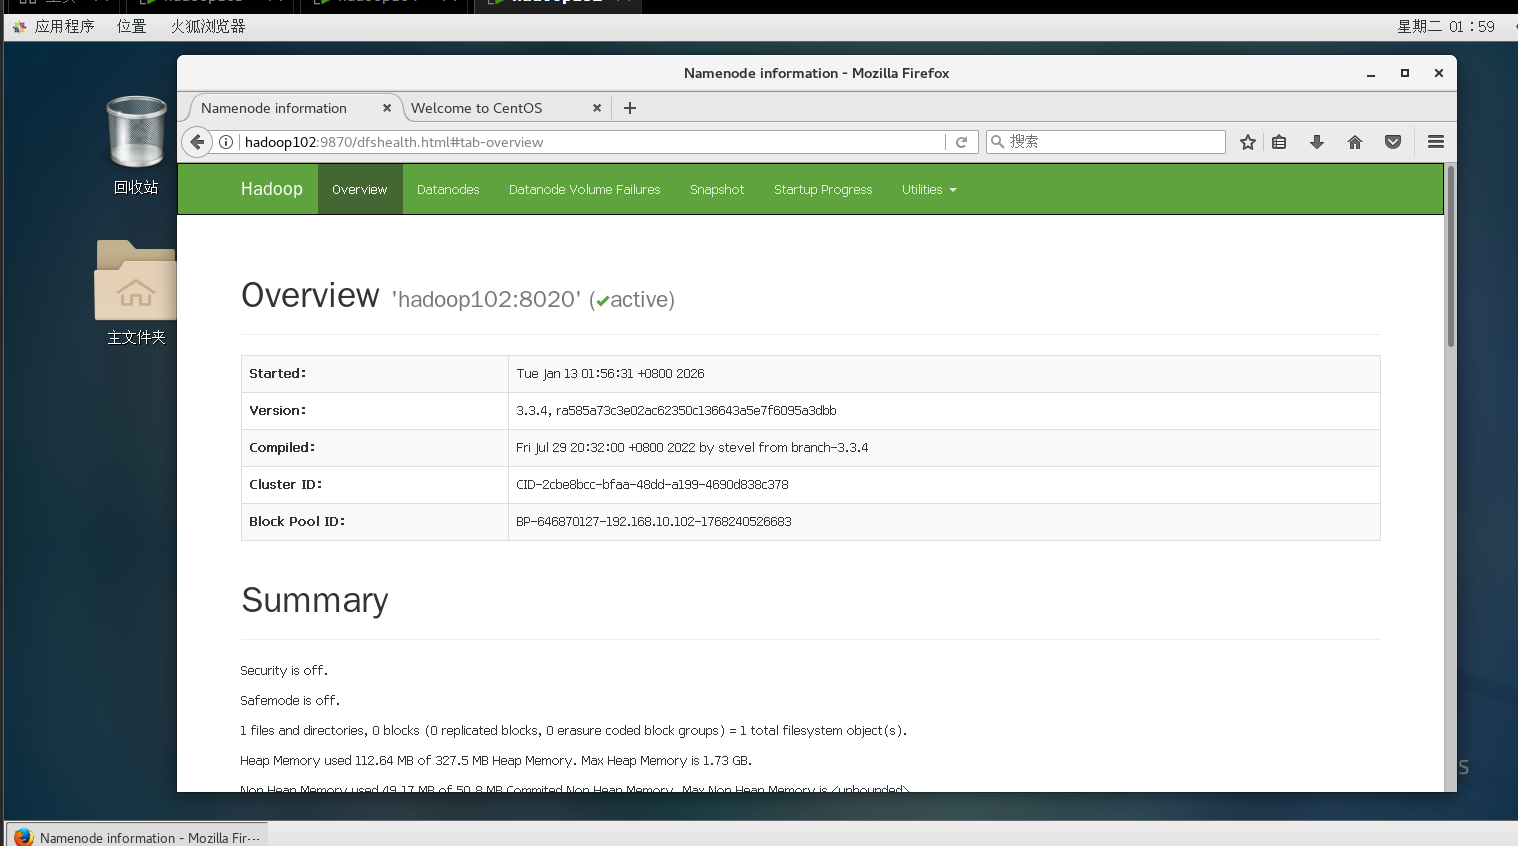
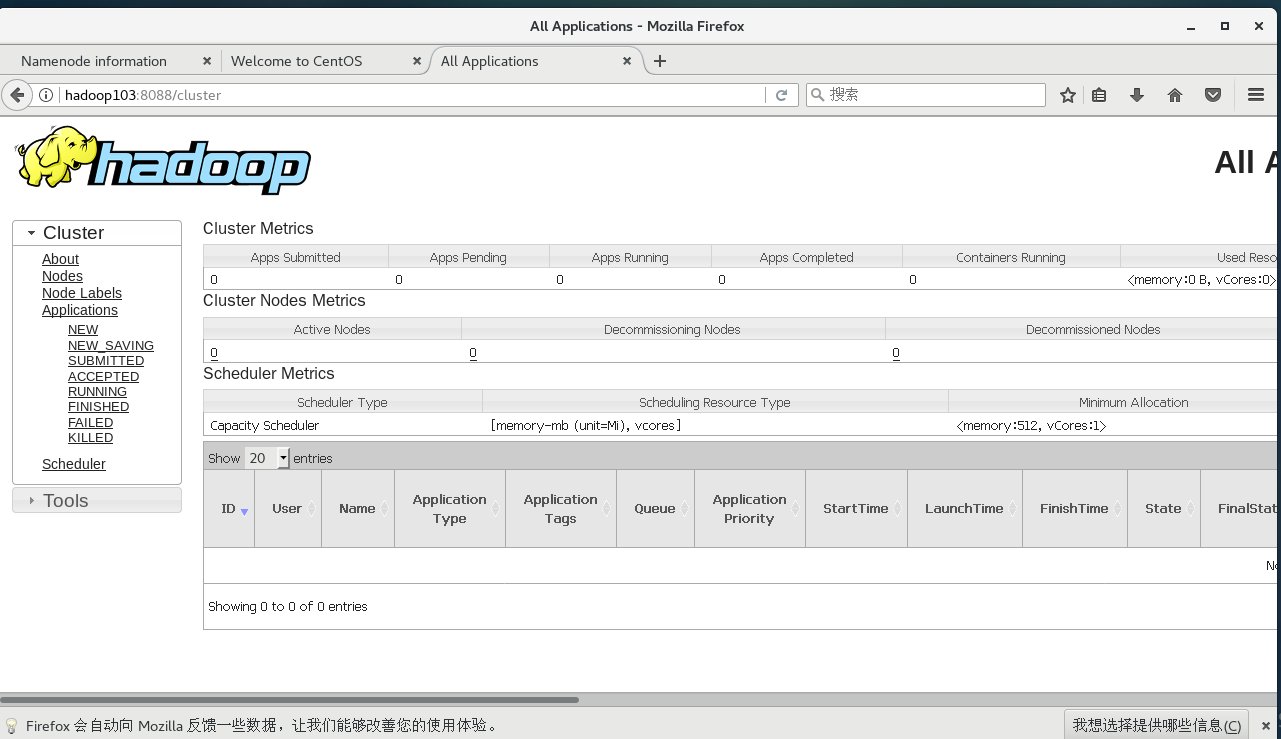
最后在虚拟机中的浏览器输入下面网址查看集群web页面验证
http://hadoop102:9870
http://hadoop103:8088
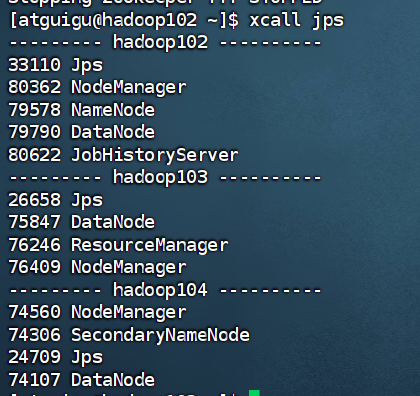
最后在hadoop102输入下面命令查看进程
xcall jps
结果如图:
五、Hadoop群起脚本
在hadoop102输入下面命令:
cd /home/atguigu/bin
vim hdp.sh
输入下面的脚本内容:
#!/bin/bash
# 检查参数个数
if [ $# -lt 1 ]
then
echo "No Args Input..."
echo "Usage: $0 {start|stop}"
exit 1
fi
# 根据参数执行相应操作
case $1 in
"start")
echo " --- 启动 hadoop集群 ---"
echo " --- 启动 hdfs ---"
ssh hadoop102 "/opt/module/hadoop/sbin/start-dfs.sh"
echo " --- 启动 yarn ---"
ssh hadoop103 "/opt/module/hadoop/sbin/start-yarn.sh"
echo " --- 启动 historyserver ---"
ssh hadoop102 "/opt/module/hadoop/bin/mapred --daemon start historyserver"
;;
"stop")
echo " --- 关闭 hadoop集群 ---"
echo " --- 关闭 historyserver ---"
ssh hadoop102 "/opt/module/hadoop/bin/mapred --daemon stop historyserver"
echo " --- 关闭 yarn ---"
ssh hadoop103 "/opt/module/hadoop/sbin/stop-yarn.sh"
echo " --- 关闭 hdfs ---"
ssh hadoop102 "/opt/module/hadoop/sbin/stop-dfs.sh"
;;
*)
echo "Input Args Error..."
echo "Usage: $0 {start|stop}"
exit 1
;;
esac
echo "操作完成!"
添加脚本权限:(hadoop102执行下面命令)
chmod 777 hdp.sh
验证脚本,输入下面命令:(hadoop102执行下面命令)
# 先关闭上面已经开启的Hadoop集群,如果你未开启就不用执行下面的第一条命令
hdp.sh stop
# 使用脚本启动集群
hdp.sh start
更多推荐
 36
36 0
0- 0


 已为社区贡献10条内容

所有评论(0)