
大模型开发(六):应用开发框架
1、LangChain
github 项目:https://github.com/langchain-ai/langchain.git
文档:https://python.langchain.com/docs/introduction/
入门:https://python.langchain.com/docs/how_to/
api 文档:https://python.langchain.com/api_reference/core/index.html#
示例模版:https://smith.langchain.com/hub
劝退 langchain 的文章https://www.octomind.dev/blog/why-we-no-longer-use-langchain-for-building-our-ai-agents
LangChain 是一个基于开源大语言模型的 AI 工程开发框架,开发人员能够更轻松地构建 AI 应用程序它提供了多种组件和工具,可帮助用户利用最近的语言模型进展,如大型 Transformer 模型等,并且可以与 Hugging Face 等平台集成LangChain 的核心理念是将语言模型用作协作工具,开发者可以构建出处理复杂任务的系统,并且可以高效地对接不同的数据源和应用程序接口(APIs)
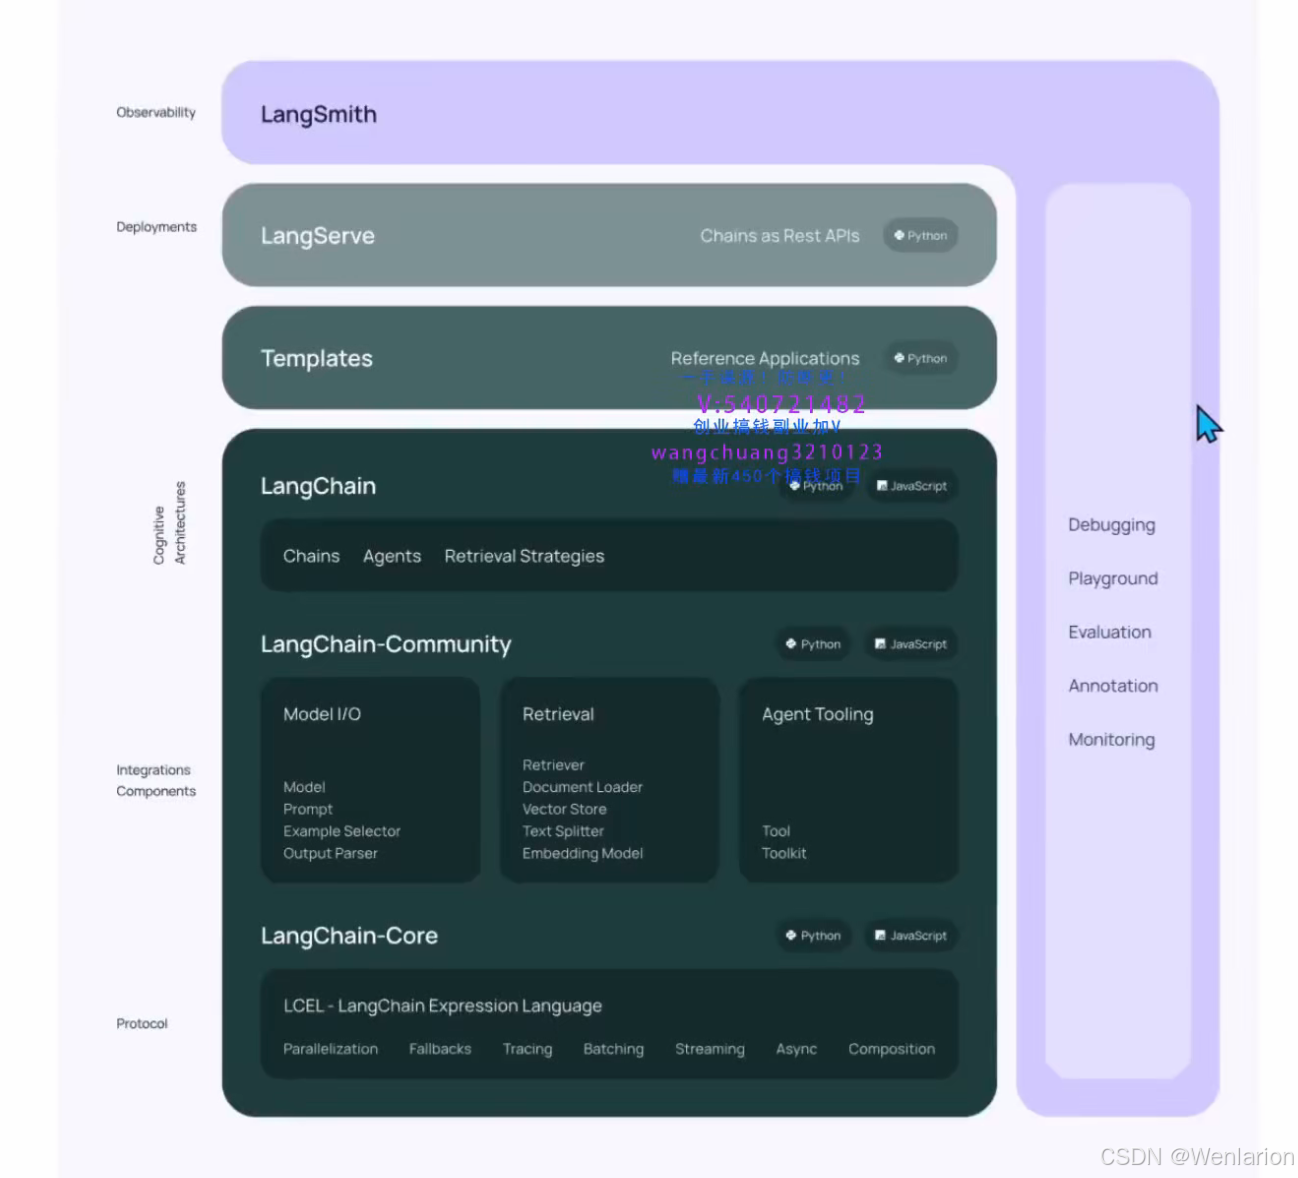
如图,从下至上分别是:
-
LangChain 库:Python 和 JavaScript 库,包含接口和集成,用于各种组件的组合,以及现成的链和代理的实现
-
LangChain 模板:易于部署的各种任务的参考架构集合
-
LangServe:将 LangChain 部署为 REST API 的库
-
LangSmith:开发平台,可用于调试、测试、评估和监控基于任何 LLM 框架构建的链,并与 LangChain 无缝集成
Langchain 在架构上使用了从抽象、到具体、再到整合适配的三层架构,这种一层一层逐渐具体的设计最大可能性的保证了架构的可扩展性和维护性同时这种设计也说明其实每一层架构其实是类似的,无非是一层一层逐渐把抽象的设计实现出来而已
无论是在抽象层(Core),还是实现层(Community),还是整合层(Langchain)Langchain 的核心模块都是由 Model I/O、Retrieval、Agents、Chains、Memory、Callbacks 六部分组成的
LangChain 库
LangChain 的核心组件和能力(六大核心抽象,用于构建复杂的 AI 应用,同时保持了良好的扩展能力。)
Models(模型):
-
LLMs(大型语言模型):在 LangChain 中,LLMs 的实现例如 OpenAI 的 GPT-3 模型,这些模型接受文本字符串作为输入,并返回文本字符串作为输出
-
Chat Models(聊天模型):以聊天消息列表作为输入,并返回聊天消息,使得管理对话历史记录和维护上下文变得容易。这些模型是语言模型的变体,其接口基于消息而不是原始文本。您可以使用不同类型的消息(如 AIMessage、HumanMessage、SystemMessage 和 ChatMessage)与聊天模型进行交互。
-
Embeddings(嵌入):帮助将文本转换为 Embedding 向量表示,以便进行相似性搜索和其他计算
Prompts(提示)
LangChain 提供了多种类型的 Prompts,以适应不同的应用场景:
-
PromptTemplate:这是最基本的提示模板,用于创建字符串提示的模板。它允许定义占位符,这些占位符在运行时可以用特定值替换,从而生成定制化的提示
-
ChatPromptTemplate:专门用于构建聊天模型的提示,它处理的是消息列表而非普通文本。每个消息都与一个角色(如 AI、人类或系统)相关联,这有助于模型更好地理解上下文和指令
-
MessagePromptTemplate:用于创建与特定角色相关联的消息模板,如系统消息、AI 消息和人类消息。这些模板可以通过
from_template方法方便地构建
Indexes(索引)
-
文档加载器(Document Loaders):文档转换器可以将许多类型的文件(文本、PowerPoint、图像、HTML、PDF 等)转换为文本数据,包含公共数据集加载器工具、专有数据集加载器工具
-
文本分割器(Text Splitters):当我们需要处理长文本时,有必要将文本分割成块,支持多种文件的分割。有两点注意:文本如何被分割,块的大小如何衡量
-
向量存储器(Vectorstores):Vectorstores 是构建索引的最重要组件之一,需要结合向量数据库和 embedding 模型
-
检索器(Retrievers):检索器(Retrievers)是一个通用的接口,方便地将文档与语言模型结合在一起。该接口公开了一个
get_relevant_documents方法,接受一个查询字符串并返回一组相关文档
Memory(记忆)
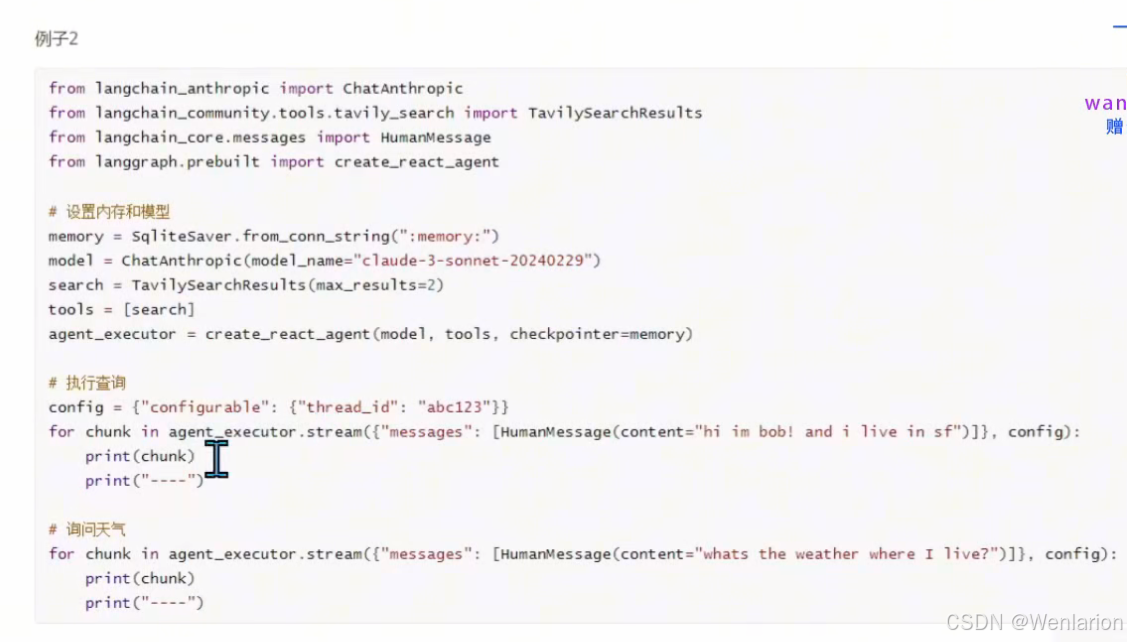
默认情况下,链(Chains)和代理(Agents)是无状态的
-
ChatMessageHistory:提供了保存人类消息、AI 消息以及获取所有消息的便捷方法
-
ConversationBufferMemory:是一个对
ChatMessageHistory的包装器 -
ConversationBufferWindowMemory:用于跟踪会话中的来回消息,然后使用大小为 k 的窗口将最近的 k 条来回消息提取出来作为内存
-
ConversationSummaryMemory:在对话时对其进行总结并储存在记忆中,可将当前对话总结注入到提示中,对较长的对话进行总结时非常有用,能节省 token
-
ConversationKGMemory:这种类型的记忆使用知识图谱来重建记忆
-
ConversationEntityMemory:使用语言模型(LLMs)提取实体相关的信息,并随着时间的推移逐渐积累对该实体的知识
-
VectorStoreRetrieverMemory:将记忆存储在向量数据库中,并在每次调用时查询最 “显著” 的前 K 个文档
Agents(代理)
使得 LLMs 能够与外部环境进行交互,例如通过 function call 执行操作
总之,LangChain 是一个强大的工具箱,不仅涵盖了基础工具,还为个性化需求提供了自定义组件解决方案。它使开发者能够更专注于创新和优化产品功能,从原型到生产环境的转化变得更加高效。
Chains(链)
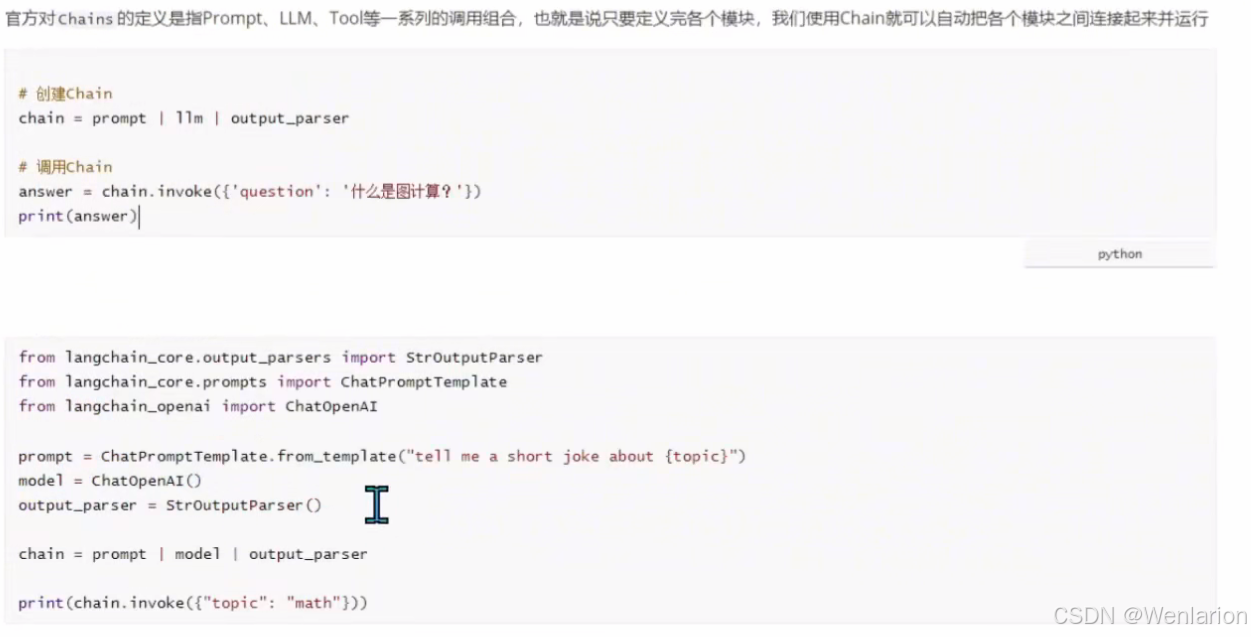
"Chain" 是一个核心概念,它指的是将一系列模块化组件(可以是 LLMs、工具或数据预处理步骤)以特定方式组合起来,以实现共同的用例
-
LangChain 提供了 LCEL(LangChain Expression Language) 声明式编程语言,将不同组件组合起来解决特定任务
-
LLMChain:最常见的链类型,由
PromptTemplate(提示模板)、模型(可以是 LLM 或 ChatModel)和可选的输出解析器组成 -
SequentialChain:使用顺序链式把一些处理步骤连接起来,按照预定义的顺序执行其链接
环境安装
pip install langchain langchain-core langchain-communityModels(模型)
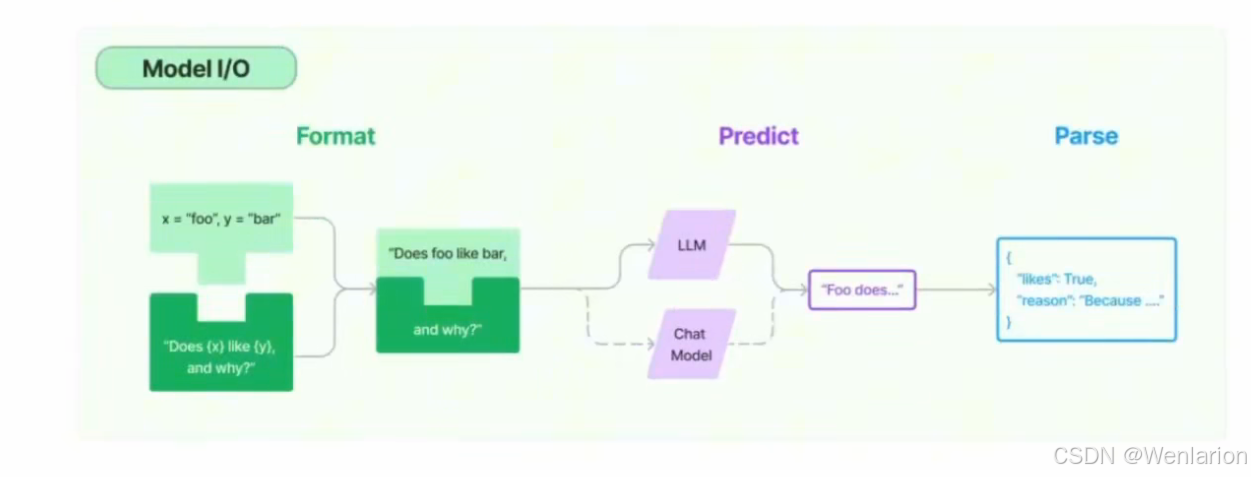
对于文本生成模型服务来说,实际的输入和输出本质上都是字符串
直接调用 LLM 服务带来的问题是要在输入格式化和输出结果解析上做大量的重复的文本处理工作
LangChain 提供了 Prompt 和 OutputParser 抽象,用户可以根据自己的需要选择具体的实现类型使用
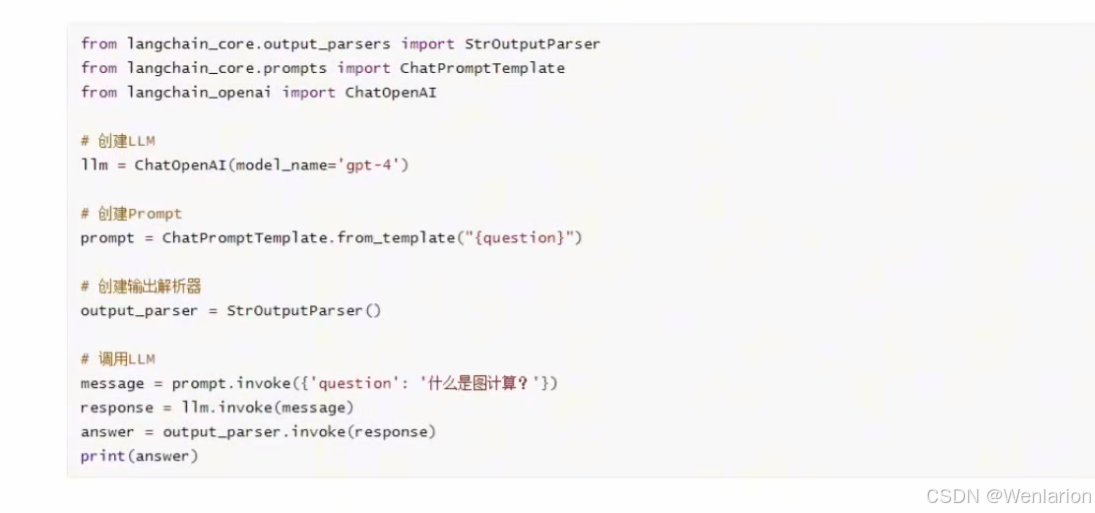
LLMs vs Chat Model
-
LLMs:主要用于单轮的问题回答处理,输入和输出的数据格式都是
string(字符串) -
Chat Model:主要用于多轮的对话处理,输入和输出的数据格式都是
List[BaseMessage](消息数组)。BaseMessage消息主要包括AIMessage/HumanMessage/SystemMessage这三种类型
Prompts(提示)
在 LangChain 中,Prompt 具体是指向大语言模型 LLM 发起的一组指令或输入,用于引导 LLM 的响应。
-
目标:建立与模型无关的跨语言、跨平台、跨模型的通用性 Prompt 系统
-
分类(根据 Model 类型不同):
-
PromptTemplate:先使用
from_template()方法创建一个模板,支持传递任意数量的变量,然后使用format()方法格式化即可。 -
ChatPromptTemplate:显示用
from_messages()方法创建一个消息列表,然后再在消息列表中组装不同类型的BaseMessage类型即可
-
Output Parsers(输出解析器)
Output Parsers 即输出解析器,用于对 Model 的输出执行二次处理(部分支持流式输出)
-
常见场景:对 Model 输出做 JSON 化处理
流式输出:如果需要流式输出,使用 chain.stream() 即可。需要注意的是使用前需要确认具体的某个 Output Parser 是否支持流式输出功能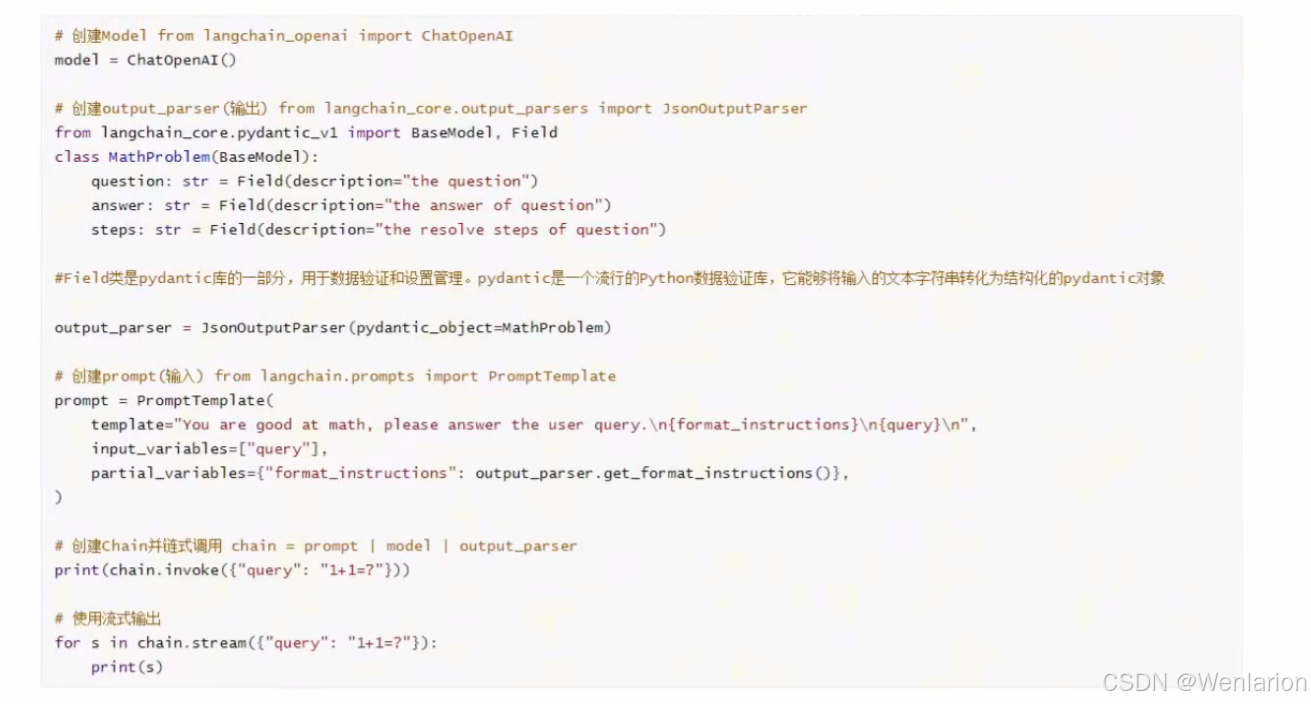 Memory 内存的类型:内存分为 short-term(短期存储) 和 Long-term(长期存储),具体类型如下:
-
Conversation Buffer Window:有窗口的会话缓冲
-
Conversation Buffer:无窗口的会话缓冲
-
Conversation Summary:无窗口的会话摘要(摘要是指对内容的总结压缩,而非全部)
-
Conversation Summary Buffer:有窗口的会话摘要
-
Conversation Token Buffer:基于 token 长度计算的会话缓冲
-
Backed by a Vector Store:基于向量存储的会话存储
LCEL (LangChain Expression Language)
LangChain 的表达式语言(LCEL)通过重载
__or__运算符的思路,构建了类似 Unix 管道运算符的设计,实现更简洁的 LLM 调用形式LCEL (LangChain Expression Language) 是一种构建复杂链的简便方法,语法是使用
|或运算符自动创建 Chain 后,即可完成链式操作。这在背后的原理是 python 的
__or__魔术函数,比如chain = prompt | model就相当于chain = prompt.__or__(model)。是 Python 的一种高级语法,允许你在类中自定义函数(函数名格式一般为__xx__)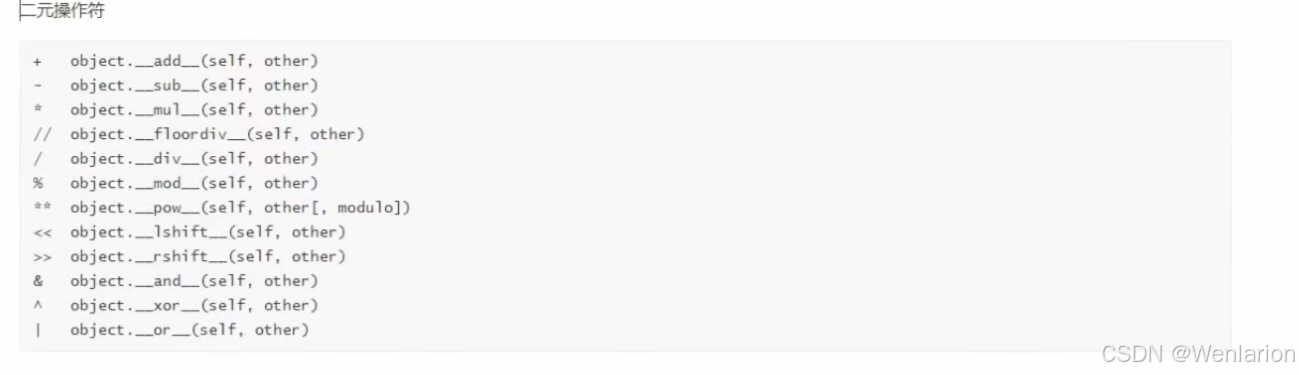
Callbacks
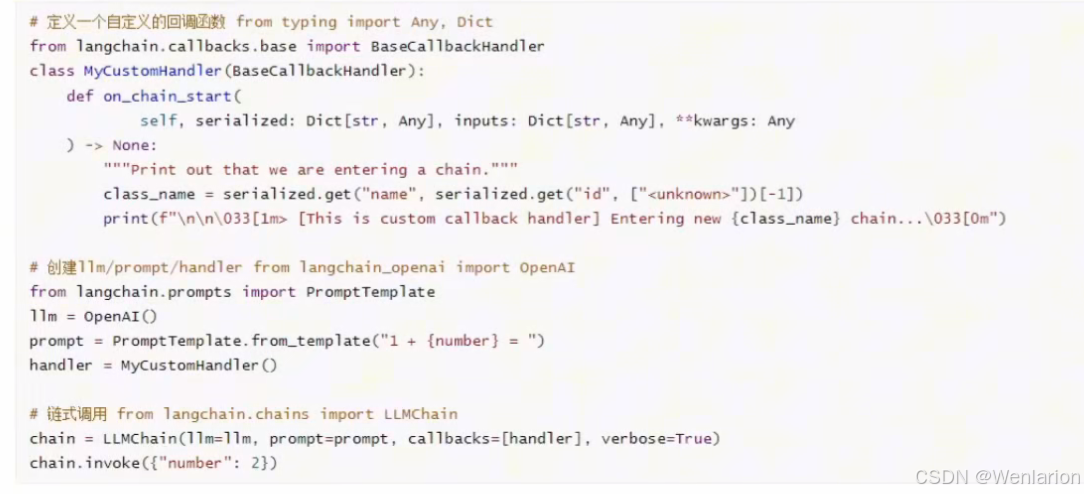
Langchain 提供了一系列系统级别的回调函数,也就是在整个生命周期内的 Hook 钩子,以便于用户在应用层做日志、监控等其他处理
定义一个on_chain_start的自定义回调函数
Agent
-
文档:https://python.langchain.com/docs/how_to/migrate_agent/
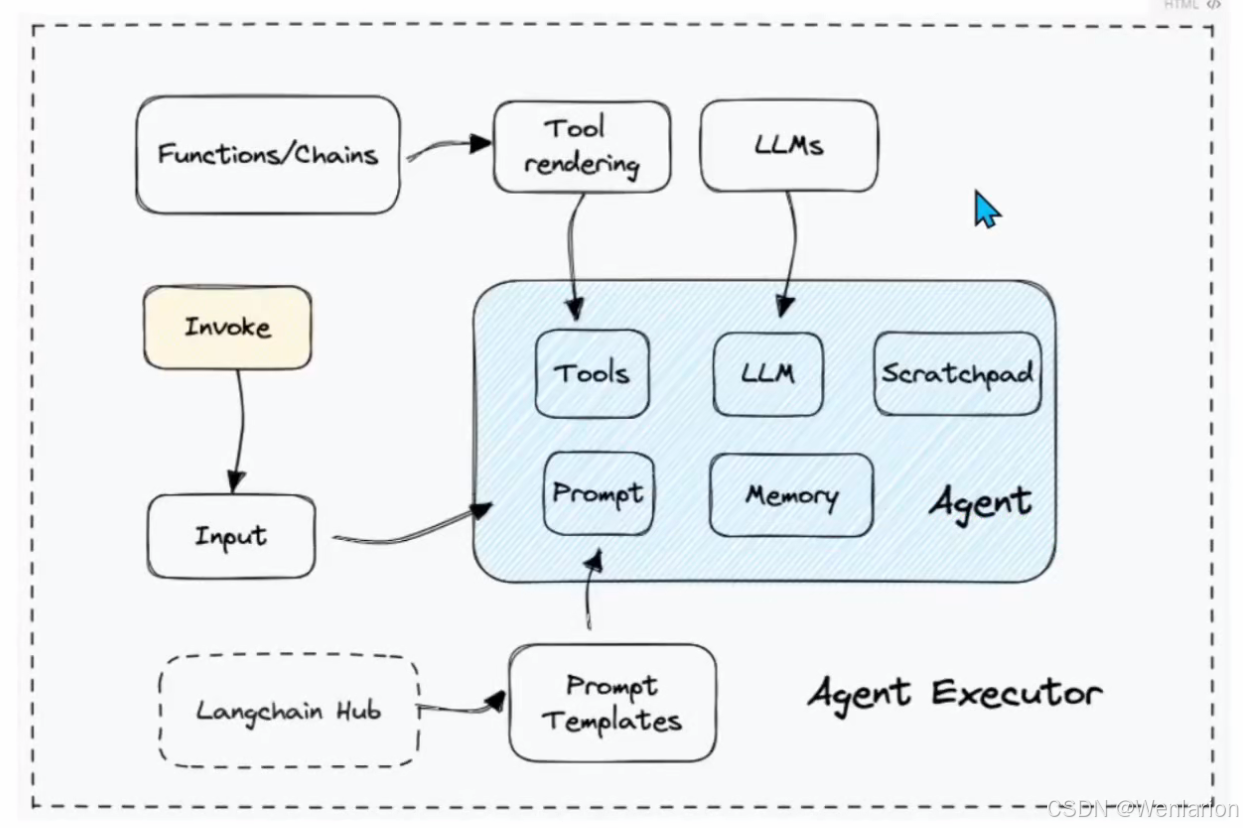
语言模型(LLM)通过文本生成实现与用户的交互,但其本身并不能执行动作。
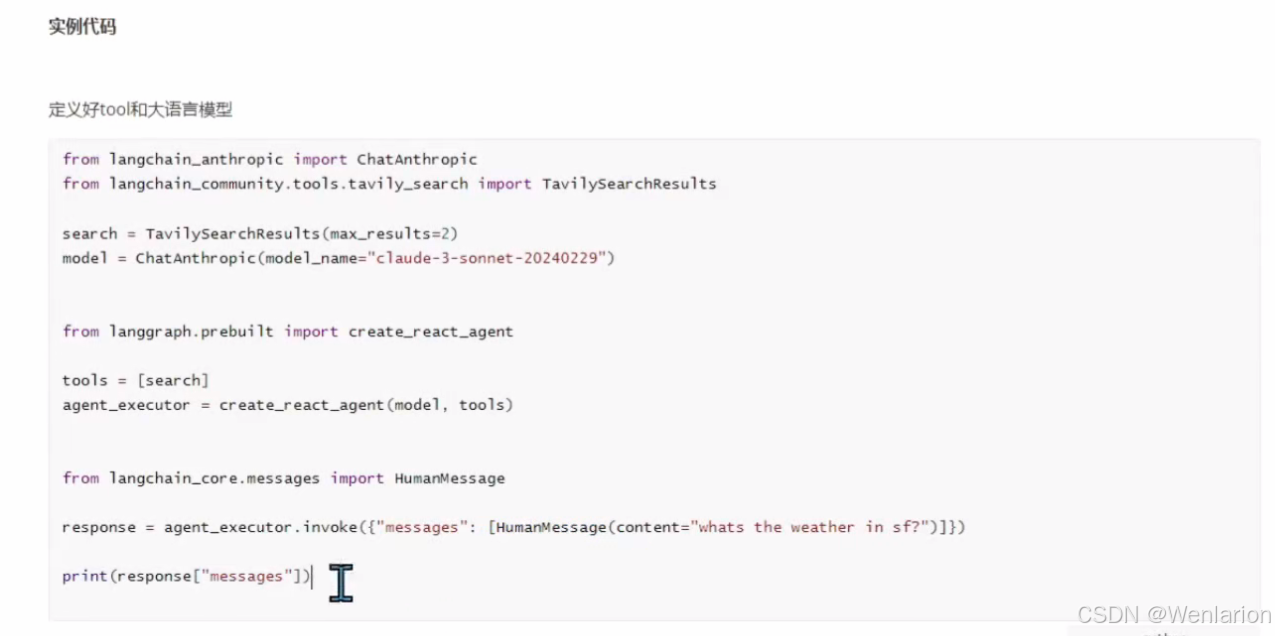
LangChain 提供了一种创建智能体(Agent)的框架,这些 Agent 使用 LLM 作为推理引擎,根据输入决定采取哪种动作
Agent 类型
Agent 类型按照模型类型、是否支持聊天历史、是否支持函数并行调用等维度的不同,主要分为以下几种不同的 Agent:
-
OpenAI functions:基于 OpenAI Function 的 Agent -
OpenAI tools:基于 OpenAI Tool 的 Agent -
XML Agent:有些 LLM 模型很适合编写和理解 XML(比如 Anthropic's Claude),所以可以使用 XML Agent -
JSON Chat Agent:有些 LLM 模型很适合编写和理解 JSON,所以可以使用 JSON Agent -
Structured chat Agent:使用结构化的聊天 Agent 可以使用多输入的工具 -
ReAct Agent:基于 ReAct 逻辑的 Agent
Tools 工具
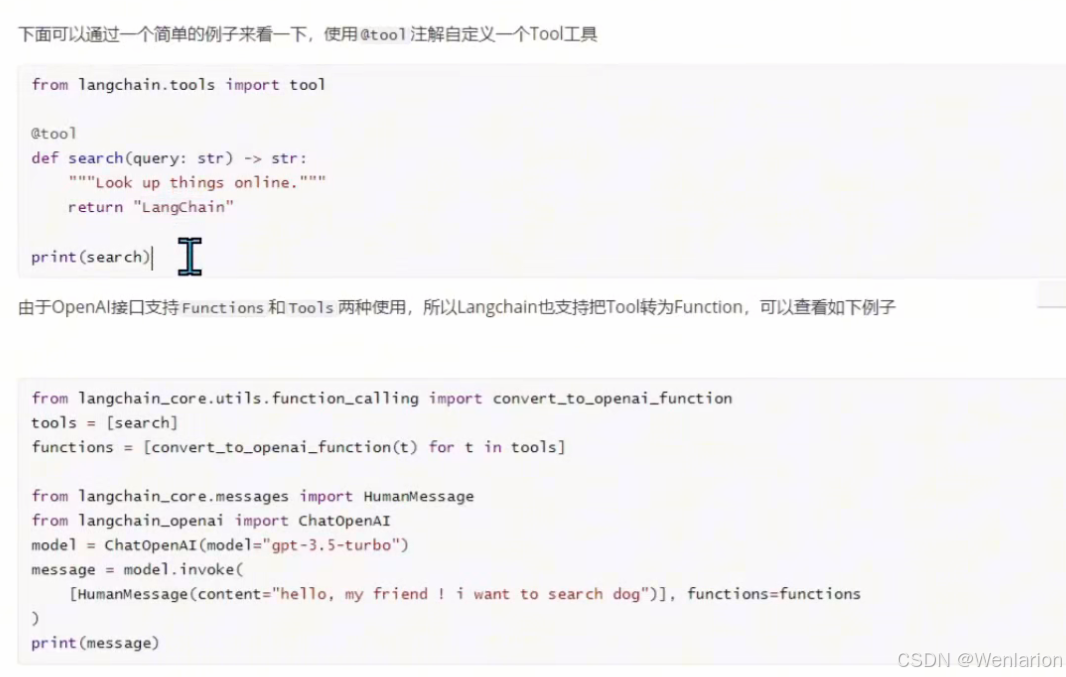
Tools 是 Agent 最核心的部分之一,也是 Agent 与外界交互的重要接口,让它具备了与世界沟通的能力。
工具充当了 Agent 与外部环境之间的桥梁,使得 Agent 能够处理来自外部环境的输入,并生成相应的输出。
Tools 并不是 Langchain 自己发明创造的,而是属于通用的 Agent 概念中的一个重要组成部分,在 OpenAI 中它就原生支持了 message 之外的 Tools 参数和 Functions 参数,这两个参数没有太大区别,只是使用 Tools 逐步代替了早期的 Functions 参数
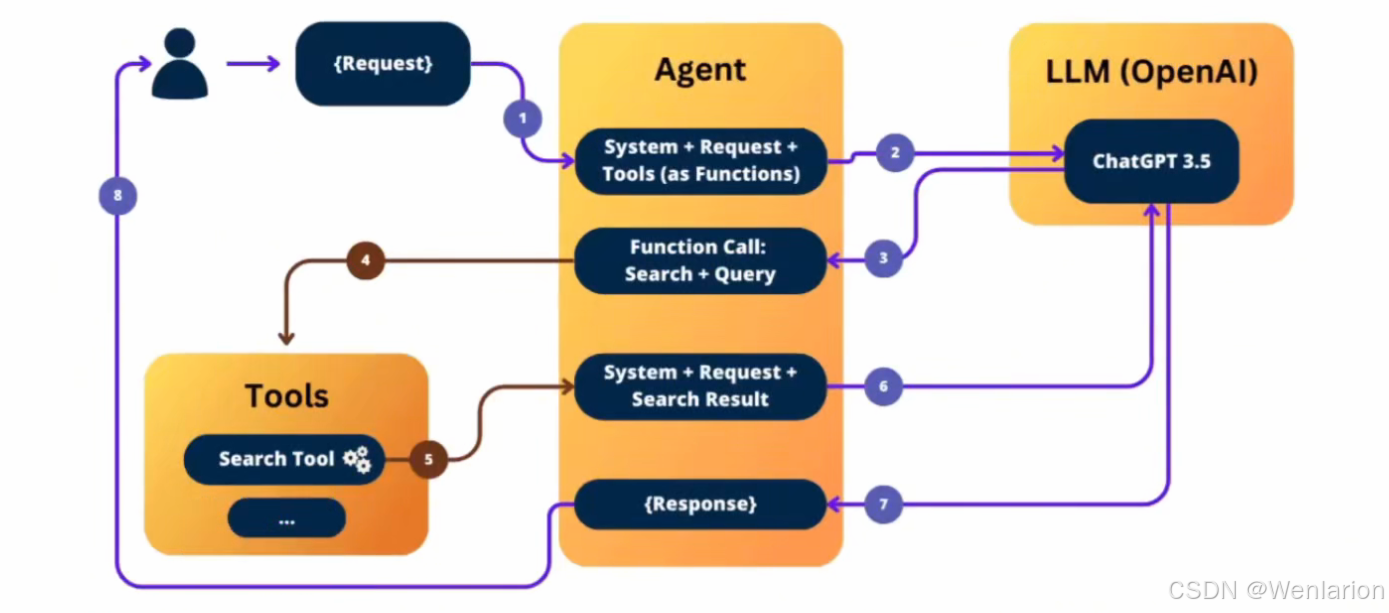
例子流程
举例来说,Agent 可以使用搜索工具来获取特定主题的信息,使用语言处理工具来理解和生成文本,使用编程执行工具来执行特定的代码等。这些工具允许 Agent 从外部获取所需的信息,并对外部环境产生影响
在这种情况下它的工作流程如下所示:① 用户发起请求,Agent 接收请求② Agent 会把 System Text + User Text + Tools/Functions 一起传递给 LLM(如调用 ChatGPT 接口)③ 由于 LLM 发现传递了 Tools/Functions 参数,所以首次 LLM 只返回应该调用的函数(如search_func)④ Agent 会自己调用对应的函数(如search_func)并获取到函数的返回结果(如search_result)⑤ Agent 把函数的返回结果并入到上下文中,最后再把 System Text + User Text + search_result 一起传递给 LLM⑥ LLM 把结果返回给 Agent⑦ Agent 再把结果返回给用户
2、LangGraph
GitHub 项目: https://github.com/langchain-ai/langgraph/tree/main
文档: https://langchain-ai.github.io/langgraph/
LangGraph 于 2024 年 1 月推出,是在 LangChain 基础上的一个库,也属于 LangChain 团队的产品。
LangGraph 的主要优势在于它能够实现循环工作流,这对于在 LLM 应用程序中模拟类似 Agent 的行为至关重要。与典型的有向无环图 (DAG) 工作流有区别,如何构建更具交互性和迭代性的基于 LLM 的系统。
核心优势
LangGraph 在设计上具有三个核心优势,使其成为构建 Agent 应用程序的首选框架之一:
-
循环支持:LangGraph 允许用户定义涉及循环的流程,这对于大多数 Agent 架构来说是必不可少的。这种能力使 LangGraph 有别于基于有向无环图(DAG)的解决方案,后者不直接支持循环。
-
细粒度控制:作为一个非常低级的框架,LangGraph 为用户提供了对应用程序的流程和状态的细粒度控制。这对于创建可靠、可预测的 Agent 至关重要,因为 Agent 需要在复杂的环境中做出明智的决策。
-
内置持久性:LangGraph 还包括内置的持久性功能,使 Agent 能够记住过去的交互并使用这些信息来指导未来的决策。这种持久性还支持高级的人机交互,使 Agent 能够与人类用户进行更自然、更有效的交互。
原理
图(Graph)是一种数据结构,由节点(Node)和边(Edge)组成。节点表示实体或对象,边表示节点之间的关系。图可以用于表示复杂的关系和流程,广泛应用于计算机科学和人工智能领域。
在 LangGraph 中,图被用于表示和构建复杂的智能体应用。每个节点代表一个操作或步骤,边表示节点之间的依赖关系。通过定义节点和边,开发者可以构建复杂的流程和逻辑。
LangGraph 的设计灵感来自 Pregel 和 Apache Beam,部分接口设计思想参考:NetworkX
环境准备
pip install -U langgraphStatefulGraph
LangGraph 中最基础的类型是 StatefulGraph,这种图会在每一个 Node 之间传递不同的状态信息。
LangGraph 的核心特性之一就是 state,每次 graph 的执行都会创建一个 state,graph 的节点执行时,都会传递这个 state。
同时每个节点在执行后都会用其返回值更新该 state,具体如何更新取决于 graph 的类型或自定义函数。
可以将 state 理解为 graph 的各个节点共同维护的全局变量,graph 的每个节点执行时都可以对 state 进行数据更新,以此实现数据传递和共享。
StateGraph 是 LangGraph 的核心,是 graph 的一个类。
可以通过定义一个 state 来初始化一个 StateGraph 对象。定义的 state 可以随时更新 StateGraph 对象的状态。StateGraph 对象可以通过 nodes(结点)更新状态。
from langgraph.graph import StateGraph
from typing import TypedDict, List, Annotated
import operator

#------------------------------
# 定义一个State,继承TypedDict
class State(TypedDict):
    input: str
    all_actions: Annotated[List[str], operator.add]

# 初始化一个StateGraph对象
graph = StateGraph(State)

#------------------------------
# 添加节点
# graph.add_node(name, value),
# name是节点的名称str,
# value是节点的值,是一个函数或者是LCEL runnable(一个chain)。
# 一个model,暂时理解为调用大模型,Reasoning的过程。

def model():
    return "model"

# 一个tool_executor,理解为Acting的过程。
def tool_executor():
    return "tool_executor"

graph.add_node("model", model)
graph.add_node("tools", tool_executor)

# 还有一个特殊的节点,叫End,表示StateGraph的结束状态。
from langgraph.graph import END

#------------------------------
# 在创建了上面的两个节点之后,可以通过边将两个节点连接起来。
# LangGraph提供了3种边的类型
# Starting Edge,开始边,表示从StateGraph的开始状态到第一个节点的边。
# 开始边到model节点

graph.set_entry_point("model")

# Normal Edge,普通边,表示从一个节点到另一个节点的边。
# model节点到tools节点
graph.add_edge("model", "tools")

# Conditional Edges,条件边,表示从一个节点到另一个节点的边,但是这个边是有条件的。
# 一个条件函数
def condition():
    return "我是一个判定节点"
# 添加条件边,从model节点开始,根据condition函数的返回值,
# 如果是end就结束,如果不是end就继续到tools节点。

graph.add_conditional_edges(
    "model",
    condition,  # 判定函数
    {
        "end": END,
        "continue": "tools"
    }
)

#------------------------------
# 最后返回一个runnable的chain
app = graph.compile()
保存 graph 图
LangGraph 提供了一些工具来可视化图的结构,这对于调试或理解复杂图的逻辑特别有用。要可视化图,您可以使用 LangGraph 的 get_graph 方法。
安装 pygraphviz
conda install pygraphviz代码示例
t = app.get_graph(xray=True).draw_png()

from PIL import Image
import io

# 假设你已经有了图片数据,这里以二进制数据为例
image_data = t

# 如果图片数据是二进制形式,可以这样保存:
with io.BytesIO(image_data) as img_stream:
    img = Image.open(img_stream)
    img.save('langgraph_test.png')  # 保存为PNG格式的图片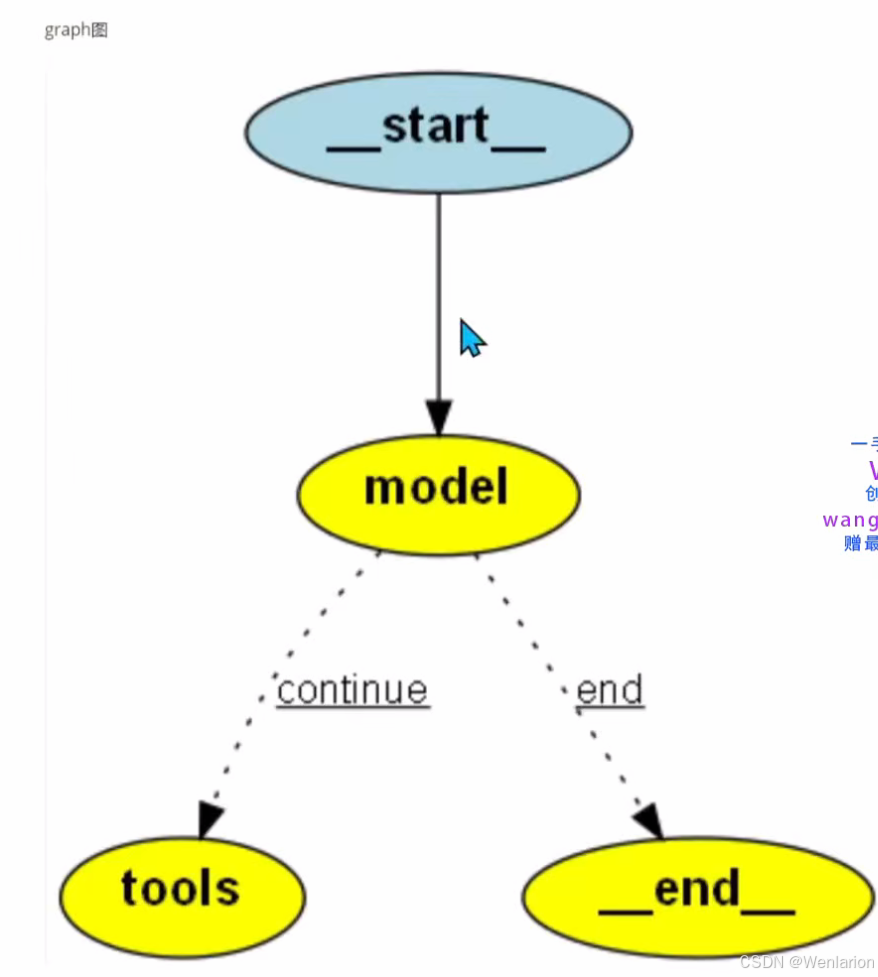
在 LangGraph 中,节点一般是一个函数或者 langchain 中 runnable 的一种类型。
我们这里定义两个节点,agent 和 tool 节点,其中 agent 节点就是决定执行什么样的行动,tool 节点就是当 agent 节点选择执行某个行动时,去调用相应的工具。
此外,还需要定义节点之间的连接,也就是边。
条件判断的边:定义图的走向,比如 Agent 要采取行动时,就需要接下来调用 tools,如果 Agent 说当前的的任务已经完成了,则结束整个流程。
普通的边:调用工具后,始终需要返回到 Agent,让 Agent 决定下一步的行动。
完整例子代码
使用本地部署大模型,需要安装好 ollama
# 如果是本地部署ollama,langchain对ollama的支持
pip install -U langchain-ollama
from dotenv import load_dotenv, find_dotenv
from typing import Annotated, Literal, TypedDict
from langchain_core.tools import tool
from langgraph.prebuilt import ToolNode
from typing import TypedDict, Annotated, Sequence
import operator
from langchain_core.messages import BaseMessage
from langgraph.prebuilt import ToolInvocation
import json
from langgraph.graph import END, StateGraph, MessagesState
from langchain_core.messages import HumanMessage
# from langchain_openai import ChatOpenAI
# ollama本地部署大模型
from langchain_ollama import ChatOllama
# 加载环境变量
# _ = load_dotenv(find_dotenv())
# 定义搜索工具
@tool
def search(query: str):
"""搜索天气"""
# 调用api接口查询
return "今天天气晴朗"
tools = [search]
tool_node = ToolNode(tools)
# 创建一个ChatOpenAI对象
# model = ChatOpenAI(model="gpt-4-1106-preview", temperature=0, streaming=True)
# ollama本地部署大模型,使用默认的端口,或者OLLAMA_BASE_URL环境变量指定的地址
model = ChatOllama(
model = "llama3", # 要支持tool use的模型,
temperature = 0.8,
num_predict = 256,
# other params ...
)
# 将tools转换为openai tools
model = model.bind_tools(tools)
# 定义一个Agent State
# 定义一个AgentState,继承自TypedDict,定义了一个messages字段,类型是Sequence[BaseMessage],operator.add,表示可以追加。
# 它的作用是存储消息。
class AgentState(TypedDict):
messages: Annotated[Sequence[BaseMessage], operator.add]
# 定义节点
# 判定函数,如果没有tool_calls就结束,如果有就返回 tools
def should_continue(state: MessagesState):
messages = state['messages']
# 获取最后一条消息:从 messages 列表中获取最后一条消息
last_message = messages[-1]
# 如果最后一条消息包含工具调用,则返回字符串 "tools"
if last_message.tool_calls:
return "tools"
# 如果没有工具调用,则返回常量 END,表示停止
return END
# 模型调用函数,节点
def call_model(state):
messages = state["messages"]
response = model.invoke(messages)
# 返回一个FunctionMessage
return {"messages": [response]}
# 定义一个Graph
# 初始化一个StateGraph对象
workflow = StateGraph(AgentState)
# 添加节点
workflow.add_node("agent", call_model)
workflow.add_node("tools", tool_node)
# 设置开始节点agent
# 执行开始节点
workflow.set_entry_point("agent")
# 添加条件边
workflow.add_conditional_edges(
# 首先从`agent`节点开始
# 这说明我们将首先调用`agent`节点
"agent",
# 然后执行判定函数
should_continue,
)
# 添加边,从`tools`节点到`agent`节点
# tools执行完后,返回到agent
workflow.add_edge("tools", "agent")
# 最后返回一个runnable的chain
app = workflow.compile()
# 运行
inputs = {"messages": [HumanMessage(content="湖南长沙的天气如何?")]}
res = app.invoke(inputs)
print(res)
# 流式输出
# inputs = {"messages": [HumanMessage(content="湖南长沙的天气如何?")]}
# for output in app.stream(inputs):
# # stream() yields dictionaries with output keyed by node name
# for key, value in output.items():
# print(f"Output from node '{key}':")
# print("---")
# print(value)
# print("\n---\n")Human-in-the-loop (HIL)
文档: https://langchain-ai.github.io/langgraph/how-tos/human_in_the_loop/breakpoints/
Agent 系统中 “人机交互”(Human-in-the-loop, HIL)交互模式至关重要。
LangGraph 允许开发人员创建基于图的流程,其中 Agent 可以根据用户的输入做出决策。这种模式在处理需要用户反馈的场景中非常有用,比如在任务执行过程中向用户询问澄清性问题。
建立一个节点以获取用户反馈。在这个过程中,开发人员需要:
- 设置断点:通过
interrupt_before来指定在特定节点之前中断图的执行。 - 设置检查点:使用
MemorySaver来保存图的状态,以便在用户输入后恢复。 - 更新状态:使用
.update_state方法,将用户的反馈更新到图的状态中。
from typing_extensions import TypedDict
from langgraph.graph import StateGraph, START, END
from langgraph.checkpoint.memory import MemorySaver
from IPython.display import Image, display

class State(TypedDict):
    input: str
    user_feedback: str

def step_1(state):
    print("---Step 1---")
    pass

def human_feedback(state):
    print("---human_feedback---")
    pass

def step_3(state):
    print("---Step 3---")
    pass

builder = StateGraph(State)
builder.add_node("step_1", step_1)
builder.add_node("human_feedback", human_feedback)
builder.add_node("step_3", step_3)
builder.add_edge(START, "step_1")
builder.add_edge("step_1", "human_feedback")
builder.add_edge("human_feedback", "step_3")
builder.add_edge("step_3", END)

# 设置内存检查点
memory = MemorySaver()

# 编译图并设置断点
graph = builder.compile(checkpointer=memory, interrupt_before=["human_feedback"])

# 查看图的结构
display(Image(graph.get_graph().draw_mermaid_png()))

#------------------------------------
# 接下来,可以运行图直到指定的断点,等待用户输入。以下代码展示了如何实现这一点:
# 输入初始化数据
initial_input = {"input": "hello world"}
thread = {"configurable": {"thread_id": "1"}}

# 运行图,直到第一个中断点
for event in graph.stream(initial_input, thread, stream_mode="values"):
    print(event)

#---
# 一旦程序到达断点,开发人员可以通过以下方式获取用户输入并更新图的状态

try:
    user_input = input("Tell me how you want to update the state: ")
except:
    user_input = "go to step 3!"

# 更新状态
graph.update_state(thread, {"user_feedback": user_input}, as_node="human_feedback")

# 检查状态
print("--State after update--")
print(graph.get_state(thread))

# 检查下一个节点
print(graph.get_state(thread).next)
LangGraph MultiAgent 架构
安全提醒
请注意,Agent 如果有文件系统访问权限,这在所有情况下都是不安全的,要在 docker 容器中运行。
协作多 Agent (multi-agent-collaboration)
在这个例子中,不同的 Agent 在一个共享的消息暂存器上进行协作。这意味着他们所做的所有工作对对方都是可见的。
-
优点:其他 Agent 可以看到完成的所有单个步骤,便于协作和信息共享。
-
缺点:有时传递所有这些信息过于冗长和不必要,有时只需要 Agent 的最终答案。
由于共享的性质,我们将这种协作称为暂存器(scratchpad)模式。
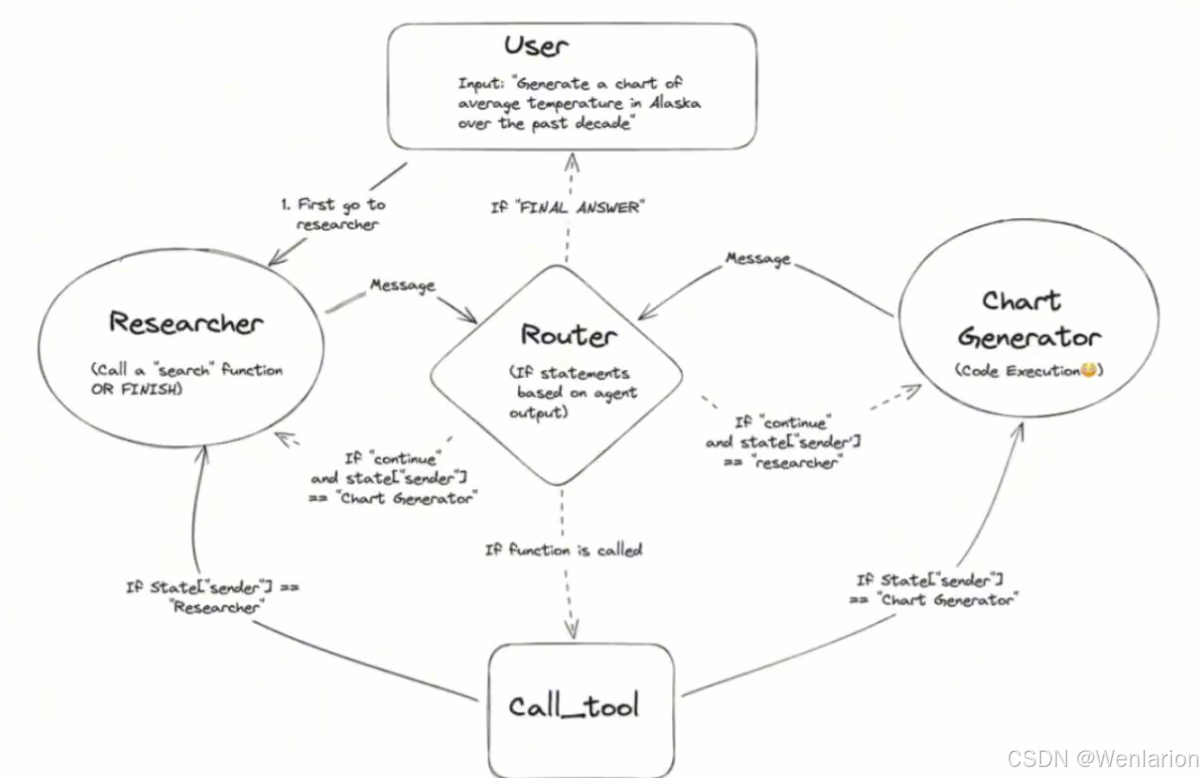
控制状态转换的主要东西是路由器,但它是一个基于规则的路由器,因此相当简单。基本上,每次调用 LLM 后,它都会查看输出:
- 如果调用了一个工具,那么它会调用该工具。
- 如果没有调用任何工具,并且 LLM 响应 “最终答案”,那么它会返回给用户。
- 否则(如果没有调用任何工具,并且 LLM 没有响应 “最终答案”),那么它会转到另一个 Agent。
完整代码
#---
# 创建Agent,下面是创建Agent的函数,指定大模型和tools,以及自定义的系统提示词

from langchain_core.messages import (
    BaseMessage,
    HumanMessage,
    ToolMessage,
)
from langchain_core.prompts import ChatPromptTemplate, MessagesPlaceholder

from langgraph.graph import END, StateGraph, START

...

"""
你是一个乐于助人的人工智能助手,与其他助手合作。
"使用提供的工具来回答问题。"
"如果你不能完全回答,没关系,另一个助手用不同的工具"
"这将有助于你取得进展。尽你所能取得进展。"
"如果你或其他助理有最终答案或可交付成果,"
"在你的回答前加上最终答案,这样团队就知道该停下来了。"
"你可以访问以下工具:{tool_names}。\n {system_message}",
...

def create_agent(llm, tools, system_message: str):
    """Create an agent."""
    prompt = ChatPromptTemplate.from_messages(
        [
            (
                "system",
                "You are a helpful AI assistant, collaborating with other assistants."
                " Use the provided tools to progress towards answering the question."
                " If you are unable to fully answer, that's OK, another assistant with different tools "
                " will help where you left off. Execute what you can to make progress."
                " If you or any of the other assistants have the final answer or deliverable,"
                " prefix your response with FINAL ANSWER so the team knows to stop."
                " You have access to the following tools: {tool_names}.\n{system_message}",
            ),
            MessagesPlaceholder(variable_name="messages"),
        ]
    )
    prompt = prompt.partial(system_message=system_message)
    prompt = prompt.partial(tool_names=", ".join([tool.name for tool in tools]))
    return prompt | llm.bind_tools(tools)
代码例子
提示词任务
中文:
“获取英国过去 5 年的国内生产总值,然后画一个折线图。一旦你把它编码好,就完成。”
英文:
"Fetch the UK's GDP over the past 5 years,then draw a line graph of it.Once you code it up, finish."
#------------------------------
# 定义了2个工具,一个是搜索工具tavily_tool,一个是代码运行工具python_repl
from typing import Annotated
from langchain_community.tools.tavily_search import TavilySearchResults
from langchain_core.tools import tool
from langchain_experimental.utilities import PythonREPL
@tool
def search():
"""Search the web for information."""
return "test"
# tavily_tool = TavilySearchResults(max_results=5)
tavily_tool = search
# Warning: This executes code locally, which can be unsafe when not sandboxed
# 是Python编程语言的一个交互式解释器环境
repl = PythonREPL()
@tool
def python_repl(
code: Annotated[str, "The python code to execute to generate your chart."],
):
"""Use this to execute python code. If you want to see the output of a value,
you should print it out with `print(...)`. This is visible to the user."""
try:
result = repl.run(code)
except BaseException as e:
return f"Failed to execute. Error: {repr(e)}"
result_str = f"Successfully executed:\n```python\n{code}\n```\nStdout: {result}"
return (
result_str + "\n\nIf you have completed all tasks, respond with FINAL ANSWER."
)
#------------------------------
# 定义agent状态,保存agent执行过程中的状态数据,方便后面创建agent node
import operator
from typing import Annotated, Sequence
from typing_extensions import TypedDict
# from langchain_openai import ChatOpenAI
# ollama本地部署大模型
from langchain_ollama import ChatOllama
# This defines the object that is passed between each node
# in the graph. We will create different nodes for each agent and tool
class AgentState(TypedDict):
messages: Annotated[Sequence[BaseMessage], operator.add]
sender: str
# llm = ChatOpenAI(model="gpt-4o")
llm = ChatOllama(
model = "qwen2.5:7b-instruct-q4_0", # 要支持tool use的模型,一般chat模型,agent模型,coder模型都会支持
temperature = 0.8,
num_predict = 256,
# other params ...
)
# Research agent and node
research_agent = create_agent(
llm,
[tavily_tool],
system_message="You should provide accurate data for the chart_generator to use.",
)
research_node = functools.partial(agent_node, agent=research_agent, name="Researcher")
# chart_generator
chart_agent = create_agent(
llm,
[python_repl],
system_message="Any charts you display will be visible by the user.",
)
chart_node = functools.partial(agent_node, agent=chart_agent, name="chart_generator")
#------------------------------
# 定义工具节点
from langgraph.prebuilt import ToolNode
tools = [tavily_tool, python_repl]
tool_node = ToolNode(tools)
#------------------------------
# 定义路由器router
# Either agent can decide to end
from typing import Literal
def router(state):
# This is the router
messages = state["messages"]
last_message = messages[-1]
if last_message.tool_calls:
# The previous agent is invoking a tool
return "call_tool"
if "FINAL ANSWER" in last_message.content:
# Any agent decided the work is done
return END
return "continue"
#------------------------------
# 定义graph,由于可以循环,所以不再是DAG啦,添加节点,再添加边,定义初始节点,生成graph
workflow = StateGraph(AgentState)
workflow.add_node("Researcher", research_node)
workflow.add_node("chart_generator", chart_node)
workflow.add_node("call_tool", tool_node)
workflow.add_conditional_edges(
"Researcher",
router,
{"continue": "chart_generator", "call_tool": "call_tool", END: END},
)
workflow.add_conditional_edges(
"chart_generator",
router,
{"continue": "Researcher", "call_tool": "call_tool", END: END},
)
workflow.add_conditional_edges(
"call_tool",
# Each agent node updates the 'sender' field
# the tool calling node does not, meaning
# this edge will route back to the original agent
# who invoked the tool
lambda x: x["sender"],
{
"Researcher": "Researcher",
"chart_generator": "chart_generator",
},
)
workflow.add_edge(START, "Researcher")
graph = workflow.compile()
#------------------------------
# 调用graph,得到结果
events = graph.stream(
{
"messages": [
HumanMessage(
content="Fetch the UK's GDP over the past 5 years,"
" then draw a line graph of it."
" Once you code it up, finish."
)
],
},
# Maximum number of steps to take in the graph
{"recursion_limit": 150},
)
for s in events:
print(s)
print("----")
#------------------------------
# 可以把生成的graph结构显示出来
from IPython.display import Image, display
try:
display(Image(graph.get_graph(xray=True).draw_mermaid_png()))
except Exception:
# This requires some extra dependencies and is optional
pass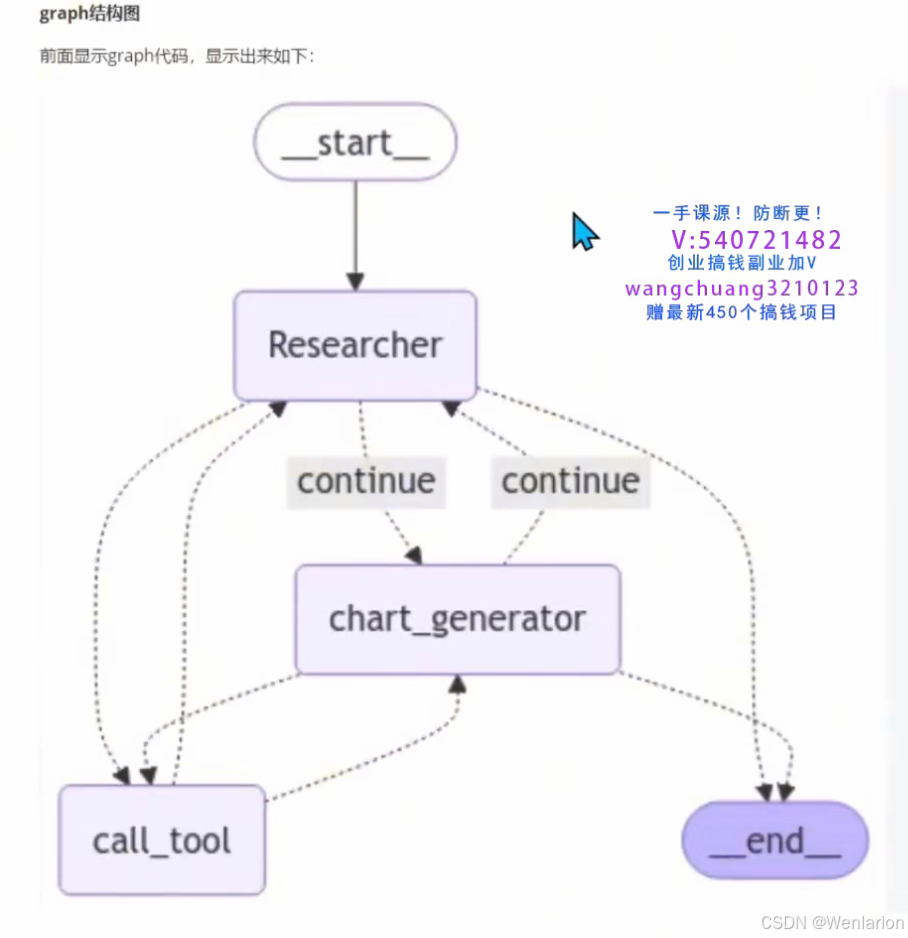
主管多 Agent (Multi-agent supervisor)
在这个架构中,多个 Agent 协作的方式与之前的 “暂存器模式” 有所不同:
-
独立暂存器:每个 Agent 拥有自己独立的暂存器,而非共享一个全局暂存器。
-
全局汇总:各 Agent 的最终响应会被附加到一个全局暂存器中。
-
主管路由:由一个专门的 “Agent 主管” 负责路由决策,将任务分配给合适的 Agent。
-
主管即 Agent:主管本身也可被视为一个特殊的 Agent,其 “工具” 就是其他的工作 Agent。
这种模式的优势在于:
-
隔离性更强,避免了信息冗余。
-
主管可以更灵活地调度不同 Agent 的专长,实现更复杂的协作流程。
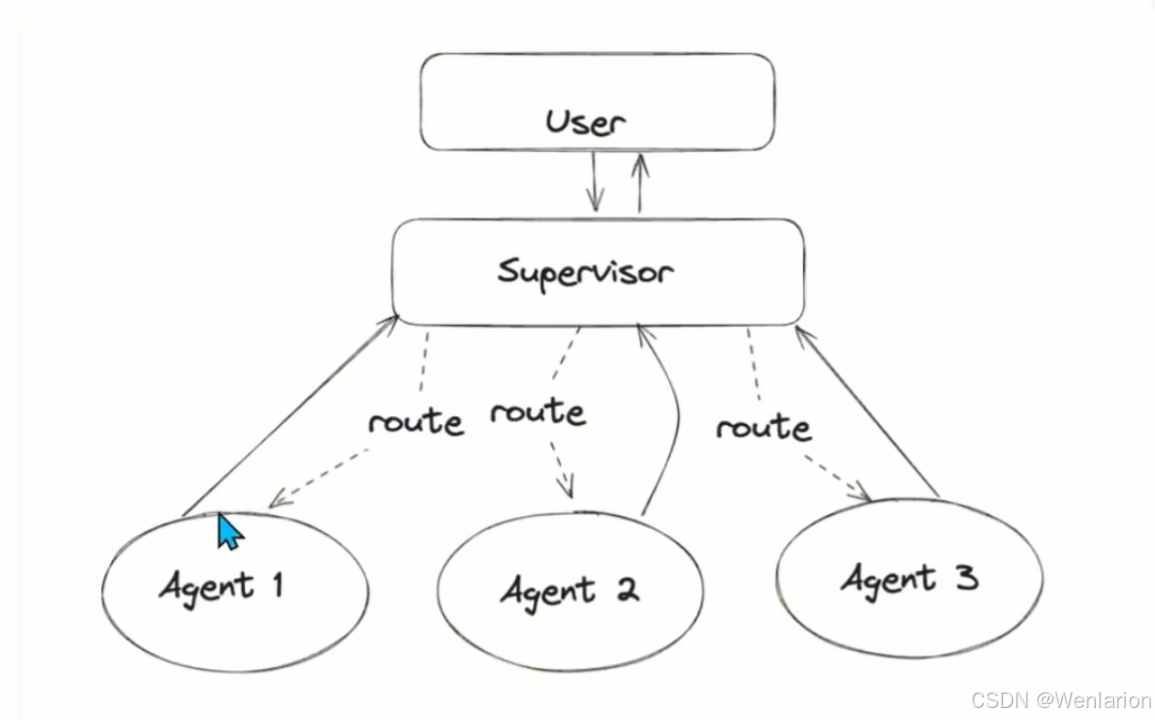
代码例子
# 创建tool,各种agent架构都一样

from typing import Annotated

from langchain_community.tools.tavily_search import TavilySearchResults
from langchain_experimental.tools import PythonREPLTool
from langchain_core.tools import tool

@tool
def search():
    """Search the web for information."""
    return "test"

# tavily_tool = TavilySearchResults(max_results=5)
tavily_tool = search

# This executes code locally, which can be unsafe
python_repl_tool = PythonREPLTool()

#------------------------------
# agent node方法
from langchain_core.messages import HumanMessage

...
# Define a helper function that we will use to create the nodes in the graph - it takes care of converting the agent response to a human message.
# This is important because that is how we will add it the global state of the graph
...

# 通过这个函数将 message 添加到全局
def agent_node(state, agent, name):
    result = agent.invoke(state)
    return {
        "messages": [HumanMessage(content=result["messages"][-1].content, name=name)]
    }

#------------------------------
# 创建主管Agent
# 它将使用函数调用来选择下一个工作节点或完成处理

from langchain_core.prompts import ChatPromptTemplate, MessagesPlaceholder
from langchain_openai import ChatOpenAI
from pydantic import BaseModel
from typing import Literal

# 系统提示词用在了主管Agent
members = ["Researcher", "Coder"]
system_prompt = (
    "You are a supervisor tasked with managing a conversation between the"
    " following workers: {members}. Given the following user request,"
    " respond with the worker to act next. Each worker will perform a"
    " task and respond with their results and status. When finished,"
    " respond with FINISH."
)

# Our team supervisor is an LLM node. It just picks the next agent to process
# and decides when the work is completed
options = ["FINISH"] + members

class routeResponse(BaseModel):
    next: Literal[*options]

prompt = ChatPromptTemplate.from_messages(
    [
        ("system", system_prompt),
        MessagesPlaceholder(variable_name="messages"),
        (
            "system",
            "Given the conversation above, who should act next?"
            " Or should we FINISH? Select one of: {options}",
        ),
    ]
).partial(options=str(options), members=", ".join(members))

llm = ChatOpenAI(model="gpt-4o")

def supervisor_agent(state):
    supervisor_chain = prompt | llm.with_structured_output(routeResponse)
    return supervisor_chain.invoke(state)

#------------------------------
# 创建graph节点,agent采用ReAct

import functools
import operator
from typing import Sequence
from typing_extensions import TypedDict

from langchain_core.messages import BaseMessage
from langgraph.graph import END, StateGraph, START
from langgraph.prebuilt import create_react_agent

# The agent state is the input to each node in the graph
class AgentState(TypedDict):
    # The annotation tells the graph that new messages will always
    # be added to the current states
    messages: Annotated[Sequence[BaseMessage], operator.add]
    # The 'next' field indicates where to route to next
    next: str

research_agent = create_react_agent(llm, tools=[tavily_tool])
research_node = functools.partial(agent_node, agent=research_agent, name="Researcher")

# NOTE: THIS PERFORMS ARBITRARY CODE EXECUTION. PROCEED WITH CAUTION
code_agent = create_react_agent(llm, tools=[python_repl_tool])
code_node = functools.partial(agent_node, agent=code_agent, name="Coder")

workflow = StateGraph(AgentState)
workflow.add_node("Researcher", research_node)
workflow.add_node("Coder", code_node)
workflow.add_node("supervisor", supervisor_agent)

#------------------------------
# 添加边,添加主管agent为开始节点,生成graph

for member in members:
    # We want our workers to ALWAYS "report back" to the supervisor when done
    workflow.add_edge(member, "supervisor")
# The supervisor populates the "next" field in the graph state
# which routes to a node or finishes
conditional_map = {k: k for k in members}
conditional_map["FINISH"] = END
workflow.add_conditional_edges("supervisor", lambda x: x["next"], conditional_map)
# Finally, add entrypoint
workflow.add_edge(START, "supervisor")

graph = workflow.compile()

#------------------------------
# 执行图

for s in graph.stream(
    {
        "messages": [
            HumanMessage(content="Code hello world and print it to the terminal")
        ]
    }
):
    if "__end__" not in s:
        print(s)
        print("----")
分层多 Agent (Hierarchical Agent)
在之前的 “Agent 主管” 示例中,我们引入了单个主管节点,负责在不同的工作节点之间路由任务。但当单个工人的任务变得过于复杂,或工人数量过多时,这种单层架构可能会遇到瓶颈。
对于这类应用,分层多 Agent 架构会更加有效:
- 子图组合:通过组合不同的子图,将复杂任务拆解为多个子团队。
- 多级主管:创建顶级主管和中级主管,形成层级化的任务调度结构。
- 团队化 Agent:子 Agent 可以被视为独立的 “团队”,由更高层级的主管 Agent 进行协调。
这种架构的优势在于:
- 更好的可扩展性,能够应对更复杂、更多样化的任务。
- 更清晰的职责划分,每个层级专注于特定范围的决策。
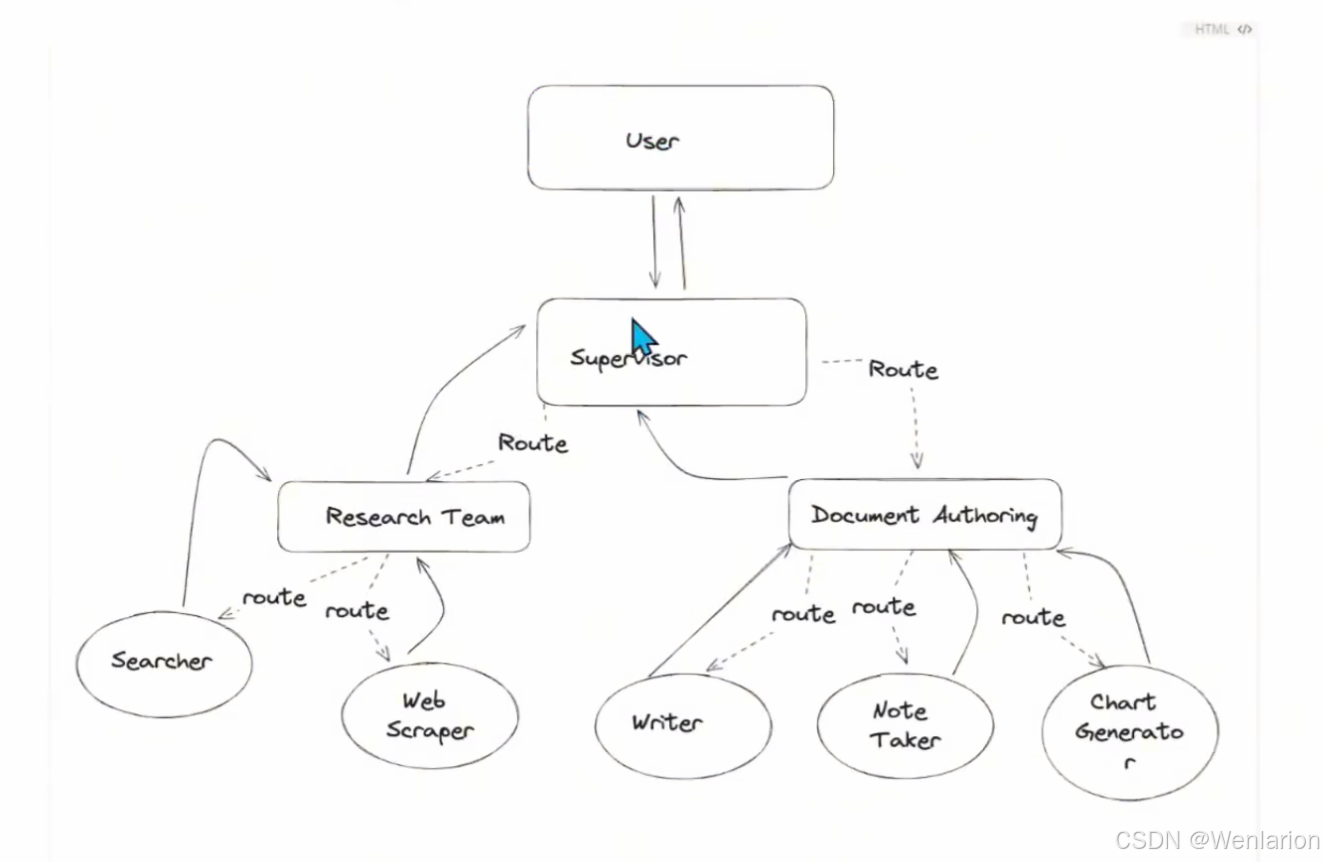
代码例子
# 定义Agent访问web和写入文件的工具
# 定义一些实用程序来帮助创建图形和Agent
# 创建和定义每个团队(网络研究+文档写作)
# 把一切都组合在一起。

# 每个团队将由一名或多名Agent组成,每个Agent都有一个或多个工具。下面,定义不同团队使用的所有工具

#------------------------------
# 建立研究团队
# 研究团队工具:爬虫工具

from typing import Annotated, List
from langchain_community.document_loaders import WebBaseLoader
from langchain_community.tools.tavily_search import TavilySearchResults
from langchain_core.tools import tool

# 需要api_key,不然会报错
tavily_tool = TavilySearchResults(max_results=5)

@tool
def scrape_webpages(urls: List[str]) -> str:
    """Use requests and bs4 to scrape the provided web pages for detailed information."""
    loader = WebBaseLoader(urls)
    docs = loader.load()
    return "\n\n".join(
        [
            f'<Document name="{doc.metadata.get("title", "")}">\n{doc.page_content}\n</Document>'
            for doc in docs
        ]
    )

# 文档编写团队工具

from pathlib import Path
from tempfile import TemporaryDirectory
from typing import Dict, Optional
from langchain_experimental.utilities import PythonREPL
from typing_extensions import TypedDict

_TEMP_DIRECTORY = TemporaryDirectory()
WORKING_DIRECTORY = Path(_TEMP_DIRECTORY.name)

# 大纲工具
@tool
def create_outline(
    points: Annotated[List[str], "List of main points or sections."],
    file_name: Annotated[str, "File path to save the outline."],
) -> Annotated[str, "Path of the saved outline file."]:
    """Create and save an outline."""
    with (WORKING_DIRECTORY / file_name).open("w") as file:
        for i, point in enumerate(points):
            file.write(f"{i + 1}. {point}\n")
    return f"Outline saved to {file_name}"

# 文档阅读工具
@tool
def read_document(
    file_name: Annotated[str, "File path to save the document."],
    start: Annotated[Optional[int], "The start line. Default is 0"] = None,
    end: Annotated[Optional[int], "The end line. Default is None"] = None,
) -> str:
    """Read the specified document."""
    with (WORKING_DIRECTORY / file_name).open("r") as file:
        lines = file.readlines()
    if start is not None:
        start = 0
    return "\n".join(lines[start:end])

# 写文档工具
@tool
def write_document(
    content: Annotated[str, "Text content to be written into the document."],
    file_name: Annotated[str, "File path to save the document."],
) -> Annotated[str, "Path of the saved document file."]:
    """Create and save a text document."""
    with (WORKING_DIRECTORY / file_name).open("w") as file:
        file.write(content)
    return f"Document saved to {file_name}"

# 编辑文档工具
@tool
def edit_document(
    file_name: Annotated[str, "Path of the document to be edited."],
    inserts: Annotated[
        Dict[int, str],
        "Dictionary where key is the line number (1-indexed) and value is the text to be inserted at that line.",
    ],
) -> Annotated[str, "Path of the edited document file."]:
    """Edit a document by inserting text at specific line numbers."""
    with (WORKING_DIRECTORY / file_name).open("r") as file:
        lines = file.readlines()

    sorted_inserts = sorted(inserts.items())

    for line_number, text in sorted_inserts:
        if 1 <= line_number <= len(lines) + 1:
            lines.insert(line_number - 1, text + "\n")
        else:
            return f"Error: Line number {line_number} is out of range."

    with (WORKING_DIRECTORY / file_name).open("w") as file:
        file.writelines(lines)
    return f"Document edited and saved to {file_name}"

# Warning: This executes code locally, which can be unsafe when not sandboxed
repl = PythonREPL()

# 代码执行工具
@tool
def python_repl(
    code: Annotated[str, "The python code to execute to generate your chart."],
):
    """Use this to execute python code. If you want to see the output of a value,
    you should print it out with `print(...)`. This is visible to the user."""
    try:
        result = repl.run(code)
    except BaseException as e:
        return f"Failed to execute. Error: {repr(e)}"
    return f"Successfully executed:\n```python\n{code}\n```\nStdout: {result}"

# 创建一个worker agent。为子图创建一个主管。

from typing import List, Optional
from langchain.output_parsers.openai_functions import JsonOutputFunctionsParser
from langchain_core.prompts import ChatPromptTemplate, MessagesPlaceholder
from langchain_openai import ChatOpenAI
from langgraph.graph import END, StateGraph, START
from langchain_core.messages import HumanMessage, trim_messages

llm = ChatOpenAI(model="gpt-4o-mini")

trimmer = trim_messages(
    max_tokens=100000,
    strategy="last",
    token_counter=llm,
    include_system=True,
)

def agent_node(state, agent, name):
    result = agent.invoke(state)
    return {
        "messages": [HumanMessage(content=result["messages"][-1].content, name=name)]
    }

# 主管定义函数,可以创建子团队的主管,也可以创建大主管
# 自己写function call的提示词
def create_team_supervisor(llm: ChatOpenAI, system_prompt, members) -> str:
    """An LLM-based router."""
    options = ["FINISH"] + members
    function_def = {
        "name": "route",
        "description": "Select the next role.",
        "parameters": {
            "title": "routeSchema",
            "type": "object",
            "properties": {
                "next": {
                    "title": "Next",
                    "anyOf": [
                        {"enum": options},
                    ],
                },
            },
            "required": ["next"],
        },
    }

    prompt = ChatPromptTemplate.from_messages(
        [
            ("system", system_prompt),
            MessagesPlaceholder(variable_name="messages"),
            (
                "system",
                "Given the conversation above, who should act next?"
                " Or should we FINISH? Select one of: {options}",
            ),
        ]
    ).partial(options=str(options), team_members=", ".join(members))
    return (
        prompt
        | trimmer
        | llm.bind_functions(functions=[function_def], function_call="route")
        | JsonOutputFunctionsParser()
    )

# bind_functions属于比较遗弃方法,新的用bind_tools,如果是要换成本地部署的ollama模型,需要注意langchain_ollama的版本
# 或者修改提示词描述的形式,改成tool定义

...

# 定义Agent团队,现在我们可以定义我们的分层团队了。
# 研究团队
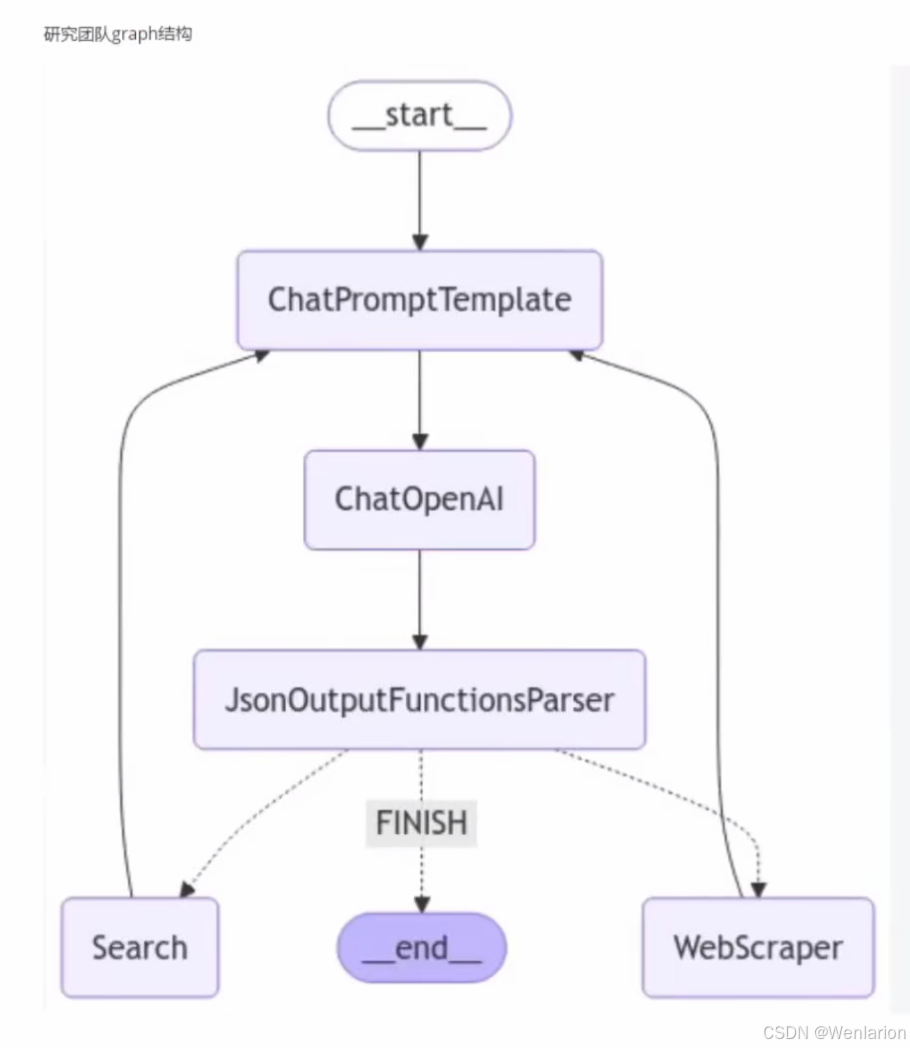
# 研究团队将有一个搜索Agent和一个网络抓取“research_agent”作为两个工作节点,以及团队主管
...

import functools
import operator
from langchain_core.messages import BaseMessage, HumanMessage
from langchain_openai.chat_models import ChatOpenAI
from langgraph.prebuilt import create_react_agent

# 定义state
# ResearchTeam graph state
class ResearchTeamState(TypedDict):
    # A message is added after each team member finishes
    messages: Annotated[List[BaseMessage], operator.add]
    # The team members are tracked so they are aware of
    # the others' skill-sets
    team_members: List[str]
    # Used to route work. The supervisor calls a function
    # to update this every time it makes a decision
    next: str

llm = ChatOpenAI(model="gpt-4o")

search_agent = create_react_agent(llm, tools=[tavily_tool])
search_node = functools.partial(agent_node, agent=search_agent, name="Search")

research_agent = create_react_agent(llm, tools=[scrape_webpages])
research_node = functools.partial(agent_node, agent=research_agent, name="WebScraper")

# 创建子团队主管
supervisor_agent = create_team_supervisor(
    llm,
    "You are a supervisor tasked with managing a conversation between the"
    " following workers: Search, WebScraper. Given the following user request,"
    " respond with the worker to act next. Each worker will perform a"
    " task and respond with their results and status. When finished,"
    " respond with FINISH.",
    ["Search", "WebScraper"],
)

# 创建子团队主管
supervisor_agent = create_team_supervisor(
    llm,
    "You are a supervisor tasked with managing a conversation between the"
    " following workers: Search, WebScraper. Given the following user request,"
    " respond with the worker to act next. Each worker will perform a"
    " task and respond with their results and status. When finished,"
    " respond with FINISH.",
    ["Search", "WebScraper"],
)

research_graph = StateGraph(ResearchTeamState)
research_graph.add_node("Search", search_node)
research_graph.add_node("WebScraper", research_node)
research_graph.add_node("supervisor", supervisor_agent)

# Define the control flow
research_graph.add_edge("Search", "supervisor")
research_graph.add_edge("WebScraper", "supervisor")
research_graph.add_conditional_edges(
    "supervisor",
    lambda x: x["next"],
    {"Search": "Search", "WebScraper": "WebScraper", "FINISH": END},
)

research_graph.add_edge(START, "supervisor")
chain = research_graph.compile()

# The following functions interoperate between the top level graph state
# and the state of the research sub-graph
# this makes it so that the states of each graph don't get intermixed
def enter_chain(message: str):
    results = {
        "messages": [HumanMessage(content=message)],
    }
    return results

research_chain = enter_chain | chain

# 可以显示 graph 结构
...
from IPython.display import Image, display

display(Image(chain.get_graph(xray=True).draw_mermaid_png()))
...

# 运行研究团队
...
for s in research_chain.stream(
    "when is Taylor Swift's next tour?", {"recursion_limit": 100}
):
    if "__end__" not in s:
        print(s)
        print("----")
...
#文档编写团队
#使用类似的方法创建下面的文档编写团队。这一次,我们将为每个Agent提供对不同文件写入工具的访问权限。
#请注意,我们在这里为我们的Agent提供文件系统访问权限,这在所有情况下都是不安全的。
import operator
from pathlib import Path

# Document writing team graph state
class DocWritingState(TypedDict):
    # This tracks the team's conversation internally
    messages: Annotated[List[BaseMessage], operator.add]
    # This provides each worker with context on the others' skill sets
    team_members: str
    # This is how the supervisor tells langgraph who to work next
    next: str
    # This tracks the shared directory state
    current_files: str


# 这将在每个worker agent开始工作之前运行
# 这使他们更加了解当前的状态
# 工作目录。

# This will be run before each worker agent begins work
# It makes it so they are more aware of the current state
# of the working directory.
def prelude(state):
    written_files = []
    if not WORKING_DIRECTORY.exists():
        WORKING_DIRECTORY.mkdir()
    try:
        written_files = [
            f.relative_to(WORKING_DIRECTORY) for f in WORKING_DIRECTORY.rglob("*")
        ]
    except Exception:
        pass
    if not written_files:
        return {**state, "current_files": "No files written."}
    return {
        **state,
        "current_files": "\nBelow are files your team has written to the directory:\n"
        + "\n".join([f" - {f}" for f in written_files]),
    }

llm = ChatOpenAI(model="gpt-4o")

doc_writer_agent = create_react_agent(
    llm, tools=[write_document, edit_document, read_document]
)
# Injects current directory working state before each call
context_aware_doc_writer_agent = prelude | doc_writer_agent
doc_writing_node = functools.partial(
    agent_node, agent=context_aware_doc_writer_agent, name="DocWriter"
)

note_taking_agent = create_react_agent(llm, tools=[create_outline, read_document])
context_aware_note_taking_agent = prelude | note_taking_agent
note_taking_node = functools.partial(
    agent_node, agent=context_aware_note_taking_agent, name="NoteTaker"
)

chart_generating_agent = create_react_agent(llm, tools=[read_document, python_repl])
context_aware_chart_generating_agent = prelude | chart_generating_agent
chart_generating_node = functools.partial(
    agent_node, agent=context_aware_chart_generating_agent, name="ChartGenerator"
)

# 创建子团队主管
doc_writing_supervisor = create_team_supervisor(
    llm,
    "You are a supervisor tasked with managing a conversation between the"
    " following workers: {team_members}. Given the following user request,"
    " respond with the worker to act next. Each worker will perform a"
    " task and respond with their results and status. When finished,"
    " respond with FINISH.",
    ["DocWriter", "NoteTaker", "ChartGenerator"],
)

# 添加节点,添加边

# Create the graph here:
# Note that we have unrolled the loop for the sake of this doc
authoring_graph = StateGraph(DocWritingState)
authoring_graph.add_node("DocWriter", doc_writing_node)
authoring_graph.add_node("NoteTaker", note_taking_node)
authoring_graph.add_node("ChartGenerator", chart_generating_node)
authoring_graph.add_node("supervisor", doc_writing_supervisor)

# Add the edges that always occur
authoring_graph.add_edge("DocWriter", "supervisor")
authoring_graph.add_edge("NoteTaker", "supervisor")
authoring_graph.add_edge("ChartGenerator", "supervisor")

# Add the edges where routing applies
authoring_graph.add_conditional_edges(
    "supervisor",
    lambda x: x["next"],
    {
        "DocWriter": "DocWriter",
        "NoteTaker": "NoteTaker",
        "ChartGenerator": "ChartGenerator",
        "FINISH": END,
    },
)

authoring_graph.add_edge(START, "supervisor")
chain = authoring_graph.compile()

# 以下函数在顶层图形状态之间进行互操作
# 以及研究子图的状态
# 这使得每个图的状态不会混合在一起
# The following functions interoperate between the top level graph state
# and the state of the research sub-graph
# this makes it so that the states of each graph don't get intermixed
def enter_chain(message: str, members: List[str]):
    results = {
        "messages": [HumanMessage(content=message)],
        "team_members": ", ".join(members),
    }
    return results

# We reuse the enter/exit functions to wrap the graph
authoring_chain = (
    functools.partial(enter_chain, members=authoring_graph.nodes)
    | authoring_graph.compile()
)

# 显示graph结构
...
from IPython.display import Image, display

display(Image(chain.get_graph().draw_mermaid_png()))
...

# 运行文档团队
...
for s in authoring_chain.stream(
    "write an outline for poem and then write the poem to disk.",
    {"recursion_limit": 100},
):
    if "__end__" not in s:
        print(s)
        print("---")
...
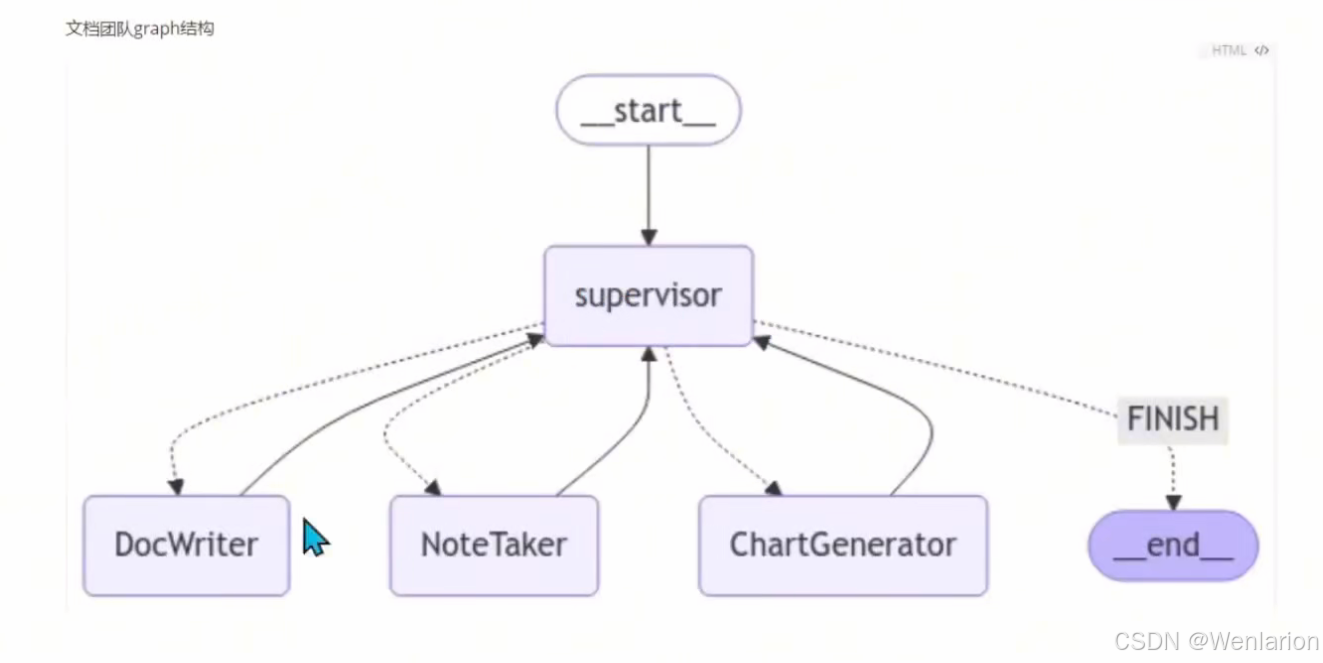
# 添加主管层
...
# 添加层
# 在这个设计中,我们执行自上而下的规划策略。我们已经创建了两个子图,但我们必须决定如何在两者之间路由工作。
# 我们将创建第三个图来编排前两个图,并添加一些连接器来定义如何在不同图之间共享此顶级状态。
...

from langchain_core.messages import BaseMessage
from langchain_openai.chat_models import ChatOpenAI

llm = ChatOpenAI(model="gpt-4o")

# 创建大主管
supervisor_node = create_team_supervisor(
    llm,
    "You are a supervisor tasked with managing a conversation between the"
    " following teams: {team_members}. Given the following user request,"
    " respond with the worker to act next. Each worker will perform a"
    " task and respond with their results and status. When finished,"
    " respond with FINISH.",
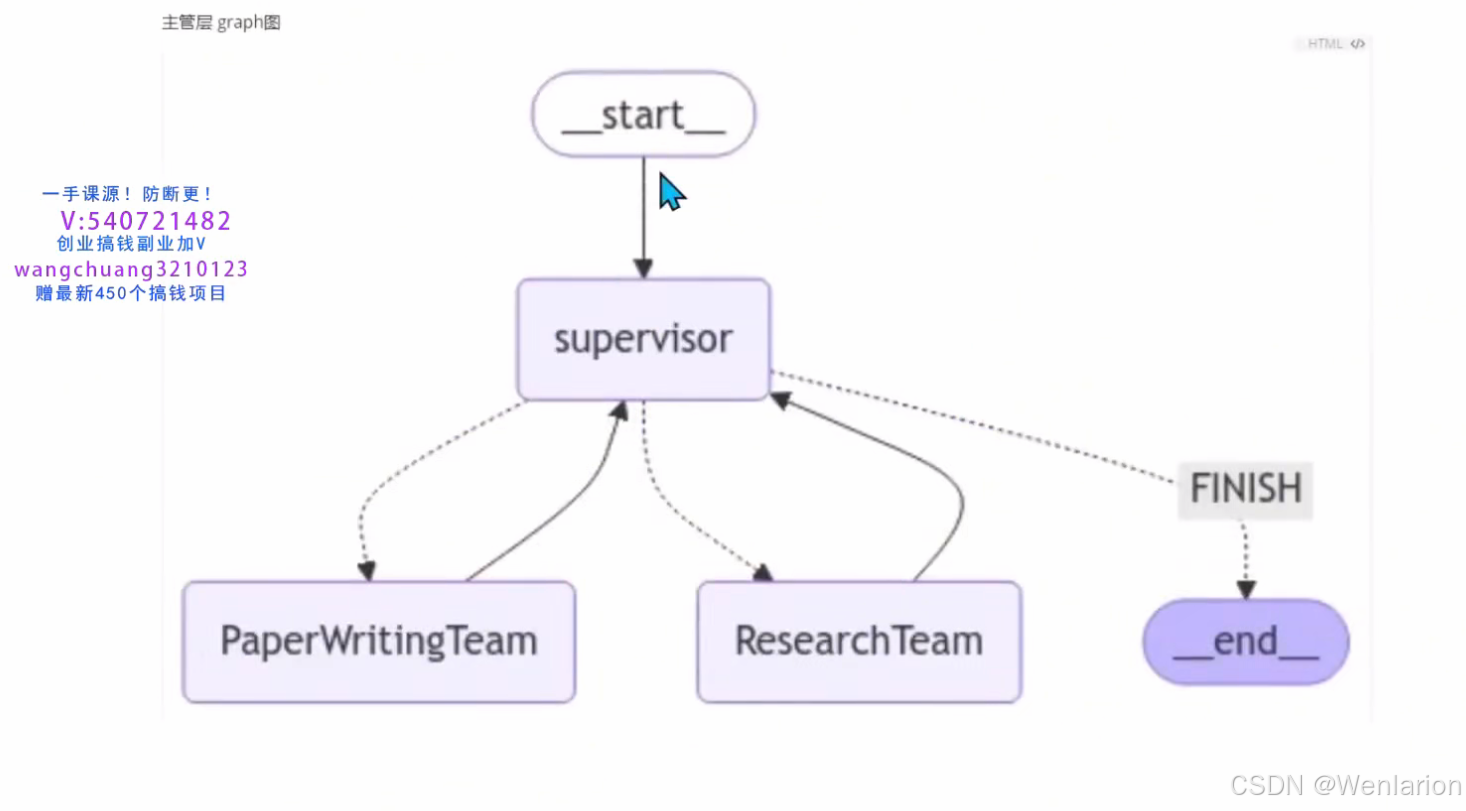
    ["ResearchTeam", "PaperWritingTeam"],
)

# Top-level graph state
class State(TypedDict):
    messages: Annotated[List[BaseMessage], operator.add]
    next: str

def get_last_message(state: State) -> str:
    return state["messages"][-1].content

def join_graph(response: dict):
    return {"messages": [response["messages"][-1]]}

# Define the graph.
super_graph = StateGraph(State)
# First add the nodes, which will do the work
super_graph.add_node("ResearchTeam", get_last_message | research_chain | join_graph)
super_graph.add_node(
    "PaperWritingTeam", get_last_message | authoring_chain | join_graph
)
super_graph.add_node("supervisor", supervisor_node)

# 定义图形连接,控制逻辑的方式
# 通过程序传播

# Define the graph connections, which controls how the logic
# propagates through the program
super_graph.add_edge("ResearchTeam", "supervisor")
super_graph.add_edge("PaperWritingTeam", "supervisor")
super_graph.add_conditional_edges(
    "supervisor",
    lambda x: x["next"],
    {
        "PaperWritingTeam": "PaperWritingTeam",
        "ResearchTeam": "ResearchTeam",
        "FINISH": END,
    },
)
super_graph.add_edge(START, "supervisor")
super_graph = super_graph.compile()

# 显示graph结构
...
from IPython.display import Image, display

display(Image(super_graph.get_graph().draw_mermaid_png()))
...

# 运行整个Agent团队
...
for s in super_graph.stream(
    {
        "messages": [
            HumanMessage(
                content="Write a brief research report on the North American sturgeon. Include a chart."
            )
        ],
    },
    {"recursion_limit": 150},
):
    if "__end__" not in s:
        print(s)
        print("---")
...
3、AutoGen
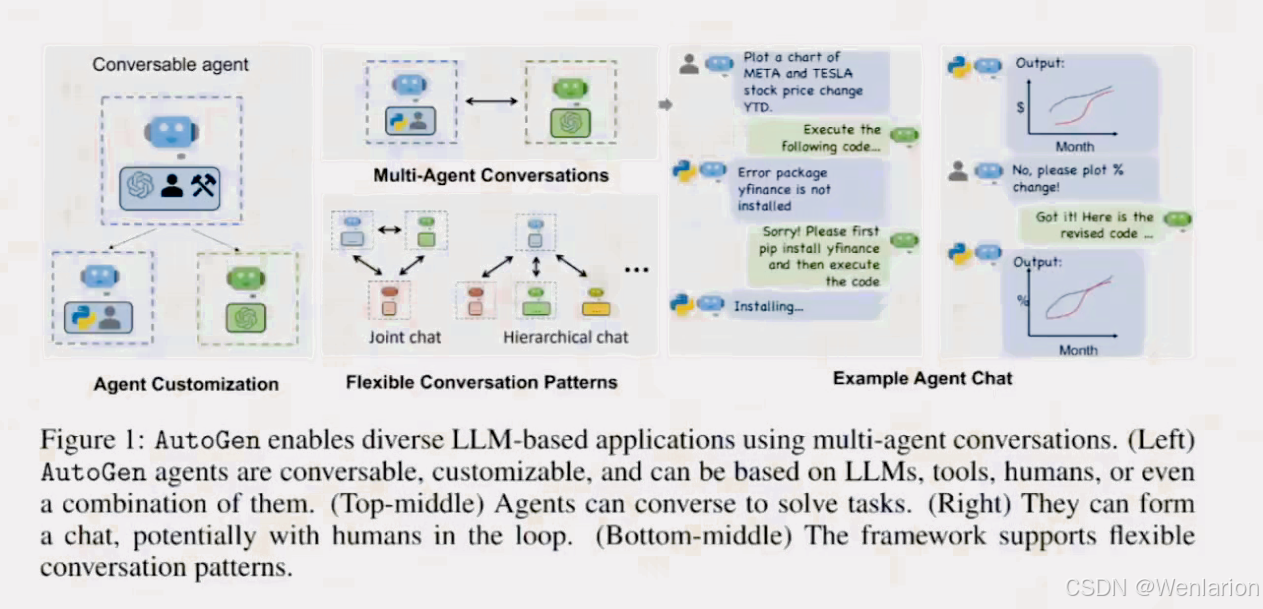
AutoGen 是微软推出的一款用于构建基于大语言模型(LLM)复杂应用的工具。
- 核心特点:它的 Agent 采用相互对话的方式协作完成任务,支持定制化、可对话,并且无缝集成人类参与,结合 LLM、人类输入与工具调用实现多种运作模式。
- 配套工具:提供了直观的 UI 开发工具 AutoGen Studio,方便开发者快速设计和调试多 Agent 系统。
- 资源链接:
AutoGen 环境准备与文档参考
参考文档
-
0.2 版入门指南:https://microsoft.github.io/autogen/0.2/docs/Getting-Started/
-
0.4 版 Agent Chat 快速开始:https://microsoft.github.io/autogen/dev/user-guide/agentchat-user-guide/quickstart.html
-
0.2 版非 OpenAI 模型(Anthropic 等)文档:https://microsoft.github.io/autogen/0.2/docs/topics/non-openai-models/cloud-anthropic
环境准备步骤
- 创建并激活 Conda 环境
conda create -n autogen python=3.10 conda activate autogen -
安装 AutoGen(0.2 版)
pip install autogen-agentchat~=0.2
AutoGen 示例代码解析
这段代码展示了如何使用 AutoGen 构建一个本地 LLM(Qwen2.5)驱动的对话式代码执行系统:
import os
import autogen
from autogen import AssistantAgent, UserProxyAgent

# 配置本地 LLM 服务(如 Ollama)
LLM_BASEURL = "http://localhost:11434/v1/"
LLM_APIKEY = "ollama"
MODEL_NAME = "qwen2.5:7b-instruct-q4_0"

# 构建 LLM 配置列表
config_list = [{"model": MODEL_NAME, "api_key": LLM_APIKEY, "base_url": LLM_BASEURL}]

# 1. 创建助手 Agent(负责思考和生成代码)
assistant = AssistantAgent(
    "assistant",
    llm_config={"config_list": config_list}
)

# 2. 创建用户代理 Agent(负责执行代码并与用户交互)
user_proxy = UserProxyAgent(
    "user_proxy",
    code_execution_config={
        "executor": autogen.coding.LocalCommandLineCodeExecutor(work_dir="coding")
    }
)
# 注:也可使用 Docker 容器执行代码,LocalCommandLineCodeExecutor 为本地执行

# 3. 启动对话
user_proxy.initiate_chat(
    assistant,
    message="Plot a chart of NVDA and TESLA stock price change YTD."
)
核心代码位于 autogen/agentchat 目录,核心组件包括:ConversableAgent 和 groupchat
ConversableAgent
用于管理每个角色的行为
-
Agent 可以指定自己在什么情况下被调用,参数
system_message指定其用途,参数description告知其他 Agent 什么时候该调用它。 -
Agent 的子类
ConversableAgent:是会话的基类,一般不直接使用,而是作为其他类的父类。它能保持对话状态、历史记录,并调用其他工具。 -
ConversableAgent的子类UserProxyAgent:用户角色,用于模拟用户输入和执行代码等。能够安排任务发起任务,user_proxy充当的角色之一是老板,而其他 agent 是员工。无论其他 agent 做什么,至少需要一个user_proxy提出目标问题。 -
ConversableAgent的子类AssistantAgent:AI 角色,用于执行任务处理、调用 API 和逻辑推理等相关代码。
name: str,

system_message: Optional[Union[str, List]] = "You are a helpful AI Assistant.",

...
# 以字典形式接收消息的函数
# 并返回一个布尔值,指示该接收到的消息是否是终止消息。
# 字典可以包含以下键:"内容"、"角色"、"名称"、"函数调用"
...

is_termination_msg: Optional[Callable[[Dict], bool]] = None,

max_consecutive_auto_reply: Optional[int] = None,

human_input_mode: Literal["ALWAYS", "NEVER", "TERMINATE"] = "TERMINATE",

将函数名(传递给openai)映射到可调用函数,也用于工具调用。
...
function_map: Optional[Dict[str, Callable]] = None,

...
代码执行配置
...
code_execution_config: Union[Dict, Literal[False]] = False,

...
大语言模型配置
...
llm_config: Optional[Union[Dict, Literal[False]]] = None,

default_auto_reply: Union[str, Dict] = "",

...
agent的简短描述。方便其它agent使用
(例如GroupChatManager)来决定何时调用此agent。(默认值:system_message)
...
description: Optional[str] = None,

...
此代理过去与其他代理的聊天消息。
可以通过提供聊天历史记录来为代理提供记忆。这将允许代理
简历之前有过对话。默认为空聊天历史记录
...
chat_messages: Optional[Dict[Agent, List[Dict]]] = None,

...
(实验)是否打印发送的消息。如果为None,将使用以下值
在每个功能中保持沉默
...
silent: Optional[bool]] = None,
human_input_mode 说明
-
NEVER: 从不要求人工输入 -
TERMINATE(默认): 仅当满足终止条件时才要求人工输入。请注意,在此模式下,如果人工选择拦截并回复,对话将继续,并且计数器max_consecutive_auto_reply将被重置 -
ALWAYS: 始终需要人工输入,并且人工可以选择跳过并触发自动回复、拦截并提供反馈或终止对话。请注意,在此模式下,基于的终止max_consecutive_auto_reply将被忽略
llm_config 文档
文档链接:https://microsoft.github.io/autogen/0.2/docs/topics/llm_configuration/
示例代码(猜数字游戏)
下面例子中 2 个 Agent 都是用ConversableAgent创建的,通过initiate_chat启动 Agent 聊天:
import os
from autogen import ConversableAgent

# 猜数字游戏,一个当裁判,一个猜
# 自定义本地部署大模型
LLM_BASEURL = "http://localhost:11434/v1/"
LLM_APIKEY = "ollama"
MODEL_NAME = "qwen2.5:7b-instruct-q4_0"

agent_with_number = ConversableAgent(
    "agent_with_number",
    system_message="You are playing a game of guess-my-number. You have the "
    "number 53 in your mind, and I will try to guess it. "
    "If I guess too high, say 'too high', if I guess too low, say 'too low'. ",
    llm_config={"config_list": [{"model": MODEL_NAME, "api_key": LLM_APIKEY, "base_url": LLM_BASEURL}]},
    is_termination_msg=lambda msg: "53" in msg["content"],  # terminate if the number is guessed by the other agent
    human_input_mode="NEVER",  # never ask for human input
)

agent_guess_number = ConversableAgent(
    "agent_guess_number",
    system_message="I have a number in my mind, and you will try to guess it. "
    "If I say 'too high', you should guess a lower number. If I say 'too low', "
    "you should guess a higher number. ",
    llm_config={"config_list": [{"model": MODEL_NAME, "api_key": LLM_APIKEY, "base_url": LLM_BASEURL}]},
    human_input_mode="NEVER",
)

result = agent_with_number.initiate_chat(
    agent_guess_number,
    message="I have a number between 1 and 100. Guess it!",
)
AssistantAgent 与 UserProxyAgent
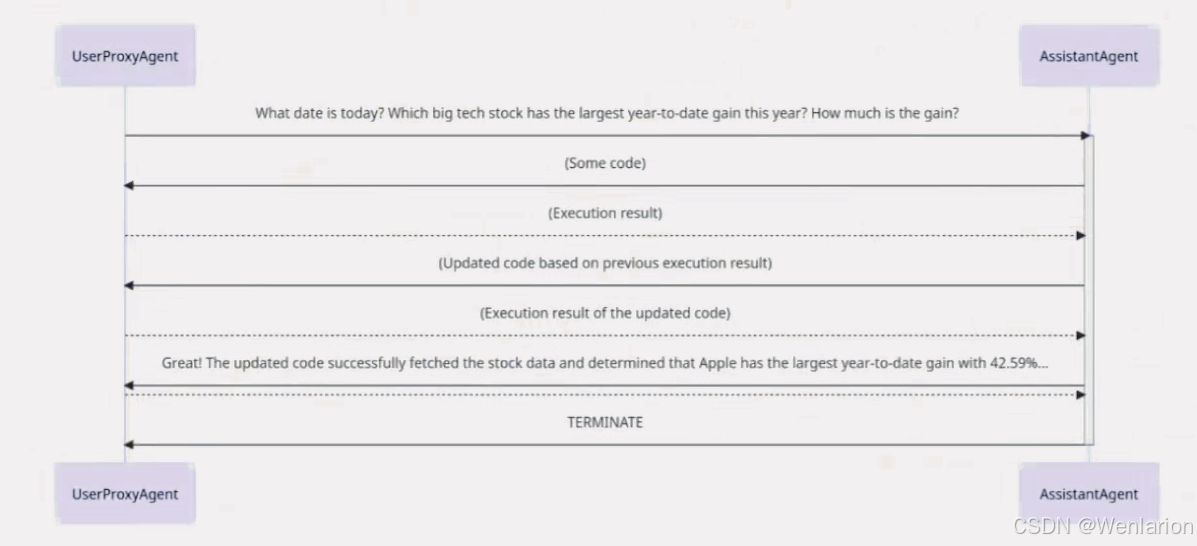
对话至少包含一个 AssistantAgent 和一个 UserProxyAgent。
AssistantAgent
用于与 LLM 交互:
-
参数:
llm_config=llm_config,设置 LLM 参数,需要访问大模型
UserProxyAgent
用于与程序员交互及运行代码:
-
参数:
code_execution_config,设置是否运行代码和相关配置 -
参数:
human_input_mode="NEVER",设置是否需要与人交互,默认情况下最后一步与人交互
Initiate_chat
用于开始对话:
-
参数:
max_turns=2,限制讨论回合数
对话开始后,在两个 Agent 之间展开:A.send() -> B.recv(), B.send() -> A.recv()... 如此往复直到结束(找到答案、超过对话轮数或满足退出条件)
-
每次 AssistantAgent 调用 LLM 时,会参考初始问题和当前的多轮对话内容做出回应
-
UserProxyAgent 可以让用户参与、执行代码或调用工具来完成具体任务
import os
from autogen import AssistantAgent, UserProxyAgent
from autogen.coding import DockerCommandLineCodeExecutor

LLM_BASEURL="http://localhost:11434/v1/"
LLM_APIKEY="ollama"
MODEL_NAME="qwen2.5:7b-instruct-q4_0"

config_list = [{"model": MODEL_NAME, "api_key": LLM_APIKEY, "base_url": LLM_BASEURL}]

# create an AssistantAgent instance named "assistant" with the LLM configuration.
assistant = AssistantAgent(name="assistant", llm_config={"config_list": config_list})

# create a UserProxyAgent instance named "user_proxy" with code execution on docker.
code_executor = DockerCommandLineCodeExecutor()  # docker容器中执行代码,LocalCommandLineCodeExecutor是本地执行
user_proxy = UserProxyAgent(name="user_proxy", code_execution_config={"executor": code_executor})

# the assistant receives a message from the user, which contains the task description
user_proxy.initiate_chat(
    assistant,
    message="""What date is today? Which big tech stock has the largest year-to-date gain this year? How much is the gain?""",
)
GroupChat
用于管理多个 Agent 的协作。
- 通过多个 agent 以一定规则结合实现一个大功能,具体规则可以由聊天组来定义。
- 所有 Agent 都参与到一个对话线程中并共享相同的上下文。这对于需要多个 Agent 之间协作的任务非常重要。
- 如果有两个以上 Agent,就不确定的下一句话该传给谁,就需要使用 ChatGroup 管理,并利用 transitions 设置 Agent 之间的衔接。
- GroupChat:管理多个 Agent 之间的对话,相当于管理一个群聊房间。可通过字典限定各个 Agent 可与谁交互。
- GroupChatManager:管理多个 GroupChat,相当于多个群聊房间的管理者,负责统筹多个对话组的协调和资源分配。
Agent Chat 模式
参考:https://microsoft.github.io/autogen/0.2/docs/tutorial/conversation-patterns/
Two-agent chat
两个 Agent 相互聊天的最简单的对话模式
Sequential chat
两个 Agent 之间的一系列聊天,通过 carryover 机制链接在一起,将前一个聊天的摘要带入下一个聊天的上下文中。
- 此模式适用于可分解为相互依赖的子任务的复杂任务
- 下图说明了此模式的工作原理
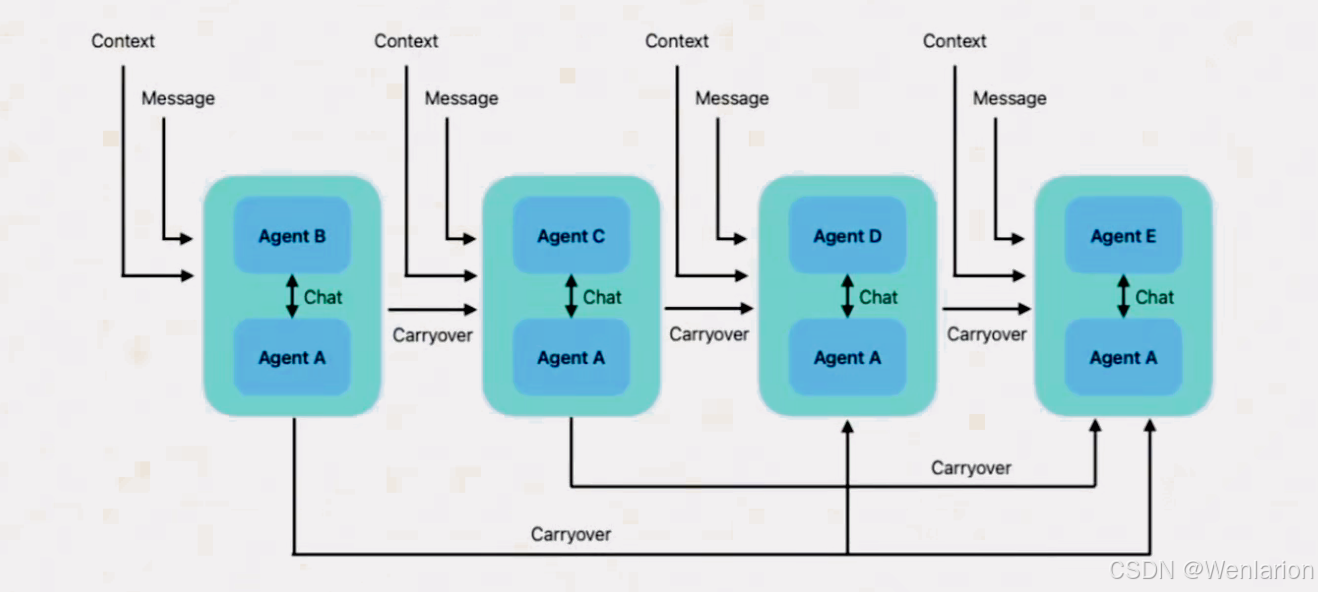
首先要注意的是,该 initiate_chats 方法采用字典列表,每个字典都包含该 initiate_chat 方法的参数。
import os
from autogen import AssistantAgent, UserProxyAgent
from autogen import ConversableAgent

LLM_BASEURL = "http://localhost:11434/v1/"
LLM_APIKEY = "ollama"
MODEL_NAME = "qwen2.5:7b-instruct-q4_0"

config_list = [{"model": MODEL_NAME, "api_key": LLM_APIKEY, "base_url": LLM_BASEURL}]

# llm_config={"config_list": [{"model": "gpt-4", "api_key": os.environ["OPENAI_API_KEY"]}]},

# The Number Agent always returns the same numbers.
number_agent = ConversableAgent(
    name="Number_Agent",
    system_message="You return me the numbers I give you, one number each line.",
    llm_config={"config_list": config_list},
    human_input_mode="NEVER",
)

# The Adder Agent adds 1 to each number it receives.
adder_agent = ConversableAgent(
    name="Adder_Agent",
    system_message="You add 1 to each number I give you and return me the new numbers, one number each line.",
    llm_config={"config_list": config_list},
    human_input_mode="NEVER",
)

# The Multiplier Agent multiplies each number it receives by 2.
multiplier_agent = ConversableAgent(
    name="Multiplier_Agent",
    system_message="You multiply each number I give you by 2 and return me the new numbers, one number each line.",
    llm_config={"config_list": config_list},
    human_input_mode="NEVER",
)

# The Subtracter Agent subtracts 1 from each number it receives.
subtracter_agent = ConversableAgent(
    name="Subtracter_Agent",
    system_message="You subtract 1 from each number I give you and return me the new numbers, one number each line.",
    llm_config={"config_list": config_list},
    human_input_mode="NEVER",
)

# The Divider Agent divides each number it receives by 2.
divider_agent = ConversableAgent(
    name="Divider_Agent",
    system_message="You divide each number I give you by 2 and return me the new numbers, one number each line.",
    llm_config={"config_list": config_list},
    human_input_mode="NEVER",
)
Group Chat
参考 1: https://microsoft.github.io/autogen/0.2/blog/2024/02/29/StateFlow参考 2: https://microsoft.github.io/autogen/0.2/docs/topics/groupchat/customized_speaker_selection
用于管理多个 Agent 的协作
群聊中的一个重要问题是:哪个座席应该接下来发言?为了支持不同的场景,我们提供了在群聊中组织座席的不同方式:
我们支持几种策略来选择下一个 Agent:
-
round_robin: 群聊管理器根据 Agent 提供的顺序以循环方式选择 Agent
-
random: 群聊管理器随机选择 Agent
-
manual: 群聊管理器通过请求人工输入来选择 Agent
-
auto: 默认策略,使用群聊管理器的 LLM 选择 Agent
-
我们提供了一种方法来限制下一位发言者的选择(见下面的例子)。
-
我们允许您传入一个函数来自定义下一位发言者的选择。借助此功能,您可以构建一个 StateFlow 模型,从而实现 Agent 之间的确定性工作流程。
-
GroupChatManager: 管理多个 GroupChat,相当于多个群聊房间的管理者,负责统筹多个对话组的协调和资源分配。
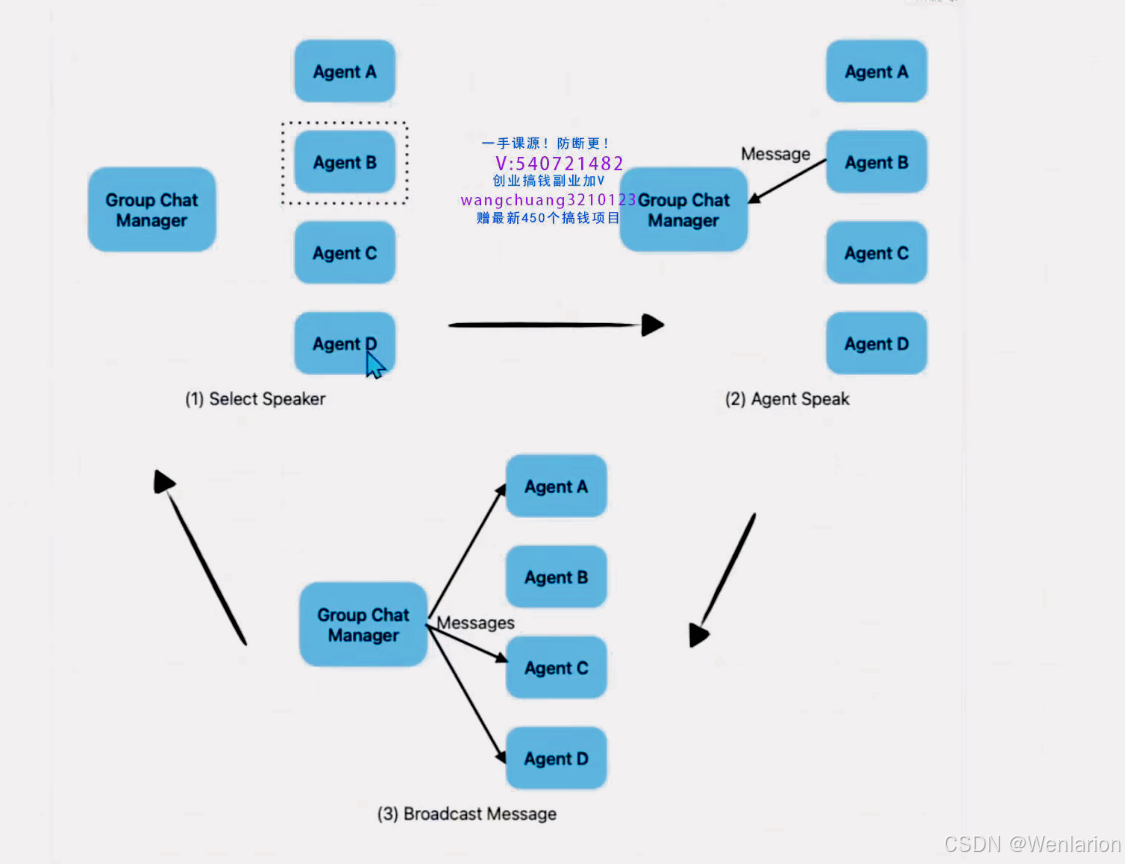
在此示例中,我们使用 auto 策略来选择下一个 Agent,为了帮助群聊管理器选择下一个 Agent,我们还设置了 description 代理的。如果没有 description,群聊管理器将使用 Agent 的 system_message,这可能不是最佳选择。
import os
from autogen import AssistantAgent, UserProxyAgent
from autogen import ConversableAgent

LLM_BASEURL = "http://localhost:11434/v1/"
LLM_APIKEY = "ollama"
MODEL_NAME = "qwen2.5:7b-instruct-q4_0"

config_list = [{"model": MODEL_NAME, "api_key": LLM_APIKEY, "base_url": LLM_BASEURL}]

# llm_config={"config_list": [{"model": "gpt-4", "api_key": os.environ["OPENAI_API_KEY"]}]},

# The Number Agent always returns the same numbers.
number_agent = ConversableAgent(
    name="Number_Agent",
    system_message="You return me the numbers I give you, one number each line.",
    llm_config={"config_list": config_list},
    human_input_mode="NEVER",
)

# The Adder Agent adds 1 to each number it receives.
adder_agent = ConversableAgent(
    name="Adder_Agent",
    system_message="You add 1 to each number I give you and return me the new numbers, one number each line.",
    llm_config={"config_list": config_list},
    human_input_mode="NEVER",
)

# The Multiplier Agent multiplies each number it receives by 2.
multiplier_agent = ConversableAgent(
    name="Multiplier_Agent",
    system_message="You multiply each number I give you by 2 and return me the new numbers, one number each line.",
    llm_config={"config_list": config_list},
    human_input_mode="NEVER",
)

# The Subtracter Agent subtracts 1 from each number it receives.
subtracter_agent = ConversableAgent(
    name="Subtracter_Agent",
    system_message="You subtract 1 from each number I give you and return me the new numbers, one number each line.",
    llm_config={"config_list": config_list},
    human_input_mode="NEVER",
)

# The Divider Agent divides each number it receives by 2.
divider_agent = ConversableAgent(
    name="Divider_Agent",
    system_message="You divide each number I give you by 2 and return me the new numbers, one number each line.",
    llm_config={"config_list": config_list},
    human_input_mode="NEVER",
)

# The `description` attribute is a string that describes the agent.
# It can also be set in `ConversableAgent` constructor.
adder_agent.description = "Add 1 to each input number."
multiplier_agent.description = "Multiply each input number by 2."
subtracter_agent.description = "Subtract 1 from each input number."
divider_agent.description = "Divide each input number by 2."
number_agent.description = "Return the numbers given."

from autogen import GroupChat

...
我们首先创建一个GroupChat对象并提供Agent列表。如果我们要使用该round_robin策略,此列表将指定要选择的Agent的顺序。我们还使用一个空的消息列表和最大轮数6来初始化群聊,这意味着最多会有6次选择发言人。Agent发言和广播消息的迭代
...

group_chat = GroupChat(
    agents=[adder_agent, multiplier_agent, subtracter_agent, divider_agent, number_agent],
    messages=[],
    speaker_selection_method="round_robin",
    max_round=6,
)

...
在上例中,我们设置了description代理的,以帮助群聊管理器选择下一个Agent。这仅有助于群聊管理器,但不能帮助参与的Agent相互了解。有时让每个Agent向群聊中的其他Agent介绍自己很有用。这可以通过设置 来实现send_introductions=True
group_chat_with_introductions = GroupChat(
    agents=[adder_agent, multiplier_agent, subtracter_agent, divider_agent, number_agent],
    messages=[],
    max_round=6,
    send_introductions=True,
)
在底层,群聊管理器在群聊开始之前向群聊中的所有Agent发送一条包含Agent姓名和描述的消息

...

from autogen import GroupChatManager

...
现在我们创建一个GroupChatManager对象并将该GroupChat对象作为输入。我们还需要指定llm_config群聊管理器的,以便它可以使用 LLM 选择下一个Agent(auto 策略)
...

group_chat_manager = GroupChatManager(
    groupchat=group_chat,
    llm_config={"config_list": config_list},
)

...
最后,我们让之前的number_agent与群聊管理器开始双人聊天,群聊管理器在内部运行群聊,并在内部群聊结束时终止双人聊天。因为number_agent是我们选择发言的,所以这算作群聊的第一轮。
...

chat_result = number_agent.initiate_chat(
    group_chat_manager,
    message="My number is 3, I want to turn it into 13.",
    summary_method="reflection_with_llm",
)

print(chat_result.summary)
Group Chat in a Sequential Chat
群聊也可用作顺序聊天的一部分。在这种情况下,群聊管理员将被视为双座聊天序列中的常规座席。
# Let's use the group chat with introduction messages created above.
group_chat_manager_with_intros = GroupChatManager(
    groupchat=group_chat_with_introductions,
    llm_config={"config_list": config_list},
)

# Start a sequence of two-agent chats between the number agent and
# the group chat manager.
chat_result = number_agent.initiate_chats(
    [
        {
            "recipient": group_chat_manager_with_intros,
            "message": "My number is 3, I want to turn it into 13.",
        },
        {
            "recipient": group_chat_manager_with_intros,
            "message": "Turn this number to 32.",
        },
    ]
)
指定 GroupChat 的 Speaker
allowed_or_disallowed_speaker_transitions 群聊是一种强大的对话模式,但如果参与的 Agent 数量很大,则可能很难控制。AutoGen 提供了一种通过使用类的参数来限制下一个发言者选择的方法 GroupChat。
-
该
allowed_or_disallowed_speaker_transitions参数是一个字典,它将给定 Agent 映射到可以(或不能)被选中接下来发言的 Agent 列表。 -
该
speaker_transitions_type参数指定是否允许或不允许转换。
allowed_transitions = {
    number_agent: [adder_agent, number_agent],
    adder_agent: [multiplier_agent, number_agent],
    subtracter_agent: [divider_agent, number_agent],
    multiplier_agent: [subtracter_agent, number_agent],
    divider_agent: [adder_agent, number_agent],
}
在此示例中,为每个 agent 指定了允许的转换。number_agent 可以跟在 adder_agent 和 number_agent 之后,adder_agent 可以跟在 multiplier_agent 和 number_agent 之后,依此类推。让我们将其放入群聊中,看看它是如何工作的。设置 speaker_transitions_type 为 allowed 因此转换是正约束。
constrained_graph_chat = GroupChat(
    agents=[adder_agent, multiplier_agent, subtracter_agent, divider_agent, number_agent],
    allowed_or_disallowed_speaker_transitions=allowed_transitions,
    speaker_transitions_type="allowed",
    messages=[],
    max_round=12,
    send_introductions=True,
)

constrained_group_chat_manager = GroupChatManager(
    groupchat=constrained_graph_chat,
    llm_config={"config_list": config_list},
)

chat_result = number_agent.initiate_chat(
    constrained_group_chat_manager,
    message="My number is 3, I want to turn it into 10. Once I get to 10, keep it there.",
    summary_method="reflection_with_llm",
)
Nested Chat
将工作流打包到单个 Agent 中,以便在更大的工作流中重复使用。
AutoGen 提供了一种通过使用嵌套聊天来实现这一点的方法。
嵌套聊天由嵌套聊天处理程序提供支持,该处理程序是 ConversableAgent 的一个可插入组件。下图说明了嵌套聊天处理程序在收到消息时如何触发一系列嵌套聊天。
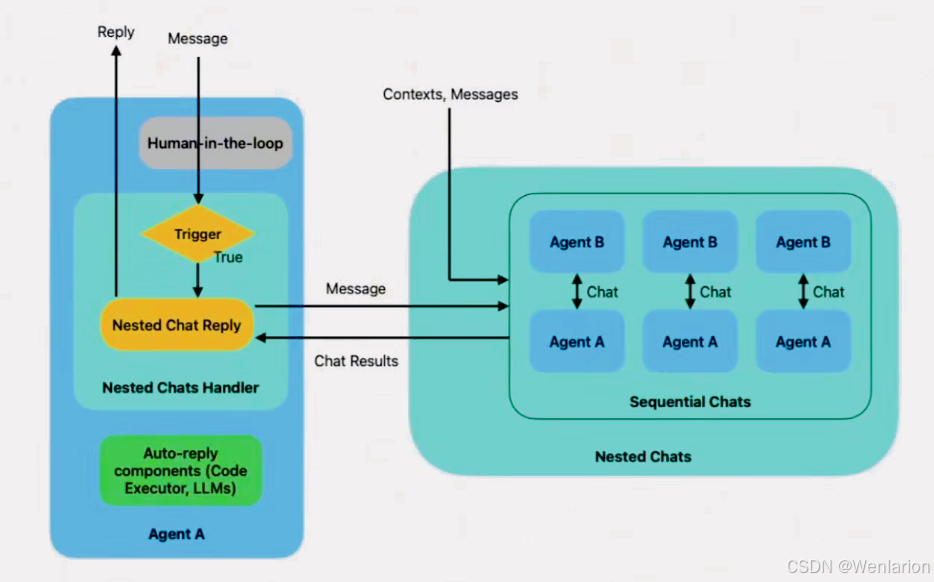
当消息进入并通过人机交互组件时,嵌套聊天处理程序会根据用户指定的条件检查该消息是否应触发嵌套聊天。如果满足条件,嵌套聊天处理程序将使用顺序聊天模式启动一系列嵌套聊天。在每个嵌套聊天中,发送方 Agent 始终是触发嵌套聊天的同一 Agent。最后,嵌套聊天处理程序使用嵌套聊天的结果来生成对原始消息的响应。默认情况下,嵌套聊天处理程序使用最后一次聊天的摘要作为响应。
import tempfile
temp_dir = tempfile.gettempdir()

arithmetic_agent = ConversableAgent(
    name="Arithmetic_Agent",
    llm_config=False,
    human_input_mode="ALWAYS",
    # This agent will always require human input to make sure the code is
    # safe to execute.
    code_execution_config={"use_docker": False, "work_dir": temp_dir},
)

code_writer_agent = ConversableAgent(
    name="Code_Writer_Agent",
    system_message="You are a code writer. You write Python script in Markdown code blocks.",
    llm_config={"config_list": [{"model": "gpt-4", "api_key": os.environ["OPENAI_API_KEY"]}]},
    human_input_mode="NEVER",
)

poetry_agent = ConversableAgent(
    name="Poetry_Agent",
    system_message="You are an AI poet.",
    llm_config={"config_list": [{"model": "gpt-4", "api_key": os.environ["OPENAI_API_KEY"]}]},
    human_input_mode="NEVER",
)
现在我们使用顺序聊天模式定义嵌套聊天。所有发送者始终是arithmetic_agent
nested_chats = [
    {
        "recipient": group_chat_manager_with_intros,
        "summary_method": "reflection_with_llm",
        "summary_prompt": "Summarize the sequence of operations used to turn " "the source number into target number.",
    },
    {
        "recipient": code_writer_agent,
        "message": "write a Python script to verify the arithmetic operations is correct.",
        "summary_method": "reflection_with_llm",
    },
    {
        "recipient": poetry_agent,
        "message": "write a poem about it.",
        "max_turns": 1,
        "summary_method": "last_msg",
    },
]

# 现在我们将嵌套聊天处理程序注册到arithmetic_agent并设置触发嵌套聊天的条件。
arithmetic_agent.register_nested_chats(
    nested_chats,
    # The trigger function is used to determine if the agent should start the nested chat
    # given the sender agent.
    # In this case, the arithmetic agent will not start the nested chats if the sender is
    # from the nested chats' recipient to avoid recursive calls.
    trigger=lambda sender: sender not in [group_chat_manager_with_intros, code_writer_agent, poetry_agent],
)

...
最后,我们调用generate_reply来获取响应 arithmetic_agent - 这将触发一系列嵌套聊天,并返回最后一次嵌套聊天的摘要作为响应。
...

# Instead of using `initiate_chat` method to start another conversation,
# we can use the `generate_reply` method to get single reply to a message directly.
reply = arithmetic_agent.generate_reply(
    messages=[{"role": "user", "content": "I have a number 3 and I want to turn it into 7."}]
)
嵌套聊天处理程序的实现利用了 register_reply 方法,它允许您对 ConversableAgent 进行广泛的自定义。GroupChatManager 使用相同的机制来实现群聊。
import os
from autogen import AssistantAgent, UserProxyAgent
from autogen import ConversableAgent

LLM_BASEURL="http://localhost:11434/v1/"
LLM_APIKEY="ollama"
MODEL_NAME="qwen2.5:7b-instruct-q4_0"

config_list = [{"model": MODEL_NAME, "api_key": LLM_APIKEY, "base_url": LLM_BASEURL}]

# llm_config={"config_list": [{"model": "gpt-4", "api_key": os.environ["OPENAI_API_KEY"]}]},

# The Number Agent always returns the same numbers.
number_agent = ConversableAgent(
    name="Number_Agent",
    system_message="You return me the numbers I give you, one number each line.",
    llm_config={"config_list": config_list},
    human_input_mode="NEVER",
)

# The Adder Agent adds 1 to each number it receives.
adder_agent = ConversableAgent(
    name="Adder_Agent",
    system_message="You add 1 to each number I give you and return me the new numbers, one number each line.",
    llm_config={"config_list": config_list},
    human_input_mode="NEVER",
)
代码执行器
在 AutoGen 中,代码执行器是一个组件,它接受输入消息(例如,包含代码块的消息),执行并输出带有结果的消息。
AutoGen 提供了两种类型的内置代码执行器:
- 一种是命令行代码执行器,它在命令行环境(例如 UNIX shell)中运行代码。
- 另一种是 Jupyter 执行器,它在交互式 Jupyter 内核中运行代码。
对于每种类型的执行器,AutoGen 都提供了两种执行代码的方式:本地执行和在 Docker 容器中执行。
- 一种方法是直接在 AutoGen 运行的同一主机平台(即本地操作系统)中执行代码。它适用于开发和测试,但对于生产来说并不理想,因为 LLM 可以生成任意代码。
- 另一种方法是在 Docker 容器中执行代码。
下表显示了代码执行器和执行环境的组合:
| 代码执行器(autogen.coding) | 环境 | 平台 |
|---|---|---|
| LocalCommandLineCodeExecutor | Shell | Local |
| DockerCommandLineCodeExecutor | Shell | Docker |
| jupyter.JupyterCodeExecutor | Jupyter 内核(例如 python3) | Local/Docker |
本地执行
当本地命令行代码执行器收到带有代码块的消息时,首先将代码写入代码文件,然后启动新的子进程来执行代码文件。执行器读取代码执行的控制台输出并将其作为回复消息发送回去。
以下是使用代码执行器运行打印随机数的 Python 代码块的示例:
首先,我们使用代码执行器创建一个代理,该代理使用临时目录来存储代码文件。我们指定human_input_mode="ALWAYS"手动验证正在执行的代码的安全性。在运行此示例之前,我们需要确保matplotlib和numpy已安装:
pip install matplotlib numpy代码例子
import tempfile
from autogen import ConversableAgent
from autogen.coding import LocalCommandLineCodeExecutor

# Create a temporary directory to store the code files.
temp_dir = tempfile.TemporaryDirectory()

# Create a local command line code executor.
executor = LocalCommandLineCodeExecutor(
    timeout=10,  # Timeout for each code execution in seconds.
    work_dir=temp_dir.name,  # Use the temporary directory to store the code files.
)

# Create an agent with code executor configuration.
code_executor_agent = ConversableAgent(
    "code_executor_agent",
    llm_config=False,  # Turn off LLM for this agent.
    code_execution_config={"executor": executor},  # Use the local command line code executor.
    human_input_mode="ALWAYS",  # Always take human input for this agent for safety.
)

# 代码块,甚至这段代码可以是大模型生成的
message_with_code_block = """This is a message with code block.
The code block is below:
```python
import numpy as np
import matplotlib.pyplot as plt
x = np.random.randint(0, 100, 100)
y = np.random.randint(0, 100, 100)
plt.scatter(x, y)
plt.savefig('scatter.png')
print('Scatter plot saved to scatter.png')
```
This is the end of the message."""

#Generate a reply for the given code.
reply = code_executor_agent.generate_reply(messages=[{"role": "user", "content": message_with_code_block}])
print(reply)
在生成响应期间,会请求人工输入,以便有机会拦截代码执行。在这种情况下,我们选择继续执行,代理的回复包含代码执行的输出。我们可以在临时目录中查看生成的图:
import os
print(os.listdir(temp_dir.name))
清理工作目录以避免影响以后的对话:
temp_dir.cleanup()Docker 容器执行
为了减轻在本地运行 LLM 生成的代码的安全风险,使用 docker 命令行代码执行器(autogen.coding.DockerCommandLineCodeExecutor)在 Docker 容器中执行代码。这样,生成的代码只能访问明确赋予它的资源。
Docker 执行器类似于本地命令行代码执行器:从输入消息中提取代码块,写入代码文件,对每个代码文件启动一个 Docker 容器执行该代码文件,并读取代码执行的控制台输出。
下图说明了 Docker 执行的工作原理。
要使用 Docker 执行,您需要在机器上安装 Docker,安装并运行 Docker 后,您可以按如下方式设置代码执行器代理:
前面 RAG 课程中有具体讲 Docker 安装和使用。docker 下载:https://docs.docker.com/engine/install/
from autogen.coding import DockerCommandLineCodeExecutor

# Create a temporary directory to store the code files.
temp_dir = tempfile.TemporaryDirectory()

# Create a Docker command line code executor.
executor = DockerCommandLineCodeExecutor(
    image="python:3.12-slim",  # Execute code using the given docker image name.
    timeout=10,  # Timeout for each code execution in seconds.
    work_dir=temp_dir.name,  # Use the temporary directory to store the code files.
)

# Create an agent with code executor configuration that uses docker.
code_executor_agent_using_docker = ConversableAgent(
    "code_executor_agent_docker",
    llm_config=False,  # Turn off LLM for this agent.
    code_execution_config={"executor": executor},  # Use the docker command line code executor.
    human_input_mode="ALWAYS",  # Always take human input for this agent for safety.
)

# When the code executor is no longer used, stop it to release the resources.
# executor.stop()
Tool Use
在上一章中,我们探讨了代码执行器,它赋予代理超强的编程能力。代理编写任意代码很有用,但是,控制代理编写的代码可能具有挑战性。这就是工具发挥作用的地方。
工具是代理可以使用的预定义函数。代理无需编写任意代码,而是可以调用工具来执行操作,例如搜索网页、执行计算、读取文件或调用远程 API。由于您可以控制代理可以使用哪些工具,因此您可以控制代理可以执行哪些操作。
注意:目前只有支持 OpenAI 兼容工具调用 API 的 LLM 才可以使用此功能。
from typing import Annotated, Literal

Operator = Literal["+", "-", "*", "/"]

# 定义一个工具函数
def calculator(a: int, b: int, operator: Annotated[Operator, "operator"]) -> int:
    if operator == "+":
        return a + b
    elif operator == "-":
        return a - b
    elif operator == "*":
        return a * b
    elif operator == "/":
        return int(a / b)
    else:
        raise ValueError("Invalid operator")

import os
from autogen import ConversableAgent

# 首先定义负责发起工具调用的助理代理
assistant = ConversableAgent(
    name="Assistant",
    system_message="You are a helpful AI assistant. "
    "You can help with simple calculations. "
    "Return 'TERMINATE' when the task is done.",
    llm_config={"config_list": [{"model": "gpt-4", "api_key": os.environ["OPENAI_API_KEY"]}]},
)

# 用户代理用于与助理代理交互,并执行工具调用
user_proxy = ConversableAgent(
    name="User",
    llm_config=False,
    is_termination_msg=lambda msg: msg.get("content") is not None and "TERMINATE" in msg["content"],
    human_input_mode="NEVER",
)

# 向助理agent中注册,让大模型规划,提供description方便大模型根据描述规划
# Register the tool signature with the assistant agent.
assistant.register_for_llm(name="calculator", description="A simple calculator")(calculator)

# 向proxy agent中注册,让agent执行
# Register the tool function with the user proxy agent.
user_proxy.register_for_execution(name="calculator")(calculator)

chat_result = user_proxy.initiate_chat(assistant, message="What is (44232 + 13312 / (232 - 32)) * 5?")
工具注册
与代码执行器类似,一个工具必须至少向两个代理注册才能用于对话:
- 通过向工具签名注册的代理
register_for_llm可以调用该工具; - 通过向工具函数对象注册的代理
register_for_execution可以执行该工具的函数。
可以使用 autogen.register_function 函数同时向两个代理注册一个工具:
from autogen import register_function

# Register the calculator function to the two agents.
register_function(
    calculator,
    caller=assistant,  # The assistant agent can suggest calls to the calculator.
    executor=user_proxy,  # The user proxy agent can execute the calculator calls.
    name="calculator",  # By default, the function name is used as the tool name.
    description="A simple calculator",  # A description of the tool.
)
工具 Schema 是根据函数签名和类型提示自动生成的。可以通过检查 llm_config 代理的属性来查看工具模式:
assistant.llm_config["tools"]
...
[
  {
    "type": "function",
    "function": {
      "description": "A simple calculator",
      "name": "calculator",
      "parameters": {
        "type": "object",
        "properties": {
          "a": {
            "type": "integer",
            "description": "a"
          },
          "b": {
            "type": "integer",
            "description": "b"
          },
          "operator": {
            "enum": ["+", "-", "*", "/"],
            "type": "string",
            "description": "operator"
          }
        },
        "required": ["a", "b", "operator"]
      }
    }
  }
]
...
缓存(Cache)
AutoGen 支持缓存 API 请求,以便在发出相同请求时可以重复使用它们。这在重复或继续实验以实现可重复性和节省成本时非常有用。
可以使用数据库缓存(Cosmos DB Cache)、Redis 缓存(RedisCache)或本地磁盘缓存(DiskCache)。
示例代码
from autogen import Cache

# 使用 Redis 作为缓存
with Cache.redis(redis_url="redis://localhost:6379/0") as cache:
    user.initiate_chat(assistant, message=coding_task, cache=cache)

# 使用 DiskCache 作为缓存
with Cache.disk() as cache:
    user.initiate_chat(assistant, message=coding_task, cache=cache)

# 磁盘文件缓存,设置路径
with Cache.disk(cache_path_root="/tmp/autogen_cache") as cache:
    user.initiate_chat(assistant, message=coding_task, cache=cache)

# 使用 Azure Cosmos DB 作为缓存
with Cache.cosmos_db(
    connection_string="your_connection_string",
    database_id="your_database_id",
    container_id="your_container_id"
) as cache:
    user.initiate_chat(assistant, message=coding_task, cache=cache)
Seed 控制
您可以改变 cache_seed 参数以获得不同的 LLM 输出,同时仍使用缓存:
# 将 cache_seed 设置为 1 将使用与默认不同的缓存,输出也会不同
with Cache.disk(cache_seed=1) as cache:
    user.initiate_chat(assistant, message=coding_task, cache=cache)
长上下文压缩
LLMLingua 压缩文本
LLMLingua 项目由微软提出,在之前的 RAG 课程中已有介绍。文本压缩对优化与 LLM 的交互至关重要,尤其是在处理可能导致成本增加和响应时间变慢的长提示时。LLMLingua 是一种旨在高效压缩提示的工具,可提升 LLM 操作的效率和成本效益。它支持与 AutoGen 集成,可用于压缩文本,从而优化 LLM 在各类应用中的使用。
环境准备
由于示例涉及 PDF 处理,需要先安装依赖:
pip install "autogen-agentchat[long-context]~=0.2" PyMuPDF
示例代码
我们将使用 TextMessageCompressor 压缩 AutoGen 研究论文,以下是初始化 LLMLingua 文本压缩器的代码:
import tempfile
import fitz  # PyMuPDF
import requests

from autogen.agentchat.contrib.capabilities.text_compressors import LLMLingua
from autogen.agentchat.contrib.capabilities.transforms import TextMessageCompressor

AUTOGEN_PAPER = "https://arxiv.org/pdf/2308.08155"

def extract_text_from_pdf():
    # 下载 PDF
    response = requests.get(AUTOGEN_PAPER)
    response.raise_for_status()  # 确保下载成功

    text = ""
    # 将 PDF 保存到临时目录
    with tempfile.TemporaryDirectory() as temp_dir:
        with open(temp_dir + "temp.pdf", "wb") as f:
            f.write(response.content)

        # 打开并提取 PDF 文本
        with fitz.open(temp_dir + "temp.pdf") as doc:
            for page in doc:
                text += page.get_text()

    return text

# Example usage
pdf_text = extract_text_from_pdf()
llm_lingua = LLMLingua()
text_compressor = TextMessageCompressor(text_compressor=llm_lingua)
compressed_text = text_compressor.apply_transform([{"content": pdf_text}])
print(text_compressor.get_logs([], []))
ConversableAgent 集成 LLMLingua
将 LLMLingua 集成到 AutoGen 的对话代理中,允许在提示发送到 LLM 之前对其进行动态压缩。
import os
import autogen
from autogen.agentchat.contrib.capabilities import transform_messages

system_message = "You are a world class researcher."
config_list = [{"model": "gpt-4-turbo", "api_key": os.getenv("OPENAI_API_KEY")}]

# Define your agent; the user proxy and an assistant
researcher = autogen.ConversableAgent(
    "assistant",
    llm_config={"config_list": config_list},
    max_consecutive_auto_reply=1,
    system_message=system_message,
    human_input_mode="NEVER",
)

user_proxy = autogen.UserProxyAgent(
    "user_proxy",
    human_input_mode="NEVER",
    is_termination_msg=lambda x: "TERMINATE" in x.get("content", ""),
    max_consecutive_auto_reply=1,
)
集成 LLMLingua 到对话代理
# 将使用text_compressor的context_handling,添加到researcher agent中
context_handling = transform_messages.TransformMessages(transforms=[text_compressor])
context_handling.add_to_agent(researcher)

message = "Summarize this research paper for me, include the important information" + pdf_text
result = user_proxy.initiate_chat(recipient=researcher, clear_history=True, message=message, silent=True)
print(result.chat_history[1]["content"])
配置 LLMLingua 压缩目标
你可以配置 LLMLingua 的压缩目标(如目标 Token 数):
config_list = [{"model": "gpt-3.5-turbo", "api_key": os.getenv("OPENAI_API_KEY")}]
researcher = autogen.ConversableAgent(
    "assistant",
    llm_config={"config_list": config_list},
    max_consecutive_auto_reply=1,
    system_message=system_message,
    human_input_mode="NEVER",
)

text_compressor = TextMessageCompressor(
    text_compressor=llm_lingua,
    compression_params={"target_token": 13000},  # 配置压缩目标 Token 数
    cache=None,
)

context_handling = transform_messages.TransformMessages(transforms=[text_compressor])
context_handling.add_to_agent(researcher)

compressed_text = text_compressor.apply_transform([{"content": message}])

result = user_proxy.initiate_chat(recipient=researcher, clear_history=True, message=message, silent=True)
print(result.chat_history[1]["content"])
规划、推理和反思
创建一个规划 Agent
import os
from datetime import datetime
from typing import Callable, Dict, Literal, Optional, Union
from typing_extensions import Annotated

from autogen import (
    Agent,
    AssistantAgent,
    ConversableAgent,
    GroupChat,
    GroupChatManager,
    UserProxyAgent,
    config_list_from_json,
    register_function,
)
from autogen.agentchat.contrib import agent_builder
from autogen.cache import Cache
from autogen.coding import DockerCommandLineCodeExecutor, LocalCommandLineCodeExecutor

config_list = [
    {"model": "gpt-4-1106-preview", "api_key": os.environ["OPENAI_API_KEY"]},
    {"model": "gpt-3.5-turbo", "api_key": os.environ["OPENAI_API_KEY"]},
]

task = (
    f"Today is {datetime.now().date()}. Write a blogpost about the stock price performance of Nvidia in the past month."
)
print(task)

# Create planner agent.
planner = AssistantAgent(
    name="planner",
    llm_config={
        "config_list": config_list,
        "cache_seed": None,  # Disable legacy cache.
    },
    system_message="You are a helpful AI assistant. You suggest a feasible plan "
    "for finishing a complex task by decomposing it into 3-5 sub-tasks. "
    "If the plan is not good, suggest a better plan. "
    "If the execution is wrong, analyze the error and suggest a fix.",
)

# Create a planner user agent used to interact with the planner.
planner_user = UserProxyAgent(
    name="planner_user",
    human_input_mode="NEVER",
    code_execution_config=False,
)

# The function for asking the planner.
def task_planner(question: Annotated[str, "Question to ask the planner."]) -> str:
    with Cache.disk(cache_seed=4) as cache:
        planner_user.initiate_chat(planner, message=question, max_turns=1, cache=cache)
    # return the last message received from the planner
    return planner_user.last_message()["content"]


# 执行规划
# 创建一个助理agent来执行该计划,使用规划agent作为工具

# Create assistant agent
assistant = AssistantAgent(
    name="assistant",
    system_message=(
        "You are a helpful AI assistant. "
        "You can use the task planner to decompose a complex task into sub-tasks. "
        "Make sure your task follow through the sub-tasks. "
        "When needed, write Python code in markdown down blocks, and I will execute them."
        "Give the user a final solution at the end. "
        "Return TERMINATE only if the sub-tasks are completed."
    ),
    llm_config={
        "config_list": config_list,
        "cache_seed": None,  # Disable legacy cache.
    },
)

# Setting up code executor.
os.makedirs("planning", exist_ok=True)
# Use DockerCommandLineCodeExecutor to run code in a docker container.
# code_executor = DockerCommandLineCodeExecutor(work_dir="planning")
code_executor = LocalCommandLineCodeExecutor(work_dir="planning")

# Create user proxy agent used to interact with the assistant.
user_proxy = UserProxyAgent(
    name="user_proxy",
    human_input_mode="ALWAYS",
    is_termination_msg=lambda x: "content" in x
        and x["content"] is not None
        and x["content"].rstrip().endswith("TERMINATE"),
    code_execution_config={"executor": code_executor},
)

# Register the function to the agent pair.
register_function(
    task_planner,
    caller=assistant,
    executor=user_proxy,
    name="task_planner",
    description="A task planner than can help you with decomposing a complex task into sub-tasks.",
)

# Use Cache.disk to cache LLM responses. Change cache_seed for different responses.
with Cache.disk(cache_seed=1) as cache:
    # the assistant receives a message from the user, which contains the task description
    user_proxy.initiate_chat(
        assistant,
        message=task,
        cache=cache,
    )
ReAct
构建一个通用的 ReAct 提示和一个 react_prompt_message 基于 ReAct 提示的自定义消息函数:
# NOTE: this ReAct prompt is adapted from Langchain's ReAct agent:
# https://github.com/langchain-ai/langchain/blob/master/libs/langchain/langchain/agents/react/agent.py#L79
# 参考langchain的提示词模板
ReAct_prompt = """
Answer the following questions as best you can. You have access to tools provided.

Use the following format:

Question: the input question you must answer
Thought: you should always think about what to do
Action: the action to take
Action Input: the input to the action
Observation: the result of the action
... (this process can repeat multiple times)
Thought: I now know the final answer
Final Answer: the final answer to the original input question

Begin!
Question: {input}
"""

# Define the ReAct prompt message. Assuming a "question" field is present in the context
def react_prompt_message(sender, recipient, context):
    return ReAct_prompt.format(input=context["question"])

# Setting up code executor.
os.makedirs("coding", exist_ok=True)
# Use docker executor for running code in a container if you have docker installed.
# code_executor = DockerCommandLineCodeExecutor(work_dir="coding")
code_executor = LocalCommandLineCodeExecutor(work_dir="coding")

user_proxy = UserProxyAgent(
    name="User",
    is_termination_msg=lambda x: x.get("content", "") and x.get("content", "").rstrip().endswith("TERMINATE"),
    human_input_mode="ALWAYS",
    max_consecutive_auto_reply=10,
    code_execution_config={"executor": code_executor},
)

assistant = AssistantAgent(
    name="Assistant",
    system_message="Only use the tools you have been provided with. Reply TERMINATE when the task is done.",
    llm_config={"config_list": config_list, "cache_seed": None},
)

# Register the search tool.
register_function(
    search_tool,
    caller=assistant,
    executor=user_proxy,
    name="search_tool",
    description="Search the web for the given query",
)

# 这儿把任务问题、react提示词设置好,使用react
# Cache LLM responses. To get different responses, change the cache_seed value.
with Cache.disk(cache_seed=43) as cache:
    user_proxy.initiate_chat(
        assistant,
        message=react_prompt_message,
        question="What is the result of super bowl 2024?",
        cache=cache,
    )
构建 Reflection Agent
创建三个代理:
user_proxy:用户代理writing_assistant:生成解决方案(基于初始请求或批评)reflection_assistant:反思和提供批评
os.makedirs("coding", exist_ok=True)
# Use DockerCommandLineCodeExecutor if docker is available to run the generated code.
# Using docker is safer than running the generated code directly.
# code_executor = DockerCommandLineCodeExecutor(work_dir="coding")
code_executor = LocalCommandLineCodeExecutor(work_dir="coding")

user_proxy = UserProxyAgent(
    name="user_proxy",
    is_termination_msg=lambda x: x.get("content", "") and x.get("content", "").rstrip().endswith("TERMINATE"),
    human_input_mode="TERMINATE",
    max_consecutive_auto_reply=10,
    code_execution_config={"executor": code_executor},
)

# 在系统提示词中加入反思、评价的提示词,生成初始的请求和反思
writing_assistant = AssistantAgent(
    name="writing_assistant",
    system_message="You are an writing assistant tasked to write engaging blogpost. You try generate the best blogpost possible for the user's request. If the user provides critique, respond with a revised version of your previous attempts.",
    llm_config={"config_list": config_list, "cache_seed": None},
)

# 一个 reflection agent 用于迭代评价和反思
reflection_assistant = AssistantAgent(
    name="reflection_assistant",
    system_message="Generate critique and recommendations on the writing. Provide detailed recommendations, including requests for length, depth, style, etc..",
    llm_config={"config_list": config_list, "cache_seed": None},
)
内置 RAG
我们可以用更强大的 RAG 系统来集成,前面 RAG 课程有详细讲解。这里主要介绍 AutoGen 内部的 RAG 支持:RetrieveUserProxyAgent,可以创建一个 RetrieveUserProxyAgent 来实现检索增强生成。
assistant = AssistantAgent(
    name="assistant",
    system_message="You are a helpful assistant.",
    llm_config={
        "timeout": 600,
        "cache_seed": 42,
        "config_list": config_list,
    },
)

ragproxyagent = RetrieveUserProxyAgent(
    name="ragproxyagent",
    human_input_mode="NEVER",
    max_consecutive_auto_reply=3,
    retrieve_config={
        "task": "code",
        "docs_path": [
            "https://raw.githubusercontent.com/microsoft/FLAML/main/website/docs/Examples/Integrate%20-%20Spark.md",
            "https://raw.githubusercontent.com/microsoft/FLAML/main/website/docs/Research.md",
            os.path.join(os.path.abspath(""), "..", "website", "docs"),
        ],
        "vector_db": "pgvector",
        "collection_name": "autogen_docs",
        "db_config": {
            "connection_string": "postgresql://testuser:testpwd@localhost:5432/vectordb", # 可选 - 连接外部向量数据库
            # "host": None, # 可选向量数据库主机
            # "port": None, # 可选向量数据库端口
            # "database": None, # 可选向量数据库名称
            # "username": None, # 可选向量数据库用户名
            # "password": None, # 可选向量数据库密码
        },
        "custom_text_types": ["mdx"],
        "chunk_token_size": 2000,
        "model": config_list[0]["model"],
        "get_or_create": True,
    },
    code_execution_config=False,
)

# 聊天时,内容会基于检索增强生成
code_problem = "How can I use FLAML to perform a classification task and use spark to do parallel training. Train 30 seconds and force cancel jobs if time limit is reached."
ragproxyagent.initiate_chat(
    assistant, message=ragproxyagent.message_generator, problem=code_problem, search_string="spark"
)

# search_string is used as an extra filter for the embeddings search, in this case, we only want to search documents that contain "spark".
这段代码实现了 AutoGen 内置的 RAG(检索增强生成) 功能:
-
定义了一个普通的
AssistantAgent作为回答生成器。 -
创建了
RetrieveUserProxyAgent,并配置了:-
检索任务类型为
code -
文档来源(在线文档 + 本地目录)
-
向量数据库(pgvector)的连接信息
-
文档分块、模型等参数
-
-
发起聊天时,代理会先检索相关文档,再基于检索结果生成回答,从而提升回答的准确性和专业性。
Autogen Studio
参考文档: https://microsoft.github.io/autogen/0.2/docs/autogen-studio/getting-started
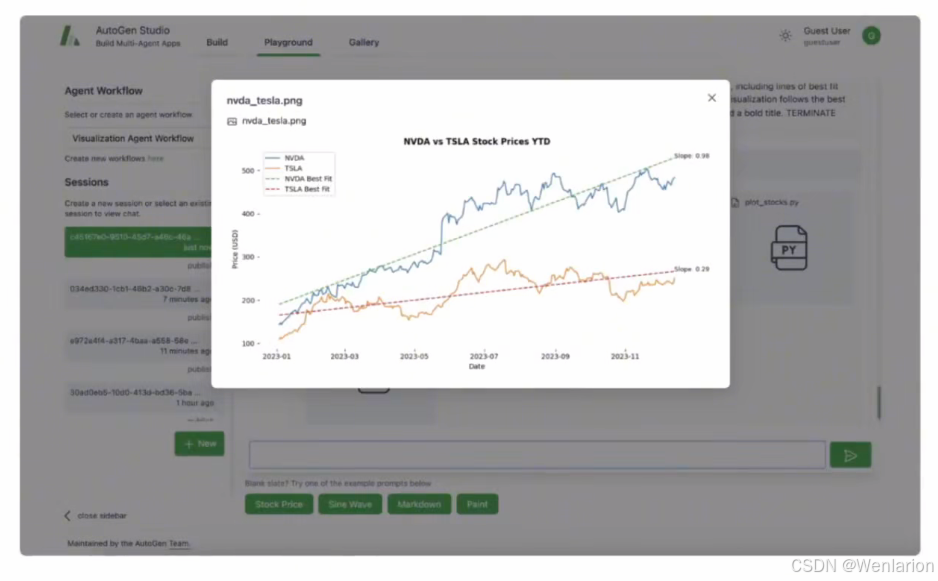
4、Crew AI
项目: https://github.com/joaomdmoura/crewAI
一款不错的框架 ——CrewAI,站在 AutoGen 这样的框架肩膀上,以实际投产为目标
兼具 AutoGen 对话 Agent 的灵活性和 ChatDev 的领域流程化的优点,规避了 AutoGen 缺乏框架层面的流程支持和 ChatDev 领域流程过于狭窄不够泛化的问题,支持动态的泛场景的流程设计,能够无缝适应开发和生产工作流程。
ChatDev
-
GitHub 地址:https://github.com/OpenBMB/ChatDev
-
简介:2023 年 7 月,面壁智能联合清华大学 NLP 实验室、北京邮电大学、布朗大学等的研究人员共同发布了一个大模型驱动的全流程自动化软件开发框架 ChatDev(Chat-powered Software Development)。
也就是说,在 CrewAI 中可以像 AutoGen 一样结合场景定义自己的角色,又能像 ChatDev 那样约定一定的流程执行
在 CrewAI 的背后,CrewAI 的每个智能体在核心上都是基于 LangChain 的智能体
CrewAI 既可以用 OpenAI 的 API,也可以通过 Ollama 使用本地的大模型来运行程序
CrewAI 的主要构建模块包括 Agent、任务、工具和团队。
- Agent 是具有自己的角色、背景故事、目标和记忆的专用团队成员;
- 任务是给定 Agent 应完成的小型、专注的任务;
- 工具是 Agent 使用的设备,用于高效完成任务;
- 而团队则是 Agent、任务和流程相遇的容器层,在这里进行工作。
CrewAI 核心特征
- 角色定制 Agent:可以根据不同的角色、目标和工具来量身定制 Agent
- 自动任务委派:Agent 之间能够自主地分配任务和进行交流,有效提升解题效率
- 任务管理灵活性:可以根据需要自定义任务和工具,并灵活地指派给不同 Agent
- 流程导向:目前系统仅支持按顺序执行任务,但更加复杂的如基于共识和层级的流程正在研发中
我们将讨论 crewAI 最重要的组成部分。以下是我们将要介绍的内容的细分:Agents、Tasks、Tools、Crews、Processes
CrewAI 的架构由多个关键组件构成,这些组件共同协作以实现多智能体系统的稳定运行。以下是对这些组件的详细解析:
工具 (Tool):工具是智能体执行特定任务所需的辅助手段,如搜索引擎、文档加载器等。CrewAI 基于 LangChain 构建,允许开发者使用 LangChain 提供的现有工具或自定义定义新工具,以满足不同任务的需求。
任务 (Task):任务是智能体需要执行的具体工作单元。在 CrewAI 中,每个任务都被明确定义,并配备必要的工具和资源。智能体根据任务要求,选择合适的工具和方法来完成工作。
智能体 (Agent):智能体是 CrewAI 框架中的核心单元,扮演着团队成员的角色。每个智能体都具备特定的角色、背景故事、目标和记忆。CrewAI 中的智能体基于 LangChain Agent 进行扩展,增加了 ReActSingleInputOutputParser 以支持更复杂的角色扮演和上下文记忆功能。
团队 (Crew):团队由多个智能体组成,共同协作以完成特定目标。在 CrewAI 中,团队成员之间的协作方式通过预定义的流程或策略进行组织和管理,确保任务能够有序、高效地执行。
流程 (Process):流程定义了团队完成任务的策略和方式。CrewAI 框架提供了三种基本流程策略:顺序执行 (Sequential)、层次化执行 (Hierarchical) 和共识过程 (Consensual,计划中)。这些策略允许开发者根据任务特性和需求选择合适的协作模式。
CrewAI 的多智能体协作框架为多个领域的应用提供了广阔的舞台。以下是一些应用场景:
- 自动化与机器人:在自动化生产线和机器人应用中,CrewAI 可以构建出多个智能体协作的团队,以实现复杂的生产流程和精准的操作控制。智能体之间可以通过实时通信和协同决策来优化生产效率和产品质量。
- 客户服务:在客户服务领域,CrewAI 可以构建出具有多轮对话能力的智能客服团队。这些智能体可以共同应对客户的咨询和投诉,通过协同工作来提高响应速度和解决问题的能力。
- 金融分析:在金融领域,CrewAI 可以构建出多个智能体共同参与的金融市场分析团队。这些智能体可以通过收集和分析各种金融数据来预测市场趋势和风险,为投资者提供精准的决策支持。
- 医疗健康:在医疗健康领域,CrewAI 可以构建出多个智能体协同工作的医疗辅助团队。这些智能体可以协助医生进行病历分析、药物推荐等工作,提高医疗服务的效率和质量。
环境准备
python 版本要求:Python >=3.10 <=3.13
pip install crewai
LLM
参考文档:https://docs.crewai.com/concepts/llms
CrewAI 支持线上的大模型,也支持 ollama 本地部署大模型
openai环境变量的方式使用
import os

os.environ["OPENAI_API_KEY"] = "your-api-key"
os.environ["OPENAI_API_BASE"] = "https://api.your-provider.com/v1"

llm = LLM(model="gpt-4", temperature=0.7)
agent = Agent(llm=llm, ...)
指定参数方式
from crewai import LLM

llm = LLM(
    model="custom-model-name",
    api_key="your-api-key",
    base_url="https://api.your-provider.com/v1"
)
agent = Agent(llm=llm, ...)
也可以指定更多参数
from crewai import LLM

llm = LLM(
    model="gpt-4",
    temperature=0.8,
    max_tokens=150,
    top_p=0.9,
    frequency_penalty=0.1,
    presence_penalty=0.1,
    stop=["END"],
    seed=42,
    base_url="https://api.openai.com/v1",  # 指定接口url
    api_key="your-api-key-here"
)
agent = Agent(llm=llm, ...)
ollama 本地部署
安装 ollama 的教程,前面模型训练课程中有详细讲解
主要是模型换成本地模型,base_url 换成本地 ollama 对外的 url,端口默认就是 11434
from crewai import LLM

agent = Agent(
    llm=LLM(model="ollama/llama3.1", base_url="http://localhost:11434"),
    ...
)
其它线上模型
如果是兼容 openai api 的其它线上模型,和 openai 的使用方式一样
from crewai import LLM

llm = LLM(
    model="custom-model-name",
    base_url="https://api.your-provider.com/v1",
    api_key="your-api-key"
)
agent = Agent(llm=llm, ...)
Agent
文档: https://docs.crewai.com/concepts/agents
执行任务、做出决策、与其他 Agent 进行通信
Agent属性表
| 属性 | 范围 | 描述 |
|---|---|---|
| 角色 | role | 定义代理在团队中的职能。它决定了代理最适合执行的任务类型。 |
| 目标 | goal | 代理想要实现的个体目标。它指导代理的决策过程。 |
| 背景故事 | backstory | 为代理的角色和目标提供背景,丰富互动和协作动力。 |
| LLM(可选) | llm | 表示将运行代理的语言模型。它从OPENAI_MODEL_NAME环境变量中动态获取模型名称,如果未指定,则默认为 "gpt-4"。 |
| 工具(可选) | tools | 代理可用于执行任务的功能或函数集。预期是与代理的执行环境兼容的自定义类的实例。工具使用空列表的默认值进行初始化。 |
| 函数调用的 LLM(可选) | function_calling_llm | 指定将处理此代理的工具调用的语言模型,如果传递,则覆盖调用 LLM 的 crew 函数。默认值为None。 |
| 最大迭代次数(可选) | max_iter | Max Iter 是代理在被迫给出最佳答案之前可以执行的最大迭代次数。默认值为 25。 |
| 最大转速(可选) | max_rpm | 最大 RPM 是代理每分钟可以执行的最大请求数,以避免速率限制。它是可选的,可以不指定,默认值为None。 |
| 最大执行时间(可选) | max_execution_time | 最大执行时间是代理执行任务的最大执行时间。它是可选的,可以不指定,默认值为None,表示没有最大执行时间。 |
| 日志打印开关(可选) | verbose | 将其设置为True可配置内部记录器以提供详细的执行日志,帮助调试和监控。默认值为False。 |
| 允许委派(可选) | allow_delegation | 代理可以相互委派任务或问题,确保每项任务都由最合适的代理处理。默认值为False。 |
| 步骤回调(可选) | step_callback | 代理每执行一步后调用的函数。可用于记录代理的操作或执行其他操作。它将覆盖工作人员step_callback。 |
| 缓存(可选) | cache | 指示代理是否应使用缓存来使用工具。默认值为True。 |
| 系统提示模板(可选) | system_template | 指定代理的系统格式。默认值为None。 |
| 提示模板(可选) | prompt_template | 指定代理的提示格式。默认值为None。 |
| 响应模板(可选) | response_template | 指定代理的响应格式。默认值为None。 |
| 允许代码执行(可选) | allow_code_execution | 启用代理的代码执行。默认值为False。 |
| 最大重试限制(可选) | max_retry_limit | 发生错误时代理执行任务的最大重试次数。默认值为 2。 |
| 使用系统提示(可选) | use_system_prompt | 添加不使用系统提示的功能(以支持 o1 型号)。默认为 True。 |
| 摘要上下文窗口(可选) | respect_context_window | 避免上下文溢出的摘要策略。默认值为 True。 |
| 代码执行模式(可选) | code_execution_mode | 确定代码执行的模式:“安全”(使用 Docker)或 “不安全”(直接在主机上执行)。默认值为safe。 |
示例:创建具有所有属性的 Agent
from crewai import Agent

agent = Agent(
    role='数据分析师',
    goal='提取可操作的见解',
    backstory="""您是一家大公司的数据分析师。
您负责分析数据并为业务提供见解。
您目前正在进行一个项目,分析我们营销活动的表现。""",
    tools=[my_tool1, my_tool2],  # 可选,默认为空列表
    llm=my_llm,  # 可选
    function_calling_llm=my_llm,  # 可选
    max_iter=15,  # 可选
    max_rpm=None,  # 可选
    verbose=True,  # 可选
    allow_delegation=True,  # 可选
    step_callback=my_intermediate_step_callback,  # 可选
    cache=True  # 可选
)
使用提示词模板
agent = Agent(
    role="{topic} specialist",
    goal="Figure {goal} out",
    backstory="I am the master of {role}",
    system_template="""<|start_header_id|>system<|end_header_id|>
    {{ .System }}<|eot_id|>""",
    prompt_template="""<|start_header_id|>user<|end_header_id|>
    {{ .Prompt }}<|eot_id|>""",
    response_template="""<|start_header_id|>assistant<|end_header_id|>
    {{ .Response }}<|eot_id|>""",
)
注意:
code_execution_mode属性为代理执行代码的方式提供了灵活性,允许安全和直接执行选项。
Task
在 crewAI 框架中,任务是由 Agent 完成的具体任务。它们提供执行所需的所有必要细节,如描述、负责 Agent、所需工具等,有助于促进各种行动复杂性。
Task 属性表
| 属性 | 参数 | 类型 | 描述 |
|---|---|---|---|
| 描述 | description | str | 对任务内容的清晰、简洁的陈述。 |
| Agent | agent | Optional[BaseAgent] | 负责任务的 Agent,直接分配或由 Crew 的流程分配。 |
| 预期输出 | expected_output | str | 关于任务完成情况的详细描述。 |
| 工具(可选) | tools | Optional[list[Any]] | 代理可用于执行任务的功能或能力。默认为空列表。 |
| 异步执行(可选) | async_execution | Optional[bool] | 如果设置,任务将异步执行,无需等待完成即可继续执行。默认为 False。 |
| 上下文(可选) | context | Optional[list["Task"]] | 指定其输出用作该任务的上下文的任务。 |
| 配置(可选) | config | Optional[dict[str, Any]] | 执行任务的代理的附加配置详细信息,允许进一步自定义。默认为无。 |
| 输出 JSON(可选) | output_json | Optional[Type[BaseModel]] | 输出 JSON 对象,需要 OpenAI 客户端。只能设置一种输出格式。 |
| 输出 Pydantic(可选) | output_pydantic | Optional[Type[BaseModel]] | 输出 Pydantic 模型对象,需要 OpenAI 客户端。只能设置一种输出格式。 |
| 输出文件(可选) | output_file | Optional[str] | 将任务输出保存到文件。如果与 Output JSON 或 Output Pydantic 一起使用,则指定如何保存输出。 |
| 输出(可选) | output | Optional[TaskOutput] | 一个 TaskOutput 实例,包含原始、JSON 和 Pydantic 输出以及其他详细信息。 |
| 回调(可选) | callback | Optional[Any] | 任务完成后,使用任务的输出执行的可调用函数。 |
| 人工输入(可选) | human_input | Optional[bool] | 指示任务是否应在最后进行人工审核,这对于需要人工监督的任务很有用。默认为 False。 |
| 转换器类(可选) | converter_cls | Optional[Type[Converter]] | 用于导出结构化输出的转换器类。默认为 None。 |
示例代码
from crewai import Task

task = Task(
    description='查找并总结有关人工智能的最新和最相关新闻',
    agent=sales_agent
)
import os
os.environ["OPENAI_API_KEY"] = "Your Key"
os.environ["SERPER_API_KEY"] = "Your Key" # serper.dev API key
from crewai import Agent, Task, Crew
from crewai_tools import SerperDevTool
research_agent = Agent(
role='研究员',
goal='查找并总结最新的人工智能新闻',
backstory="""您是一家大公司的研究员。
您负责分析数据并为业务提供见解。""",
verbose=True
)
search_tool = SerperDevTool()
task = Task(
description='查找并总结最新的人工智能新闻',
expected_output='对前5条最重要的人工智能新闻进行列表总结',
agent=research_agent,
tools=[search_tool]
)
crew = Crew(
agents=[research_agent],
tasks=[task],
verbose=2
)
result = crew.kickoff()
print(result)
任务输出
CrewAI 框架中的任务输出封装在TaskOutput类中。此类提供了一种结构化的方式来访问任务的结果,包括各种格式,例如原始输出、JSON 和 Pydantic 模型。
默认情况下,TaskOutput将仅包含raw输出。如果原始对象分别配置了output_pydantic或output_json,TaskOutput则将仅包含对应的pydantic或json输出。json_output = Task.output_pydantic output_json
TaskOutput 属性表
| 属性 | 参数 | 类型 | 描述 |
|---|---|---|---|
| 描述 | description | str | 任务描述。 |
| 概括 | summary | Optional[str] | 任务摘要,根据描述的前 10 个字符自动生成。 |
| raw | raw | str | 任务的原始输出。这是输出的默认格式。 |
| pydantic | pydantic | Optional[BaseModel] | 表示任务的结构化输出的 Pydantic 模型对象。 |
| JSON 字典 | json_dict | Optional[Dict[str, Any]] | 表示任务的 JSON 输出的字典。 |
| agent | agent | str | 执行任务的代理。 |
| 输出格式 | output_format | OutputFormat | 任务输出的格式,选项包括 RAW、JSON 和 Pydantic。默认为 RAW。 |
访问任务输出
通过对象 output 的属性访问其输出 Task。TaskOutput 类提供了多种方式来与此输出进行交互并呈现此输出:
result = crew.kickoff()

# 不是通过result,是通过task的output
# Accessing the task output
task_output = task.output

print(f"Task Description: {task_output.description}")
print(f"Task Summary: {task_output.summary}")
print(f"Raw Output: {task_output.raw}")
if task_output.json_dict:
    print(f"JSON Output: {json.dumps(task_output.json_dict, indent=2)}")
if task_output.pydantic:
    print(f"Pydantic Output: {task_output.pydantic}")
引用其它任务
在 CrewAI 中,一项任务的输出会自动传递到下一项任务中,但您可以具体定义哪些任务的输出(包括多个任务)应该用作另一项任务的上下文。
当你有一个任务依赖于另一个未在其后立即执行的任务的输出时,这很有用。这是通过 context 任务的属性完成的。
# ...
research_ai_task = Task(
    description='Find and summarize the latest AI news',
    expected_output='A bullet list summary of the top 5 most important AI news',
    async_execution=True,
    agent=research_agent,
    tools=[search_tool]
)

research_ops_task = Task(
    description='Find and summarize the latest AI Ops news',
    expected_output='A bullet list summary of the top 5 most important AI Ops news',
    async_execution=True,
    agent=research_agent,
    tools=[search_tool]
)

# 引用了上面两个任务的结果作为上下文,写blog的任务,需要前面查找的资料
write_blog_task = Task(
    description="Write a full blog post about the importance of AI and its latest news",
    expected_output="A full blog post that is 4 paragraphs long",
    agent=writer_agent,
    context=[research_ai_task, research_ops_task]
)
异步执行
定义一个异步执行的任务,不用等待该任务完成即可继续执行下一个任务。这对于需要很长时间才能完成的任务或对下一个要执行的任务不重要的任务非常有用。然后,您可以使用该 context 属性在未来的任务中定义它应该等待异步任务的输出完成。
#...
list_ideas = Task(
    description="List of 5 interesting ideas to explore for an article about AI.",
    expected_output="Bullet point list of 5 ideas for an article.",
    agent=researcher,
    async_execution=True # will be executed asynchronously
)

list_important_history = Task(
    description="Research the history of AI and give me the 5 most important events.",
    expected_output="Bullet point list of 5 important events.",
    agent=researcher,
    async_execution=True # will be executed asynchronously
)

write_article = Task(
    description="Write an article about AI, its history, and interesting ideas.",
    expected_output="A 4 paragraph article about AI.",
    agent=writer,
    context=[list_ideas, list_important_history] # will wait for the output of the two tasks to be completed
)
任务回调
回调函数在任务完成后执行,允许根据任务的结果触发操作或通知。在任务异步执行的时候常用。
# ...
def callback_function(output: TaskOutput):
    # Do something after the task is completed
    # Example: Send an email to the manager
    print(f"""
        Task completed!
        Task: {output.description}
        Output: {output.raw}
    """)

research_task = Task(
    description='Find and summarize the latest AI news',
    expected_output='A bullet list summary of the top 5 most important AI news',
    agent=research_agent,
    tools=[search_tool],
    callback=callback_function
)
Tool
参考文档: https://docs.crewai.com/concepts/tools
CrewAI 中的工具是一种技能,Agent 可以使用它来执行任务,目前这些工具可以是 crewAI Toolkit 和 LangChain Toolkit 的工具,这些基本上是 Agent 可以用于各种操作的功能,从简单的搜索到复杂的交互外部系统。
常用工具列表
| 工具名称 | 描述 |
|---|---|
| BrowserbaseLoadTool | 与网络浏览器交互并从中提取数据的工具。 |
| CodeDocsSearchTool | 一种针对搜索代码文档和相关技术文档而优化的 RAG 工具。 |
| CodeInterpreterTool | 一个用于解释 Python 代码的工具。 |
| ComposioTool | 允许使用 Composio 工具。 |
| CSVSearchTool | 一种专为在 CSV 文件中进行搜索而设计的 RAG 工具,专门用于处理结构化数据。 |
| DALL-E Tool | 使用 DALL-E API 生成图像的工具。 |
| DirectorySearchTool | 用于在目录内搜索的 RAG 工具,对于浏览文件系统很有用。 |
| DOCXSearchTool | RAG 工具旨在在 DOCX 文档中进行搜索,非常适合处理 Word 文件。 |
| DirectoryReadTool | 方便读取和处理目录结构及其内容。 |
| EXASearchTool | 一种用于对各种数据源进行详尽搜索的工具。 |
| FileReadTool | 可以读取和提取文件中的数据,支持各种文件格式。 |
| FirecrawlSearchTool | 使用 Firecrawl 搜索网页并返回结果的工具。 |
| FirecrawlCrawlWebsiteTool | 使用 Firecrawl 抓取网页的工具。 |
| FirecrawlScrapeWebsiteTool | 使用 Firecrawl 抓取网页 URL 并返回其内容的工具。 |
| GithubSearchTool | 用于在 GitHub 存储库内进行搜索的 RAG 工具,可用于代码和文档搜索。 |
| SerperDevTool | 用于开发目的的专用工具,特定功能正在开发中。 |
| TXTSearchTool | RAG 工具专注于在文本(.txt)文件中进行搜索,适用于非结构化数据。 |
| JSONSearchTool | 一种用于在 JSON 文件中进行搜索的 RAG 工具,适合结构化数据处理。 |
| LlamaIndexTool | 允许使用 LlamaIndex 工具。 |
| MDXSearchTool | 专为在 Markdown(MDX)文件中进行搜索而定制的 RAG 工具,对于文档编制很有用。 |
| PDFSearchTool | RAG 工具旨在在 PDF 文档中进行搜索,非常适合处理扫描文档。 |
| PGSearchTool | 针对 PostgreSQL 数据库内搜索进行优化的 RAG 工具,适用于数据库查询。 |
| Vision Tool | 使用 DALL-E API 生成图像的工具。 |
| RagTool | 一种通用的 RAG 工具,能够处理各种数据源和类型。 |
| ScrapeElementFromWebsiteTool | 可以从网站抓取特定元素,有助于有针对性的数据提取。 |
| ScrapeWebsiteTool | 方便抓取整个网站,非常适合全面的数据收集。 |
| WebsiteSearchTool | 用于搜索网站内容的 RAG 工具,针对网络数据提取进行了优化。 |
| XMLSearchTool | 一种用于在 XML 文件中进行搜索的 RAG 工具,适用于结构化数据格式。 |
| YoutubeChannelSearchTool | 用于在 YouTube 频道内进行搜索的 RAG 工具,可用于视频内容分析。 |
| YoutubeVideoSearchTool | RAG 工具旨在在 YouTube 视频中进行搜索,非常适合视频数据提取。 |
开发人员也可以根据Agent的需求自定义工具
import os
from crewai import Agent, Task, Crew

# Importing crewAI tools
from crewai_tools import (
    DirectoryReadTool,
    FileReadTool,
    SerperDevTool,
    WebsiteSearchTool
)

# 这儿用的openai,后面详细讲ollama本地的大模型
# Set up API keys
os.environ["SERPER_API_KEY"] = "Your Key"  # serper.dev API key
os.environ["OPENAI_API_KEY"] = "Your Key"

# 这几个工具都是 crewai 实现的
# Instantiate tools
docs_tool = DirectoryReadTool(directory='./blog-posts')
file_tool = FileReadTool()
search_tool = SerperDevTool()
web_rag_tool = WebsiteSearchTool()

# 研究员agent,有角色,有目标,有背景
# Create agents
researcher = Agent(
    role='Market Research Analyst',
    goal='Provide up-to-date market analysis of the AI industry',
    backstory='An expert analyst with a keen eye for market trends.',
    tools=[search_tool, web_rag_tool],
    verbose=True
)

# 写作agent
writer = Agent(
    role='Content Writer',
    goal='Craft engaging blog posts about the AI industry',
    backstory='A skilled writer with a passion for technology.',
    tools=[docs_tool, file_tool],
    verbose=True
)

# 研究任务
# Define tasks
research = Task(
    description='Research the latest trends in the AI industry and provide a summary.',
    expected_output='A summary of the top 3 trending developments in the AI industry with a unique perspective on their significance.',
    agent=researcher
)

# 写作任务
write = Task(
    description='Write an engaging blog post about the AI industry, based on the research analyst\'s summary. Draw inspiration from the latest blog posts in the directory.',
    expected_output='A 4-paragraph blog post formatted in markdown with engaging, informative, and accessible content, avoiding complex jargon.',
    agent=writer,
    output_file='blog-posts/new_post.md'  # The final blog post will be saved here
)

# Assemble a crew with planning enabled
crew = Crew(
    agents=[researcher, writer],
    tasks=[research, write],
    verbose=True,
    planning=True,  # Enable planning feature
)

# Execute tasks
crew.kickoff()
自定义工具
创建 CrewAI 工具主要有两种方法:
子类化 BaseTool
from crewai.tools import BaseTool

class MyCustomTool(BaseTool):
    name: str = "Name of my tool"
    description: str = "Clear description for what this tool is useful for, your agent will need this information to use it."

    def _run(self, argument: str) -> str:
        # Implementation goes here
        return "Result from custom tool"
使用 tool 装饰器
from crewai.tools import tool

@tool("Name of my tool")
def my_tool(question: str) -> str:
    """Clear description for what this tool is useful for, your agent will need this information to use it."""
    # Function logic here
    return "Result from your custom tool"
自定义 cache
工具可以选择性地实现 cache_function 微调缓存行为。此功能根据特定条件确定何时缓存结果,从而提供对缓存逻辑的精细控制。
from crewai.tools import tool

@tool
def multiplication_tool(first_number: int, second_number: int) -> str:
    """Useful for when you need to multiply two numbers together."""
    return first_number * second_number

def cache_func(args, result):
    # In this case, we only cache the result if it's a multiple of 2
    cache = result % 2 == 0
    return cache

# 为工具指定cache函数
multiplication_tool.cache_function = cache_func

writer1 = Agent(
    role="writer",
    goal="You write lessons of math for kids.",
    backstory="You're an expert in writing and you love to teach kids but you know nothing of math.",
    tools=[multiplication_tool],
    allow_delegation=False,
)
Crew
在 crewAI 中 Crew 类似于选角,每个特工都扮演着独特的角色。这将引导创建团队、分配角色和任务,并激活他们协调工作。
任务可以设计为需要 Agent 之间的协作。例如,一个 Agent 可能收集数据,而另一个 Agent 则分析数据。这种协作方法可以在任务属性中定义并由 Crew 流程进行管理。
Crew 会将上述几类对象连接在一起,并执行任务。
Crew 属性表
| 属性 | 参数 | 描述 |
|---|---|---|
| 任务 | tasks | 分配给 Crew 的任务列表。 |
| 代理 | agents | Crew 的 Agent 列表。 |
| 流程(可选) | process | Agent 遵循的流程(例如顺序、层次)。默认值为 sequential。 |
| 详细(可选) | verbose | 执行期间日志记录的详细级别。默认为 False。 |
| 管理规划 agent 时的 llm(可选) | manager_llm | 管理代理在分层进程中使用的语言模型。使用分层进程时必需。 |
| 函数调用规划师的 llm(可选) | function_calling_llm | 如果通过,Crew 将使用此 LLM 为 Crew 中的所有代理进行工具的函数调用。每个代理都可以拥有自己的 LLM,它将覆盖 Crew 的配置。目前主要由内存使用。 |
| 配置(可选) | config | 可选的 Crew 配置设置,以 json 或 dict[str, Any] 格式。 |
| 最大转速(可选) | max_rpm | 执行期间 Crew 每分钟的最大请求数。默认为 None。 |
| 语言(可选) | language | Crew 使用的语言,默认为英语。 |
| 语言文件(可选) | language_file | Crew 使用的语言文件的路径。 |
| 内存(可选) | memory | 用于存储执行记忆(短期、长期、实体记忆)。默认为 False。 |
| 缓存(可选) | cache | 指定是否使用缓存来存储工具执行的结果。默认为 True。 |
| 嵌入器(可选) | embedder | 供 Crew 使用的嵌入器的配置。主要由内存使用。默认值为 {"provider": "openai"}。 |
| 全部输出(可选) | full_output | Crew 是否应返回所有任务输出的完整输出或仅返回最终输出。默认为 False。 |
| 步骤回调(可选) | step_callback | 每个代理执行完每个步骤后都会调用的函数。这可用于记录代理的操作或执行其他操作;它不会覆盖特定代理的 step_callback。 |
| 任务回调(可选) | task_callback | 每个任务完成后调用的函数。用于监控或任务执行后的附加操作。 |
| 分享 Crew(可选) | share_crew | 是否愿意与 crewAI 团队分享完整的 Crew 信息和执行情况,以使该库变得更好,并允许我们训练模型。 |
| 输出日志文件(可选) | output_log_file | 是否要拥有一个包含完整 Crew 输出和执行情况的文件。您可以使用 True 进行设置,它将默认为您当前所在的文件夹,并将被称为 logs.txt,或者传递一个包含文件完整路径和名称的字符串。 |
| 管理器 agent(可选) | manager_agent | manager 设置将用作管理器的自定义代理。 |
| 管理器回调(可选) | manager_callbacks | 当使用分层流程时,获取由管理代理执行的回调处理程序列表。 |
| 提示词文件(可选) | prompt_file | 用于 Crew 的提示 JSON 文件的路径。 |
| 规划(可选) | planning | 为 Crew 添加规划能力。在每次 Crew 迭代之前激活时,所有 Crew 数据都会发送到 AgentPlanner,后者将规划任务,并将此计划添加到每个任务描述中。 |
| 规划是的 llm(可选) | planning_llm | AgentPlanner 在规划过程中使用的语言模型。 |
示例:Crew 执行
# Example crew execution
crew = Crew(
    agents=[research_agent, writer_agent],
    tasks=[research_task, write_article_task],
    verbose=True
)

crew_output = crew.kickoff()
Crew 输出结果
CrewAI 框架中团队的输出封装在CrewOutput类中。此类提供了一种结构化的方式来访问团队执行的结果,包括各种格式,例如原始字符串、JSON 和 Pydantic 模型。其中CrewOutput包括最终任务输出、令牌使用情况和单个任务输出的结果。
CrewOutput 属性表
| 属性 | 参数 | 类型 | 描述 |
|---|---|---|---|
| 生的 | raw | str | Crew 的原始输出。这是输出的默认格式。 |
| pydantic | pydantic | Optional[BaseModel] | 一个 Pydantic 模型对象,代表船员的结构化输出。 |
| JSON 字典 | json_dict | Optional[Dict[str, Any]] | 代表船员的 JSON 输出的字典。 |
| 任务输出 | tasks_output | List[TaskOutput] | 对象列表 TaskOutput,每个对象代表 Crew 中某项任务的输出。 |
| token 使用 | token_usage | Dict[str, Any] | 标记使用情况的摘要,提供有关语言模型在执行过程中的性能的见解。 |
访问 Crew 输出
可以通过对象 .output 的属性访问其输出 Crew。CrewOutput 类提供了多种方式来与此输出进行交互并呈现此输出。
# Example crew execution
crew = Crew(
    agents=[research_agent, writer_agent],
    tasks=[research_task, write_article_task],
    verbose=True
)

crew_output = crew.kickoff()
# 这儿是直接通过 crew 返回的结果进行格式化访问

# Accessing the crew output
print(f"Raw Output: {crew_output.raw}")
if crew_output.json_dict:
    print(f"JSON Output: {json.dumps(crew_output.json_dict, indent=2)}")
if crew_output.pydantic:
    print(f"Pydantic Output: {crew_output.pydantic}")
print(f"Tasks Output: {crew_output.tasks_output}")
print(f"Token Usage: {crew_output.token_usage}")
启动流程
一旦你的团队组建完毕,就用 kickoff() 方法启动工作流程。这将根据定义的流程启动执行过程。
# Start the crew's task execution
result = my_crew.kickoff()
print(result)
组建团队后,使用适当的启动方法启动工作流程。
CrewAI 提供了几种方法可以更好地控制启动过程:kickoff()、kickoff_for_each()、kickoff_async() 和 kickoff_for_each_async()。
kickoff():按照定义的工艺流程,开始执行流程。kickoff_for_each():为每个代理单独执行任务。kickoff_async():异步启动工作流。
kickoff_for_each_async():以异步方式为每个代理单独执行任务。
Process
参考文档: https://docs.crewai.com/concepts/processes
顺序执行 (Sequential):该策略按照预定顺序依次执行各个任务,适用于流水线式的工作流程。每个智能体在完成自身任务后,将结果传递给下一个智能体,确保任务的有序进行。任务执行遵循任务列表中的预定义顺序,上一个任务的输出作为下一个任务的背景。要定制任务上下文,请利用类 context 中的参数 Task 来指定应用于后续任务上下文的输出。
层次化执行 (Hierarchical):该策略将任务组织成层次结构,并通过链式命令进行分配和执行。
CrewAI 模拟企业层级结构,允许指定自定义管理 agent 或自动创建一个,这需要指定管理语言模型(manager_llm)。此代理负责监督任务执行,包括规划、委派和验证。任务不是预先分配的;管理者根据代理的能力将任务分配给代理,审查输出并评估任务完成情况。这种策略适用于需要复杂协调和决策的任务。
共识过程 (Consensual, 计划中):该策略基于协作决策和民主原则,允许智能体之间通过对话和协商来共同完成任务。尽管该策略目前尚未在 CrewAI 中正式发布,但它代表了多智能体系统未来发展的重要方向之一。
示例代码
from crewai import Crew
from crewai.process import Process
from langchain_openai import ChatOpenAI

# Example: Creating a crew with a sequential process
crew = Crew(
    agents=my_agents,
    tasks=my_tasks,
    process=Process.sequential
)

# Example: Creating a crew with a hierarchical process
# Ensure to provide a manager_llm or manager_agent
crew = Crew(
    agents=my_agents,
    tasks=my_tasks,
    process=Process.hierarchical,
    manager_llm=ChatOpenAI(model="gpt-4")
    # or
    # manager_agent=my_manager_agent
)
注意:确保在创建 Crew 对象之前定义了my_agents和my_tasks,并且对于分层过程,还需要manager_llm或manager_agent。
记忆(Memory)
CrewAI 框架引入了一个复杂的记忆系统,旨在显著增强 AI 代理的能力。长期记忆可帮助代理记忆、推理和从过去的交互中学习。该系统包括短期记忆(short-term memory)、长期记忆(long-term memory)、实体记忆(entity memory)和上下文记忆(contextual memory),每个功能都有其独特的用途:
| 组件 | 描述 |
|---|---|
| Short-Term Memory (短期记忆) | 使用临时存储最近的交互和结果 RAG,使代理能够在当前执行期间回忆和利用与其当前环境相关的信息。 |
| Long-Term Memory (长期记忆) | 保留过去执行中的宝贵见解和经验,使代理能够随着时间的推移建立和完善他们的知识。 |
| Entity Memory (实体记忆) | 捕获并组织有关在任务中遇到的实体(人物、地点、概念)的信息,以促进更深入的理解和关系映射。用于 RAG 存储实体信息。 |
| Contextual Memory (上下文记忆) | 通过结合短期记忆、长期记忆和实体记忆来维持交互的上下文,有助于代理在一系列任务或对话中的响应的连贯性和相关性。 |
记忆系统配置说明
默认情况下,记忆系统处于禁用状态,您可以通过 memory=True 在 Crew 配置中进行设置来确保它处于活动状态。
- 默认情况下,记忆将使用 OpenAI 嵌入,但您可以通过设置
embedder为不同的模型来更改它。 - 您也可以使用自己的实例初始化记忆实例。
"embedder"仅适用于使用 Chroma 进行 RAG 的短期记忆。- 长期记忆使用 SQLite3 来存储任务结果。
- 数据存储文件保存到使用
appdirs包找到的平台特定位置,并且可以使用CREWAI_STORAGE_DIR环境变量覆盖项目名称。
启用记忆的 Crew 示例代码
from crewai import Crew, Agent, Task, Process

# Assemble your crew with memory capabilities
my_crew = Crew(
    agents=[...],
    tasks=[...],
    process=Process.sequential,
    memory=True,
    verbose=True
)
自定义 Memory 配置示例
from crewai import Crew, Agent, Task, Process

# Assemble your crew with memory capabilities
my_crew = Crew(
    agents=[...],
    tasks=[...],
    process="Process.sequential",
    memory=True,
    long_term_memory=EnhanceLongTermMemory(
        storage=LTMSQLiteStorage(
            db_path="/my_data_dir/my_crew1/long_term_memory_storage.db"
        )
    ),
    short_term_memory=EnhanceShortTermMemory(
        storage=CustomRAGStorage(
            crew_name="my_crew",
            storage_type="short_term",
            data_dir="//my_data_dir",
            model=embedder["model"],
            dimension=embedder["dimension"],
        ),
    ),
    entity_memory=EnhanceEntityMemory(
        storage=CustomRAGStorage(
            crew_name="my_crew",
            storage_type="entities",
            data_dir="//my_data_dir",
            model=embedder["model"],
            dimension=embedder["dimension"],
        ),
    ),
    verbose=True,
)
配置说明
-
long_term_memory:自定义长期记忆存储,使用LTMSQLiteStorage并指定 SQLite 数据库路径。 -
short_term_memory:自定义短期记忆存储,使用CustomRAGStorage,配置团队名称、存储类型、数据目录、嵌入模型及维度。 -
entity_memory:自定义实体记忆存储,同样使用CustomRAGStorage,配置与短期记忆类似,用于存储实体信息。
记忆系统使用嵌入(Embedding)
文档: https://docs.crewai.com/concepts/memory
OpenAI Embedding 配置示例
my_crew = Crew(
    agents=[...],
    tasks=[...],
    process=Process.sequential,
    memory=True,
    verbose=True,
    embedder={
        "provider": "openai",
        "config": {
            "model": "text-embedding-3-small"
        }
    }
)
使用 OpenAIEmbeddingFunction 配置
from crewai import Crew, Agent, Task, Process
from chromadb.utils.embedding_functions import OpenAIEmbeddingFunction

my_crew = Crew(
    agents=[...],
    tasks=[...],
    process=Process.sequential,
    memory=True,
    verbose=True,
    embedder=OpenAIEmbeddingFunction(api_key=os.getenv("OPENAI_API_KEY"), model_name="text-embedding-3-small"),
)
Ollama 本地 Embedding 配置
from crewai import Crew, Agent, Task, Process

my_crew = Crew(
    agents=[...],
    tasks=[...],
    process=Process.sequential,
    memory=True,
    verbose=True,
    embedder={
        "provider": "ollama",
        "config": {
            "model": "mxbai-embed-large"
        }
    }
)
HuggingFace Embedding 配置
from crewai import Crew, Agent, Task, Process

my_crew = Crew(
    agents=[...],
    tasks=[...],
    process=Process.sequential,
    memory=True,
    verbose=True,
    embedder={
        "provider": "huggingface",
        "config": {
            "api_url": "<api_url>",
        }
    }
)
规划(Planning)
CrewAI 中的规划功能可让您为 Crew 添加规划能力。启用后,在每次 Crew 迭代之前,所有 Crew 信息都会发送到 AgentPlanner,该 AgentPlanner 将逐步规划任务,并将此计划添加到每个任务描述中。
from crewai import Crew, Agent, Task, Process

# Assemble your crew with planning capabilities
my_crew = Crew(
    agents=self.agents,
    tasks=self.tasks,
    process=Process.sequential,
    planning=True,  # 启用规划功能
)
指定规划使用的大模型
您可以自定义规划阶段使用的语言模型,替换默认配置。
from crewai import Crew, Agent, Task, Process
from langchain_openai import ChatOpenAI

# Assemble your crew with planning capabilities and custom LLM
my_crew = Crew(
    agents=self.agents,
    tasks=self.tasks,
    process=Process.sequential,
    planning=True,
    planning_llm=ChatOpenAI(model="gpt-4o")  # 自定义规划阶段使用的 LLM
)

# Run the crew
my_crew.kickoff()
测试(CLI 命令)
通过 CLI 命令 crewai test 可以测试你的 Crew 团队。此命令会运行你的团队进行指定次数的迭代,并提供详细的性能指标。
- 可选参数:
n_iterations:迭代次数,默认值为2model:使用的模型,默认值为gpt-4o-mini
- 目前唯一可用的提供商是 OpenAI。
示例命令
-
基础测试(使用默认参数):
crewai test -
指定迭代次数和模型:
crewai test --n_iterations 5 --model gpt-4o -
缩写形式:
crewai test -n 5 -m gpt-4o
更多推荐

 13
13 0
0- 0


 已为社区贡献18条内容

所有评论(0)