
云原生(haproxy实验及socat热更新)
·
实验简介
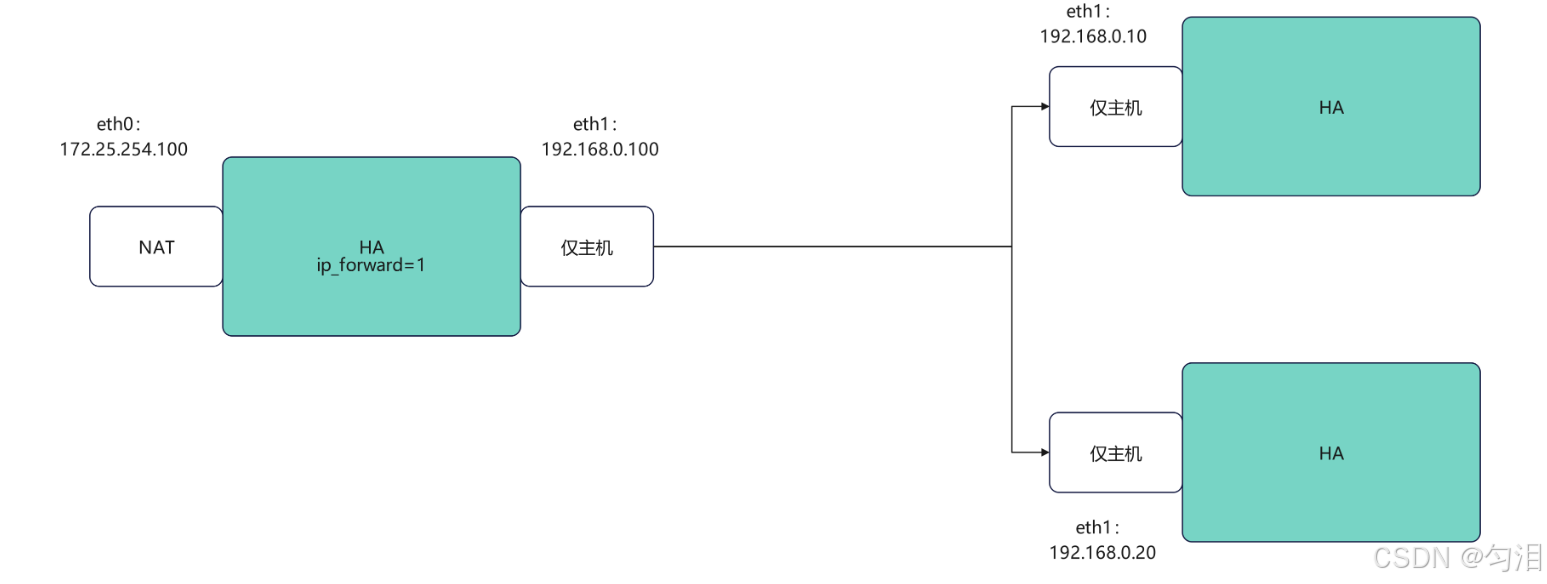
1. HAPORXY 实验环境设定
该实验主要搭建 HAProxy 负载均衡的基础网络与服务环境:
- HAProxy 主机:配置双网卡(eth0:172.25.254.100、eth1:192.168.0.100),开启内核 IP 转发功能,为负载转发做准备;
- Web 后端服务器:搭建两台 Web 服务器(webserver1:192.168.0.10、webserver2:192.168.0.20),安装 httpd 服务并编写差异化首页内容,验证两台服务器均可正常访问;
- 最终实现 HAProxy 主机可连通两台 Web 服务器,为后续负载均衡配置奠定基础。
2. Haproxy 的安装及配置参数
该实验完成 HAProxy 的安装与核心功能配置:
- 基础安装:在调度器(双网卡主机)安装 haproxy 软件并启动服务;
- 负载均衡配置:两种方式实现 HTTP 负载均衡 ——① 前后端分离(frontend 绑定 80 端口,backend 定义两台 Web 服务器,配置健康检查);② listen 方式直接定义负载集群;
- 扩展配置:
- 日志配置:将 HAProxy 日志发送至指定 Web 服务器(192.168.0.10)的 514 端口,可查看访问日志;
- 多进程 / 多线程:配置多进程并绑定 CPU,或启用多线程(二者不可同时开启),优化 HAProxy 性能;
- 自定义套接字:为不同进程配置独立的 stats socket 文件,细化权限与进程管理。
3. socat 热更新工具
该实验利用 socat 工具实现 HAProxy 服务不停止的 “热更新”,核心是动态调整后端服务器权重:
- 工具安装:安装 socat 工具,用于与 HAProxy 的 stats socket 交互;
- 信息查看:通过 socat 向 stats socket 发送指令,查看后端服务器状态、权重等信息;
- 权限配置:修改 HAProxy 配置文件,为 stats socket 赋予 admin 级别权限(解决修改权重时的 “Permission denied” 问题),重启 HAProxy 使配置生效;
- 热更新验证:通过 socat 发送 “set weight” 指令,动态修改后端服务器权重(如将 webcluster/hehe 权重改为 4),无需重启 HAProxy 即可生效;
- 效果测试:多次 curl 访问 HAProxy 地址,验证权重调整后请求转发比例的变化,实现服务不停机的权重更新。
一、实验环境设定
1.haproxy主机
[root@haproxy yxs]# vmset.sh eth0 172.25.254.100 haproxy
连接已成功激活(D-Bus 活动路径:/org/freedesktop/NetworkManager/ActiveConnection/4)
2: eth0: <BROADCAST,MULTICAST,UP,LOWER_UP> mtu 1500 qdisc mq state UP group default qlen 1000
    link/ether 00:0c:29:dd:b2:d1 brd ff:ff:ff:ff:ff:ff
    altname enp3s0
    altname ens160
    inet 172.25.254.100/24 brd 172.25.254.255 scope global noprefixroute eth0
       valid_lft forever preferred_lft forever
    inet6 fe80::2561:a71c:f726:c0c9/64 scope link tentative noprefixroute
       valid_lft forever preferred_lft forever
haproxy
[root@haproxy yxs]# vmset.sh eth1 192.168.0.100 haproxy norouter
连接已成功激活(D-Bus 活动路径:/org/freedesktop/NetworkManager/ActiveConnection/7)
3: eth1: <BROADCAST,MULTICAST,UP,LOWER_UP> mtu 1500 qdisc mq state UP group default qlen 1000
    link/ether 00:0c:29:dd:b2:db brd ff:ff:ff:ff:ff:ff
    altname enp19s0
    altname ens224
    inet 192.168.0.100/24 brd 192.168.0.255 scope global noprefixroute eth1
       valid_lft forever preferred_lft forever
    inet6 fe80::1e39:eb0c:7ee3:c8f3/64 scope link tentative noprefixroute
       valid_lft forever preferred_lft forever
haproxy

#配置内核路由功能
[root@haproxy yxs]# echo net.ipv4.ip_forward=1 > /etc/sysctl.conf
[root@haproxy yxs]# sysctl -p
net.ipv4.ip_forward = 1
2.webserver1
[root@redhat yxs]# vmset.sh eth0 192.168.0.10 webserver1 noroute
连接已成功激活(D-Bus 活动路径:/org/freedesktop/NetworkManager/ActiveConnection/4)
2: eth0: <BROADCAST,MULTICAST,UP,LOWER_UP> mtu 1500 qdisc mq state UP group default qlen 1000
    link/ether 00:0c:29:3c:ad:91 brd ff:ff:ff:ff:ff:ff
    altname enp3s0
    altname ens160
    inet 192.168.0.10/24 brd 192.168.0.255 scope global noprefixroute eth0
       valid_lft forever preferred_lft forever
    inet6 fe80::c237:b05e:4605:b14d/64 scope link tentative noprefixroute
       valid_lft forever preferred_lft forever
webserver1

[root@redhat yxs]# dnf install httpd -y
[root@redhat yxs]# echo webserver1 - 192.168.0.10 > /var/www/html/index.html
[root@redhat yxs]# systemctl enable --now httpd
Created symlink /etc/systemd/system/multi-user.target.wants/httpd.service → /usr/lib/systemd/system/httpd.service.
3.webserver2
[root@redhat yxs]# vmset.sh eth0 192.168.0.20 webserver2 noroute
连接已成功激活(D-Bus 活动路径:/org/freedesktop/NetworkManager/ActiveConnection/4)
2: eth0: <BROADCAST,MULTICAST,UP,LOWER_UP> mtu 1500 qdisc mq state UP group default qlen 1000
    link/ether 00:0c:29:18:56:f1 brd ff:ff:ff:ff:ff:ff
    altname enp3s0
    altname ens160
    inet 192.168.0.20/24 brd 192.168.0.255 scope global noprefixroute eth0
       valid_lft forever preferred_lft forever
    inet6 fe80::27b8:c064:208e:1ade/64 scope link tentative noprefixroute
       valid_lft forever preferred_lft forever
webserver2

[root@redhat yxs]# dnf install httpd -y
[root@redhat yxs]# echo webserver2 - 192.168.0.20 > /var/www/html/index.html
[root@redhat yxs]# systemctl enable --now httpd
Created symlink /etc/systemd/system/multi-user.target.wants/httpd.service → /usr/lib/systemd/system/httpd.service.
4.测试环境
[root@haproxy yxs]# curl  192.168.0.10
webserver1 - 192.168.0.10
[root@haproxy yxs]# curl  192.168.0.20
webserver2 - 192.168.0.20
二、Haproxy的安装及配置参数
1.安装Haproxy
[root@haproxy yxs]# dnf install haproxy.x86_64 -y
[root@haproxy yxs]# systemctl enable --now haproxy
Created symlink /etc/systemd/system/multi-user.target.wants/haproxy.service → /usr/lib/systemd/system/haproxy.service.
2.harpoxy的参数详解实验
实现最基本的负载
#设定vim中tab键的空格个数
[root@haproxy yxs]# vim ~/.vimrc
set ts=4 ai

#前后端分开设定
[root@haproxy yxs]# vim /etc/haproxy/haproxy.cfg
frontend webcluster
    bind            *:80
    mode            http
    use_backend     webserver-80

backend webserver-80
    server web1 192.168.0.10:80 check inter 3s fall 3 rise 5
    server web2 192.168.0.20:80 check inter 3s fall 3 rise 5
[root@haproxy yxs]# systemctl restart haproxy.service

#测试
[root@haproxy yxs]# curl 172.25.254.100
webserver1 - 192.168.0.10
[root@haproxy yxs]# curl 172.25.254.100
webserver2 - 192.168.0.20


#用listen方式书写负载均衡
[root@haproxy yxs]# vim /etc/haproxy/haproxy.cfg
listen webcluster
    bind        *:80
    mode        http
    server haha 192.168.0.10:80 check inter 3s fall 3 rise 5
    server hehe 192.168.0.20:80 check inter 3s fall 3 rise 5
[root@haproxy yxs]# systemctl restart haproxy.service
#测试
[root@haproxy yxs]# curl 172.25.254.100
webserver1 - 192.168.0.10
[root@haproxy yxs]# curl 172.25.254.100
webserver2 - 192.168.0.20
三、把日志发送到指定位置
log 127.0.0.1 local2 指定日志发送到192.168.0.10
#在192.168.0.10 开启接受日志的端口
[root@webserver1 ~]$ vim /etc/rsyslog.conf
module(load="imudp") # needs to be done just once
input(type="imudp" port="514")
[root@webserver1 yxs]# systemctl restart rsyslog.service

#测试接受日志端口是否开启
[root@webserver1 yxs]# netstat -antlupe | grep rsyslog
udp        0      0 0.0.0.0:514             0.0.0.0:*                           0          47093      3980/rsyslogd
udp6       0      0 :::514                  :::*                                0          47094      3980/rsyslogd

#在haproxy主机中设定日志发送信息
[root@haproxy yxs]# vim haproxy.cfg
log         192.168.0.10 local2
[root@haproxy yxs]# systemctl restart haproxy.service

#验证
[root@test yxs]# curl 172.25.254.100
webserver1 - 192.168.0.10
[root@test yxs]# curl 172.25.254.100
webserver2 - 192.168.0.20
[root@webserver1 yxs]# cat /var/log/messages
Feb  7 15:19:06 192.168.0.100 haproxy[31310]: 172.25.254.1:9514 [23/Jan/2026:15:19:06.320] webcluster webcluster/haha 0/0/0/1/1 200 273 - - ---- 1/1/0/0/0 0/0 "GET / HTTP/1.1"
Feb  15:19:10 192.168.0.100 haproxy[31310]: 172.25.254.1:9519 [23/Jan/2026:15:19:10.095] webcluster webcluster/hehe 0/0/0/0/0 200 273 - - ---- 1/1/0/0/0 0/0 "GET / HTTP/1.1"
四、实现haproxy的多进程
#默认haproxy是单进程
[root@haproxy yxs]# pstree -p | grep haproxy
           |-haproxy(3982)---haproxy(3984)---{haproxy}(3985)
[root@haproxy yxs]# vim /etc/haproxy/haproxy.cfg
global
    nbproc      2
[root@haproxy yxs]# systemctl restart haproxy.service

#验证
[root@haproxy yxs]# pstree -p | grep haproxy
           |-haproxy(4074)-+-haproxy(4076)
           |               `-haproxy(4077)

#多进程cpu绑定
[root@haproxy yxs]# vim /etc/haproxy/haproxy.cfg
global
    nbproc      2
    cpu-map     1 0
    cpu-map     2 1
[root@haproxy yxs]# systemctl restart haproxy.service

#为不同进程准备不同套接字
[root@haproxy yxs]# systemctl stop haproxy.service
[root@haproxy yxs]# rm -fr /var/lib/haproxy/stats
[root@haproxy yxs]# vim /etc/haproxy/haproxy.cfg
 # stats socket /var/lib/haproxy/stats
   stats socket /var/lib/haproxy/haproxy1  mode 600 level admin process 1
   stats socket /var/lib/haproxy/haporxy2  mode 660 level admin process 1

#效果
[root@haproxy yxs]# ll /var/lib/haproxy/
总用量 0
srw-rw---- 1 root root 0  2月  7 18:10 haporxy2
srw------- 1 root root 0  2月  7 18:10 haproxy1
五、haproxy实现多线程
注意多线程不能和多进程同时启用
#查看当前haproxy的进程信息
[root@haproxy yxs]# pstree -p | grep haproxy
           |-haproxy(3035)-+-haproxy(3037)
           |               `-haproxy(3038)

#查看haproxy子进程的线程信息
[root@haproxy yxs]# cat /proc/3037/status  | grep Threads
Threads:	1

#启用多线程
[root@haproxy yxs]# vim /etc/haproxy/haproxy.cfg
global
    #nbproc      2
    #cpu-map     1 0
    #cpu-map     2 1
    nbthread    2

    # turn on stats unix socket
    stats socket /var/lib/haproxy/stats
    # stats socket /var/lib/haproxy/haproxy1  mode 600 level admin process 1
    # stats socket /var/lib/haproxy/haporxy2  mode 660 level admin process 1
[root@haproxy yxs]# systemctl restart haproxy.service
[root@haproxy yxs]# pstree -p | grep haproxy
           |-haproxy(3083)---haproxy(3085)---{haproxy}(3086)
[root@haproxy yxs]# cat /proc/3085/status  | grep Threads
Threads:	2
六、socat热更新
在服务或软件不停止的情况下更新软件或服务的工作方式,完成对软件不停工更新。
典型的热更新设备,usb,在使用usb进行插拔时,电脑系统时不需要停止工作的,这种设备叫热插拔设备。
1.安装socat
[root@haproxy yxs]# dnf install socat -y
[root@haproxy yxs]# socat  -h
2.利用socat查看haproxy信息
[root@haproxy yxs]# echo "show servers state"  | socat stdio /var/lib/haproxy/stats
1
# be_id be_name srv_id srv_name srv_addr srv_op_state srv_admin_state srv_uweight srv_iweight srv_time_since_last_change srv_check_status srv_check_result srv_check_health srv_check_state srv_agent_state bk_f_forced_id srv_f_forced_id srv_fqdn srv_port srvrecord srv_use_ssl srv_check_port srv_check_addr srv_agent_addr srv_agent_port
2 webcluster 1 haha 192.168.0.10 2 0 1 1 252 6 3 7 6 0 0 0 - 80 - 0 0 - - 0
2 webcluster 2 hehe 192.168.0.20 2 0 1 1 252 6 3 7 6 0 0 0 - 80 - 0 0 - - 0
3 webserver-80 1 web1 192.168.0.10 2 0 1 1 252 6 3 7 6 0 0 0 - 80 - 0 0 - - 0
3 webserver-80 2 web2 192.168.0.20 2 0 1 1 252 6 3 7 6 0 0 0 - 80 - 0 0 - - 0
4 app 1 app1 127.0.0.1 0 0 1 1 251 8 2 0 6 0 0 0 - 5001 - 0 0 - - 0
4 app 2 app2 127.0.0.1 0 0 1 1 250 8 2 0 6 0 0 0 - 5002 - 0 0 - - 0
4 app 3 app3 127.0.0.1 0 0 1 1 250 8 2 0 6 0 0 0 - 5003 - 0 0 - - 0
4 app 4 app4 127.0.0.1 0 0 1 1 250 8 2 0 6 0 0 0 - 5004 - 0 0 - - 0
[root@haproxy yxs]# echo "get  weight webcluster/haha" | socat  stdio /var/lib/haproxy/stats
1 (initial 1)

[root@haproxy yxs]# echo "get  weight webcluster/hehe" | socat  stdio /var/lib/haproxy/stats
1 (initial 1)
3.利用socat更改haproxy信息
#直接更改会报错
[root@haproxy yxs]# echo "set  weight  webcluster/haha 2 " | socat stdio /var/lib/haproxy/stats
Permission denied

#对socket进行授权
[root@haproxy yxs]# vim /etc/haproxy/haproxy.cfg
stats socket /var/lib/haproxy/stats mode 600 level admin
[root@haproxy yxs]# rm -rf /var/lib/haproxy/*
[root@haproxy yxs]# systemctl restart haproxy.service
[root@haproxy yxs]# ll /var/lib/haproxy/
总用量 0
srw------- 1 root root 0  2月  7 18:22 stats

#执行更改
[root@haproxy yxs]# echo "get  weight webcluster/hehe" | socat  stdio /var/lib/haproxy/stats
1 (initial 1)

[root@haproxy yxs]# echo "set  weight  webcluster/hehe 4 " | socat stdio /var/lib/haproxy/stats

[root@haproxy yxs]# echo "get  weight webcluster/hehe" | socat  stdio /var/lib/haproxy/stats
4 (initial 1)

#测试
[root@test yxs]# for i in {1..10}; do curl 172.25.254.100; done
webserver2 - 192.168.0.20
webserver2 - 192.168.0.20
webserver2 - 192.168.0.20
webserver2 - 192.168.0.20
webserver1 - 192.168.0.10
webserver2 - 192.168.0.20
webserver2 - 192.168.0.20
webserver2 - 192.168.0.20
webserver2 - 192.168.0.20
webserver1 - 192.168.0.10
更多推荐

 2
2 0
0- 0


 已为社区贡献40条内容

所有评论(0)