
云原生高级课——haproxy
一.基础知识
1.负载均衡:Load Balance,简称LB,是一种服务或基于硬件设备等实现的高可用反向代理技术,负载均衡将特定的业务(web服务、网络流量等)分担给指定的一个或多个后端特定的服务器或设备,从而提高了 公司业务的并发处理能力、保证了业务的高可用性、方便了业务后期的水平动态扩展
为什么需要使用负载均衡:
(1)Web服务器的动态水平扩展-->对用户无感知
(2)增加业务并发访问及处理能力-->解决单服务器瓶颈问题
(3)节约公网IP地址-->降低IT支出成本
(4)隐藏内部服务器IP-->提高内部服务器安全性
(5)配置简单-->固定格式的配置文件
(6)功能丰富-->支持四层和七层,支持动态下线主机
(7)性能较强-->并发数万甚至数十万
2.七层负载均衡
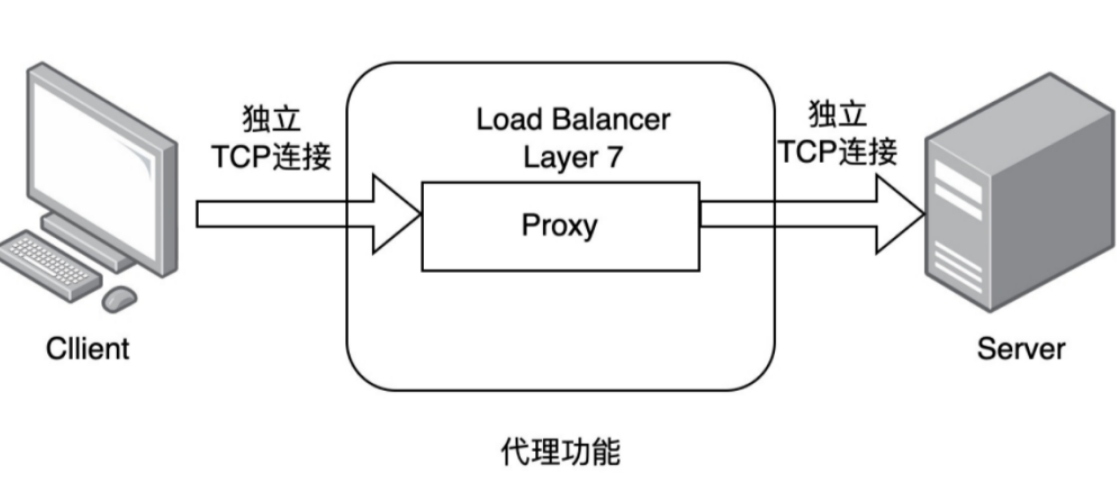
通过虚拟ur|或主机ip进行流量识别,根据应用层信息进行解析,决定是否需要进行负载均衡。
代理后台服务器与客户端建立连接,如nginx可代理前后端,与前端客户端tcp连接,与后端服务器建立tcp连接
3.支持7层代理的软件:
Nginx:基于http协议(nginx七层是通过proxy_pass)
Haproxy:七层代理,会话保持、标记、路径转移等
4.四层和七层的区别:
四层的负载均衡,就是通过发布三层的IP地址(VIP),然后加四层的端口号,来决定哪些流量需要做负 载均衡,对需要处理的流量进行NAT处理,转发至后台服务器,并记录下这个TCP或者UDP的流量是由哪 台服务器处理的,后续这个连接的所有流量都同样转发到同一台服务器处理
七层的负载均衡,就是在四层的基础上(没有四层是绝对不可能有七层的),再考虑应用层的特征,比 如同一个Web服务器的负载均衡,除了根据VIP加80端口辨别是否需要处理的流量,还可根据七层的 URL、浏览器类别、语言来决定是否要进行负载均衡。
分层位置:四层负载均衡在传输层及以下,七层负载均衡在应用层及以下
性能:四层负载均衡架构无需解析报文消息内容,在网络吞吐量与处理能力上较高:七层可支持解析应用层报文消息内容,识别URL、Cookie、HTTP header等信息。
原理:四层负载均衡是基于ip+port;七层是基于虚拟的URL或主机IP等。
功能类比:四层负载均衡类似于路由器;七层类似于代理服务器。
安全性:四层负载均衡无法识别DDoS攻击;七层可防御SYN Cookie/Flood攻击
二.基于Haproxy的七层负载均衡实验
实验环境
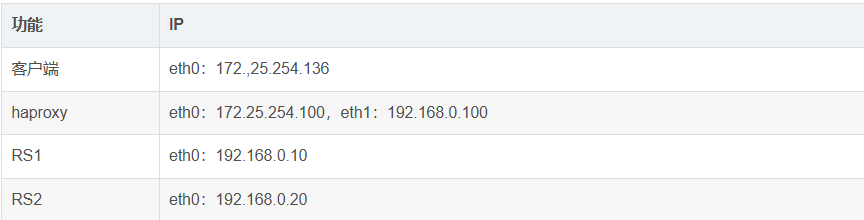
各主机配置
RS1
[root@RS1 ~]#  dnf install httpd -y
[root@RS1 ~]# echo RS1 - 192.168.0.10 > /var/www/html/index.html
[root@RS1 ~]# systemctl enable --now httpd
Created symlink /etc/systemd/system/multi-user.target.wants/httpd.service → /usr/lib/systemd/system/httpd.service.
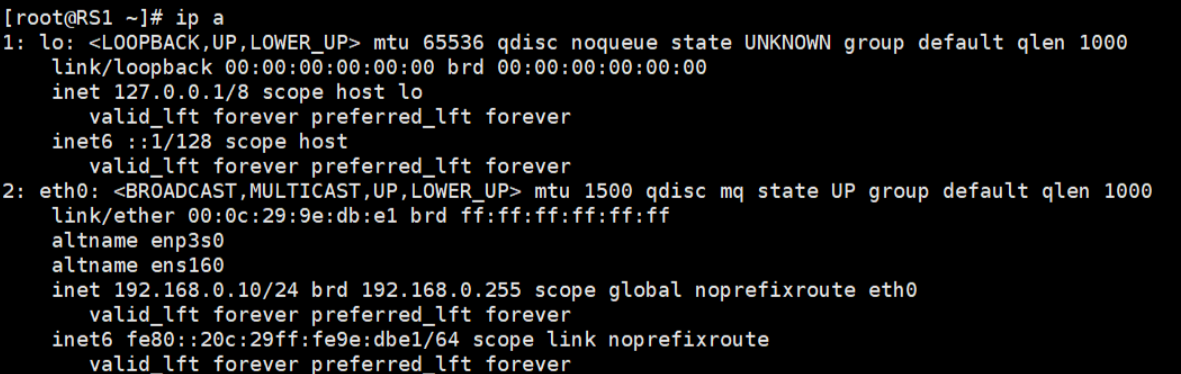
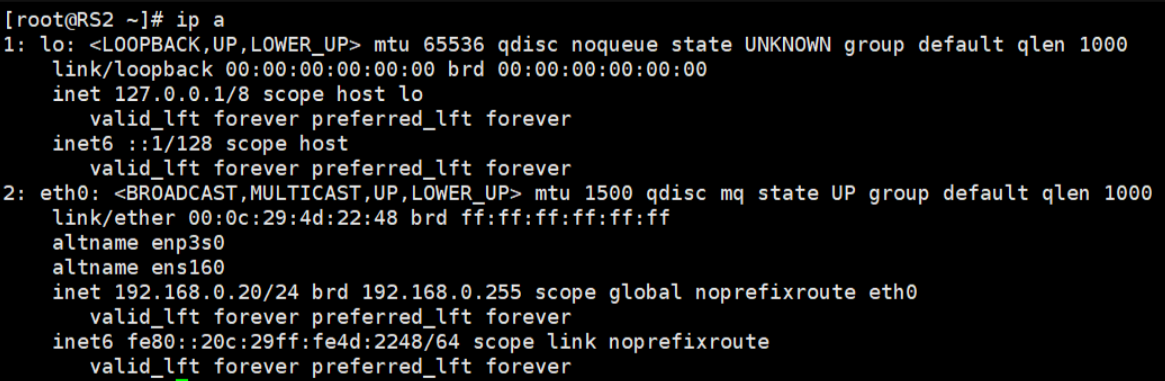
RS2
[root@RS2 ~]#  dnf install httpd -y
[root@RS2 ~]# echo RS2 - 192.168.0.20 > /var/www/html/index.html
[root@RS2 ~]# systemctl enable --now httpd
Created symlink /etc/systemd/system/multi-user.target.wants/httpd.service → /usr/lib/systemd/system/httpd.service.
haproxy
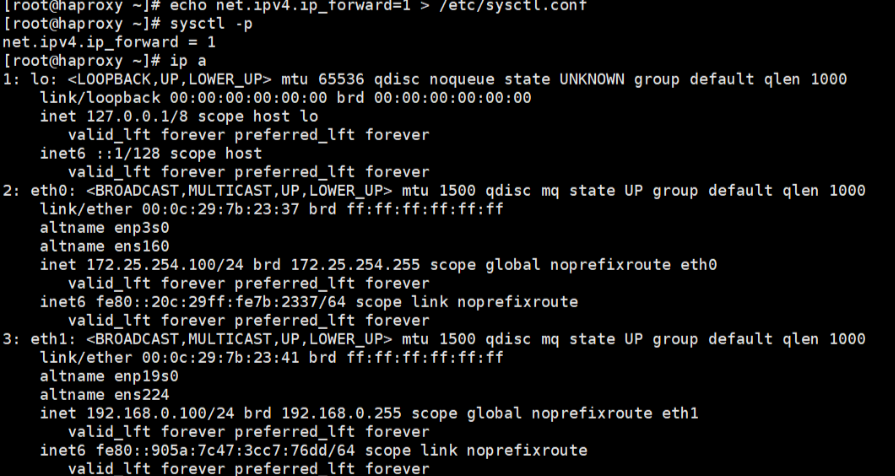
[root@haproxy ~]# echo net.ipv4.ip_forward=1 > /etc/sysctl.conf   #开启内核路由
[root@haproxy ~]# sysctl -p
net.ipv4.ip_forward = 1
[root@haproxy ~]# ip a
1: lo: <LOOPBACK,UP,LOWER_UP> mtu 65536 qdisc noqueue state UNKNOWN group default qlen 1000
    link/loopback 00:00:00:00:00:00 brd 00:00:00:00:00:00
    inet 127.0.0.1/8 scope host lo
       valid_lft forever preferred_lft forever
    inet6 ::1/128 scope host
       valid_lft forever preferred_lft forever
2: eth0: <BROADCAST,MULTICAST,UP,LOWER_UP> mtu 1500 qdisc mq state UP group default qlen 1000
    link/ether 00:0c:29:7b:23:37 brd ff:ff:ff:ff:ff:ff
    altname enp3s0
    altname ens160
    inet 172.25.254.100/24 brd 172.25.254.255 scope global noprefixroute eth0
       valid_lft forever preferred_lft forever
    inet6 fe80::20c:29ff:fe7b:2337/64 scope link noprefixroute
       valid_lft forever preferred_lft forever
3: eth1: <BROADCAST,MULTICAST,UP,LOWER_UP> mtu 1500 qdisc mq state UP group default qlen 1000
    link/ether 00:0c:29:7b:23:41 brd ff:ff:ff:ff:ff:ff
    altname enp19s0
    altname ens224
    inet 192.168.0.100/24 brd 192.168.0.255 scope global noprefixroute eth1
       valid_lft forever preferred_lft forever
    inet6 fe80::905a:7c47:3cc7:76dd/64 scope link noprefixroute
       valid_lft forever preferred_lft forever
测试:
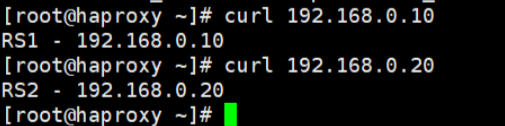
配置Haproxy
在调度机haproxy上进行:
[root@haproxy ~]# dnf install haproxy.x86_64 -y
[root@haproxy ~]# systemctl enable --now haproxy
Created symlink /etc/systemd/system/multi-user.target.wants/haproxy.service → /usr/lib/systemd/system/haproxy.service.
设置一下tab的默认空格数:
[root@haproxy ~]# vim ~/.vimrc
set ts=4 ai
在配置文件(/etc/haproxy/haproxy.cfg)中添加如下配置: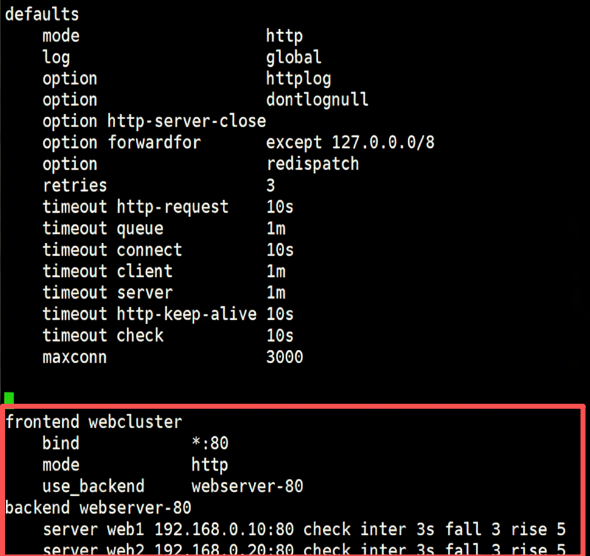
然后重启服务测试
[root@haproxy ~]# systemctl restart haproxy.service
[root@haproxy ~]# curl  172.25.254.100
RS1 - 192.168.0.10
[root@haproxy ~]# curl  172.25.254.100
RS2 - 192.168.0.20
[root@haproxy ~]# curl  172.25.254.100
RS1 - 192.168.0.10
[root@haproxy ~]# curl  172.25.254.100
RS2 - 192.168.0.20
[root@haproxy ~]# curl  172.25.254.100
RS1 - 192.168.0.10
[root@haproxy ~]# curl  172.25.254.100
RS2 - 192.168.0.20
可以看到现在是负载均衡状态
用listen方式负载均衡
修改haproxy的配置文件,将刚刚配置的模式替换

[root@haproxy ~]# curl  172.25.254.100
RS1 - 192.168.0.10
[root@haproxy ~]# curl  172.25.254.100
RS2 - 192.168.0.20
[root@haproxy ~]# curl  172.25.254.100
RS1 - 192.168.0.10
[root@haproxy ~]# curl  172.25.254.100
RS2 - 192.168.0.20
指定日志发送
指定把日志发送到192.168.0.10中。
首先在192.168.0.10 开启接受日志的端口:
[root@RS1 ~]# vim /etc/rsyslog.conf
在配置文件中找到
input(type="imudp" port="514")
将注释去除
[root@RS1 ~]# vim /etc/rsyslog.conf
[root@RS1 ~]# systemctl restart rsyslog.service
#测试接受日志端口是否开启
[root@RS1 ~]# netstat -antlupe | grep rsyslog
tcp        0      0 0.0.0.0:514             0.0.0.0:*               LISTEN      0          29937      2321/rsyslogd
tcp6       0      0 :::514                  :::*                    LISTEN      0          29938      2321/rsyslogd
在haproxy主机中设定日志发送信息
[root@haproxy ~]# vim /etc/haproxy/haproxy.cfg
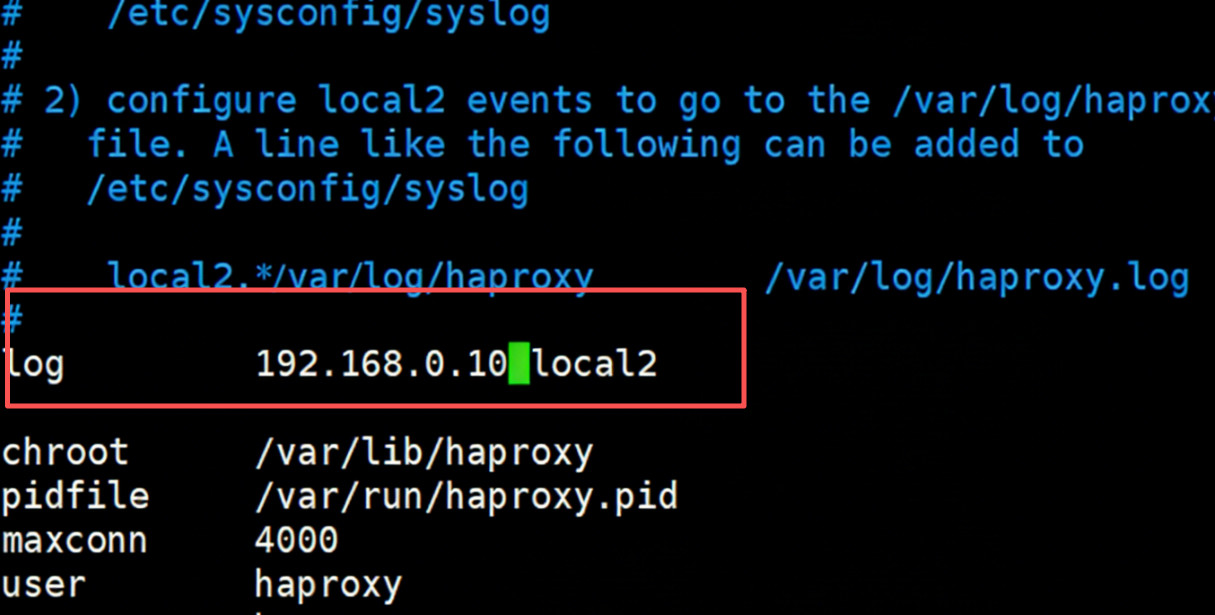
指定接受日志主机
重启服务生效
测试:
#首先在haproxy主机中访问
[root@haproxy ~]# curl  172.25.254.100
RS1 - 192.168.0.10
[root@haproxy ~]# curl  172.25.254.100
RS2 - 192.168.0.20
[root@haproxy ~]# curl  172.25.254.100
RS1 - 192.168.0.10
[root@haproxy ~]# curl  172.25.254.100
RS2 - 192.168.0.20
[root@haproxy ~]# curl  172.25.254.100
RS1 - 192.168.0.10
[root@haproxy ~]# curl  172.25.254.100
RS2 - 192.168.0.20
[root@haproxy ~]# curl  172.25.254.100
RS1 - 192.168.0.10
[root@haproxy ~]# curl  172.25.254.100
RS2 - 192.168.0.20

实现haproxy的多进程
默认情况下haproxy是单进程的
在配置文件中的global中加入参数:
[root@haproxy ~]# vim /etc/haproxy/haproxy.cfg
nbproc 2
# 2、验证
[root@haproxy ~]# systemctl restart haproxy.service
# 多进程CPU绑定
[root@haproxy ~]# vim /etc/haproxy/haproxy.cfg
    nbproc      2
    cpu-map    1 0
    cpu-map    2 1
[root@haproxy ~]# systemctl restart haproxy.service
# 1、为不同进程准备不同套接字
[root@haproxy ~]# vim /etc/haproxy/haproxy.cfg
   # stats socket /var/lib/haproxy/stats
    stats socket /var/lib/haproxy/haproxy1 mode 600 level admin process 1
    stats socket /var/lib/haproxy/haproxy2 mode 660 level admin process 1
[root@haproxy ~]# systemctl restart haproxy.service

# 2、效果
[root@haproxy ~]# ll /var/lib/haproxy/
总用量 0
srw------- 1 root root 0  1月 23 16:07 haproxy1
srw-rw---- 1 root root 0  1月 23 16:07 haproxy2
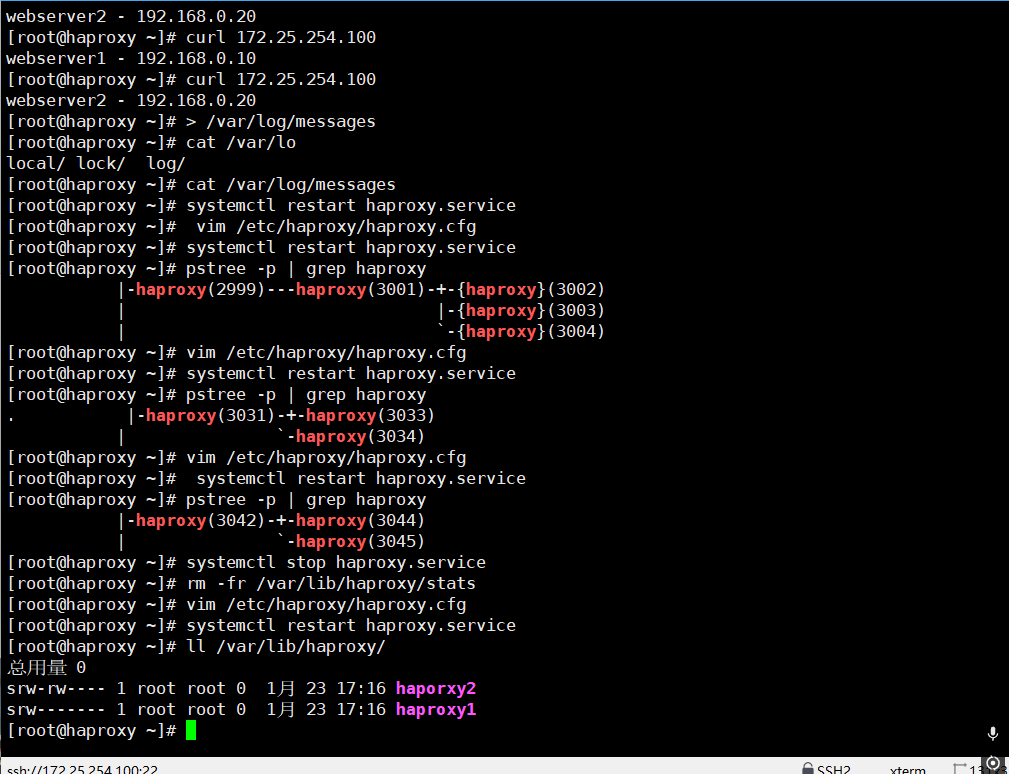
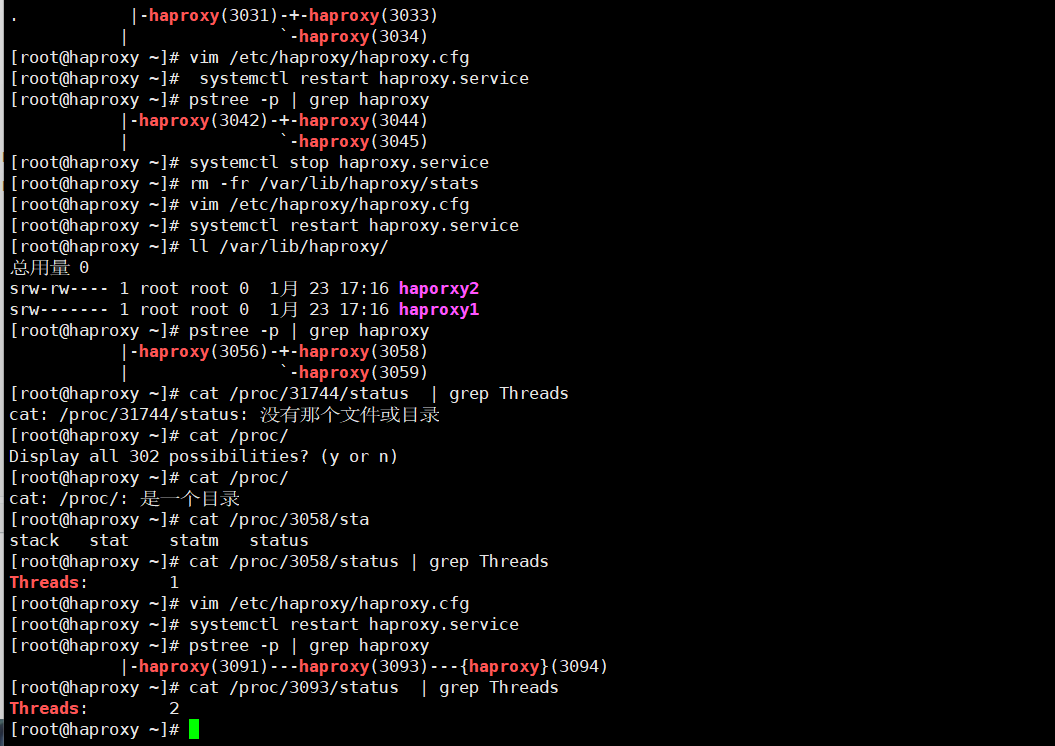
注:多线程和单线程不能同时进行
三.haproxy的调度算法
静态算法
静态算法:按照事先定义好的规则轮询公平调度,不关心后端服务器的当前负载、连接数和响应速度 等,且无法实时修改权重( 只能为 0 和 1, 不支持其它值 ) ,只能靠重启 HAProxy 生效。
static-rr
不支持运行时利用socat进行权重的动态调整(只支持0和1,不支持其它值)
不支持端服务器慢启动--指在服务器刚刚启动上不会把他所应该承担的访问压力全部给它,而是先给一部分,当没问题后在给一部分
其后端主机数量没有限制,相当于LVS中的 wrr
[root@haproxy ~]# vim /etc/haproxy/haproxy.cfg
frontend webcluster
    bind            *:80
    mode            http
    use_backend     webserver-80
    balance static-rr
backend webserver-80
    server web1 192.168.0.10:80 check inter 3s fall 3 rise 5
    server web2 192.168.0.20:80 check inter 3s fall 3 rise 5
[root@haproxy ~]# systemctl restart haproxy.service
first
根据服务器在列表中的位置,自上而下进行调度
其只会当第一台服务器的连接数达到上限,新请求才会分配给下一台服务
其会忽略服务器的权重设置
不支持用socat进行动态修改权重,可以设置0和1,可以设置其它值但无效
[root@haproxy ~]# vim /etc/haproxy/haproxy.cfg
frontend webcluster
    bind            *:80
    mode            http
    use_backend     webserver-80
    balance first
backend webserver-80
    server web1 192.168.0.10:80 check inter 3s fall 3 rise 5
    server web2 192.168.0.20:80 check inter 3s fall 3 rise 5
[root@haproxy ~]# systemctl restart haproxy.service
动态算法
roundrobin
基于权重的轮询动态调度算法,
支持权重的运行时调整,不同于lvs中的rr轮训模式,
HAProxy中的roundrobin支持慢启动(新加的服务器会逐渐增加转发数),
其每个后端backend中最多支持4095个real server,
支持对real server权重动态调整,
roundrobin为默认调度算法,此算法使用广泛
动态调整权重
[root@haproxy ~]# vim /etc/haproxy/haproxy.cfg
frontend webcluster
    bind            *:80
    mode            http
    use_backend     webserver-80
    balance roundrobin
backend webserver-80
    server web1 192.168.0.10:80 check inter 3s fall 3 rise 5
    server web2 192.168.0.20:80 check inter 3s fall 3 rise 5
[root@haproxy ~]# yum install  socat -y
[root@haproxy ~]# echo "set weight webserver_80/webserver1 2" | socat stdio
/var/lib/haproxy/haproxy.sock
[root@haproxy ~]# systemctl restart haproxy.service
leastconn
leastconn加权的最少连接的动态
支持权重的运行时调整和慢启动,即:根据当前连接最少的后端服务器而非权重进行优先调度(新客户端连接)
比较适合长连接的场景使用,比如:MySQL等场景。
[root@haproxy ~]# vim /etc/haproxy/haproxy.cfg
frontend webcluster
    bind            *:80
    mode            http
    use_backend     webserver-80
    balance leastconn
backend webserver-80
    server web1 192.168.0.10:80 check inter 3s fall 3 rise 5
    server web2 192.168.0.20:80 check inter 3s fall 3 rise 5
[root@haproxy ~]# systemctl restart haproxy.service
其他算法
source
源地址hash ,基于用户源地址 hash 并将请求转发到后端服务器,后续同一个源地址请求将被转发至同一 个后端web 服务器。
此方式当后端服务器数据量发生变化时,会导致很多用户的请求转发至新的后端服务器,默认为静态方式,但是可以通过hash-type支持的选项更改这个算法一般是在不插入Cookie的TCP模式下使用,也可给拒绝会话cookie的客户提供最好的会话粘性。
适用于session 会话保持但不支持 cookie和缓存的场景源地址有两种转发客户端请求到后端服务器的服务器选取计算方式,分别是取模法 和一致性hash
[root@haproxy ~]# vim /etc/haproxy/haproxy.cfg
listen webserver_80
        bind *:80
        mode http
        balance source
        server webserver1 192.168.0.10:80 weight 1 check inter 3s fall 3 rise 5
        server webserver2 192.168.0.20:80 weight 1 check inter 3s fall 3 rise 5
[root@haproxy ~]# systemctl restart haproxy.service
uri
基于对用户请求的URI的左半部分或整个uri做hash,再将hash结果对总权重进行取模后
根据最终结果将请求转发到后端指定服务器
适用于后端是缓存服务器场景
默认是静态算法,也可以通过hash-type指定map-based和consistent,来定义使用取模法还是一致性hash
[haproxy ~]# vim /etc/haproxy/haproxy.cfg
listen webserver_80
    bind *:80
    mode http
    balance uri
    server webserver1 192.168.0.10:80 weight 1 check inter 3s fall 3 rise 5
    server webserver2 192.168.0.20:80 weight 1 check inter 3s fall 3 rise 5
url_param
url_param对用户请求的 url 中的 params 部分中的一个参数 key 对应的 value 值作 hash 计算,并由服务器
总权重相除以后派发至某挑出的服务器, 后端搜索同一个数据会被调度到同一个服务器,多用与电商
通常用于追踪用户,以确保来自同一个用户的请求始终发往同一个real server ,如果无没key ,将按 roundrobin 算法
[haproxy ~]# vim /etc/haproxy/haproxy.cfg


listen webserver_80
    bind 172.25.254.100:80
    mode http
    balance url_param name,userid 		#支持对多个url_param hash
    server webserver1 192.168.0.10:80 weight 1 check inter 3s fall 3 rise 5
    server webserver2 192.168.0.20:80 weight 1 check inter 3s fall 3 rise 5
[root@haproxy ~]# curl  172.25.254.100/index.html?name=zxf
RS2 - 192.168.0.20
[root@haproxy ~]# curl  172.25.254.100/index.html?name=zxf
RS1 - 192.168.0.10
[root@haproxy ~]# curl  172.25.254.100/index.html?userid=lee
RS1 - 192.168.0.10
[root@haproxy ~]# curl  172.25.254.100/index.html?userid=lee
RS1 - 192.168.0.10
hdr
针对用户每个 http 头部 (header) 请求中的指定信息做 hash ,
此处由 name 指定的 http 首部将会被取出并做 hash 计算,
然后由服务器总权重取模以后派发至某挑出的服务器,如果无有效值,则会使用默认的轮询调度。
[haproxy ~]# vim /etc/haproxy/haproxy.cfg
listen webserver_80
bind 172.25.254.100:80
mode http
balance hdr(User-Agent)
server webserver1 192.168.0.10:80 weight 1 check inter 3s fall 3 rise 5
server webserver2 192.168.0.20:80 weight 1 check inter 3s fall 3 rise 5
[root@haproxy ~]# curl  -v 172.25.254.100
[root@haproxy ~]# curl  -vA "firefox" 172.25.254.100
[root@haproxy ~]# curl  -vA "sougou" 172.25.254.100
四.高级功能及配置
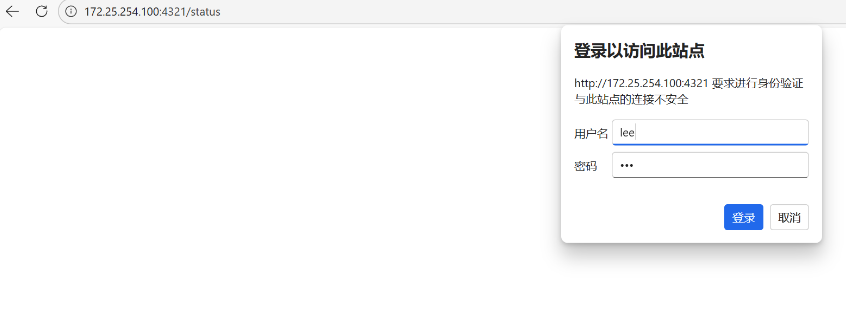
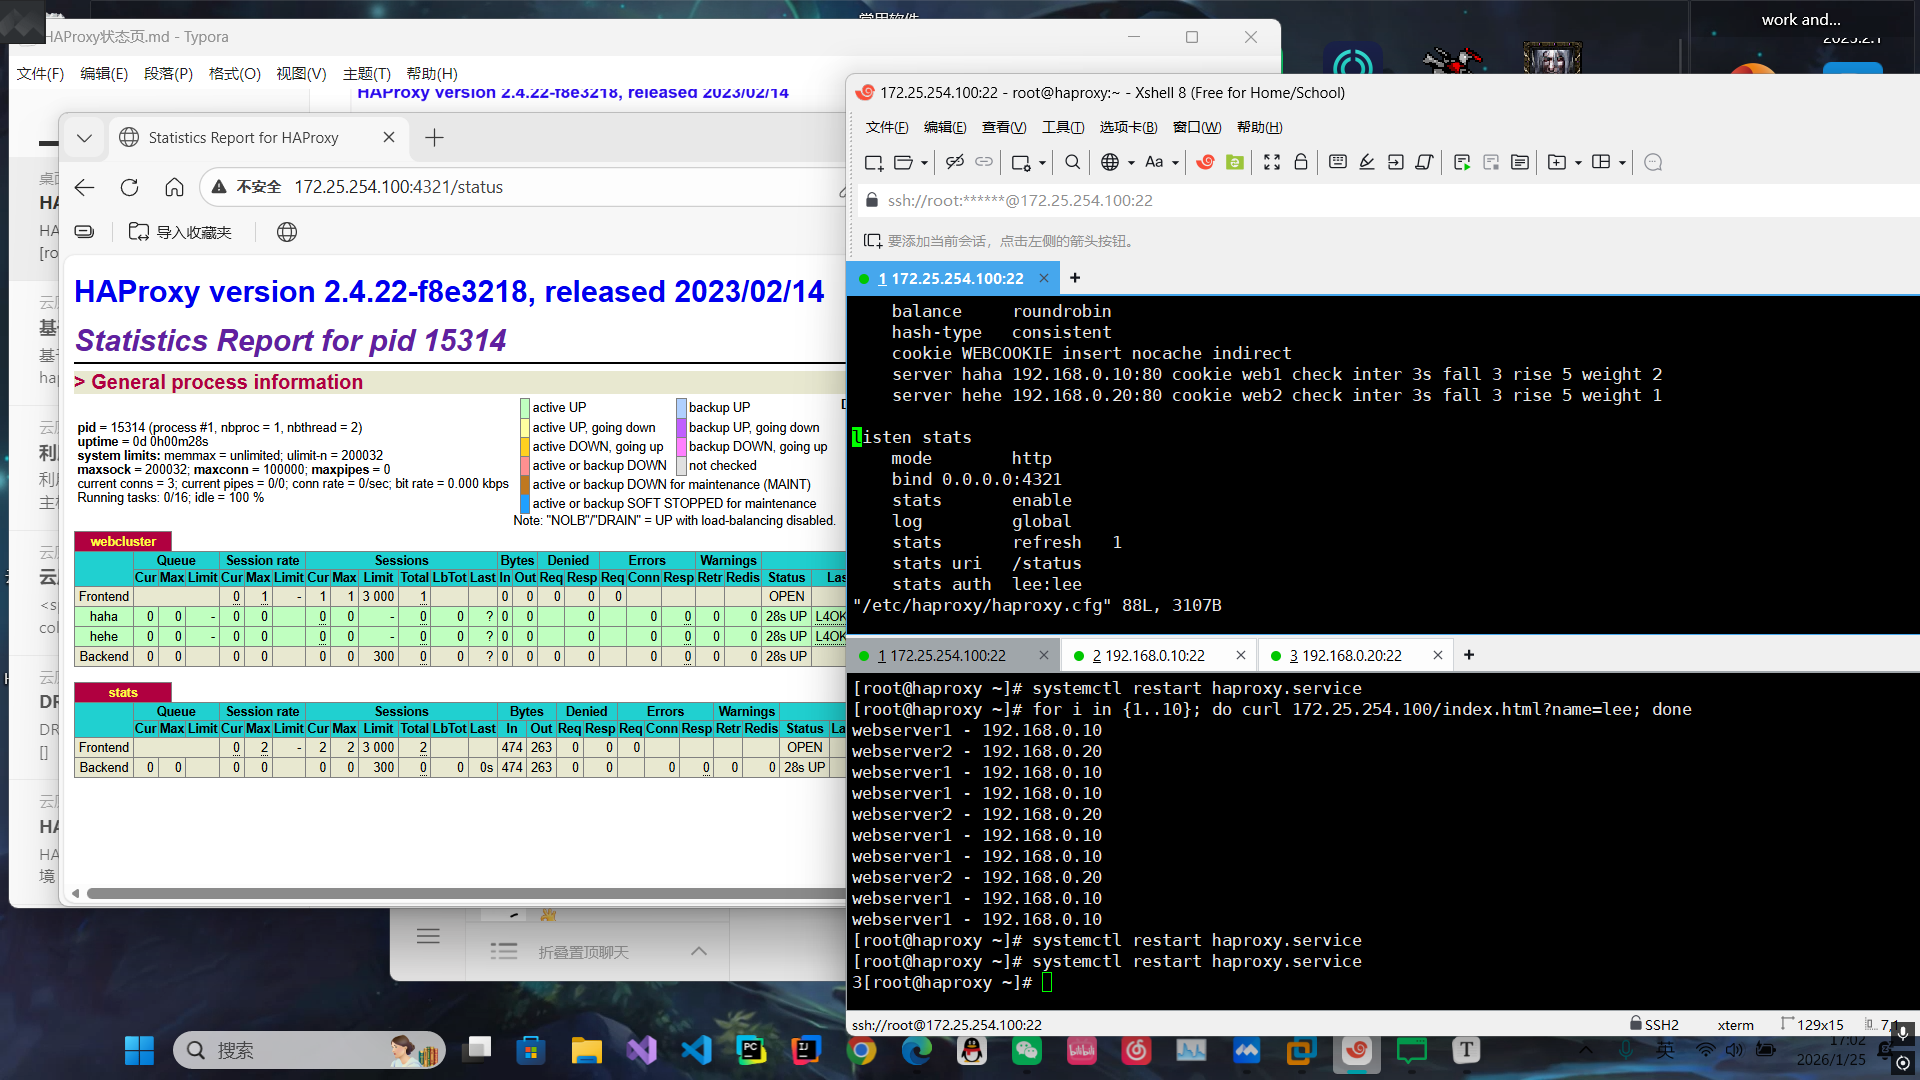
HAProxy状态页
通过 web 界面,显示当前 HAProxy 的运行状态
stats enable #基于默认的参数启用stats page
stats hide-version #将状态页中haproxy版本隐藏
stats refresh <delay> #设定自动刷新时间间隔,默认不自动刷新
stats uri <prefix> #自定义stats page uri,默认值:/haproxy?stats
stats auth <user>:<passwd> #认证时的账号和密码,可定义多个用户,每行指定一个用户
#默认:no authentication
stats admin { if | unless } <cond> #启用stats page中的管理功能
[haproxy ~]# vim /etc/haproxy/haproxy.cfg
listen stats
    mode        http
    bind 0.0.0.0:4321
    stats       enable
    log         global
#   stats       refresh  1
    stats uri   /status
    stats auth  lee:lee
IP透传
环境设置
在RS中把apache停止
#在RS1上
[root@RS1 ~]# systemctl disable --now httpd
Removed "/etc/systemd/system/multi-user.target.wants/httpd.service".
[root@RS1 ~]# dnf install nginx -y
[root@RS1 ~]# echo RS1 - 192.168.0.10 > /usr/share/nginx/html/index.html
[root@RS1 ~]# systemctl enable --now nginx
Created symlink /etc/systemd/system/multi-user.target.wants/nginx.service → /usr/lib/systemd/system/nginx.service.
#在RS2上
[root@RS2 ~]# systemctl disable --now httpd
Removed "/etc/systemd/system/multi-user.target.wants/httpd.service".
[root@RS2 ~]# dnf install nginx -y
[root@RS2 ~]# echo RS1 - 192.168.0.10 > /usr/share/nginx/html/index.html
[root@RS2 ~]# systemctl enable --now nginx
Created symlink /etc/systemd/system/multi-user.target.wants/nginx.service → /usr/lib/systemd/system/nginx.service.
测试:
[root@haproxy ~]# for i in {1..5}; do curl 172.25.254.100; done
RS1 - 192.168.0.10
RS2 - 192.168.0.20
RS1 - 192.168.0.10
RS2 - 192.168.0.20
RS1 - 192.168.0.10
启用nginx的四层访问控制
[root@RS1 ~]# vim /etc/nginx/nginx.conf
 server {
        listen       80 proxy_protocol;  #开启四层透传的参数
        listen       [::]:80;
        server_name  _;
        root         /usr/share/nginx/html;

        # Load configuration files for the default server block.
        include /etc/nginx/default.d/*.conf;
[root@RS1 ~]# systemctl restart nginx.service
修改配置
[root@haproxy ~]# vim /etc/haproxy/haproxy.cfg
listen webcluster
    bind    *:80
    mode    tcp			#四层访问
    balance roundrobin
    server haha 192.168.0.10:80 send-proxy check inter 3s fall 3 rise 5 weight 1
    server hehe 192.168.0.20:80 send-proxy check inter 3s fall 3 rise 5 weight 1
测试
[root@haproxy ~]# for i in {1..5}; do curl 172.25.254.100; done
RS2 - 192.168.0.20
RS1 - 192.168.0.10
RS2 - 192.168.0.20
RS1 - 192.168.0.10
RS2 - 192.168.0.20
设置4层ip透传
#两台服务器都要改
[root@RS1 system-connections]#  vim /etc/nginx/nginx.conf
         '"$proxy_protocol_addr"'
[root@RS1 system-connections]# systemctl restart nginx.service
[root@webserver1 ~]# vim /etc/nginx/nginx.conf
http {
    log_format  main  '$remote_addr - $remote_user [$time_local] "$request" '
                        ' "$proxy_protocol_addr"'	# 采集透传消息
                      '$status $body_bytes_sent "$http_referer" '
                      '"$http_user_agent" "$http_x_forwarded_for"';
[root@webserver1 ~]# systemctl restart nginx.service
[root@webserver2 ~]# vim /etc/nginx/nginx.conf
http {
    log_format  main  '$remote_addr - $remote_user [$time_local] "$request" '
                        ' "$proxy_protocol_addr"'	# 采集透传消息
                      '$status $body_bytes_sent "$http_referer" '
                      '"$http_user_agent" "$http_x_forwarded_for"';
[root@webserver2 ~]# systemctl restart nginx.service
测试
[root@haproxy ~]# for i in {1..5}; do curl 172.25.254.100; done
RS1 - 192.168.0.10
RS2 - 192.168.0.20
RS1 - 192.168.0.10
RS2 - 192.168.0.20
RS1 - 192.168.0.10
七层透传
开启IP透传
[root@haproxy ~]# vim /etc/haproxy/haproxy.cfg
    option forwardfor       except 127.0.0.0/8
[root@haproxy ~]# vim /etc/haproxy/haproxy.cfg
defaults
    mode                    http
    log                     global
    option                  httplog
    option                  dontlognull
    option http-server-close
    option forwardfor       except 127.0.0.0/8  # 加上forwardfor
[root@haproxy ~]# systemctl restart haproxy.service
在rs中设定采集透传IP
[root@webserver2 ~]# vim /etc/httpd/conf/httpd.conf
LogFormat "%h %l %u %t \"%r\" %>s %b \"%{Referer}i\" \"%{User-Agent}i\" \"%{X-Forwarded-For}i\"" combined
[root@webserver2 ~]# systemctl restart httpd
测试
[root@webserver2 ~]# cat /etc/httpd/logs/access_log
192.168.0.100 - - [28/Jan/2026:13:35:04 +0800] "GET / HTTP/1.1" 200 26 "-" "curl/8.12.1" "172.25.254.1"
192.168.0.100 - - [28/Jan/2026:13:35:04 +0800] "GET / HTTP/1.1" 200 26 "-" "curl/8.12.1" "172.25.254.1"
HAProxy 四层负载
针对除 HTTP 以外的 TCP 协议应用服务访问的应用场景
MySQL
Redis
Memcache
RabbitMQ
环境准备
部署mariadb数据库
[root@webserver1 ~]# dnf install mariadb-server mariadb -y
[root@webserver1 ~]# vim /etc/my.cnf.d/mariadb-server.cnf
[mysqld]
server_id=10	# 设定数据库所在主机的id标识为10
datadir=/var/lib/mysql
socket=/var/lib/mysql/mysql.sock
log-error=/var/log/mariadb/mariadb.log
pid-file=/run/mariadb/mariadb.pid
[root@webserver1 ~]# systemctl start mariadb.service

[root@webserver2 ~]# dnf install mariadb-server mariadb -y
[root@webserver2 ~]# vim /etc/my.cnf.d/mariadb-server.cnf
[mysqld]
server_id=20	# 设定数据库所在主机的id标识为20
datadir=/var/lib/mysql
socket=/var/lib/mysql/mysql.sock
log-error=/var/log/mariadb/mariadb.log
pid-file=/run/mariadb/mariadb.pid
[root@webserver2 ~]# systemctl start mariadb.service
四层负载操作
[root@haproxy ~]# vim /etc/haproxy/haproxy.cfg
listen mariadbcluster
    bind    *:6663
    mode    tcp
    balance roundrobin
    server haha 192.168.0.10:3306 check inter 3s fall 3 rise 5 weight 1
    server hehe 192.168.0.20:3306 check inter 3s fall 3 rise 5 weight 1
[root@haproxy ~]# systemctl restart haproxy.service
检查端口号
[root@haproxy ~]# netstat -antlupe | grep haproxy
tcp        0      0 0.0.0.0:6663            0.0.0.0:*               LISTEN      0          77284      16004/haproxy
tcp        0      0 0.0.0.0:4321            0.0.0.0:*               LISTEN      0          77285      16004/haproxy
tcp        0      0 0.0.0.0:80              0.0.0.0:*               LISTEN      0
测试
[root@localhost ~]#  mysql -ulee -plee -h192.168.0.100 -P 6663
Welcome to the MariaDB monitor.  Commands end with ; or \g.
Your MariaDB connection id is 3
Server version: 10.5.27-MariaDB MariaDB Server
Copyright (c) 2000, 2018, Oracle, MariaDB Corporation Ab and others.
Type 'help;' or '\h' for help. Type '\c' to clear the current input statement.

MariaDB [(none)]> select @@server_id
    -> ;
+-------------+
| @@server_id |
+-------------+
|          10 |
+-------------+
1 row in set (0.001 sec)

MariaDB [(none)]>
backup参数
[root@haproxy ~]# vim /etc/haproxy/haproxy.cfg
listen mariadbcluster
    bind        *:6663
    mode        tcp
    balance     roundrobin
    server haha 192.168.0.10:3306  check inter 3s fall 3 rise 5 weight 1
    server hehe 192.168.0.20:3306  check inter 3s fall 3 rise 5 weight 1 backup
[root@haproxy ~]# systemctl restart haproxy.service
测试
[root@localhost ~]#  mysql -ulee -plee -h192.168.0.100 -P 6663
Welcome to the MariaDB monitor.  Commands end with ; or \g.
Your MariaDB connection id is 6
Server version: 10.5.27-MariaDB MariaDB Server
Copyright (c) 2000, 2018, Oracle, MariaDB Corporation Ab and others.
Type 'help;' or '\h' for help. Type '\c' to clear the current input statement.

MariaDB [(none)]> select @@server_id
    -> ;
+-------------+
| @@server_id |
+-------------+
|          10 |
+-------------+
1 row in set (0.001 sec)
关闭10的mariadb并等待1分钟,标识haproxy没有完成故障转换
[root@webserver1 ~]# systemctl stop mariadb.service
[root@localhost ~]#  mysql -ulee -plee -h192.168.0.100 -P 6663
Welcome to the MariaDB monitor.  Commands end with ; or \g.
Your MariaDB connection id is 6
Server version: 10.5.27-MariaDB MariaDB Server
Copyright (c) 2000, 2018, Oracle, MariaDB Corporation Ab and others.
Type 'help;' or '\h' for help. Type '\c' to clear the current input statement.

MariaDB [(none)]> select @@server_id
    -> ;
+-------------+
| @@server_id |
+-------------+
|          20 |
+-------------+
1 row in set (0.006 sec)
还原故障主机等待片刻
[root@webserver1 ~]# systemctl enable --now  mariadb.service
[root@localhost ~]#  mysql -ulee -plee -h192.168.0.100 -P 6663
Welcome to the MariaDB monitor.  Commands end with ; or \g.
Your MariaDB connection id is 3
Server version: 10.5.27-MariaDB MariaDB Server
Copyright (c) 2000, 2018, Oracle, MariaDB Corporation Ab and others.
Type 'help;' or '\h' for help. Type '\c' to clear the current input statement.

MariaDB [(none)]> select @@server_id
    -> ;
+-------------+
| @@server_id |
+-------------+
|          10 |
+-------------+
1 row in set (0.001 sec)
更多推荐

 12
12 0
0- 0


 已为社区贡献5条内容

所有评论(0)