
【大数据存储与管理】实验4:NoSQL和关系数据库的操作比较

【作者主页】Francek Chen
【专栏介绍】 ⌈ ⌈ ⌈大数据技术原理与应用 ⌋ ⌋ ⌋专栏系统介绍大数据的相关知识,分为大数据基础篇、大数据存储与管理篇、大数据处理与分析篇、大数据应用篇。内容包含大数据概述、大数据处理架构Hadoop、分布式文件系统HDFS、分布式数据库HBase、NoSQL数据库、云数据库、MapReduce、Hadoop再探讨、数据仓库Hive、Spark、流计算、Flink、图计算、数据可视化,以及大数据在互联网领域、生物医学领域的应用和大数据的其他应用。
【GitCode】专栏资源保存在我的GitCode仓库:https://gitcode.com/Morse_Chen/BigData_principle_application。
一、实验目的
(1)理解 4 种数据库(MySQL、HBase、Redis 和 MongoDB)的概念以及不同点。
(2)熟练使用 4 种数据库操作常用的Shell命令。
(3)熟悉 4 种数据库操作常用的 Java API。
二、实验平台
- 操作系统:Ubuntu 16.04。
- Hadoop 版本:3.3.5。
- MySQL 版本:5.7。
- HBase 版本:2.5.4。
- Redis 版本:6.0.6。
- MongoDB 版本:4.4.22。
- JDK 版本:1.8。
- Java IDE:Eclipse。
三、实验步骤
1. MySQL 数据库操作
(1)根据上面给出的 Student 表,在 MySQL 中完成如下操作。
| Name | English | Math | Computer |
|---|---|---|---|
| ZhangSan | 69 | 86 | 77 |
| LiSi | 55 | 100 | 88 |
① 在 MySQL 中创建 Student 表,并录入数据。
创建 Student 表的 SQL 语句如下:
create table student(
    name varchar(30) not null,
    English tinyint unsigned not null,
    Math tinyint unsigned not null,
    Computer tinyint unsigned not null
    );
向 Student 表中插入两条记录的 SQL 语句如下:
insert into student values("zhangsan",69,86,77);
insert into student values("lisi",55,100,88);
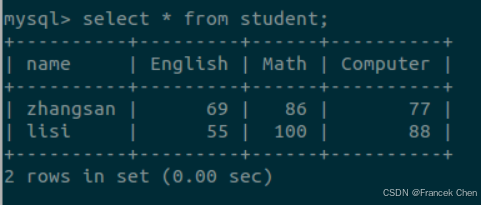
② 用 SQL 语句输出 Student 表中的所有记录。
输出 Student 表中的所有记录的 SQL 语句如下:
select * from student;
上述 SQL 语句执行后的结果截图如图所示。
③ 查询 zhangsan 的 Computer 成绩。
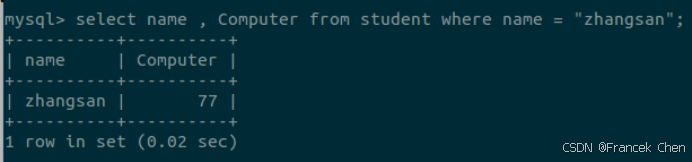
查询 zhangsan 的 Computer 成绩的 SQL 语句如下:
select name , Computer from student where name = "zhangsan";
上述语句执行后的结果截图如图所示。
④ 修改 lisi 的 Math 成绩为 95。
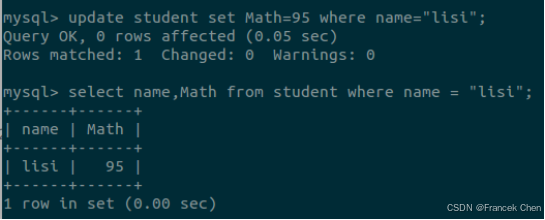
修改 lisi 的 Math 成绩的 SQL 语句如下:
update student set Math=95 where name="lisi";
上述 SQL 语句执行结果截图如图所示。
(2)根据上面已经设计出的 Student 表,使用 MySQL 的 Java 客户端编程实现以下操作。
① 向 Student 表中添加一条记录“scofield,45,89,100”。
向 Student 表添加上述记录的 Java 代码如下:
import java.sql.*;
public class mysql_test {

	/**
	 * @param args
	 */
	//JDBC DRIVER and DB
	static final String  DRIVER="com.mysql.jdbc.Driver";
	static final String DB="jdbc:mysql://localhost/test";
	//Database auth
	static final String USER="root";
	static final String PASSWD="root";

	public static void main(String[] args) {
		// TODO Auto-generated method stub
		Connection conn=null;
		Statement stmt=null;
		try {
			//加载驱动程序
			Class.forName(DRIVER);
			System.out.println("Connecting to a selected database...");
			//打开一个连接
			conn=DriverManager.getConnection(DB, USER, PASSWD);
			//执行一个查询
			stmt=conn.createStatement();
			String sql="insert into student values('scofield',45,89,100)";
			stmt.executeUpdate(sql);
			System.out.println("Inserting records into the table successfully!");
		} catch (ClassNotFoundException e) {
			// TODO Auto-generated catch block
			e.printStackTrace();
		}catch (SQLException e) {
			// TODO Auto-generated catch block
			e.printStackTrace();
		}finally
		{
			if(stmt!=null)
				try {
					stmt.close();
				} catch (SQLException e) {
					// TODO Auto-generated catch block
					e.printStackTrace();
				}
			if(conn!=null)
				try {
					conn.close();
				} catch (SQLException e) {
					// TODO Auto-generated catch block
					e.printStackTrace();
				}
		}
	}
}
② 获取 scofield 的 English 成绩信息。
获取 scofield 的 English 成绩信息的 Java 代码如下:
import java.sql.*;
public class mysql_qurty {

	/**
	 * @param args
	 */
	//JDBC DRIVER and DB
	static final String  DRIVER="com.mysql.jdbc.Driver";
	static final String DB="jdbc:mysql://localhost/test";
	//Database auth
	static final String USER="root";
	static final String PASSWD="root";

	public static void main(String[] args) {
		// TODO Auto-generated method stub
		Connection conn=null;
		Statement stmt=null;
		ResultSet rs=null;
		try {
			//加载驱动程序
			Class.forName(DRIVER);
			System.out.println("Connecting to a selected database...");
			//打开一个连接
			conn=DriverManager.getConnection(DB, USER, PASSWD);
			//执行一个查询
			stmt=conn.createStatement();
			String sql="select name,English from student where name='scofield' ";
			//获得结果集
			rs=stmt.executeQuery(sql);
			System.out.println("name"+"\t\t"+"English");
			while(rs.next())
			{
				System.out.print(rs.getString(1)+"\t\t");
				System.out.println(rs.getInt(2));
			}
		} catch (ClassNotFoundException e) {
			// TODO Auto-generated catch block
			e.printStackTrace();
		}catch (SQLException e) {
			// TODO Auto-generated catch block
			e.printStackTrace();
		}finally
		{
			if(rs!=null)
				try {
					rs.close();
				} catch (SQLException e1) {
					// TODO Auto-generated catch block
					e1.printStackTrace();
				}
			if(stmt!=null)
				try {
					stmt.close();
				} catch (SQLException e) {
					// TODO Auto-generated catch block
					e.printStackTrace();
				}
			if(conn!=null)
				try {
					conn.close();
				} catch (SQLException e) {
					// TODO Auto-generated catch block
					e.printStackTrace();
				}
		}
	}
}
| Name | Score | ||
|---|---|---|---|
| English | Math | Computer | |
| zhangsan | 69 | 86 | 77 |
| lisi | 55 | 100 | 88 |
(1)根据上面给出的 Student 表的信息,执行如下操作。
① 用 Hbase Shell 命令创建学生(Student)表。
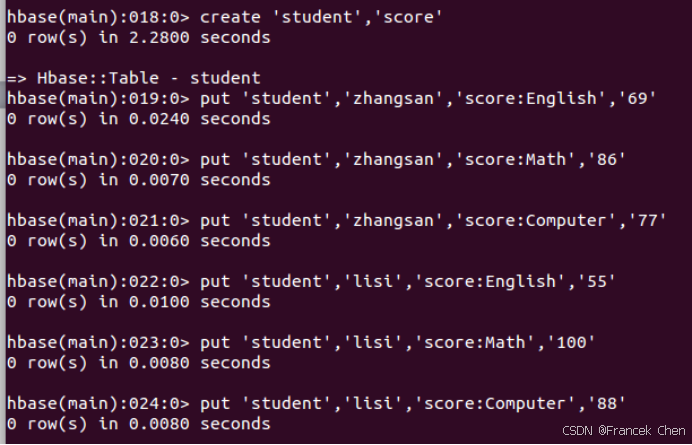
创建 Student 表的命令如下:
create 'student','score'
向 Student 表中插入上面表格数据的命令如下:
put 'student','zhangsan','score:English','69'
put 'student','zhangsan','score:Math','86'
put 'student','zhangsan','score:Computer','77'
put 'student','lisi','score:English','55'
put 'student','lisi','score:Math','100'
put 'student','lisi','score:Computer','88'
上述命令执行结果截图如图所示。
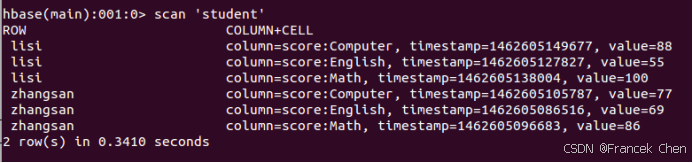
② 用 scan 命令浏览 Student 表的相关信息。
用 scan 指令浏览 Student 表相关信息的命令如下:
scan 'student'
上述命令执行结果截图如图所示。
③ 查询 zhangsan 的 Computer 成绩。
查询 zhangsan 的 Computer 成绩的命令如下:
get 'student','zhangsan','score:Computer'
上述命令执行结果截图如图所示。

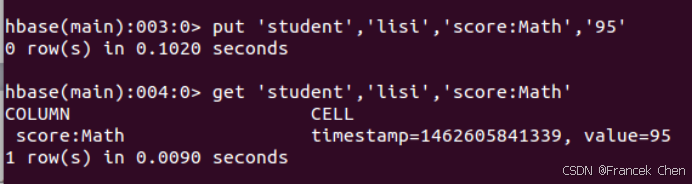
④ 修改 lisi 的 Math 成绩为 95。
修改 lisi 的 Math 成绩的命令如下:
put 'student','lisi','score:Math','95'
上述命令的执行结果截图如图所示。
(2)根据上面已经设计出的 Student 表,用 HBase API 编程实现以下操作。
① 向 Student 表中添加一条记录"scofield,45,89,100"。
实现添加数据的 Java 代码如下:
import java.io.IOException;
import org.apache.hadoop.conf.Configuration;
import org.apache.hadoop.hbase.HBaseConfiguration;
import org.apache.hadoop.hbase.TableName;
import org.apache.hadoop.hbase.client.Admin;
import org.apache.hadoop.hbase.client.Connection;
import org.apache.hadoop.hbase.client.ConnectionFactory;
import org.apache.hadoop.hbase.client.Put;
import org.apache.hadoop.hbase.client.Table;

public class hbase_insert {

    /**
     * @param args
     */
    public static Configuration configuration;
    public static Connection connection;
    public static Admin admin;

    public static void main(String[] args) {
        // TODO Auto-generated method stub
        configuration = HBaseConfiguration.create();
        configuration.set("hbase.rootdir", "hdfs://localhost:9000/hbase");
        try {
            connection = ConnectionFactory.createConnection(configuration);
            admin = connection.getAdmin();
        } catch (IOException e) {
            e.printStackTrace();
        }
        try {
            insertRow("student", "scofield", "score", "English", "45");
            insertRow("student", "scofield", "score", "Math", "89");
            insertRow("student", "scofield", "score", "Computer", "100");
        } catch (IOException e) {
            // TODO Auto-generated catch block
            e.printStackTrace();
        }
        close();
    }

    public static void insertRow(String tableName, String rowKey, String colFamily,
            String col, String val) throws IOException {
        Table table = connection.getTable(TableName.valueOf(tableName));
        Put put = new Put(rowKey.getBytes());
        put.addColumn(colFamily.getBytes(), col.getBytes(), val.getBytes());
        table.put(put);
        table.close();
    }

    public static void close() {
        try {
            if (admin != null) {
                admin.close();
            }
            if (null != connection) {
                connection.close();
            }
        } catch (IOException e) {
            e.printStackTrace();
        }
    }
}
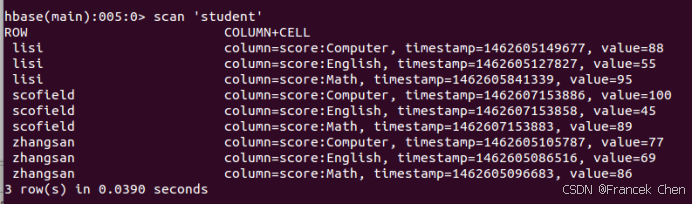
执行完上述代码以后,可以用 scan 命令输出数据库数据,以检验是否插入成功,执行结果截图如图所示。
② 获取 scofield 的 English 成绩信息。
Java 代码如下:
import java.io.IOException;
import org.apache.hadoop.conf.Configuration;
import org.apache.hadoop.hbase.Cell;
import org.apache.hadoop.hbase.CellUtil;
import org.apache.hadoop.hbase.HBaseConfiguration;
import org.apache.hadoop.hbase.TableName;
import org.apache.hadoop.hbase.client.Admin;
import org.apache.hadoop.hbase.client.Connection;
import org.apache.hadoop.hbase.client.ConnectionFactory;
import org.apache.hadoop.hbase.client.Get;
import org.apache.hadoop.hbase.client.Put;
import org.apache.hadoop.hbase.client.Result;
import org.apache.hadoop.hbase.client.Table;

public class hbase_query {

    /**
     * @param args
     */
    public static Configuration configuration;
    public static Connection connection;
    public static Admin admin;

    public static void main(String[] args) {
        // TODO Auto-generated method stub
        configuration = HBaseConfiguration.create();
        configuration.set("hbase.rootdir", "hdfs://localhost:9000/hbase");
        try {
            connection = ConnectionFactory.createConnection(configuration);
            admin = connection.getAdmin();
        } catch (IOException e) {
            e.printStackTrace();
        }
        try {
            getData("student", "scofield", "score", "English");
        } catch (IOException e) {
            // TODO Auto-generated catch block
            e.printStackTrace();
        }
        close();
    }

    public static void getData(String tableName, String rowKey, String colFamily,
            String col) throws IOException {
        Table table = connection.getTable(TableName.valueOf(tableName));
        Get get = new Get(rowKey.getBytes());
        get.addColumn(colFamily.getBytes(), col.getBytes());
        Result result = table.get(get);
        showCell(result);
        table.close();
    }

    public static void showCell(Result result) {
        Cell[] cells = result.rawCells();
        for (Cell cell : cells) {
            System.out.println("RowName:" + new String(CellUtil.cloneRow(cell)) + " ");
            System.out.println("Timetamp:" + cell.getTimestamp() + " ");
            System.out.println("column Family:" + new String(CellUtil.cloneFamily(cell)) + " ");
            System.out.println("row Name:" + new String(CellUtil.cloneQualifier(cell)) + " ");
            System.out.println("value:" + new String(CellUtil.cloneValue(cell)) + " ");
        }
    }

    public static void close() {
        try {
            if (admin != null) {
                admin.close();
            }
            if (null != connection) {
                connection.close();
            }
        } catch (IOException e) {
            e.printStackTrace();
        }
    }
}
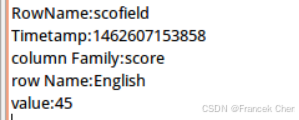
可以在 Eclipse 中执行上述代码,会在控制台中输出如下信息:
3. Redis数据库操作
Student 键值对如下:
zhangsan: {
    English: 69
    Math: 86
    Computer: 77
}
lisi: {
    English: 55
    Math: 100
    Computer: 88
}
(1)根据上面给出的键值对,完成如下操作。
① 用 Redis 的哈希结构设计出 Student 表(键值可以用 student.zhangsan 和 student.lisi 来表示两个键值属于同一个表)。
插入上述键值对的命令如下:
hset student.zhangsan English 69
hset student.zhangsan Math 86
hset student.zhangsan Computer 77
hset student.lisi English 55
hset student.lisi Math 100
hset student.lisi Computer 88
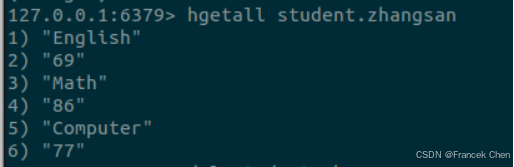
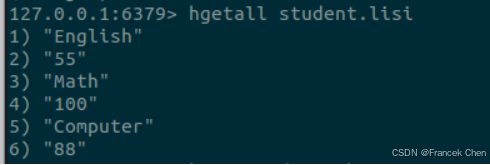
② 用 hgetall 命令分别输出 zhangsan 和 lisi 的成绩信息。
查询 zhangsan 成绩信息的命令如下:
hgetall student.zhangsan
执行该命令的结果截图如图所示。
查询lisi成绩信息的命令如下:
hgetall student.lisi
执行该命令的结果截图如图所示。
③ 用 hget 命令查询 zhangsan 的 Computer 成绩。
查询 zhangsan 的 Computer 成绩的命令如下:
hget student.zhangsan Computer
执行该命令的结果截图如图所示。

④ 修改 lisi 的 Math 成绩为 95。
修改 lis i的 Math 成绩的命令如下:
hset student.lisi Math 95
执行该命令的结果截图如图所示。

(2)根据已经设计出的 Student 表,用 Redis 的 Java 客户端(jedis)编程实现如下操作。
① 向 Student 表中添加如下所示的一条记录。
该数据对应的键值对形式如下:
scofield:{
    English: 45
    Math: 89
    Computer: 100
}
完成添加数据操作的 Java 代码如下:
import java.util.Map;
import redis.clients.jedis.Jedis;

public class jedis_test {

    /**
     * @param args
     */
    public static void main(String[] args) {
        // TODO Auto-generated method stub
        Jedis jedis = new Jedis("localhost");
        jedis.hset("student.scofield", "English", "45");
        jedis.hset("student.scofield", "Math", "89");
        jedis.hset("student.scofield", "Computer", "100");
        Map<String, String> value = jedis.hgetAll("student.scofield");
        for (Map.Entry<String, String> entry : value.entrySet()) {
            System.out.println(entry.getKey() + ":" + entry.getValue());
        }
    }
}
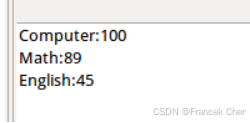
在 Eclipse 中执行程序时,需要添加 JAR 包 jedis-2.9.0.jar。在 Eclipse 中执行上述代码后,在 Eclipse 控制台输出的信息截图如图所示。
② 获取 scofield 的 English 成绩信息。
获取 scofield 的 English 成绩信息的 Java 代码如下:
import java.util.Map;
import redis.clients.jedis.Jedis;

public class jedis_query {

    /**
     * @param args
     */
    public static void main(String[] args) {
        // TODO Auto-generated method stub
        Jedis jedis = new Jedis("localhost");
        String value = jedis.hget("student.scofield", "English");
        System.out.println("scofield's English score is:    " + value);
    }
}
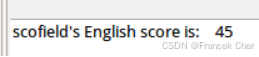
在 Eclipse 中执行上述代码后,在 Eclipse 控制台输出的信息截图如图所示。
4. MongoDB数据库操作
Student 文档如下:
{
    "name": "zhangsan",
    "score": {
        "English": 69,
        "Math": 86,
        "Computer": 77
    }
}
{
    "name": "lisi",
    "score": {
        "English": 55,
        "Math": 100,
        "Computer": 88
    }
}
(1)根据上面给出的文档,完成如下操作。
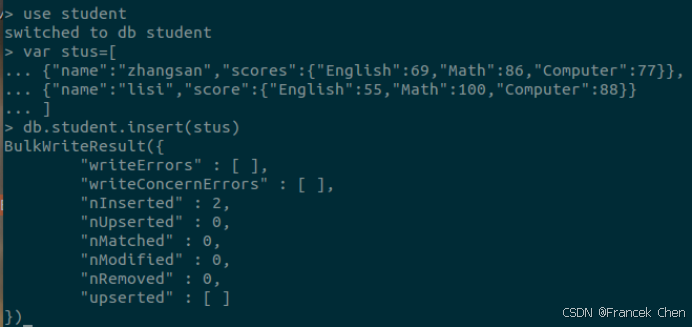
① 用 MongoDB Shell 设计出 Student 集合。
首先,切换到 student 集合,命令如下:
use student
其次,定义包含上述两个文档的数组,命令如下:
var stus=[
{"name":"zhangsan","scores":{"English":69,"Math":86,"Computer":77}},                    {"name":"lisi","score":{"English":55,"Math":100,"Computer":88}} ]
最后,调用如下命令插入数据库:
db.student.insert(stus)
上述命令及其执行结果的截图如图所示。
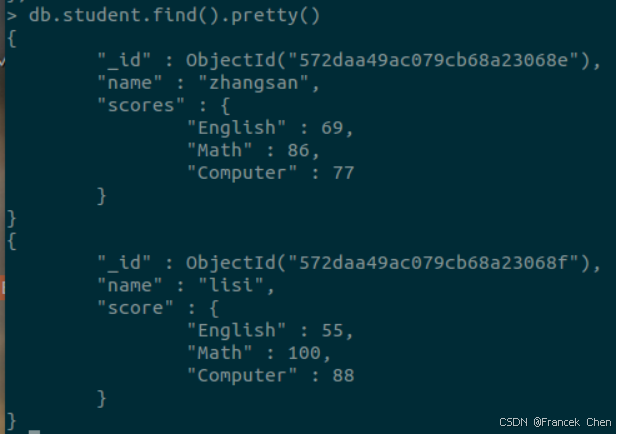
② 用 find() 方法输出两个学生的信息。
用 find() 方法输出两个学生信息的命令如下:
db.student.find().pretty()
上述命令及其执行结果的截图如图所示。
③ 用 find() 方法查询 zhangsan 的所有成绩(只显示 score 列)。
用 find 函数查询 zhangsan 的所有成绩的命令如下:
db.student.find({"name":"zhangsan"},{"_id":0,"name":0})
上述命令及其执行结果的截图如图所示。

④ 修改 lisi 的 Math 成绩为 95。
修改 lisi 的 Math 成绩的命令如下:
db.student.update({"name":"lisi"}, {"$set":{"score.Math":95}} )
上述命令及其执行结果的截图如图所示。

(2)根据上面已经设计出的 Student,用 MongoDB 的 Java 客户端编程,实现如下操作。
① 向 Student 表中添加如下所示的一条记录。
与上述数据对应的文档形式如下:
{
    "name": "scofield",
    "score": {
        "English": 45,
        "Math": 89,
        "Computer": 100
    }
}
实现上述添加数据操作的 Java 代码如下:
import java.util.ArrayList;
import java.util.List;

import org.bson.Document;
import com.mongodb.MongoClient;
import com.mongodb.client.MongoCollection;
import com.mongodb.client.MongoDatabase;

public class mongo_insert {

    /**
     * @param args
     */
    public static void main(String[] args) {
        // TODO Auto-generated method stub
        // 实例化一个mongo客户端
        MongoClient mongoClient = new MongoClient("localhost", 27017);
        // 实例化一个mongo数据库
        MongoDatabase mongoDatabase = mongoClient.getDatabase("student");
        // 获取数据库中某个集合
        MongoCollection<Document> collection = mongoDatabase.getCollection("student");
        // 实例化一个文档,内嵌一个子文档
        Document document = new Document("name", "scofield").
                append("score", new Document("English", 45).
                        append("Math", 89).
                        append("Computer", 100));
        List<Document> documents = new ArrayList<Document>();
        documents.add(document);
        // 将文档插入集合中
        collection.insertMany(documents);
        System.out.println("文档插入成功");
    }
}
运行上面的程序需要导入 mongo-java-driver-3.12.1.jar。
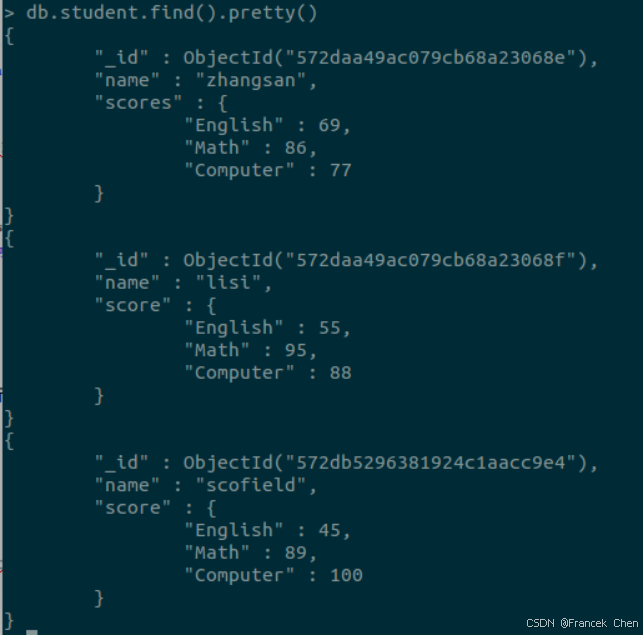
可以使用 find() 方法验证数据是否已经成功插入到 MongoDB 数据库中,具体命令及其执行结果截图如图所示。
② 获取 Scofield 的所有成绩信息(只显示 score 列)。
Java 代码如下:
import java.util.ArrayList;
import java.util.List;

import org.bson.Document;
import com.mongodb.MongoClient;
import com.mongodb.client.MongoCollection;
import com.mongodb.client.MongoCursor;
import com.mongodb.client.MongoDatabase;
import com.mongodb.client.model.Filters;
import static com.mongodb.client.model.Filters.eq;

public class mongo_query {

    /**
     * @param args
     */
    public static void main(String[] args) {
        // TODO Auto-generated method stub
        // 实例化一个mongo客户端
        MongoClient mongoClient = new MongoClient("localhost", 27017);
        // 实例化一个mongo数据库
        MongoDatabase mongoDatabase = mongoClient.getDatabase("student");
        // 获取数据库中某个集合
        MongoCollection<Document> collection = mongoDatabase.getCollection("student");
        // 进行数据查找,查询条件为name=scofield, 对获取的结果集只显示score这个域
        MongoCursor<Document> cursor = collection.find(new Document("name", "scofield")).
                projection(new Document("score", 1).append("_id", 0)).iterator();
        while (cursor.hasNext())
            System.out.println(cursor.next().toJson());
    }
}
小结
通过本次实验,我深入理解了四种数据库的核心差异。MySQL 作为关系型数据库,采用表格结构和 SQL 语言,强调事务一致性和数据完整性,适合结构化数据存储。HBase 是列族式 NoSQL数据库,基于 HDFS 构建,擅长海量数据的随机读写,适合大规模稀疏数据存储。Redis 是内存型键值数据库,支持多种数据结构如哈希、列表等,具有极高的读写性能,适合缓存和实时应用场景。MongoDB 是文档型数据库,以 BSON 格式存储数据,支持嵌套结构,具有灵活的 Schema 设计,适合半结构化和层次化数据。
在实践层面,我掌握了各数据库的 Shell 命令和 Java API 操作方法,包括表的创建、数据的增删改查等核心操作。通过对比四种数据库对同一学生成绩数据的插入、查询和更新操作,我深刻体会到不同数据库在数据模型、查询语言和适用场景上的差异,为今后在实际项目中选择合适的数据存储方案奠定了实践基础。
欢迎 点赞👍 | 收藏⭐ | 评论✍ | 关注🤗

更多推荐
 8
8 0
0- 0


 已为社区贡献47条内容

所有评论(0)