
Ansible 自动化部署 Kubernetes 集群
环境准备
1台 Master 10.8.0.48 4c 6g 2台 Worker 10.8.0.26 10.8.0.27 2c 2g
下载Ansible
下载阿里云 CentOS 7 基础源配置
curl -o /etc/yum.repos.d/CentOS-Base.repo https://mirrors.aliyun.com/repo/Centos-7.repo下载阿里云 EPEL 7 源配置(覆盖之前安装的 epel-release 生成的默认配置)
curl -o /etc/yum.repos.d/epel.repo https://mirrors.aliyun.com/repo/epel-7.repo清除旧缓存并生成新缓存
yum clean all && yum makecache安装 Ansible
yum install -y ansible
在/root下创建文件
hosts
[master]
.8.0.48[workers]
.8.0.26
.8.0.27[all:vars]
ansible_user=root
ansible_ssh_pass='你的虚拟机密码'
创建 deploy_k8s.yml 文件
---
# ================= 1. 全局环境初始化 =================
- name: 1. 全局环境初始化
hosts: all
become: yes
tasks:
# 自动修改主机名,防止 localhost 问题
- name: 配置主机名
hostname:
name: "{{ 'k8s-master' if ansible_host == '10.8.0.48' else 'k8s-worker-' + ansible_host.split('.')[-1] }}"# 自动配置 hosts 解析,防止 DNS 问题
- name: 配置所有节点的 /etc/hosts 解析
copy:
dest: /etc/hosts
content: |
127.0.0.1 localhost localhost.localdomain
10.8.0.48 k8s-master
10.8.0.26 k8s-worker-26
10.8.0.27 k8s-worker-27- name: 关闭防火墙和 SELinux
shell: |
systemctl stop firewalld && systemctl disable firewalld
setenforce 0 || true
sed -i 's/^SELINUX=enforcing$/SELINUX=disabled/' /etc/selinux/config
ignore_errors: yes- name: 永久关闭 Swap
shell: |
swapoff -a
sed -i '/ swap / s/^\(.*\)$/#\1/g' /etc/fstab- name: 加载必需的内核模块
modprobe:
name: "{{ item }}"
state: present
loop: [br_netfilter, overlay]- name: 配置内核网络参数
sysctl:
name: "{{ item.name }}"
value: "{{ item.value }}"
state: present
sysctl_set: yes
reload: yes
loop:
- { name: 'net.bridge.bridge-nf-call-iptables', value: '1' }
- { name: 'net.bridge.bridge-nf-call-ip6tables', value: '1' }
- { name: 'net.ipv4.ip_forward', value: '1' }# ================= 2. 安装 Containerd 与 K8s 组件 =================
- name: 2. 安装 Containerd 与 K8s 组件
hosts: all
become: yes
tasks:
- name: 安装基础依赖
yum:
name: [yum-utils, device-mapper-persistent-data, lvm2]
state: present- name: 添加 Docker/Containerd 阿里云 Yum 源
get_url:
url: https://mirrors.aliyun.com/docker-ce/linux/centos/docker-ce.repo
dest: /etc/yum.repos.d/docker-ce.repo
mode: '0644'- name: 安装 Containerd
yum:
name: containerd.io
state: present
update_cache: yes- name: 生成并配置 Containerd (开启 SystemdCgroup)
shell: |
mkdir -p /etc/containerd
containerd config default > /etc/containerd/config.toml
sed -i 's/SystemdCgroup = false/SystemdCgroup = true/' /etc/containerd/config.toml
sed -i 's|sandbox_image = ".*"|sandbox_image = "registry.aliyuncs.com/google_containers/pause:3.9"|' /etc/containerd/config.toml
args:
creates: /etc/containerd/config.toml.bak- name: 启动并设置 Containerd 开机自启
service:
name: containerd
state: started
enabled: yes- name: 添加 Kubernetes 阿里云 Yum 源
copy:
dest: /etc/yum.repos.d/kubernetes.repo
content: |
[kubernetes]
name=Kubernetes
baseurl=https://mirrors.aliyun.com/kubernetes-new/core/stable/v1.28/rpm/
enabled=1
gpgcheck=0- name: 安装 K8s 核心组件
yum:
name: [kubelet-1.28.2, kubeadm-1.28.2, kubectl-1.28.2]
state: present
update_cache: yes- name: 启动并设置 Kubelet 开机自启
service:
name: kubelet
state: started
enabled: yes# ================= 3. Master 节点初始化 =================
- name: 3. Master 节点初始化
hosts: master
become: yes
tasks:
- name: 初始化 K8s 集群 (使用阿里云镜像仓库)
shell: |
kubeadm init \
--apiserver-advertise-address=10.8.0.48 \
--image-repository registry.aliyuncs.com/google_containers \
--pod-network-cidr=10.244.0.0/16 \
--cri-socket=unix:///var/run/containerd/containerd.sock \
> /tmp/kubeadm-init.log 2>&1
args:
creates: /etc/kubernetes/admin.conf- name: 配置 kubectl 环境变量
shell: |
mkdir -p $HOME/.kube
cp -f /etc/kubernetes/admin.conf $HOME/.kube/config
chown $(id -u):$(id -g) $HOME/.kube/config- name: 获取 Join 命令
shell: kubeadm token create --print-join-command
register: join_command_raw- name: 设置 Join 命令变量
set_fact:
join_command: "{{ join_command_raw.stdout_lines[0] }}"# ================= 4. Worker 节点加入集群 =================
- name: 4. Worker 节点加入集群
hosts: workers
become: yes
tasks:
- name: 执行 Join 命令加入集群
shell: "{{ hostvars['10.8.0.48']['join_command'] }}"
args:
creates: /etc/kubernetes/kubelet.conf# ================= 5. 部署 Calico 网络插件 (彻底解决镜像墙) =================
- name: 5. 部署 Calico 网络插件
hosts: master
become: yes
tasks:
- name: 下载官方 Calico 配置文件
get_url:
url: https://docs.projectcalico.org/manifests/calico.yaml
dest: /tmp/calico.yaml- name: 替换 Calico 镜像地址为国内 DaoCloud 源
replace:
path: /tmp/calico.yaml
regexp: 'docker.io/calico/'
replace: 'docker.m.daocloud.io/calico/'- name: 应用 Calico 网络插件
shell: kubectl apply -f /tmp/calico.yaml
#在win上创建文件再上传,不容易出错。
在终端执行:
ansible-playbook -i /root/hosts /root/deploy_k8s.yml
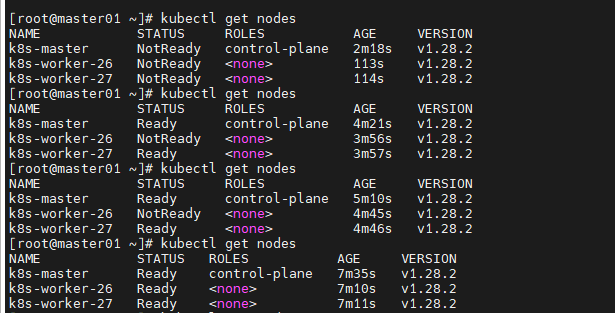
要等一段时间才会全部ready
更多推荐
 9
9 0
0- 0


 已为社区贡献1条内容

所有评论(0)