
分不清 MBR/GPT?Linux 硬盘分区、格式化、挂载一站式教程
Linux 硬盘分区管理
硬盘为什么要分区?
- 将操作系统文件与用户文件分隔开,避免应用数据太多撑满操作系统盘。
- 限制应用或用户的可用空间。
- 如果一个分区出现逻辑损坏,仅损坏该分区数据而不影响硬盘上其他分区。
- 用于创建交换分区。
- 限制磁盘空间使用,以提高诊断工具和备份镜像的性能。
- 便于定制文件系统,例如有的文件系统存放大量小文件,有的文件系统存放大量大文件。
MBR 分区方案
自 1982年以来,主启动记录(MBR-Master Boot Record)分区方案指定了在运行 BIOS 固件 的系统上如何对磁盘进行分区:
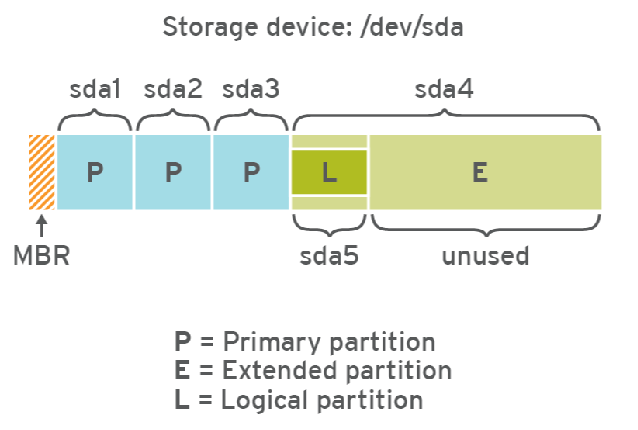
- 该方案支持最多4个主分区。
- 在 Linux系统上,管理员可以使用扩展分区和逻辑分区来创建最多 15个分区。
逻辑分区是可以格式化(format),扩展分区是不可以格式化。
- MBR 记录用4个字节(1byte=8bit)存储分区的总扇区数,最大能表示2的32次方的扇区个数,按每扇区512字节计算,每个分区最大不能超过 2 TiB。
类比为:笔记本只有4个usb接口,如果不够用,则将第四个usb接口外接扩展坞,由扩展坞提供多个usb接口。
通常,我们将磁盘第一个扇区称为主引导扇区,位于硬盘的柱面0、磁头0、扇区1的位置,这一扇区包含MBR引导代码,承担系统启动职能。它不属于磁盘上任何分区,因而分区空间内的格式化命令不能清除主引导记录的任何信息。
主引导扇区由三个部分组成:
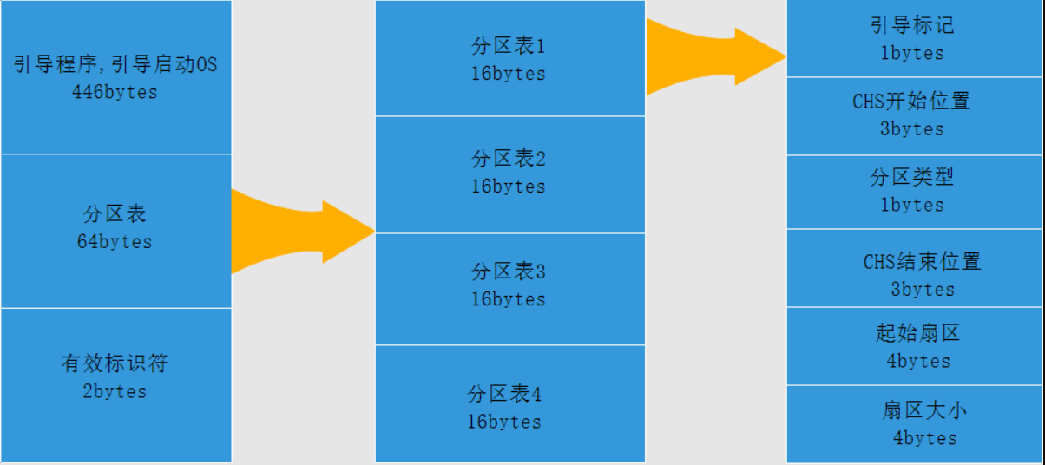
- 引导程序(占446个字节),硬盘启动时将系统控制权转给分区表中的某个操作系统。
- 磁盘分区表项(DPT,Disk Partition Table),由四个分区表项构成(每个16个字节)。
- 结束标志(占2个字节),其值为AA55(十六进制)。
fdisk 工具
fdisk 工具可用于管理采用 MBR 分区方案的磁盘,用户可以根据实际情况进行划分分区。
fdisk 命令语法
[root@centos7 ~]# fdisk -h
Usage:
 fdisk [options] <disk>    change partition table
 fdisk [options] -l <disk> list partition table(s)
 fdisk -s <partition>      give partition size(s) in blocks

Options:
 -b <size>             sector size (512, 1024, 2048 or 4096)
 -c[=<mode>]           compatible mode: 'dos' or 'nondos' (default)
 -h                    print this help text
 -u[=<unit>]           display units: 'cylinders' or 'sectors' (default)
 -v                    print program version
 -C <number>           specify the number of cylinders
 -H <number>           specify the number of heads
 -S <number>           specify the number of sectors per track
除了使用-l选项查看分区表,其他选项暂时都不用。
查看分区
fdisk工具大部分操作通过交互式完成,除了查看分区表。
DOS disklabel 指的硬盘管理方式是MBR。
我们使用上一章准备的一块硬盘/dev/sdb。
# 方法1:
[root@centos7 ~]# fdisk -l /dev/sdb

Disk /dev/sdb: 21.5 GB, 21474836480 bytes, 41943040 sectors
Units = sectors of 1 * 512 = 512 bytes
Sector size (logical/physical): 512 bytes / 512 bytes
I/O size (minimum/optimal): 512 bytes / 512 bytes
Disk label type: dos
Disk identifier: 0x78ceaffe

   Device Boot      Start         End      Blocks   Id  System
/dev/sdb1            2048    41943039    20970496   83  Linux

# 方法2:
[root@centos7 ~]# fdisk /dev/sdb
Welcome to fdisk (util-linux 2.23.2).

Changes will remain in memory only, until you decide to write them.
Be careful before using the write command.

# 输入m,查看帮助信息
Command (m for help): `m`
Command action
   a   toggle a bootable flag
   b   edit bsd disklabel
   c   toggle the dos compatibility flag
   d   delete a partition
   g   create a new empty GPT partition table
   G   create an IRIX (SGI) partition table
   l   list known partition types
   m   print this menu
   n   add a new partition
   o   create a new empty DOS partition table
   p   print the partition table
   q   quit without saving changes
   s   create a new empty Sun disklabel
   t   change a partition's system id
   u   change display/entry units
   v   verify the partition table
   w   write table to disk and exit
   x   extra functionality (experts only)

# 输入q,退出管理
Command (m for help): q
创建分区
# 输入n,创建一个新分区
Command (m for help): `n`

# 选择分区类型
Partition type:
   p   primary (0 primary, 0 extended, 4 free)
   e   extended
# 直接回车,选择默认分区类型:primary
Select (default p): `回车`
Using default response p

# 直接回车,分区号,使用默认值1
Partition number (1-4, default 1):

# 直接回车,设置分区起始位置为:默认值2048扇区,也就是1M位置。
First sector (2048-41943039, default 2048):
Using default value 2048

# 设置分区结束位置,输入+2G,也就是起始位置之后2
# 以当前起始扇区为起点,向后划分 2GiB 的连续空间作为1号分区

Last sector, +sectors or +size{K,M,G} (2048-41943039, default 41943039): +2G
Partition 1 of type Linux and of size 2 GiB is set

Command (m for help): p

Disk /dev/sdb: 21.5 GB, 21474836480 bytes, 41943040 sectors
Units = sectors of 1 * 512 = 512 bytes
Sector size (logical/physical): 512 bytes / 512 bytes
I/O size (minimum/optimal): 512 bytes / 512 bytes
Disk label type: dos
Disk identifier: 0x78ceaffe

   Device Boot      Start         End      Blocks   Id  System
/dev/sdb1            2048     4196351     2097152   83  Linux

# 输入w,保存更改并退出
# 输入q,不保存更改并退出
Command (m for help): w
The partition table has been altered!

Calling ioctl() to re-read partition table.
Syncing disks.

# 再次验证分区表变化
# lsblk:全称 list block,专门用来查看 Linux 块设备(硬盘、分区)结构的命令,能清晰看出「整块硬盘→下属分区」的树形层级。TYPE=part:partition 分区;MOUNTPOINT空白:重点说明:当前 sdb1 还没有挂载到任何目录,临时挂载、永久挂载都没生效。

[root@centos7 ~]# lsblk /dev/sdb
NAME   MAJ:MIN RM SIZE RO TYPE MOUNTPOINT
sdb      8:16   0  20G  0 disk
`-sdb1   8:17   0   2G  0 part
disk 和 part 区别?
disk = 整块硬盘,不能挂载使用;
part = 硬盘切出来的分区,格式化 + 挂载后才能存文件。
配套常用对比命令
- blkid /dev/sdb1:查看分区是否格式化、UUID、文件系统 xfs;
- df -h:只显示已经挂载的分区,未挂载的分区 df 看不到,lsblk 可以看到;
- lsblk -f /dev/sdb:加 - f 参数,额外显示文件系统、UUID,日常最实用。
注意:如果此时分区表未生成,执行以下命令,通知kernel重新生成分区表。有时候重启系统才会生成最新分区表。
[root@centos7 ~]# partprobe
删除分区
[root@centos7 ~]# fdisk /dev/sdb
Welcome to fdisk (util-linux 2.23.2).

Changes will remain in memory only, until you decide to write them.
Be careful before using the write command.

# 输入p,打印分区表
Command (m for help): p

Disk /dev/sdb: 21.5 GB, 21474836480 bytes, 41943040 sectors
Units = sectors of 1 * 512 = 512 bytes
Sector size (logical/physical): 512 bytes / 512 bytes
I/O size (minimum/optimal): 512 bytes / 512 bytes
Disk label type: dos
Disk identifier: 0x78ceaffe

   Device Boot      Start         End      Blocks   Id  System
/dev/sdb1            2048    41943039    20970496   83  Linux

# 输入d,删除分区,因为只有1个分区,所以自动删除了第一个分区
Command (m for help): `d`
Selected partition 1
Partition 1 is deleted

Command (m for help): p

Disk /dev/sdb: 21.5 GB, 21474836480 bytes, 41943040 sectors
Units = sectors of 1 * 512 = 512 bytes
Sector size (logical/physical): 512 bytes / 512 bytes
I/O size (minimum/optimal): 512 bytes / 512 bytes
Disk label type: dos
Disk identifier: 0x78ceaffe

   Device Boot      Start         End      Blocks   Id  System
如果硬盘空间比较大,需要的文件系统数量超过4个,那么就需要借助扩展分区创建逻辑分区了。
如下示例,创建第4个分区的时候,类型选择扩展分区;创建第5个分区的时候,类型选择逻辑分区。
[root@centos7 ~]# fdisk /dev/sdb
Welcome to fdisk (util-linux 2.23.2).

Changes will remain in memory only, until you decide to write them.
Be careful before using the write command.

# 再次创建一个容量为3G的分区
Command (m for help): n
Partition type:
   p   primary (1 primary, 0 extended, 3 free)
   e   extended
Select (default p):
Using default response p
Partition number (2-4, default 2):
First sector (4196352-41943039, default 4196352):
Using default value 4196352
Last sector, +sectors or +size{K,M,G} (4196352-41943039, default 41943039): +3G
Partition 2 of type Linux and of size 3 GiB is set

# 再次创建一个容量为4G的分区
Command (m for help): n
Partition type:
   p   primary (2 primary, 0 extended, 2 free)
   e   extended
Select (default p):
Using default response p
Partition number (3,4, default 3):
First sector (10487808-41943039, default 10487808):
Using default value 10487808
Last sector, +sectors or +size{K,M,G} (10487808-41943039, default 41943039): +4G
Partition 3 of type Linux and of size 4 GiB is set

# 创建第4个分区的时候,选择扩展分区,并且使用剩余所有容量
Command (m for help): n
Partition type:
   p   primary (3 primary, 0 extended, 1 free)
   e   extended
Select (default e):
Using default response e
Selected partition 4
First sector (18876416-41943039, default 18876416):
Using default value 18876416
Last sector, +sectors or +size{K,M,G} (18876416-41943039, default 41943039):
Using default value 41943039
Partition 4 of type Extended and of size 11 GiB is set

# 创建第5个分区:在扩展分区中,创建逻辑分区,分配5G容量
Command (m for help): n
All primary partitions are in use
Adding logical partition 5
First sector (18878464-41943039, default 18878464):
Using default value 18878464
Last sector, +sectors or +size{K,M,G} (18878464-41943039, default 41943039): +5G
Partition 5 of type Linux and of size 5 GiB is set

Command (m for help): p

Disk /dev/sdb: 21.5 GB, 21474836480 bytes, 41943040 sectors
Units = sectors of 1 * 512 = 512 bytes
Sector size (logical/physical): 512 bytes / 512 bytes
I/O size (minimum/optimal): 512 bytes / 512 bytes
Disk label type: dos
Disk identifier: 0x78ceaffe

   Device Boot      Start         End      Blocks   Id  System
/dev/sdb1            2048     4196351     2097152   83  Linux
/dev/sdb2         4196352    10487807     3145728   83  Linux
/dev/sdb3        10487808    18876415     4194304   83  Linux
/dev/sdb4        18876416    41943039    11533312    5  Extended
/dev/sdb5        18878464    29364223     5242880   83  Linux

Command (m for help): w
The partition table has been altered!

Calling ioctl() to re-read partition table.
Syncing disks.

# 查看分区表
[root@centos7 ~]# lsblk /dev/sdb
NAME   MAJ:MIN RM SIZE RO TYPE MOUNTPOINT
sdb      8:16   0  20G  0 disk
|-sdb1   8:17   0   2G  0 part
|-sdb2   8:18   0   3G  0 part
|-sdb3   8:19   0   4G  0 part
|-sdb4   8:20   0   1K  0 part
|-sdb5   8:21   0   5G  0 part
创建分区演示完成,只保留1个分区,多余的删除。
[root@centos7 ~]# fdisk /dev/sdb
Welcome to fdisk (util-linux 2.23.2).

Changes will remain in memory only, until you decide to write them.
Be careful before using the write command.


Command (m for help): d
Partition number (1-5, default 5):
Partition 5 is deleted

Command (m for help): d
Partition number (1-4, default 4):
Partition 4 is deleted

Command (m for help): d
Partition number (1-3, default 3):
Partition 3 is deleted

Command (m for help): d
Partition number (1,2, default 2):
Partition 2 is deleted

Command (m for help): d
Selected partition 1
Partition 1 is deleted

Command (m for help): w
The partition table has been altered!

Calling ioctl() to re-read partition table.
Syncing disks.
非交互方式管理
示例1:创建一个分区
# 将要执行的fdisk命令行写入到一个文本文件
[root@centos7 ~]# vim fdisk-create.txt
n
p
1
2048
+2G
p
w

# 执行
[root@centos7 ~]# fdisk /dev/sdb < fdisk-create.txt
[root@centos7 ~]# lsblk /dev/sdb
NAME   MAJ:MIN RM SIZE RO TYPE MOUNTPOINT
sdb      8:16   0  20G  0 disk
|-sdb1   8:17   0   2G  0 part
示例2:删除一个分区
# 将要执行的fdisk命令行写入到一个文本文件
[root@centos7 ~]# vim fdisk-delete.txt
d
p
w

# 执行
[root@centos7 ~]# fdisk /dev/sdb < fdisk-delete.txt
[root@centos7 ~]# lsblk /dev/sdb
NAME MAJ:MIN RM SIZE RO TYPE MOUNTPOINT
sdb    8:16   0  20G  0 disk
GPT 分区方案
GPT是运行统一可扩展固件接口(UEFI)固件系统上硬盘分区表的标准。
-
MBR分区方案只能管理最大2TiB分区和磁盘。全局唯一标识分区表(GPT,GUID Partition Table)使用8个字节(1byte=8bit)存储分区的总扇区数,可支持最多18 ZiB(=264*512 Byte),即18亿太字节的分区和磁盘。
-
MBR分区方案支持最多15个分区。GPT分区方案最多可提供128个分区。
-
GPT 提供分区表信息的冗余。GPT 冗余是磁盘尾部存放完整 GPT 备份,主分区表损坏可从备份恢复。
GPT 优势:分区冗余备份、分区数量多、支持超大硬盘
GPT分区表结构如下:
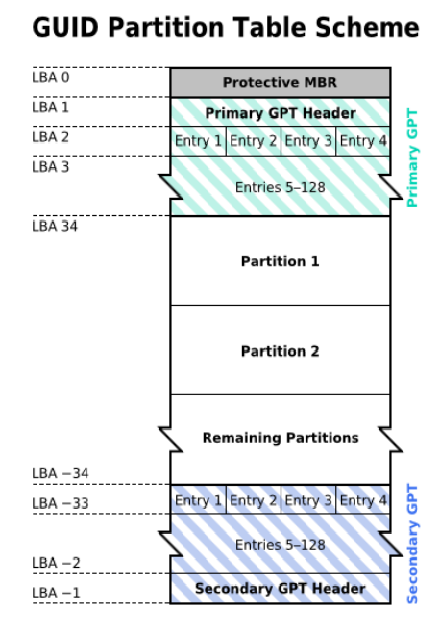
LBA 就是硬盘扇区编号,LBA0 = 硬盘最开头第 1 个扇区,LBA1 = 第二个;LBA-1、LBA-34 代表硬盘最后倒数扇区。
-
LBA0(保护性MBR),分为两个部分:
-
第一部分是与MBR中446字节相似的区块,用于存放第一阶段的启动引导程序。
-
第二部分是与MBR分区表记录区对应,该区域存储一个特殊标识符0xEE,用于表示该磁盘为GPT格式。若磁盘管理程序(比较老的软件)无法识别该磁盘,不能修改这个分区信息,进一步保护磁盘。告诉老旧软件:这是 GPT 盘,你看不懂别乱修改破坏分区;
-
-
LBA1(GPT表头记录),记录了分区表自身的位置和大小,同时也记录了前面提到备份用的GPT分区所在位置(最后34个LBA),还放置了分区表的校验码(CRC32),校验码的作用是让操作系统判断GPT的正确与否,倘若发现错误则可以从备份的GPT中恢复正常运行。总的来说,GPT 表头作用:记录分区表位置、备份位置、CRC 校验码,校验分区表完整性。
-
LBA2-33(主分区条目),记录分区信息,每个LBA可以提供4组的分区记录,默认情况下可以有4×32=128组分区记录。因为每个LBA都有512字节,所以每组分区记录所占128字节,除去每组记录需要的标识符和相关记录信息外,GPT在每组记录中提供了64位记载分区的扇区总数。
-
详细计算过程:1 个扇区 512 字节,规定1 个分区条目 = 128 字节
单个扇区可放:512÷128=4个分区记录
32 个扇区总条目:32×4=128条 → 对应 GPT 最多 128 个分区。每条条目里写着:分区叫啥名字、分区从哪个扇区开始、到哪个扇区结束、分区类型、唯一 GUID 编号。 -
**LBA34 ~ 倒数 34 个扇区之前:**实际分区区域(真正用来存文件的)
前面所有 LBA0~33 都只是目录表格,不存文档、软件、照片。
从 LBA34 开始,才是一块块实实在在的分区,也就是我们挂载、格式化、存放数据的空间,图里 Partition1、Partition2 就是划分好的房间。 -
硬盘末尾:Secondary GPT 备份 GPT(备用登记表,整套镜像复制)
在硬盘最后 34 个扇区,完全复制了前面整套主 GPT:
倒数 34~ 倒数 2 扇区:和 LBA2~33 一模一样,128 条分区条目备份;
最后 LBA-1(倒数第 1 扇区):备份 GPT 表头。
核心意义:
前面开头的主 GPT 表格误删、损坏、硬盘开头坏道,系统直接读取末尾备用 GPT,分区不会丢失,这就是 GPT 的冗余容错,MBR 没有备份,坏了直接寄。 -
虽然GPT最大支持128个分区,但是实际使用过程中分区超过第120个会出现无法格式化使用的情况。
gdisk 工具
gdisk工具用于管理采用GPT分区方案的磁盘分区,主要用于管理磁盘容量超过2T的磁盘。
gdisk≠只看 GPT:gdisk 可以识别 MBR,只是会临时模拟 GPT 展示;查看原生 MBR 更推荐fdisk -l /dev/sdb。
gdisk命令语法
gdisk [ -l ] device
查看分区表
查看、修改硬盘分区必须 root 权限,普通用户执行会权限不足报错。
**/dev/sdb:**Linux 硬盘设备文件名
/dev:系统存放硬件设备文件的目录;sd:SATA/SCSI/U 盘通用硬盘标识;- 命名规则:sda = 第一块硬盘、sdb = 第二块硬盘、sdc = 第三块……
- 后缀数字是分区:sdb1、sdb2 代表 sdb 硬盘的 1、2 号分区。
#  -l=list查看,只读模式:只会打印分区信息,不会写入、修改、删除分区。
# 只读查看第二块物理硬盘
[root@centos7 ~]# gdisk -l /dev/sdb

GPT fdisk (gdisk) version 0.8.10  # 当前使用的 gdisk 工具版本为 0.8.10。

# 这里显示识别到了MBR分区方案
Partition table scan:
  MBR: MBR only     # 这块硬盘只有老式 MBR 分区表;
  BSD: not present
  APM: not present
  GPT: not present   # 没有 GPT 分区表;


***************************************************************
Found invalid GPT and valid MBR; converting MBR to GPT format
in memory.    # 系统没找到合法 GPT 分区,但找到了正常可用的 MBR 分区;但找到了正常可用的 MBR 分区;仅在内存中临时把 MBR 翻译成 GPT 格式展示,不会修改硬盘本身!
***************************************************************

Disk /dev/sdb: 41943040 sectors, 20.0 GiB   # 总扇区:41943040 个扇区,总容量 20GiB;
Logical sector size: 512 bytes   # 逻辑扇区大小:1 扇区固定 512 字节
Disk identifier (GUID): 1038836E-C6BD-48D3-A490-8FFF2133146B
Partition table holds up to 128 entries   # GPT 标准:最多支持 128 个分区条目;
First usable sector is 34, last usable sector is 41943006  #  LBA0~LBA33 存放分区表,真正存放数据的分区从 LBA34 开始,这是 GPT 固定规则;
Partitions will be aligned on 2048-sector boundaries   # 分区对齐,从 2048 扇区开始划分分区,是 Linux 硬盘优化规范,提升读写速度。
Total free space is 41942973 sectors (20.0 GiB)  # 整块硬盘所有扇区都是空闲未划分状态,没有任何分区,20G 全部是空的。

Number  Start (sector)    End (sector)  Size       Code  Name
表头说明
Number Start (sector) End (sector) Size Code Name
这是分区列表表头,含义:
-
Number:分区编号;
-
Start (sector):分区起始扇区;
-
End (sector):分区结束扇区;
-
Size:分区大小;
-
Code:分区类型编码(区分 linux、windows、swap 交换分区等);
-
Name:分区自定义名称。
因为硬盘无分区,表头下方没有任何分区条目。
关键知识点:
-l是只读模式,绝对不会把 MBR 真正转成 GPT 写入硬盘;- 仅仅是 gdisk 为了统一展示格式,在内存临时模拟转换,关掉终端、命令结束,临时转换立刻消失,硬盘依旧是 MBR。
- 只有不加
-l进入交互界面手动确认写入,才会永久把 MBR 改成 GPT。
转换分区表方案
gdisk工具用于管理gpt分区,所以我们需要将磁盘的分区管理方案由MBR转换成GPT。
#  不带-l直接执行gdisk /dev/sdb,会进入交互式编辑界面,
[root@centos7 ~]# gdisk /dev/sdb
GPT fdisk (gdisk) version 0.8.10

Partition table scan:
  MBR: MBR only
  BSD: not present
  APM: not present
  GPT: not present


***************************************************************
Found invalid GPT and valid MBR; converting MBR to GPT format
in memory. THIS OPERATION IS POTENTIALLY DESTRUCTIVE! Exit by
typing 'q' if you don't want to convert your MBR partitions
to GPT format!
***************************************************************

# 输入?,查看帮助信息。gdisk管理命令跟fdisk很相似。
Command (? for help): ?
b	back up GPT data to a file  # 备份GPT分区表到文件
c	change a partition's name   # 修改分区名称
d	delete a partition   # 删除指定分区
i	show detailed information on a partition  # 查看某个分区的详细参数
l	list known partition types  # 查看所有分区类型编码
n	add a new partition #  创建新分区
o	create a new empty GUID partition table (GPT) #  清空磁盘,新建空白GPT分区表(高危)
p	print the partition table   # 打印查看当前内存中的分区表
q	quit without saving changes  #  直接退出,**放弃所有内存改动,不写入硬盘**
r	recovery and transformation options (experts only)  # 分区修复、格式转换(专家模式,新手不用)
s	sort partitions 自动重新排序分区编号
t	change a partition's type code
v	verify disk  校验磁盘分区完整性
w	write table to disk and exit  将内存里的所有修改写入硬盘,永久生效,然后退出
x	extra functionality (experts only)
?	print this menu

# 输入o,将磁盘的分区管理方案由MBR转换成GPT
#  系统提示:该操作会删除全部分区,同时生成 GPT 必备的保护性 MBR
Command (? for help): o
This option deletes all partitions and creates a new protective MBR.
Proceed? (Y/N): Y    # 输入 Y 确认:内存中立刻抹除 MBR,生成空白 GPT 框架,此时改动依旧只在内存,硬盘没变。

# 输入p,查看分区表
Command (? for help): p
Disk /dev/sdb: 41943040 sectors, 20.0 GiB
Logical sector size: 512 bytes
Disk identifier (GUID): 99FE6E5F-8316-428D-BA81-D824C786CC43
Partition table holds up to 128 entries
First usable sector is 34, last usable sector is 41943006
Partitions will be aligned on 2048-sector boundaries
Total free space is 41942973 sectors (20.0 GiB)

Number  Start (sector)    End (sector)  Size       Code  Name

# 输入w,保存更改并退出
# 输入q,不保存更改并退出
Command (? for help): w

Final checks complete. About to write GPT data. THIS WILL OVERWRITE EXISTING
PARTITIONS!!

Do you want to proceed? (Y/N): Y
OK; writing new GUID partition table (GPT) to /dev/sdb.
The operation has completed successfully.
创建分区
GPT 上限:最多 128 个分区
[root@centos7 ~]# gdisk /dev/sdb
GPT fdisk (gdisk) version 0.8.10

# 这里识别到了GPT分区方案
Partition table scan:
  MBR: protective
  BSD: not present
  APM: not present
  GPT: present

Found valid GPT with protective MBR; using GPT.

# 输入n,创建新分区  n=new
Command (? for help): `n`

# 设置分区ID
Partition number (1-128, default 1): `回车`
# 含义:分区编号,GPT 支持 1~128 号分区,默认自动分配 1 号,回车使用默认 1 号分区。

# 设置分区起始位置
# 理论起始扇区最小为 34(GPT 前 34 个 LBA 存放分区表,不能占用);默认起始 2048 扇区:Linux 行业标准2048 扇区对齐,优化硬盘读写性能,
First sector (34-41943006, default = 2048) or {+-}size{KMGTP}: `回车`

# 设置分区结束位置
# +2G 代表:这个分区固定占用 2GB 空间。
# +数字单位:从起始扇区往后划定固定大小分区;K=KB、M=MB、G=GB、T=TB、P=PB;
不写+直接填数字,代表指定结束扇区编号。
Last sector (2048-41943006, default = 41943006) or {+-}size{KMGTP}: `+2G`
Current type is 'Linux filesystem'

# 设置分区类型,输入L查看所有分区类型,L=list,查看全部分区类型十六进制编码
# 8300:Linux 文件系统,日常存放普通文件、目录最常用类型;
Hex code or GUID (L to show codes, Enter = 8300): `L`
0700 Microsoft basic data  0c01 Microsoft reserved    2700 Windows RE
3000 ONIE boot             3001 ONIE config           4100 PowerPC PReP boot
4200 Windows LDM data      4201 Windows LDM metadata  7501 IBM GPFS
7f00 ChromeOS kernel       7f01 ChromeOS root         7f02 ChromeOS reserved
8200 Linux swap            8300 Linux filesystem      8301 Linux reserved
8302 Linux /home           8400 Intel Rapid Start     8e00 Linux LVM
a500 FreeBSD disklabel     a501 FreeBSD boot          a502 FreeBSD swap
a503 FreeBSD UFS           a504 FreeBSD ZFS           a505 FreeBSD Vinum/RAID
a580 Midnight BSD data     a581 Midnight BSD boot     a582 Midnight BSD swap
a583 Midnight BSD UFS      a584 Midnight BSD ZFS      a585 Midnight BSD Vinum
a800 Apple UFS             a901 NetBSD swap           a902 NetBSD FFS
a903 NetBSD LFS            a904 NetBSD concatenated   a905 NetBSD encrypted
a906 NetBSD RAID           ab00 Apple boot            af00 Apple HFS/HFS+
af01 Apple RAID            af02 Apple RAID offline    af03 Apple label
af04 AppleTV recovery      af05 Apple Core Storage    be00 Solaris boot
bf00 Solaris root          bf01 Solaris /usr & Mac Z  bf02 Solaris swap
bf03 Solaris backup        bf04 Solaris /var          bf05 Solaris /home
bf06 Solaris alternate se  bf07 Solaris Reserved 1    bf08 Solaris Reserved 2
bf09 Solaris Reserved 3    bf0a Solaris Reserved 4    bf0b Solaris Reserved 5
c001 HP-UX data            c002 HP-UX service         ea00 Freedesktop $BOOT
eb00 Haiku BFS             ed00 Sony system partitio  ed01 Lenovo system partit

# 输入回车继续查看
Press the <Enter> key to see more codes:`回车`
ef00 EFI System            ef01 MBR partition scheme  ef02 BIOS boot partition
fb00 VMWare VMFS           fb01 VMWare reserved       fc00 VMWare kcore crash p
fd00 Linux RAID

# 输入回车,选择默认分区类型
Hex code or GUID (L to show codes, Enter = 8300):
Changed type of partition to 'Linux filesystem'

# 输入p,查看分区表
Command (? for help): p
Disk /dev/sdb: 41943040 sectors, 20.0 GiB
Logical sector size: 512 bytes
Disk identifier (GUID): 1A3D170A-56FC-4655-8B9C-01E1B89294FE
Partition table holds up to 128 entries
First usable sector is 34, last usable sector is 41943006
Partitions will be aligned on 2048-sector boundaries
Total free space is 37748669 sectors (18.0 GiB)

Number  Start (sector)    End (sector)  Size       Code  Name
   1            2048         4196351   2.0 GiB     8300  Linux filesystem
# 剩余空闲空间从 20G 变为 18G,2G 空间划分给 1 号分区。
更改分区名称
# 输入c,修改分区ID为1的分区名 c=change name
Command (? for help): c
Using 1
# 输入新名称
Enter name: data01

# 查看分区表
Command (? for help): p
Disk /dev/sdb: 41943040 sectors, 20.0 GiB
Logical sector size: 512 bytes
Disk identifier (GUID): 1A3D170A-56FC-4655-8B9C-01E1B89294FE
Partition table holds up to 128 entries
First usable sector is 34, last usable sector is 41943006
Partitions will be aligned on 2048-sector boundaries
Total free space is 37748669 sectors (18.0 GiB)

Number  Start (sector)    End (sector)  Size       Code  Name
   1            2048         4196351   2.0 GiB     8300  data01
查看分区详细信息
#  i=information,查看单个分区完整详情
Command (? for help): i
Using 1
Partition GUID code: 0FC63DAF-8483-4772-8E79-3D69D8477DE4 (Linux filesystem)
Partition unique GUID: 19AE5CDC-1AB2-4EBA-B9E2-AE9E7BF42653
First sector: 2048 (at 1024.0 KiB)
Last sector: 4196351 (at 2.0 GiB)
Partition size: 4194304 sectors (2.0 GiB)
Attribute flags: 0000000000000000
Partition name: 'data01'
删除分区
# 输入d,删除分区ID为1的分区 d=delete 删除分区;
Command (? for help): d
Using 1

# 分区列表清空,硬盘恢复 20G 全空闲状态。
⚠️ 重点:此时只是内存删除,硬盘分区表没有变化。
Command (? for help): p
Disk /dev/sdb: 41943040 sectors, 20.0 GiB
Logical sector size: 512 bytes
Disk identifier (GUID): 1A3D170A-56FC-4655-8B9C-01E1B89294FE
Partition table holds up to 128 entries
First usable sector is 34, last usable sector is 41943006
Partitions will be aligned on 2048-sector boundaries
Total free space is 41942973 sectors (20.0 GiB)

Number  Start (sector)    End (sector)  Size       Code  Name

# w 写入磁盘,永久生效。分区彻底删除,磁盘回到空白 GPT 状态。
Command (? for help): w

Final checks complete. About to write GPT data. THIS WILL OVERWRITE EXISTING
PARTITIONS!!

Do you want to proceed? (Y/N): Y
OK; writing new GUID partition table (GPT) to /dev/sdb.
The operation has completed successfully.
wipefs 工具
作用:查看和清除磁盘管理信息。
语法:
wipefs [选项] 磁盘/分区路径
常用对象:整块硬盘/dev/sdb、单个分区/dev/sdb1。
普通-a会拒绝清理已挂载的设备;-f可以强行抹除挂载设备的标识;
-a执行效果:
- 擦掉 GPT/MBR 分区标识、ext4/xfs/swap 等文件系统标识;
- 磁盘变为 “无任何标识的空白裸盘”,适合重新划分分区。
注意:数据无价,操作需谨慎,最好提前备份。
# 查看磁盘管理信息
[root@centos7 ~]# wipefs /dev/sdb

# 清除未挂载磁盘的分区表 -a = all,删除该设备上检测到的所有文件系统、分区表签名。
[root@centos7 ~]# wipefs -a /dev/sdb

# 禁止使用 -f 强制清除分区表  -a:清除全部标识;
# -f = force,强制清除。
[root@centos7 ~]# wipefs -fa /dev/sdb
执行完 wipefs 后,用什么命令查看验证清理效果?
方式 1:再次执行 wipefs 自查(最直观)
wipefs /dev/sdb
- 清理成功:终端无任何输出,代表没有任何分区、文件系统标签;
- 清理失败:依旧列出 gpt/mbr/ext4 等标识。
方式 2:gdisk /fdisk 查看分区表
- 查看 GPT/MBR 分区表:
gdisk -l /dev/sdb
# 或者查看MBR
fdisk -l /dev/sdb
清理成功:提示无有效 GPT、MBR 分区表,无分区列表。
方式 3:lsblk 查看磁盘文件系统(推荐日常使用)
lsblk -f /dev/sdb
-f:专门展示文件系统类型;- 清理成功:
FSTYPE列全部为空,无文件系统、分区格式标识。
方式 4:blkid 查看设备 UUID(系统识别标识)
blkid /dev/sdb
-
blkid 用来读取系统识别的磁盘 UUID、文件系统;
-
清理成功:无任何输出,系统识别不到磁盘格式。
实操高频注意事项(避坑 + 考点)
-
wipefs ≠ 格式化
wipefs 只删头部标签,数据还在磁盘;
mkfs格式化才会清空数据、重建文件系统。 -
未挂载磁盘:
wipefs -a足够使用,严禁加-f; -
挂载磁盘:绝对禁止
-fa,会直接损坏正在使用的文件系统; -
清理分区
sdb1:wipefs -a /dev/sdb1;清理整块硬盘sdb:wipefs -a /dev/sdb; -
清理分区表后,必须用 gdisk/fdisk 重新建立分区表,磁盘才能正常划分分区。
管理硬盘
parted 工具
parted 工具既可以管理采用MBR分区方案的磁盘,又可以管理采用GPT分区方案的磁盘。
GPT 和 MBR 在 parted 中的区别
-
GPT:mkpart 后可直接跟自定义名称;
格式:
mkpart 分区名 类型 起点 终点 -
MBR (msdos):不支持自定义名称,只能写分区类型 primary/extended/logical;
格式:
mkpart primary 起点 终点
parted 命令同时支持交互式操作和非交互式操作(编写脚本)。
我们先来看看交互式操作。
操作流程:
- 查看分区表。如果是未初始化硬盘,创建分区。
- 设置单位(MiB)
- 创建分区
- 调整分区大小
- 调整分区类型
- 删除分区
parted 实时写入磁盘,无内存缓存,一旦创建无法撤回,删除分区只能用parted /dev/sdb rm 编号。
查看分区表
[root@centos7 ~]# parted /dev/sdb
GNU Parted 3.1
Using /dev/sdb

# 查看帮助,输入help
Welcome to GNU Parted! Type 'help' to view a list of commands.
(parted) `help`
  align-check TYPE N                        check partition N for TYPE(min|opt) alignment
  help [COMMAND]                           print general help, or help on COMMAND
  mklabel,mktable LABEL-TYPE               create a new disklabel (partition table)
  mkpart PART-TYPE [FS-TYPE] START END     make a partition
  name NUMBER NAME                         name partition NUMBER as NAME
  print [devices|free|list,all|NUMBER]     display the partition table, available devices,
        free space, all found partitions, or a particular partition
  quit                                     exit program
  rescue START END                         rescue a lost partition near START and END

  resizepart NUMBER END                    resize partition NUMBER
  rm NUMBER                                delete partition NUMBER
  select DEVICE                            choose the device to edit
  disk_set FLAG STATE                      change the FLAG on selected device
  disk_toggle [FLAG]                       toggle the state of FLAG on selected device
  set NUMBER FLAG STATE                    change the FLAG on partition NUMBER
  toggle [NUMBER [FLAG]]                   toggle the state of FLAG on partition NUMBER
  unit UNIT                                set the default unit to UNIT
  version                                  display the version number and copyright
        information of GNU Parted

# 查看分区表,输入 print
(parted) `print`
Model: VMware, VMware Virtual S (scsi)
Disk /dev/sdb: 21.5GB
Sector size (logical/physical): 512B/512B
Partition Table: gpt
Disk Flags:

Number  Start  End  Size  File system  Name  Flags
设置单位
parted工具默认单位是MB(103K),设置为MiB(210KiB)
(parted) unit MiB
管理 MBR 磁盘
设置磁盘分区管理方案
# 输入mklabel或mktable设置磁盘分区管理方案
# 设置分区方案为msdos,也就是MBR,输入mklabel msdos
(parted) `mklabel msdos`
Warning: The existing disk label on /dev/sdb will be destroyed and all data on this disk will
be lost. Do you want to continue?
# 确认更改,输入y
Yes/No? `y`
(parted) print
Model: VMware, VMware Virtual S (scsi)
Disk /dev/sdb: 21.5GB
Sector size (logical/physical): 512B/512B
# 分区表已改成msdos
Partition Table: `msdos`
Disk Flags:

Number  Start  End  Size  Type  File system  Flags
**注意:**parted命令所做更改立刻生效。
创建分区
# 创建分区,输入 mkpart
(parted) `mkpart`

# 设置分区类型,输入 primary
Partition type?  primary/extended? `primary`

# 设置分区文件系统类型,输入 xfs,实际不生效,格式化文件系统仍需手动操作
File system type?  [ext2]? `xfs`

# 设置分区起始位置,输入 1
Start? `1`

# 设置分区结束位置,输入 2049
End? `2049`
(parted) `print`
Model: VMware, VMware Virtual S (scsi)
Disk /dev/sdb: 20480MiB
Sector size (logical/physical): 512B/512B
Partition Table: msdos
Disk Flags:

Number  Start    End      Size     Type     File system  Flags
 1      1.00MiB  2049MiB  2048MiB  primary  xfs
扩展分区容量
# 1 代表分区号,4097代表分区结束位置
(parted) resizepart 1 4097
(parted) print
Model: VMware, VMware Virtual S (scsi)
Disk /dev/sdb: 20480MiB
Sector size (logical/physical): 512B/512B
Partition Table: msdos
Disk Flags:

Number  Start    End      Size     Type     File system  Flags
 1      1.00MiB  4097MiB  4096MiB  primary  xfs
删除分区
# 1 代表分区号
(parted) rm 1
(parted) print
Model: VMware, VMware Virtual S (scsi)
Disk /dev/sdb: 20480MiB
Sector size (logical/physical): 512B/512B
Partition Table: msdos
Disk Flags:

Number  Start  End  Size  Type  File system  Flags
免交互操作
4 个高频指令速记
| 命令 | 作用 |
|---|---|
| mklabel msdos/gpt | 新建 MBR/GPT 分区表 |
| mkpart primary | 新建主分区 |
| resizepart 编号 结束值 | 调整分区大小 |
| rm 编号 | 删除指定分区 |
| 查看分区表 |
# 设置磁盘分区管理方案
# parted /dev/sdb:指定操作第二块硬盘   mklabel:新建磁盘分区标签(分区表框架)msdos:指定标签类型为 MBR 分区表,换成gpt就是 GPT 分区表

[root@centos7 ~]# parted /dev/sdb mklabel msdos
Warning: The existing disk label on /dev/sdb will be destroyed and all data on this
disk will be lost. Do you want to continue?
Yes/No? y
Information: You may need to update /etc/fstab.
#  提示:/etc/fstab是开机自动挂载配置文件,分区改动后如果有挂载需求,需要修改这个文件,无挂载可忽略。

# 查看分区
#  指定显示单位为 MiB(兆字节)
[root@centos7 ~]# parted /dev/sdb unit MiB print
Model: VMware, VMware Virtual S (scsi)
Disk /dev/sdb: 20480MiB  # 磁盘总大小 20480MB=20G;
Sector size (logical/physical): 512B/512B  # 逻辑 / 物理扇区都是 512 字节
Partition Table: msdos  # 确认当前为 MBR 分区表;
Disk Flags:

Number  Start  End  Size  Type  File system  Flags

# 创建分区
# mkpart:make partition,新建分区;
# primary:分区类型为主分区(MBR 三种类型:primary 主分区、extended 扩展分区、logical 逻辑分区);
# 1 2049:单位 MiB,起始位置 1MiB,结束位置 2049MiB。计算分区大小:2049-1=2048MiB=2GB。
[root@centos7 ~]# parted /dev/sdb unit MiB mkpart primary 1 2049
Information: You may need to update /etc/fstab.

#  执行完查看结果,出现 1 号分区,大小匹配设定的 2G;
[root@centos7 ~]# parted /dev/sdb unit MiB print
Model: VMware, VMware Virtual S (scsi)
Disk /dev/sdb: 20480MiB
Sector size (logical/physical): 512B/512B
Partition Table: msdos
Disk Flags:

Number  Start    End      Size     Type     File system  Flags
 1      1.00MiB  2049MiB  2048MiB  primary  xfs

# 扩展分区

# resizepart:resize partition,调整分区结束位置,扩容 / 缩容分区;1:要修改的分区编号 ;15121:新的结束位置 5121MiB。新分区大小:5121-1=5120MiB=5G。
[root@centos7 ~]# parted /dev/sdb unit MiB resizepart 1 5121
Information: You may need to update /etc/fstab.

# 查看结果,分区从 2G 扩容为 5G,起始位置不变
[root@centos7 ~]# parted /dev/sdb unit MiB print
Model: VMware, VMware Virtual S (scsi)
Disk /dev/sdb: 20480MiB
Sector size (logical/physical): 512B/512B
Partition Table: msdos
Disk Flags:

Number  Start    End      Size     Type     File system  Flags
 1      1.00MiB  5121MiB  5120MiB  primary  xfs

# 删除分区
[root@centos7 ~]# parted /dev/sdb rm 1
Information: You may need to update /etc/fstab.

# 删除分区之后查看
[root@centos7 ~]# parted /dev/sdb unit MiB print
Model: VMware, VMware Virtual S (scsi)
Disk /dev/sdb: 20480MiB
Sector size (logical/physical): 512B/512B
Partition Table: msdos
Disk Flags:

Number  Start  End  Size  Type  File system  Flags
MBR 分区 3 个硬性规则
- mklabel msdos=MBR,mklabel gpt=GPT;
- MBR 最多 4 个主分区,超过需要扩展分区;
- 分区起点推荐 1MiB 对齐,不要从 0 开始。
标准验证流程模板
执行操作 → parted /dev/sdb print 核对分区表类型、分区大小 / 数量 → lsblk /dev/sdb查看设备文件是否生成, 查看是否生成 sdb1、sdb2 等分区设备;→ blkid /dev/sdb1查看分区识别状态,分区正常存在会输出 UUID,删除分区后无输出。。
管理 GPT 磁盘
管理GPT磁盘基本与管理MBR磁盘一致,除了创建分区。
设置磁盘分区管理方案
# 设置分区方案为gpt,输入mklabel gpt
(parted) `mklabel gpt`
Warning: The existing disk label on /dev/sdb will be destroyed and all data on this disk will
be lost. Do you want to continue?
Yes/No? y
(parted) print
Model: VMware, VMware Virtual S (scsi)
Disk /dev/sdb: 21.5GB
Sector size (logical/physical): 512B/512B
# 分区表已改成gpt
Partition Table: `gpt`
Disk Flags:

Number  Start  End  Size  File system  Name  Flags
创建分区
(parted) unit MiB
(parted) mkpart

# 设置分区名
Partition name?  []? data01
File system type?  [ext2]? xfs
Start? 1
End? 2049
(parted) print
Model: VMware, VMware Virtual S (scsi)
Disk /dev/sdb: 20480MiB
Sector size (logical/physical): 512B/512B
Partition Table: gpt
Disk Flags:

Number  Start    End      Size     File system  Name    Flags
 1      1.00MiB  2049MiB  2048MiB  xfs          data01
扩展分区
(parted) resizepart 1 5121
(parted) print
Model: VMware, VMware Virtual S (scsi)
Disk /dev/sdb: 20480MiB
Sector size (logical/physical): 512B/512B
Partition Table: gpt
Disk Flags:

Number  Start    End      Size     File system  Name    Flags
 1      1.00MiB  5121MiB  5120MiB  xfs          data01
删除分区
(parted) rm 1
(parted) print
Model: VMware, VMware Virtual S (scsi)
Disk /dev/sdb: 20480MiB
Sector size (logical/physical): 512B/512B
Partition Table: gpt
Disk Flags:

Number  Start  End  Size  File system  Name  Flags
免交互操作
# 设置磁盘分区管理方案
[root@centos7 ~]# parted /dev/sdb mklabel gpt
Warning: The existing disk label on /dev/sdb will be destroyed and all data on this
disk will be lost. Do you want to continue?
Yes/No? y
Information: You may need to update /etc/fstab.

# 查看分区
[root@centos7 ~]# parted /dev/sdb print
Model: VMware, VMware Virtual S (scsi)
Disk /dev/sdb: 21.5GB
Sector size (logical/physical): 512B/512B
Partition Table: gpt
Disk Flags:

Number  Start  End  Size  File system  Name  Flags

# 创建分区

# parted 磁盘 unit 单位 mkpart 分区名 文件系统类型 起始位置 结束位置。
# 容量单位统一使用 MiB(1MiB≈1MB)
#  data01 【GPT 专属参数】自定义分区名称,仅 GPT 分区表支持命名,MBR 不支持该写法;
# /etc/fstab 是 Linux 开机自动挂载配置文件,分区新增 / 删除后,如果后续需要开机自动挂载该分区,就需要修改此文件;只是临时使用、手动挂载,可以忽略该提示。

[root@centos7 ~]# parted /dev/sdb unit MiB mkpart data01 xfs 1 2049
Information: You may need to update /etc/fstab.

[root@centos7 ~]# parted /dev/sdb unit MiB print
Model: VMware, VMware Virtual S (scsi)
Disk /dev/sdb: 20480MiB
Sector size (logical/physical): 512B/512B
Partition Table: gpt  #  当前磁盘分区格式为GPT,因此支持自定义分区名称。
Disk Flags:

Number  Start    End      Size     File system  Name    Flags
 1      1.00MiB  2049MiB  2048MiB  xfs          data01

# 扩展分区
[root@centos7 ~]# parted /dev/sdb unit MiB resizepart 1 5121
Information: You may need to update /etc/fstab.

[root@centos7 ~]# parted /dev/sdb unit MiB print
Model: VMware, VMware Virtual S (scsi)
Disk /dev/sdb: 20480MiB
Sector size (logical/physical): 512B/512B
Partition Table: gpt
Disk Flags:

Number  Start    End      Size     File system  Name    Flags
 1      1.00MiB  5121MiB  5120MiB  xfs          data01

# 删除分区
[root@centos7 ~]# parted /dev/sdb rm 1
Information: You may need to update /etc/fstab.
# 删除分区后查看
[root@centos7 ~]# parted /dev/sdb unit MiB print
Model: VMware, VMware Virtual S (scsi)
Disk /dev/sdb: 20480MiB
Sector size (logical/physical): 512B/512B
Partition Table: gpt
Disk Flags:

Number  Start  End  Size  File system  Name  Flags
文件系统持久化挂载
环境准备
利用 parted 创建一个分区,并格式化为xfs文件系统,格式化完成后,该分区才可以挂载、存放文件。
mkfs:make filesystem,Linux 格式化命令,用来在空白分区上创建文件系统;
mkfs.xfs:专门把分区格式化为 XFS 文件系统(CentOS7 默认文件系统,日志型、支持大硬盘、扩容简单);
[root@centos7 ~]# parted /dev/sdb mklabel gpt
Warning: The existing disk label on /dev/sdb will be destroyed and all data on this
disk will be lost. Do you want to continue?
Yes/No? y
Information: You may need to update /etc/fstab.

[root@centos7 ~]# parted /dev/sdb unit MiB mkpart data01 xfs 1 2049
Information: You may need to update /etc/fstab.

# /dev/sdb1:操作对象,刚才用 parted 划分出来的 sdb 1 号分区。
[root@centos7 ~]# mkfs.xfs /dev/sdb1
meta-data=/dev/sdb1    isize=512    agcount=4, agsize=131072 blks
         =             sectsz=512   attr=2, projid32bit=1
         =             crc=1        finobt=0, sparse=0
data     =             bsize=4096   blocks=524288, imaxpct=25
         =             sunit=0      swidth=0 blks
naming   =version 2    bsize=4096   ascii-ci=0 ftype=1
log      =internal log bsize=4096   blocks=2560, version=2
         =             sectsz=512   sunit=0 blks, lazy-count=1
realtime =none         extsz=4096   blocks=0, rtextents=0


# 如果格式化时候,提示存在文件系统,则需要-f选项强制格式化
[root@centos7 ~]# mkfs.xfs /dev/sdb1
mkfs.xfs: /dev/sdb1 appears to contain an existing filesystem (xfs).
mkfs.xfs: Use the -f option to force overwrite.
[root@centos7 ~]# mkfs.xfs -f /dev/sdb1
如何验证格式化是否成功?(4 种常用方法)
方法 1:blkid 查看(最常用)
blkid /dev/sdb1
✅ 成功标准:输出中出现 TYPE=“xfs”,并且生成唯一 UUID。
示例正常输出:
/dev/sdb1: UUID="xxxx" TYPE="xfs" PARTLABEL="data01" PARTUUID="xxxx"
方法 2:lsblk -f 查看文件系统
lsblk -f /dev/sdb
✅ 成功:sdb1 对应的 FSTYPE 列显示 xfs。
方法 3:尝试挂载测试(落地验证)
mkdir /data
mount /dev/sdb1 /data
df -h
✅ 成功:df -h 可以看到 /data 挂载点,容量 2G,说明文件系统正常可用。
方法 4:wipefs 查看文件系统签名
wipefs /dev/sdb1
✅ 成功:识别出 xfs 文件系统标识。
重要知识点 & 易错提醒
- mkfs.xfs 会清空分区内所有数据,不要对存有重要文件的分区执行格式化;
- XFS 特性:XFS 不支持缩小分区,仅支持扩容;ext4 可以扩容、缩容;
- 格式化只是创建文件系统,分区依旧是 GPT 分区结构,不会改变分区大小;
- 格式化后分区依然无法直接使用,必须挂载才能读写文件。
持久化挂载
临时挂载
mount 设备 目录,重启服务器挂载消失,每次开机需要手动挂载。
当服务器重启时,系统不会再次将文件系统自动挂载到目录树上,用户无法访问。为了确保系统在启动时自动挂载文件系统, 需要在 /etc/fstab文件中添加一个条目。系统开机读取/etc/fstab配置文件,自动按照配置挂载磁盘,一次配置永久生效。
/etc/fstab 是以空格分隔的文件,每行具有六个字段。
- **第一个字段指定设备。**可以使用UUID或device来指定设备。
- **第二个字段是目录挂载点。**通过它可以访问目录结构中的块设备。挂载点必须存在;如果不存在,请使用mkdir命令进行创建。
- 第三个字段包含文件系统类型,如xfs或ext4 。
- 第四个字段是挂载选项,以逗号分隔的。 defaults是一组常用选项。详细信息参考mount(8) 。
- 第五个字段指定dump命令是否备份设备。
- 第六个字段指定fsck顺序字段,决定了在系统启动吋是否应运行fsck命令,以验证文件系统是否干净。 该字段中的值指示了 fsck的运行顺序。 对于XFS文件系统, 请将该字段设为0 ,因为XFS并不使用fsck来检查自己的文件系统状态。 对于ext4 文件系统,如果是根文件系统, 请将该字段设 为 1 ; 如果是其他ext4 文件系统, 则将该字段设为2。 这样, fsck就会先处理根文件系统,然后同步检查不同磁盘上的文件系统,并按顺序检查同一磁盘上的文件系统。
示例:
#  blkid:block id,Linux 专门查看块设备唯一标识、文件系统的工具。/dev/sdb1:指定查询 1 号分区。
# UUID:复制引号内字符串,写入 fstab;
# TYPE="xfs":确认文件系统为 xfs,fstab 第三列填写 xfs。

[root@centos7 ~]# blkid /dev/sdb1
/dev/sdb1: UUID="f5c35f10-0274-45af-b044-73694989fe01" TYPE="xfs" PARTLABEL="data01" PARTUUID="432d7d79-1a08-4429-bf38-7ab1444a0ab9"

# 创建挂载目录
# /data01:自定义挂载目录,挂载后进入/data01就可以读写 sdb1 分区里的文件;
# 挂载目录必须提前存在,不存在会开机挂载失败、系统启动报错。

[root@centos7 ~]# mkdir /data01

[root@centos7 ~]# vim /etc/fstab
# 最后一行增加一个条目
UUID="f5c35f10-0274-45af-b044-73694989fe01" /data01 xfs defaults 0 0

# 使用如下命令立刻挂载
[root@centos7 ~]# mount /data01
# 或者
[root@centos7 ~]# mount /dev/sdb1

# 验证
# 查看当前挂载状态,检验是否挂载成功
[root@centos7 ~]# df -h /data01
Filesystem      Size  Used Avail Use% Mounted on
/dev/sdb1       2.0G   33M  2.0G   2% /data01

# 重启系统验证,依旧出现挂载信息,代表永久挂载实验全部完成。
[root@centos7 ~]# reboot
[root@centos7 ~]# df -h /data01
Filesystem      Size  Used Avail Use% Mounted on
/dev/sdb1       2.0G   33M  2.0G   2% /data01
整体实验总结流程
1.blkid 查 UUID → 2.mkdir 建挂载目录 → 3.vim 编辑 fstab 写 6 列配置 → 4.mount 挂载 → 5.df -h 查看挂载 → 6.reboot 重启验证。
取消持久化挂载
删除/etc/fstab中对应条目即可。
综合案例:文件系统空间不足
情况1:大量的大文件占用空间
准备环境
[root@centos7 ~]# parted /dev/sdb mklabel gpt
[root@centos7 ~]# parted /dev/sdb unit MiB mkpart data01 xfs 1 2049
[root@centos7 ~]# mkfs.xfs -f /dev/sdb1
[root@centos7 ~]# mkdir /myapp-1
[root@centos7 ~]# mount /dev/sdb1 /myapp-1
[root@centos7 ~]# cp -r /etc/ /myapp-1/

# 创建一个大文件
[root@centos7 ~]# dd if=/dev/zero of=/myapp-1/etc/bigfile bs=1M count=2000
原因:大文件占用大量空间。
解决方法:找到文件后删除。
[root@centos7 ~]# df -h /myapp-1/
文件系统        容量  已用  可用 已用% 挂载点
/dev/sdb1       2.0G  2.0G  436K  100% /myapp-1

# 方法1:find 查找
[root@centos7 ~]# find /myapp-1/ -size +100M
/myapp-1/etc/bigfile

# 方法2:du 查找
[root@centos7 ~]# du -s /myapp-1/* |sort -n |tail -2
2051628	/myapp-1/etc
[root@centos7 ~]# du -s /myapp-1/etc/* |sort -n |tail -2
23220	/myapp-1/etc/selinux
2008512	/myapp-1/etc/bigfile
[root@centos7 ~]# du -s /myapp-1/etc/bigfile/* |sort -n |tail -2
du: 无法访问"/myapp-1/etc/bigfile/*": 不是目录

# 删除大文件
[root@centos7 ~]# rm -f /myapp-1/etc/bigfile

[root@centos7 ~ ]# df -h /myapp-1/
文件系统        容量  已用  可用 已用% 挂载点
/dev/sdb1       2.0G   77M  2.0G    4% /myapp-1
找到文件后,删除即可。
情况2:删除文件后,空间没有释放
准备环境
 [root@centos7 ~]# dd if=/dev/zero of=/myapp-1/etc/bigfile bs=1M count=2000
[root@centos7 ~]# tail -f /myapp-1/etc/bigfile &

# 删除文件后,空间没有释放
[root@centos7 ~]# rm -f /myapp-1/etc/bigfile
[root@centos7 ~]# df -h /myapp-1/
文件系统        容量  已用  可用 已用% 挂载点
/dev/sdb1       2.0G  2.0G  772K  100% /myapp-1
原因:被删除的文件,仍然有程序在使用。
解决方法:找到程序并终止程序。
[root@centos7 ~]# lsof |grep delete |grep /myapp-1
tail      1654                   root    3r      REG               8,17 2061565952        444 /myapp-1/etc/bigfile (deleted)

[root@centos7 ~]# kill 1654

[root@centos7 ~]# df -h /myapp-1/
文件系统        容量  已用  可用 已用% 挂载点
/dev/sdb1       2.0G   72M  2.0G    4% /myapp-1
建议:清理大文件,先使用重定向清空文件内容,再删除文件。
情况3:大量的小文件占用空间
准备环境
[root@centos7 ~]# parted /dev/sdb unit MiB mkpart data02 ext4 2049 3073
[root@centos7 ~]# mkfs.ext4 /dev/sdb2
[root@centos7 ~]# mkdir /myapp-2
[root@centos7 ~]# mount /dev/sdb2 /myapp-2
[root@server ~ 15:01:00]# df -i /myapp-2
文件系统       Inode 已用(I) 可用(I) 已用(I)% 挂载点
/dev/sdb2      65536      11   65525       1% /myapp-2

[root@centos7 ~]# touch /myapp-2/file-{00001..65530}
touch: 无法创建"/myapp-2/file-65526": 设备上没有空间
touch: 无法创建"/myapp-2/file-65527": 设备上没有空间
touch: 无法创建"/myapp-2/file-65528": 设备上没有空间
touch: 无法创建"/myapp-2/file-65529": 设备上没有空间
touch: 无法创建"/myapp-2/file-65530": 设备上没有空间

[root@centos7 ~] df -h /myapp-2/
Filesystem      Size  Used Avail Use% Mounted on
/dev/sdb2       974M  1.8M  905M   1% /myapp-2
原因:文件系统中inode使用完了。
解决方法:删除大量的小文件或者将这些小文件备份到其他地方。
[root@centos7 ~] df -hi /myapp-2
Filesystem     Inodes IUsed IFree IUse% Mounted on
/dev/sdb2         64K   64K     0  100% /myapp-2

# 思路1:直接将这些小文件移走或删除
[root@centos7 ~]# rm -f /myapp-2/file-0*

# 思路2:合并大量小文件为单个文件
[root@centos7 ~]# cat /myapp-2/file-{00001..10000} > file-00001
思考:如何彻底擦除硬盘上数据
解答:
- 逻辑破坏:用0填充所有数据,例如
dd if=/dev/zero of=/dev/sdb。 - 物理破坏,例如消磁。
更多推荐


 14
14 0
0- 0


 已为社区贡献2条内容

所有评论(0)