
零依赖实现java8项目中集成deepseek做简单对话功能
·
原理:JDK 8与DeepSeek API天然兼容,因为DeepSeek的API采用RESTful设计规范,与JDK 8内置的HttpURLConnection或第三方库(如Apache HttpClient 4.5.x、OkHttp)完全兼容
1.获取deepseek的apikey
2.上代码,使用原生httpapi,所有语法都是java8兼容的,必要代码都有解释,就核心几个步骤:
1.代码如图
package com.hmdp.ai;

import java.io.BufferedReader;
import java.io.InputStreamReader;
import java.io.OutputStream;
import java.net.HttpURLConnection;
import java.net.URL;
import java.nio.charset.StandardCharsets;

public class DeepSeekClient {

    // 注意:这里要换成你自己的真实 API Key
    private static final String API_KEY = "sk-your-actual-deepseek-api-key";

    // DeepSeek 最新模型地址(2026 年 7 月后请使用 deepseek-v4-flash)
    private static final String API_URL = "https://api.deepseek.com/v1/chat/completions";

    /**
     * 调用 DeepSeek 大模型,返回生成的文本
     * @param userMessage 用户输入的消息
     * @return AI 返回的回复内容
     */
    public static String chat(String userMessage) throws Exception {
        // 1. 构造请求体 JSON(使用普通字符串拼接,避免文本块语法)
        String requestBody = buildRequestBody(userMessage);

        // 2. 创建 HTTP 连接
        URL url = new URL(API_URL);
        HttpURLConnection conn = (HttpURLConnection) url.openConnection();
        conn.setRequestMethod("POST");
        conn.setRequestProperty("Content-Type", "application/json");
        conn.setRequestProperty("Authorization", "Bearer " + API_KEY);
        conn.setDoOutput(true);
        conn.setConnectTimeout(5000);   // 连接超时 5 秒
        conn.setReadTimeout(10000);     // 读取超时 10 秒

        // 3. 发送请求
        try (OutputStream os = conn.getOutputStream()) {
            byte[] input = requestBody.getBytes(StandardCharsets.UTF_8);
            os.write(input, 0, input.length);
        }

        // 4. 读取响应
        int responseCode = conn.getResponseCode();
        if (responseCode != 200) {
            // 读取错误流
            try (BufferedReader br = new BufferedReader(
                    new InputStreamReader(conn.getErrorStream(), StandardCharsets.UTF_8))) {
                StringBuilder error = new StringBuilder();
                String line;
                while ((line = br.readLine()) != null) {
                    error.append(line);
                }
                throw new RuntimeException("API 调用失败,HTTP 状态码: " + responseCode + ", 错误信息: " + error.toString());
            }
        }

        StringBuilder response = new StringBuilder();
        try (BufferedReader br = new BufferedReader(
                new InputStreamReader(conn.getInputStream(), StandardCharsets.UTF_8))) {
            String line;
            while ((line = br.readLine()) != null) {
                response.append(line);
            }
        }

        // 5. 解析响应,提取 AI 回复的内容
        String jsonResponse = response.toString();
        String content = extractContentFromJson(jsonResponse);
        return content;
    }

    /**
     * 构造请求体的 JSON 字符串(JDK 8 兼容写法)
     */
    private static String buildRequestBody(String userMessage) {
        // 注意:字符串中的双引号需要转义
        String escapedMessage = escapeJson(userMessage);
        return "{\n" +
                "  \"model\": \"deepseek-v4-flash\",\n" +
                "  \"messages\": [\n" +
                "    {\"role\": \"system\", \"content\": \"你是一个智能助手\"},\n" +
                "    {\"role\": \"user\", \"content\": \"" + escapedMessage + "\"}\n" +
                "  ],\n" +
                "  \"temperature\": 0.7,\n" +
                "  \"max_tokens\": 2048\n" +
                "}";
    }

    /**
     * 简单的 JSON 字符串转义(只处理必要的字符)
     */
    private static String escapeJson(String s) {
        if (s == null) return "";
        return s.replace("\\", "\\\\")
                .replace("\"", "\\\"")
                .replace("\n", "\\n")
                .replace("\r", "\\r")
                .replace("\t", "\\t");
    }

    /**
     * 从 DeepSeek 返回的 JSON 中提取 content 字段
     * 示例响应:{"choices":[{"message":{"content":"你好!"}}]}
     */
    private static String extractContentFromJson(String json) {
        // 简单查找 "content":" 后面的内容
        String target = "\"content\":\"";
        int startIndex = json.indexOf(target);
        if (startIndex == -1) {
            return "解析失败:未找到 content 字段";
        }
        startIndex += target.length();
        int endIndex = json.indexOf("\"", startIndex);
        if (endIndex == -1) {
            return "解析失败:content 值未正确结束";
        }
        return json.substring(startIndex, endIndex);
    }
}
2.总结一下思路:
1.先将用户输入的消息进行转义避免破坏我们封装的json
2.构建标准的json格式的请求体
3.构建http发送给deepseek服务器
4.同时要带上apikey进行身份验证
5.获取到从服务器返回的json,os读出来
6.拿到json中context那部分,就是回答的部分
7.返回给用户
如果看着麻烦就直接复制好了
3.编写一个测试类,验证是否调通
1.代码如下:
package com.hmdp.ai;

public class TestDeepSeek {
    public static void main(String[] args) {
        try {
            String userMsg = "你好,请介绍一下你自己。";
            String reply = DeepSeekClient.chat(userMsg);
            System.out.println("用户问:" + userMsg);
            System.out.println("AI 答:" + reply);
        } catch (Exception e) {
            e.printStackTrace();
        }
    }
}
2.运行这个main方法结果如下,说明连接成功测试通过:

3.如果测试失败
1.看一下apikey是否替换了,或是否有效
2.看自己的网络是否可用能不能打开deepseek官网
4.改造以上代码,注册成springbean
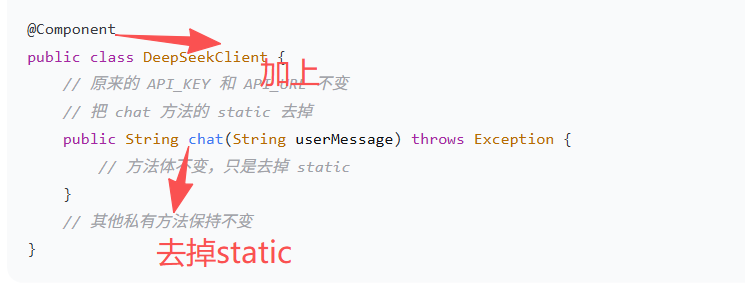
5.新建一个aicontroller接口:
package com.hmdp.ai;

import org.springframework.beans.factory.annotation.Autowired;
import org.springframework.web.bind.annotation.*;

@RestController
@RequestMapping("/ai")
public class AiTestController {

//注入刚才写的client
    @Autowired
    private DeepSeekClient deepSeekClient;

    // 简单测试接口:GET /ai/chat?msg=背一首关于西湖的诗
    @GetMapping("/chat")
    public String chat(@RequestParam("msg") String msg) {
        try {
            String reply = deepSeekClient.chat(msg);
            return reply;
        } catch (Exception e) {
            e.printStackTrace();
            return "调用 AI 失败:" + e.getMessage();
        }
    }
}
6.启动项目,用postman进行测试,如图:
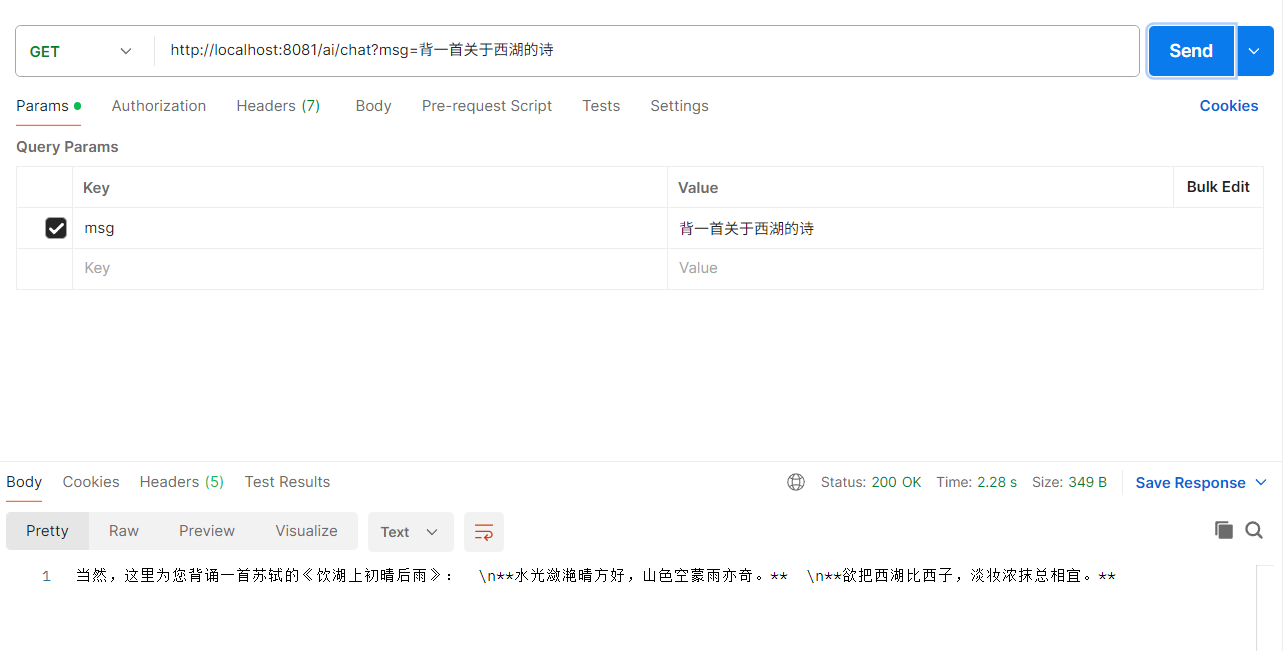
拿到了回答:deepseek背诵了一首《饮湖上初晴后雨》
更多推荐
 23
23 0
0- 0


 已为社区贡献2条内容

所有评论(0)