
GitCode文心大模型-参赛过程记录
本文介绍了参加GitCode-文心大模型比赛的完整流程。比赛提供丰厚奖金和Token券奖励,使用百度文心4.5系列API。文章详细说明从报名、API使用到提交作品的步骤,包括基础文本处理、多模态图文分析、Web和Gradio界面开发等核心内容。重点讲解了如何利用文心4.5模型进行门状态识别,提供了完整的Python代码实现和部署方案。最后指导参赛者如何录制演示视频、上传代码到GitCode并完成作
前言
这是一场非常适合AI玩家玩耍的大赛,很有意思,并且所有的接口都已经提供,我们只需要进行解析处理即可,非常的方便,并且可以体验到AI的快感,感谢gitCode提供本次活动的所有环境支持,下面是我参赛的一个记录,仅仅是小号打个样,具体提交的不是这个。
赛事介绍
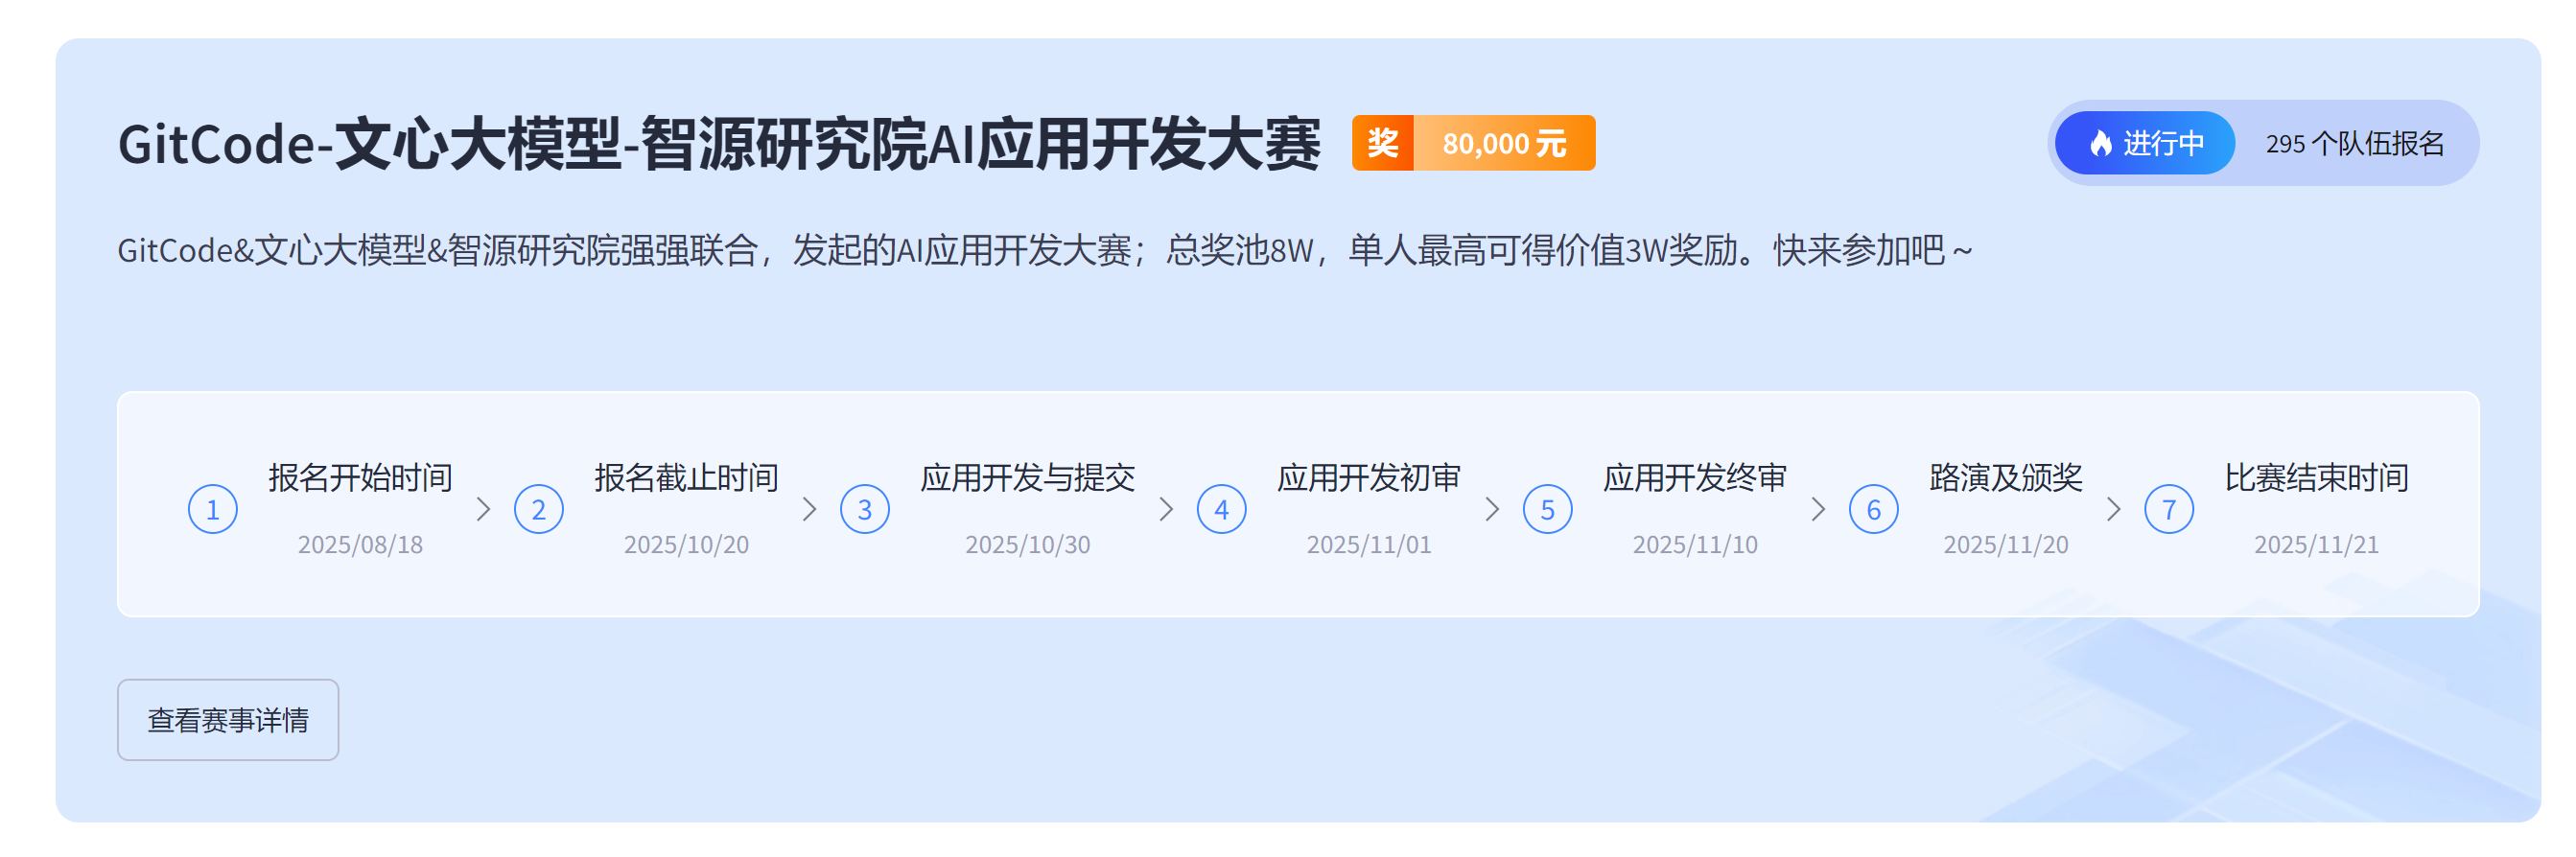
奖项
| 奖项名称 | 数量 | 现金奖励 | Tokens 券奖励 | 其他奖励 |
|---|---|---|---|---|
| 一等奖 | 1 个 | ¥20,000 | 价值¥10,000 | - |
| 二等奖 | 2 个 | ¥10,000 | 价值¥5,000 | - |
| 三等奖 | 3 个 | ¥1,000 | 价值¥1,000 | - |
| 优秀奖 | 10 支队伍 | - | 价值¥1,000 | 价值¥400 社区精美周边礼品 |
核心
API链接:https://ai.baidu.com/ai-doc/AISTUDIO/rm344erns

这里的API使用的是百度的文心4.5系列。
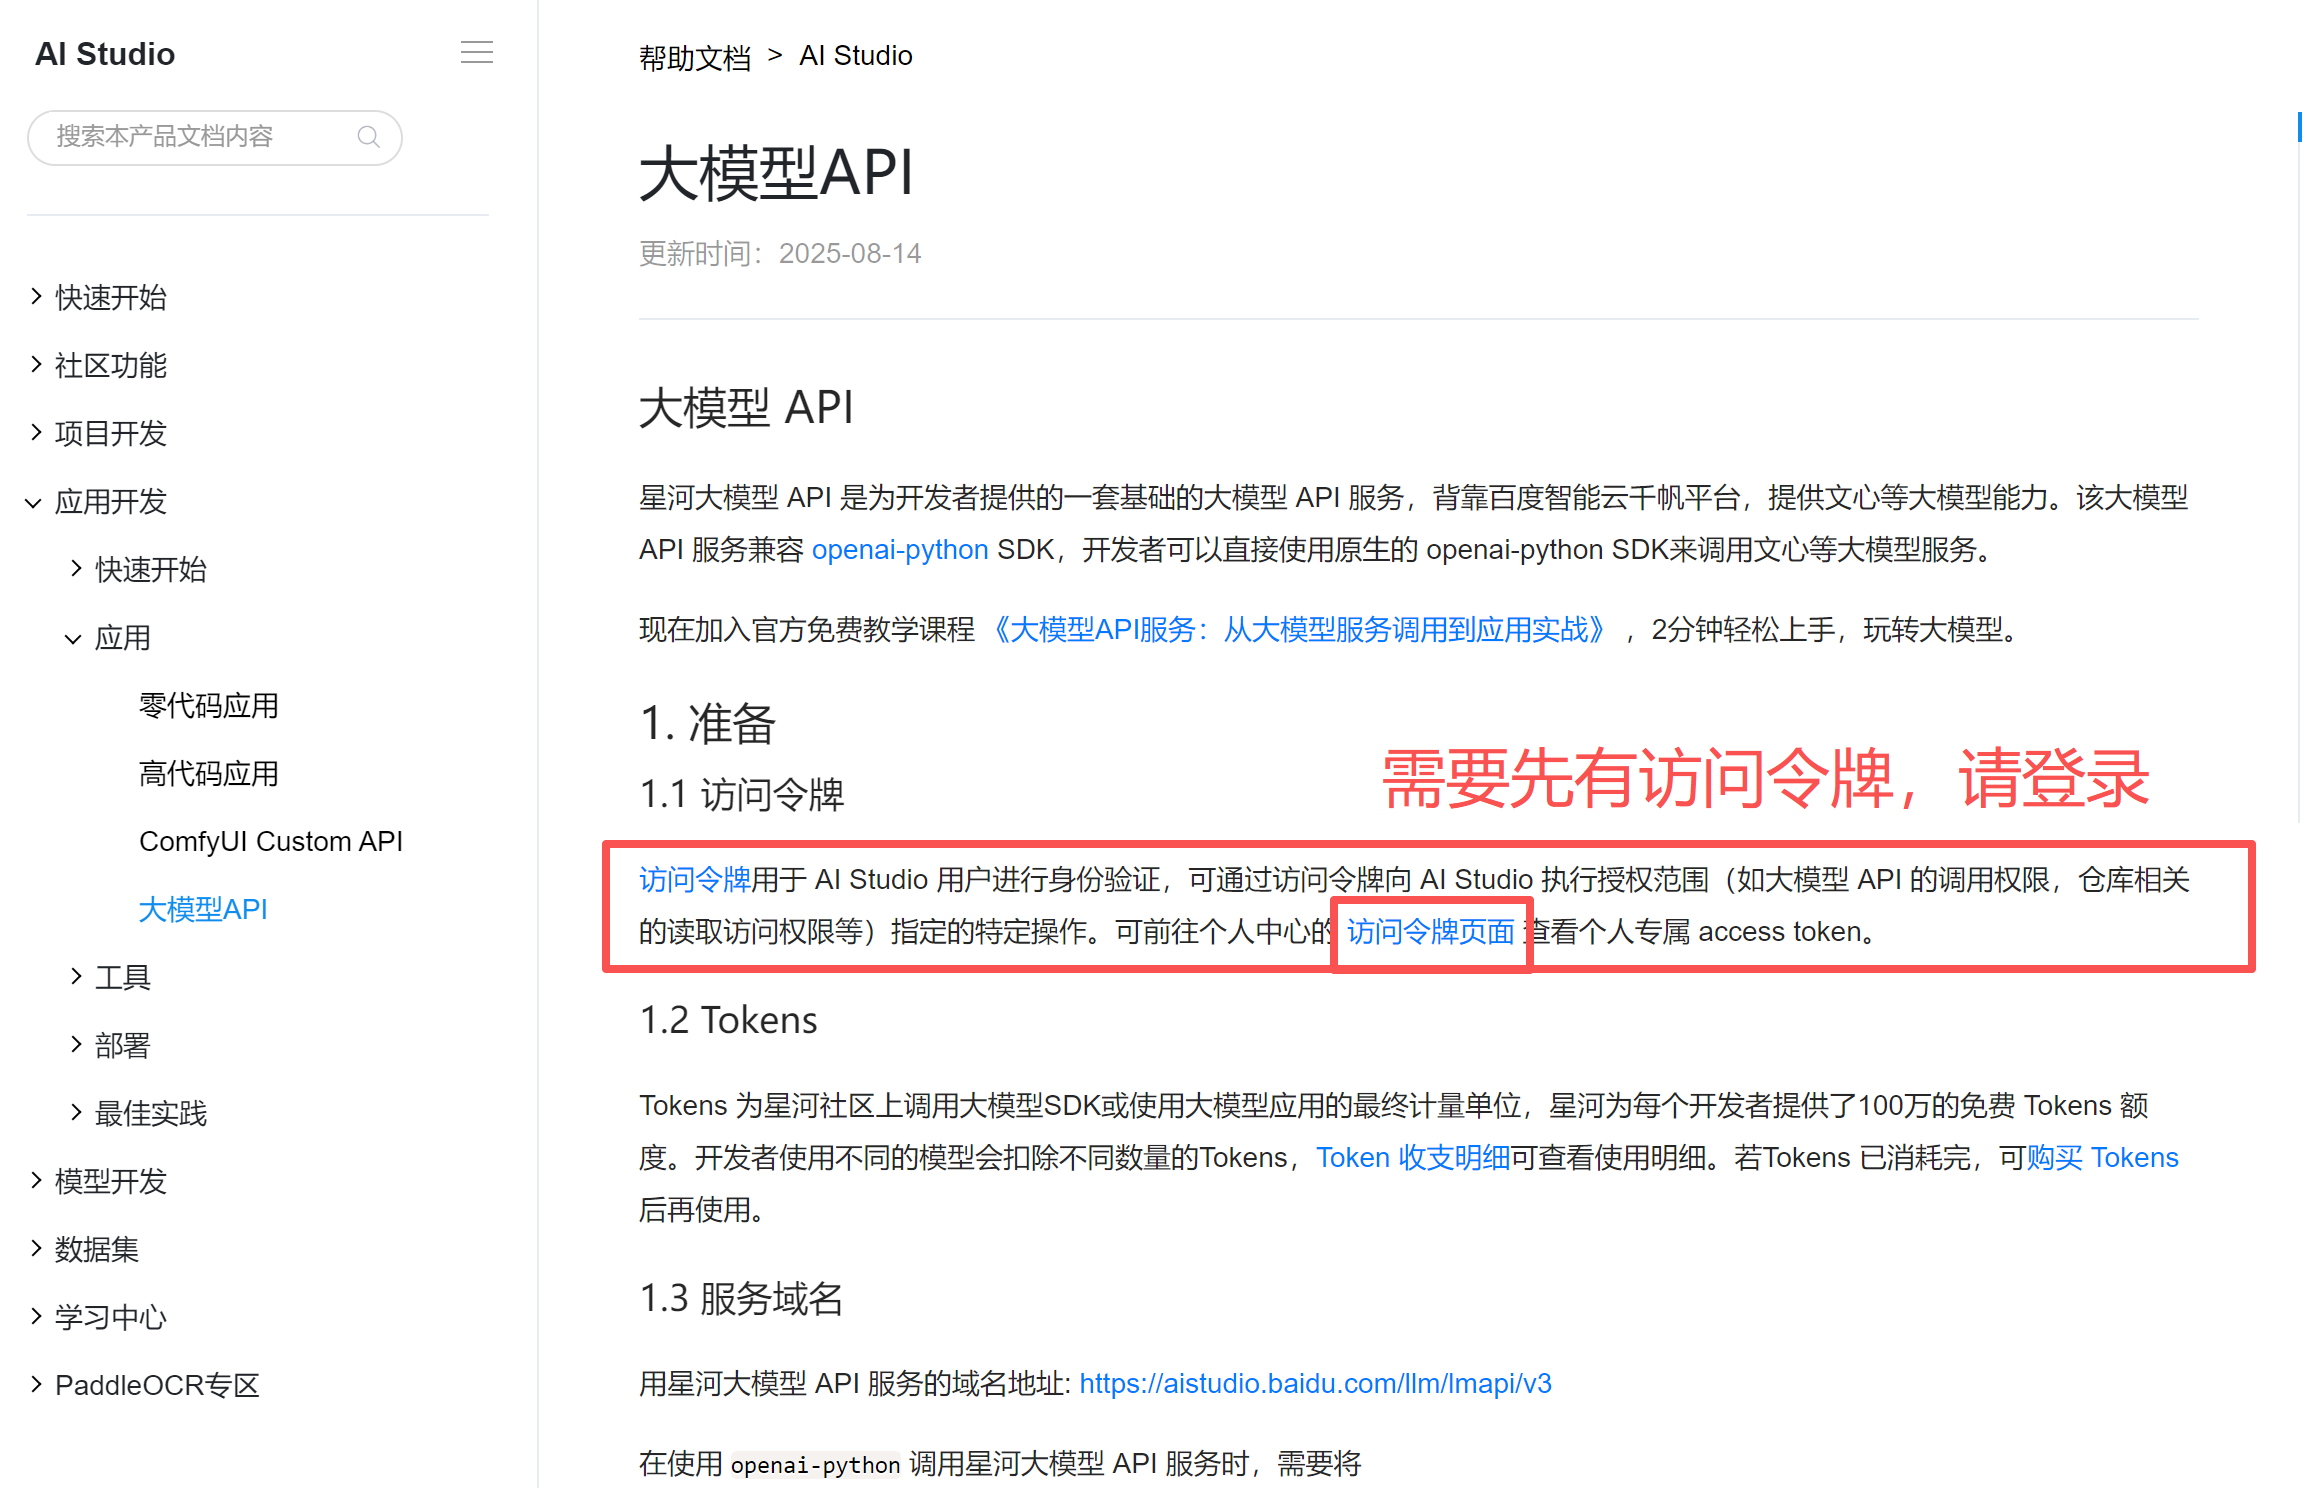
直接登录即可。
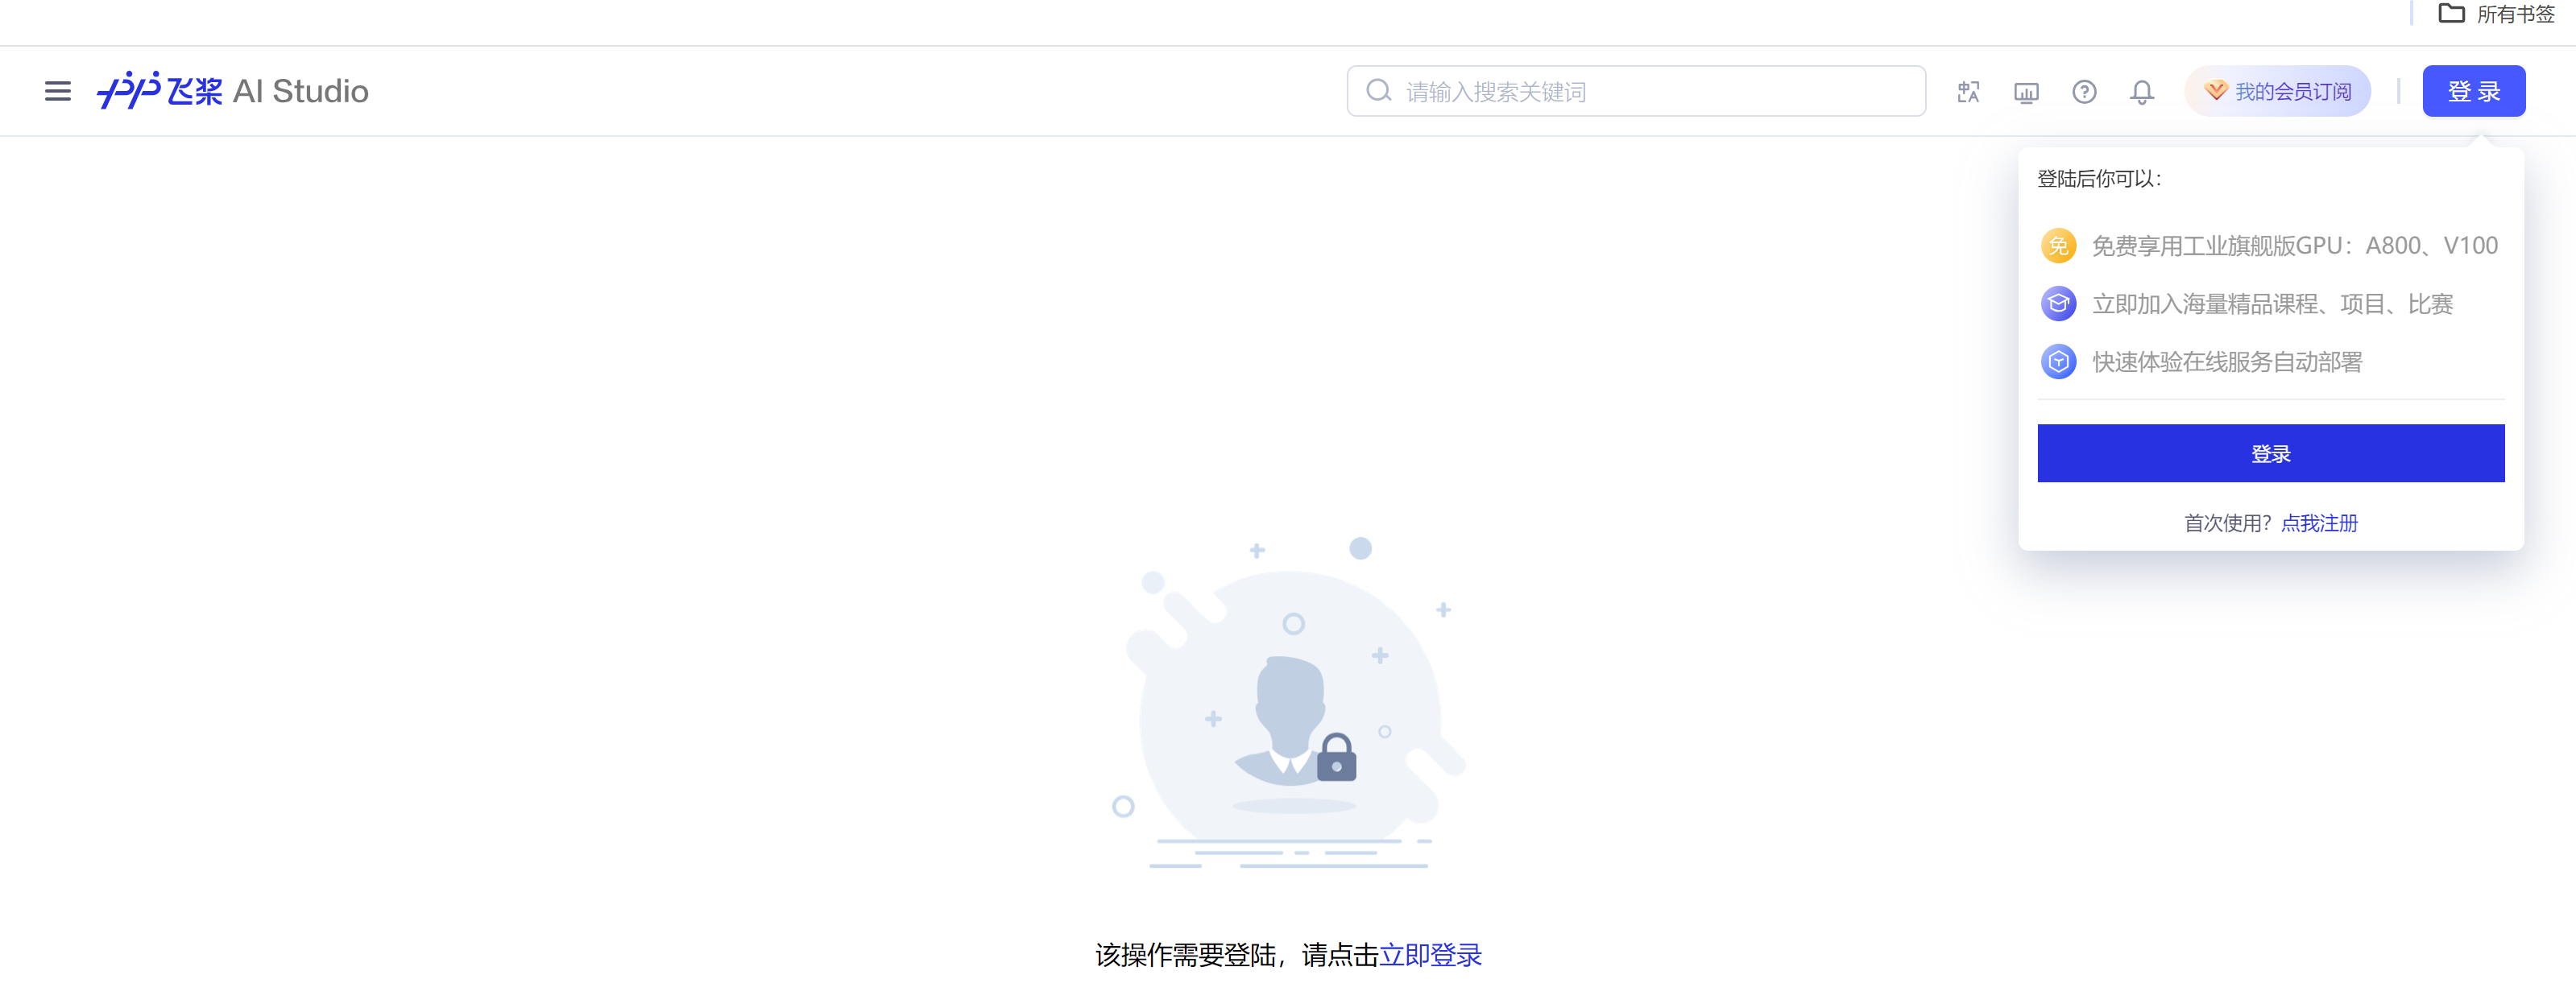
登录会有一个提示,是否创建,他会直接给创建。
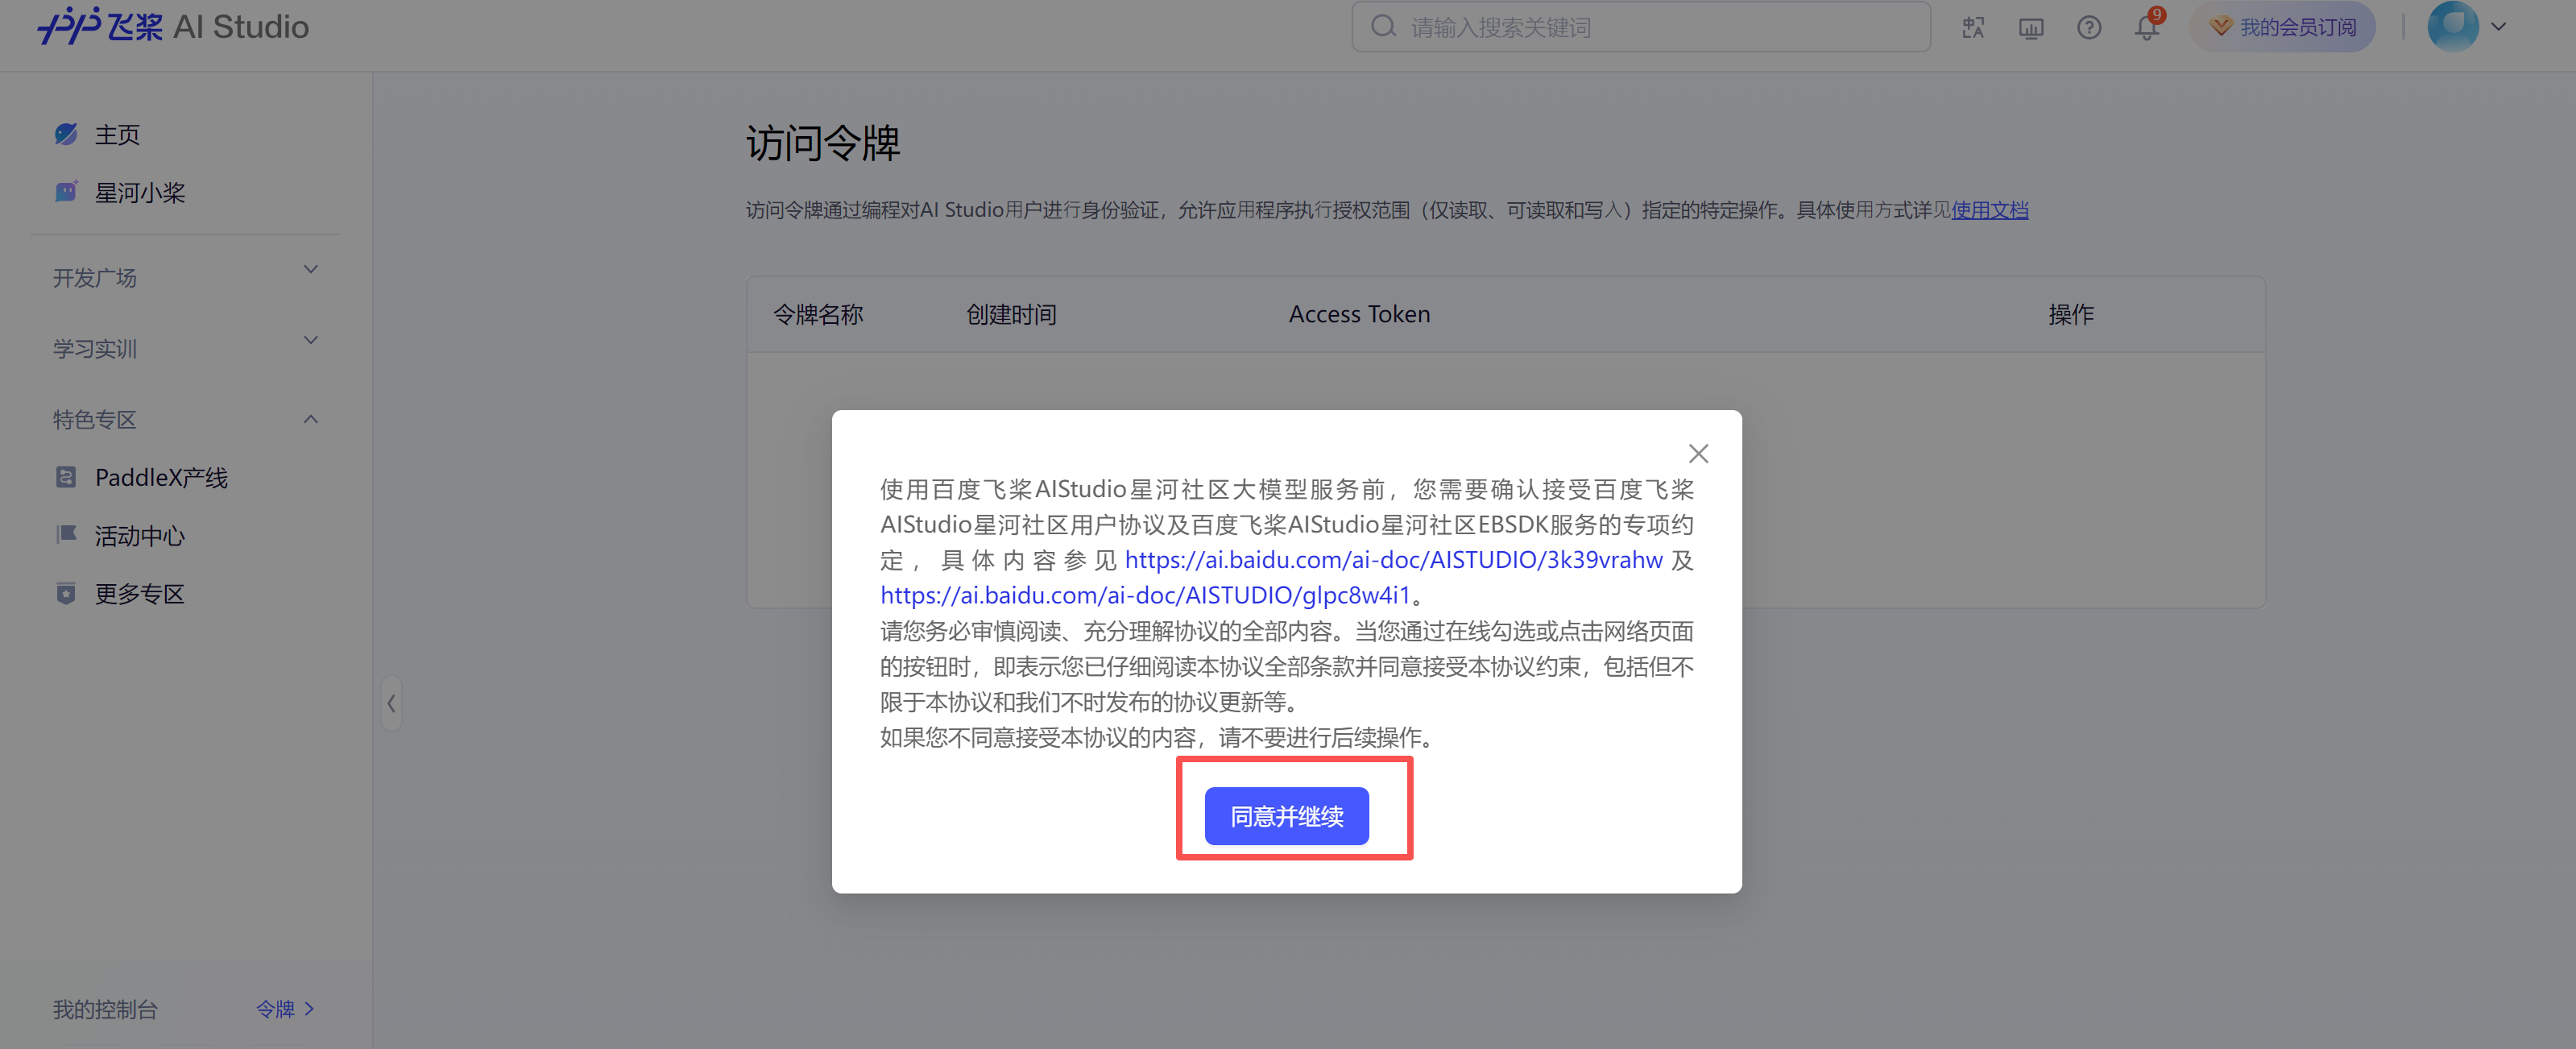
点击同意后会自动出现一个。
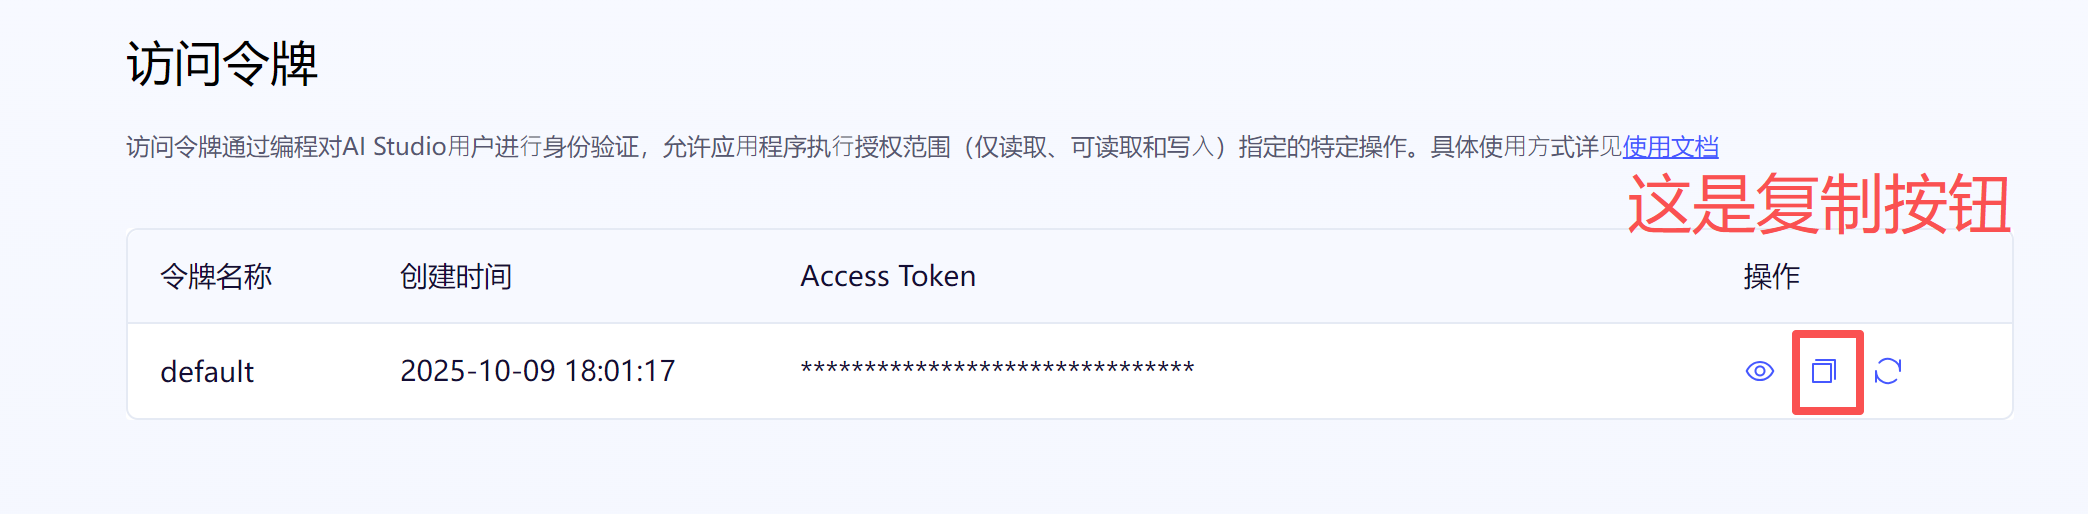
至此我们就有了核心的内容了,后面是实操过程。
实操过程
下面是整个流程。
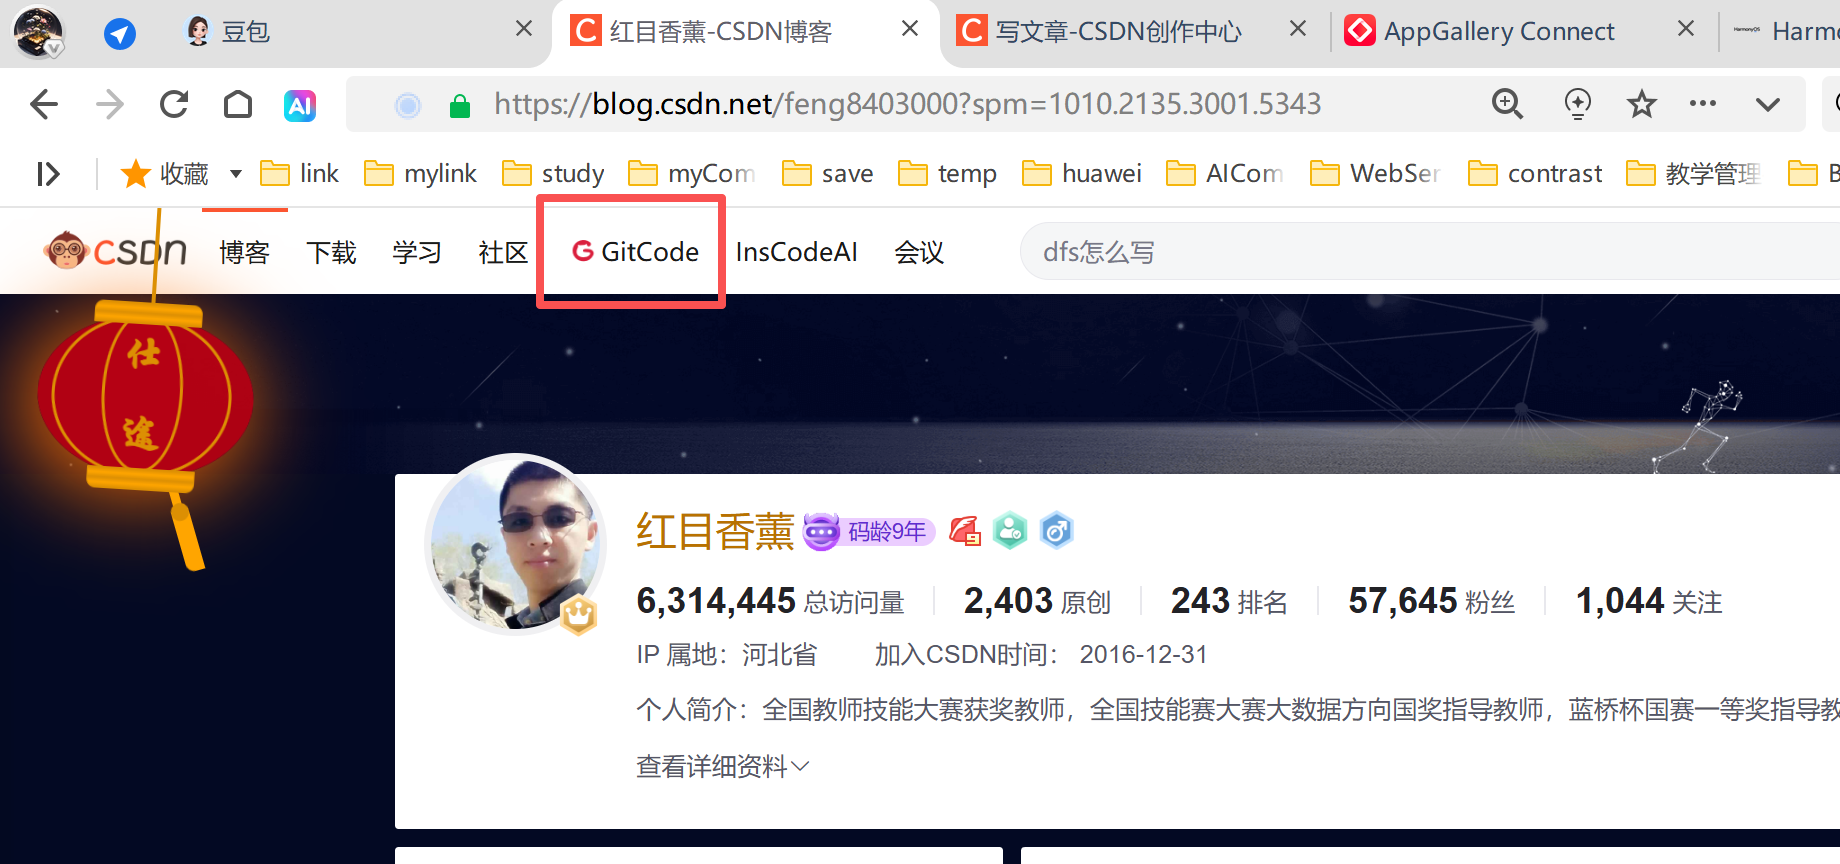
1、进入gitCode点击大赛
从主页点击进入GitCode
2、进入大赛平台参赛
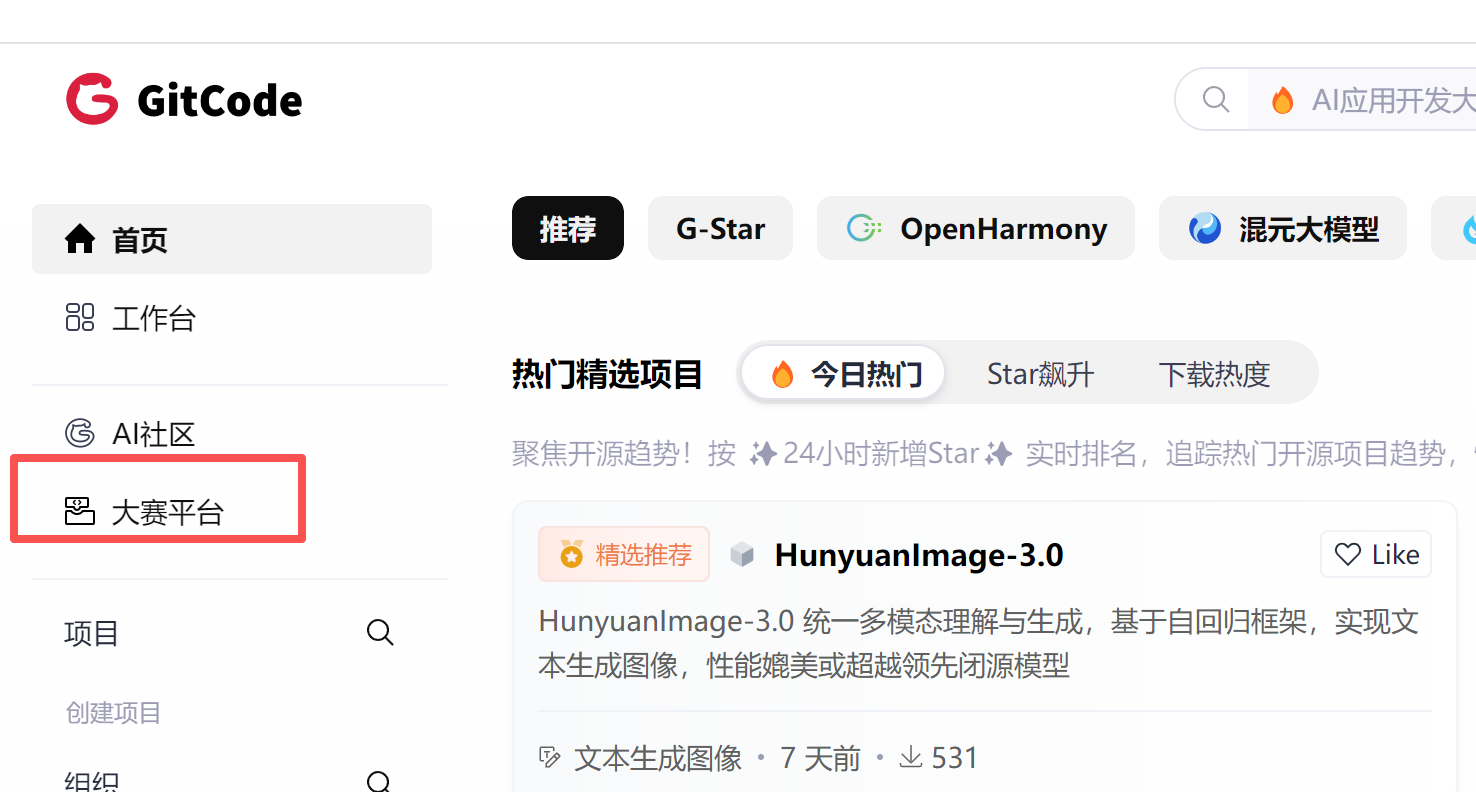
下拉找到GitCode-文心大模型的比赛点击进入。
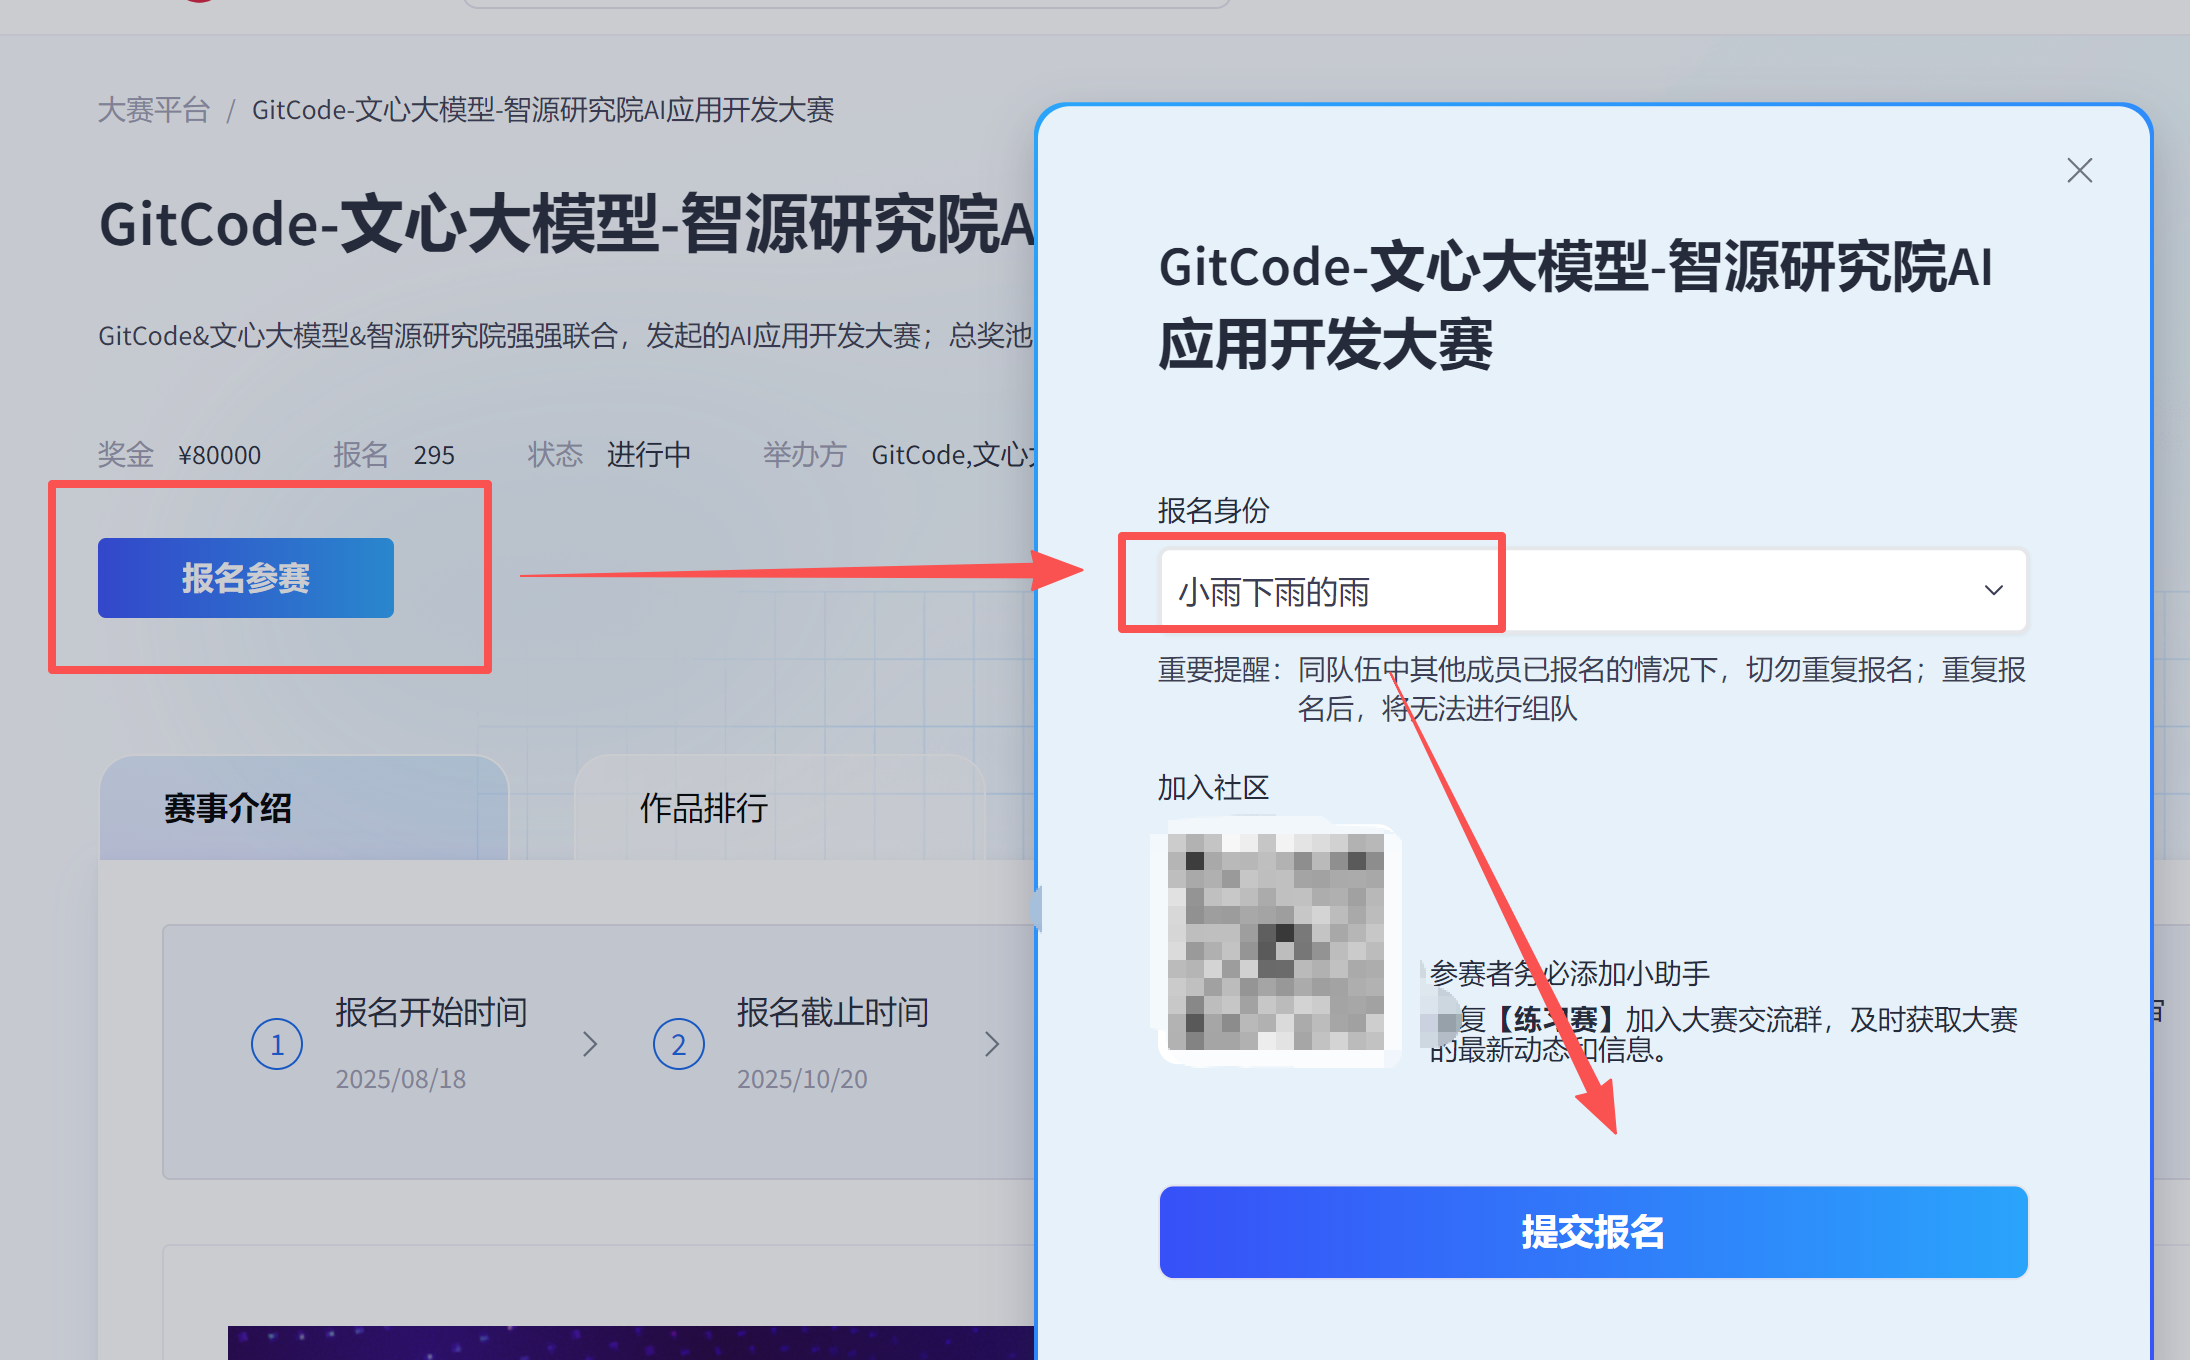
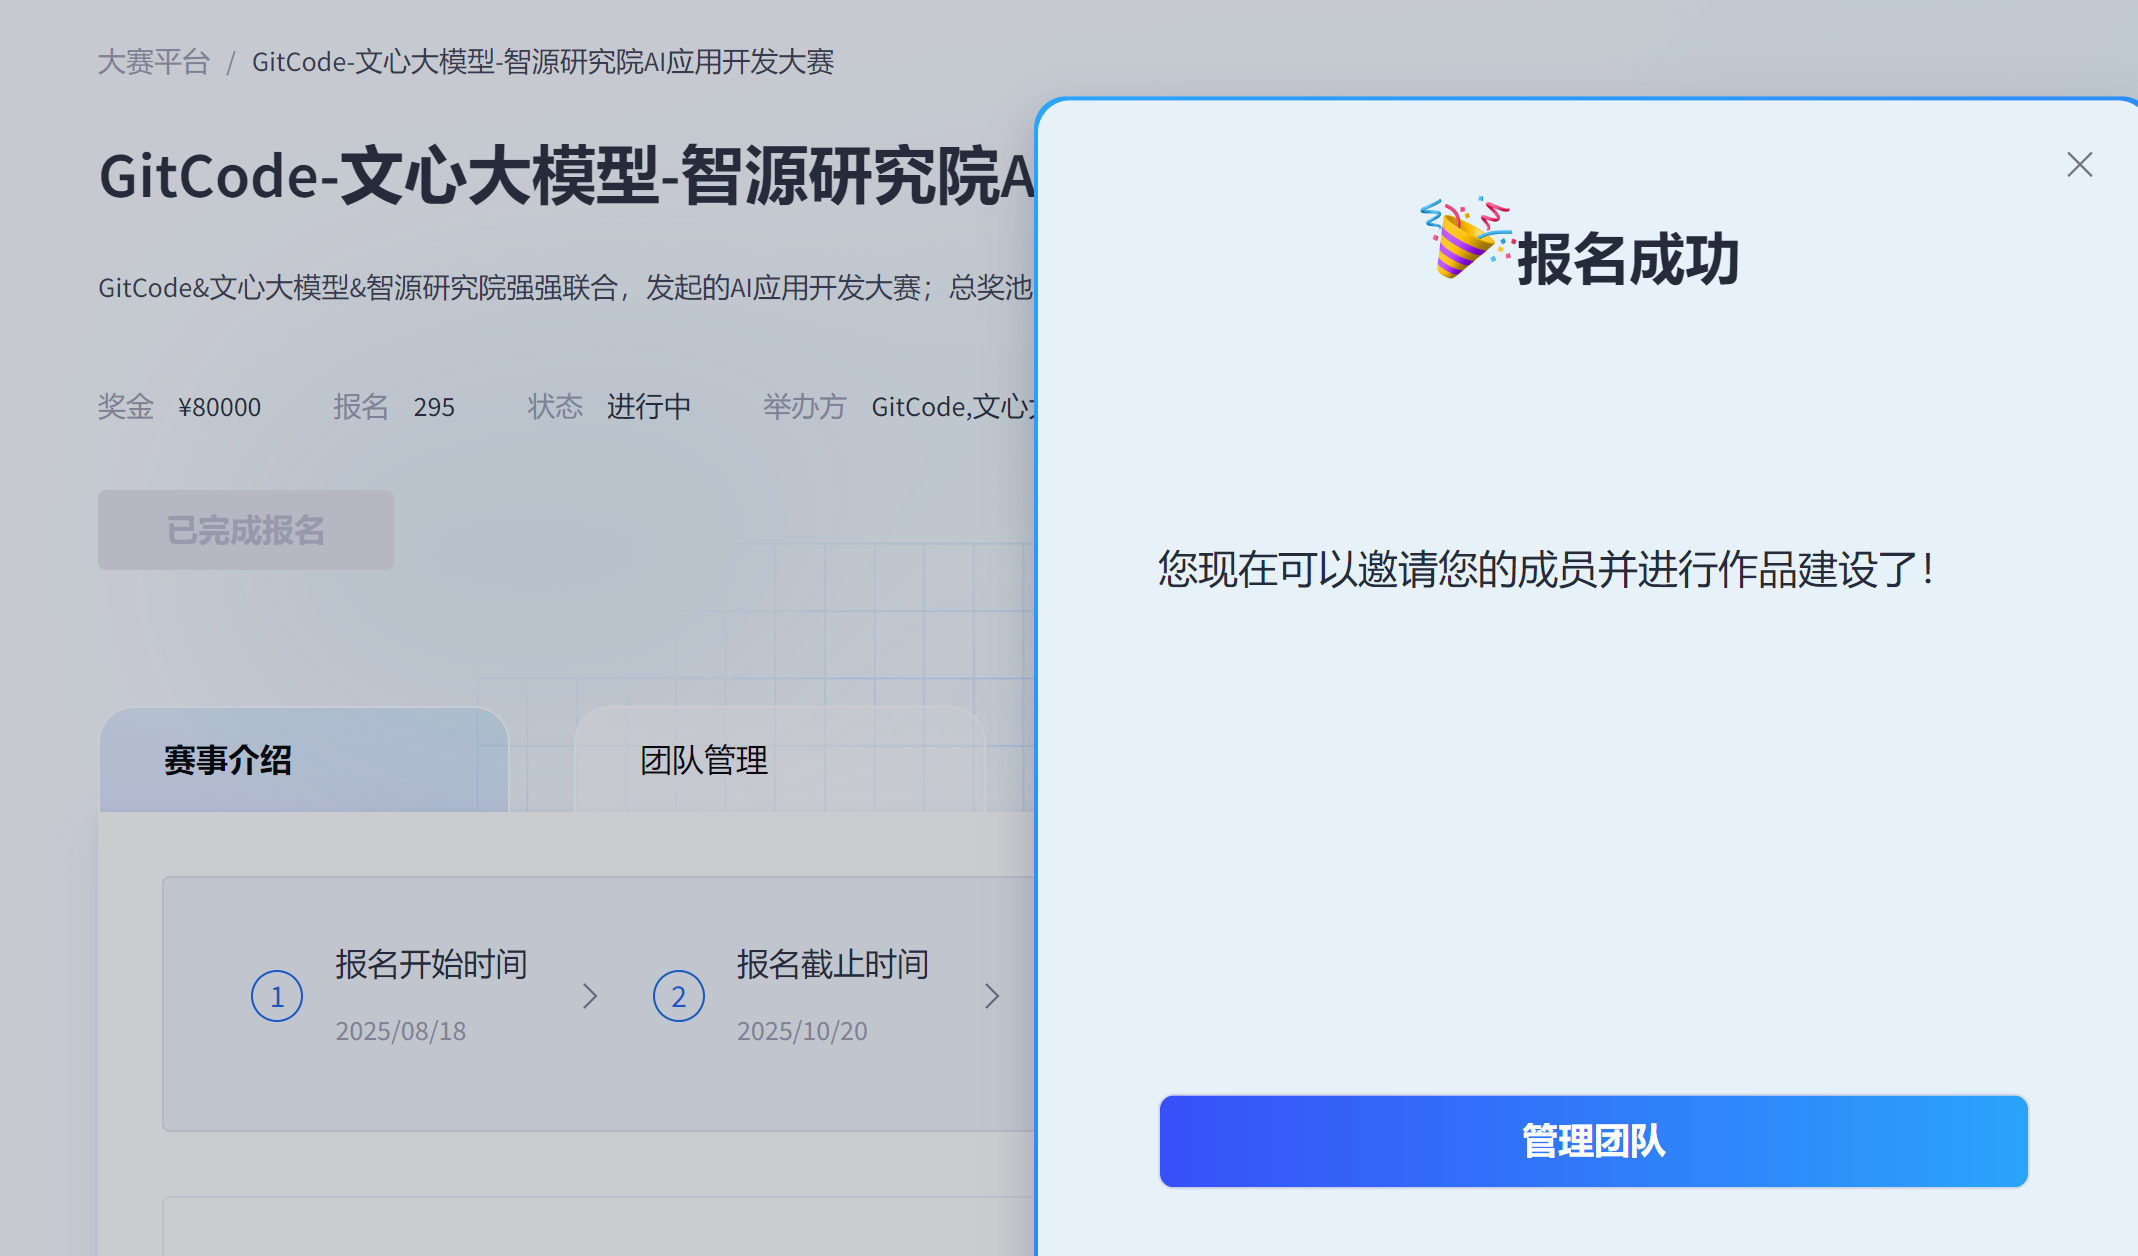
3、报名操作
报名很方便,直接就能获取CSDN的信息。
4、报名成功-管理团队
我们进入团队管理看看。
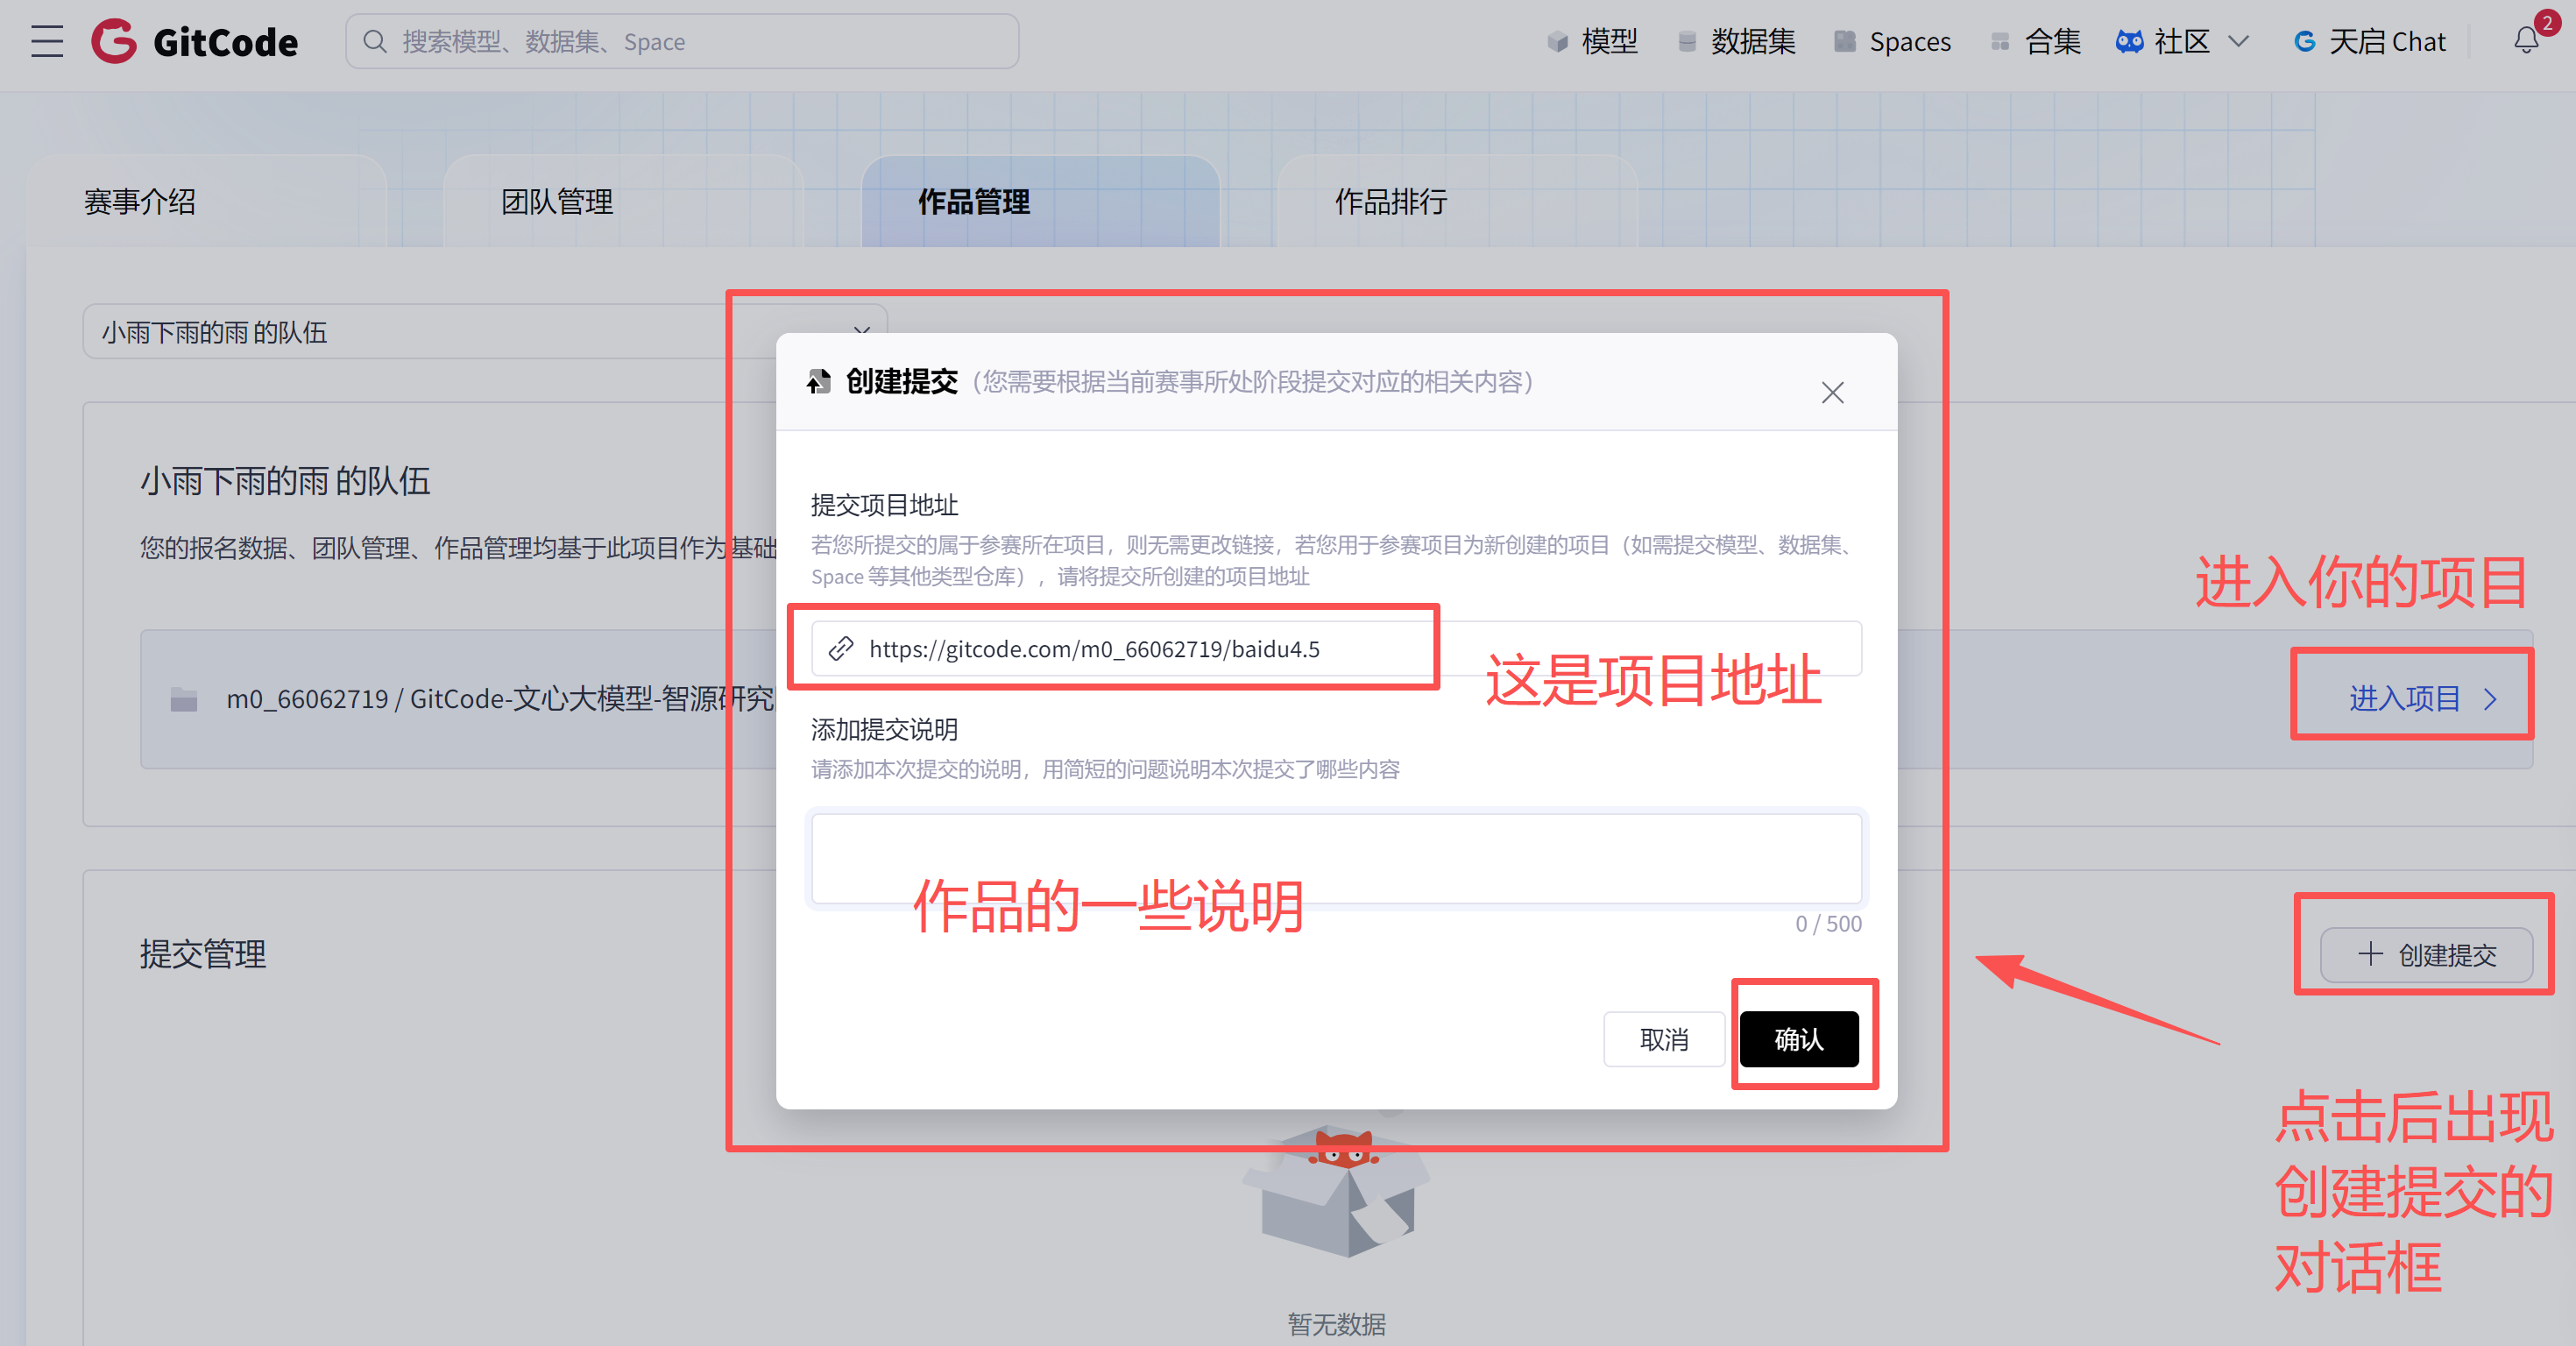
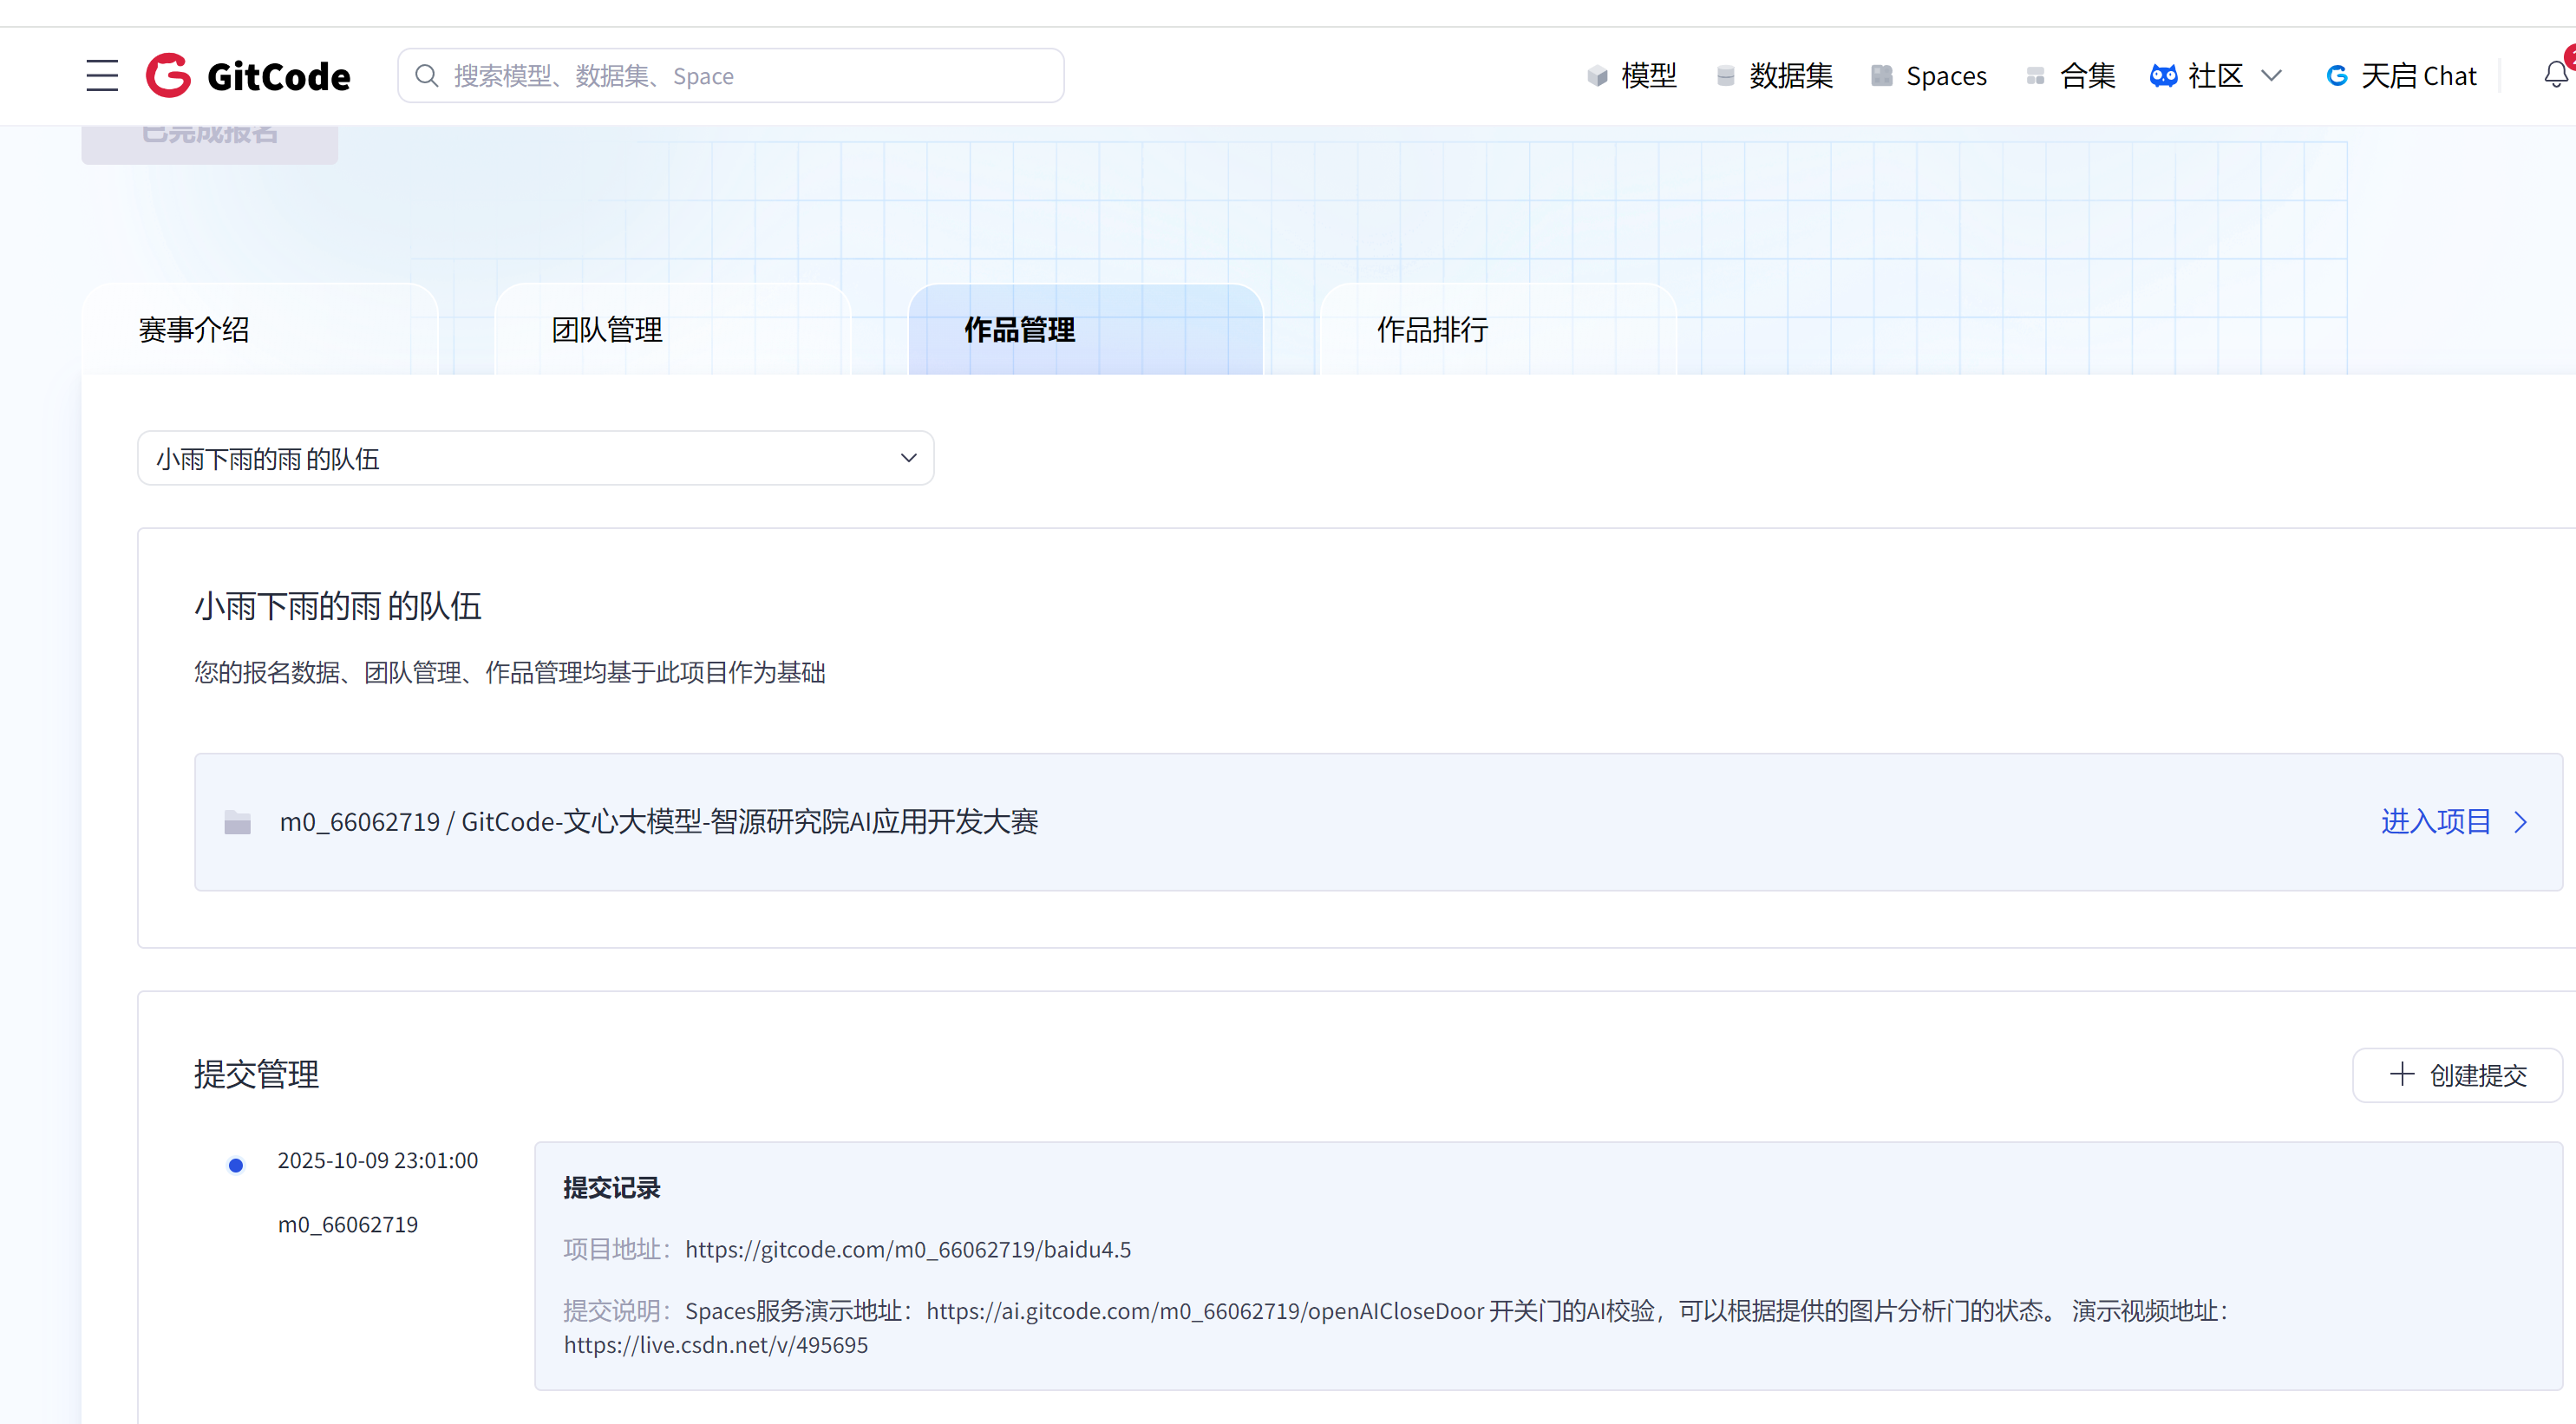
5、提交作品位置
下方你能看到作品管理,可以点击看一下。
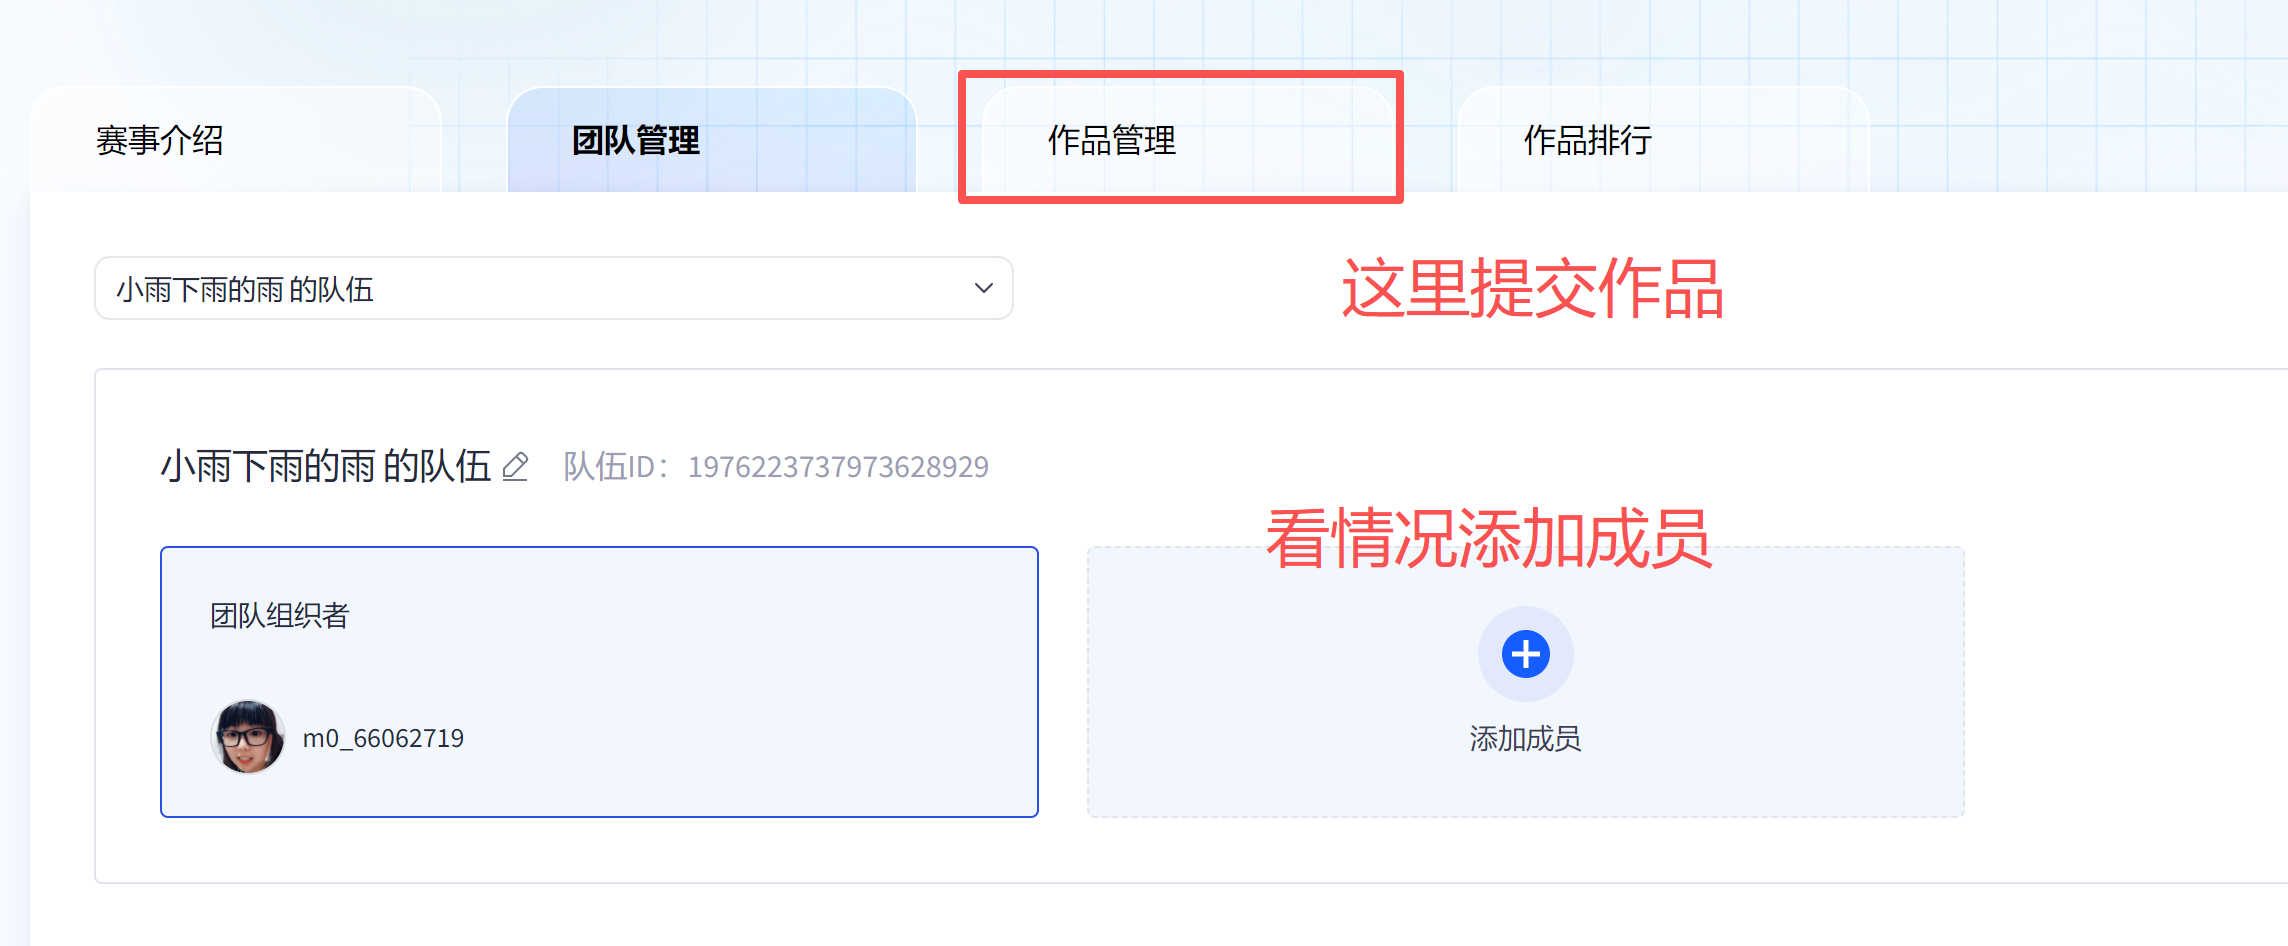
提交的位置
6、选择模型
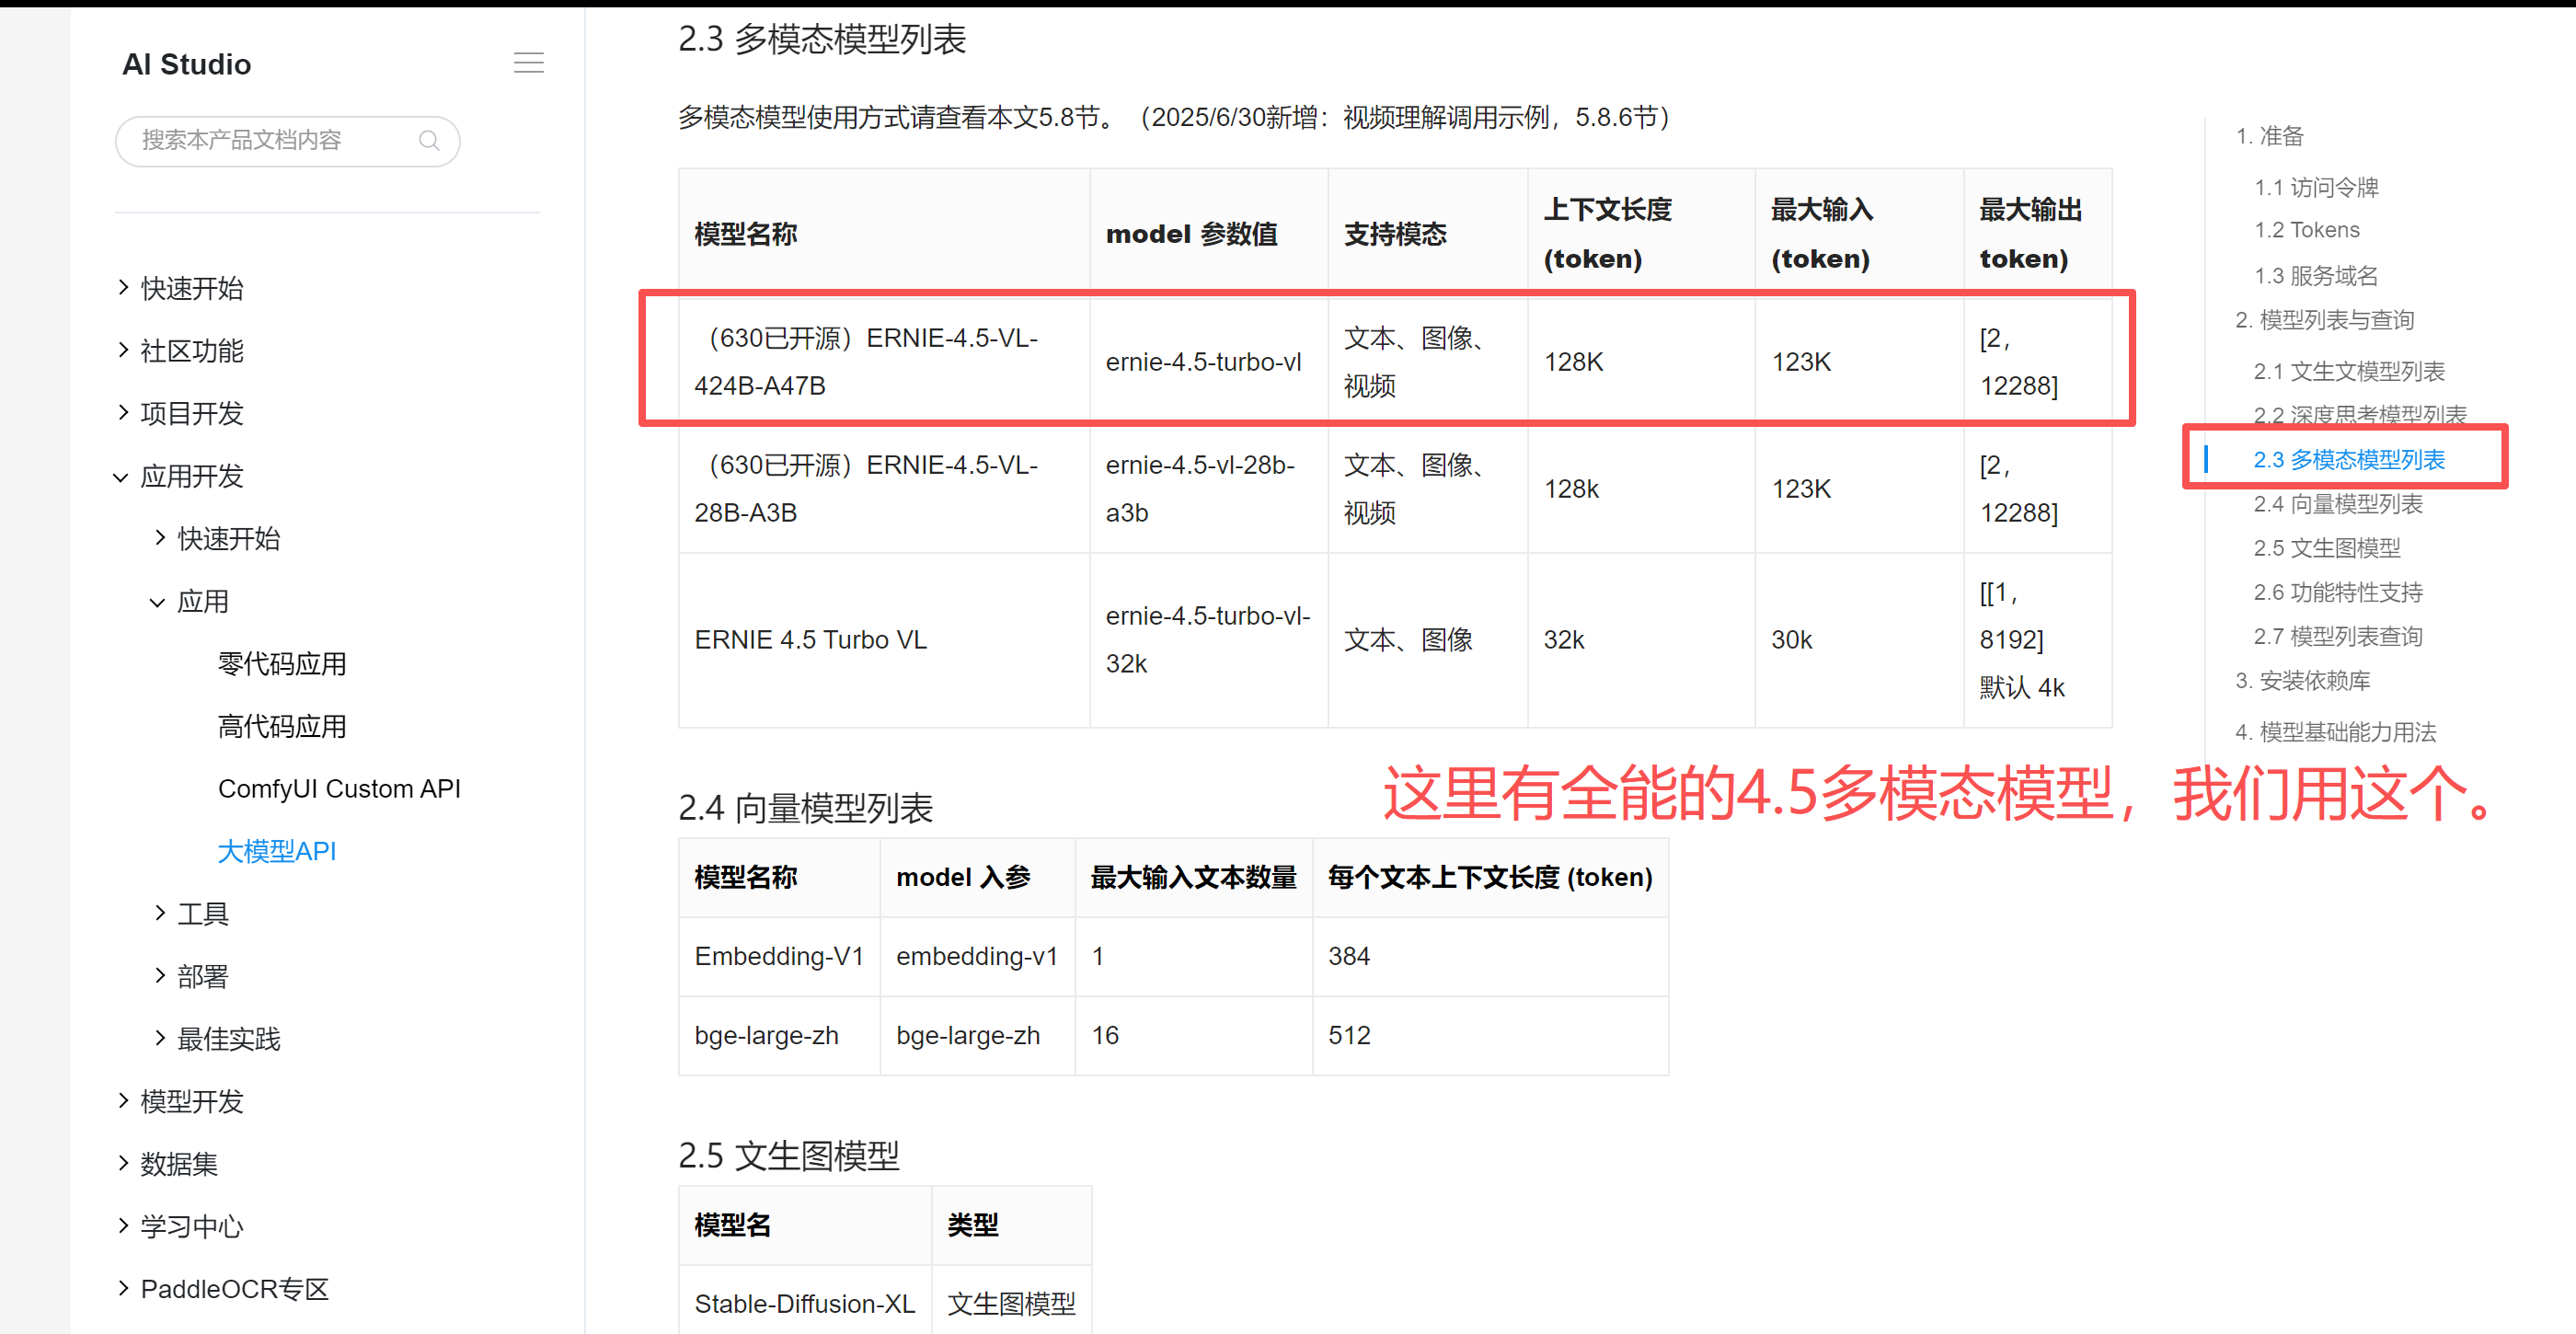
这里需要记住,我们的模型model参数值是:ernie-4.5-turbo-vl
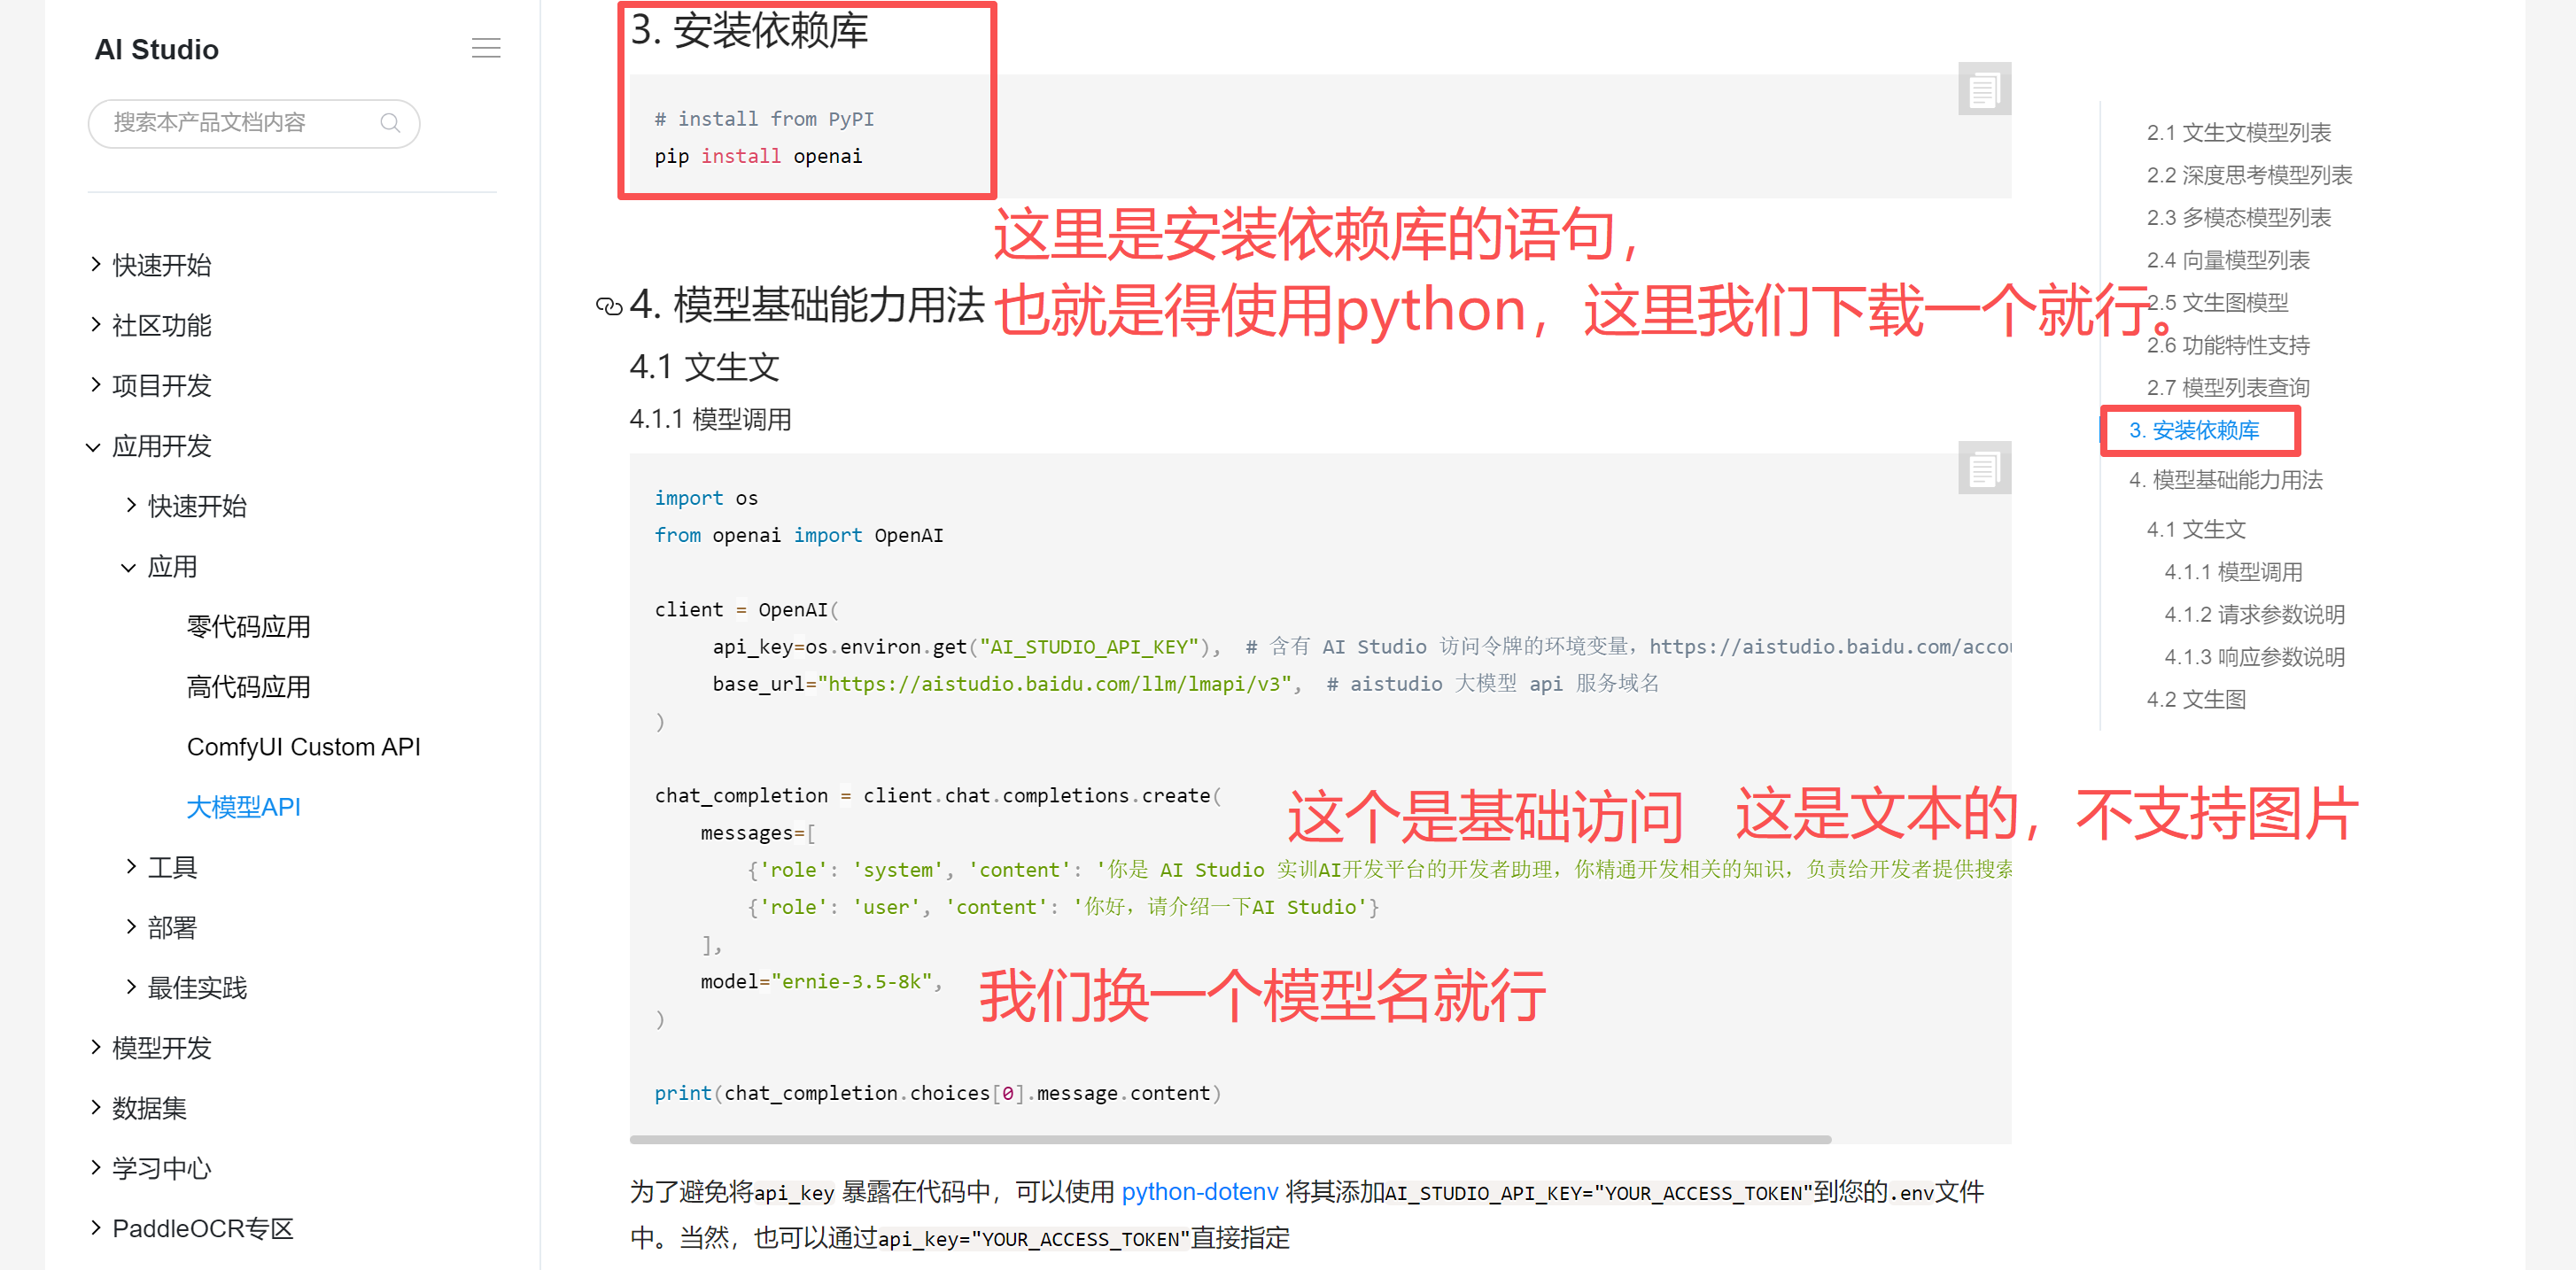
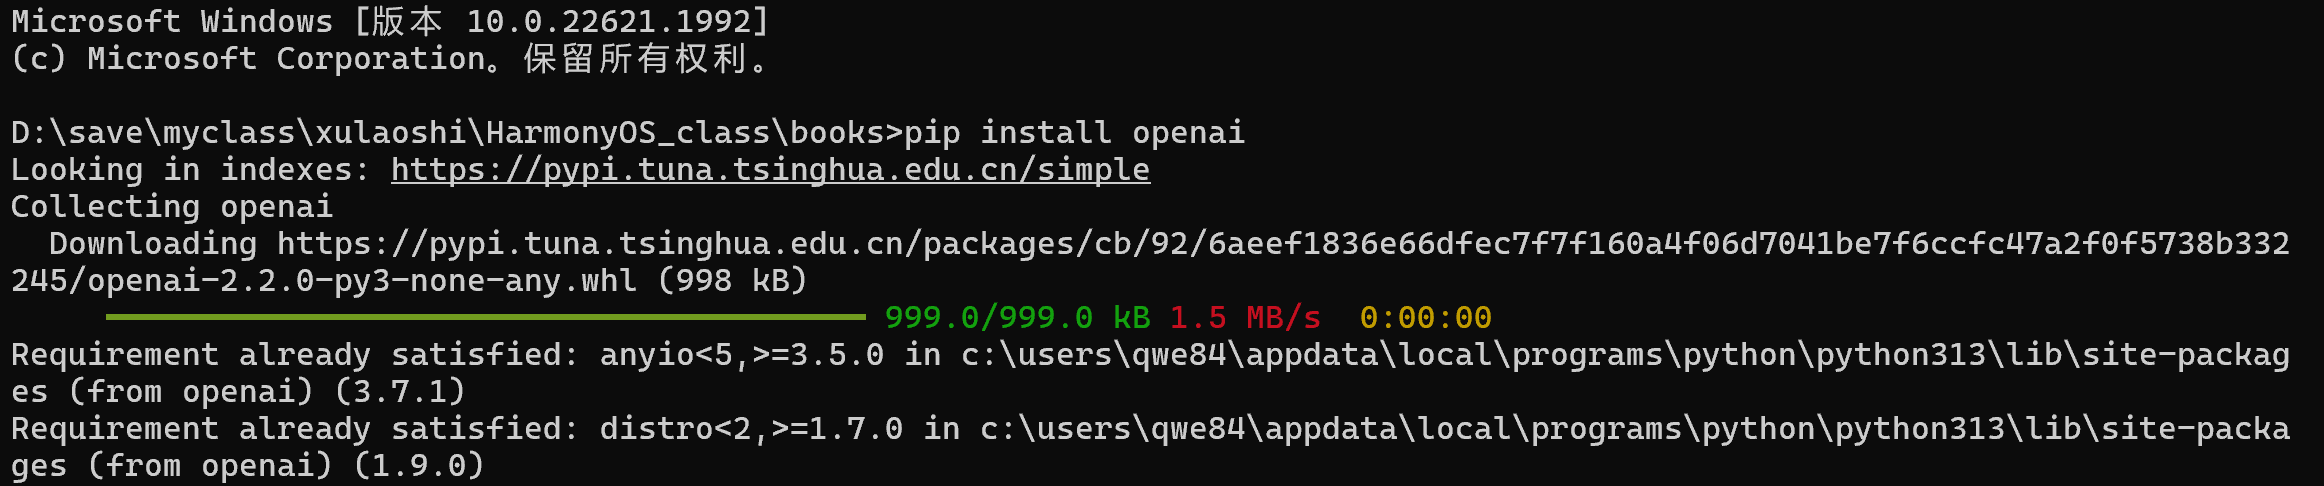
7、安装依赖库
需要先安装python,再去操作啊。
pip install openai
如果需要安装python可以参考:https://blog.csdn.net/feng8403000/article/details/142427681
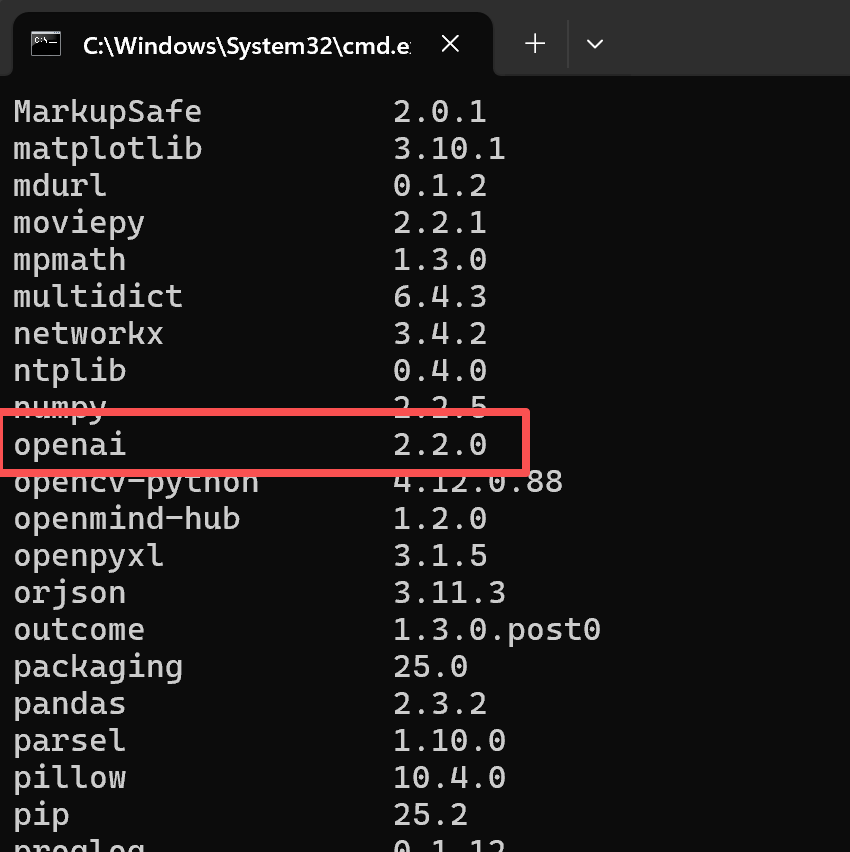
使用下面的命令可以查看是否安装完毕。
pip list
8、API使用示例
编码这里我们可以使用各类AI工具以及自行编辑代码,例如:百度-文心快码。
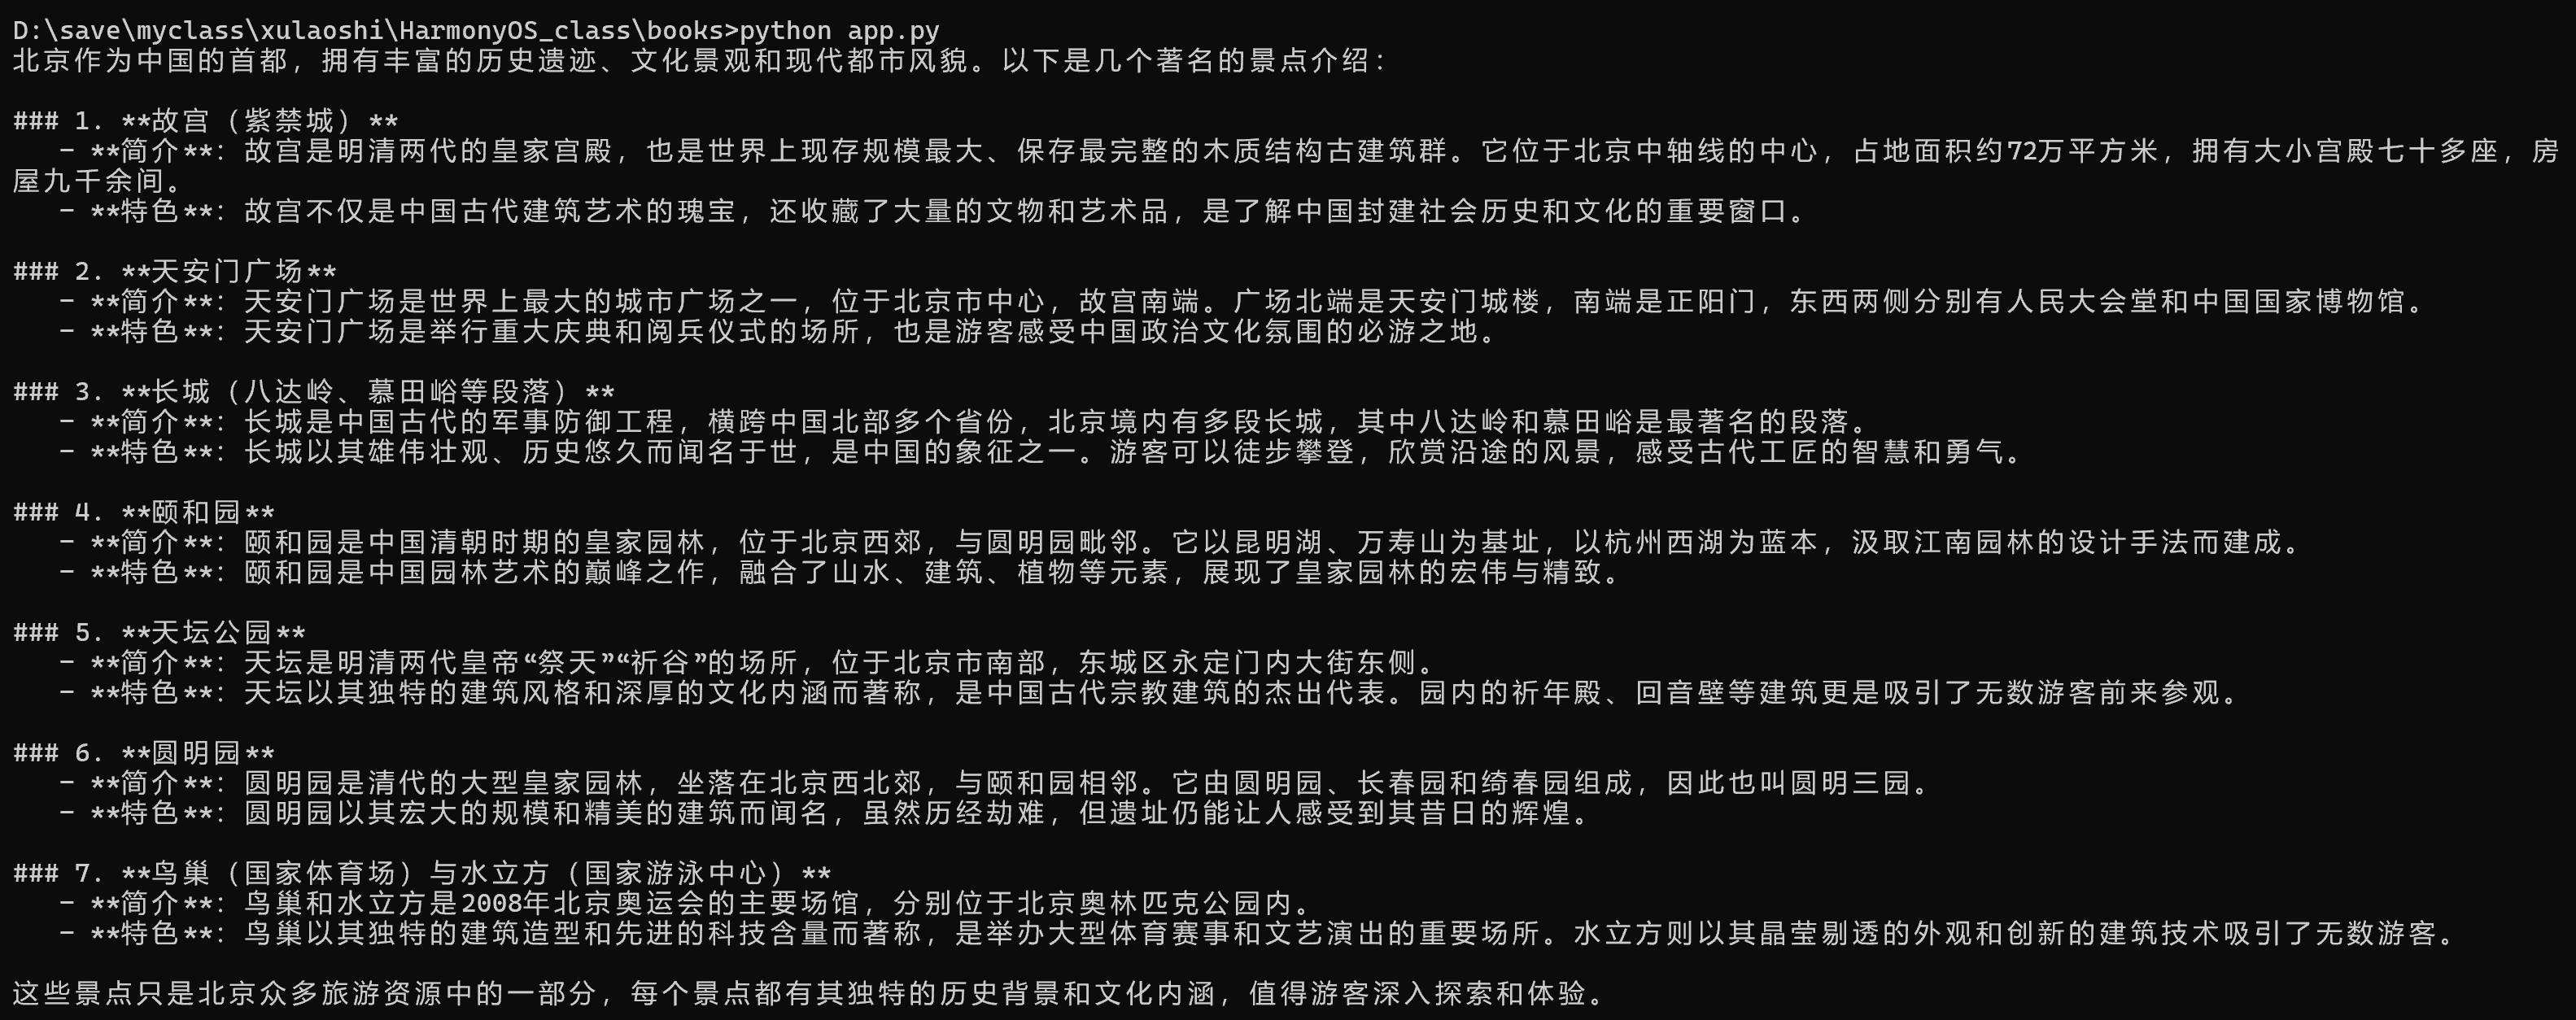
基本文本示例
需要改一下model模型名称【ernie-4.5-turbo-vl】

代码效果,我们在前面已经拿到了对应的API_KEY,所以替换一下就可以。
import os
from openai import OpenAI

client = OpenAI(
    api_key="AI_STUDIO_API_KEY",  # 含有 AI Studio 访问令牌的环境变量,https://aistudio.baidu.com/account/accessToken,
    base_url="https://aistudio.baidu.com/llm/lmapi/v3",  # aistudio 大模型 api 服务域名
)

completion = client.chat.completions.create(
        model="ernie-4.5-turbo-vl",
        messages=[
            {
                'role': 'user', 'content': [
                    {
                        "type": "text",
                        "text": "介绍几个北京著名景点"
                    }
                ]
            }
        ]
    )

print(completion.choices[0].message.content or "")
请求结果:
多模态图文示例(网络图片)
这里可以采用多模态的-图片+文本输入-流式的方式,这个效果好一些,这里也要改一下model的名称。【ernie-4.5-turbo-vl】
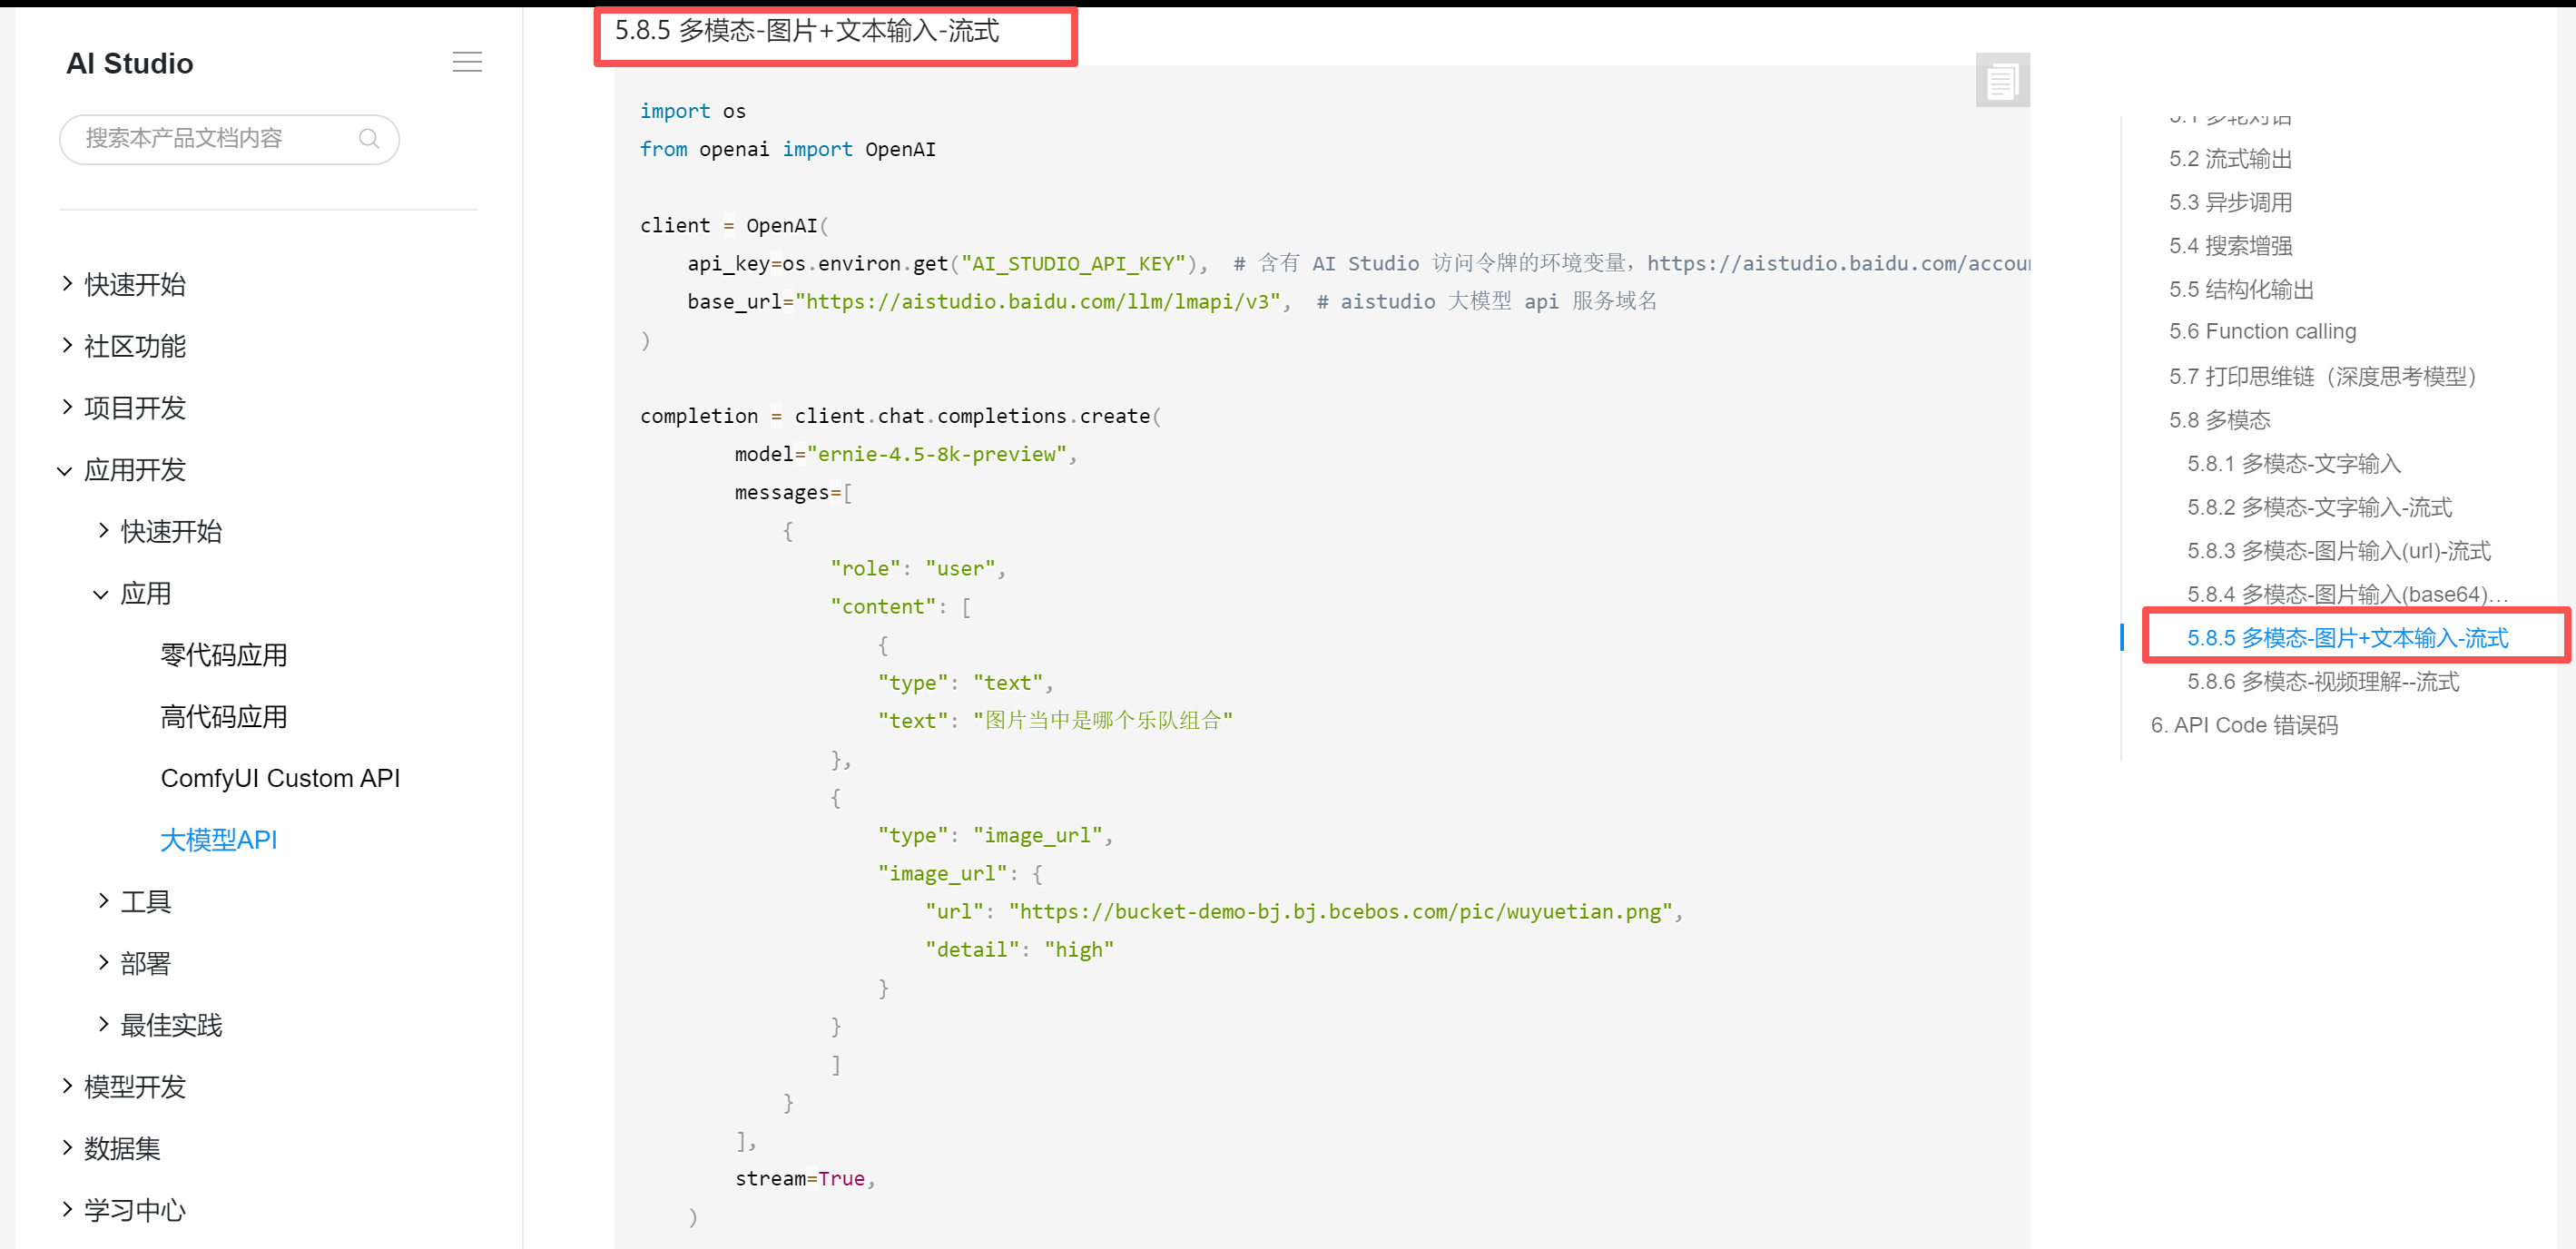
示例代码:
import os
from openai import OpenAI
client = OpenAI(
api_key="API_KEY", # 含有 AI Studio 访问令牌的环境变量,https://aistudio.baidu.com/account/accessToken,
base_url="https://aistudio.baidu.com/llm/lmapi/v3", # aistudio 大模型 api 服务域名
)
completion = client.chat.completions.create(
model="ernie-4.5-turbo-vl",
messages=[
{
"role": "user",
"content": [
{
"type": "text",
"text": "图片当中是哪个乐队组合"
},
{
"type": "image_url",
"image_url": {
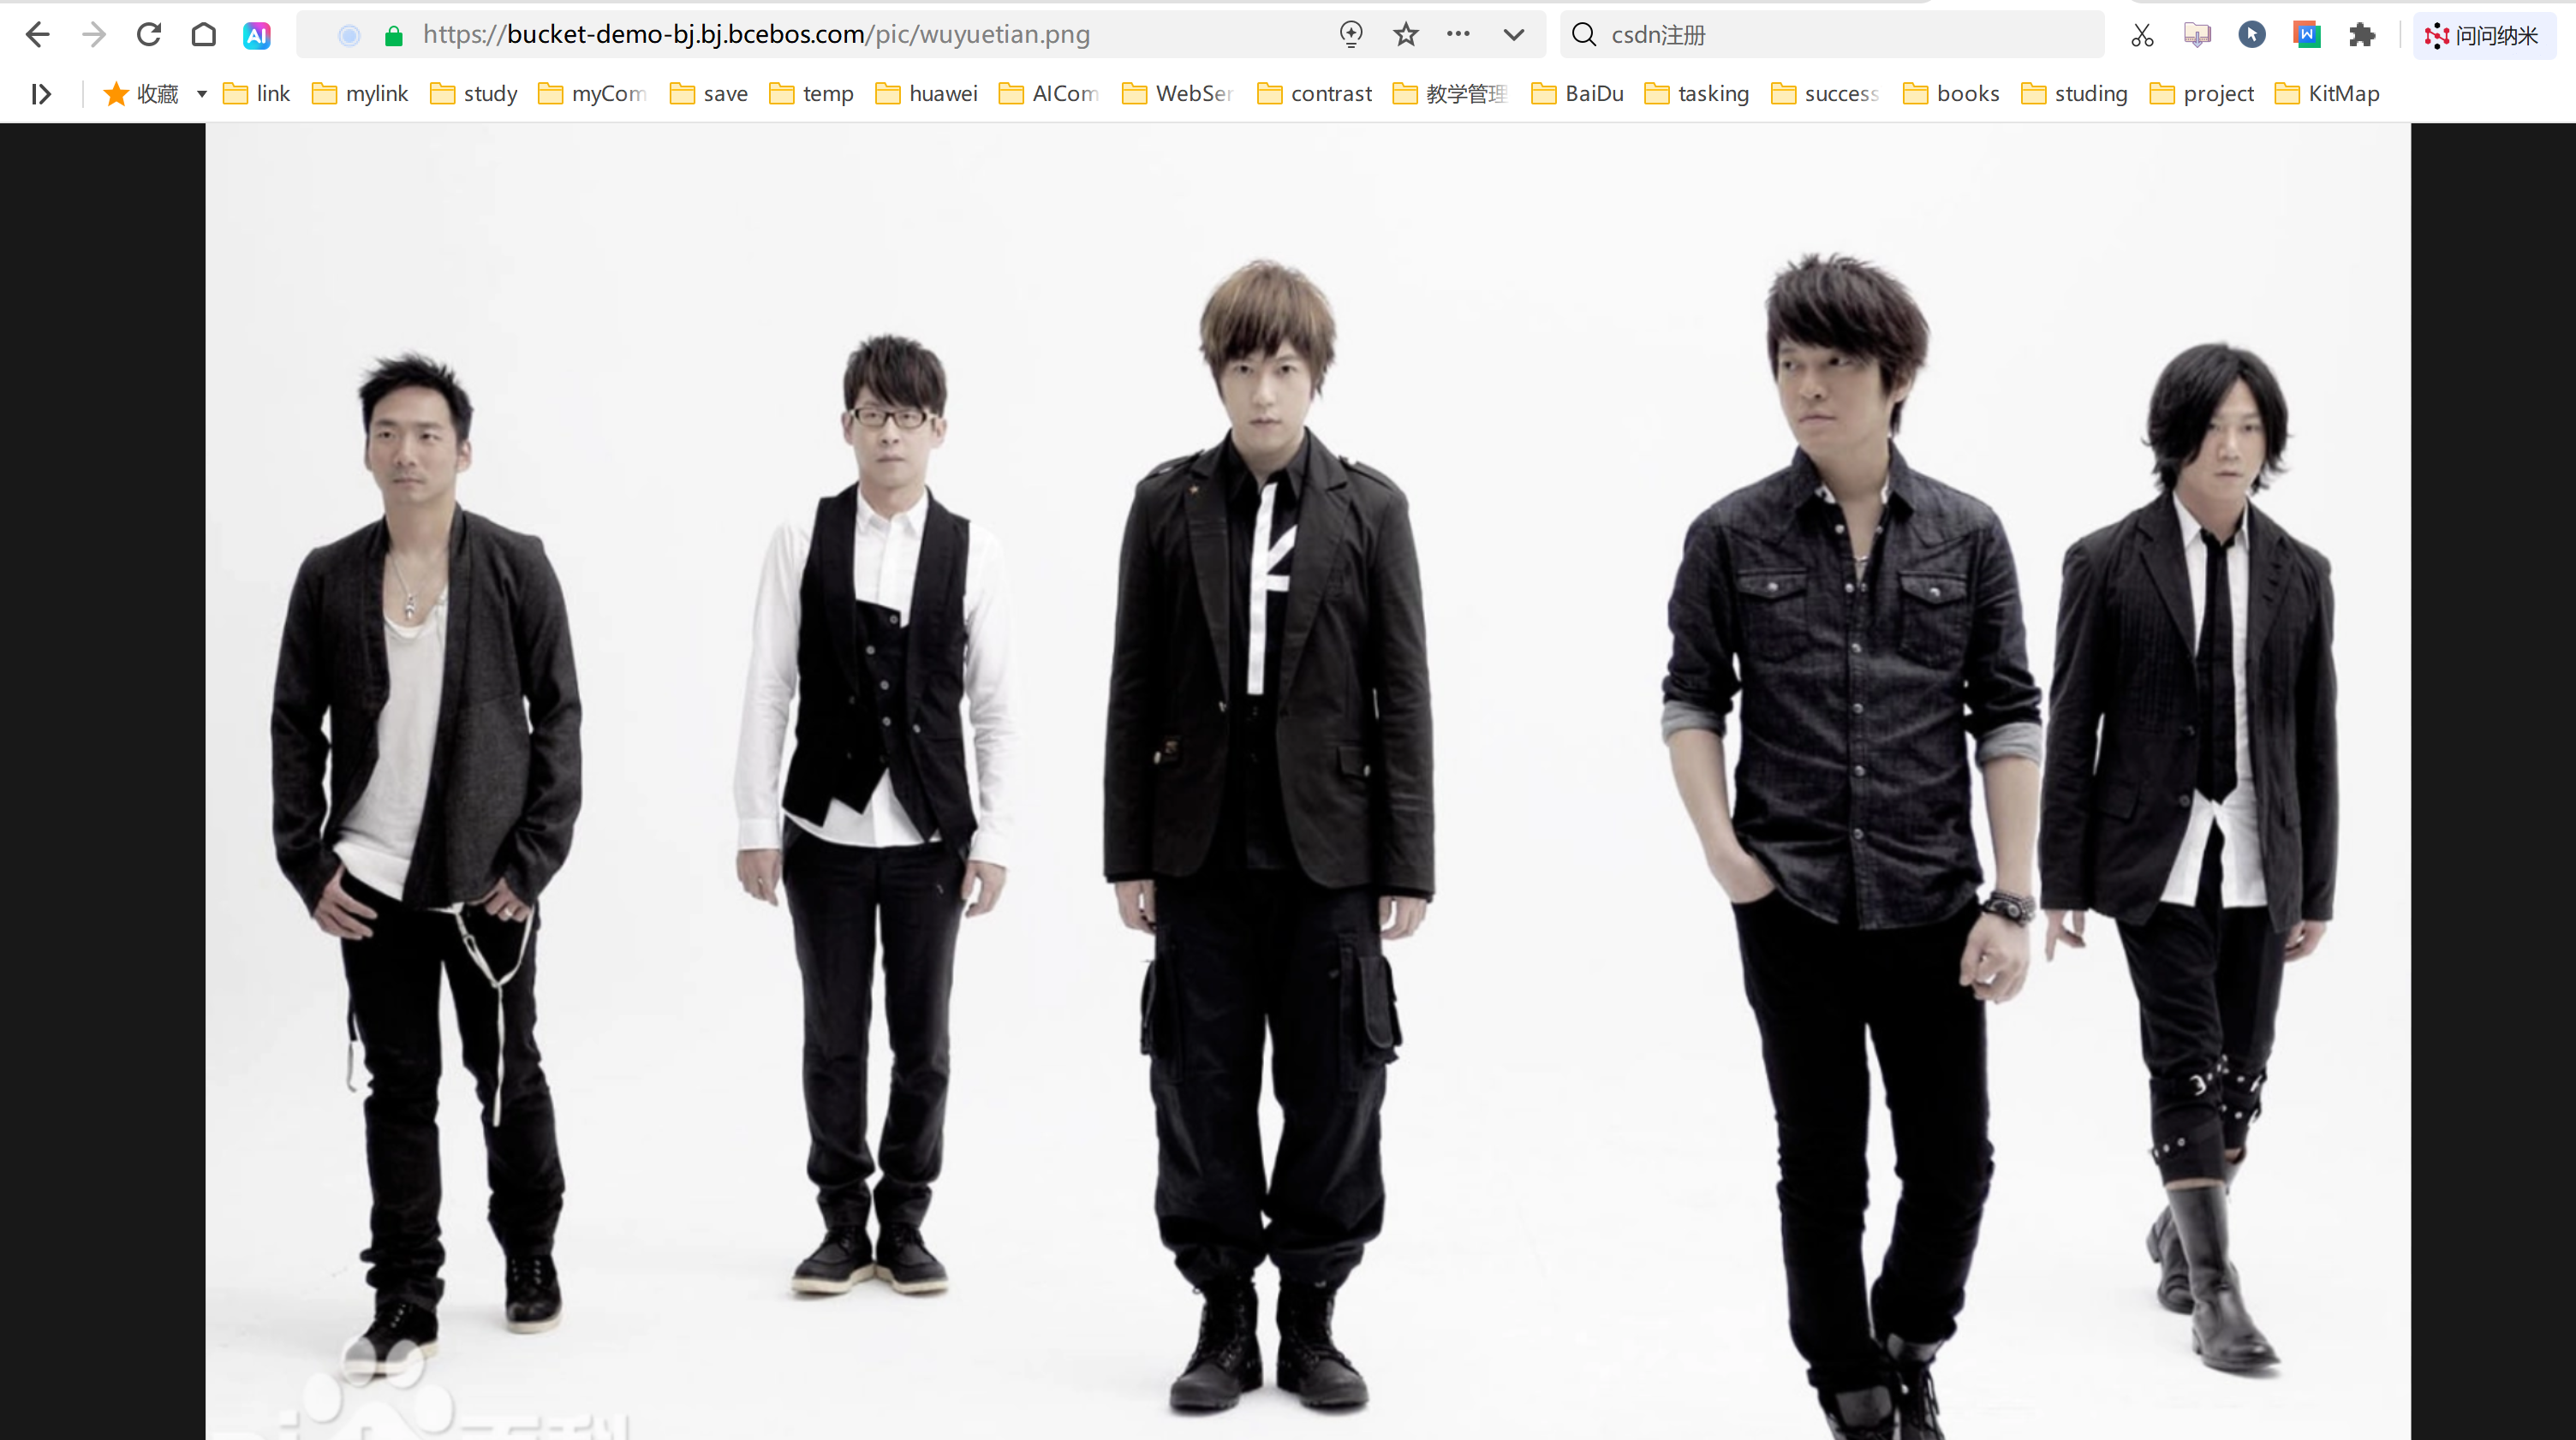
"url": "https://bucket-demo-bj.bj.bcebos.com/pic/wuyuetian.png",
"detail": "high"
}
}
]
}
],
stream=True,
)
for chunk in completion:
if (len(chunk.choices) > 0):
print(chunk.choices[0].delta.content, end="", flush=True)示例效果:

测试的图片:
多模态图文示例(本地图片base64处理)
示例代码:
import os
import base64
from openai import OpenAI
def encode_image(image_path):
"""将本地图片转换为base64编码"""
with open(image_path, "rb") as image_file:
return base64.b64encode(image_file.read()).decode('utf-8')
client = OpenAI(
api_key="API-KEY", # 含有 AI Studio 访问令牌的环境变量,https://aistudio.baidu.com/account/accessToken,
base_url="https://aistudio.baidu.com/llm/lmapi/v3", # aistudio 大模型 api 服务域名
)
completion = client.chat.completions.create(
model="ernie-4.5-turbo-vl",
messages=[
{
"role": "user",
"content": [
{
"type": "text",
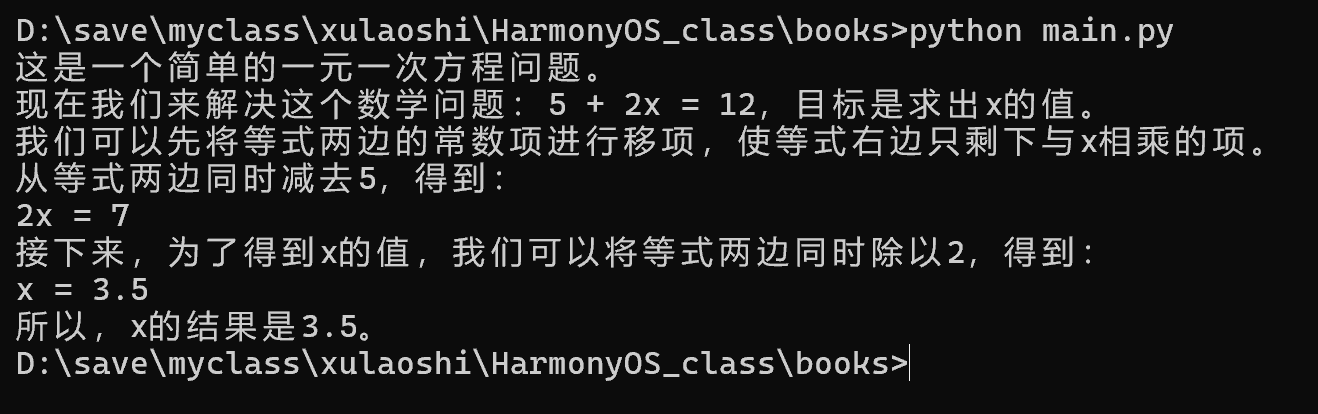
"text": "x的结果是多少?"
},
{
"type": "image_url",
"image_url": {
# 本地图片base64编码
"url": f"data:image/png;base64,{encode_image('pic.png')}",
"detail": "high"
}
}
]
}
],
stream=True,
)
for chunk in completion:
if (len(chunk.choices) > 0):
print(chunk.choices[0].delta.content, end="", flush=True)示例效果:
上传的图片是:

返回结果:
9、Web效果
示例代码:
import os
import base64
from flask import Flask, request, jsonify
from openai import OpenAI

app = Flask(__name__)

# 初始化OpenAI客户端
client = OpenAI(
    api_key="5124588afef0ea3dba67365a5b9cd429283ba74d",
    base_url="https://aistudio.baidu.com/llm/lmapi/v3",
)

def encode_image(image_path):
    """将本地图片转换为base64编码"""
    with open(image_path, "rb") as image_file:
        return base64.b64encode(image_file.read()).decode('utf-8')

def analyze_door_status(image_base64):
    """分析图片中门的状态"""
    try:
        completion = client.chat.completions.create(
            model="ernie-4.5-turbo-vl",
            messages=[
                {
                    "role": "user",
                    "content": [
                        {
                            "type": "text",
                            "text": "请仔细查看这张图片中的门,判断门是关闭的还是打开的。请用中文回答,格式如下:\n门的状态:[关闭/打开]\n详细描述:[具体描述门的状况]"
                        },
                        {
                            "type": "image_url",
                            "image_url": {
                                "url": f"data:image/png;base64,{image_base64}",
                                "detail": "high"
                            }
                        }
                    ]
                }
            ],
            stream=False,
        )

        return completion.choices[0].message.content or "无法识别门的状态"
    except Exception as e:
        return f"分析失败: {str(e)}"

@app.route('/')
def index():
    """主页 - 返回内嵌HTML"""
    return '''
<!DOCTYPE html>
<html lang="zh-CN">
<head>
    <meta charset="UTF-8">
    <meta name="viewport" content="width=device-width, initial-scale=1.0">
    <title>门状态识别系统</title>
    <style>
        * {
            margin: 0;
            padding: 0;
            box-sizing: border-box;
        }

        body {
            font-family: 'Microsoft YaHei', Arial, sans-serif;
            background: linear-gradient(135deg, #667eea 0%, #764ba2 100%);
            min-height: 100vh;
            display: flex;
            align-items: center;
            justify-content: center;
            padding: 20px;
        }

        .container {
            background: white;
            border-radius: 20px;
            box-shadow: 0 20px 40px rgba(0,0,0,0.1);
            padding: 40px;
            max-width: 600px;
            width: 100%;
        }

        .header {
            text-align: center;
            margin-bottom: 30px;
        }

        .header h1 {
            color: #333;
            font-size: 2.5em;
            margin-bottom: 10px;
        }

        .header p {
            color: #666;
            font-size: 1.1em;
        }

        .upload-area {
            border: 3px dashed #ddd;
            border-radius: 15px;
            padding: 40px;
            text-align: center;
            margin-bottom: 30px;
            transition: all 0.3s ease;
            cursor: pointer;
        }

        .upload-area:hover {
            border-color: #667eea;
            background-color: #f8f9ff;
        }

        .upload-area.dragover {
            border-color: #667eea;
            background-color: #f0f4ff;
        }

        .upload-icon {
            font-size: 3em;
            color: #667eea;
            margin-bottom: 20px;
        }

        .upload-text {
            font-size: 1.2em;
            color: #666;
            margin-bottom: 20px;
        }

        .file-input {
            display: none;
        }

        .btn {
            background: linear-gradient(135deg, #667eea 0%, #764ba2 100%);
            color: white;
            border: none;
            padding: 15px 30px;
            border-radius: 25px;
            font-size: 1.1em;
            cursor: pointer;
            transition: transform 0.2s ease;
            margin: 10px;
        }

        .btn:hover {
            transform: translateY(-2px);
        }

        .btn:disabled {
            opacity: 0.6;
            cursor: not-allowed;
            transform: none;
        }

        .result-area {
            margin-top: 30px;
            padding: 20px;
            background: #f8f9fa;
            border-radius: 15px;
            display: none;
        }

        .result-title {
            font-size: 1.3em;
            color: #333;
            margin-bottom: 15px;
            font-weight: bold;
        }

        .result-content {
            color: #555;
            line-height: 1.6;
            font-size: 1.1em;
        }

        .loading {
            text-align: center;
            margin: 20px 0;
            display: none;
        }

        .spinner {
            border: 4px solid #f3f3f3;
            border-top: 4px solid #667eea;
            border-radius: 50%;
            width: 40px;
            height: 40px;
            animation: spin 1s linear infinite;
            margin: 0 auto 10px;
        }

        @keyframes spin {
            0% { transform: rotate(0deg); }
            100% { transform: rotate(360deg); }
        }

        .error {
            color: #e74c3c;
            background: #fdf2f2;
            border: 1px solid #fecaca;
            padding: 15px;
            border-radius: 10px;
            margin-top: 20px;
            display: none;
        }

        .success {
            color: #27ae60;
            background: #f0f9f0;
            border: 1px solid #c3e6c3;
            padding: 15px;
            border-radius: 10px;
            margin-top: 20px;
            display: none;
        }
    </style>
</head>
<body>
    <div class="container">
        <div class="header">
            <h1>🚪 门状态识别系统</h1>
            <p>上传图片,AI智能识别门是否关闭</p>
        </div>

        <div class="upload-area" id="uploadArea">
            <div class="upload-icon">📷</div>
            <div class="upload-text">点击选择图片或拖拽图片到此处</div>
            <input type="file" id="fileInput" class="file-input" accept="image/*">
            <button class="btn" onclick="document.getElementById('fileInput').click()">
                选择图片
            </button>
        </div>

        <div class="loading" id="loading">
            <div class="spinner"></div>
            <p>AI正在分析图片中...</p>
        </div>

        <div class="result-area" id="resultArea">
            <div class="result-title">识别结果</div>
            <div class="result-content" id="resultContent"></div>
        </div>

        <div class="error" id="errorArea"></div>
        <div class="success" id="successArea"></div>
    </div>

    <script>
        const uploadArea = document.getElementById('uploadArea');
        const fileInput = document.getElementById('fileInput');
        const loading = document.getElementById('loading');
        const resultArea = document.getElementById('resultArea');
        const resultContent = document.getElementById('resultContent');
        const errorArea = document.getElementById('errorArea');
        const successArea = document.getElementById('successArea');

        // 拖拽功能
        uploadArea.addEventListener('dragover', (e) => {
            e.preventDefault();
            uploadArea.classList.add('dragover');
        });

        uploadArea.addEventListener('dragleave', () => {
            uploadArea.classList.remove('dragover');
        });

        uploadArea.addEventListener('drop', (e) => {
            e.preventDefault();
            uploadArea.classList.remove('dragover');
            const files = e.dataTransfer.files;
            if (files.length > 0) {
                handleFile(files[0]);
            }
        });

        // 文件选择
        fileInput.addEventListener('change', (e) => {
            if (e.target.files.length > 0) {
                handleFile(e.target.files[0]);
            }
        });

        function handleFile(file) {
            // 验证文件类型
            if (!file.type.startsWith('image/')) {
                showError('请选择图片文件!');
                return;
            }

            // 验证文件大小 (5MB限制)
            if (file.size > 5 * 1024 * 1024) {
                showError('图片文件过大,请选择小于5MB的图片!');
                return;
            }

            uploadFile(file);
        }

        function uploadFile(file) {
            const formData = new FormData();
            formData.append('file', file);

            // 显示加载状态
            showLoading();
            hideResult();
            hideError();
            hideSuccess();

            fetch('/upload', {
                method: 'POST',
                body: formData
            })
            .then(response => response.json())
            .then(data => {
                hideLoading();
                if (data.success) {
                    showResult(data.result);
                    showSuccess(`图片 "${data.filename}" 分析完成!`);
                } else {
                    showError(data.error || '分析失败');
                }
            })
            .catch(error => {
                hideLoading();
                showError('网络错误:' + error.message);
            });
        }

        function showLoading() {
            loading.style.display = 'block';
        }

        function hideLoading() {
            loading.style.display = 'none';
        }

        function showResult(result) {
            resultContent.textContent = result;
            resultArea.style.display = 'block';
        }

        function hideResult() {
            resultArea.style.display = 'none';
        }

        function showError(message) {
            errorArea.textContent = message;
            errorArea.style.display = 'block';
        }

        function hideError() {
            errorArea.style.display = 'none';
        }

        function showSuccess(message) {
            successArea.textContent = message;
            successArea.style.display = 'block';
        }

        function hideSuccess() {
            successArea.style.display = 'none';
        }
    </script>
</body>
</html>
    '''

@app.route('/upload', methods=['POST'])
def upload_file():
    """处理图片上传和分析"""
    if 'file' not in request.files:
        return jsonify({'error': '没有选择文件'}), 400

    file = request.files['file']
    if file.filename == '':
        return jsonify({'error': '没有选择文件'}), 400

    if file:
        try:
            # 读取上传的图片并转换为base64
            image_data = file.read()
            image_base64 = base64.b64encode(image_data).decode('utf-8')

            # 分析门的状态
            result = analyze_door_status(image_base64)

            return jsonify({
                'success': True,
                'result': result,
                'filename': file.filename
            })
        except Exception as e:
            return jsonify({'error': f'处理失败: {str(e)}'}), 500

    return jsonify({'error': '文件处理失败'}), 500

if __name__ == '__main__':
    app.run(debug=True, host='0.0.0.0', port=5000)
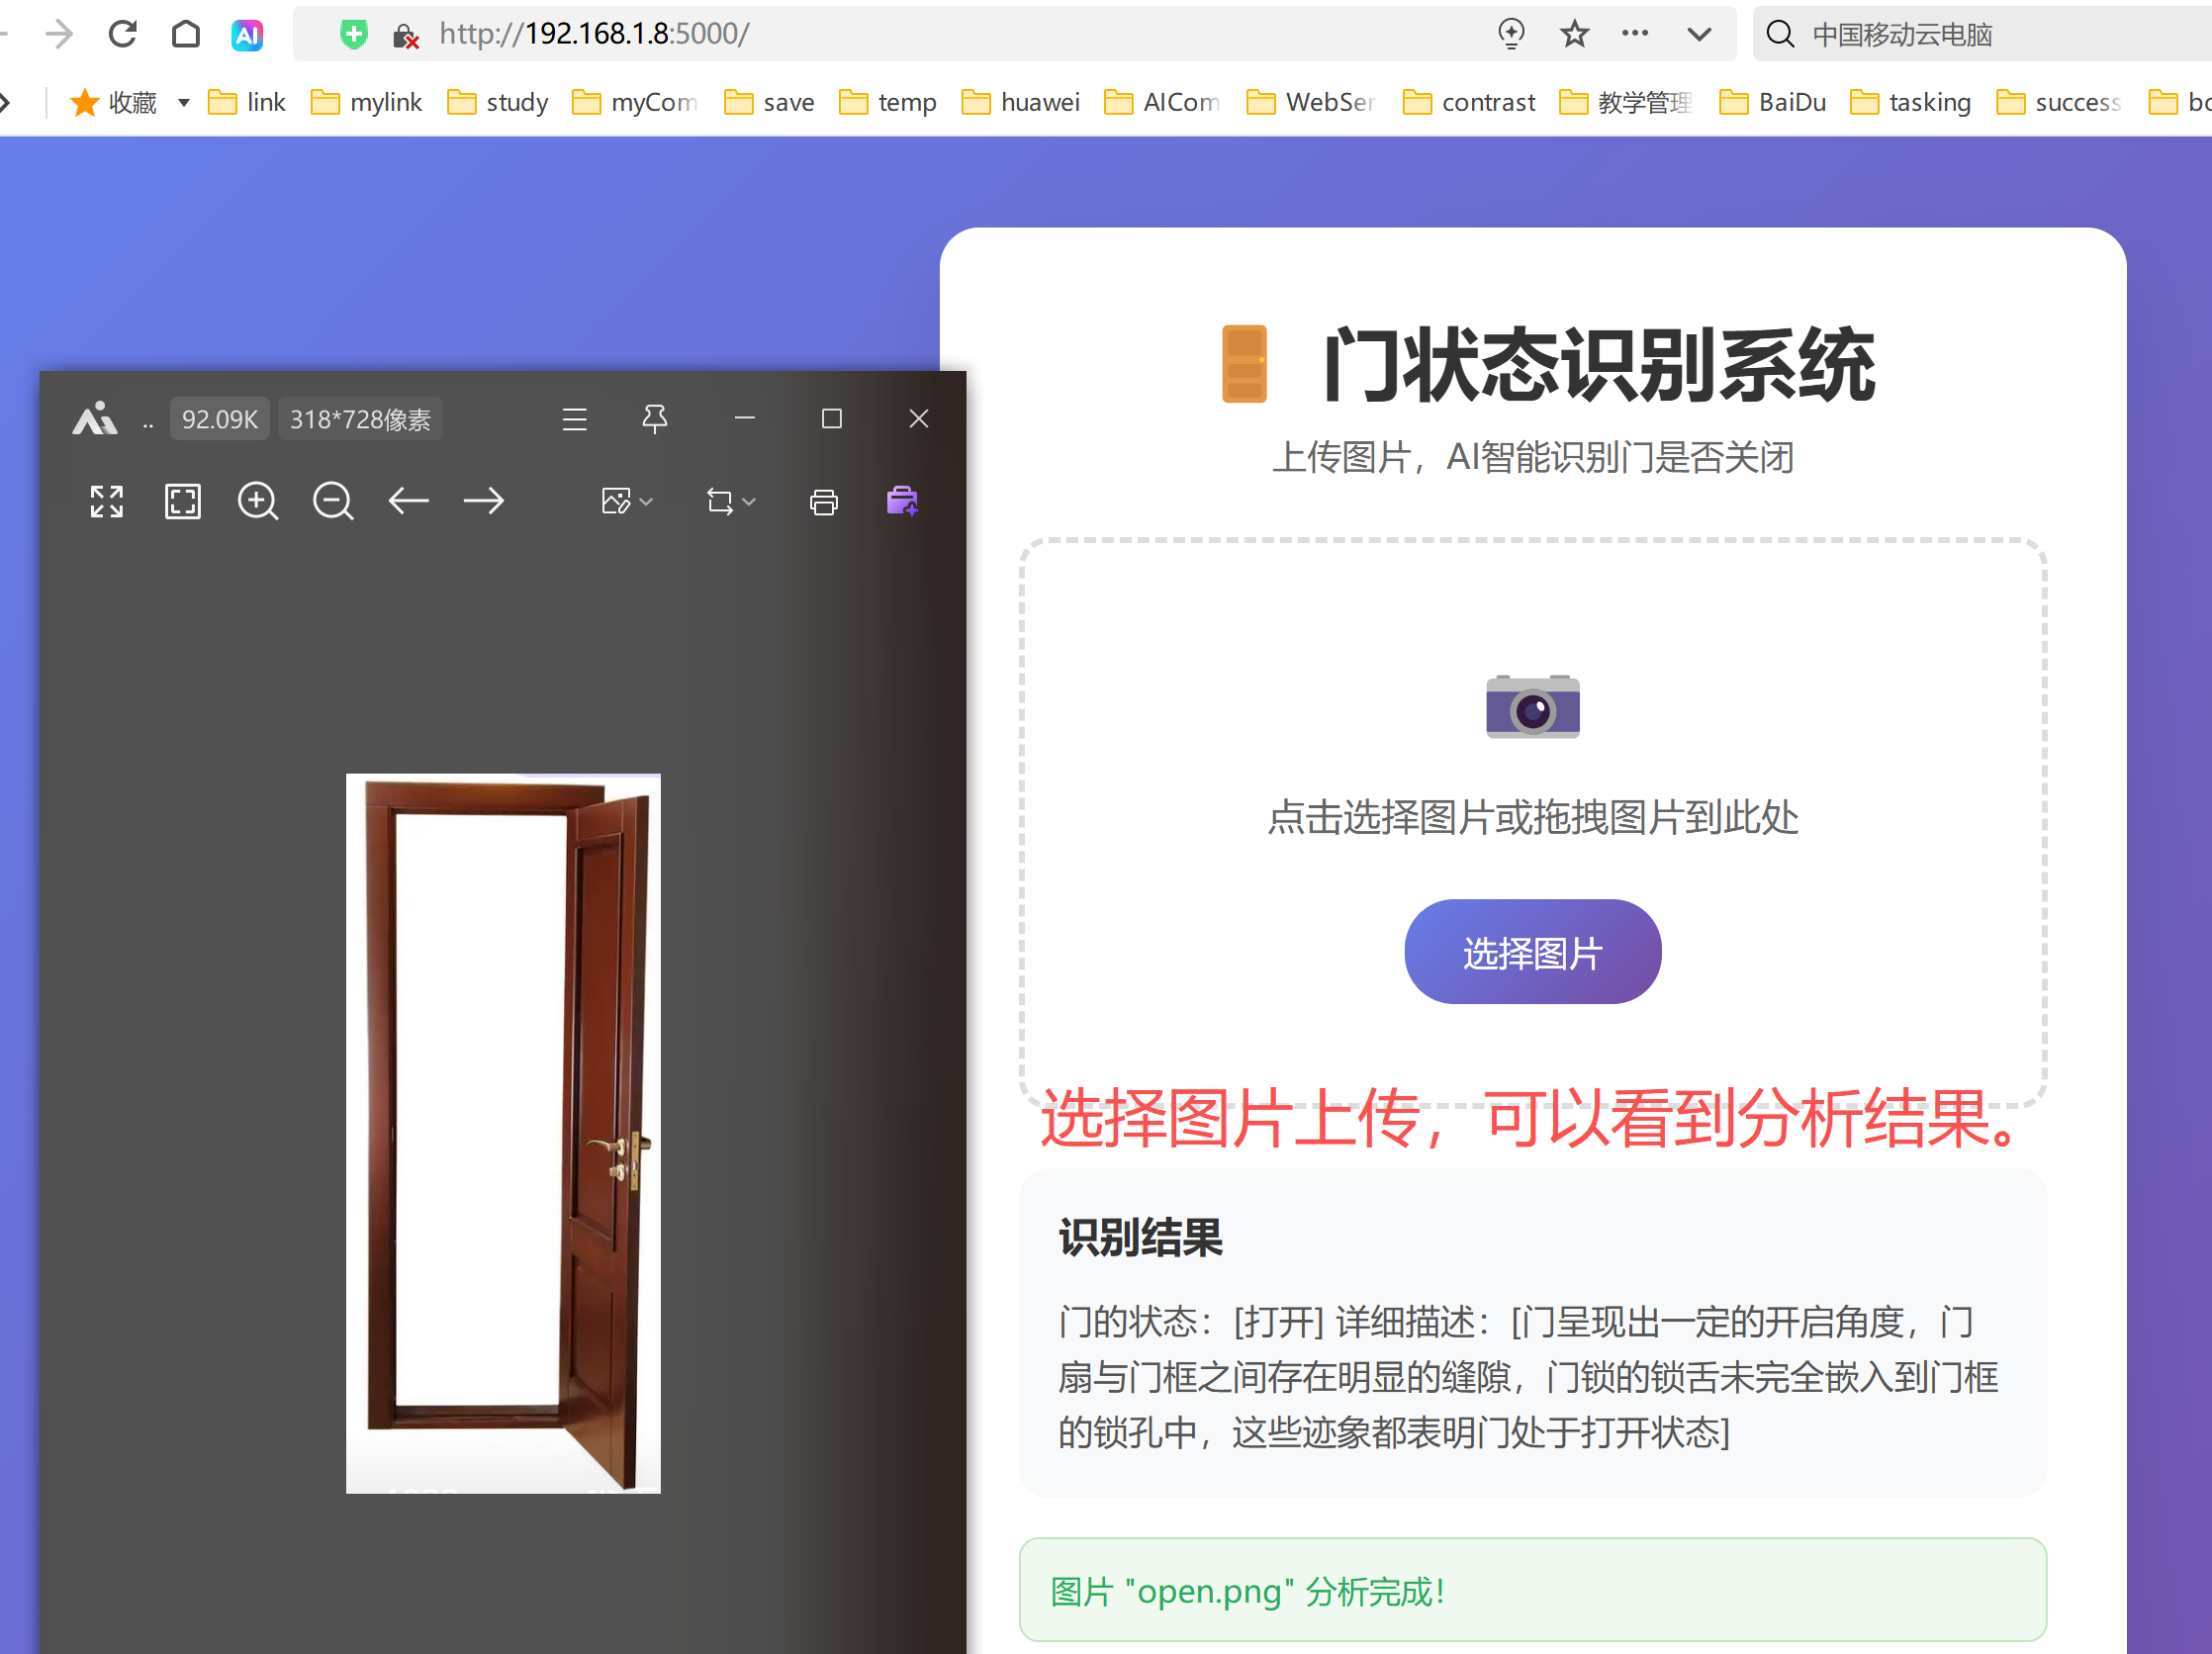
启动效果:
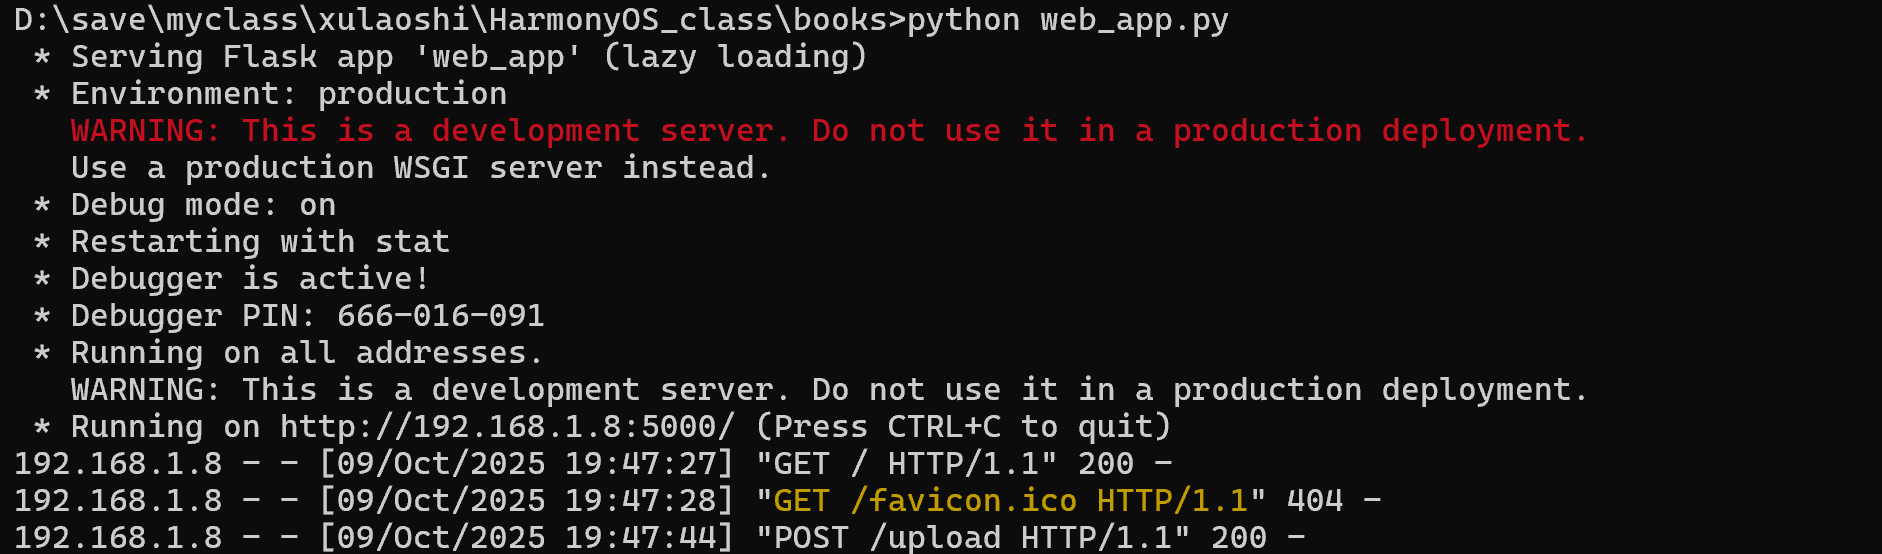
示例效果:
10、gradio效果
我们最终需要上传gradio,所以还需要通过文心快码来帮忙,让他支持gradio。
space地址:https://ai.gitcode.com/space/create
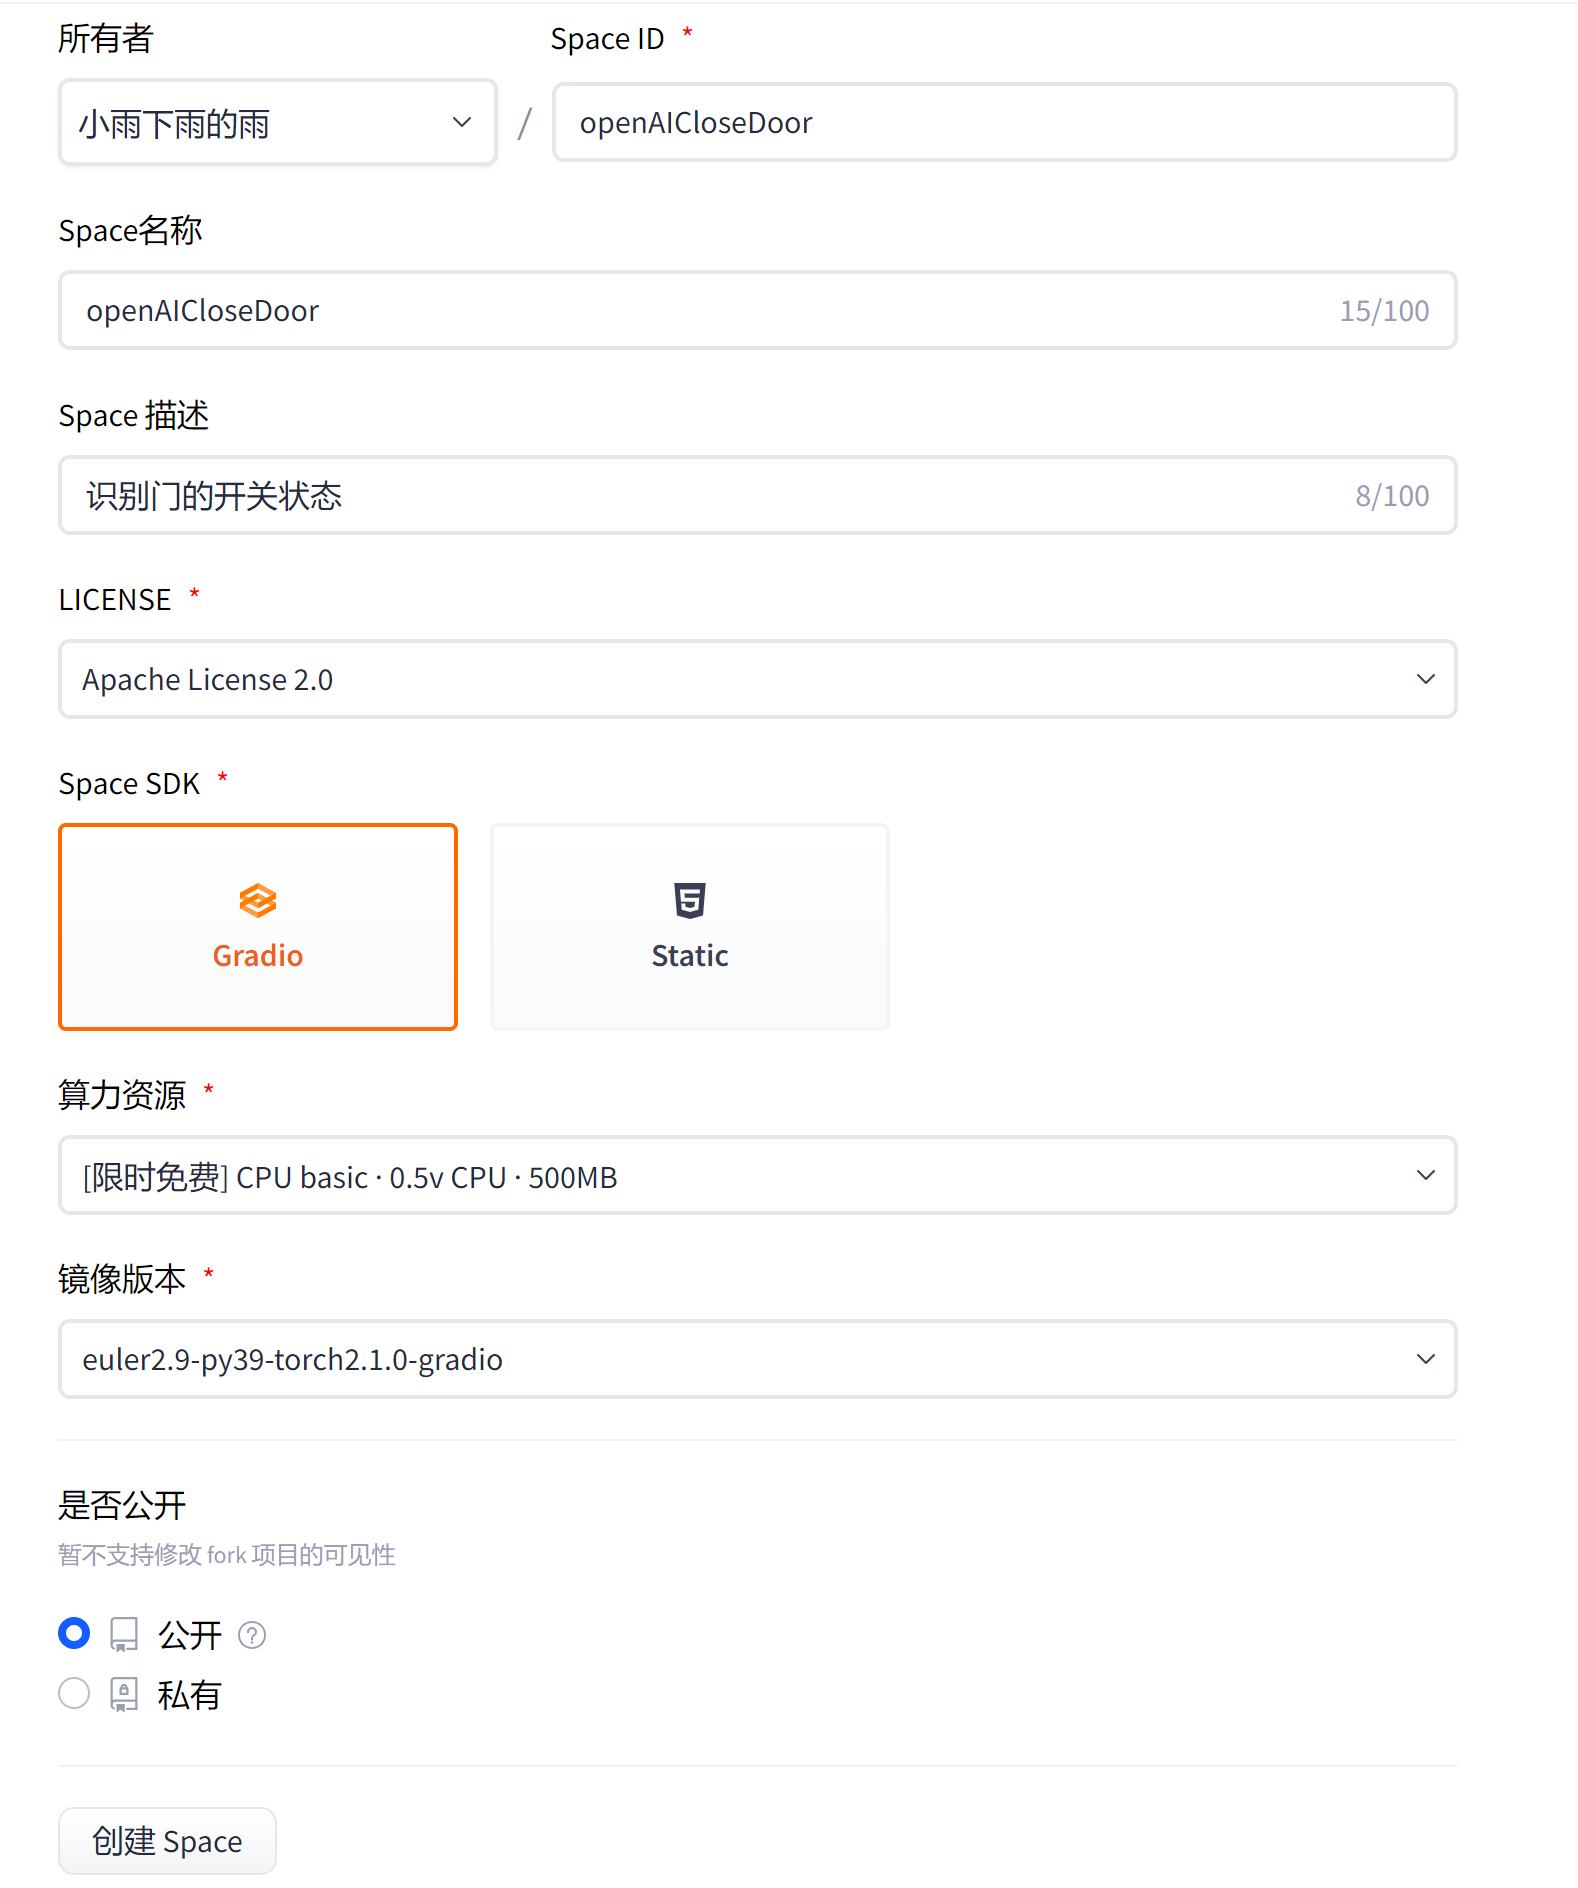
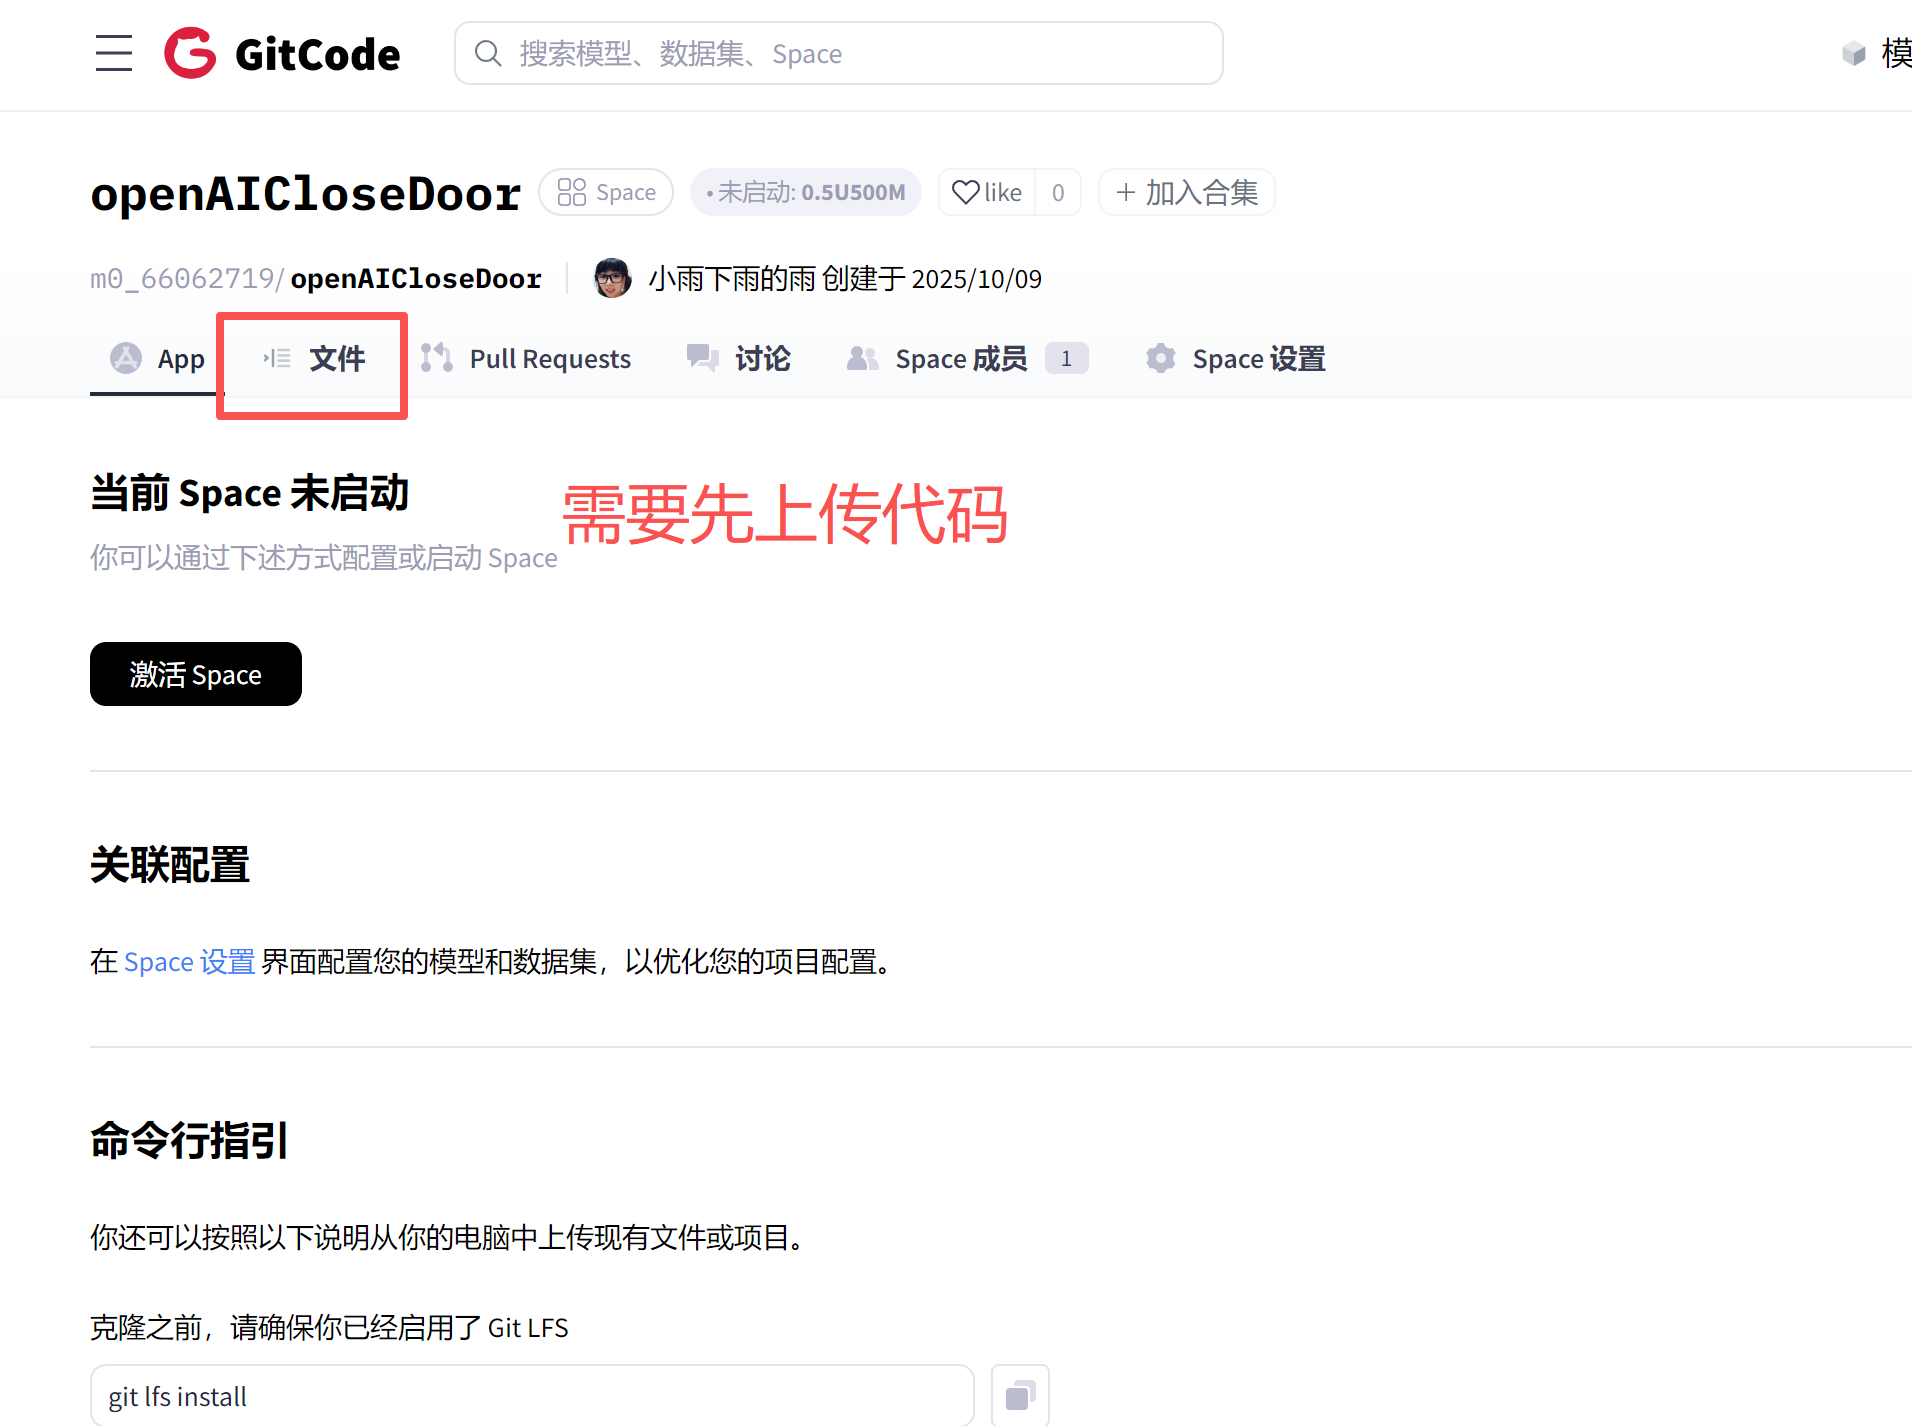
我们需要先创建Spaces项目。
创建项目
上传代码
写入代码:
代码内容:
import base64
import os
import gradio as gr
from openai import OpenAI

# 获取root_path参数,用于Gradio低于4.0版本的兼容性
root_path = os.environ.get("ROOT_PATH")

# 初始化OpenAI客户端
client = OpenAI(
    api_key="5124588afef0ea3dba67365a5b9cd429283ba74d",
    base_url="https://aistudio.baidu.com/llm/lmapi/v3",
)

def analyze_door_status(image):
    """分析图片中门的状态"""
    try:
        # 将PIL图像转换为base64
        import io
        import PIL.Image

        # 如果输入是PIL图像,转换为base64
        if isinstance(image, PIL.Image.Image):
            buffer = io.BytesIO()
            image.save(buffer, format='PNG')
            image_base64 = base64.b64encode(buffer.getvalue()).decode('utf-8')
        else:
            # 如果已经是base64字符串
            image_base64 = image

        completion = client.chat.completions.create(
            model="ernie-4.5-turbo-vl",
            messages=[
                {
                    "role": "user",
                    "content": [
                        {
                            "type": "text",
                            "text": "请仔细查看这张图片中的门,判断门是关闭的还是打开的。请用中文回答,格式如下:\n门的状态:[关闭/打开]\n详细描述:[具体描述门的状况]"
                        },
                        {
                            "type": "image_url",
                            "image_url": {
                                "url": f"data:image/png;base64,{image_base64}",
                                "detail": "high"
                            }
                        }
                    ]
                }
            ],
            stream=False,
        )

        return completion.choices[0].message.content or "无法识别门的状态"
    except Exception as e:
        return f"分析失败: {str(e)}"

# 创建Gradio界面
def create_interface():
    with gr.Blocks(
        title="🚪 门状态识别系统",
        theme=gr.themes.Soft(),
        css="""
        .gradio-container {
            max-width: 800px !important;
            margin: 0 auto !important;
        }
        .main-header {
            text-align: center;
            margin-bottom: 30px;
        }
        .main-header h1 {
            color: #333;
            font-size: 2.5em;
            margin-bottom: 10px;
        }
        .main-header p {
            color: #666;
            font-size: 1.1em;
        }
        """
    ) as demo:

        # 标题
        gr.HTML("""
        <div class="main-header">
            <h1>🚪 门状态识别系统</h1>
            <p>上传图片,AI智能识别门是否关闭</p>
        </div>
        """)

        with gr.Row():
            with gr.Column(scale=1):
                # 图片上传组件
                image_input = gr.Image(
                    label="上传门图片",
                    type="pil",
                    height=400
                )

                # 分析按钮
                analyze_btn = gr.Button(
                    "🔍 分析门状态",
                    variant="primary",
                    size="lg"
                )

            with gr.Column(scale=1):
                # 结果显示
                result_output = gr.Textbox(
                    label="识别结果",
                    lines=8,
                    interactive=False,
                    placeholder="分析结果将显示在这里..."
                )

        # 示例图片
        gr.Examples(
            examples=[],
            inputs=image_input,
            label="示例图片(如果有的话)"
        )

        # 处理函数
        def process_image(image):
            if image is None:
                return "请先上传一张图片!"

            return analyze_door_status(image)

        # 绑定事件
        analyze_btn.click(
            fn=process_image,
            inputs=image_input,
            outputs=result_output,
            show_progress=True
        )

        # 自动分析(当图片上传时)
        image_input.change(
            fn=process_image,
            inputs=image_input,
            outputs=result_output,
            show_progress=True
        )

    return demo

# 创建并启动应用
if __name__ == "__main__":
    demo = create_interface()
    demo.launch(
        server_name="0.0.0.0",
        server_port=7860,
        share=False,
        show_error=True,
        root_path=root_path  # 兼容Gradio低于4.0版本
    )
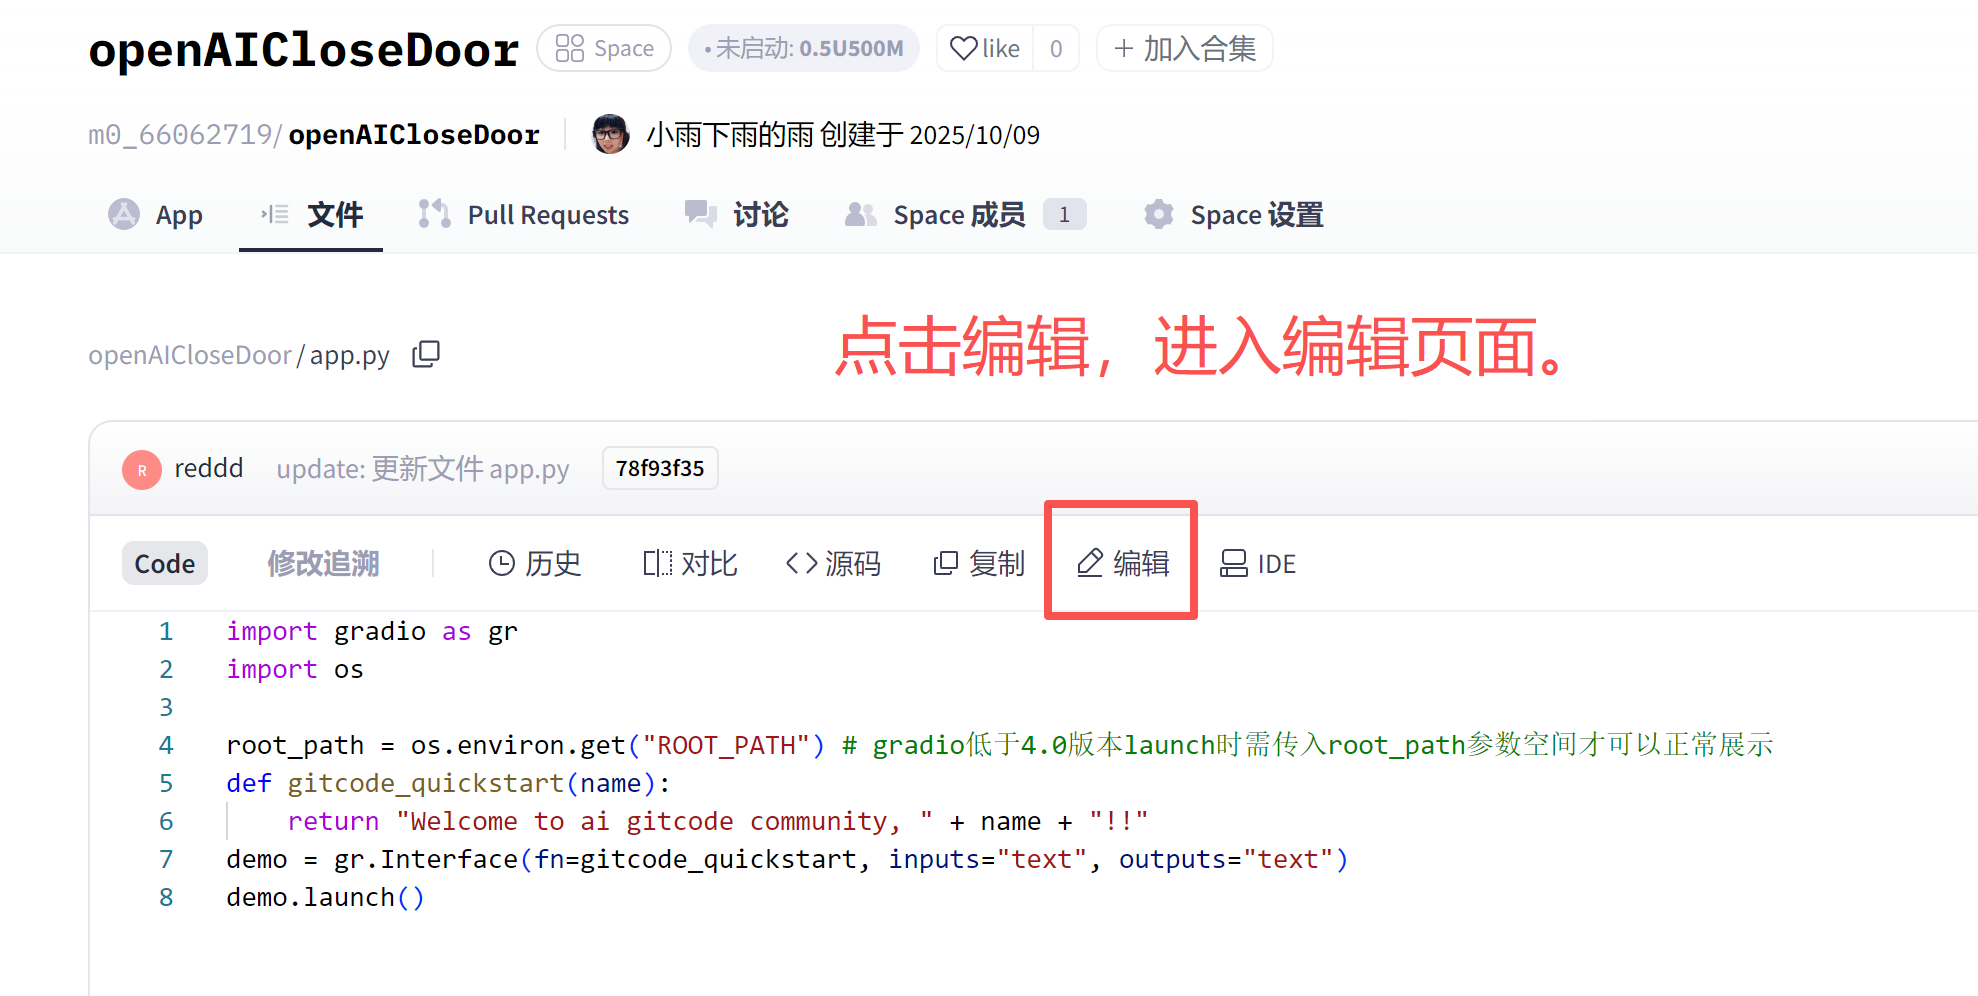
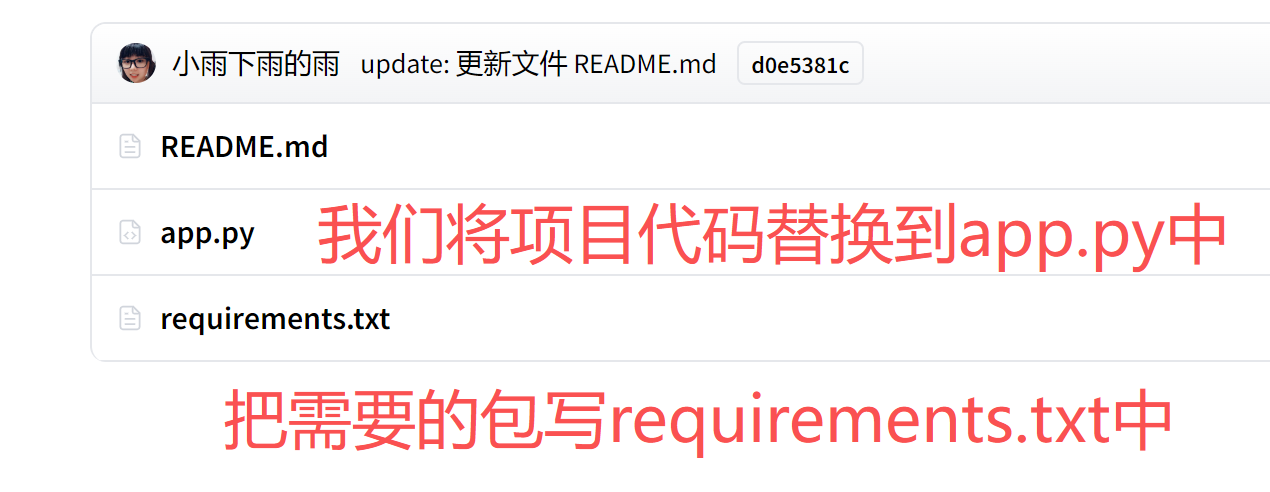
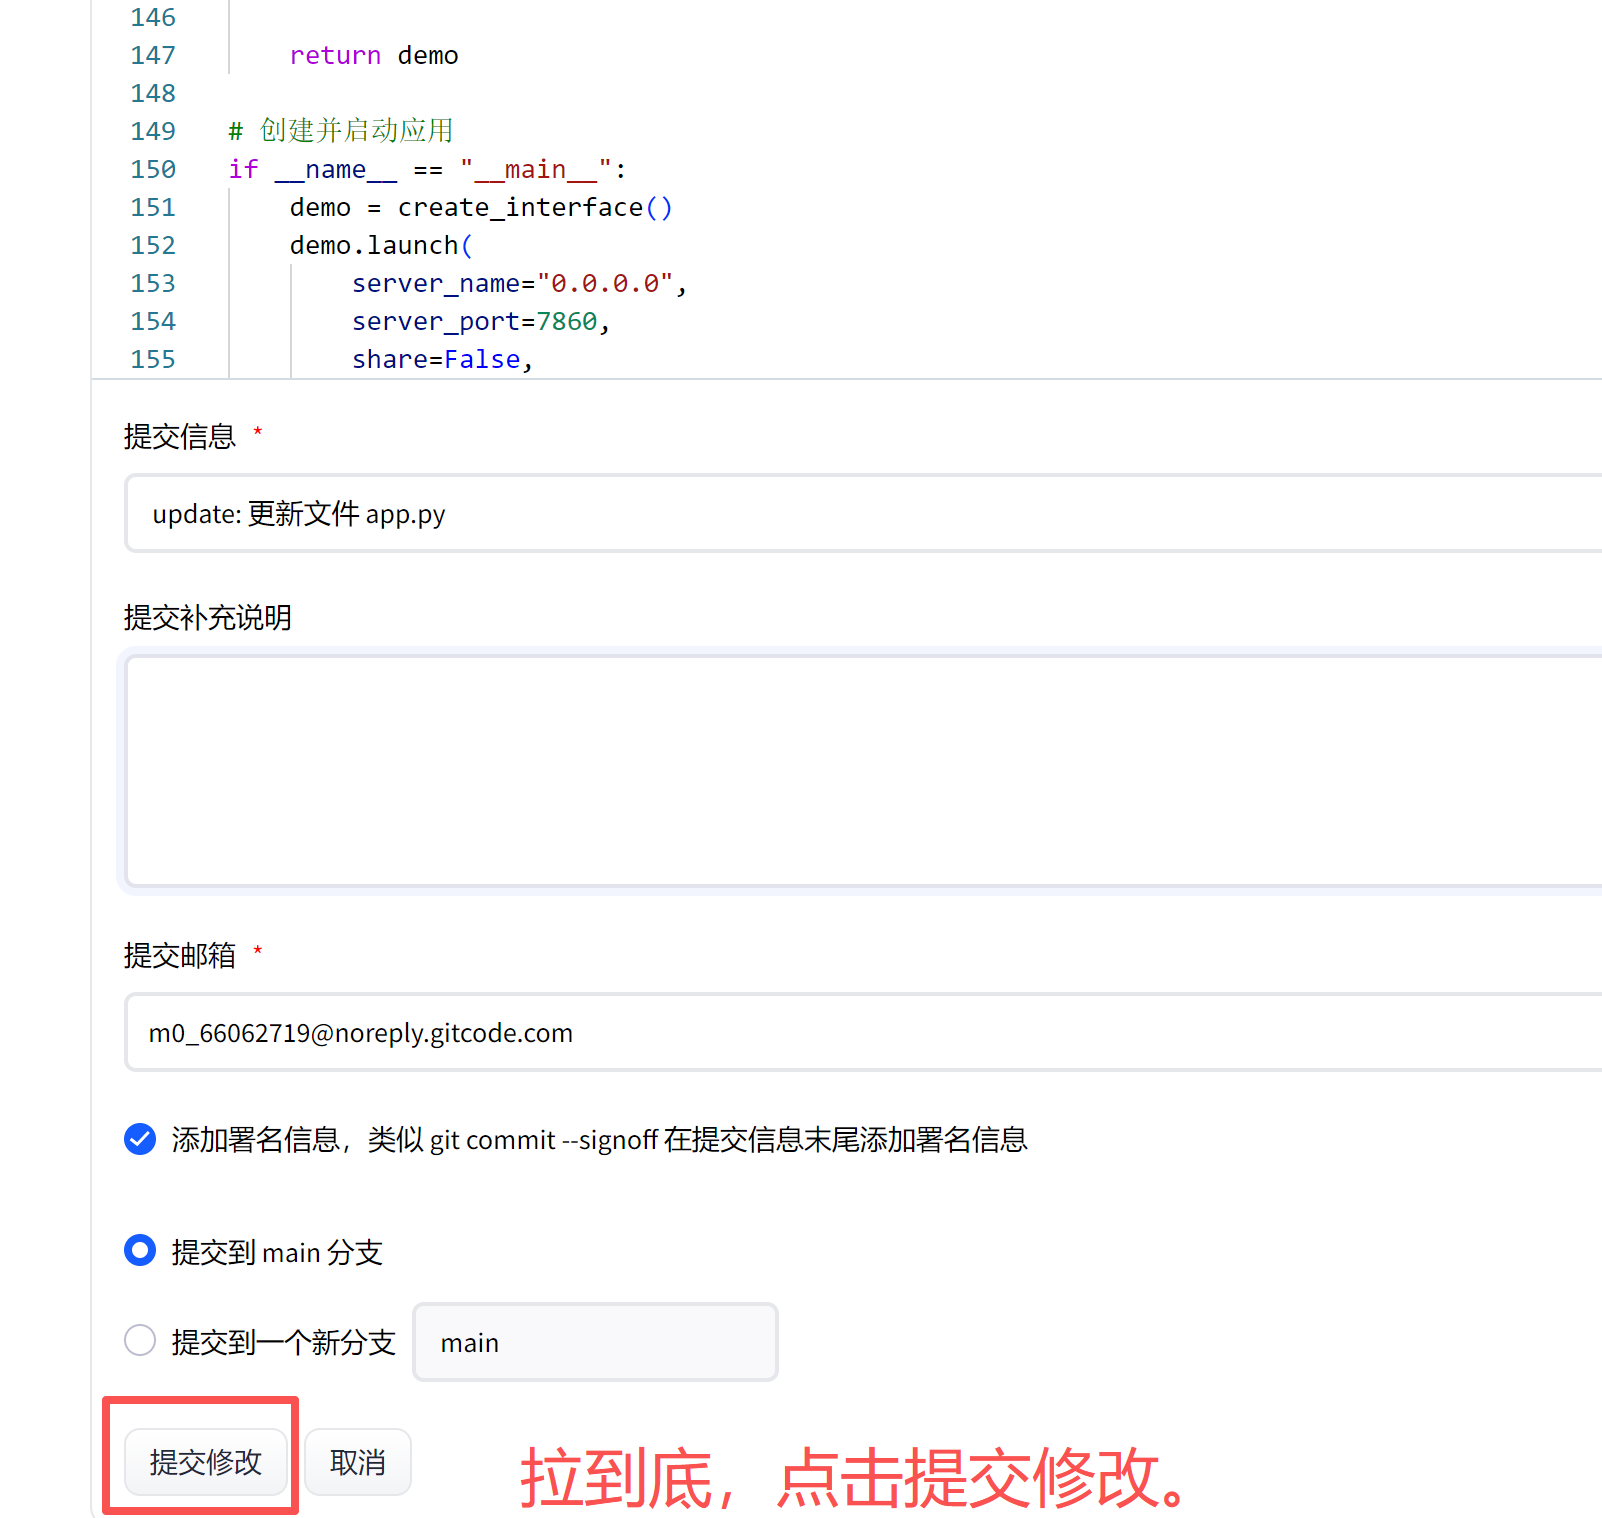
替换代码即可。
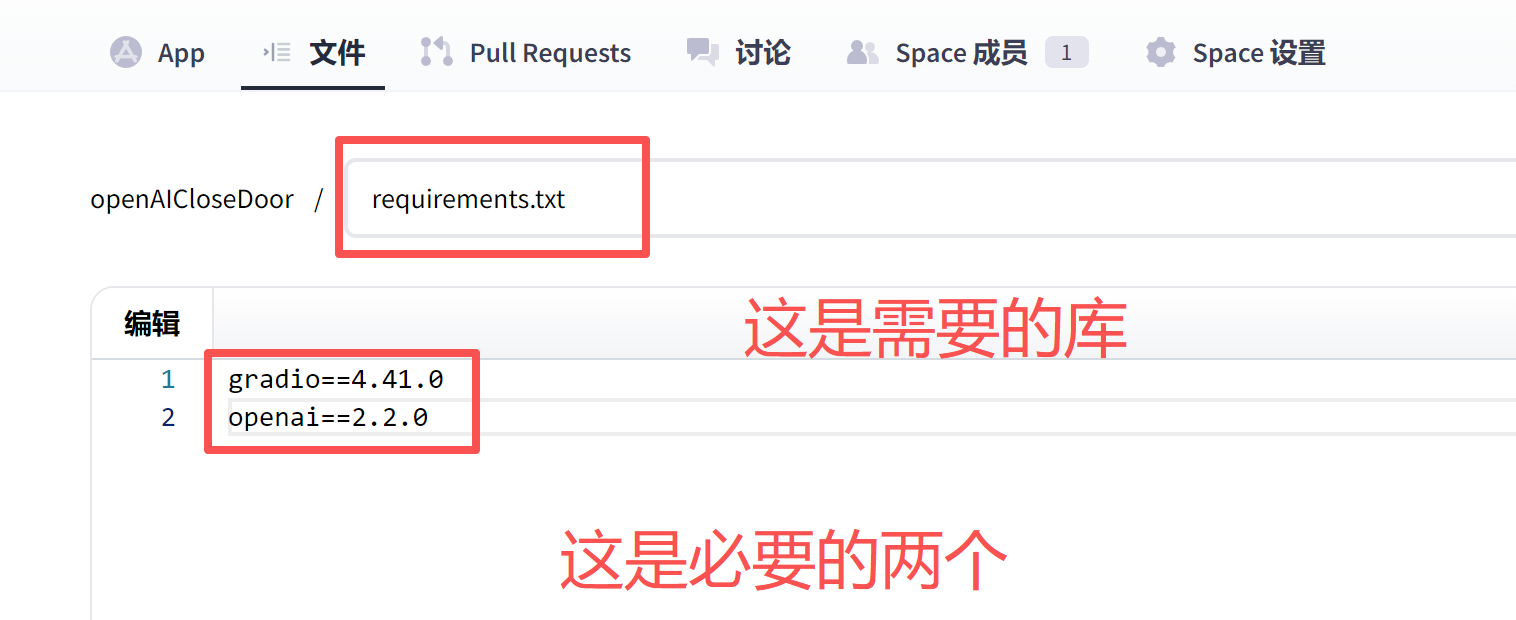
修改requirements.txt
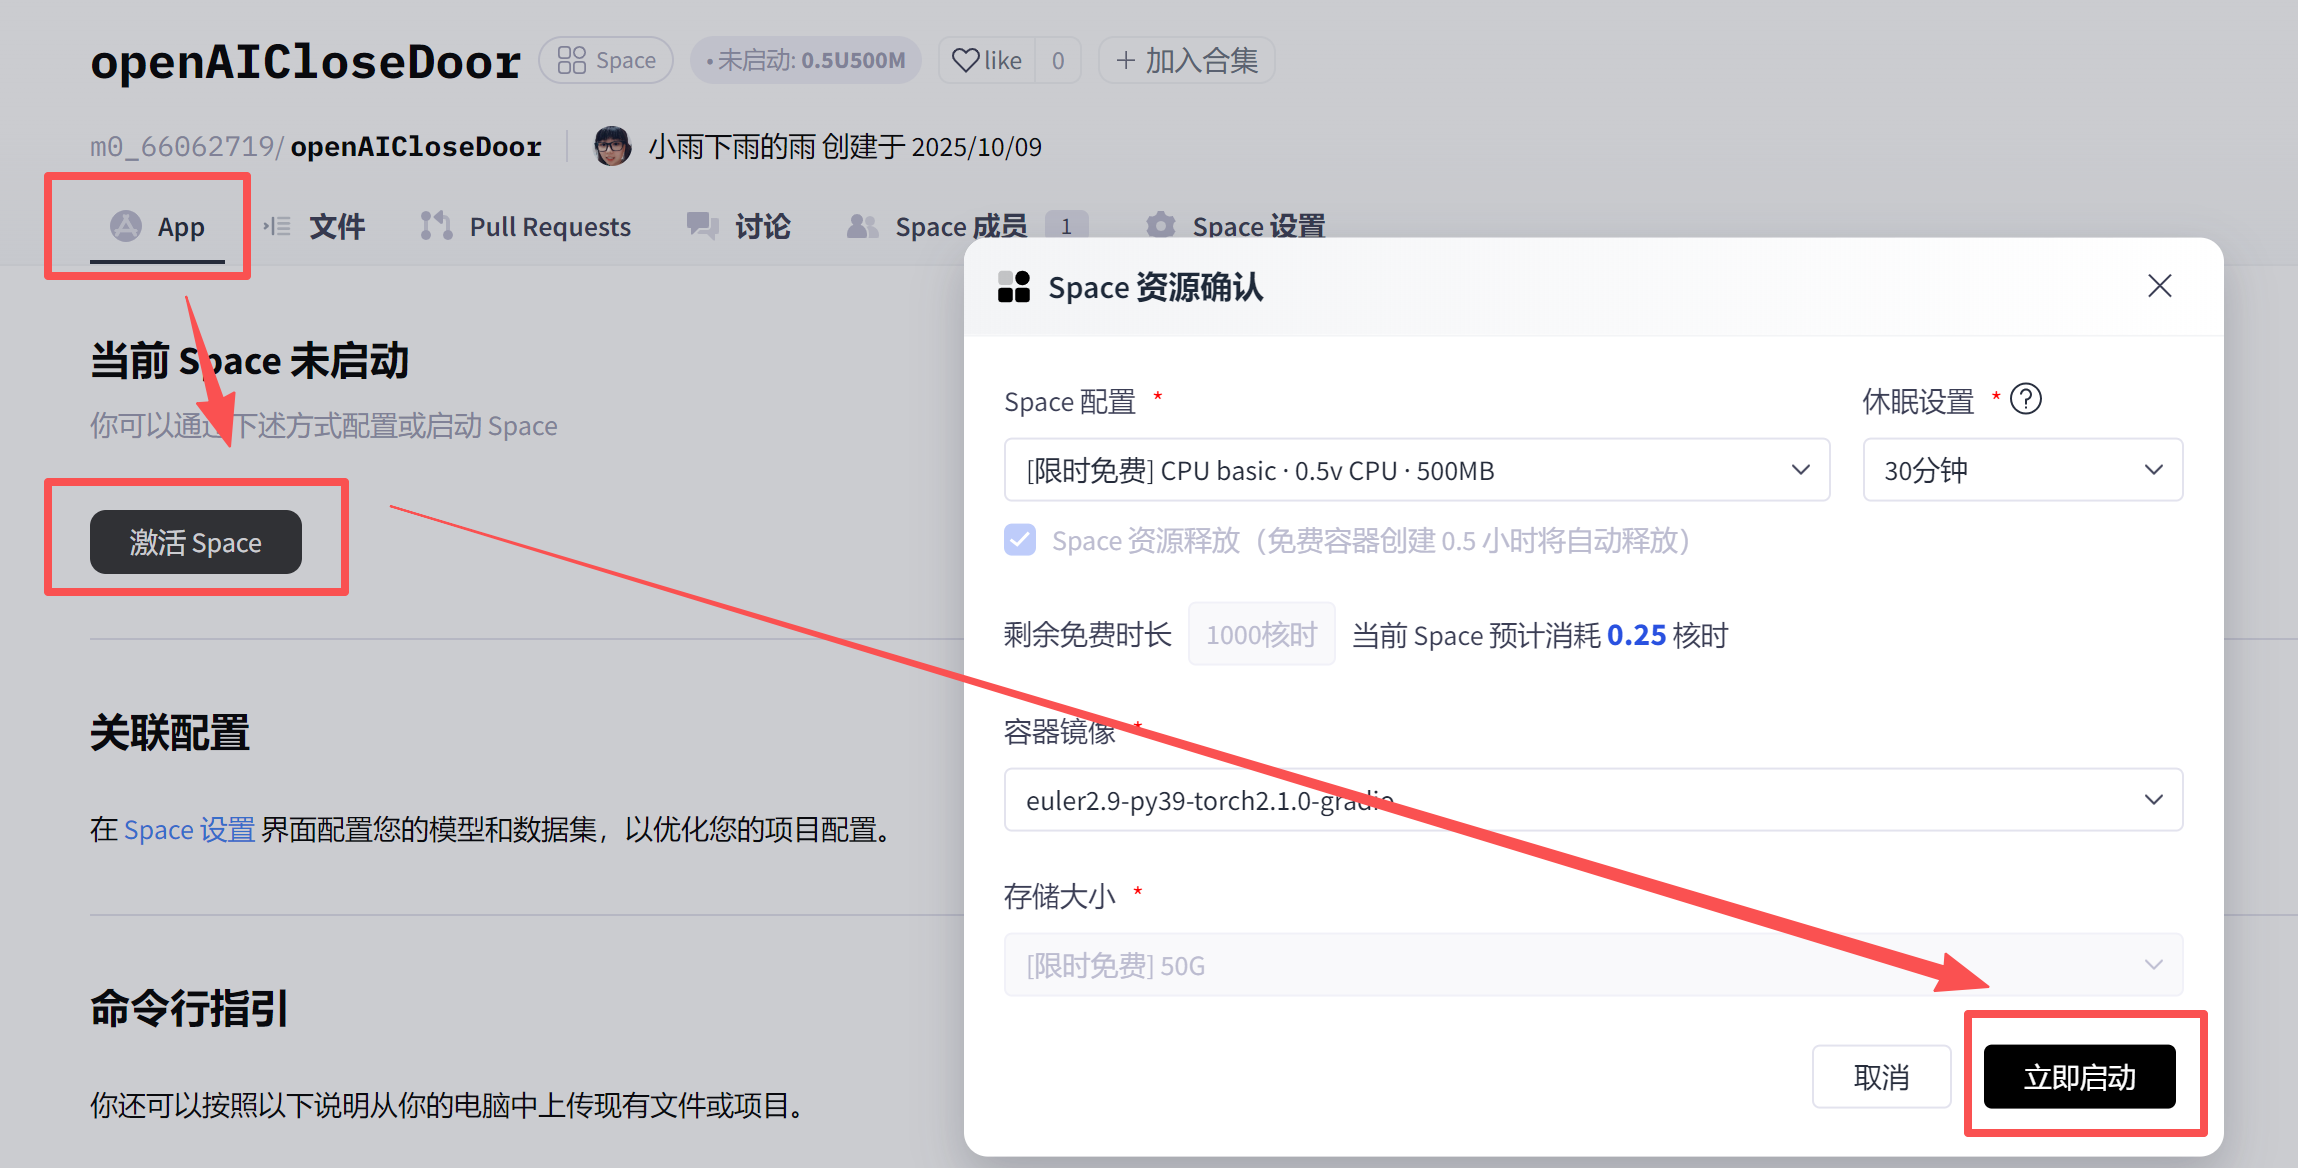
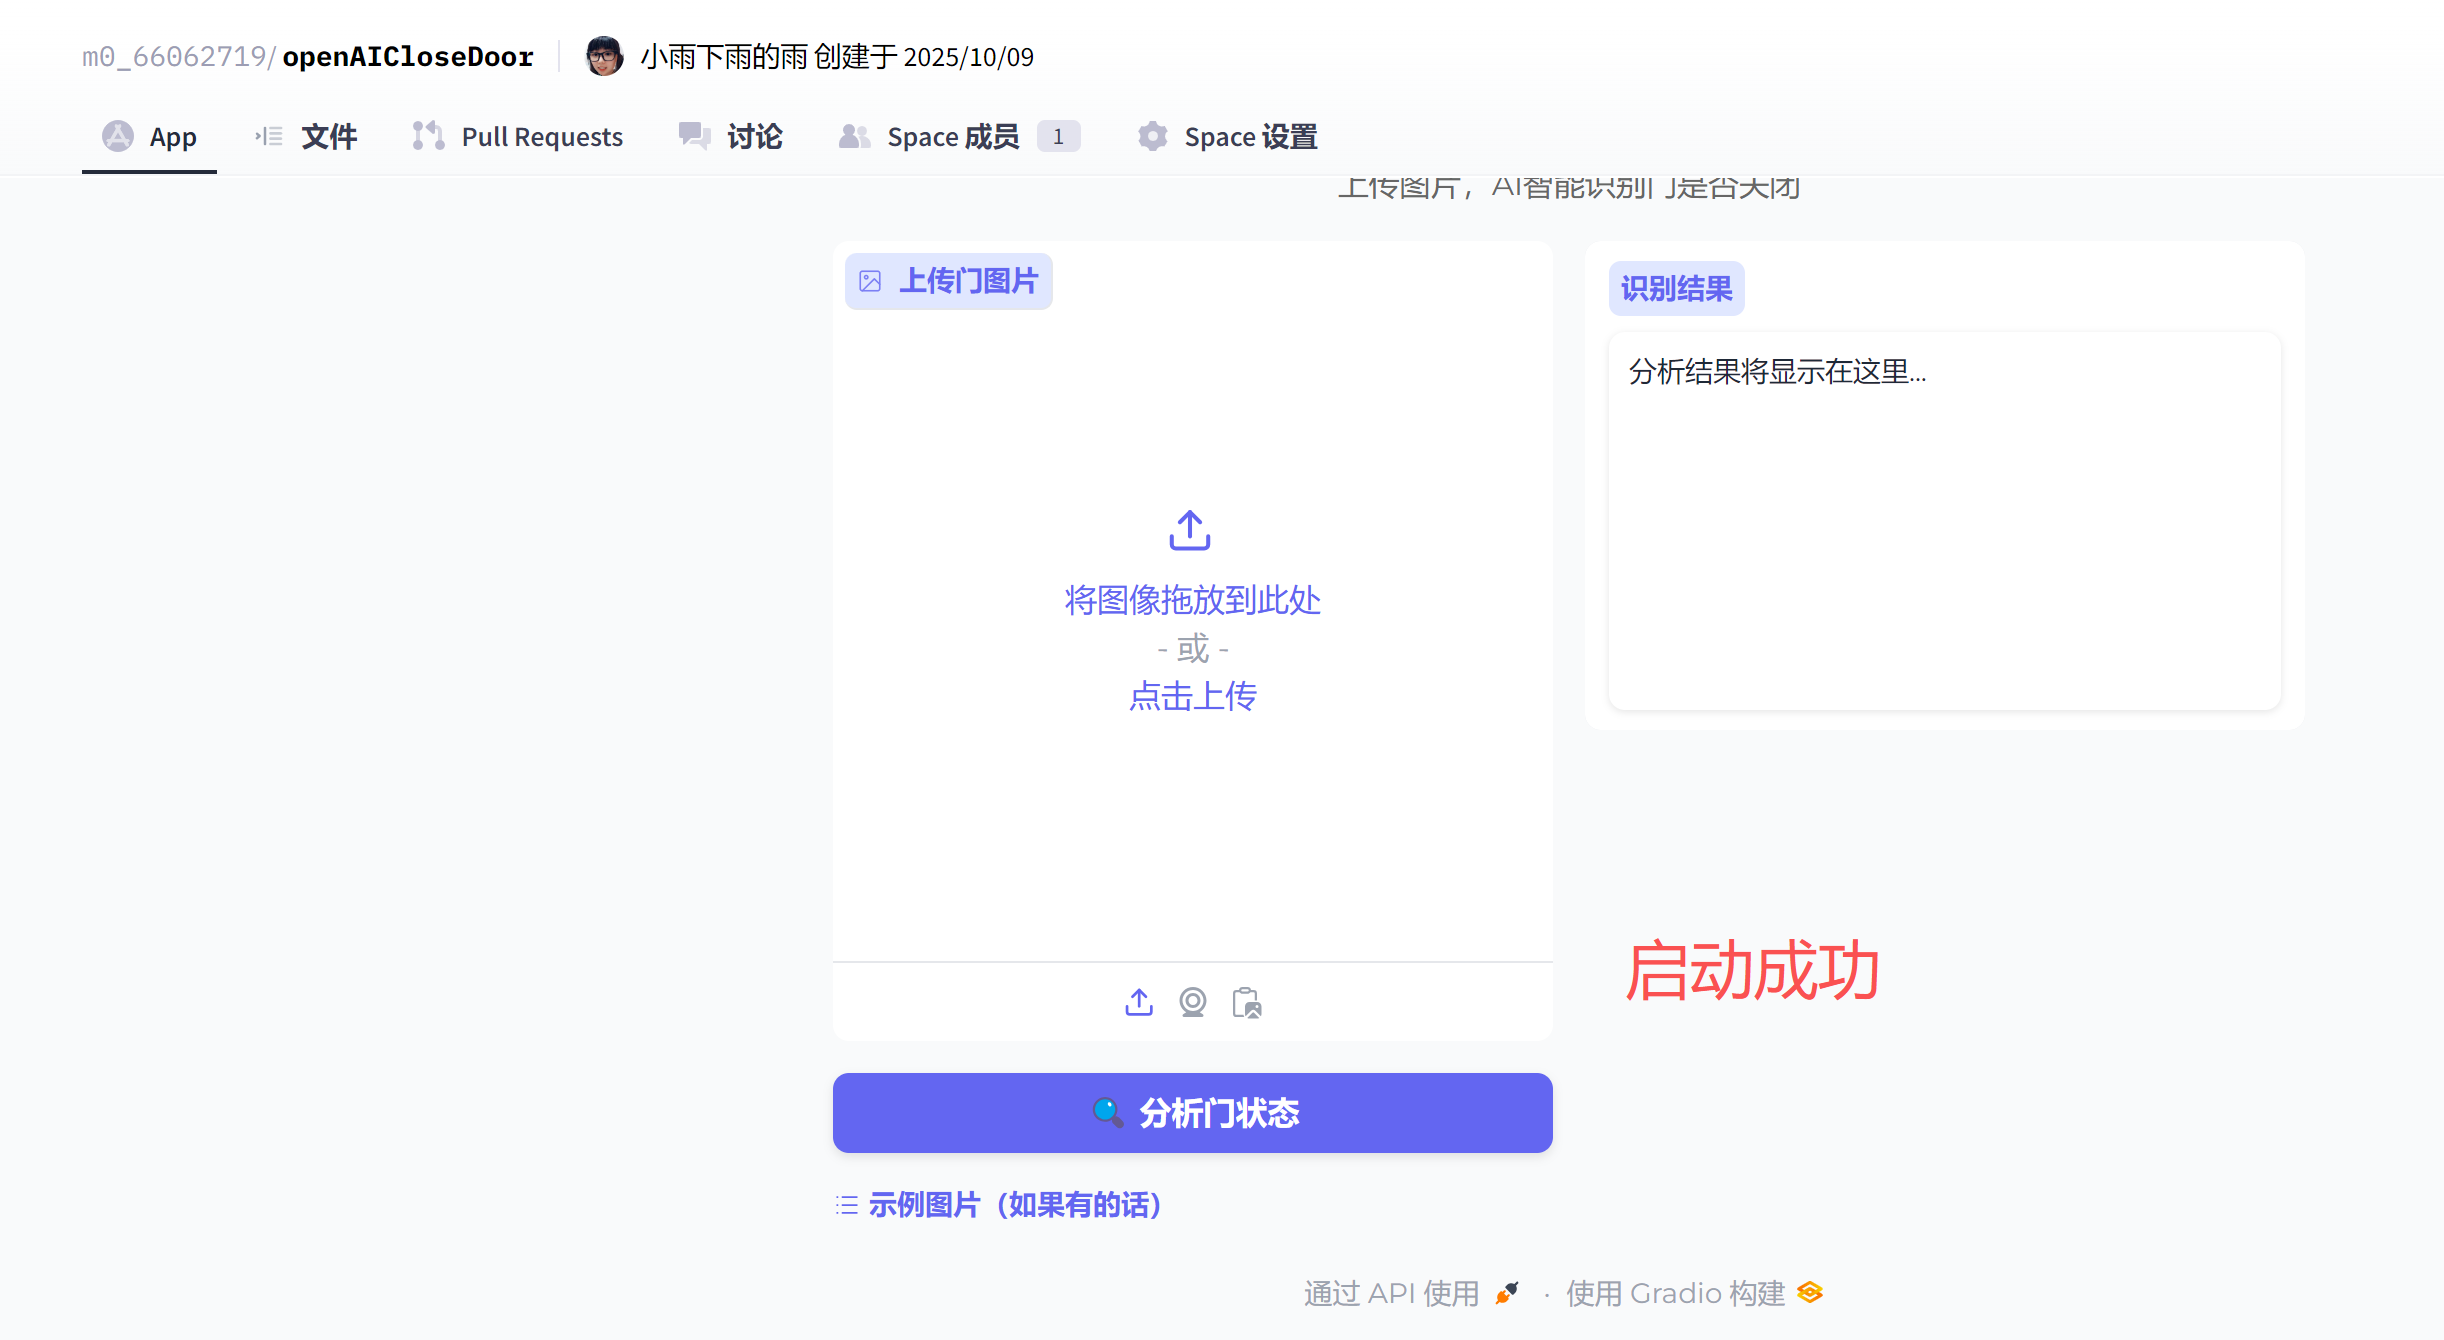
启动space
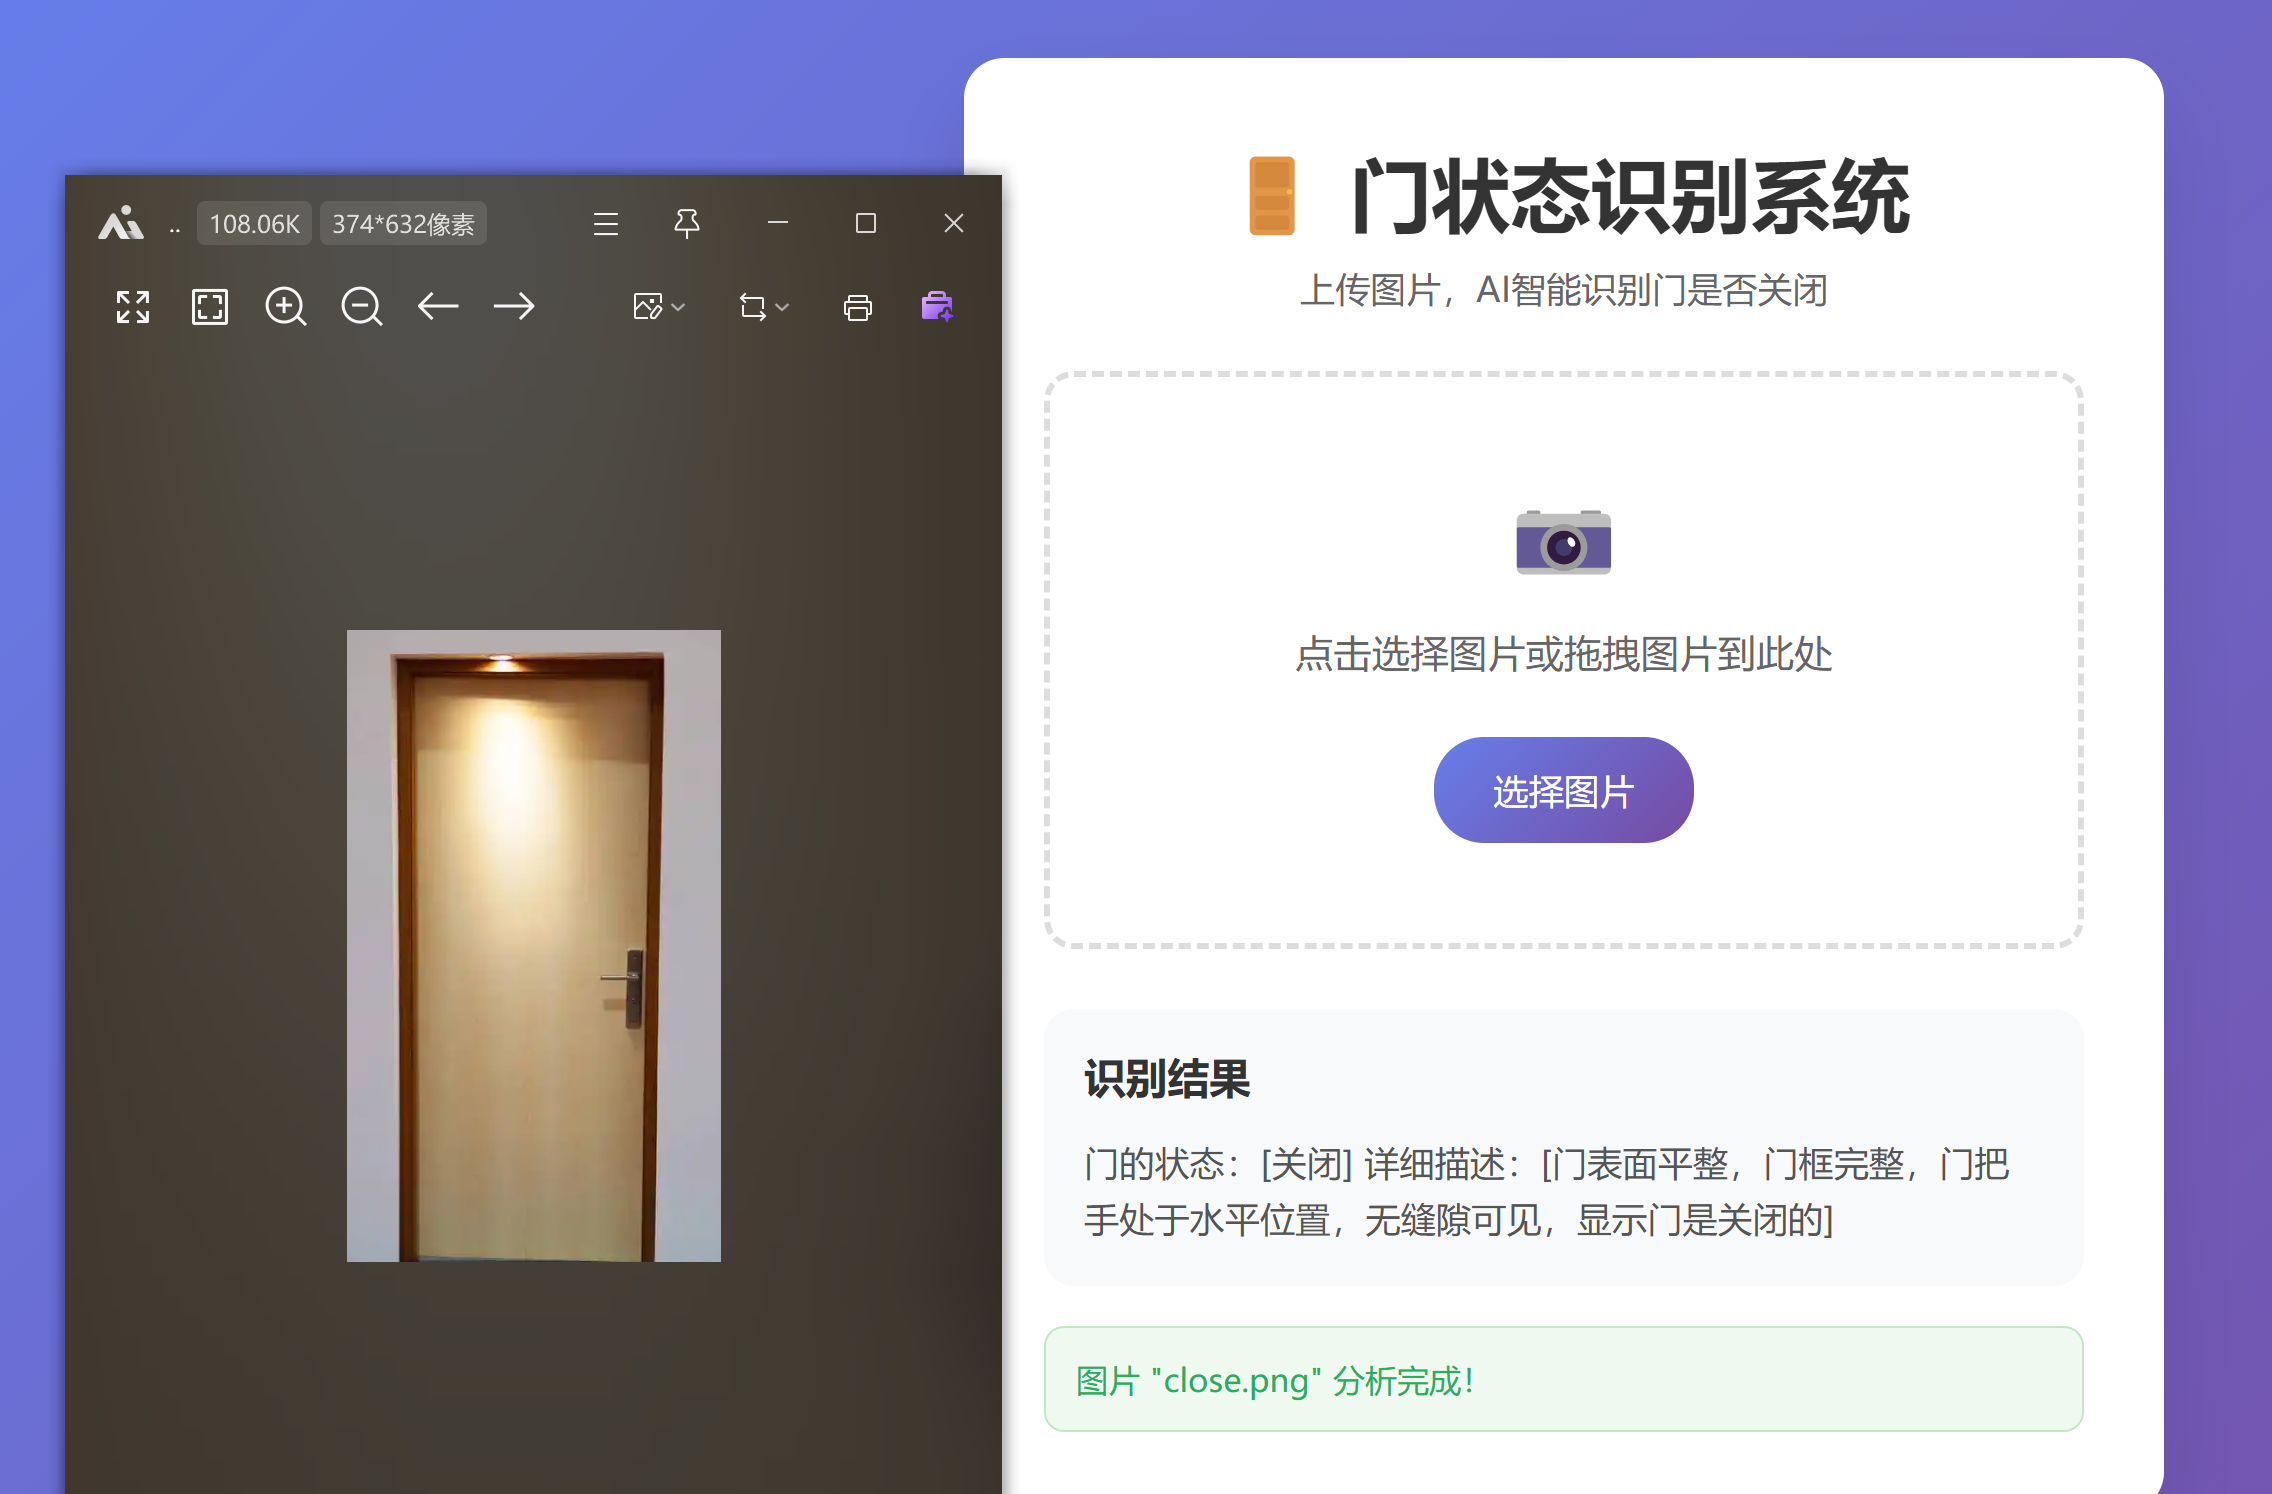
最终效果:
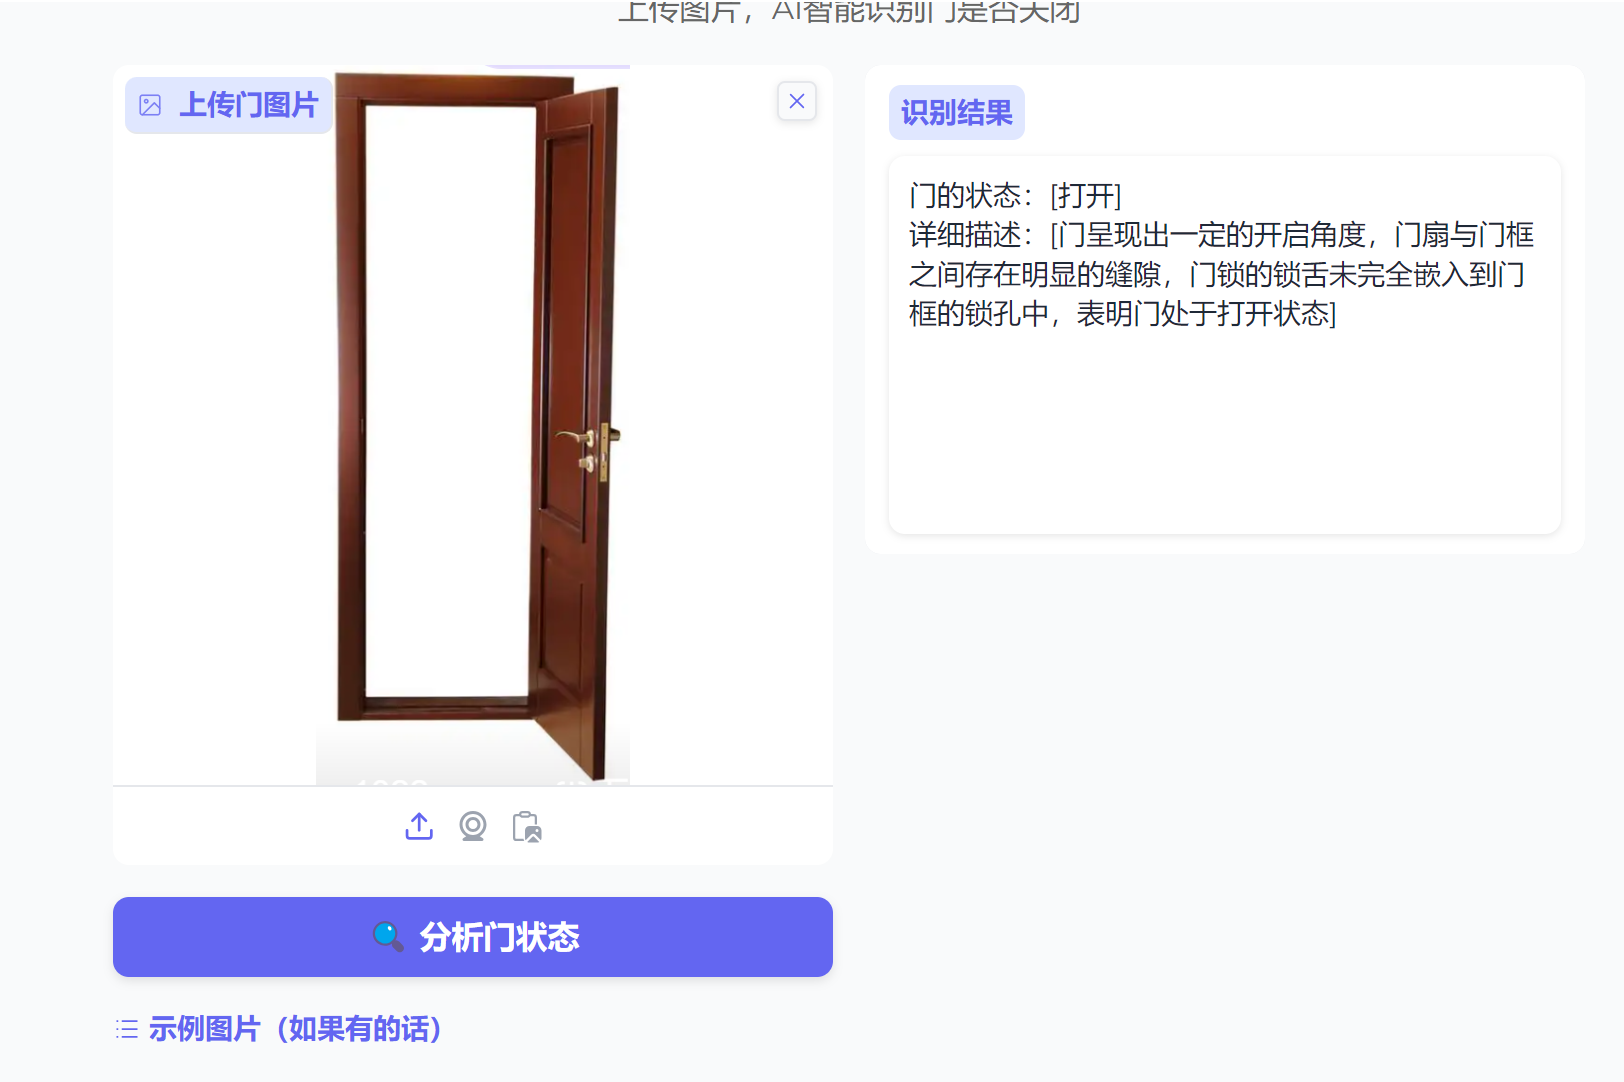
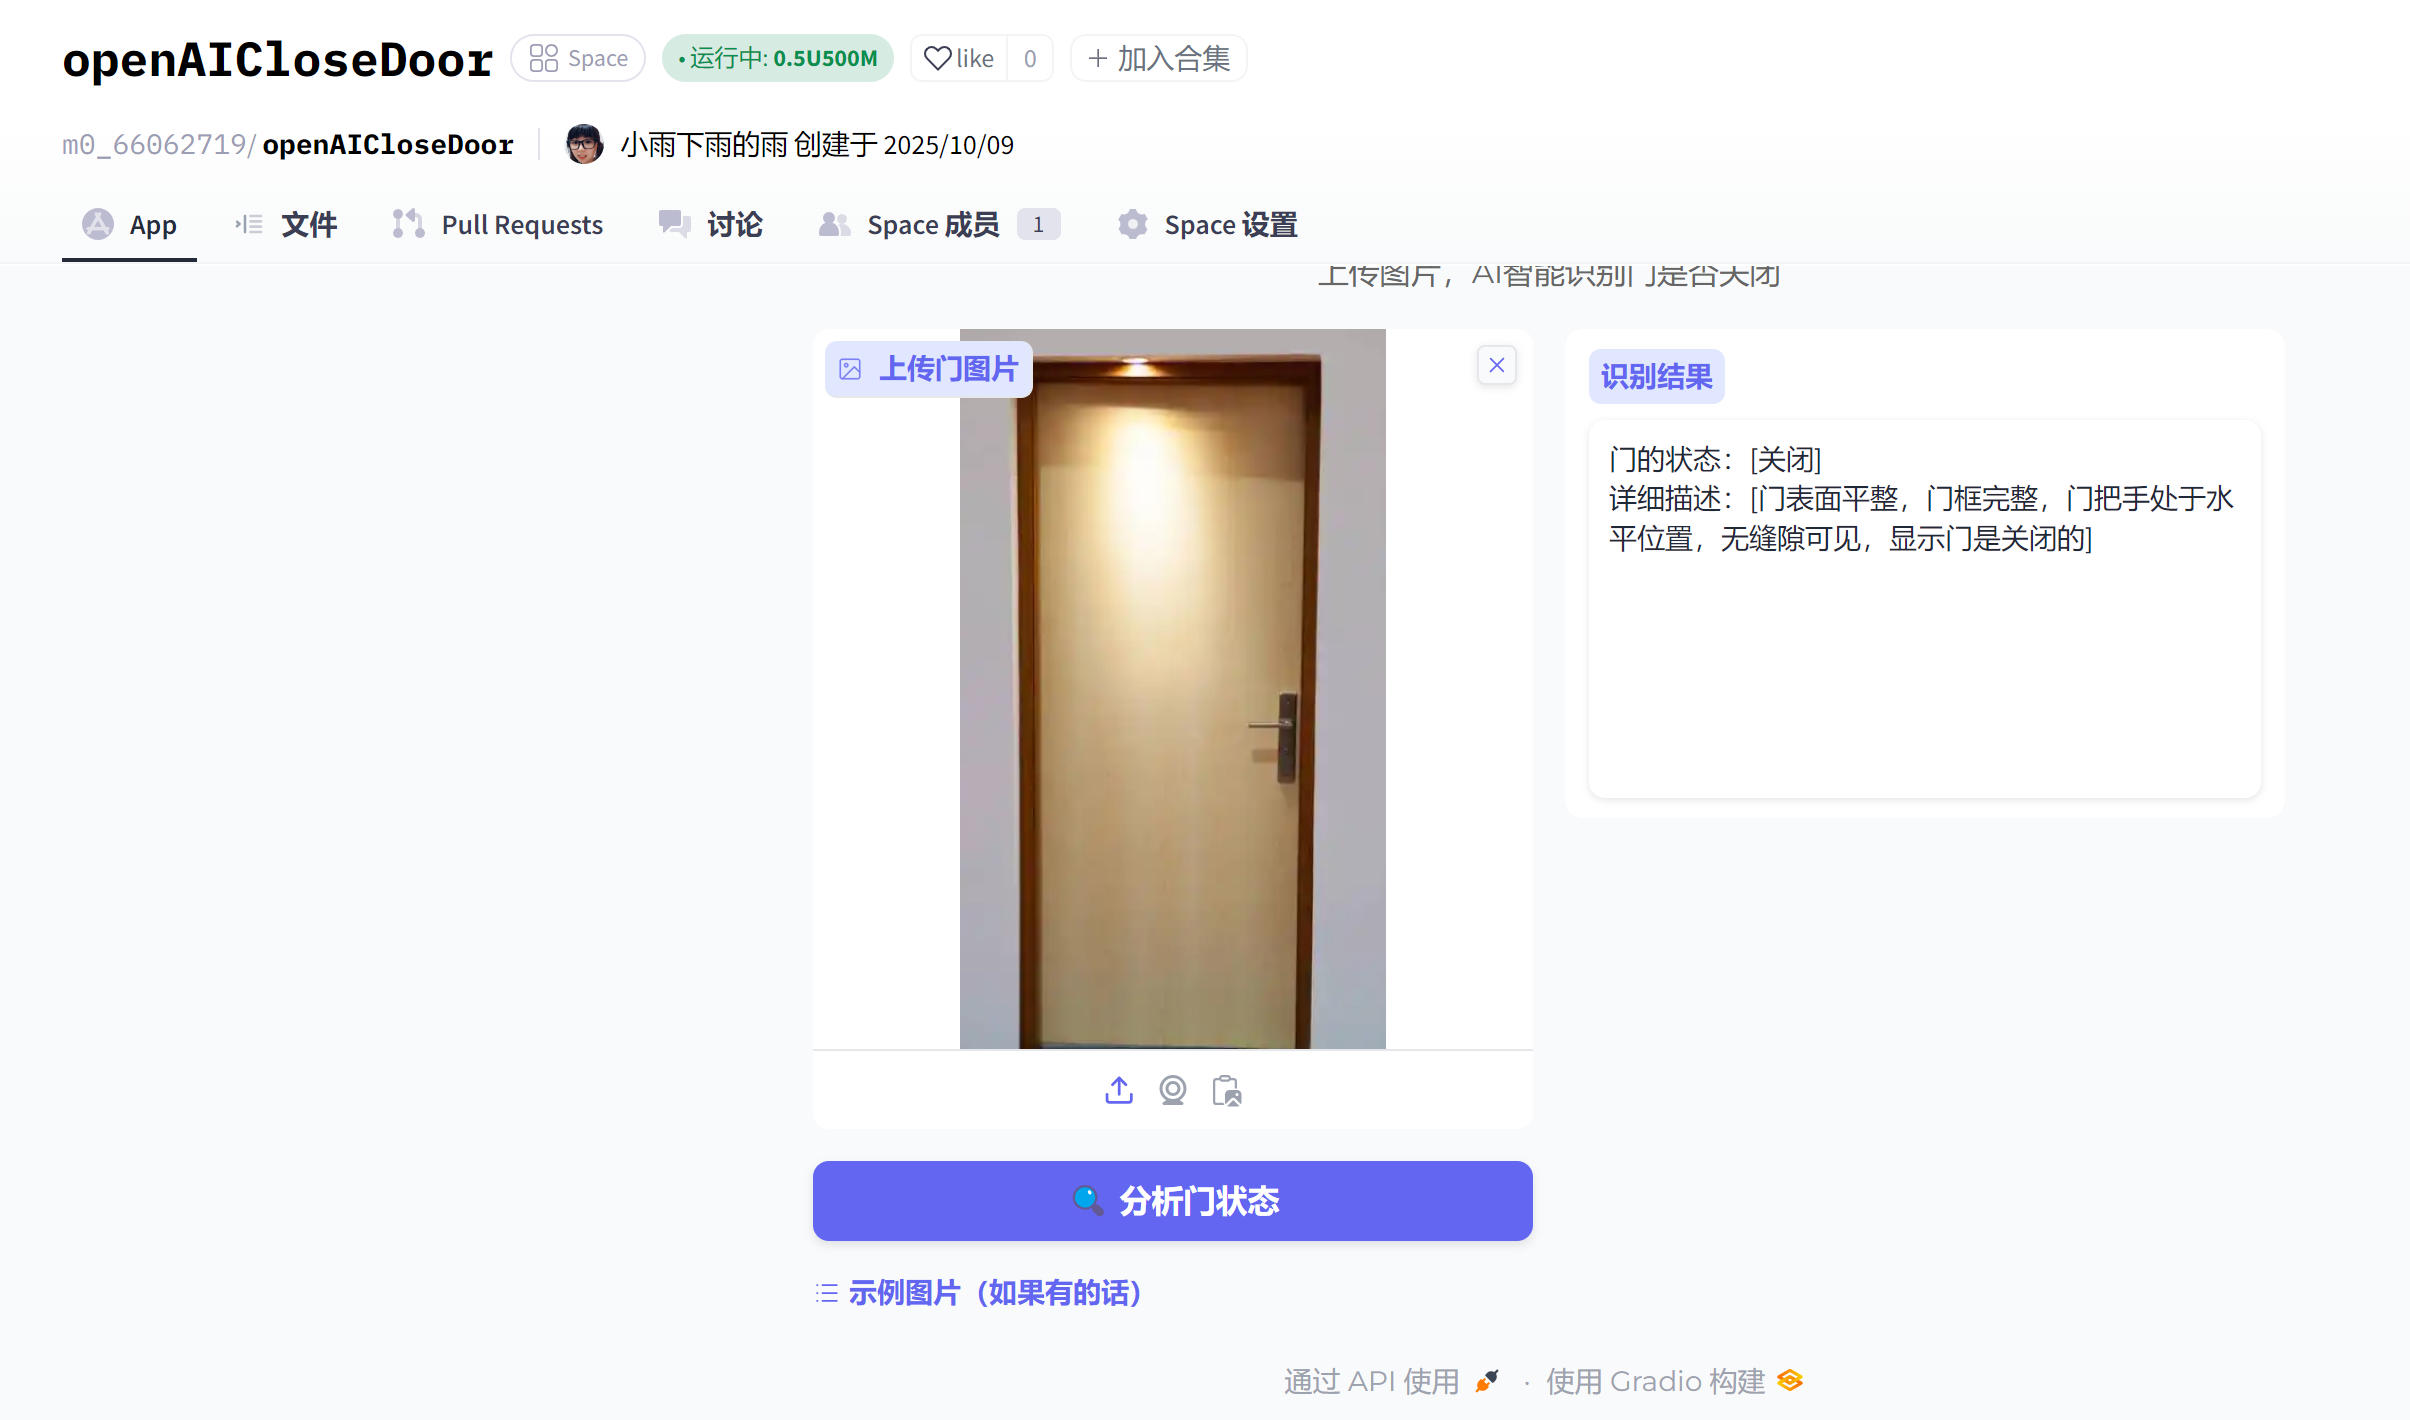
测试效果:
11、录制视频与上传到CSDN
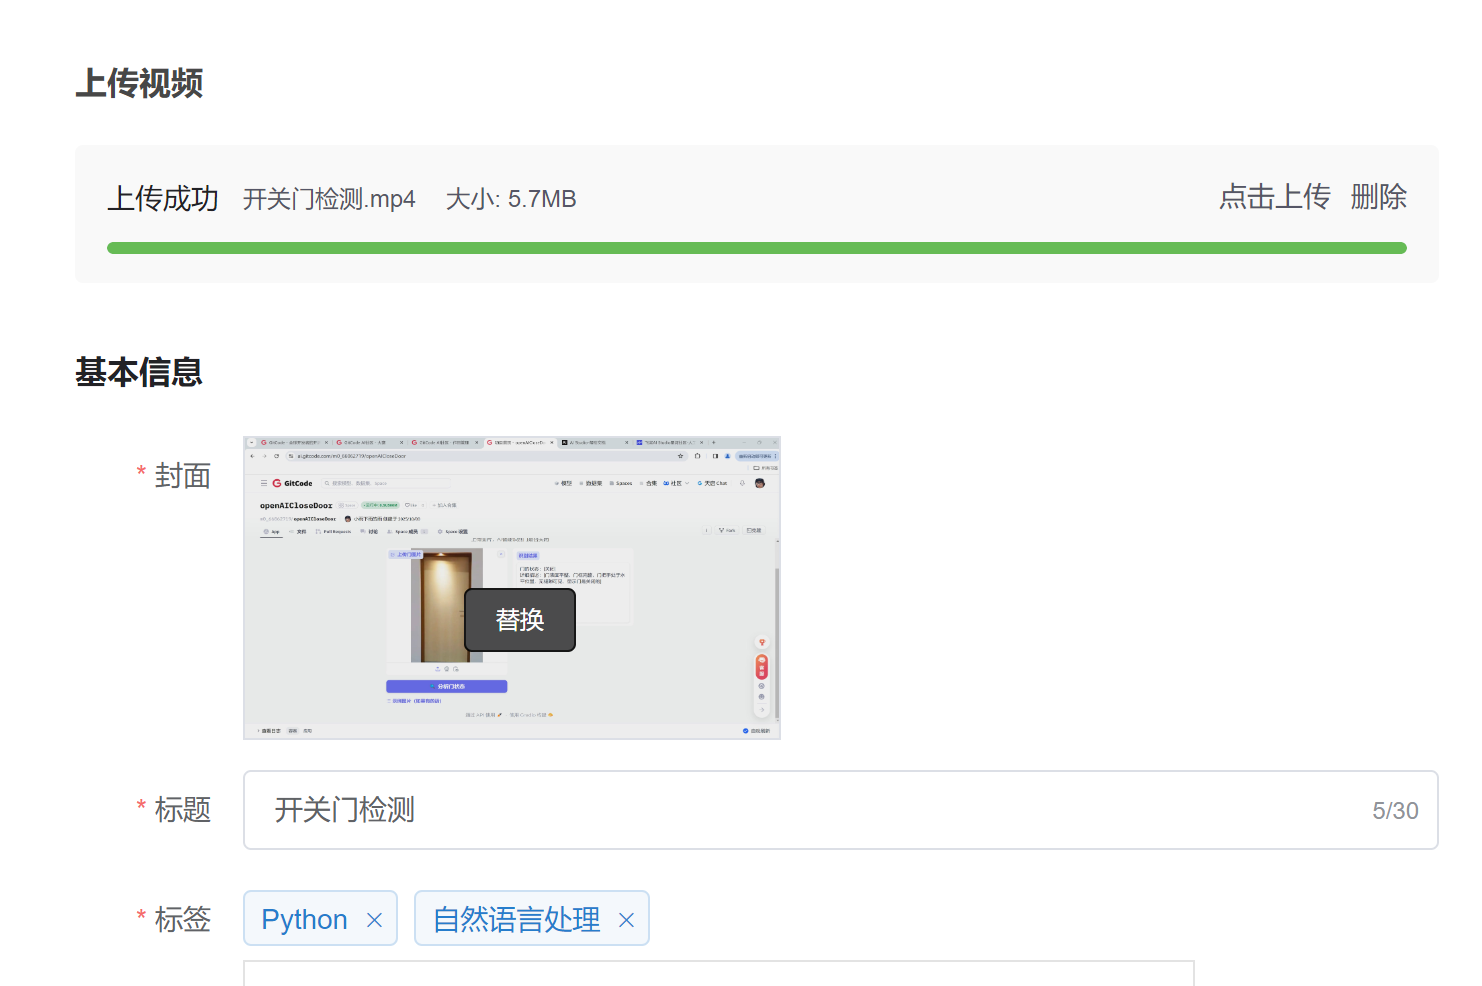
我们在gitCode的比赛地址中能看到我们的仓库,将代码上传上去,录制的视频也传上去。
这里建议,如果视频比较大,则上传到CSDN的视频中,提交的时候写上备注。
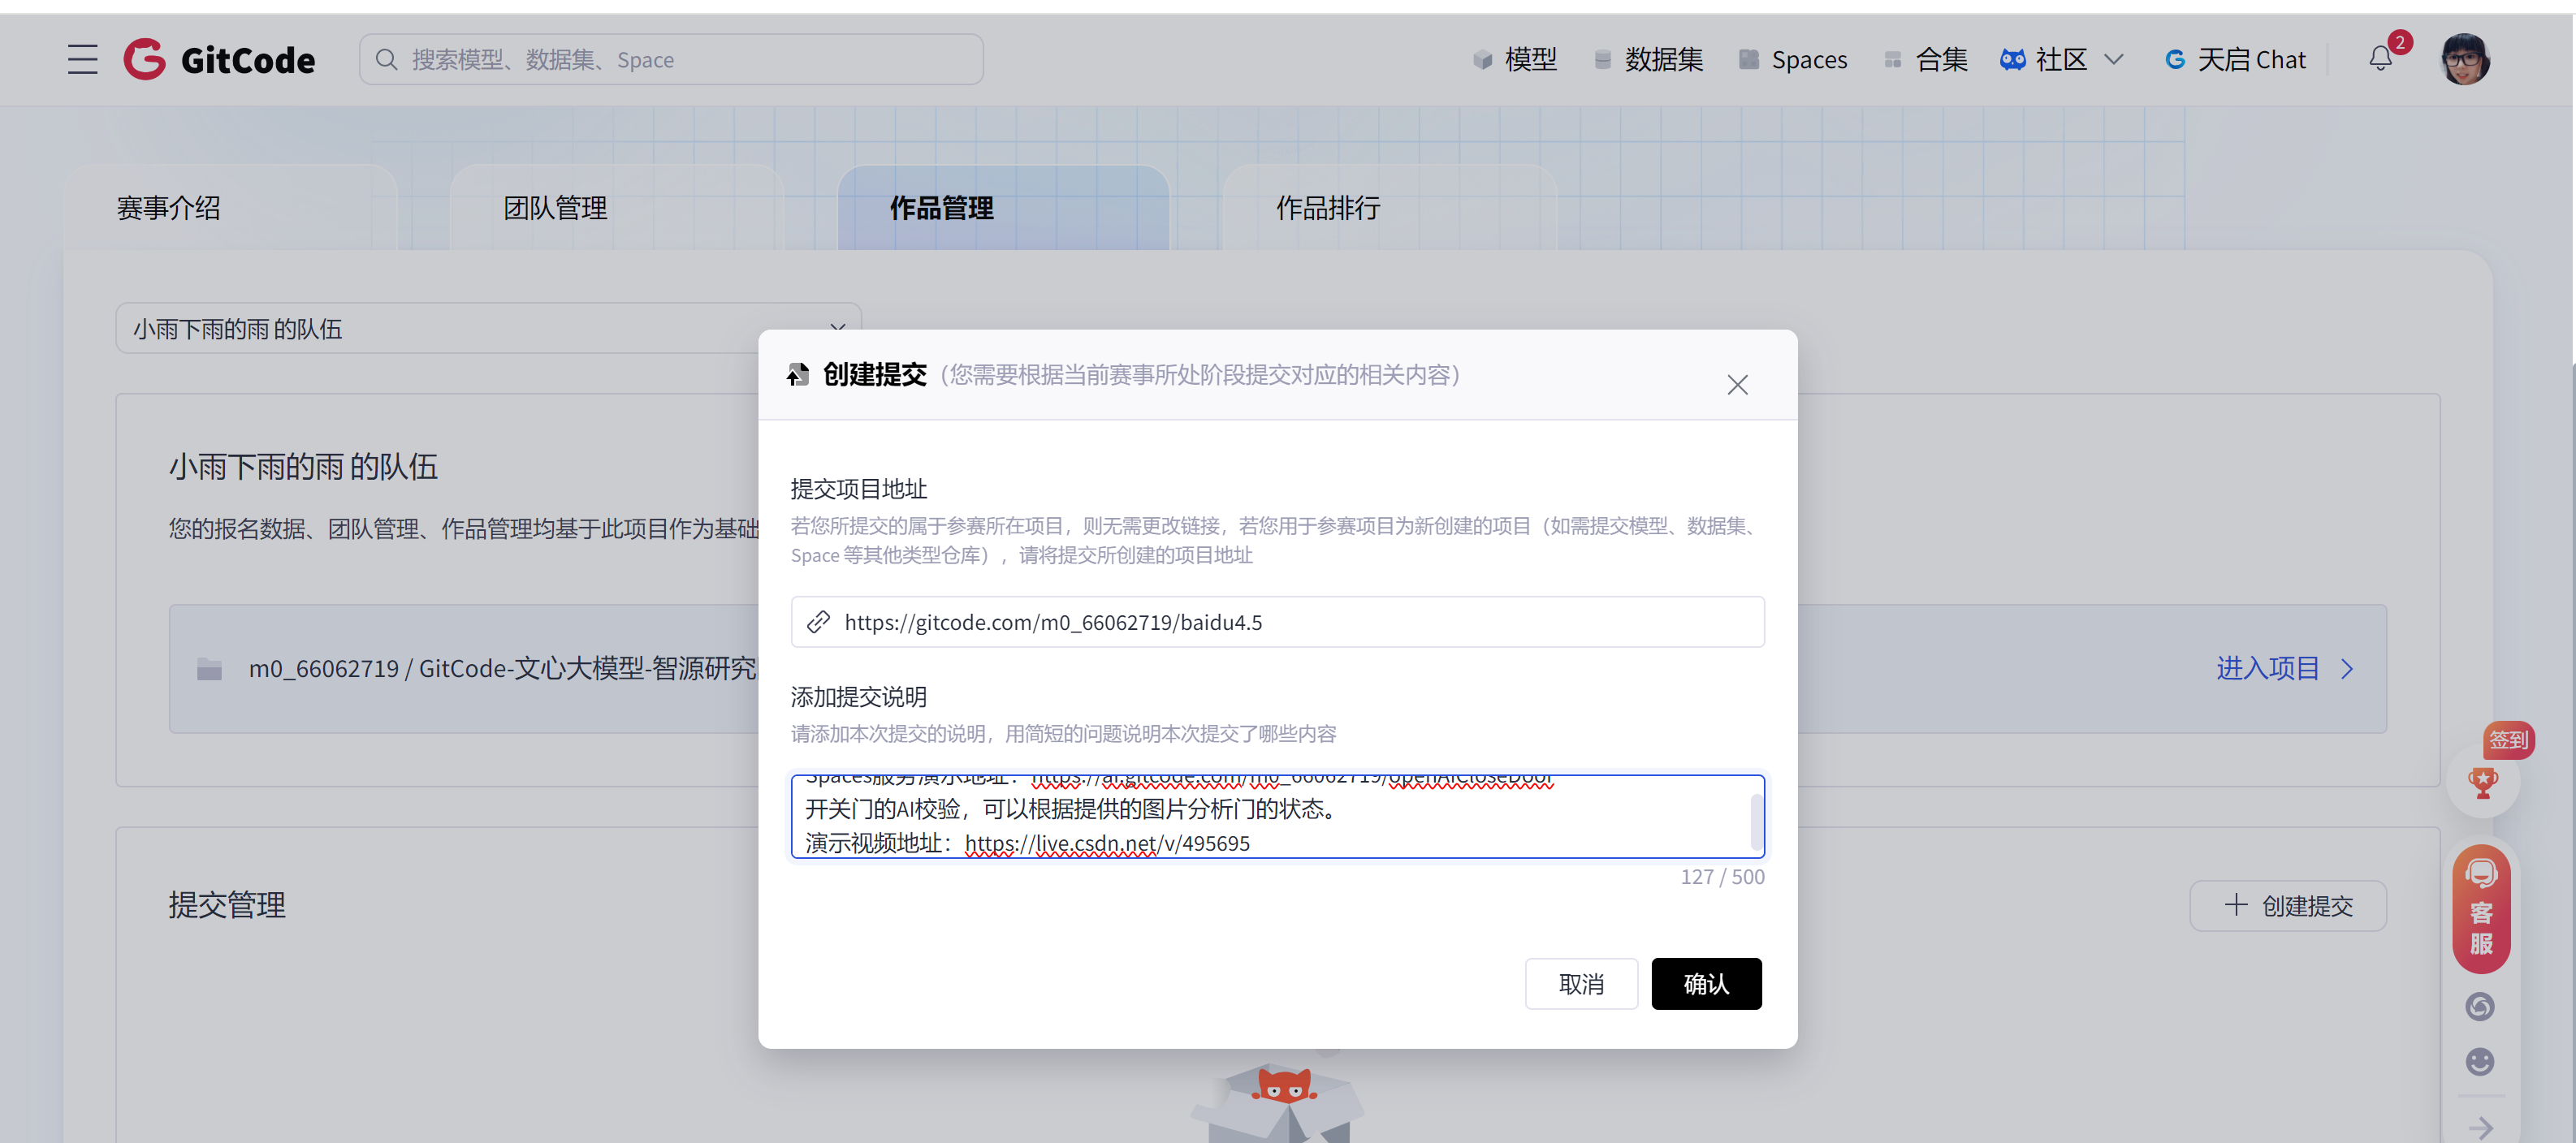
Spaces服务演示地址:https://ai.gitcode.com/m0_66062719/openAICloseDoor
开关门的AI校验,可以根据提供的图片分析门的状态。
演示视频地址:https://live.csdn.net/v/495695
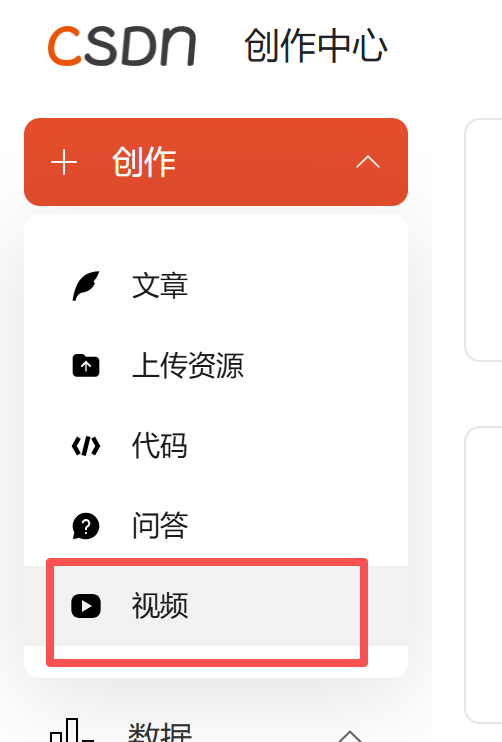
视频发布操作位置->头像->内容管理->左上角创作->视频:
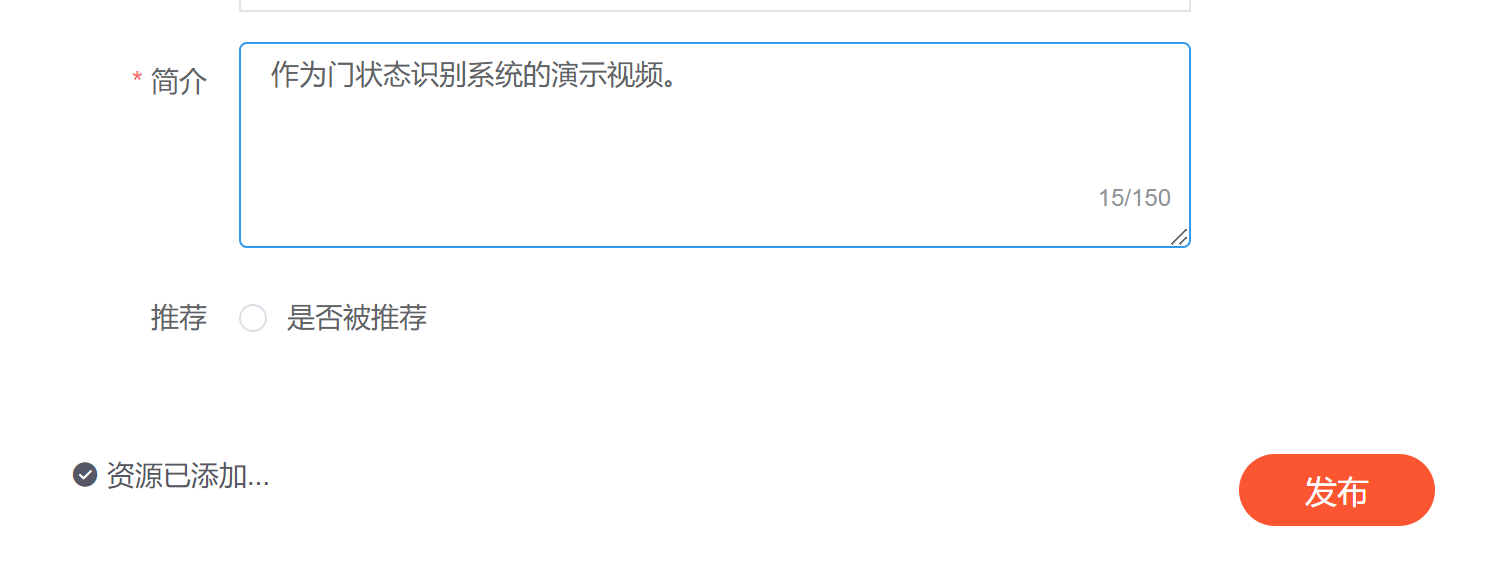
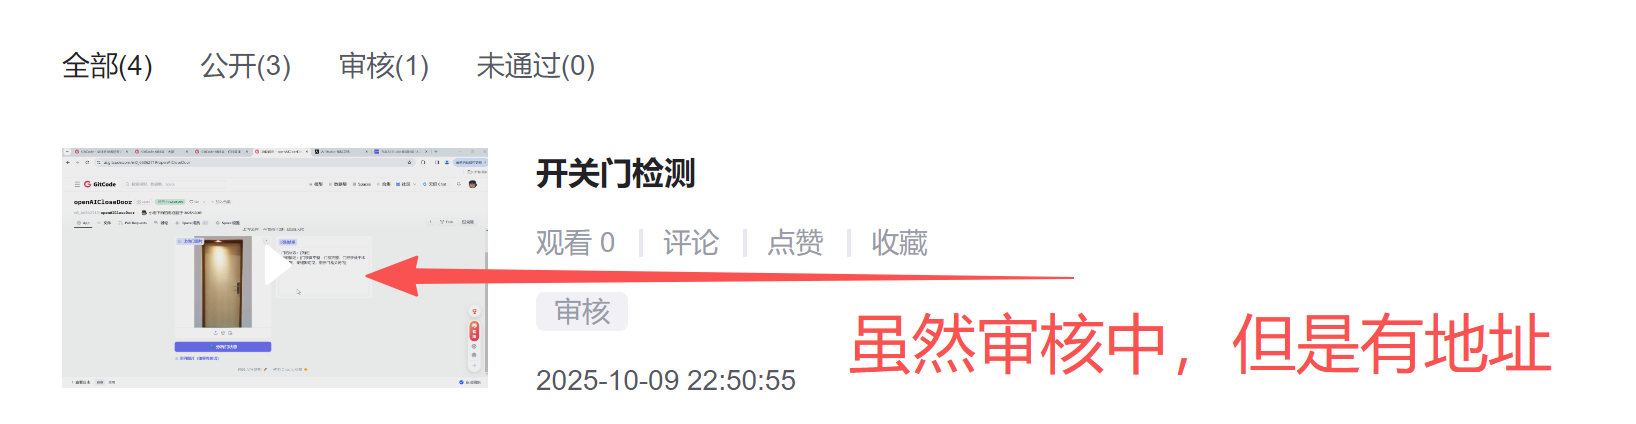
发布完毕后会有个地址:
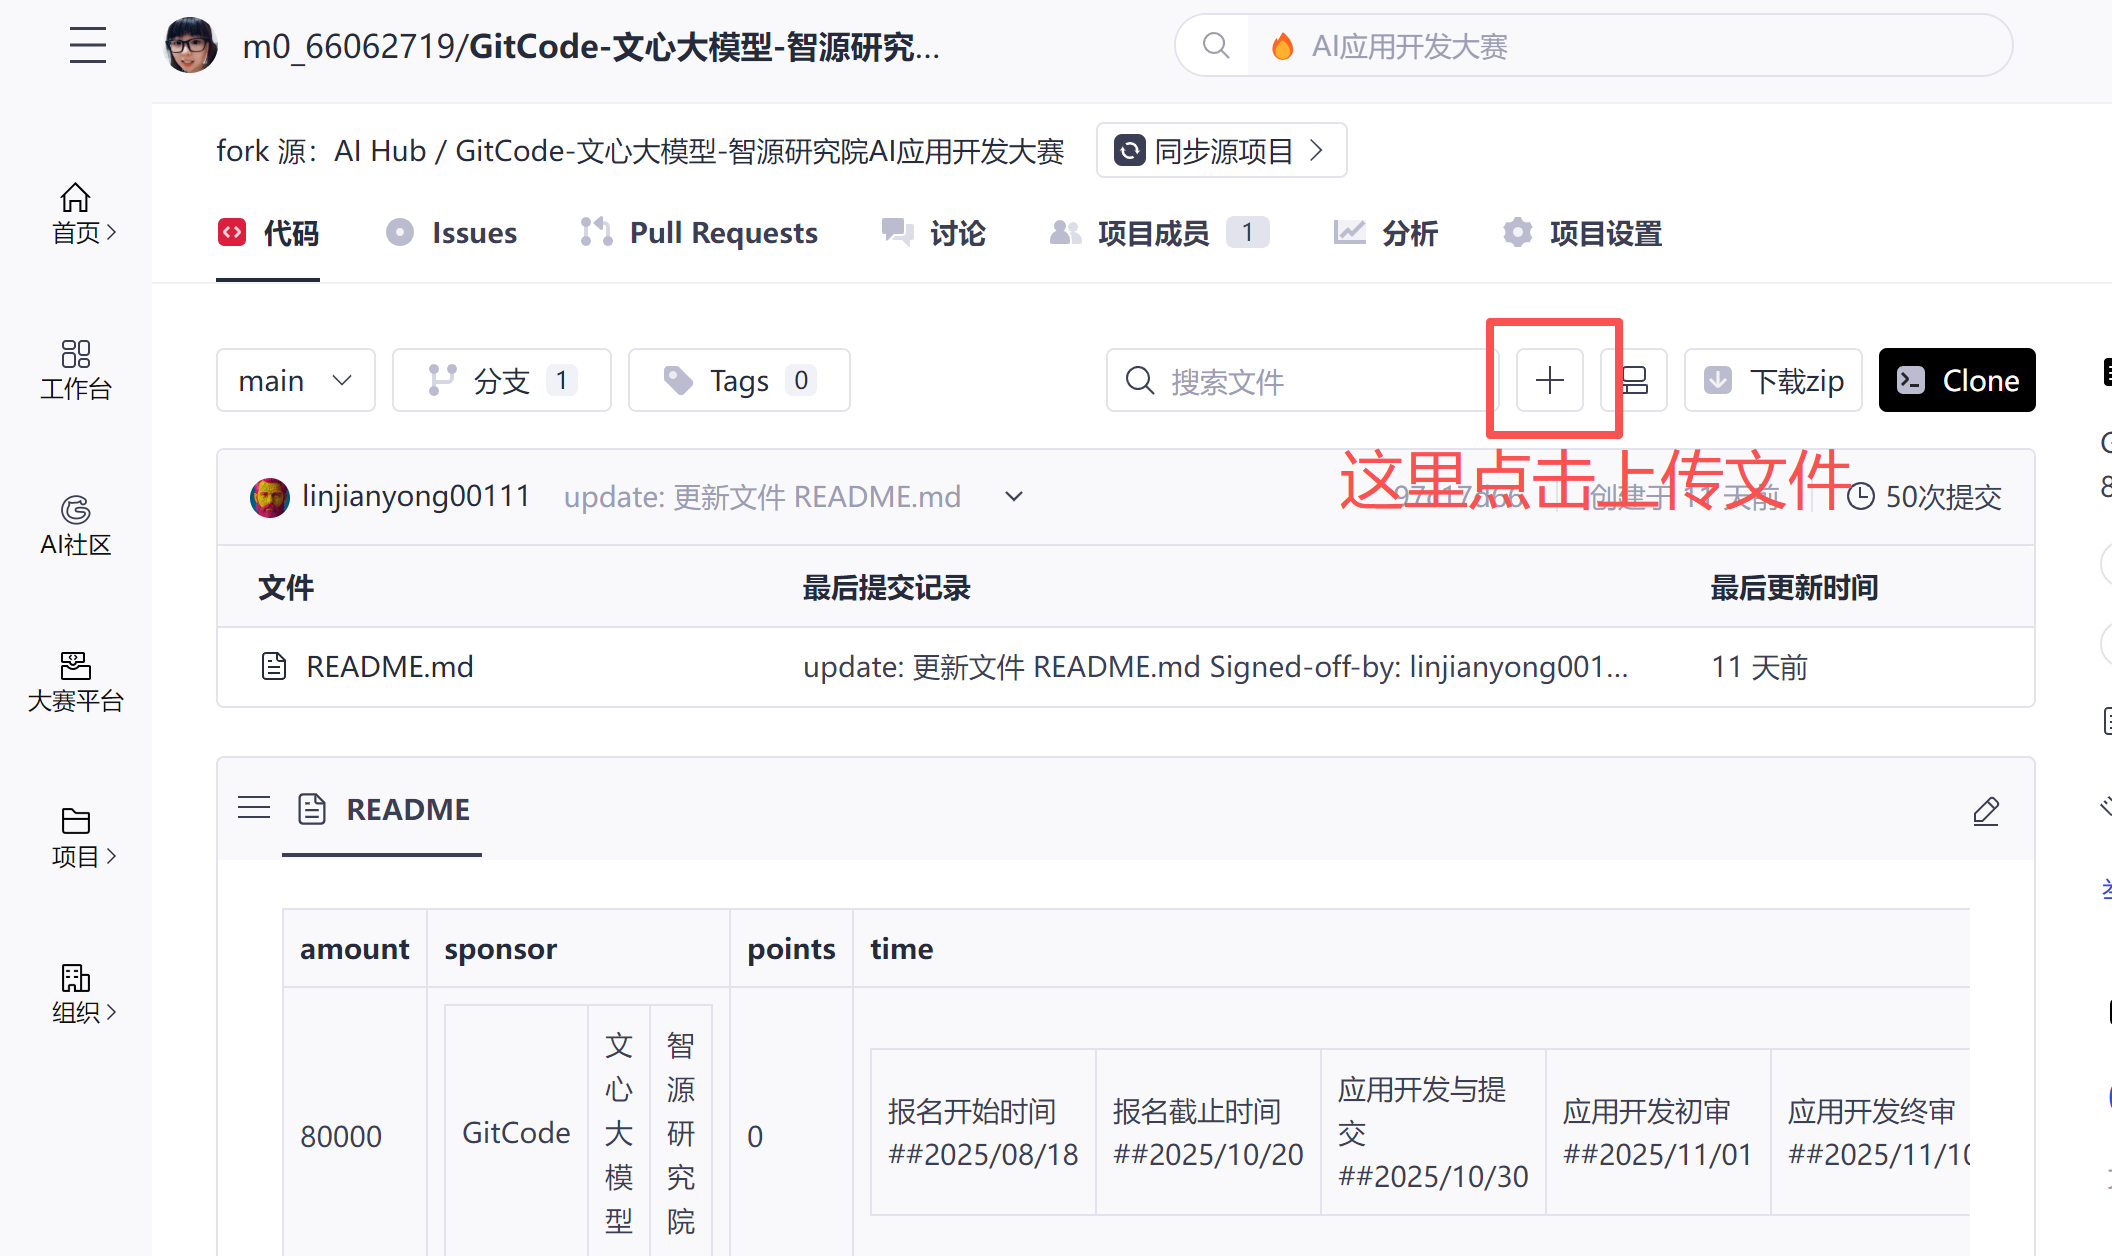
12、上传gitCode代码
在提交的页面能找到仓库地址。
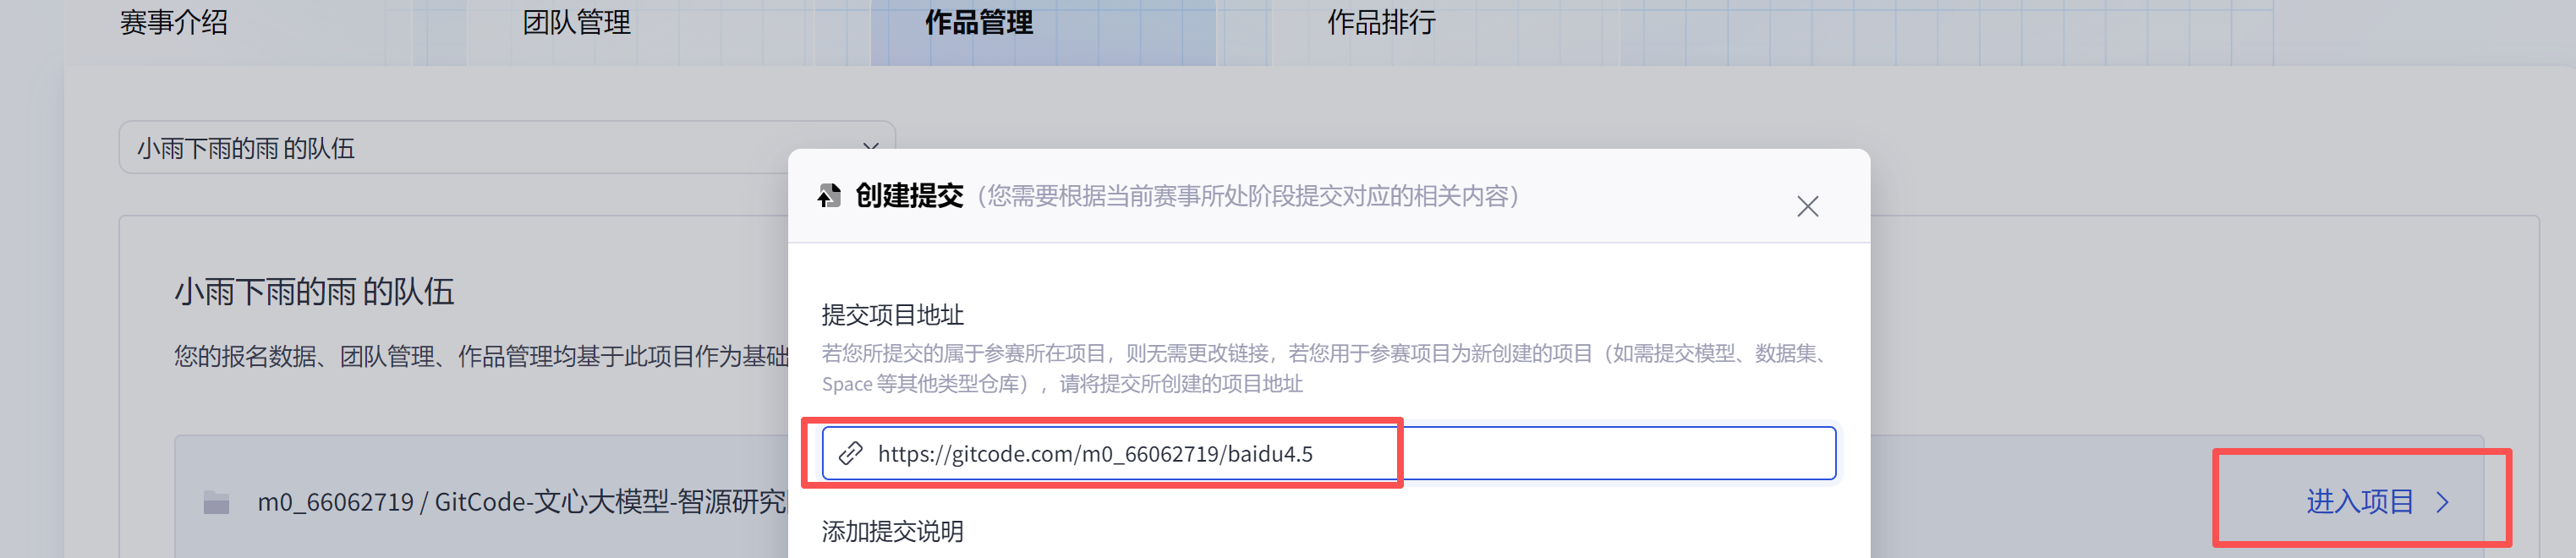
进入后直接操作即可。
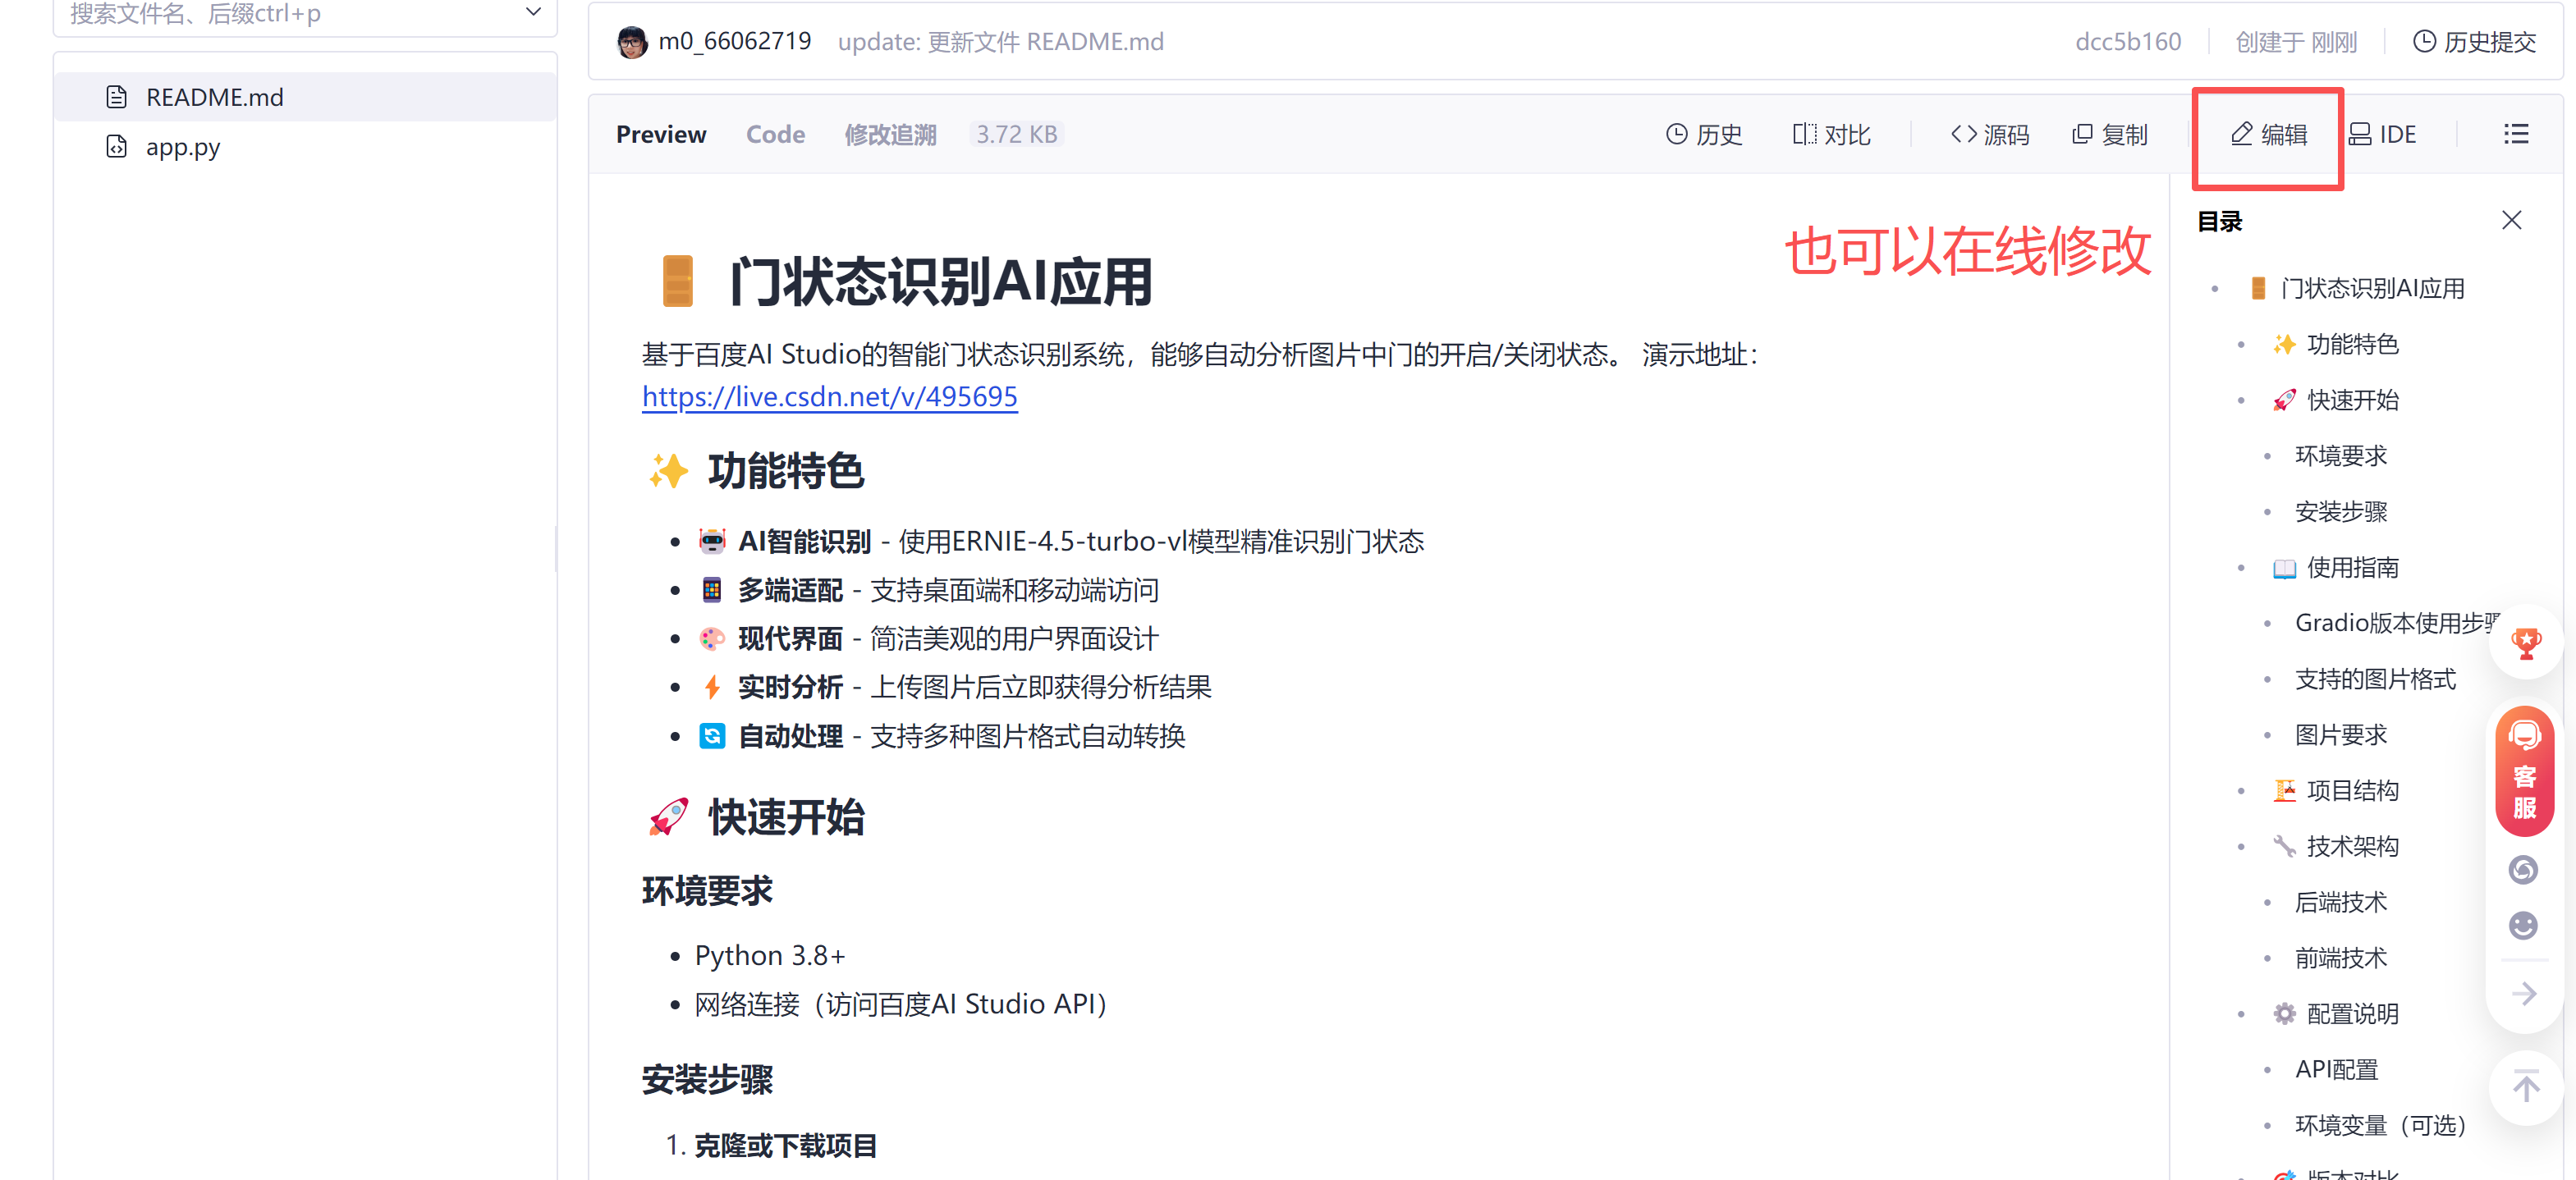
也可以在线操作创建文件和修改文件。
上传完毕。
13、提交作品
这里写完就提交啊。
提交完毕效果:
总结
这是一次非常好的活动,最后几天,期待大家的踊跃参加,希望能决赛见。
更多推荐


 23
23 0
0- 0


 已为社区贡献2条内容

所有评论(0)