
【大模型实战篇】AgentScope引入Sequential thinking mcp server实现顺序思考的React Agent
agentscope、agent scope studio、智能体框架、工具调用、mcp server、sequential thinking mcp server、顺序思考、任务规划、智能体、agent、react agent、meta planner agent
1. AgentScope简单回顾
1.1 架构分析
AgentScope 架构分为三层 + 一套交互接口:
Utility 层 :提供模型调用、代码执行、数据库访问等底层功能,内建重试机制;Manager & Wrapper 层:负责资源管理与 API 调用封装,并支持可定制的容错逻辑;
Agent 层:封装智能体逻辑、消息传递、工作流控制,包括统一消息格式、短期/长期记忆、提示词工程等。提供了基础智能体类、React智能体、用户交互智能体的实现。
交互层(Web UI + AS Studio):提供监控、图形化拖拽开发和零代码编程能力。
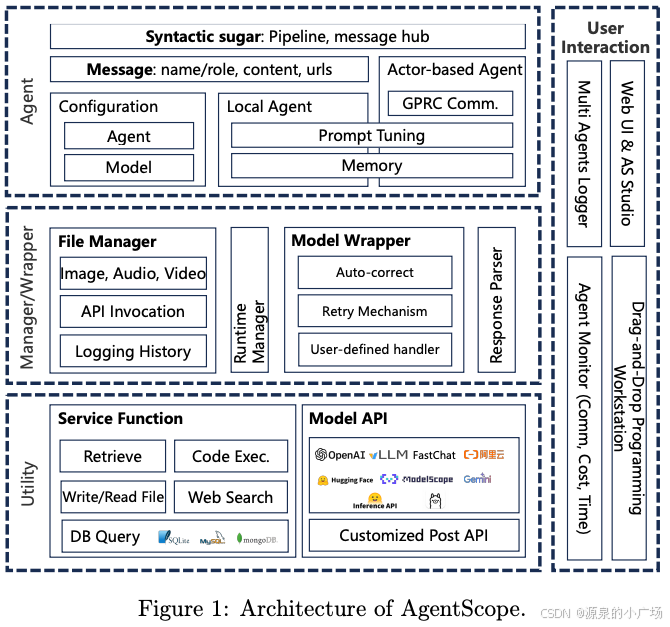
整个系统,有四个非常关键的概念,贯穿其中:
Message(消息):信息传递单元,包含发送者、内容、URL(多模态数据)。
Agent(智能体):执行任务与对话的核心实体,定义
reply()与observe()接口。Service / Tool(服务与工具):服务函数是基础API;工具是对服务函数的封装,使LLM可理解与调用。
Workflow(工作流):定义多agent间任务与消息流动,可包含顺序、条件、并行结构。
1.2 工具调用机制
工具使用是由大模型驱动的智能体的重要特性,允许智能体感知、改变环境,并处理更复杂的任务,我们将工具使用看作是大模型调用服务函数的过程。
在 AgentScope 中,工具使用包含四个步骤:
函数准备:
解析提供的服务函数,对函数进行预处理,使大模型能直接调用。指令准备:
为工具使用准备提示词,详细说明可用工具函数的目的、参数、约束及调用格式。迭代推理:
大模型生成策略性推理,决定何时以及如何使用工具,并以规定格式输出结果。迭代执行:
根据调用格式解析并检查 LLM 的响应,如果格式正确则调用对应函数执行;
若不符合要求,则向 LLM 返回详细的错误信息以供其修正。
工具调用也可以抽象成三层架构来理解:
Toolkit (工具集管理)
- 注册工具函数
- 管理工具分组
- 生成 JSON Schema
- MCP 集成
RegisteredToolFunction (工具元数据)
- name / group / source
- json_schema
- preset_kwargs
- postprocess_func
实际工具函数
- Python 函数
- MCP Server 工具
- 自定义工具
2. AgentScope部署
这里我们选择从源代码安装 AgentScope,需要从 GitHub 克隆仓库,并通过以下命令安装:
git clone -b main https://github.com/agentscope-ai/agentscope
cd agentscope
pip install -e .
执行以下代码确保 AgentScope 正常安装:
import agentscope

print(agentscope.__version__)
另外,可视化前端as studio,需要安装npm 11.6.0版本,node版本v22.14.0。
执行下述安装命令:
npm install -g @agentscope/studio
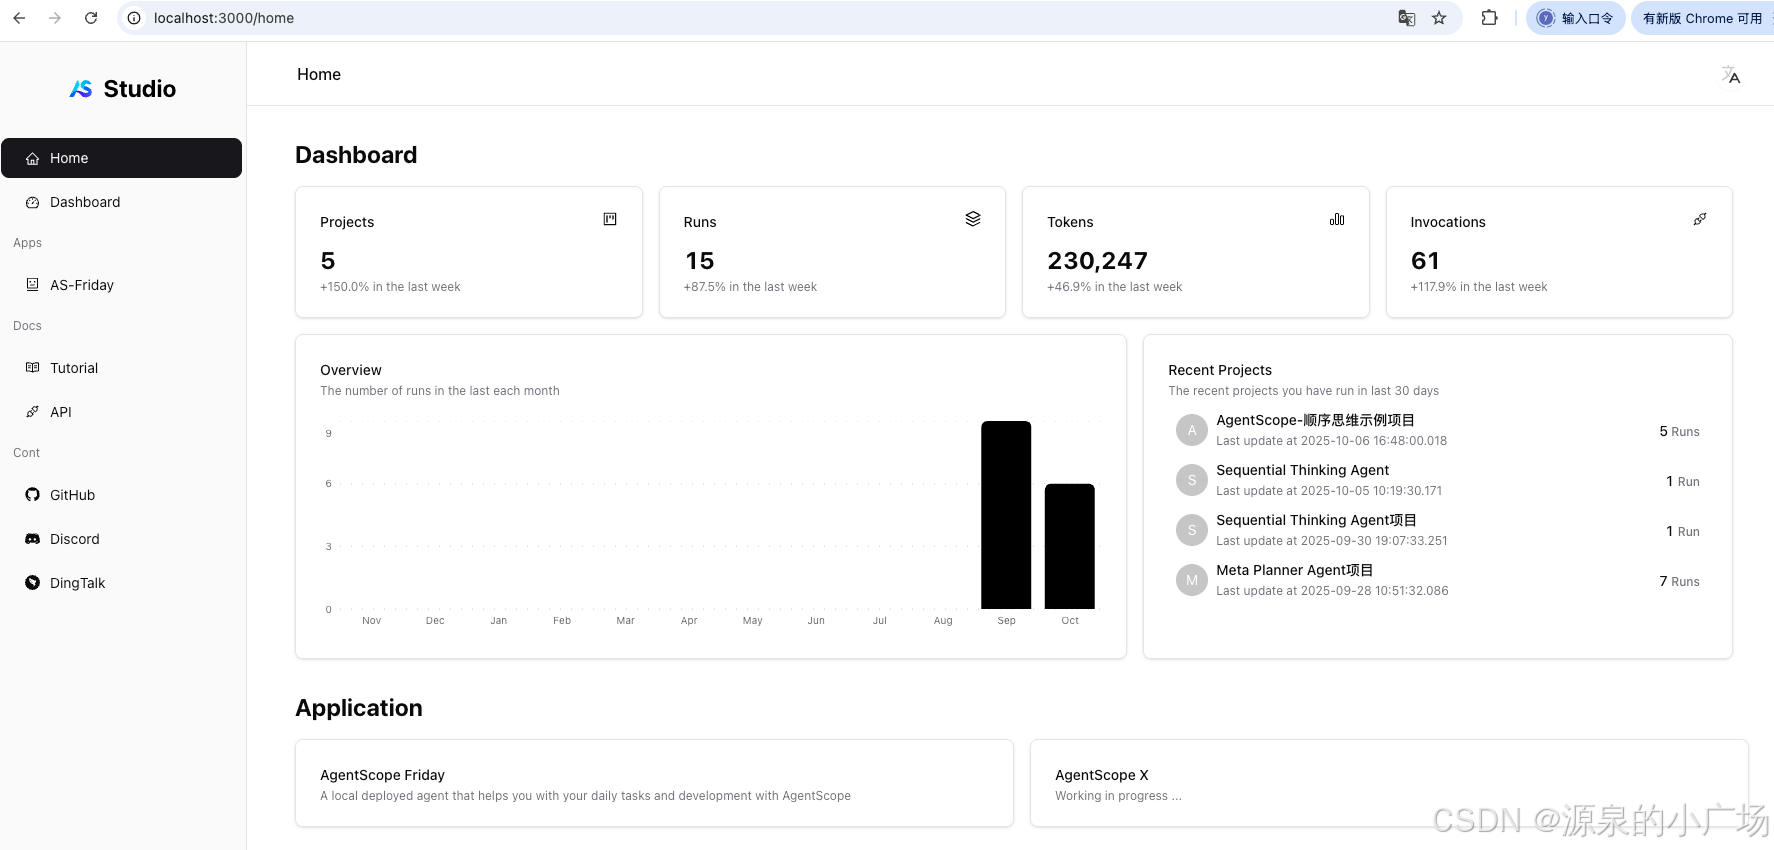
as_studio如果安装成功,访问3000端口,会弹出相应的界面
3. 启动相应的智能体服务
在第2部分,可以从dashboard中看到相应的projects,这个是需要按照下述操作。这里以react agent以及meta_planner_agent两个项目为例来说明,这两个项目位于agentscope/examples中。
官方版本只给了简单的说明,没有加入对应代码,所以我们需要自己加一下。
比如对于react agent项目,启动的时候需要加入下述代码:
agentscope.init(
        project="AgentScope示例项目",           # 项目名称
        name=f"ReAct测试_{datetime.now().strftime('%Y%m%d_%H%M%S')}", # 运行名称(带时间戳)
        studio_url="http://localhost:3000",     # Studio服务地址
        logging_level="DEBUG",                  # 详细日志级别
        logging_path="./logs/agent.log"        # 日志文件路径
    )
同理,对于meta_planner_agent也是如此,启动阶段需要添加下述代码:
studio_url = os.getenv("STUDIO_URL", "http://localhost:3000")
agentscope.init(
    project=os.getenv("STUDIO_PROJECT", "Meta Planner Agent项目"),
    name=os.getenv("STUDIO_RUN_NAME", f"MetaPlanner_{time_str}"),
    studio_url=studio_url,
    logging_level=os.getenv("LOGGING_LEVEL", "INFO"),
    logging_path=os.path.join(log_dir, "meta_planner.log")
)
也就是说通过该方式,as studio才能捕捉到相应的项目信息。这个官方开源项目中没有做具体的说明,所以需要注意下。
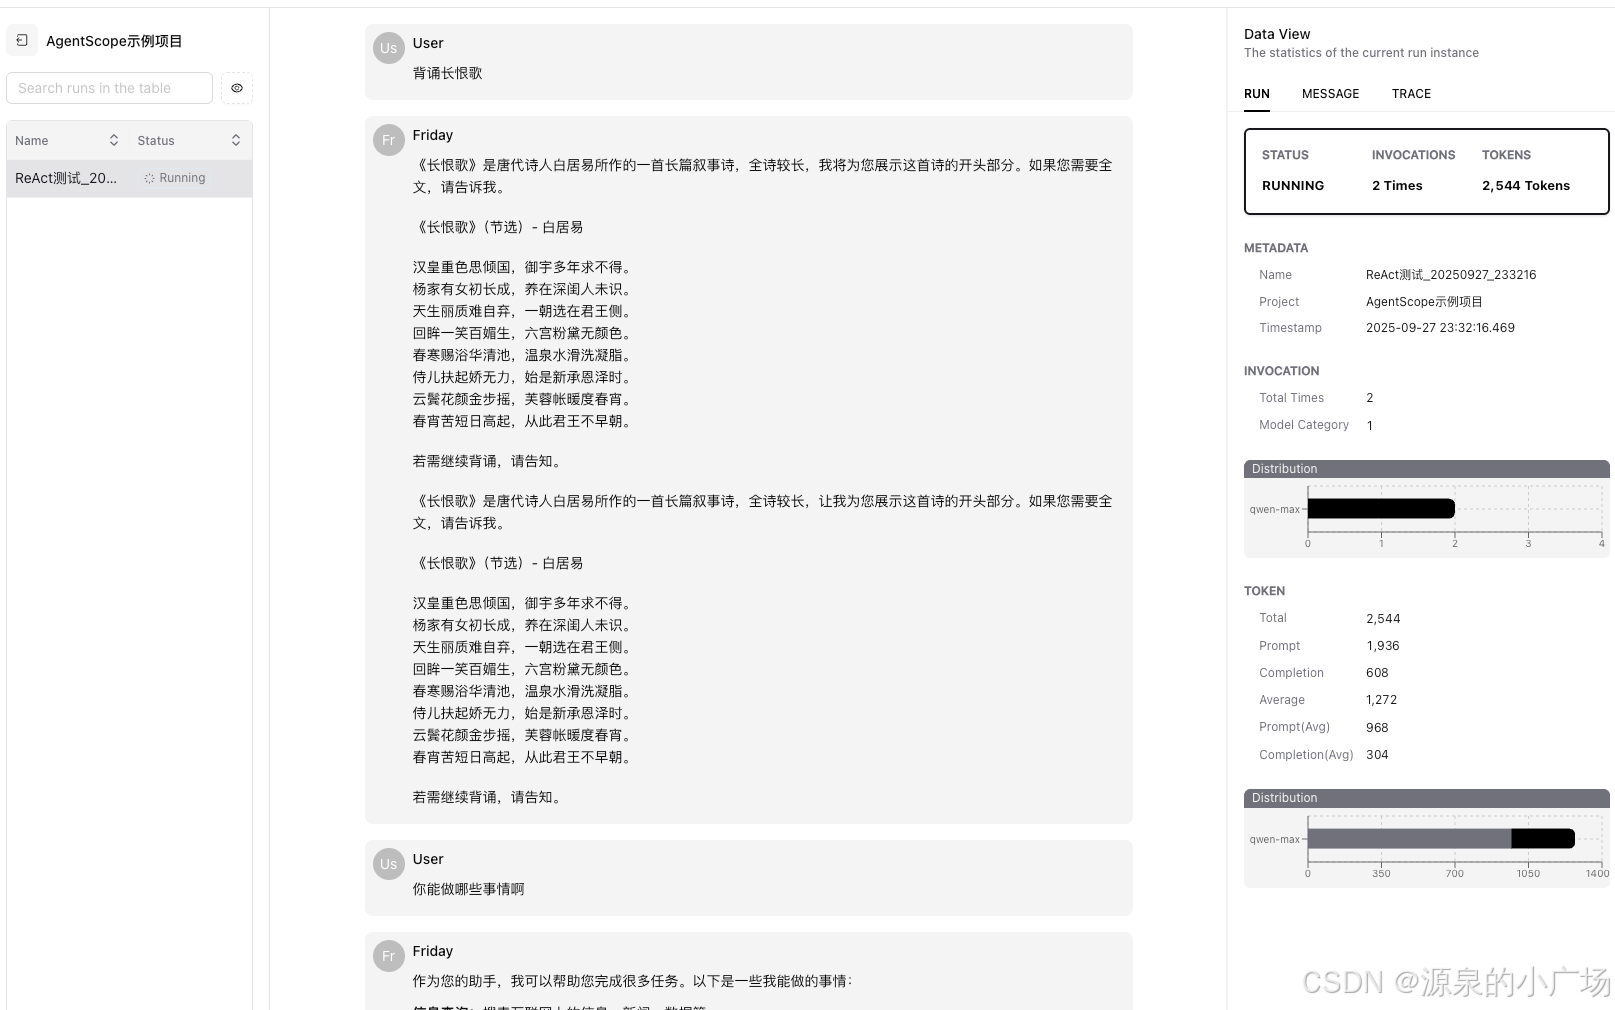
接下来,我们启动react agent, 只需要输入:
python examples/react_agent/main.py然后就可以在studio界面进行相应的指令操作:
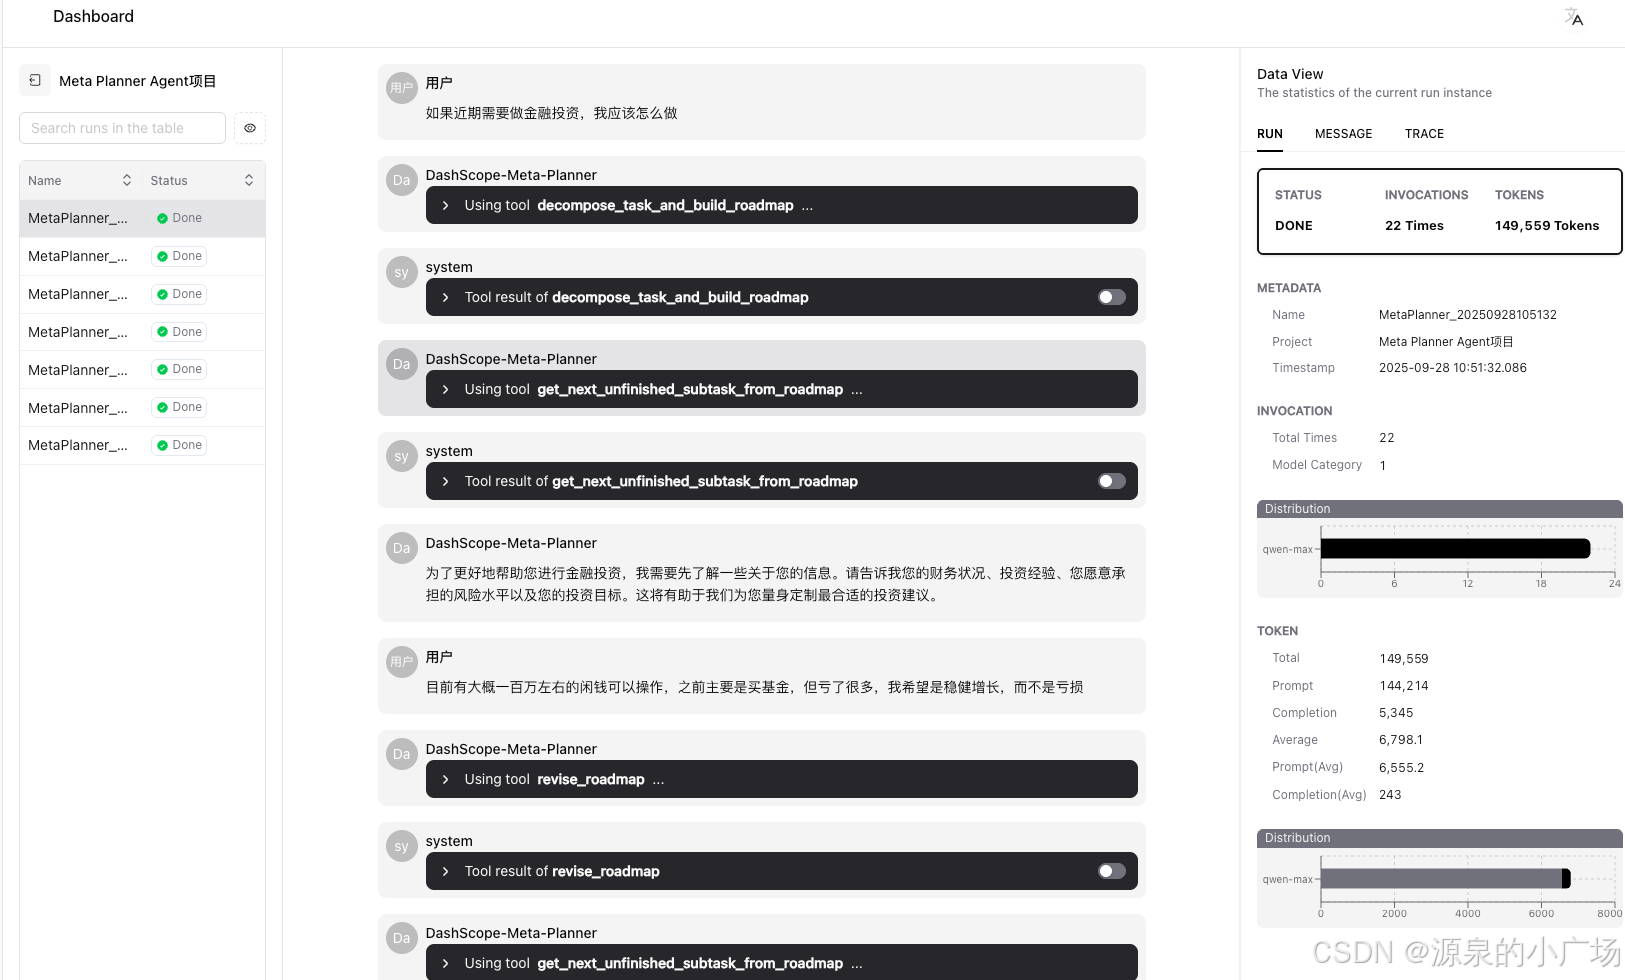
react agent相对比较简单,复杂一些的agent可以参考meta_planner_agent项目,在该项目中我们启用planner的工具能力,需要调整下代码,增加planner_mode="enforced",也就是强制启用planner模式,执行规划动作。否则原来的版本会自己判断任务是否简单,只有判定为复杂的任务才会启用,具有不确定性。为了实验方便,我们设置为强制每次都启用。
agent = MetaPlanner(
            name="DashScope-Meta-Planner",
            model=DashScopeChatModel(
                api_key=os.environ.get("DASHSCOPE_API_KEY"),
                model_name="qwen-max",  # 使用qwen-max模型
                enable_thinking=False,  # 可选:启用思维链
                stream=False,  # 建议先设为False避免异步问题
            ),
            formatter=DashScopeChatFormatter(),
            toolkit=planner_toolkit,
            worker_full_toolkit=worker_toolkit,
            agent_working_dir=agent_working_dir,
            memory=InMemoryMemory(),
            state_saving_dir=f"./agent-states/run-{time_str}",
            max_iters=100,
            planner_mode="enforced",  # 强制启用 planner 模式,确保每次都执行规划
        )
启用后就能看到相应的工具调用:
4. 在react agent中引入sequential thinking mcp 工具能力
首先sequential-thinking的实现,我们参考了这个开源项目:https://github.com/modelcontextprotocol/servers/tree/main/src/sequentialthinking
将代码下载到本地后,然后在react agent代码中,加入该mcp server的启用,由于sequential thinking只支持stdio模式,所以我们没有使用http的形式,调整后的代码如下:
# -*- coding: utf-8 -*-
"""The main entry point of the ReAct agent example."""
import asyncio
import os
from datetime import datetime

from agentscope.agent import ReActAgent, UserAgent
from agentscope.formatter import DashScopeChatFormatter
from agentscope.mcp import StdIOStatefulClient
from agentscope.memory import InMemoryMemory
from agentscope.model import DashScopeChatModel
from agentscope.tool import (
    Toolkit,
    execute_shell_command,
    execute_python_code,
    view_text_file,
)


async def main() -> None:
    """The main entry point for the ReAct agent example."""
    import agentscope

    log_dir = "./logs"
    os.makedirs(log_dir, exist_ok=True)

    agentscope.init(
        project="AgentScope-顺序思维示例项目",           # 项目名称
        name=f"ReAct测试_{datetime.now().strftime('%Y%m%d_%H%M%S')}", # 运行名称(带时间戳)
        studio_url="http://localhost:3000",     # Studio服务地址
        logging_level="DEBUG",                  # 详细日志级别
        logging_path="./logs/sequentialthinking_agent.log"        # 日志文件路径
    )

    toolkit = Toolkit()

    seq_client = StdIOStatefulClient(
    name="sequentialthinking",
    command="node",
    args=["/data/servers/src/sequentialthinking/dist/index.js"],
)

    await seq_client.connect()

    print(f" MCP Server 子进程信息:")
    if hasattr(seq_client, '_process') and seq_client._process:
        print(f"  - 进程ID (PID): {seq_client._process.pid}")
        print(f"  - 进程状态: 运行中")
    print(f"  - 启动命令: {seq_client.command} {' '.join(seq_client.args)}")
    print()

    def monitor_tool_call(tool_call, tool_response):
        """监控并记录工具调用"""
        print(f"\n{'='*60}")
        print(f" 工具调用检测:")
        print(f"  - 工具名称: {tool_call.get('name', 'unknown')}")
        print(f"  - 工具ID: {tool_call.get('id', 'unknown')}")
        print(f"  - 输入参数: {tool_call.get('input', {})}")
        print(f"  - 调用结果长度: {len(str(tool_response))}")
        print(f"{'='*60}\n")
        return None  # 返回 None 表示使用原始响应

    await toolkit.register_mcp_client(
        seq_client,
        postprocess_func=monitor_tool_call  # 添加监控函数
    )

    toolkit.register_tool_function(execute_shell_command)
    toolkit.register_tool_function(execute_python_code)
    toolkit.register_tool_function(view_text_file)

    # 打印已注册的工具列表
    print("\n" + "="*60)
    print("已注册的工具列表:")
    for tool_name in toolkit.tools.keys():
        tool_info = toolkit.tools[tool_name]
        print(f"  ✓ {tool_name}")
        print(f"    - 分组: {tool_info.group}")
        print(f"    - 来源: {tool_info.source}")
        if tool_info.json_schema.get('description'):
            desc = tool_info.json_schema['description'][:100]
            print(f"    - 描述: {desc}...")
    print("="*60 + "\n")

    # 测试工具是否可用(可选,测试完可注释掉)
    print(" 测试 sequential-thinking 工具...")
    try:
        test_result = await toolkit.call_tool_function({
            "type": "tool_use",
            "id": "test_call",
            "name": "sequentialthinking",
            "input": {
                "task": "测试:1+1等于几?",
                "total_thoughts": 2
            }
        })
        print(f" 工具测试成功!返回: {str(test_result)[:200]}...")
    except Exception as e:
        print(f" 工具测试失败: {e}")

    # 改进的系统提示词,引导 Agent 使用 sequential-thinking
    sys_prompt = """You are a helpful assistant named Friday.

When facing complex tasks that require multi-step reasoning, planning, or problem-solving, you MUST use the 'sequentialthinking' tool to:
1. Break down the problem into clear steps
2. Think through each step systematically
3. Revise your thinking if needed
4. Arrive at a well-reasoned solution

Complex tasks include but are not limited to:
- Planning (travel itineraries, project plans, schedules)
- Problem-solving that requires multiple steps
- Analysis that needs structured reasoning
- Tasks requiring verification or validation
- Decisions that need weighing pros and cons

For simple questions or straightforward tasks, you can answer directly."""

    agent = ReActAgent(
        name="Friday",
        sys_prompt=sys_prompt,
        model=DashScopeChatModel(
            api_key=os.environ.get("DASHSCOPE_API_KEY"),
            model_name="qwen-max",
            enable_thinking=False,
            stream=True,
        ),
        formatter=DashScopeChatFormatter(),
        toolkit=toolkit,
        memory=InMemoryMemory(),
        parallel_tool_calls=False
    )
    user = UserAgent("User")

    msg = None
    while True:
        msg = await user(msg)
        if msg.get_text_content() == "exit":
            break
        msg = await agent(msg)


asyncio.run(main())
启动main.py,可以看到相应的启动日志,证明工具已经注册:
2025-10-06 13:33:50,920 | INFO | _user_input:on_connect:194 - Connected to AgentScope Studio with project name "http://localhost:3000"
2025-10-06 13:33:50,920 | INFO | _user_input:on_connect:200 - View the run at: http://localhost:3000/dashboard/projects/AgentScope-顺序思维示例项目
Sequential Thinking MCP Server running on stdio
2025-10-06 13:33:50,992 | INFO | _stateful_client_base:connect:66 - MCP client connected.
2025-10-06 13:33:50,992 | INFO | _toolkit:register_mcp_client:716 - Registered 1 tool functions from MCP: sequentialthinking.============================================================
已注册的工具列表:
✓ sequentialthinking
- 分组: basic
- 来源: function
✓ execute_shell_command
- 分组: basic
- 来源: function
✓ execute_python_code
- 分组: basic
- 来源: function
✓ view_text_file
- 分组: basic
- 来源: function
============================================================
测试 sequential-thinking 工具...
工具测试成功!返回: <async_generator object _trace_async_generator_wrapper at 0x123f45240>...
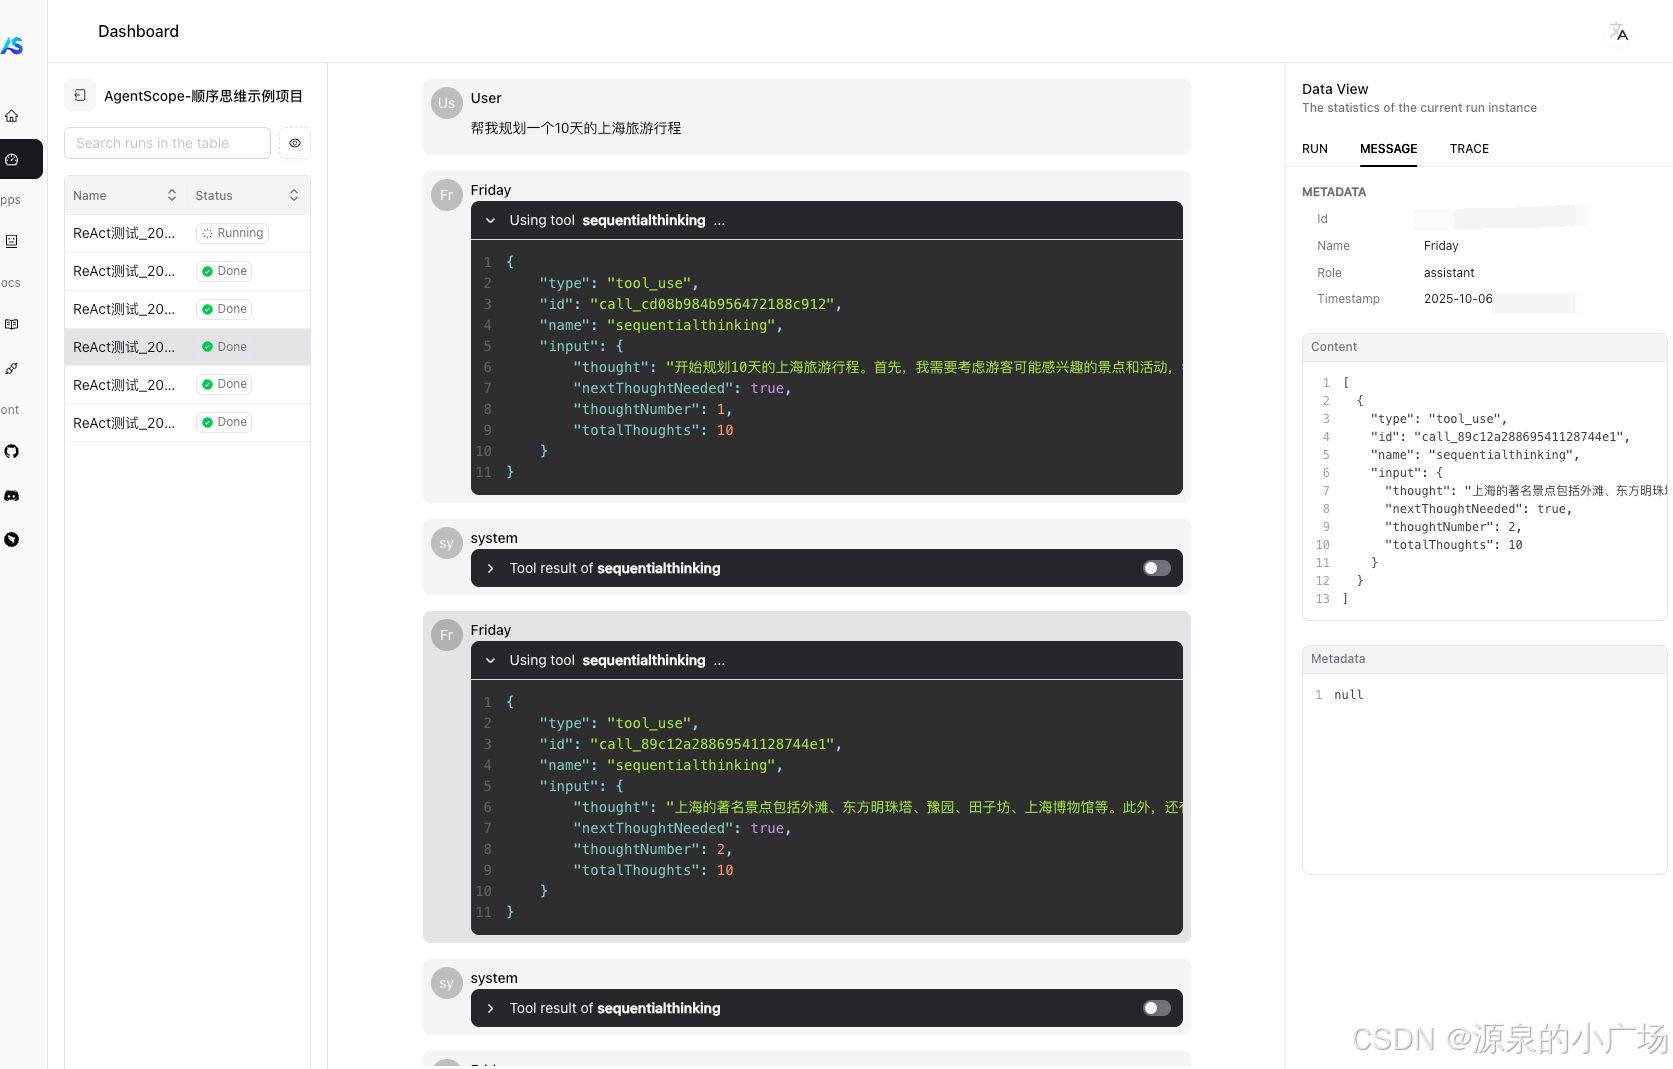
接下来,我们就可以在as studio中进行测试:

更多推荐


 7
7 0
0- 0


 已为社区贡献4条内容

所有评论(0)