
使用nodejs创建,导入mcp
本文对比了多种MCP协议实现方式的优缺点,包括Stdio、SSE、StreamableHTTP等传输协议。Stdio适合本地调试和CLI工具,SSE适用于Web应用,StreamableHTTP则提供更好的兼容性。文章详细介绍了如何使用Express框架实现StreamableHTTP MCP服务器,包括工具注册、资源管理和会话处理。同时提供了多种客户端调用方式,如axios、SDK集成等,并介绍
各种实现方式对比
| 实现情况 | 实现方式 | 测试情况 | 传输方式 | 协议 | 实时性 | 复杂度 | 适用场景 |
|---|---|---|---|---|---|---|---|
| √ | stdioMCPInit函数调用 | @modelcontextprotocol/sdk/client | Stdio | 进程管道 | 高 | 低 | CLI工具、本地调试(StdioServerTransport) |
| √ | /mcp/sse 请求接口 | × | SSE | HTTP | 中 | 中 | 前端、Web应用、简单实时(SSEServerTransport) |
| √ | /mcp 请求接口 | cherry studio, axios, inspector,@modelcontextprotocol/sdk/client | SSE+HTTP | HTTP | 中 | 高 | 兼容性要求高的Web应用(StreamableHTTPServerTransport) |
| × | × | × | WebSocket | WS | 高 | 中 | 实时应用、游戏 |
| × | × | × | HTTP Polling | HTTP | 低 | 中 | 最大兼容性环境 |
| × | × | × | gRPC | HTTP/2 | 高 | 高 | 微服务、高性能系统 |
| × | × | × | Message Queue | 多种 | 中 | 高 | 分布式系统、异步处理 |
| × | × | × | IPC | 系统 | 极高 | 中 | 本地高性能通信 |
MCP注册工具
代码都为express框架使用案例
文档地址:https://modelcontextprotocol.io/docs/getting-started/intro
github:https://github.com/modelcontextprotocol/typescript-sdk/tree/main
在后面传入transport绑定到mcpServer, 然后通过 await transport.handleRequest(req, res, req.body); 会自动调用相关工具。
import { McpServer } from "@modelcontextprotocol/sdk/server/mcp.js";
import { isInitializeRequest } from "@modelcontextprotocol/sdk/types.js";
import { StreamableHTTPServerTransport } from "@modelcontextprotocol/sdk/server/streamableHttp.js";
import { SSEServerTransport } from "@modelcontextprotocol/sdk/server/sse.js";
import { StdioServerTransport } from "@modelcontextprotocol/sdk/server/stdio.js";
import { StreamableHTTPClientTransport } from "@modelcontextprotocol/sdk/client/streamableHttp.js";
// import { StdioClientTransport } from "@modelcontextprotocol/sdk/client/stdio.js";
import { Client } from "@modelcontextprotocol/sdk/client/index.js";
import question2Text from '../../util/question2Text.js';
import { getGlobalConfig } from '../../util.js';
import { getUser } from './auth.js';
import createError from 'http-errors';
import { z } from "zod";
import axios from "axios";
import { v4 } from "uuid";


// Map to store transports by session ID
const transports = {}; // { [sessionId: string]: StreamableHTTPServerTransport };

async function createMCPServer(transport) {
  const server = new McpServer({
    name: "ChatBI",
    version: "1.0.0",
    description: "Chat with your data。查数的时候调用。",
  });

  // ... set up server resources, tools, and prompts ...
  // 注册资源
  server.registerResource(
    "echo",
    new ResourceTemplate("echo://{message}", { list: undefined }),
    {
      title: "Echo Resource",
      description: "Echoes back messages as resources"
    },
    async (uri, { message }) => ({
      contents: [{
        uri: uri.href,
        mimeType: "text/plain",
        text: `Resource echo: ${message}`,
      }],
    }),
  );

  // 注册工具
  server.registerTool(
    "ChatBI",
    {
      title: "ChatBI",
      description: "Chat with your data。查数的时候调用。",
      inputSchema: {
        userId: z.string().describe('user表_id,用来获取用户信息'),
        question: z.string().describe('提问的问题'),
        locale: z.string().optional().default('zh-cn').describe('req.query回答使用的语言zh-cn'),
        // domain: z.string().optional().default('').describe('globalConfig.domain域名'),
      }
    },
    async ({ userId, question, locale }) => {
      try {
        const user = await getUser({ _id: userId });

        if (!user) {
          return ({ content: [{ type: "text", text: '无访问权限' }] });
        }

        const globalConfig = await getGlobalConfig();

        const answer = await question2Text(
          question,
          locale, // zh-cn
          user,
          globalConfig?.domain || '', // "domain": "https://retail.yiwendata.com",
          true
        );

        return ({ content: [{ type: "text", text: JSON.stringify(answer) }] });
      } catch (err) {
        return ({ content: [{ type: "text", text: err.message }] });
      }
    }
  );

  // 注册提示词
  server.registerPrompt(
    "echo",
    {
      title: "Echo Prompt",
      description: "Creates a prompt to process a message",
      argsSchema: { message: z.string() }
    },
    ({ message }) => ({
      messages: [{
        role: "user",
        content: {
          type: "text",
          text: `Please process this message: ${message}`
        }
      }]
    })
  );

  // Connect to the MCP server
  await server.connect(transport);

  return { server };
}
一、Stdio
stdio 通常用于本地、同一台机器上的客户端和服务器通信,可以通过docker,npx,uvx下载到本地,或者本地mcp导入使用,是 Claude Desktop 等桌面应用最常用的方式。
server.ts 创建stdio类型mcp服务器。
import { McpServer, ResourceTemplate } from "@modelcontextprotocol/sdk/server/mcp.js";
import { StdioServerTransport } from "@modelcontextprotocol/sdk/server/stdio.js";
import { z } from "zod";
import axios from "axios";

(async () => {
  // Create an MCP server
  const server = new McpServer({
    name: "ChatBI",
    version: "1.0.0",
    description: "Chat with your data。查数的时候调用。",
  });

  // Add an addition tool
  server.tool("chatbi",
    { ask: z.string()},
    async ({ ask }) => {
      const response = await axios.post(`${process.env.CHATBI_DOMAIN}/api/v1/ask`, {
          ask,
          exec_logicform: true
        }, {
          headers: {
            'Content-Type': 'application/json',
            'Authorization': `Bearer ${process.env.CHATBI_TOKEN}`
          }
        })

      return {
        content: [{ type: "text", text: JSON.stringify(response.data.result) }],
      }
    }
  );

  // Add a dynamic greeting resource
  // server.resource(
  //   "chatbi",
  //   new ResourceTemplate("chatbi://{name}", { list: undefined }),
  //   async (uri, { name }) => ({
  //     contents: [{
  //       uri: uri.href,
  //       text: `Hello, ${name}!`
  //     }]
  //   })
  // );

  // Start receiving messages on stdin and sending messages on stdout
  const transport = new StdioServerTransport();
  await server.connect(transport);
})();
client.ts 导入server.ts文件引用mcp
import { StdioClientTransport } from '@modelcontextprotocol/sdk/client/stdio.js';
import { Client } from '@modelcontextprotocol/sdk/client';


async function getStdioMCP() {
  const transport = new StdioClientTransport({
    command: "node",
    args: ["./src/api/v1/mcp.js"], // 替换为你的服务器文件路径
    env: {
      NODE_ENV: "development",
      CHATBI_TOKEN: ""
    }
  });

  // Create MCP client
  const client = new Client({
    name: "My App",
    version: "1.0.0"
  })
  await client.connect(transport);

  // List available tools
  const tools = await client.listTools();
  console.log(`Available tools: ${JSON.stringify(tools)}`);

  console.log('call tool result:', await client.callTool({
    name: "ChatBI",
    arguments: {
      question: "销售流水量",
      userId: 'admin',
    },
  }));

  console.log('get prompt result:', await client.getPrompt({
    name: "echo",
    arguments: { message: "Prompt Test" },
    headers: {
      'Authorization': 'Bearer token123',
    }
  }));

  console.log('read resource result:', await client.readResource({ uri: 'echo://TestMessage' }));

  await client.close();
}

getStdioMCP();
例在一些工具中的一般导入方法@modelcontextprotocol/server-filesystem:
// docker
{
  "mcpServers": {
    "filesystem": {
      "command": "docker",
      "args": [
        "run",
        "-i",
        "--rm",
        "--mount", "type=bind,src=/Users/username/Desktop,dst=/projects/Desktop",
        "--mount", "type=bind,src=/path/to/other/allowed/dir,dst=/projects/other/allowed/dir,ro",
        "--mount", "type=bind,src=/path/to/file.txt,dst=/projects/path/to/file.txt",
        "mcp/filesystem",
        "/projects"
      ]
    }
  }
}
// npx
{
  "mcpServers": {
    "filesystem": {
      "command": "npx",
      "args": [
        "-y",
        "@modelcontextprotocol/server-filesystem",
        "/Users/username/Desktop",
        "/path/to/other/allowed/dir"
      ]
    }
  }
}
二、SSE(推荐使用streamable http)
MCP SSE 是指 MCP 的客户端和服务器之间使用 SSE 作为通信信道来传输遵循 MCP 协议的消息。通信范围:同一台机器上的进程间通信,或客户端和服务器部署在不同机器上。
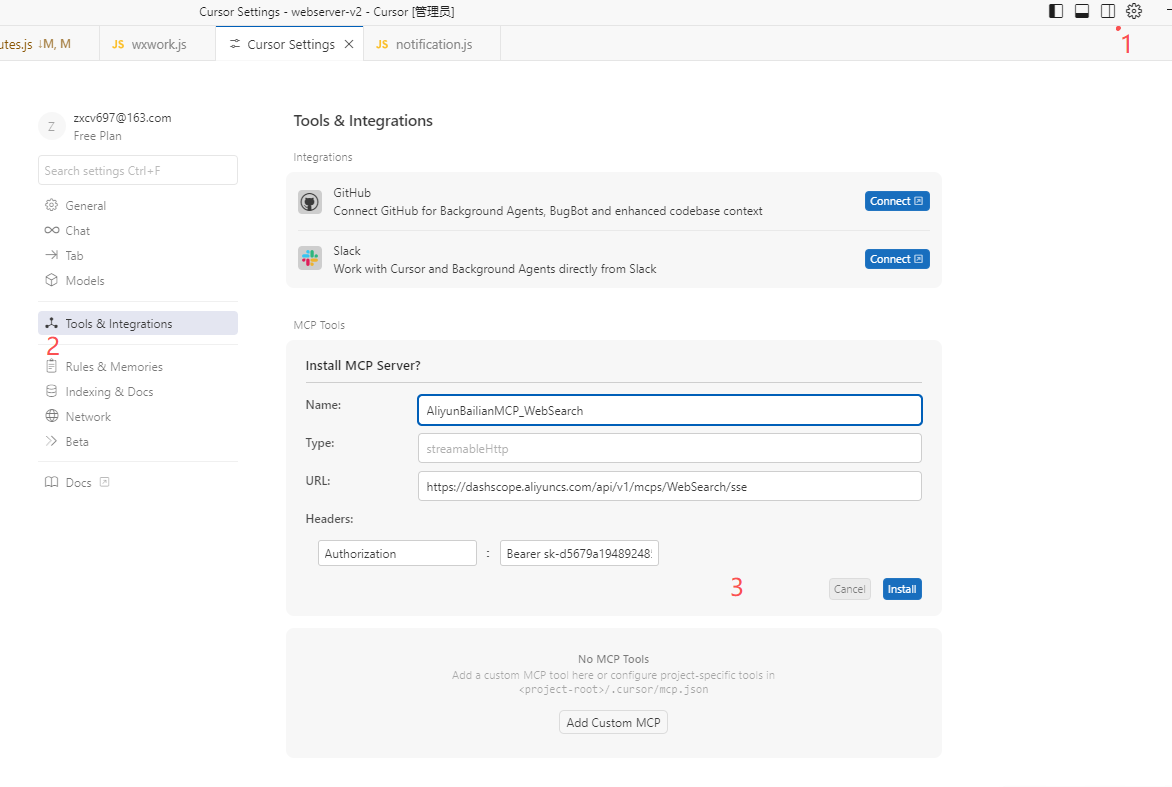
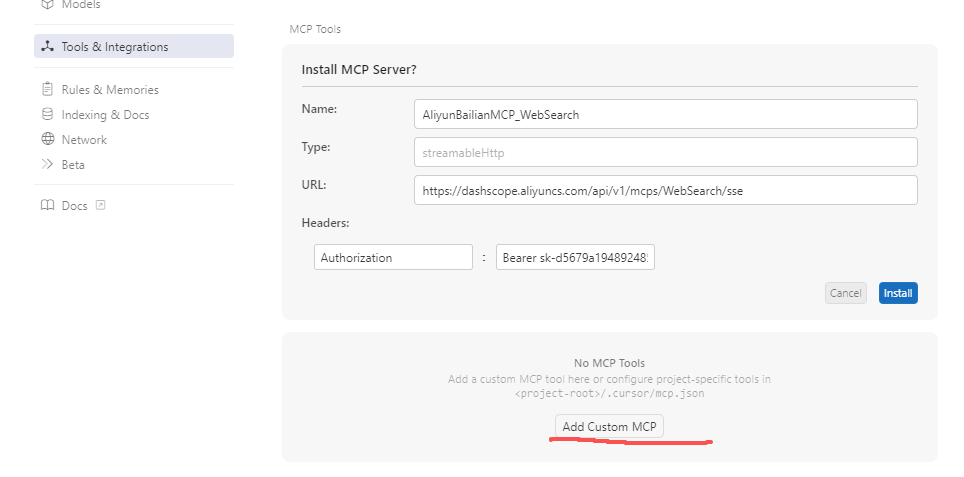
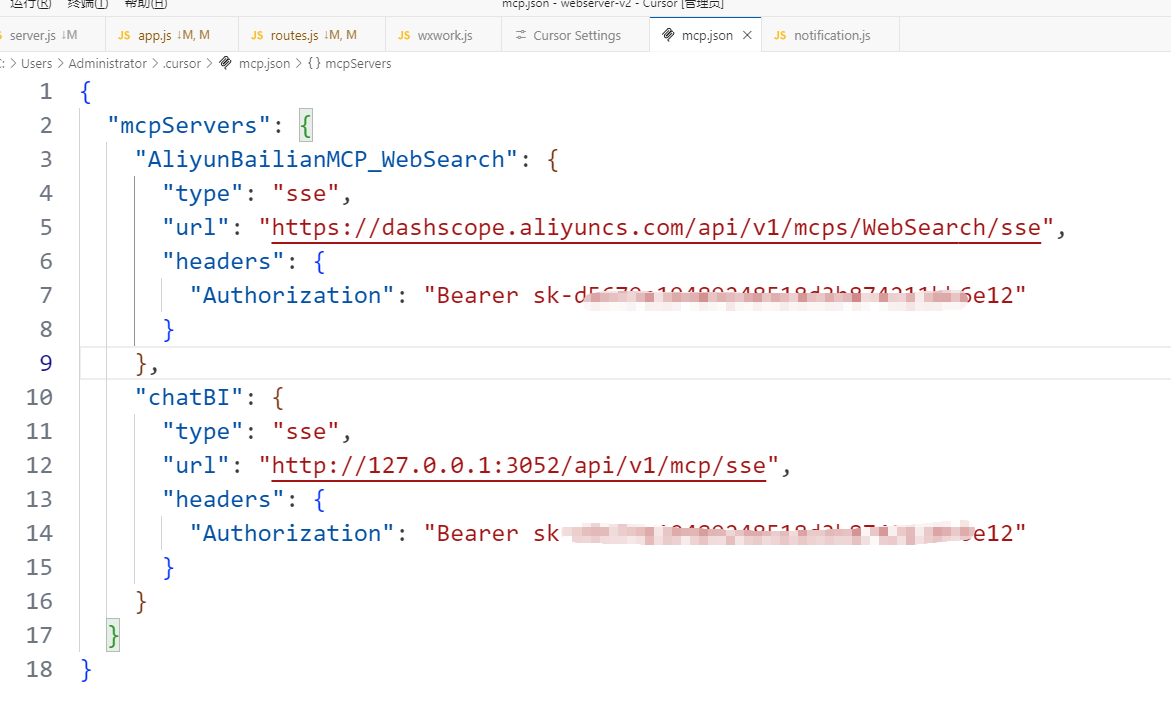
1、将streamable http mcp 导入cursor
三、streamable http
相关代码:
三个分别对应的请求接口
router.post('/mcp', sessionWrapper(mcp.streamableMCP))
router.get('/mcp', sessionWrapper(mcp.streamableMCPSyncData))
router.delete('/mcp', sessionWrapper(mcp.streamableMCPDestroy))
router.get('/mcp/test', mcp.getToolsTest) // 一个多余的测试接口
/mcp post,初始化拉取相关工具信息,调用工具获取执行结果。
// Map to store transports by session ID
const transports = {}; // { [sessionId: string]: StreamableHTTPServerTransport };

// Handle POST requests for client-to-server communication
async function streamableMCP(req, res, next) {
  // 请解析出的token中的userId, 如果有就放在要调用工具的arguments中
  if (req.user?._id && req?.body?.params?.arguments) {
    req.body.params.arguments.userId = req.user._id;
  }

  // 检查sessionID是否存在,每一个sessionID对应一个transport
  const sessionId = req.headers['mcp-session-id']; // string | undefined
  let transport; // StreamableHTTPServerTransport;

  if (sessionId && transports[sessionId]) {
    // 有sessionID直接获取transport对象
    transport = transports[sessionId];
  } else if (!sessionId && isInitializeRequest(req.body)) {
    try {
      // 没有创建并保存transport
      transport = new StreamableHTTPServerTransport({
        sessionIdGenerator: () => v4(),
        onsessioninitialized: (sessionId) => {
          // Store the transport by session ID
          transports[sessionId] = transport;
        },
        // DNS rebinding protection is disabled by default for backwards compatibility. If you are running this server
        // locally, make sure to set:
        // enableDnsRebindingProtection: true,
        // allowedHosts: ['127.0.0.1'],
      });

      //  断开时清除对象
      transport.onclose = () => {
        if (transport.sessionId) {
          delete transports[transport.sessionId];
        }
      };

      // transport.send({
      //   method: '',
      //   jsonrpc: "2.0",
      //   id: '',
      // });

      // 使用transport创建mcp server
      await createMCPServer(transport);
    } catch (err) {
      return next(createError(400, err?.message));
    }
  } else {
    // Invalid request
    res.status(400).json({
      jsonrpc: '2.0',
      error: {
        code: -32000,
        message: 'Bad Request: No valid session ID provided',
      },
      id: null,
    });
    return;
  }

  try {
    // transport,请求处理函数,调用createServer中注册的相关方法,用来返回要调用的工具信息,或者调用工具返回结果
    await transport.handleRequest(req, res, req.body);
  } catch (err) {
    return next(createError(400, err?.message));
  }
}
/mcp get 建立了一个持久化的 SSE 连接,允许服务器在资源发生变化或其他重要事件发生时,主动、即时地通知所有已连接的客户端,从而保证了客户端数据是最新的。
async function streamableMCPSyncData(req, res, next) {
  const sessionId = req.headers['mcp-session-id']; // string | undefined;
  if (!sessionId || !transports[sessionId]) {
    res.status(400).send('Invalid or missing session ID');
    return;
  }

  try {
    const transport = transports[sessionId];
    await transport.handleRequest(req, res);
  } catch (err) {
    return next(createError(400, err?.message));
  }
}
/mcp delete 断开连接。
async function streamableMCPDestroy(req, res, next) {
  const sessionId = req.headers['mcp-session-id']; // string | undefined;
  if (!sessionId || !transports[sessionId]) {
    res.status(400).send('Invalid or missing session ID');
    return;
  }

  try {
    const transport = transports[sessionId];
    await transport.handleRequest(req, res);
  } catch (err) {
    return next(createError(400, err?.message));
  }
}
调用导入streamable http mcp方法
1、将streamable http mcp导入到claude(没有测试)
相关文档地址1:https://docs.claude.com/en/docs/claude-code/mcp
相关文档地址2:https://docs.claude.com/en/docs/agents-and-tools/mcp-connector
# 基本语法
claude mcp add --transport http <name> <url>
# 实际示例:连接到Notion
claude mcp add --transport http notion https://mcp.notion.com/mcp
# 带有Bearer token的示例
claude mcp add --transport http secure-api https://api.example.com/mcp \
--header "Authorization: Bearer your-token"
curl https://api.anthropic.com/v1/messages \
-H "Content-Type: application/json" \
-H "X-API-Key: $ANTHROPIC_API_KEY" \
-H "anthropic-version: 2023-06-01" \
-H "anthropic-beta: mcp-client-2025-04-04" \
-d '{
"model": "claude-sonnet-4-20250514",
"max_tokens": 1000,
"messages": [{"role": "user", "content": "What tools do you have available?"}],
"mcp_servers": [
{
"type": "url",
"url": "https://example-server.modelcontextprotocol.io/sse",
"name": "example-mcp",
"authorization_token": "YOUR_TOKEN"
}
]
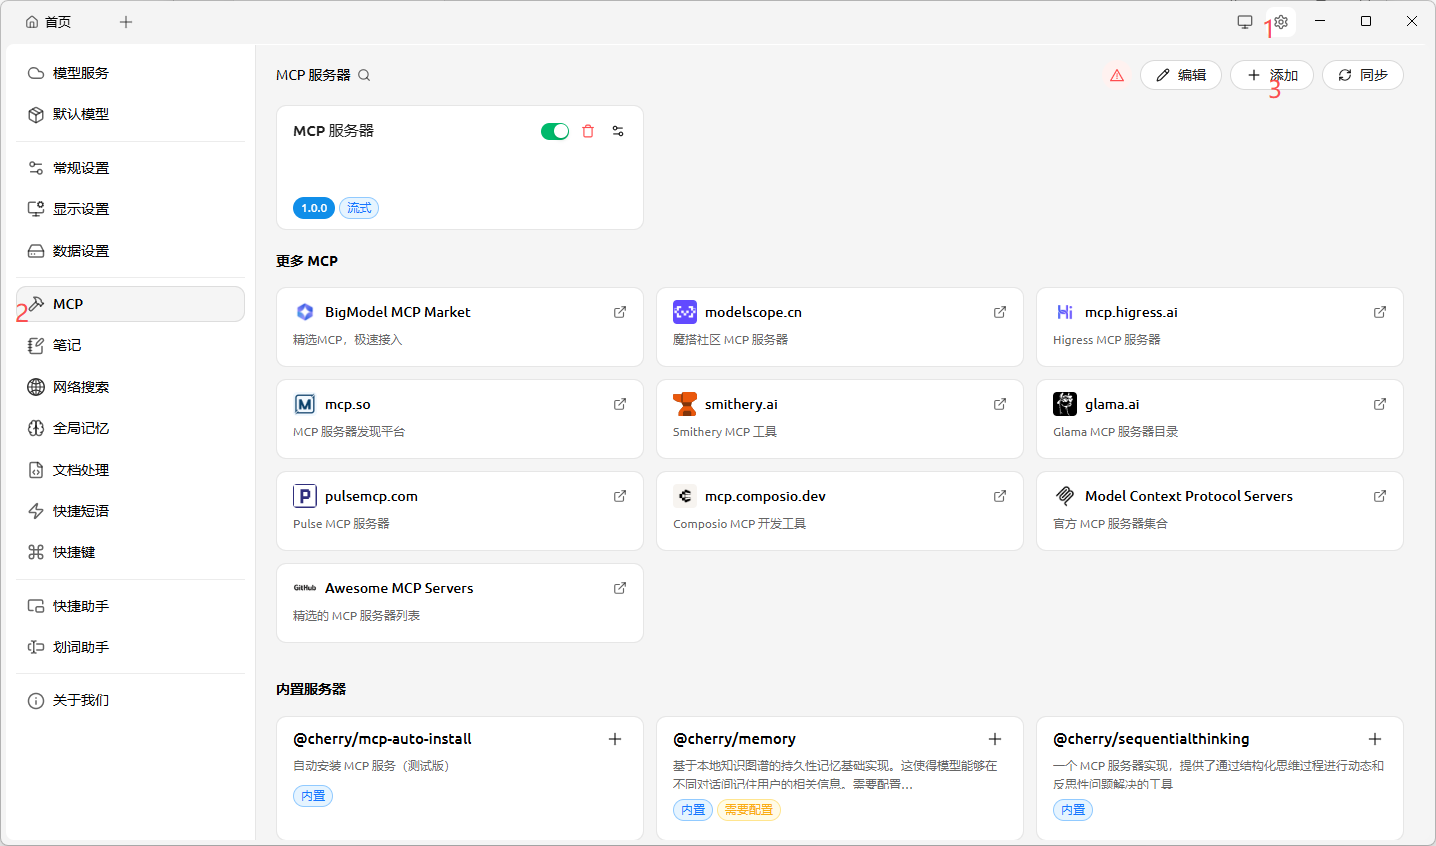
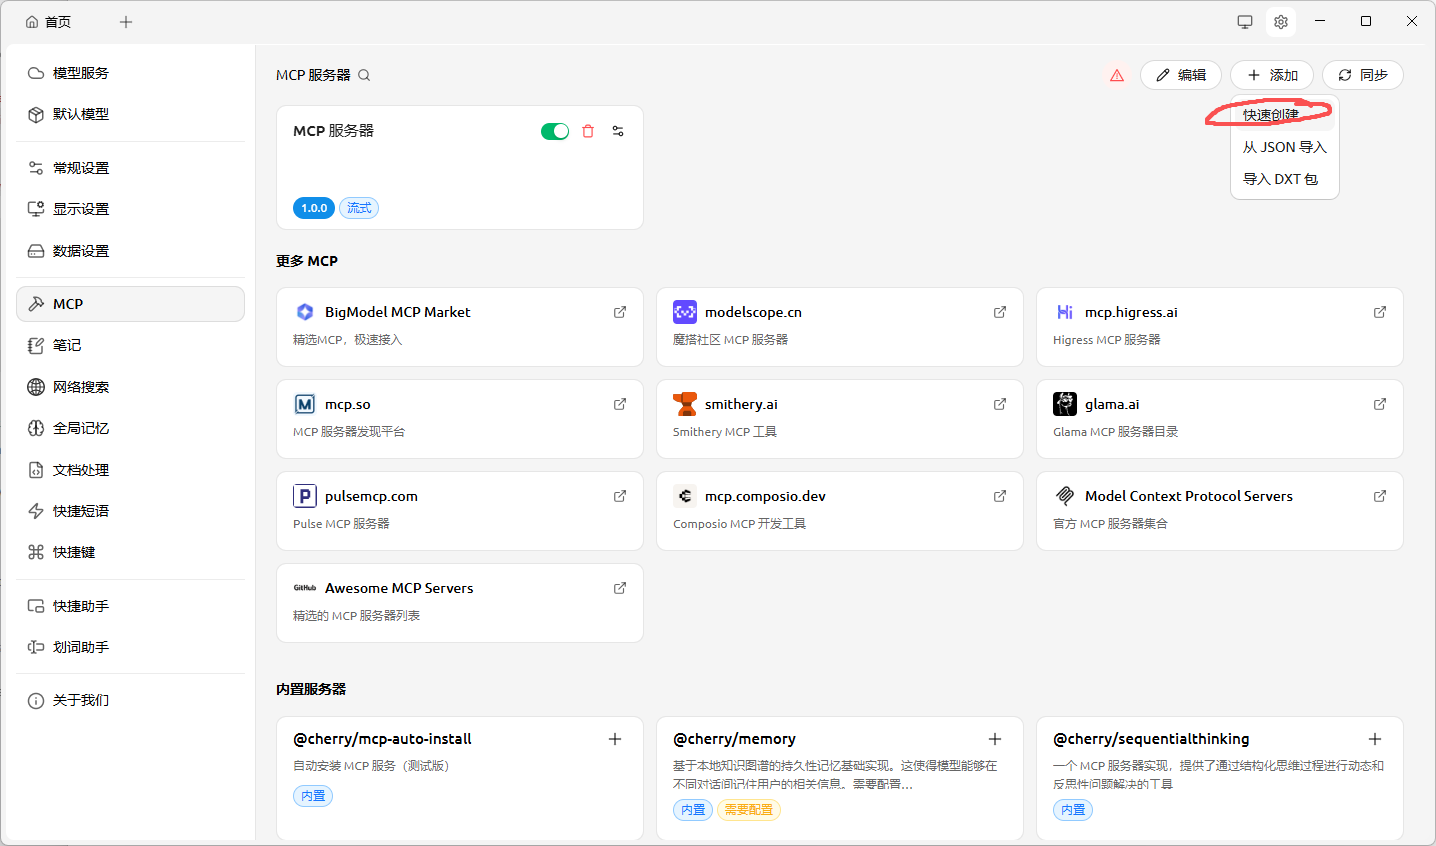
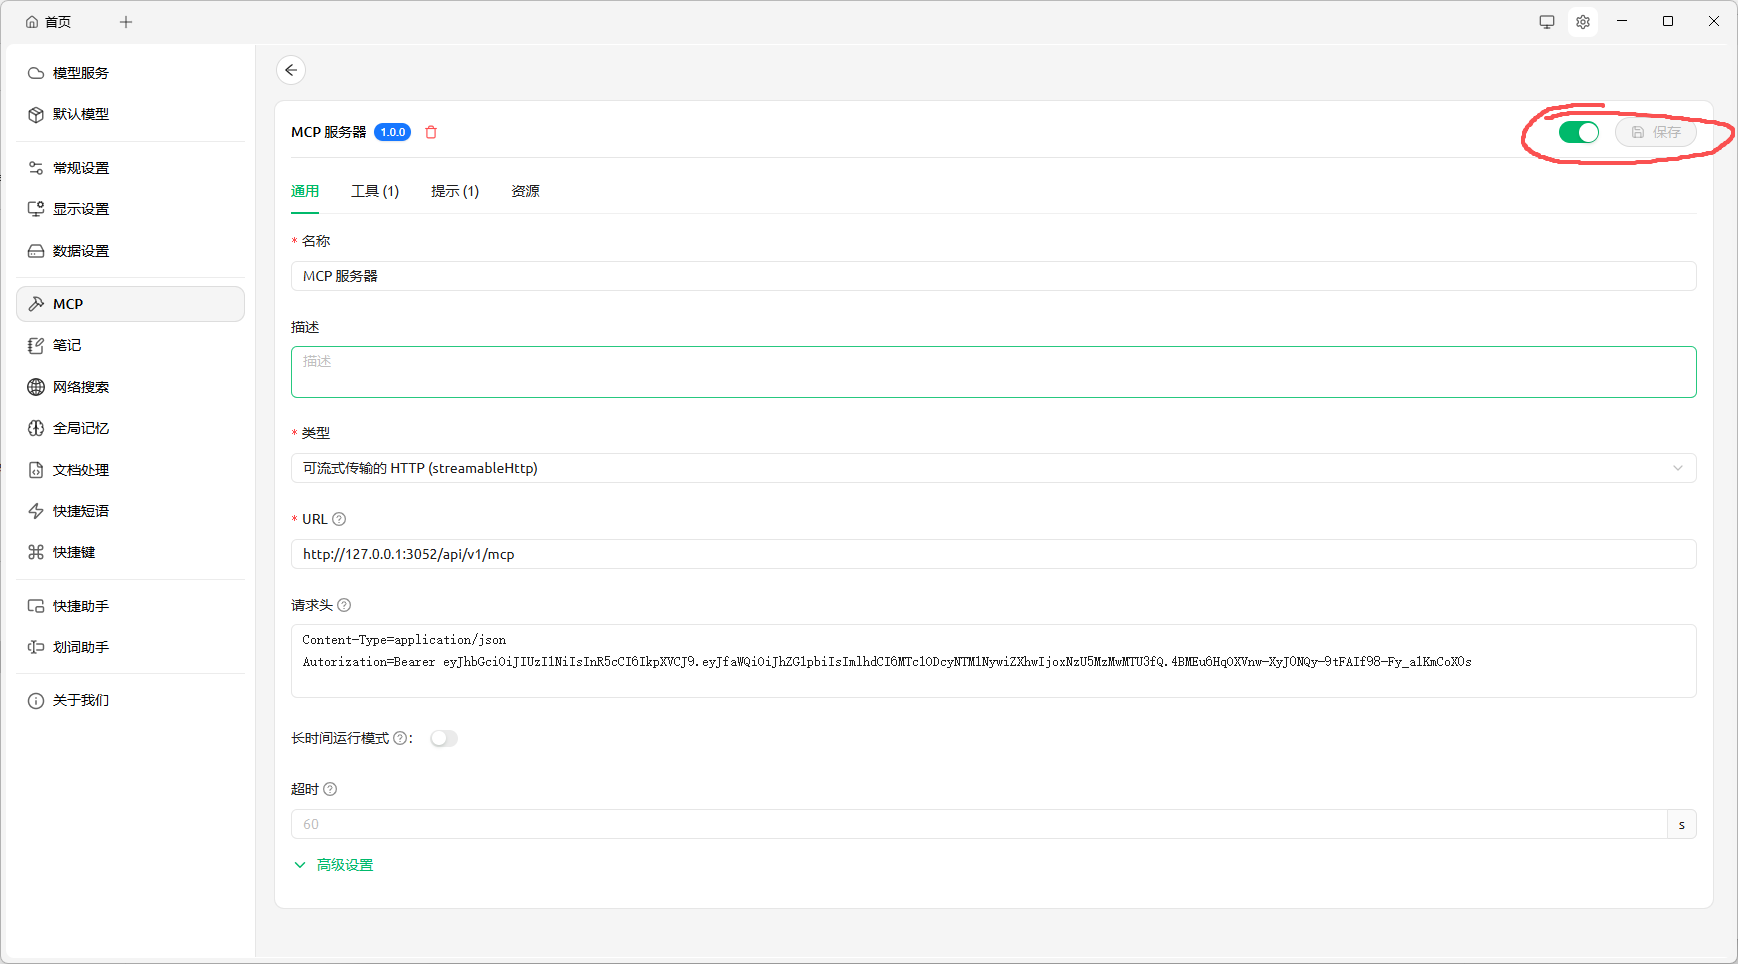
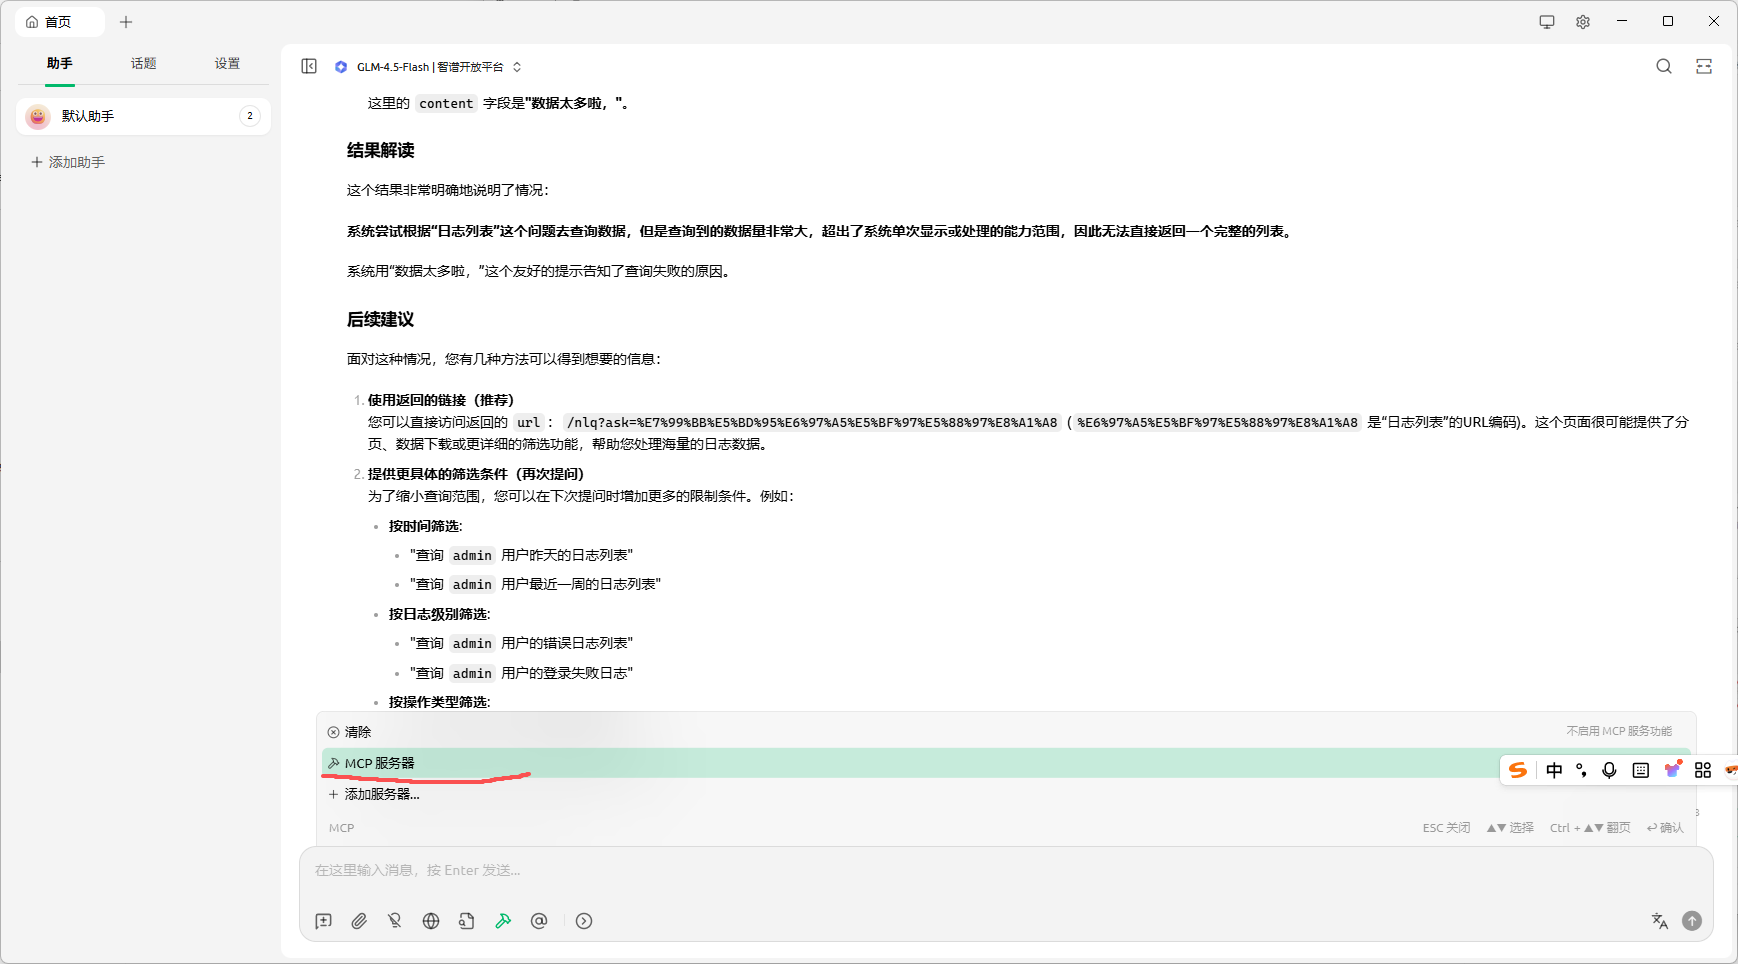
}'2、将streamable http mcp导入 cherry studio
cherry studio下载地址:https://www.cherry-ai.com/
3、使用axios调用streamable http mcp
const Authorization = 'Bearer eyJhbGciOiJIUzI1NiIsInR5cCI6IkpXVCJ9.eyJfaWQiOiJhZG1pbiIsImlhdCI6MTc1ODcyNTM1NywiZXhwIjoxNzU5MzMwMTU3fQ.4BMEu6HqOXVnw-XyJ0NQy-9tFAIf98-Fy_a1KmCoX0s';

  // axios调用相关方法
  // 初始化
  let ret = await axios.post(
    'http://localhost:3052/api/v1/mcp',
    {
      "jsonrpc": "2.0",
      "id": 1,
      "method": "initialize",
      "params": {
        "protocolVersion": "2024-11-05",
        "capabilities": {},
        "clientInfo": {
          "name": "test-client",
          "version": "1.0.0"
        }
      }
    },
    {
      headers: {
        'Content-Type': 'application/json',
        'Accept': 'application/json, text/event-stream',
        Authorization,
      }
    }
  );

  let sessionId = ret.headers['mcp-session-id'];

  console.log('init ========= ', ret.data);

  // 列出所有工具
  ret = (await axios.post(
    'http://localhost:3052/api/v1/mcp',
    {
      "jsonrpc": "2.0",
      "id": 2,
      "method": "tools/list"
    },
    {
      headers: {
        'Content-Type': 'application/json',
        'Accept': 'application/json, text/event-stream',
        'mcp-session-id': sessionId,
        Authorization,
      }
    }
  )).data;

  console.log('tool list ============== ', ret);

  // 调用特定工具
  ret = (await axios.post('http://localhost:3052/api/v1/mcp', {
    jsonrpc: "2.0",
    method: "tools/call",
    params: {
      name: "ChatBI",
      arguments: {
        question: "销售流水量",
        userId: 'admin',
        locale: 'zh_cn'
      }
    },
    id: 2
  }, {
    headers: {
      'Content-Type': 'application/json',
      'Accept': 'application/json, text/event-stream',
      'mcp-session-id': sessionId,
      Authorization,
    }
  })).data;

  console.log('call tool=========', ret);

  // 关闭会话
  ret = (await axios.delete(
    'http://localhost:3052/api/v1/mcp',
    {
      headers: {
        'Content-Type': 'application/json',
        'Accept': 'application/json, text/event-stream',
        'mcp-session-id': sessionId,
        Authorization,
      }
    }
  )).data;

  console.log('close ============= ', ret);
4、使用 @modelcontextprotocol/sdk调用streamable http
// 使用mcp sdk 调用相关方法
// Construct server URL with authentication
const url = new URL("http://localhost:3052/api/v1/mcp");
// url.searchParams.set("api_key", "••••••••••••••••");
// url.searchParams.set("profile", "••••••••");
// const serverUrl = url.toString();
const transport = new StreamableHTTPClientTransport(
url,
{
requestInit: {
method: 'POST',
headers: {
'Accept': 'text/event-stream',
'Cache-Control': 'no-cache',
Authorization,
},
},
}
);
// Create MCP client
const client = new Client({
name: "My App",
version: "1.0.0"
})
await client.connect(transport);
// List available tools
const tools = await client.listTools();
console.log(`Available tools: ${JSON.stringify(tools)}`);
console.log('call tool result:', await client.callTool({
name: "ChatBI",
arguments: {
question: "销售流水量",
userId: 'admin',
},
}));
console.log('get prompt result:', await client.getPrompt({
name: "echo",
arguments: { message: "Prompt Test" },
headers: {
'Authorization': 'Bearer token123',
}
}));
console.log('read resource result:', await client.readResource({ uri: 'echo://TestMessage' }));
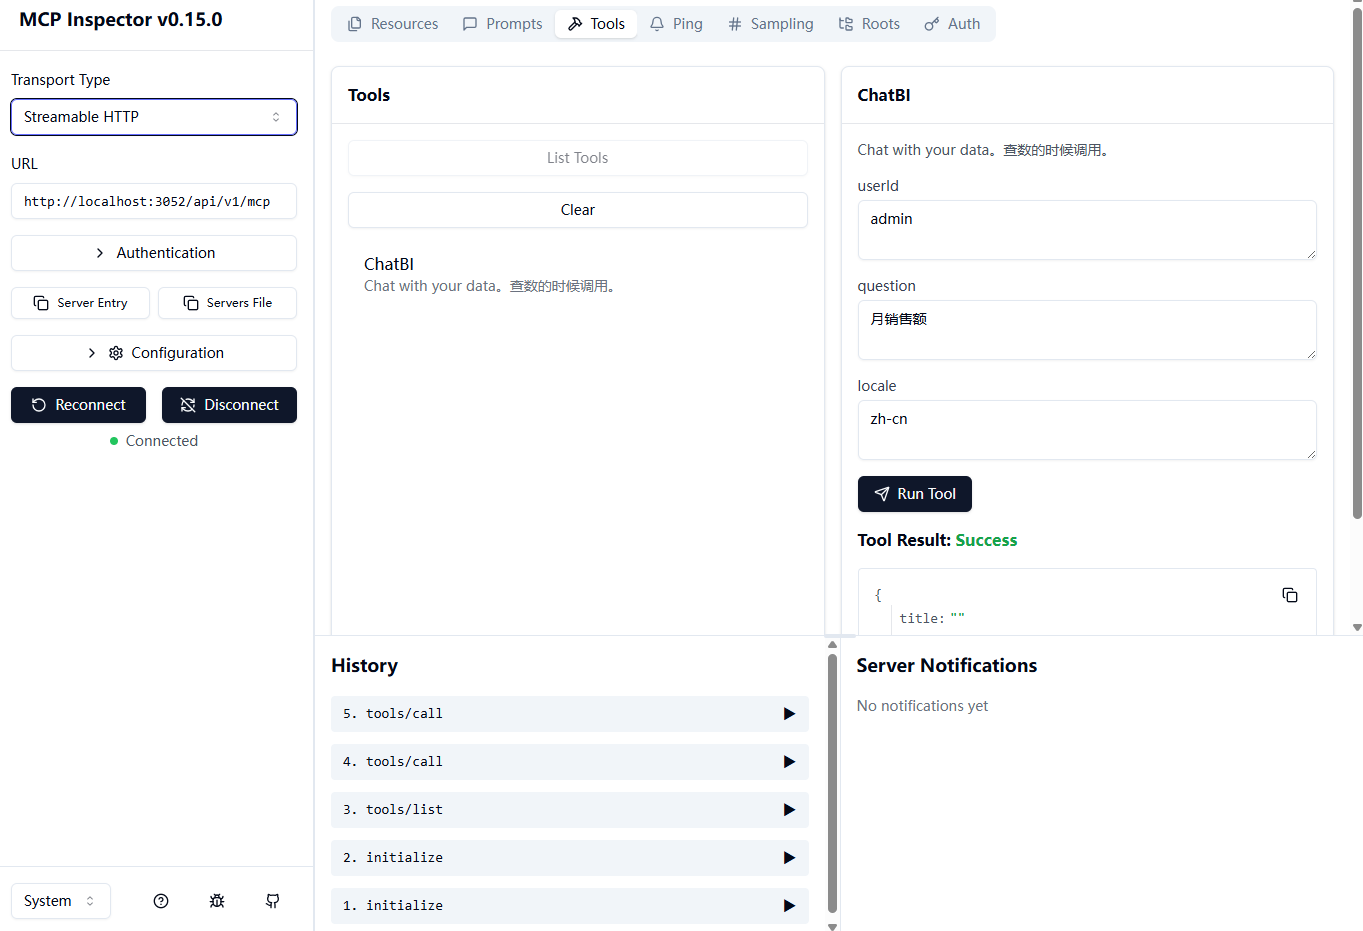
await client.close();5、inspector
启动 inspector mcp调试工具
"mcp": "npx @modelcontextprotocol/inspector"
npm run mcp
url和token编写方式
方法二:token正常放在请求头中 http://localhost:3052/api/v1/mcp
6、OAuth登录绑定MCP(用于cherry studio等)
相关代码
src/app.js 在app中挂载MCP OAuth绑定验证中间件
  // streamable http MCP OAuth绑定验证
  app.use(MCPAuth(
    // {
    //   wellKnownUrl: 'http://127.0.0.1:3052',
    //   OAuthUrl: ['http://127.0.0.1:3052'],
    // }
  ));
src/util/mcp-auth/mcp.js OAuth处理业务逻辑
import fs from 'fs';
import path from 'path';
import { fileURLToPath } from 'url';

/**
 * MCPAuth 绑定验证
 * @param {{
 *  wellKnownUrl?: string,
 *  OAuthUrl?: string[],
 *  endpoint?: string
 * }} params
 */
export default function MCPAuth(params = {}) {
  /**
 * @param {import('express').Request & { query: Record<string,string> }} req
 * @param {import('express').Response} res
 * @param {import('express').NextFunction} next
 */
  return (req, res, next) => {
    const wellKnownUrl = 'wellKnownUrl' in params ? params.wellKnownUrl : `${req.protocol}//${req.get('host')}`;
    const OAuthUrl = 'OAuthUrl' in params ? params.OAuthUrl : [`${req.protocol}//${req.get('host')}`];
    const endpoint = 'endpoint' in params ? params.endpoint : '/api/v1/mcp';

    // 获取MCP端点数据
    if (req.url.startsWith('/.well-known/oauth-protected-resource/api/v1/mcp')) {
      res.setHeader('Content-Type', 'application/json');
      res.json({
        "resource": wellKnownUrl, // 你的 MCP 服务器地址
        "authorization_servers": OAuthUrl,
        "scopes_supported": [
          "openid",
          "profile",
          "email",
          "mcp:read",
          "mcp:write"
        ],
        "bearer_methods_supported": ["header"],
        "mcp_endpoint": endpoint // 实际的 MCP SSE 端点
      });
      // 获取OAuth登录信息
    } else if (req.url.startsWith('/.well-known/oauth-authorization-server')) {
      res.setHeader('Content-Type', 'application/json');
      res.json({
        "issuer": `${OAuthUrl}/oauth`, // OAuth 服务器的
        "authorization_endpoint": `${OAuthUrl}/oauth/authorize`, //  authorization_endpoint - 用户授权页面
        "token_endpoint": `${OAuthUrl}/oauth/token`, // token_endpoint - 获取访问令牌的端点
        "jwks_uri": `${OAuthUrl}/oauth/certs`, // jwks_uri - 公钥端点(用于验证 JWT)
        // 添加 PKCE 支持
        "code_challenge_methods_supported": ["S256", "plain"],
        "scopes_supported": ["openid", "profile", "email"],
        "response_types_supported": ["code"],
        "grant_types_supported": ["authorization_code", "refresh_token"],
        "token_endpoint_auth_methods_supported": [
          "client_secret_post",
          "client_secret_basic"
        ],
        "mcp_configuration": {
          "sse_endpoint": `${wellKnownUrl}/api/v1/mcp`
        }
      });
      // 拉取OAuth登录页面,前端会自动打开该页面
    } else if (req.url.startsWith('/oauth/authorize') && req.method === 'GET') {
      const { client_id, redirect_uri, state, scope } = req.query;

      if (!(redirect_uri?.trim?.()?.length && redirect_uri?.startsWith('http'))) {
        return res.status(400).json({ error: 'redirect_uri lost!' });
      }

      const html = fs.readFileSync(path.resolve(path.dirname(fileURLToPath(import.meta.url)), './mcp.html'), 'utf-8')
        .replaceAll('{{client_id}}', client_id || '')
        .replaceAll('{{redirect_uri}}', redirect_uri || '')
        .replaceAll('{{state}}', state || '');

      // 显示模拟的登录页面
      res.send(html);
    } else if (req.url.startsWith('/oauth/approve') && req.method === 'POST') {
      console.log(req.body, req.query);
      const { token } = req.query;
      const { client_id, redirect_uri, state } = req.body;

      const redirectUrl = new URL(redirect_uri);
      redirectUrl.searchParams.set('token', token);
      redirectUrl.searchParams.set('code', token);
      if (state) redirectUrl.searchParams.set('state', state);

      res.redirect(redirectUrl.toString());
    } else if (req.url.startsWith('/oauth/token') && req.method === 'POST') {
      const { grant_type, code, client_id, client_secret, code_verifier } = req.body;

      // 简单的验证(实际使用时需要更严格的验证)
      if (grant_type !== 'authorization_code') {
        return res.status(400).json({ error: 'unsupported_grant_type' });
      }

      // 生成访问令牌
      const accessToken = code ? code : 'token' + Date.now(); // token

      res.json({
        access_token: accessToken,
        token_type: 'Bearer',
        expires_in: 3600,
        scope: 'openid profile email mcp:access'
      });
    } else if (req.url.startsWith('/oauth/certs') && req.method === 'GET') {
      res.json({
        keys: [{
          kty: "RSA",
          use: "sig",
          kid: "mock-key-1",
          alg: "RS256",
          n: "mock-modulus-placeholder",  // 实际使用时需要真实 RSA 公钥
          e: "AQAB"
        }]
      });
    } else {
      next();
    }
  }
}
访问mcp登录页面 /api/v1/oauth/authorize, query参数redirect_uri必填
src/util/mcp-auth/mcp.html登录页面
<!DOCTYPE html>
<html lang="zh-CN">

<head>
  <meta charset="UTF-8">
  <meta name="viewport" content="width=device-width, initial-scale=1.0">
  <title>ChatBI MCP - 登录授权</title>
  <style>

  </style>
</head>

<body>
  <div class="container">
    <div class="card">
      <div class="logo">
        <div class="logo-icon">BI</div>
        <h1>ChatBI MCP</h1>
        <p class="subtitle">登录后绑定 ChatBI Streamable HTTP MCP 服务,连接您的数据,开启智能对话</p>
      </div>

      <div class="client-info">
        <p><span class="info-icon">🔐</span> <strong>客户端:</strong> {{client_id}}</p>
        <p><span class="info-icon">🌐</span> <strong>回调地址:</strong> {{redirect_uri}}</p>
        <p><span class="info-icon">ℹ️</span> <strong>状态:</strong> 等待授权</p>
      </div>

      <form id="loginForm" class="login-form">
        <input type="hidden" name="skip_password_decrypt" value="true">
        <input id="client_id" type="hidden" name="client_id" value="{{client_id}}">
        <input id="redirect_uri" type="hidden" name="redirect_uri" value="{{redirect_uri}}">
        <input id="state" type="hidden" name="state" value="{{state}}">

        <div class="form-group">
          <label class="form-label">用户名</label>
          <input type="text" name="username" class="form-input" id="username" placeholder="请输入用户名" required>
          <div class="error-message" id="usernameError">请输入有效的用户名</div>
        </div>

        <div class="form-group">
          <label class="form-label">密码</label>
          <div class="password-container">
            <input type="password" name="password" class="form-input" id="password" placeholder="请输入密码" required>
            <button type="button" class="toggle-password" id="togglePassword">👁️</button>
          </div>
          <div class="error-message" id="passwordError">请输入密码</div>
        </div>

        <button type="submit" class="login-button" id="loginButton" disabled>
          <span>🔑</span> 登录&绑定
        </button>
      </form>

      <div class="features">
        <div class="feature">
          <span class="feature-icon">✓</span> 安全认证
        </div>
        <div class="feature">
          <span class="feature-icon">✓</span> 数据加密
        </div>
        <div class="feature">
          <span class="feature-icon">✓</span> 实时分析
        </div>
        <div class="feature">
          <span class="feature-icon">✓</span> 智能对话
        </div>
      </div>

      <footer>
        <p>© 2025 ChatBI MCP 服务 | 保护您的数据安全</p>
      </footer>
    </div>
  </div>

  <script>
    document.addEventListener('DOMContentLoaded', function () {
      const loginForm = document.getElementById('loginForm');
      const usernameInput = document.getElementById('username');
      const passwordInput = document.getElementById('password');
      const loginButton = document.getElementById('loginButton');
      const togglePassword = document.getElementById('togglePassword');

      // 表单验证
      function validateForm() {
        const usernameValid = usernameInput.value.trim().length >= 3;
        const passwordValid = passwordInput.value.length >= 6;

        loginButton.disabled = !(usernameValid && passwordValid);

        return usernameValid && passwordValid;
      }

      // 实时验证
      usernameInput.addEventListener('input', validateForm);
      passwordInput.addEventListener('input', validateForm);

      // 显示/隐藏密码
      togglePassword.addEventListener('click', function () {
        const type = passwordInput.type === 'password' ? 'text' : 'password';
        passwordInput.type = type;
        this.textContent = type === 'password' ? '👁️' : '🔒';
      });

      // 表单提交
      loginForm.addEventListener('submit', async function (evt) {
        evt.preventDefault();

        if (!validateForm()) {
          alert('账号或密码格式错误');
          return;
        }

        // 显示加载状态
        loginButton.innerHTML = '<span>⏳</span> 登录中...';
        loginButton.disabled = true;

        // 登录验证(实际应该发送到服务器验证)
        const username = usernameInput.value.trim();
        const password = passwordInput.value;

        try {
          const res = await fetch('/api/v1/auth/signin', {
            method: 'POST',
            headers: {
              'Content-Type': 'application/json',
            },
            body: JSON.stringify({
              username: username,
              password: password,
              skip_password_decrypt: true,
              autoLogin: false,
            }),
          });

          const loginInfo = await res.json();

          console.log(loginInfo);

          if (loginInfo.token) {
            submitVirtualForm(`/oauth/approve?token=${loginInfo.token}`, {
              client_id: document.getElementById('client_id').value,
              redirect_uri: document.getElementById('redirect_uri').value,
              state: document.getElementById('state').value
            });
          } else {
            throw new Error('登录失败');
          }
        } catch (err) {
          alert('登录失败账号或密码错误');
          console.log(err);
        } finally {
          usernameInput.value = '';
          passwordInput.value = '';
          loginButton.innerHTML = '<span>🔑</span> 登录&绑定';
          loginButton.disabled = false;
        }

        return false;
      });

      // 按钮点击动画
      loginButton.addEventListener('click', function () {
        if (!this.disabled) {
          this.style.transform = 'scale(0.98)';
          setTimeout(() => {
            this.style.transform = '';
          }, 150);
        }
      });

      // 创建一个虚拟表单提交跳转
      function submitVirtualForm(url, data) {
        // 创建form元素
        const form = document.createElement('form');
        form.method = 'POST';
        form.action = url;
        form.style.cssText = 'position:fixed;left:-10000px;top:-10000px;opacity:0;pointer-events:none;';

        // 添加数据字段
        for (const [key, value] of Object.entries(data)) {
          const input = document.createElement('input');
          input.type = 'hidden';
          input.name = key;
          input.value = value;
          form.appendChild(input);
        }

        // 添加到DOM
        document.documentElement.appendChild(form);

        // 提交表单
        form.submit();

        // 延迟清理(确保提交完成)
        setTimeout(() => {
          if (form.parentNode) {
            form.parentNode.removeChild(form);
          }
        }, 1000);
      }
    });
  </script>
</body>

</html>
注:要在webserver下访问
src/util/mcp-auth/test.html OAuth登录测试页面
<!DOCTYPE html>
<html>

<head>
  <title>OAuth测试</title>
</head>

<body>
  <button onclick="startOAuth()">开始OAuth流程</button>
  <div id="result"></div>

  <script>
    async function startOAuth() {
      const clientId = 'test_client';
      const redirectUri = encodeURIComponent('http://localhost:3052/');
      // const redirectUri = '';
      const state = 'test_state_123';

      // 第一步:重定向到授权页面
      window.location.href =
        `http://localhost:3052/oauth/authorize?client_id=${clientId}&redirect_uri=${redirectUri}&state=${state}&response_type=code`;
    }

    // 检查URL参数(用于回调处理)
    const urlParams = new URLSearchParams(window.location.search);
    const code = urlParams.get('code');
    const state = urlParams.get('state');

    if (code) {
      document.getElementById('result').innerHTML =
        `授权码: ${code}<br>状态: ${state}`;
    }
  </script>
</body>

</html>更多推荐
 11
11 0
0- 0


 已为社区贡献1条内容

所有评论(0)