
OpenClaw 在 MacBook Pro(Intel 芯片)上的安装流程与避坑指南
设备定位:MacBook Pro · Intel 处理器(x86_64)——与 Apple 芯片(M 系列) 机型在 Node 二进制、部分原生依赖与性能表现上不同;本文以 Intel 款 MacBook Pro 上的实测为准。
系统:macOS Ventura 13.x(及相近版本)。
本文根据实际安装过程整理,覆盖 官方安装 与 源码安装 两条路径,并汇总常见故障。
一、环境与前置条件
| 项目 | 说明 |
|---|---|
| Node.js | 官方要求 Node 24(推荐) 或 Node 22.16+。勿使用 Node 16/18。 |
| 包管理 | 全局安装用 npm;从源码构建优先 pnpm(与上游仓库一致)。 |
| 网络 | 安装需访问 registry.npmjs.org、GitHub(部分依赖为 git+ssh/git+https)。国内环境常需 终端代理(与浏览器一致)。 |
| 磁盘与内存 | 全量依赖与构建体积较大,建议预留充足空间;内存建议 ≥8GB 更稳。 |
| 模型 API | 使用前需准备至少一家模型服务商的 API Key(或按向导配置 OAuth)。 |
| 架构 | Intel 机型为 x86_64;nvm/Node 安装包需选 darwin-x64(勿误用 arm64)。Apple Silicon 用户请以官方 darwin-arm64 为准,步骤类似但勿混用二进制。 |
自检命令:
node -v    # 应 v22.16+ 或 v24.x
curl -I --connect-timeout 15 https://registry.npmjs.org/
curl -I --connect-timeout 15 https://github.com/
若浏览器能打开 GitHub/npm,但 curl 超时,多半是 终端未走代理——见下文「避坑:终端访问 GitHub/npm」。
二、安装路径概览
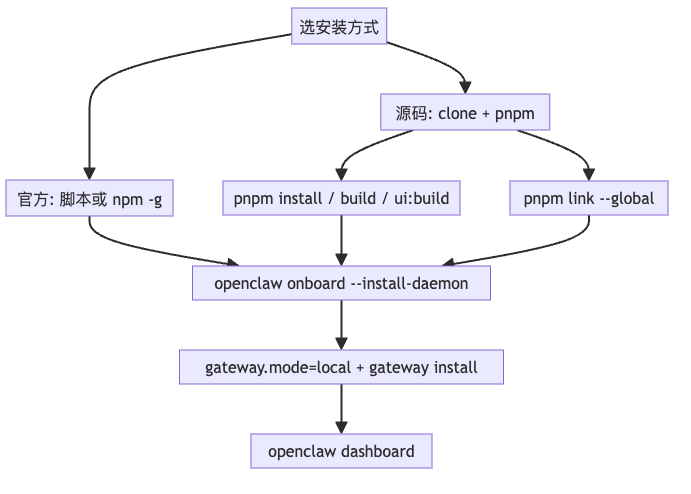
三、方式 A:官方推荐(脚本或全局 npm)
3.1 一键脚本(macOS / Linux)
curl -fsSL https://openclaw.ai/install.sh | bash
可选仅安装、不跑向导:
curl -fsSL https://openclaw.ai/install.sh | bash -s -- --no-onboard
说明: curl | bash 有安全争议;高安全环境可先下载脚本审阅,或改用 npm。
3.2 全局 npm 安装
npm install -g openclaw@latest
若 sharp 构建失败,可尝试:
SHARP_IGNORE_GLOBAL_LIBVIPS=1 npm install -g openclaw@latest
3.3 完成引导与守护进程
openclaw onboard --install-daemon
3.4 验证
openclaw --version
openclaw doctor
openclaw gateway status
openclaw dashboard
默认 Gateway:127.0.0.1:18789,控制台:http://127.0.0.1:18789/
四、方式 B:从源码安装(本环境常用)
适合已 fork/clone 仓库、或 npm 拉取失败时本地构建。
4.1 准备 Node 与 pnpm
建议使用 nvm 安装并切换 Node 24:
export NVM_NODEJS_ORG_MIRROR=https://npmmirror.com/mirrors/node   # 可选,国内加速
nvm install 24 --lts
nvm alias default 24
安装 pnpm(Corepack 或全局安装均可):
corepack enable
corepack prepare pnpm@latest --activate
# 若提示无全局 bin 目录:
pnpm setup
# 按提示把 PNPM_HOME 写入 ~/.zshrc 后:source ~/.zshrc
4.2 获取源码
git clone https://github.com/<你的用户名>/openclaw.git   # 或上游 openclaw/openclaw
cd openclaw
4.3 安装依赖与构建
pnpm install
若提示 Ignored build scripts: koffi:
pnpm approve-builds
# 按提示允许 koffi;必要时 pnpm rebuild koffi
构建主程序与 Control UI(缺一不可,否则网页提示资源缺失):
pnpm build
pnpm ui:build
4.4 全局命令 openclaw
pnpm link --global
若报错 ERR_PNPM_NO_GLOBAL_BIN_DIR:先执行 pnpm setup 并保证 PNPM_HOME** 在 PATH**。
验证:
which openclaw
openclaw --version
4.5 引导与 Gateway
openclaw onboard --install-daemon
五、配置要点(必看)
5.1 gateway.mode 必须为 local
若配置里缺少 gateway.mode,进程会拒绝启动,现象为:
openclaw gateway status显示 端口未监听、RPC probe failed;~/.openclaw/logs/gateway.err.log出现set gateway.mode=local或Missing config。
处理: 在 ~/.openclaw/openclaw.json 的 gateway 下增加:
"gateway": {
  "mode": "local",
  ...
}
或用 CLI(若支持):
openclaw config set gateway.mode local
然后 openclaw gateway restart。
5.2 LaunchAgent 必须已加载
若状态中出现:
LaunchAgent (not loaded)Could not find service "ai.openclaw.gateway"Service not installed. Run: openclaw gateway install
说明 launchd 未注册或未加载 服务,浏览器无法连接 18789。
处理:
openclaw gateway install
openclaw gateway restart
openclaw gateway status
期望看到 Listening: 127.0.0.1:18789、RPC probe: ok。
5.3 更新 Gateway Token(安全)
配置位于 ~/.openclaw/openclaw.json 的 gateway.auth.token(mode 为 token 时)。
推荐:
NEW="$(openssl rand -hex 24)"
openclaw config set gateway.auth.mode token
openclaw config set gateway.auth.token "$NEW"
openclaw gateway restart
切勿在公开聊天、截图、仓库中泄露带 #token= 的完整 URL;泄露后应 立即轮换 token。
六、避坑指南(按现象查)
6.1 终端访问 GitHub / npm 失败,浏览器却正常
原因: 浏览器走了代理,shell 默认直连。
处理: 在终端设置与浏览器一致的代理,例如:
export https_proxy=http://127.0.0.1:7890
export http_proxy=http://127.0.0.1:7890
或对 Git 单独设置:
git config --global http.https://github.com.proxy http://127.0.0.1:7890
6.2 npm error 128 + git@github.com: Permission denied (publickey)
原因: 某依赖通过 git+ssh 拉 GitHub,本机未配置 SSH 或当前 shell 未加载密钥。
处理(二选一):
- 配置 GitHub SSH,并确保
ssh -T git@github.com成功;装包前可ssh-add ~/.ssh/id_ed25519。 - 或将 GitHub SSH URL 重写为 HTTPS(仅当你接受该策略):
git config --global url."https://github.com/".insteadOf "ssh://git@github.com/"
git config --global url."https://github.com/".insteadOf "git@github.com:"
6.3 RPC failed、Connection reset、early EOF
原因: 网络不稳定或中间设备断开长连接。
处理: 换网络/代理;可尝试:
git config --global http.postBuffer 524288000
git config --global http.version HTTP/1.1
并重试 pnpm install / git clone。
6.4 nvm 安装 Node 时 Checksums do not match
原因: 本地缓存了 损坏或不完整 的 Node 包。
处理: 删除对应缓存目录后重装,例如:
rm -rf ~/.nvm/.cache/bin/node-v24.*-darwin-x64
国内可配合 NVM_NODEJS_ORG_MIRROR=https://npmmirror.com/mirrors/node。
6.5 Homebrew 安装 Node 失败(旧版 brew / 镜像问题)
现象: 官方安装脚本走 brew 装 Node 时失败。
处理: 跳过脚本内 brew,直接用 nvm 安装 Node 24,再走 npm -g 或 源码 pnpm。
6.6 pnpm link --global 报 NO_GLOBAL_BIN_DIR
处理: pnpm setup,把输出的 export PNPM_HOME=... 与 PATH 写入 ~/.zshrc,重开终端后再 pnpm link --global。
6.7 移动源码目录(例如 ~/Desktop/Claw → ~/Developer/Claw)后失效
影响:
- LaunchAgent plist 中
dist/index.js** 绝对路径** 仍指向旧目录 → Gateway 起不来。 pnpm link --global的全局openclaw仍指向旧路径 →Cannot find module ... openclaw.mjs。
处理:
- 编辑
~/Library/LaunchAgents/ai.openclaw.gateway.plist,将ProgramArguments里dist/index.js改为新路径。 pnpm unlink -g openclaw(如有),在新目录pnpm link --global。openclaw gateway install或launchctl bootstrap gui/$(id -u) ...plist,再openclaw gateway restart。
6.8 页面提示 Control UI assets not found
原因: 未执行前端构建。
处理: 在源码根目录:
pnpm ui:build
openclaw gateway restart
6.9 浏览器打不开 http://127.0.0.1:18789,但服务正常
处理: 给 127.0.0.1 / localhost 设 直连(绕过系统代理);或使用 openclaw dashboard 打开带鉴权的控制台。
6.10 openclaw doctor 关于 nvm 路径的警告
含义: Gateway 服务使用 nvm 下的 node,升级/切换 Node 后 plist 可能失效。
建议: 升级 Node 后重新确认 plist 中 node 与 dist 路径;长期可考虑 固定路径的 Node(如官方 pkg / Homebrew 稳定装法),并 openclaw doctor --repair。
七、常用命令速查
| 目的 | 命令 |
|---|---|
| 查看 Gateway | openclaw gateway status |
| 安装/注册服务 | openclaw gateway install |
| 重启 Gateway | openclaw gateway restart |
| 打开控制台 | openclaw dashboard |
| 健康检查 | openclaw doctor / openclaw doctor --repair |
| 查看错误日志 | tail -50 ~/.openclaw/logs/gateway.err.log |
| 确认端口 | lsof -nP -iTCP:18789 -sTCP:LISTEN |
八、参考链接
- 入门:https://docs.openclaw.ai/start/getting-started
- 安装:https://docs.openclaw.ai/install
- 排错:https://docs.openclaw.ai/troubleshooting
- 上游仓库:https://github.com/openclaw/openclaw
文档版本:与 OpenClaw 2026.3.14 前后 CLI 行为一致;若你使用的版本较新,请以官方文档为准。
目标设备:MacBook Pro(Intel 芯片);若标题或路径中曾出现「2017 款」等字样,可与「Intel 款 MacBook Pro」视为同一类场景表述。

小龙虾开发者社区是 CSDN 旗下专注 OpenClaw 生态的官方阵地,聚焦技能开发、插件实践与部署教程,为开发者提供可直接落地的方案、工具与交流平台,助力高效构建与落地 AI 应用
更多推荐


 26
26 0
0- 0


 已为社区贡献2条内容

所有评论(0)