
【养虾之路】OpenClaw 完全新手指南(麒麟Ky10SP2安装)
文章目录
OpenClaw 完全新手指南
个人 AI 助手本地部署与配置权威指南
EXFOLIATE! EXFOLIATE!
🚀什么是 OpenClaw?
OpenClaw 是一款个人 AI 助手,运行在你自己的设备上。它可以通过你已经在使用的通讯渠道(WhatsApp、Telegram、Slack、Discord、Google Chat、Signal、iMessage、Microsoft Teams、WebChat 等)与你交互,还支持语音对话、Canvas 可视化等高级功能。
OpenClaw 是一个本地优先的 AI 助手网关,它的核心设计理念是:
- 个人化:为你个人服务,而非企业级多用户系统
- 本地运行:Gateway 运行在你的设备上(macOS、Linux、Windows WSL2)
- 多渠道接入:支持几乎所有主流通讯平台
- 功能丰富:浏览器控制、Canvas 可视化、语音交互、定时任务等
架构概览
WhatsApp / Telegram / Slack / Discord / Google Chat / Signal / iMessage / WebChat
               │
               ▼
┌───────────────────────────────┐
│            Gateway            │
│       (控制平面 - 核心)        │
│     ws://127.0.0.1:18789      │
└──────────────┬────────────────┘
               │
               ├─ AI 智能体 (Agent)
               ├─ CLI 命令行工具
               ├─ WebChat 网页界面
               ├─ macOS/iOS/Android 客户端
               └─ 浏览器控制 (Chrome CDP)
📦安装指南
系统要求
- Node.js ≥ 22(必须)
- 操作系统:macOS、Linux、Windows (WSL2)
- 包管理器:npm、pnpm 或 bun
- 依赖:cmake(>=3.19)、git、gcc(高版本)
- 当前服务器配置:8C8G100G
快速安装(推荐)
macOS / Linux
curl -fsSL https://openclaw.ai/install.sh | bash
Windows (PowerShell)
iwr -useb https://openclaw.ai/install.ps1 | iex
npm 安装
# 使用 npm
npm install -g openclaw@latest

# 或使用 pnpm
pnpm add -g openclaw@latest
麒麟ky10_x86_64操作系统安装openclaw
检查系统版本
[root@k8s-master ~]# uname -a
Linux k8s-master.deploy.local 4.19.90-24.4.v2101.ky10.x86_64 #1 SMP Mon May 24 12:14:55 CST 2021 x86_64 x86_64 x86_64 GNU/Linux
安装conda
# 下载 Miniconda 安装脚本(适用于 Linux x86_64)
[root@k8s-master build-linux-x64]# wget https://repo.anaconda.com/miniconda/Miniconda3-latest-Linux-x86_64.sh
[root@k8s-master build-linux-x64]# bash Miniconda3-latest-Linux-x86_64.sh
[root@k8s-master build-linux-x64]# source ~/.bashrc
[root@k8s-master build-linux-x64]# conda create -n openclaw-build python=3.10
[root@k8s-master build-linux-x64]# conda activate openclaw-build
(openclaw-build) [root@k8s-master build-linux-x64]#conda install -c conda-forge gcc=10.4.0 gxx=10.4.0 make cmake git nodejs=24
# 将 Conda 环境的 bin 目录加入 PATH(激活环境后通常已自动处理,但可手动确认)
(openclaw-build) [root@k8s-master build-linux-x64]# export PATH=$CONDA_PREFIX/bin:$PATH

# 设置库路径,让运行时使用 Conda 的库
(openclaw-build) [root@k8s-master build-linux-x64]# export LD_LIBRARY_PATH=$CONDA_PREFIX/lib:$LD_LIBRARY_PATH

# 显式告诉 CMake 使用 Conda 的 make
(openclaw-build) [root@k8s-master build-linux-x64]# export CMAKE_MAKE_PROGRAM=$CONDA_PREFIX/bin/make

# 可选:指定编译器(确保 CMake 使用 Conda 的 gcc/g++)
(openclaw-build) [root@k8s-master build-linux-x64]# export CC=$CONDA_PREFIX/bin/cc
(openclaw-build) [root@k8s-master build-linux-x64]# export CXX=$CONDA_PREFIX/bin/c++

# 应显示 ~/miniconda3/envs/openclaw-build/bin/make
(openclaw-build) [root@k8s-master build-linux-x64]# which make
/root/miniconda3/envs/openclaw-build/bin/make

# 应显示 ~/miniconda3/envs/openclaw-build/bin/cmake
(openclaw-build) [root@k8s-master build-linux-x64]# which cmake
/root/miniconda3/envs/openclaw-build/bin/cmake
# 应显示 ~/miniconda3/envs/openclaw-build/bin/x86_64-conda-linux-gnu-cc(或类似
(openclaw-build) [root@k8s-master build-linux-x64]# which gcc
/root/miniconda3/envs/openclaw-build/bin/gcc

(openclaw-build) [root@k8s-master build-linux-x64]# echo $CMAKE_MAKE_PROGRAM
/root/miniconda3/bin/make

(openclaw-build) [root@k8s-master build-linux-x64]# npm cache clean --force
(openclaw-build) [root@k8s-master build-linux-x64]# npm uninstall -g openclaw
进入 node-llama-cpp 目录
(openclaw-build) [root@k8s-master build-linux-x64]# cd /root/miniconda3/envs/openclaw-build/lib/node_modules/openclaw/node_modules/node-llama-cpp

# 创建 llama 目录并克隆 llama.cpp
(openclaw-build) [root@k8s-master node-llama-cpp]# mkdir -p llama
(openclaw-build) [root@k8s-master node-llama-cpp]# cd llama
(openclaw-build) [root@k8s-master llama]# git clone --depth 1 https://github.com/ggml-org/llama.cpp.git
(openclaw-build) [root@k8s-master llama]# cd llama.cpp
(openclaw-build) [root@k8s-master llama]# git tag | grep b8121
设置必要的环境变量(确保使用Conda的工具)
(openclaw-build) [root@k8s-master build-linux-x64]# export CC=/root/miniconda3/envs/openclaw-build/bin/cc
(openclaw-build) [root@k8s-master build-linux-x64]# export CXX=/root/miniconda3/envs/openclaw-build/bin/c++
(openclaw-build) [root@k8s-master build-linux-x64]# export CMAKE_MAKE_PROGRAM=/root/miniconda3/envs/openclaw-build/bin/make
(openclaw-build) [root@k8s-master build-linux-x64]# export LD_LIBRARY_PATH=/root/miniconda3/envs/openclaw-build/lib:$LD_LIBRARY_PATH
创建构建目录并进入
(openclaw-build) [root@k8s-master build-linux-x64]# mkdir -p build-linux-x64 && cd build-linux-x64
使用 Conda 的 cmake 配置项目(关键步骤)
执行以下命令,显式指定编译器、make 程序,并传递所有必要的编译选项
(openclaw-build) [root@k8s-master build-linux-x64]# sjcmake \
  -DCMAKE_C_COMPILER=/root/miniconda3/envs/openclaw-build/bin/cc \
  -DCMAKE_CXX_COMPILER=/root/miniconda3/envs/openclaw-build/bin/c++ \
  -DCMAKE_MAKE_PROGRAM=/root/miniconda3/envs/openclaw-build/bin/make \
  -DCMAKE_BUILD_TYPE=Release \
  -DGGML_BUILD_NUMBER=1 \
  -DNLC_CURRENT_PLATFORM=linux-x64 \
  -DNLC_TARGET_PLATFORM=linux-x64 \
  -DNLC_VARIANT=b8121 \
  -DGGML_METAL=OFF \
  -DGGML_CCACHE=OFF \
  -DLLAMA_CURL=OFF \
  -DLLAMA_HTTPLIB=OFF \
  -DLLAMA_BUILD_BORINGSSL=OFF \
  -DLLAMA_OPENSSL=OFF \
  -DCMAKE_POSITION_INDEPENDENT_CODE=ON \
  ../llama/llama.cpp
注意:
- 所有
-D选项直接对应之前的--CD...参数。 - 我们移除了
--CDCMAKE_CONFIGURATION_TYPES,因为单配置生成器用CMAKE_BUILD_TYPE即可。
使用 Conda 的 make 进行编译
(openclaw-build) [root@k8s-master build-linux-x64]# /root/miniconda3/envs/openclaw-build/bin/make -j6
测试 OpenClaw
# 确保 LD_LIBRARY_PATH 仍指向 Conda 的 lib
(openclaw-build) [root@k8s-master build-linux-x64]# export LD_LIBRARY_PATH=/root/miniconda3/envs/openclaw-build/lib:$LD_LIBRARY_PATH
(openclaw-build) [root@k8s-master build-linux-x64]# openclaw --version
OpenClaw 2026.3.8 (3caab92)
运行引导向导
# 完整安装向导 + 安装系统服务
(openclaw-build) [root@k8s-master build-linux-x64]# openclaw onboard --install-daemon
🦞 OpenClaw 2026.3.8 (3caab92) — You had me at 'openclaw gateway start.'
▄▄▄▄▄▄▄▄▄▄▄▄▄▄▄▄▄▄▄▄▄▄▄▄▄▄▄▄▄▄▄▄▄▄▄▄▄▄▄▄▄▄▄▄▄▄▄▄▄▄▄▄
██░▄▄▄░██░▄▄░██░▄▄▄██░▀██░██░▄▄▀██░████░▄▄▀██░███░██
██░███░██░▀▀░██░▄▄▄██░█░█░██░█████░████░▀▀░██░█░█░██
██░▀▀▀░██░█████░▀▀▀██░██▄░██░▀▀▄██░▀▀░█░██░██▄▀▄▀▄██
▀▀▀▀▀▀▀▀▀▀▀▀▀▀▀▀▀▀▀▀▀▀▀▀▀▀▀▀▀▀▀▀▀▀▀▀▀▀▀▀▀▀▀▀▀▀▀▀▀▀▀▀
🦞 OPENCLAW 🦞
┌ OpenClaw onboarding
│
◇ Security ─────────────────────────────────────────────────────────────────────────────────╮
│ │
│ Security warning — please read. │
│ │
│ OpenClaw is a hobby project and still in beta. Expect sharp edges. │
│ By default, OpenClaw is a personal agent: one trusted operator boundary. │
│ This bot can read files and run actions if tools are enabled. │
│ A bad prompt can trick it into doing unsafe things. │
│ │
│ OpenClaw is not a hostile multi-tenant boundary by default. │
│ If multiple users can message one tool-enabled agent, they share that delegated tool │
│ authority. │
│ │
│ If you’re not comfortable with security hardening and access control, don’t run │
│ OpenClaw. │
│ Ask someone experienced to help before enabling tools or exposing it to the internet. │
│ │
│ Recommended baseline: │
│ - Pairing/allowlists + mention gating. │
│ - Multi-user/shared inbox: split trust boundaries (separate gateway/credentials, ideally │
│ separate OS users/hosts). │
│ - Sandbox + least-privilege tools. │
│ - Shared inboxes: isolate DM sessions (`session.dmScope: per-channel-peer`) and keep │
│ tool access minimal. │
│ - Keep secrets out of the agent’s reachable filesystem. │
│ - Use the strongest available model for any bot with tools or untrusted inboxes. │
│ │
│ Run regularly: │
│ openclaw security audit --deep │
│ openclaw security audit --fix │
│ │
│ Must read: https://docs.openclaw.ai/gateway/security │
│ │
├────────────────────────────────────────────────────────────────────────────────────────────╯
│
◇ I understand this is personal-by-default and shared/multi-user use requires lock-down. Continue?
│ Yes
│
◇ Onboarding mode
│ QuickStart
│
◇ QuickStart ─────────────────────────╮
│ │
│ Gateway port: 18789 │
│ Gateway bind: Loopback (127.0.0.1) │
│ Gateway auth: Token (default) │
│ Tailscale exposure: Off │
│ Direct to chat channels. │
│ │
├──────────────────────────────────────╯
│
◇ Model/auth provider
│ Qwen
│
◐ Starting Qwen OAuth…...│
◇ Qwen OAuth ─────────────────────────────────────────────────────────────────────────╮
│ │
│ Open https://chat.qwen.ai/authorize?user_code=ZxxxW-BX&client=qwen-code to approve │
│ access. │
│ If prompted, enter the code ZGZTW-BX. │
│ │
├──────────────────────────────────────────────────────────────────────────────────────╯
◇ Qwen OAuth complete
│
◇ Model configured ─────────────────────────────╮
│ │
│ Default model set to qwen-portal/coder-model │
│ │
├────────────────────────────────────────────────╯
│
◇ Provider notes ──────────────────────────────────────────────────────────────────────╮
│ │
│ Qwen OAuth tokens auto-refresh. Re-run login if refresh fails or access is revoked. │
│ Base URL defaults to https://portal.qwen.ai/v1. Override │
│ models.providers.qwen-portal.baseUrl if needed. │
│ │
├───────────────────────────────────────────────────────────────────────────────────────╯
│
◇ Default model
│ Enter model manually
│##Qwen 为 Qwen Coder 和 Qwen Vision 模型提供免费层 OAuth 流程(每天 2,000 次请求,受 Qwen 速率限制约束)
◇ Default model
│ qwen-portal/coder-model
│
◇ Channel status ────────────────────────────╮
│ │
│ Telegram: needs token │
│ WhatsApp (default): not linked │
│ Discord: needs token │
│ Slack: needs tokens │
│ Signal: needs setup │
│ signal-cli: missing (signal-cli) │
│ iMessage: needs setup │
│ imsg: missing (imsg) │
│ IRC: not configured │
│ Google Chat: not configured │
│ LINE: not configured │
│ Feishu: install plugin to enable │
│ Google Chat: install plugin to enable │
│ Nostr: install plugin to enable │
│ Microsoft Teams: install plugin to enable │
│ Mattermost: install plugin to enable │
│ Nextcloud Talk: install plugin to enable │
│ Matrix: install plugin to enable │
│ BlueBubbles: install plugin to enable │
│ LINE: install plugin to enable │
│ Zalo: install plugin to enable │
│ Zalo Personal: install plugin to enable │
│ Synology Chat: install plugin to enable │
│ Tlon: install plugin to enable │
│ │
├─────────────────────────────────────────────╯
│
◇ How channels work ───────────────────────────────────────────────────────────────────────╮
│ │
│ DM security: default is pairing; unknown DMs get a pairing code. │
│ Approve with: openclaw pairing approve <channel> <code> │
│ Public DMs require dmPolicy="open" + allowFrom=["*"]. │
│ Multi-user DMs: run: openclaw config set session.dmScope "per-channel-peer" (or │
│ "per-account-channel-peer" for multi-account channels) to isolate sessions. │
│ Docs: channels/pairing │
│ │
│ Telegram: simplest way to get started — register a bot with @BotFather and get going. │
│ WhatsApp: works with your own number; recommend a separate phone + eSIM. │
│ Discord: very well supported right now. │
│ IRC: classic IRC networks with DM/channel routing and pairing controls. │
│ Google Chat: Google Workspace Chat app with HTTP webhook. │
│ Slack: supported (Socket Mode). │
│ Signal: signal-cli linked device; more setup (David Reagans: "Hop on Discord."). │
│ iMessage: this is still a work in progress. │
│ LINE: LINE Messaging API webhook bot. │
│ Feishu: 飞书/Lark enterprise messaging with doc/wiki/drive tools. │
│ Nostr: Decentralized protocol; encrypted DMs via NIP-04. │
│ Microsoft Teams: Bot Framework; enterprise support. │
│ Mattermost: self-hosted Slack-style chat; install the plugin to enable. │
│ Nextcloud Talk: Self-hosted chat via Nextcloud Talk webhook bots. │
│ Matrix: open protocol; install the plugin to enable. │
│ BlueBubbles: iMessage via the BlueBubbles mac app + REST API. │
│ Zalo: Vietnam-focused messaging platform with Bot API. │
│ Zalo Personal: Zalo personal account via QR code login. │
│ Synology Chat: Connect your Synology NAS Chat to OpenClaw with full agent capabilities. │
│ Tlon: decentralized messaging on Urbit; install the plugin to enable. │
│ │
├───────────────────────────────────────────────────────────────────────────────────────────╯
│
◇ Select channel (QuickStart)
│ Skip for now
Updated ~/.openclaw/openclaw.json
Workspace OK: ~/.openclaw/workspace
Sessions OK: ~/.openclaw/agents/main/sessions
│
◇ Web search ────────────────────────────────────────╮
│ │
│ Web search lets your agent look things up online. │
│ Choose a provider and paste your API key. │
│ Docs: https://docs.openclaw.ai/tools/web │
│ │
├─────────────────────────────────────────────────────╯
│
◇ Search provider
│ Skip for now
│
◇ Skills status ─────────────╮
│ │
│ Eligible: 3 │
│ Missing requirements: 41 │
│ Unsupported on this OS: 7 │
│ Blocked by allowlist: 0 │
│ │
├─────────────────────────────╯
│
◇ Configure skills now? (recommended)
│ No
│
◇ Hooks ──────────────────────────────────────────────────────────────────╮
│ │
│ Hooks let you automate actions when agent commands are issued. │
│ Example: Save session context to memory when you issue /new or /reset. │
│ │
│ Learn more: https://docs.openclaw.ai/automation/hooks │
│ │
├──────────────────────────────────────────────────────────────────────────╯
│
◇ Enable hooks?
│ Skip for now
Config overwrite: /root/.openclaw/openclaw.json (sha256 1f883aa60beabccbfdb30130a587b297df4fb72c26815577529a17cec31c5235 -> c3716feedf08ca3333c31c3c24a00aa88b4dcb1f1477c9deb2240a3a699ccaf5, backup=/root/.openclaw/openclaw.json.bak)
│
◇ Gateway service runtime ────────────────────────────────────────────╮
│ │
│ QuickStart uses Node for the Gateway service (stable + supported). │
│ │
├──────────────────────────────────────────────────────────────────────╯
│
◇ Gateway service already installed
│ Restart
│
◒ Restarting Gateway service…Restarted systemd service: openclaw-gateway.service
◇ Gateway service restarted.
│
◇
Agents: main (default)
Heartbeat interval: 30m (main)
Session store (main): /root/.openclaw/agents/main/sessions/sessions.json (1 entries)
- agent:main:main (11m ago)
│
◇ Optional apps ────────────────────────╮
│ │
│ Add nodes for extra features: │
│ - macOS app (system + notifications) │
│ - iOS app (camera/canvas) │
│ - Android app (camera/canvas) │
│ │
├────────────────────────────────────────╯
│
◇ Control UI ─────────────────────────────────────────────────────────────────────╮
│ │
│ Web UI: http://127.0.0.1:18789/ │
│ Web UI (with token): │
│ http://127.0.0.1:18789/#token=148097c411bd044417ad3a998fdbda9ac99de6b4b5e62d10 │
│ Gateway WS: ws://127.0.0.1:18789 │
│ Gateway: reachable │
│ Docs: https://docs.openclaw.ai/web/control-ui │
│ │
├──────────────────────────────────────────────────────────────────────────────────╯
│
◇ Start TUI (best option!) ─────────────────────────────────╮
│ │
│ This is the defining action that makes your agent you. │
│ Please take your time. │
│ The more you tell it, the better the experience will be. │
│ We will send: "Wake up, my friend!" │
│ │
├────────────────────────────────────────────────────────────╯
│
◇ Token ────────────────────────────────────────────────────────────────────────────────────╮
│ │
│ Gateway token: shared auth for the Gateway + Control UI. │
│ Stored in: ~/.openclaw/openclaw.json (gateway.auth.token) or OPENCLAW_GATEWAY_TOKEN. │
│ View token: openclaw config get gateway.auth.token │
│ Generate token: openclaw doctor --generate-gateway-token │
│ Web UI keeps dashboard URL tokens in memory for the current tab and strips them from the │
│ URL after load. │
│ Open the dashboard anytime: openclaw dashboard --no-open │
│ If prompted: paste the token into Control UI settings (or use the tokenized dashboard │
│ URL). │
│ │
├────────────────────────────────────────────────────────────────────────────────────────────╯
│
◇ How do you want to hatch your bot?
│ Hatch in TUI (recommended)
openclaw tui - ws://127.0.0.1:18789 - agent main - session main
session agent:main:main
# 仅运行配置向导
(openclaw-build) [root@k8s-master build-linux-x64]# openclaw onboard
完成初始配置向导
首次安装后,OpenClaw 会自动启动配置向导,帮助您快速完成初始设置。您也可以手动执行openclaw onboard命令进行配置。
| 配置项 | 建议配置 |
|---|---|
| I understand this is powerful and inherently risky. Continue? | 选择 Yes |
| Onboarding mode | 选择 QuickStart |
| Model/auth provider | 选择 Skip for now(稍后配置百炼模型) |
| Filter models by provider | 选择 All providers |
| Default model | 选择 Keep current |
| Select channel (QuickStart) | 选择 Skip for now(稍后配置渠道) |
| Configure skills now? (recommended) | 选择 No |
| Enable hooks? | 按空格键选中选项,按回车键进入下一步 |
| How do you want to hatch your bot? | 选择 Do this later |
检查安装
# 查看 Gateway 状态
(openclaw-build) [root@k8s-master build-linux-x64]# openclaw gateway status
🦞 OpenClaw 2026.3.8 (3caab92) — I've survived more breaking changes than your last three relationships.

│
◇
Service: systemd (enabled)
File logs: /tmp/openclaw/openclaw-2026-03-10.log
Command: /root/miniconda3/envs/openclaw-build/bin/node /root/miniconda3/envs/openclaw-build/lib/node_modules/openclaw/dist/index.js gateway --port 18789
Service file: ~/.config/systemd/user/openclaw-gateway.service
Service env: OPENCLAW_GATEWAY_PORT=18789

Config (cli): ~/.openclaw/openclaw.json
Config (service): ~/.openclaw/openclaw.json

Gateway: bind=loopback (127.0.0.1), port=18789 (service args)
Probe target: ws://127.0.0.1:18789
Dashboard: http://127.0.0.1:18789/
Probe note: Loopback-only gateway; only local clients can connect.

Runtime: running (pid 71580, state active, sub running, last exit 0, reason 0)
RPC probe: ok

Listening: 127.0.0.1:18789
Troubles: run openclaw status
Troubleshooting: https://docs.openclaw.ai/troubleshooting

# 打开控制面板
(openclaw-build) [root@k8s-master build-linux-x64]# openclaw dashboard

🦞 OpenClaw 2026.3.8 (3caab92) — No $999 stand required.

Dashboard URL: http://127.0.0.1:18789/#token=57fcbb62ae4f354278d50dae53f2a1f9317b86c6a90ba7fa
Copy to clipboard unavailable.
No GUI detected. Open from your computer:
ssh -N -L 18789:127.0.0.1:18789 root@10.10.10.103
Then open:
http://localhost:18789/
http://localhost:18789/#token=57fcbb62ae4f354278d50dae53f2a1f9317b86c6a90ba7fa
Docs:
https://docs.openclaw.ai/gateway/remote
https://docs.openclaw.ai/web/control-ui
⚡快速开始-接入千问百炼模型
1. 启动 Gateway
# 前台运行(适合调试)
(openclaw-build) [root@k8s-master build-linux-x64]# openclaw gateway --port 18789 --verbose

# 使用守护进程(后台运行)
(openclaw-build) [root@k8s-master build-linux-x64]# openclaw gateway start
🦞 OpenClaw 2026.3.8 (3caab92)
   One CLI to rule them all, and one more restart because you changed the port.

Restarted systemd service: openclaw-gateway.service
2. 打开控制面板
(openclaw-build) [root@k8s-master build-linux-x64]# openclaw dashboard
🦞 OpenClaw 2026.3.8 (3caab92) — No $999 stand required.

Dashboard URL: http://127.0.0.1:18789/#token=57fcbb62ae4f354278d50dae53f2a1f9317b86c6a90ba7fa
Copy to clipboard unavailable.
No GUI detected. Open from your computer:
ssh -N -L 18789:127.0.0.1:18789 root@10.10.10.103
Then open:
http://localhost:18789/
http://localhost:18789/#token=57fcbb62ae4f354278d50dae53f2a1f9317b86c6a90ba7fa
Docs:
https://docs.openclaw.ai/gateway/remote
https://docs.openclaw.ai/web/control-ui
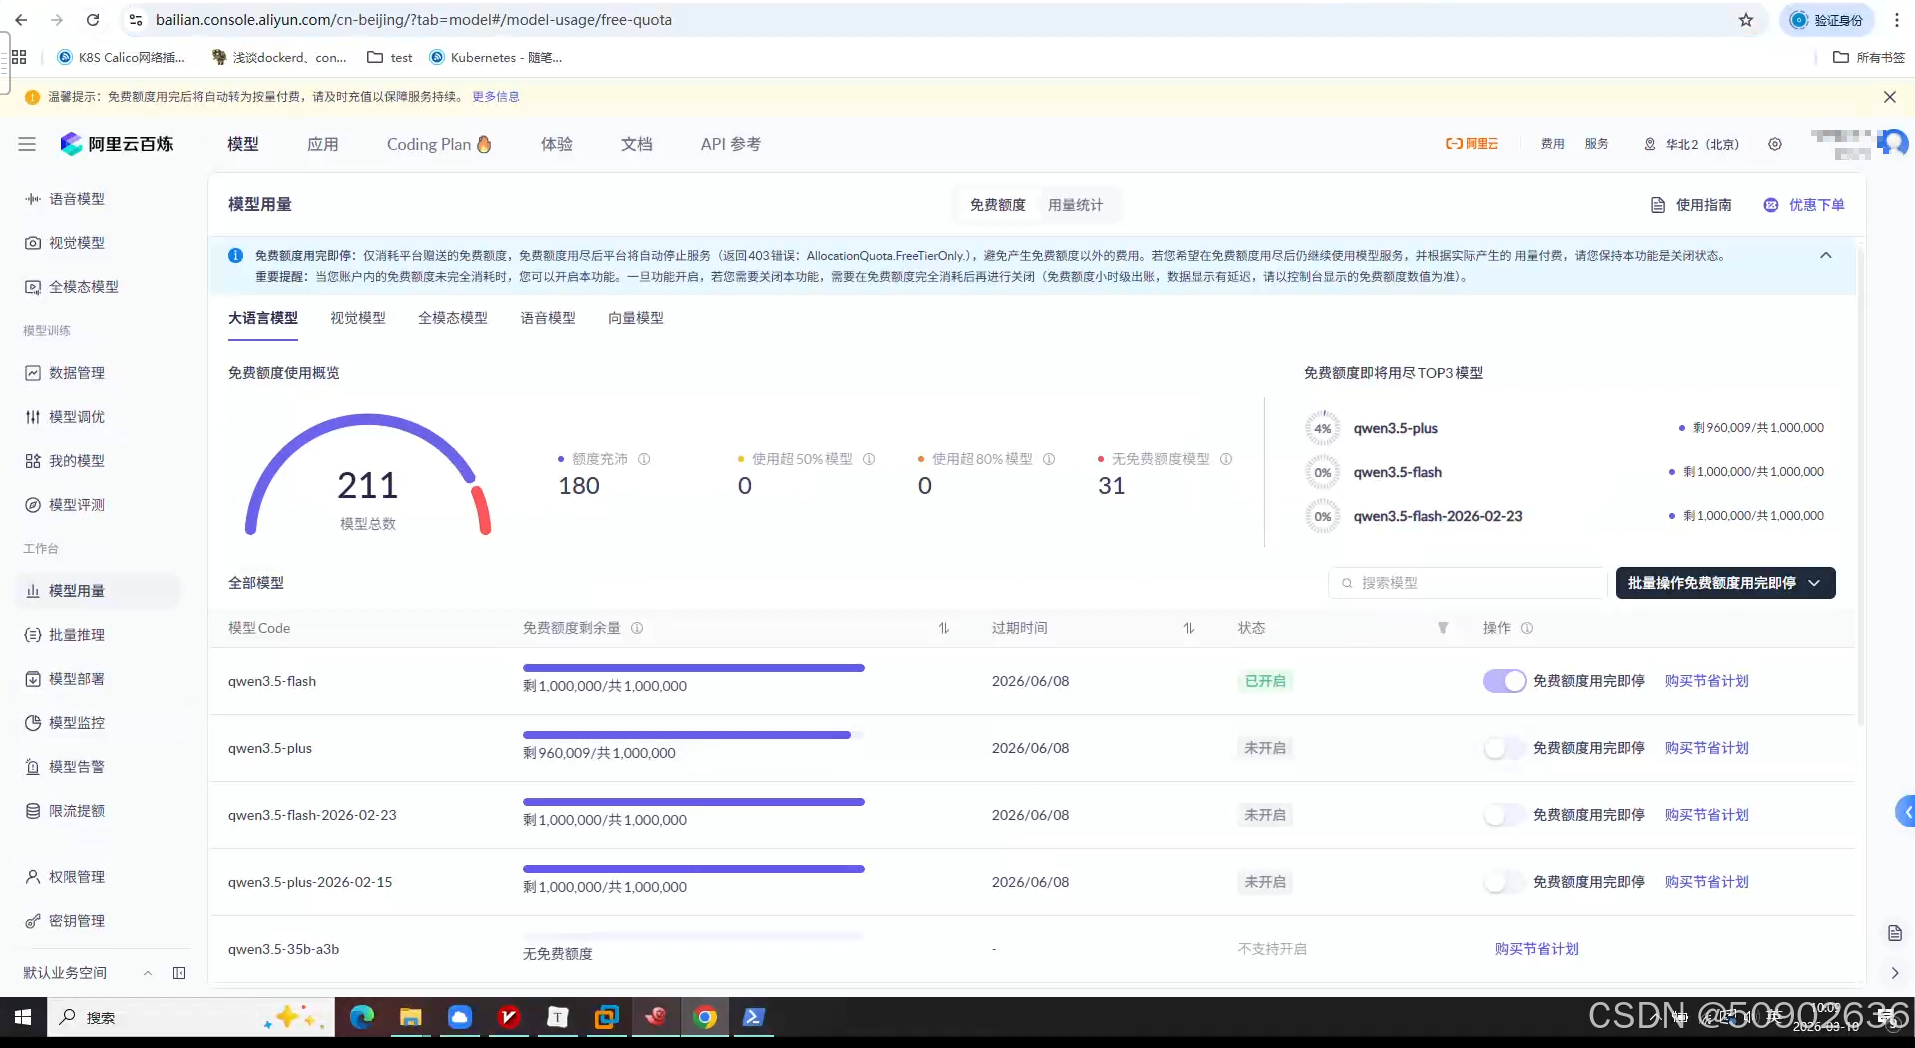
3. 配置阿里百炼
阿里百炼提供100万免费token
地址: https://bailian.console.aliyun.com/cn-beijing/?tab=model#/model-usage/free-quota
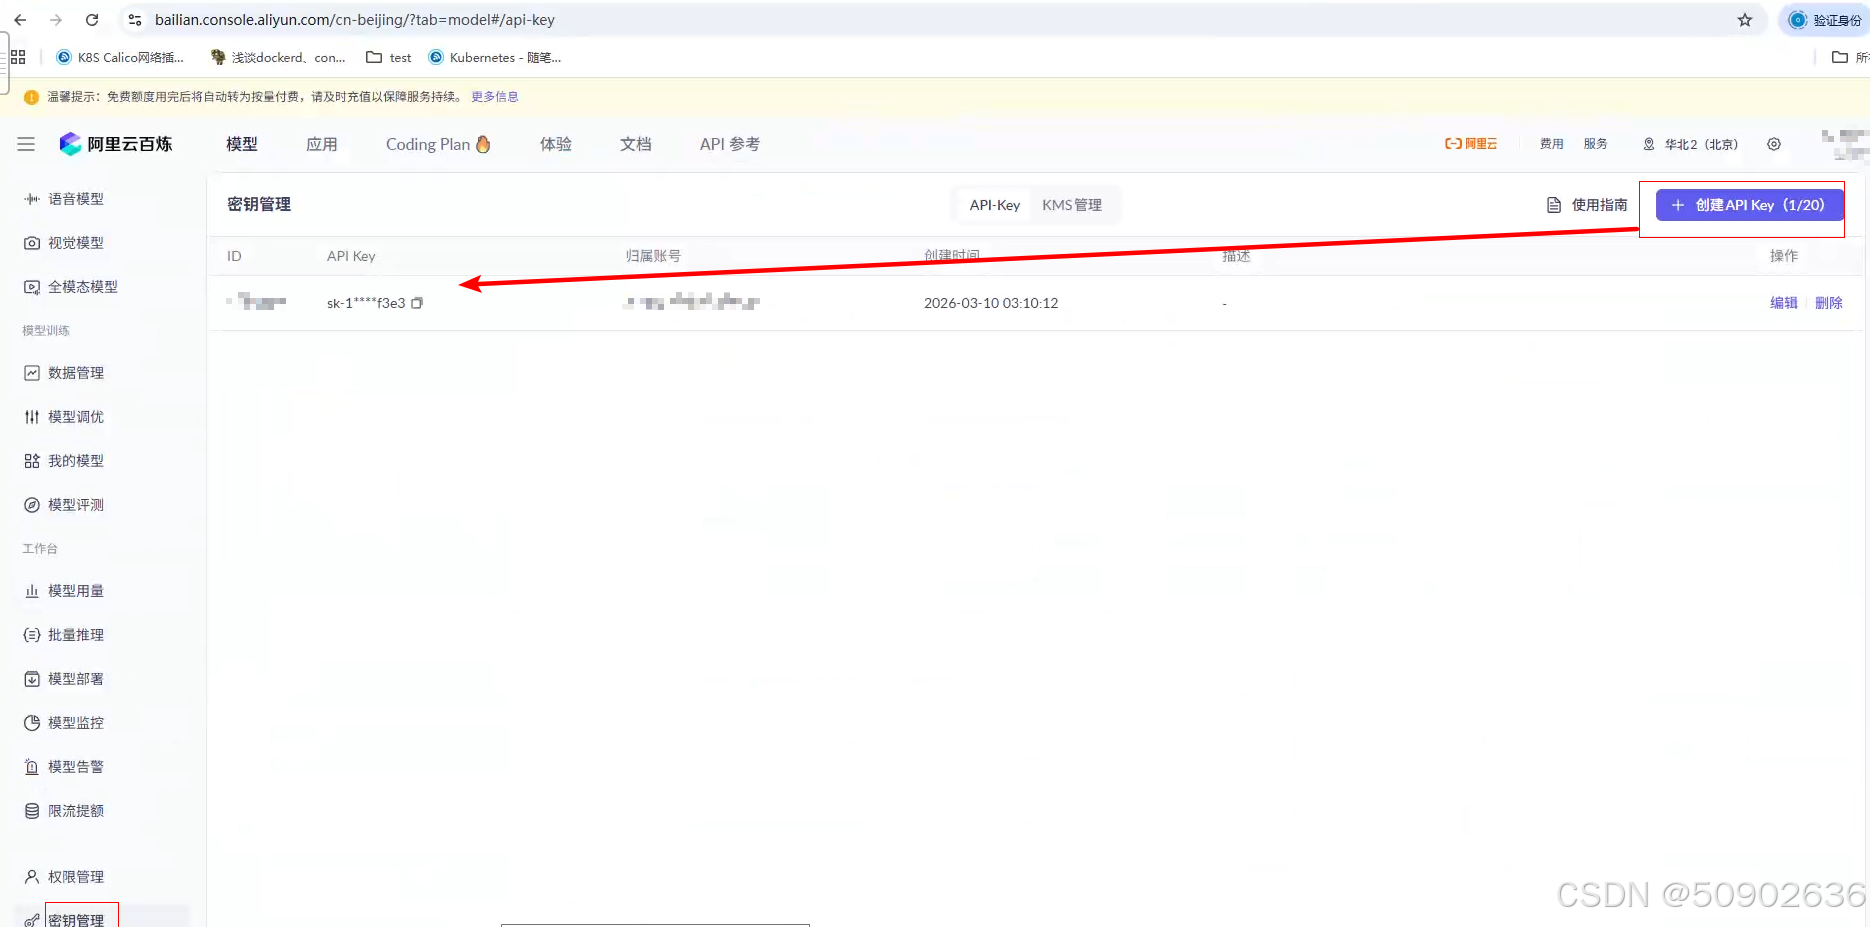
4. 创建API_KEY
点击密钥管理创建
5. 配置百炼模型
# 打开控制面板
(openclaw-build) [root@k8s-master build-linux-x64]# openclaw dashboard

# windows浏览器访问
win+r打开powershell,输入以下命令和服务器密码后,不要关闭此窗口,通过隧道实现dashboard访问
PS C:\Users\王> ssh -N -L 18789:127.0.0.1:18789 root@10.10.10.103

Authorized users only. All activities may be monitored and reported.
root@10.10.10.103's password:

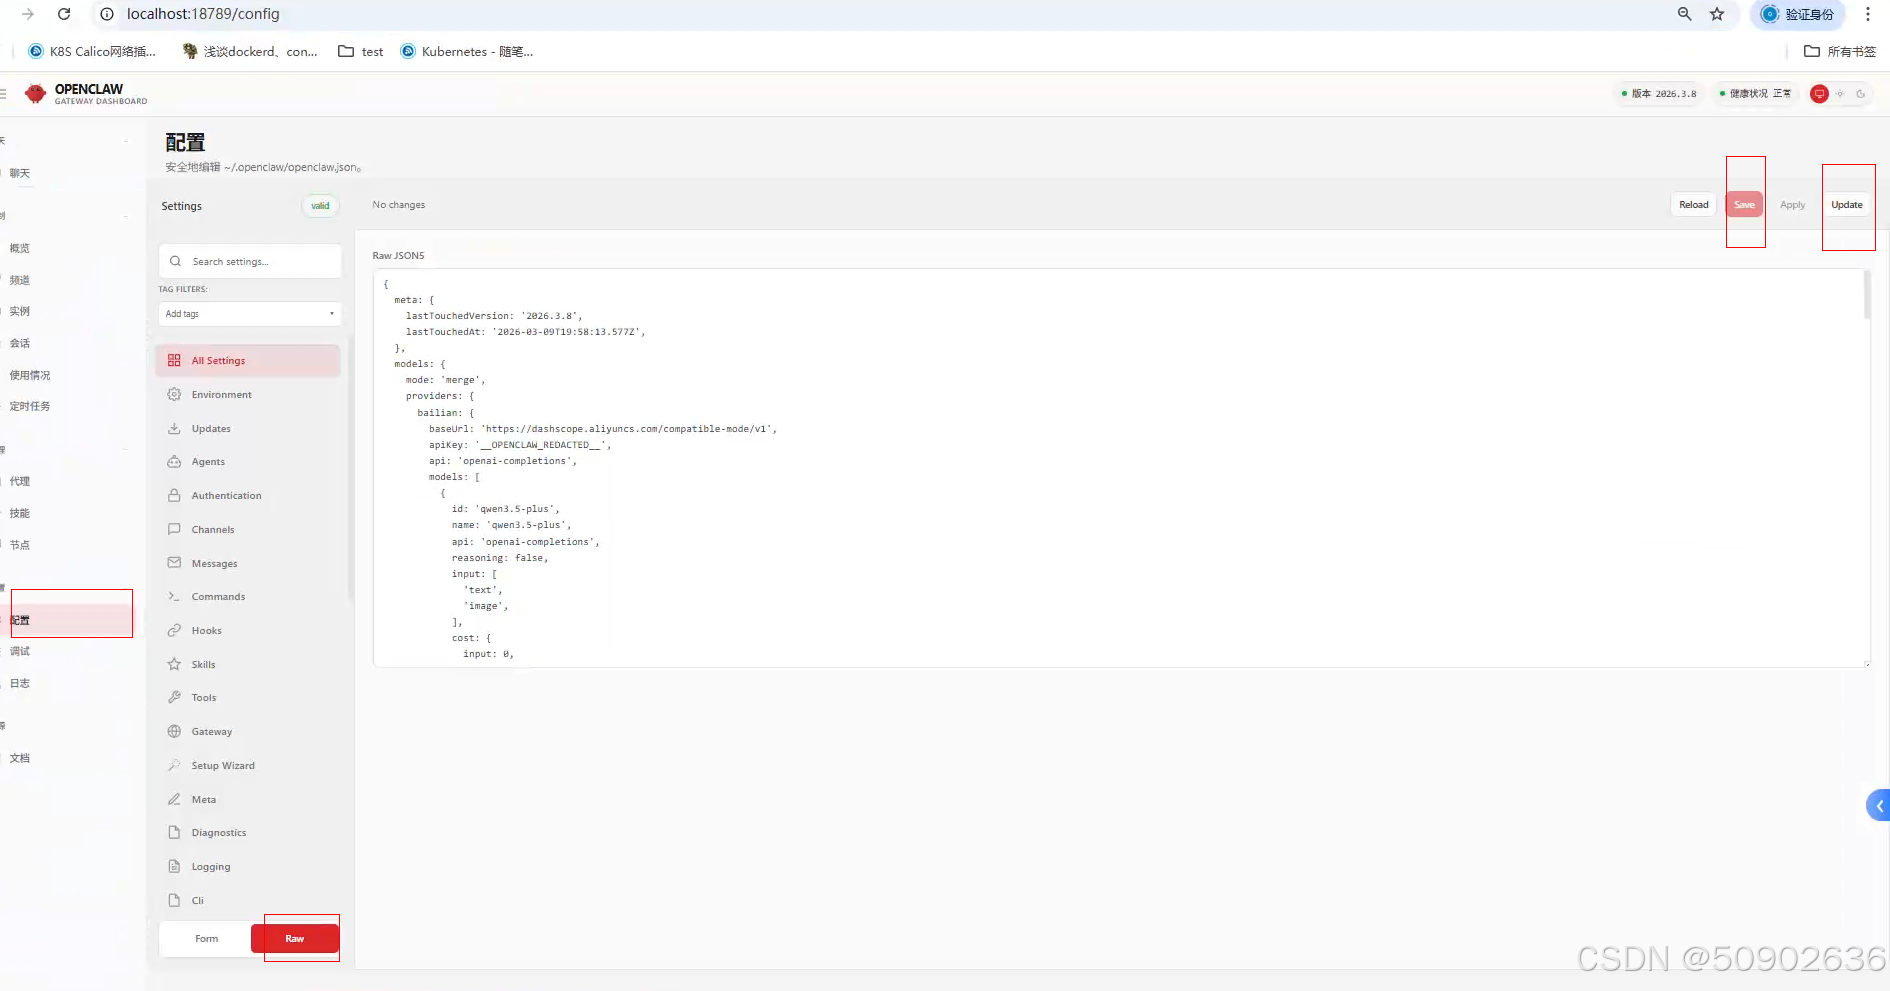
6. 点击配置,选择RAW,更新json文件
替换apikey部分,具体的key见第四步。点击save,再点击UPDATE
https://bailian.console.aliyun.com/cn-beijing/?tab=doc#/doc/?type=model&url=3020785
  "models": {
    "mode": "merge",
    "providers": {
      "bailian": {
        "baseUrl": "https://dashscope.aliyuncs.com/compatible-mode/v1",
        "apiKey": "DASHSCOPE_API_KEY",
        "api": "openai-completions",
        "models": [
          {
            "id": "qwen3.5-plus",
            "name": "qwen3.5-plus",
            "reasoning": false,
            "input": ["text", "image"],
            "contextWindow": 1000000,
            "maxTokens": 65536
          },
          {
            "id": "qwen3-coder-next",
            "name": "qwen3-coder-next",
            "reasoning": false,
            "input": ["text"],
            "contextWindow": 262144,
            "maxTokens": 65536
          }
        ]
      }
    }
  },
  "agents": {
    "defaults": {
      "model": {
        "primary": "bailian/qwen3.5-plus"
      },
      "models": {
        "bailian/qwen3.5-plus": {},
        "bailian/qwen3-coder-next": {}
      }
    }
  },
7. 重启gateway
(openclaw-build) [root@k8s-master build-linux-x64]# openclaw gateway start
🦞 OpenClaw 2026.3.8 (3caab92)
   One CLI to rule them all, and one more restart because you changed the port.

Restarted systemd service: openclaw-gateway.service
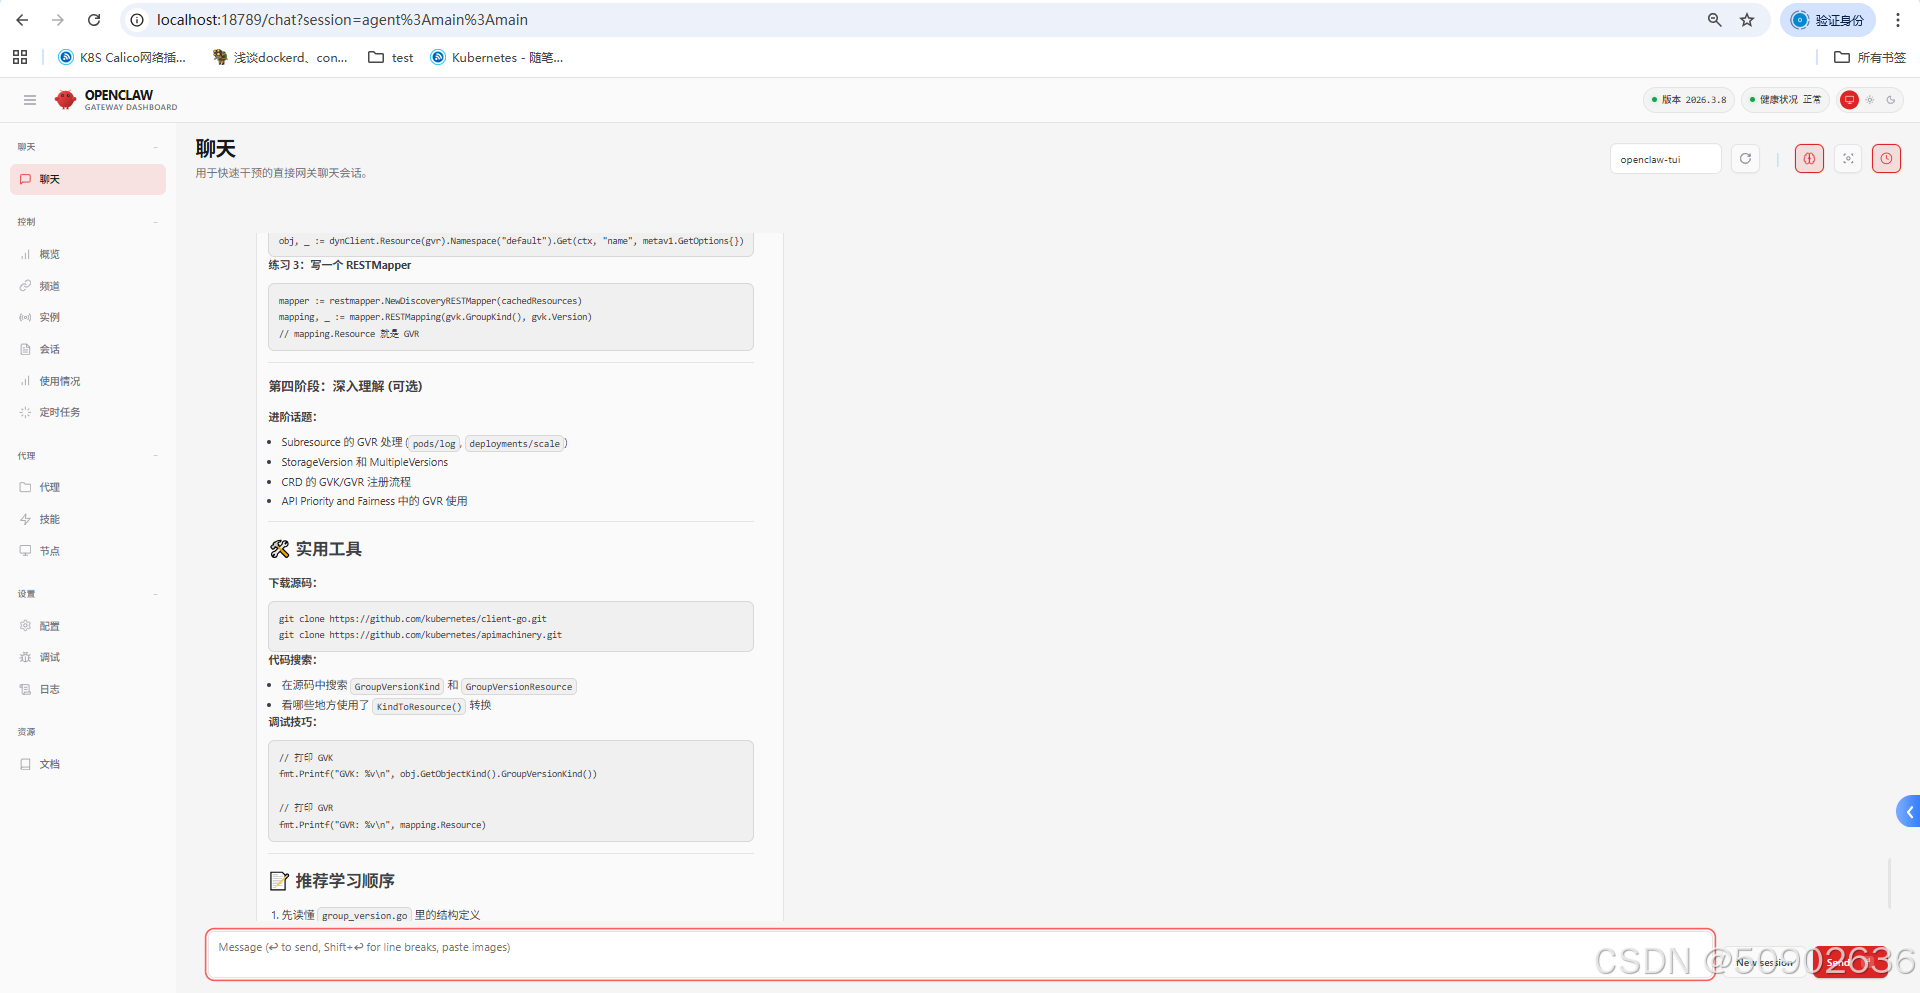
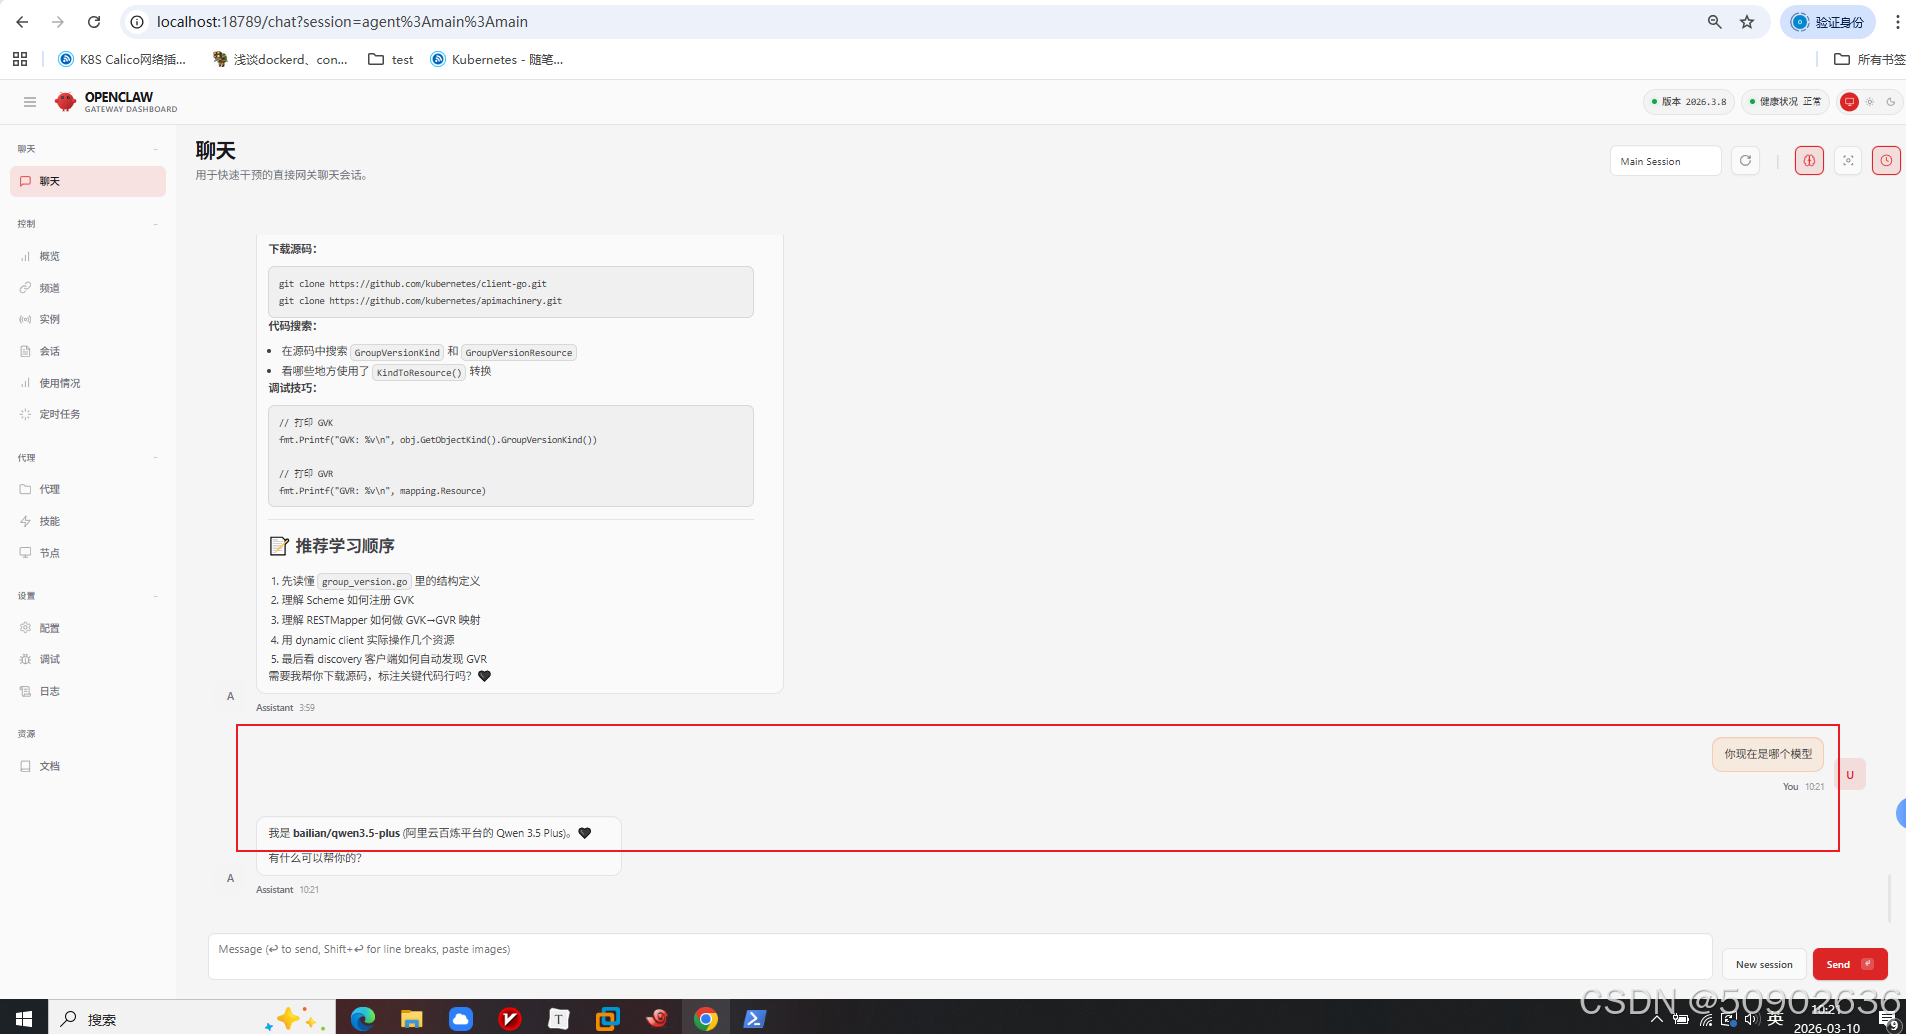
8. 对话测试-dashboard控制台
📁Workspace 工作空间
Workspace 是 OpenClaw 智能体的工作目录,也是它读取上下文、保存记忆、执行工具操作的唯一位置。
Workspace 结构
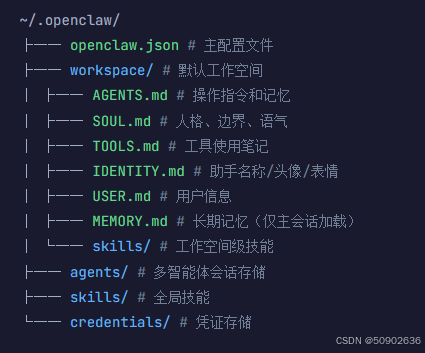
核心文件说明
| 文件 | 用途 | 加载时机 |
|---|---|---|
AGENTS.md |
操作指令、连续性规则、重要记忆 | 每会话首条消息 |
SOUL.md |
人格定义、语气、边界 | 每会话首条消息 |
TOOLS.md |
环境特定的工具说明 | 每会话首条消息 |
USER.md |
用户信息、偏好、项目背景 | 每会话首条消息 |
IDENTITY.md |
助手身份(名称、表情、头像) | 每会话首条消息 |
MEMORY.md |
长期记忆(安全敏感内容) | 仅主会话 |
⚙️配置 openclaw.json
~/.openclaw/openclaw.json 是 OpenClaw 的核心配置文件,使用 JSON5 格式(支持注释和尾随逗号)。
最小配置示例
{
  "agents": {
    "defaults": {
      "workspace": "~/.openclaw/workspace"
    }
  },
  "channels": {
    "telegram": {
      "enabled": true,
      "botToken": "123456:ABC...",
      "dmPolicy": "pairing",
      "allowFrom": ["tg:123456789"]
    }
  }
}
Agents 配置
{
  "agents": {
    "defaults": {
      "workspace": "~/.openclaw/workspace",
      "model": {
        "primary": "anthropic/claude-sonnet-4-5",
        "fallbacks": ["openai/gpt-5.2"]
      },
      "heartbeat": {
        "every": "30m",
        "target": "last"
      }
    }
  }
}
Session 会话管理
{
  "session": {
    "dmScope": "per-channel-peer",
    "reset": {
      "mode": "daily",
      "atHour": 4,
      "idleMinutes": 120
    }
  }
}
💬配置对话终端(Channels)
DM 安全策略
| 策略 | 说明 | 适用场景 |
|---|---|---|
pairing |
未知发送者获得配对码,需主人批准 | 默认,最安全 |
allowlist |
仅允许列表中的发送者 | 已知联系人 |
open |
允许所有入站 DM | 公开机器人 |
disabled |
忽略所有 DM | 仅群组使用 |
Telegram 配置
{
  "channels": {
    "telegram": {
      "enabled": true,
      "botToken": "your-bot-token",
      "dmPolicy": "pairing",
      "allowFrom": ["tg:123456789"],
      "streaming": "partial"
    }
  }
}
🤖配置多智能体(Multi-Agent)
{
  "agents": {
    "defaults": {
      "workspace": "~/.openclaw/workspace"
    },
    "list": [
      {
        "id": "main",
        "description": "通用助手"
      },
      {
        "id": "coder",
        "workspace": "~/.openclaw/workspace-coder",
        "description": "编程专家"
      }
    ]
  }
}
🧩技能安装
OpenClaw 使用技能系统来扩展功能。技能是可复用的功能模块,可以通过 ClawHub CLI 从 clawhub.com 安装。
💡
技能让你可以一键添加新能力,如图像生成、天气查询、GitHub 操作、视频处理等,无需手动配置每个工具。
安装 ClawHub CLI
首先确保已安装 ClawHub 命令行工具:
npm install -g clawhub
搜索技能
在 ClawHub 上搜索你需要的技能:
# 搜索关键词
clawhub search "postgres backups"
clawhub search "image generation"
clawhub search "weather"
安装技能
找到想要的技能后,使用以下命令安装:
# 安装最新版本
clawhub install baoyu-image-gen

# 安装指定版本
clawhub install baoyu-image-gen --version 1.2.3
管理技能
| 命令 | 说明 | 示例 |
|---|---|---|
clawhub list |
列出已安装的技能 | 查看当前工作空间的所有技能 |
clawhub update <skill> |
更新指定技能到最新版本 | clawhub update baoyu-image-gen |
clawhub update --all |
更新所有技能 | 批量更新所有已安装技能 |
clawhub update --force |
强制更新(忽略版本检查) | 解决版本冲突时使用 |
常用推荐技能
| 技能名称 | 功能 | 安装命令 |
|---|---|---|
baoyu-image-gen |
AI 图像生成(OpenAI、Google、Replicate 等) | clawhub install baoyu-image-gen |
weather |
天气查询和预报 | clawhub install weather |
github |
GitHub 操作(Issues、PR、代码审查) | clawhub install github |
video-frames |
视频帧提取和剪辑 | clawhub install video-frames |
xurl |
X (Twitter) API 操作 | clawhub install xurl |
find-skills |
帮助发现和安装技能 | clawhub install find-skills |
技能工作原理
技能是包含以下内容的文件夹:
my-skill/├── SKILL.md # 技能定义和使用说明└── 其他文件 # 脚本、配置等
✅
安装后,OpenClaw 会自动识别技能能力,并在相关任务触发时自动调用。无需额外配置。
发布自己的技能
如果你有自己开发的技能,可以发布到 ClawHub 分享:
# 登录 ClawHub
clawhub login

# 发布技能
clawhub publish ./my-skill \
  --slug my-skill \
  --name "My Skill" \
  --version 1.0.0 \
  --changelog "Initial release"
⚠️
**注意:**技能默认注册表为 https://clawhub.com,可通过 CLAWHUB_REGISTRY 环境变量或 --registry 参数覆盖。
⌨️常用 CLI 命令
Gateway 管理
# 查看状态
openclaw gateway status

# 启动/停止/重启
openclaw gateway start
openclaw gateway stop
openclaw gateway restart
配置管理
# 运行配置向导
openclaw onboard

# 获取/设置配置值
openclaw config get agents.defaults.workspace
openclaw config set agents.defaults.model.primary "openai/gpt-5.2"
诊断工具
# 健康检查
openclaw doctor

# 自动修复
openclaw doctor --fix

# 查看日志
openclaw logs --follow
🔒安全最佳实践
⚠️
永远不要在未经保护的情况下公开 DM:
使用 dmPolicy: "pairing" 或 allowlist 而非 open
多用户环境
{
  "session": {
    "dmScope": "per-channel-peer"
  }
}
沙盒执行
{
  "agents": {
    "defaults": {
      "sandbox": {
        "mode": "non-main",
        "scope": "agent"
      }
    }
  }
}
🔧故障排除
| 错误 | 原因 | 解决 |
|---|---|---|
Config validation failed |
配置格式错误 | 运行 openclaw doctor |
Unauthorized |
API Key 无效 | 检查 auth 配置 |
Session not found |
会话已过期 | 发送 /new 重置 |
🔗资源链接
- 官网: openclaw.ai
- 文档: docs.openclaw.ai
- GitHub: github.com/openclaw/openclaw
- Discord: discord.gg/clawd
- 技能市场: clawhub.com
📝总结
OpenClaw 是一个功能强大、灵活的个人 AI 助手平台。关键要点:
- Gateway 是核心 - 所有功能都围绕 Gateway 展开
- Workspace 是工作空间 - 保持文件整洁,控制 token 使用
- 配置即代码 -
openclaw.json定义一切行为 - 安全第一 - 默认使用配对模式,谨慎开放 DM
- 多智能体支持 - 可以为不同任务创建专门的助手

小龙虾开发者社区是 CSDN 旗下专注 OpenClaw 生态的官方阵地,聚焦技能开发、插件实践与部署教程,为开发者提供可直接落地的方案、工具与交流平台,助力高效构建与落地 AI 应用
更多推荐

 13
13 0
0- 0


 已为社区贡献2条内容

所有评论(0)