
OpenApi3规范——Jersey集成swagger-jaxrs2实践
OpenAPI规范(OpenAPI Specification 简称OAS)是Linux基金会的一个项目,试图通过定义一种用来描述API格式或API定义的语言,来规范RESTful服务开发过程。目前V3.0版本的OpenAPI规范(也就是SwaggerV2.0规范)已经发布并开源在github上。即swagger2.0是基于The Apache License, Version 2...
OpenAPI规范(OpenAPI Specification 简称OAS)是Linux基金会的一个项目,试图通过定义一种用来描述API格式或API定义的语言,来规范RESTful服务开发过程。目前V3.0版本的OpenAPI规范(也就是SwaggerV2.0规范)已经发布并开源在github上。即swagger2.0是基于 The Apache License, Version 2.0许可的OAS3.0实现。
一、项目构建
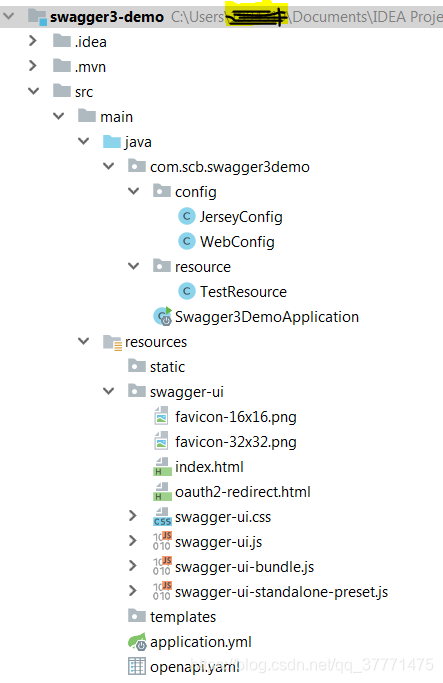
先看下项目结构:
接着,我们直接开始创建项目吧,项目依赖如下:
<?xml version="1.0" encoding="UTF-8"?>
<project xmlns="http://maven.apache.org/POM/4.0.0" xmlns:xsi="http://www.w3.org/2001/XMLSchema-instance"
	xsi:schemaLocation="http://maven.apache.org/POM/4.0.0 http://maven.apache.org/xsd/maven-4.0.0.xsd">
	<modelVersion>4.0.0</modelVersion>
	<parent>
		<groupId>org.springframework.boot</groupId>
		<artifactId>spring-boot-starter-parent</artifactId>
		<version>2.1.6.RELEASE</version>
		<relativePath/> <!-- lookup parent from repository -->
	</parent>
	<groupId>com.scb</groupId>
	<artifactId>swagger3-demo</artifactId>
	<version>0.0.1-SNAPSHOT</version>
	<name>swagger3-demo</name>
	<description>Demo project for Spring Boot</description>

	<properties>
		<java.version>1.8</java.version>
	</properties>

	<dependencies>
		<dependency>
			<groupId>org.springframework.boot</groupId>
			<artifactId>spring-boot-starter-jersey</artifactId>
		</dependency>
		<dependency>
			<groupId>io.swagger.core.v3</groupId>
			<artifactId>swagger-jaxrs2</artifactId>
			<version>2.0.0</version>
		</dependency>
		<dependency>
			<groupId>org.springframework.boot</groupId>
			<artifactId>spring-boot-starter-web</artifactId>
		</dependency>

		<dependency>
			<groupId>org.springframework.boot</groupId>
			<artifactId>spring-boot-starter-test</artifactId>
			<scope>test</scope>
		</dependency>
	</dependencies>

	<build>
		<plugins>
			<plugin>
				<groupId>org.springframework.boot</groupId>
				<artifactId>spring-boot-maven-plugin</artifactId>
			</plugin>
		</plugins>
	</build>

</project>
二、配置
1、在application.yml中做如下配置,将Jersey的根路径配置为/rest。也可以使用@ApplicationPath("/rest")配置。
spring:
  jersey:
    application-path: rest
2、JerseyConfig
package com.scb.swagger3demo.config;

import com.scb.swagger3demo.resource.TestResource;
import io.swagger.v3.jaxrs2.integration.resources.AcceptHeaderOpenApiResource;
import io.swagger.v3.jaxrs2.integration.resources.OpenApiResource;
import org.glassfish.jersey.server.ResourceConfig;
import org.springframework.beans.factory.annotation.Value;
import org.springframework.stereotype.Component;

@Component
public class JerseyConfig extends ResourceConfig {

    @Value("${spring.jersey.application-path}")
    private String apiPath;

    public JerseyConfig() {
        // open api
        register(OpenApiResource.class);
        register(AcceptHeaderOpenApiResource.class);
        // resource
        register(TestResource.class);
    }

}
这里需要注册两个类,OpenApiResource和AcceptHeaderOpenApiResource,用于集成Swagger。然后注册一个TestResource,作为资源对象。
3、TestResource资源类
package com.scb.swagger3demo.resource;

import io.swagger.v3.oas.annotations.Operation;
import io.swagger.v3.oas.annotations.Parameter;
import io.swagger.v3.oas.annotations.media.Content;
import io.swagger.v3.oas.annotations.media.Schema;
import io.swagger.v3.oas.annotations.responses.ApiResponse;
import org.springframework.stereotype.Component;

import javax.ws.rs.*;
import javax.ws.rs.core.MediaType;

@Component
@Path("/test")
public class TestResource {
    @GET
    @Path("/{name}")
    @Produces(MediaType.APPLICATION_JSON)
    @Consumes(MediaType.APPLICATION_JSON)
    @Operation(summary = "OpenApi 3 test",
            tags = {"TestResource"},
            responses = {
                    @ApiResponse(description = "return Hello world",content = @Content(schema = @Schema(implementation = String.class)))
            })
    public String findByName(@Parameter(description = "name",required = true) @PathParam(value = "name") String name) {
        return "Hello world.Hey "+name;
    }
}
到这里,一个简单的Jersey集成Swagger已经搭建完成。运行项目,访问http://localhost:8080/rest/openapi.json即可得到Api文档。
然后,我们接着看如何集成swagger-ui。
三、Swagger-ui集成
1、swagger-ui下载
从swagger-ui官网:https://github.com/swagger-api/swagger-ui下载zip包。然后解压缩,将dist目录下的文件按照开头项目结构所示复制进去。
注意:需要修改swagger-ui的index.html,在index.html中找到url,将其改为
url: "/rest/openapi.json",这是项目openapi.json的路径。
2、配置访问swagger-ui路径
package com.scb.swagger3demo.config;

import org.springframework.context.annotation.Configuration;
import org.springframework.web.servlet.config.annotation.EnableWebMvc;
import org.springframework.web.servlet.config.annotation.ResourceHandlerRegistry;
import org.springframework.web.servlet.config.annotation.WebMvcConfigurer;

@Configuration
@EnableWebMvc
public class WebConfig implements WebMvcConfigurer {
    @Override
    public void addResourceHandlers(ResourceHandlerRegistry registry) {
        registry.addResourceHandler("/swagger-ui/**").addResourceLocations("classpath:/swagger-ui/");
    }
}
3、新建openapi.yaml
resourcePackages:
- com.scb.swagger3demo
prettyPrint: true
cacheTTL: 0

openAPI:
  info:
    version: '0.0.1-SNAPSHOT'
    title: swagger3-demo
    description: 'swagger3 demo api document'
    termsOfService: http://swagger.io/terms/
    license:
      name: Apache 2.0
      url: http://www.apache.org/licenses/LICENSE-2.0.html
There are several ways to provide configuration; probably the easiest and least intrusive way is adding a yaml (or json) file named
openapi.yamloropenapi-configuration.yamlto the classpath of your application。
上面是官网推荐方式来配置Swagger,也是最简单侵入最少的方式。如果你喜欢Java Config的话,也可以使用JAX-RS Application来配置:
package com.scb.swagger3demo.config;

import io.swagger.v3.jaxrs2.integration.JaxrsOpenApiContextBuilder;
import io.swagger.v3.oas.integration.OpenApiConfigurationException;
import io.swagger.v3.oas.integration.SwaggerConfiguration;
import io.swagger.v3.oas.models.OpenAPI;
import io.swagger.v3.oas.models.info.Contact;
import io.swagger.v3.oas.models.info.Info;
import io.swagger.v3.oas.models.info.License;
import org.springframework.stereotype.Component;

import javax.servlet.ServletConfig;
import javax.ws.rs.ApplicationPath;
import javax.ws.rs.core.Application;
import javax.ws.rs.core.Context;
import java.util.stream.Collectors;
import java.util.stream.Stream;

@Component
@ApplicationPath("/rest")
public class SwaggerConfig extends Application {

    public SwaggerConfig(@Context ServletConfig servletConfig) {
        super();
        OpenAPI oas = new OpenAPI();
        Info info = new Info()
                .title("Swagger Sample App bootstrap code")
                .description("This is a sample server Petstore server.  You can find out more about Swagger " +
                        "at [http://swagger.io](http://swagger.io) or on [irc.freenode.net, #swagger](http://swagger.io/irc/).  For this sample, " +
                        "you can use the api key `special-key` to test the authorization filters.")
                .termsOfService("http://swagger.io/terms/")
                .contact(new Contact()
                        .email("apiteam@swagger.io"))
                .license(new License()
                        .name("Apache 2.0")
                        .url("http://www.apache.org/licenses/LICENSE-2.0.html"));

        oas.info(info);
        SwaggerConfiguration oasConfig = new SwaggerConfiguration()
                .openAPI(oas)
                .prettyPrint(true)
                .resourcePackages(Stream.of("com.scb.swagger3demo").collect(Collectors.toSet()));

        try {
            new JaxrsOpenApiContextBuilder()
                    .servletConfig(servletConfig)
                    .application(this)
                    .openApiConfiguration(oasConfig)
                    .buildContext(true);
        } catch (OpenApiConfigurationException e) {
            throw new RuntimeException(e.getMessage(), e);
        }

    }
}
更多配置方式请参考:Swagger-2.X Configuration
四、运行结果
至此,一个完整的Jersey集成swagger已经开发完成。运行项目,访问http://localhost:8080/swagger-ui/index.html,即可得到如下界面:


旨在为数千万中国开发者提供一个无缝且高效的云端环境,以支持学习、使用和贡献开源项目。
更多推荐


 2
2 0
0- 0


 已为社区贡献2条内容

所有评论(0)