Centos 7 安装部署elasticsearch-6.5.2教程
ElasticSearch简介什么是ElasticSearch:ElasticSearch是基于Apache Lucene构建的开源搜索引擎采用Java编写,提供了简单易用的RESTFul API轻松的横向扩展,可支持PB级的结构化或非结构化的数据处理应用场景:海量数据分析引擎站内搜索引擎作为数据仓库文档地址:https://www.elastic.co/gu...
ElasticSearch简介
什么是ElasticSearch:
- ElasticSearch是基于Apache Lucene构建的开源搜索引擎
- 采用Java编写,提供了简单易用的RESTFul API
- 轻松的横向扩展,可支持PB级的结构化或非结构化的数据处理
应用场景:
- 海量数据分析引擎
- 站内搜索引擎
- 作为数据仓库
文档地址:https://www.elastic.co/guide/en/ ... etting-started.html
部署环境:
centos 7 x64位、elasticsearch 6.5.2版本、jdk 1.8.0.191
1:安装jdk 1.8.0
ElasticSearch对JRE的版本是敏感的,错误的版本,会导致ElasticSearch无法运行。
【实战】Centos 7 安装Java JDK教程
https://www.itsvse.com/thread-6169-1-1.html
(出处: 架构师_程序员)
2:下载并运行ElasticSearch 6.5.2
下载地址页面:https://www.elastic.co/downloads/elasticsearch
- --下载
- wget https://artifacts.elastic.co/downloads/elasticsearch/elasticsearch-6.5.2.tar.gz
- --解压到/usr/local/目录下面
- tar -zxvf elasticsearch-6.5.2.tar.gz -C /usr/local/
- --进入到/usr/local/目录
- cd /usr/local/elasticsearch-6.5.2/
复制代码
- --运行,如果想后台运行后面加 -d
- ./bin/elasticsearch
复制代码
[root@VM_0_9_centos elasticsearch-6.5.2]# ./bin/elasticsearch
OpenJDK 64-Bit Server VM warning: If the number of processors is expected to increase from one, then you should configure the number of parallel GC threads appropriately using -XX:ParallelGCThreads=N
[2018-12-11T15:24:27,847][WARN ][o.e.b.ElasticsearchUncaughtExceptionHandler] [unknown] uncaught exception in thread [main]
org.elasticsearch.bootstrap.StartupException: java.lang.RuntimeException: can not run elasticsearch as root
at org.elasticsearch.bootstrap.Elasticsearch.init(Elasticsearch.java:140) ~[elasticsearch-6.5.2.jar:6.5.2]
at org.elasticsearch.bootstrap.Elasticsearch.execute(Elasticsearch.java:127) ~[elasticsearch-6.5.2.jar:6.5.2]
at org.elasticsearch.cli.EnvironmentAwareCommand.execute(EnvironmentAwareCommand.java:86) ~[elasticsearch-6.5.2.jar:6.5.2]
at org.elasticsearch.cli.Command.mainWithoutErrorHandling(Command.java:124) ~[elasticsearch-cli-6.5.2.jar:6.5.2]
at org.elasticsearch.cli.Command.main(Command.java:90) ~[elasticsearch-cli-6.5.2.jar:6.5.2]
at org.elasticsearch.bootstrap.Elasticsearch.main(Elasticsearch.java:93) ~[elasticsearch-6.5.2.jar:6.5.2]
at org.elasticsearch.bootstrap.Elasticsearch.main(Elasticsearch.java:86) ~[elasticsearch-6.5.2.jar:6.5.2]
Caused by: java.lang.RuntimeException: can not run elasticsearch as root
at org.elasticsearch.bootstrap.Bootstrap.initializeNatives(Bootstrap.java:103) ~[elasticsearch-6.5.2.jar:6.5.2]
at org.elasticsearch.bootstrap.Bootstrap.setup(Bootstrap.java:170) ~[elasticsearch-6.5.2.jar:6.5.2]
at org.elasticsearch.bootstrap.Bootstrap.init(Bootstrap.java:333) ~[elasticsearch-6.5.2.jar:6.5.2]
at org.elasticsearch.bootstrap.Elasticsearch.init(Elasticsearch.java:136) ~[elasticsearch-6.5.2.jar:6.5.2]
... 6 more

Elasticsearch 要求不能使用超级用户root运行,所以我们随便建立一个账号,我这里就得用户为es
- --创建es账户
- adduser es
- --修改密码
- passwd es
- --给es用户elasticsearch目录的授权。
- chown -R es /usr/local/elasticsearch-6.5.2/
- 或则
- --将 /usr/local/elasticsearch-6.5.2/ 的拥有者设置为 es
- chown -R es:es /usr/local/elasticsearch-6.5.2/
- --切换到 es 用户,启动elasticsearch
- su es
- --启动elasticsearch
- ./bin/elasticsearch
复制代码
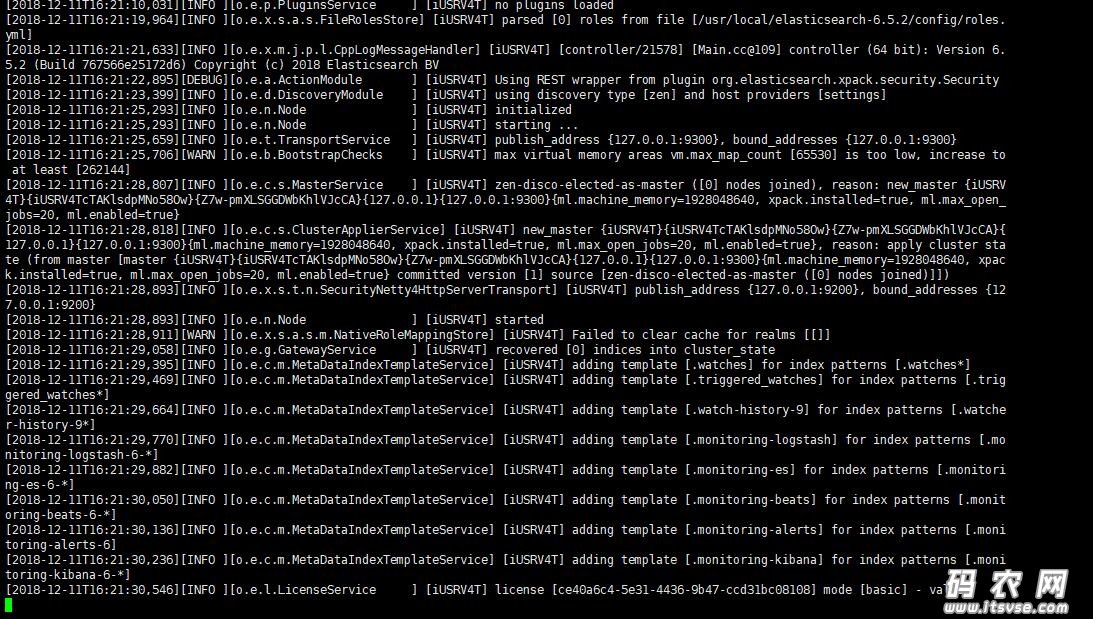
如果没有没有error,就运行成功啦
新开一个终端,用curl访问
在确定服务器端口(9200)开启,elasticsearch启动的情况下(ps -ef | grep elasticsearch)可以在浏览器中访问
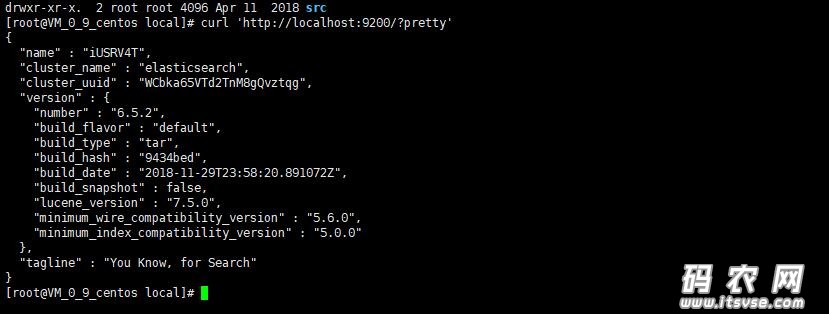
[root@VM_0_9_centos local]# curl 'http://localhost:9200/?pretty'
{
"name" : "iUSRV4T",
"cluster_name" : "elasticsearch",
"cluster_uuid" : "WCbka65VTd2TnM8gQvztqg",
"version" : {
"number" : "6.5.2",
"build_flavor" : "default",
"build_type" : "tar",
"build_hash" : "9434bed",
"build_date" : "2018-11-29T23:58:20.891072Z",
"build_snapshot" : false,
"lucene_version" : "7.5.0",
"minimum_wire_compatibility_version" : "5.6.0",
"minimum_index_compatibility_version" : "5.0.0"
},
"tagline" : "You Know, for Search"
}
3:通过外网访问elasticsearch
编辑elasticsearch的配置文件
- vim ./config/elasticsearch.yml
复制代码
找到network.host: 一行,去除#号,修改为:
- network.host: 0.0.0.0
复制代码
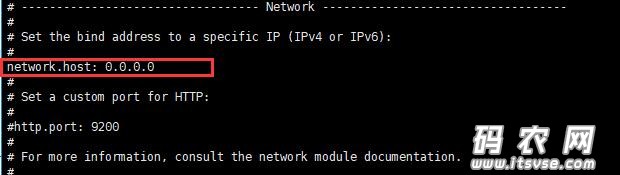
(network.host: [_local_, 172.30.6.1] 172.30.6.1为指定的ip地址,可以是多个。未测试)
重新启动elasticsearch即可,然后就可以外网访问http://ip:9200 界面了。
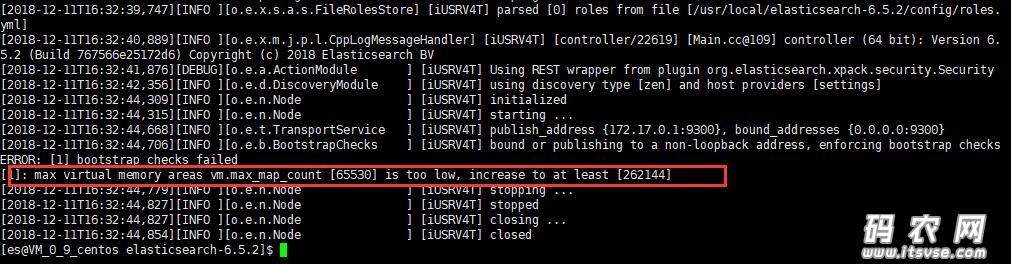
可能遇到的错误:
错误一
max virtual memory areas vm.max_map_count [65530] is too low, increase to at least [262144]
max_map_count 的值是指一个进程最多可用于的内存映射区(memory map areas),在调用malloc会用到,由mmap/mprotect生成。
解决方法 提高vm.max_map_count 的大小:
- # 切换到root用户
- vim /etc/sysctl.conf
- # 在最后面追加下面内容
- vm.max_map_count = 655360
- # 使用 sysctl -p 使其生效,并查看修改后的结果
- sysctl -p
复制代码
错误二
max file descriptors [4096] for elasticsearch process is too low, increase to at least [65536]
解决办法
- #切换到root用户修改
- vim /etc/security/limits.conf
- # 在最后面追加下面内容
- es hard nofile 65536
- es soft nofile 65536
复制代码
修改后重新登录 es 用户,使用如下命令查看是否修改成功
- ulimit -Hn
- 65536
复制代码
错误三
Java HotSpot(TM) 64-Bit Server VM warning: INFO: os::commit_memory(0x0000000085330000, 2060255232, 0) failed; error='Cannot allocate memory' (errno=12)
解决办法
- # 由于elasticsearch5.0默认分配jvm空间大小为2g,修改jvm空间分配
- # 如果使用虚拟机安装,内存最好不小于2G
- # vim config/jvm.options
- -Xms512m
- -Xmx512m
复制代码
在阿里云上可能出现的问题:
system call filters failed to install; check the logs and fix your configuration or disable system call filters at your own risk
解决方法:在elasticsearch配置中加入下面命令即可
- bootstrap.system_call_filter: false
复制代码

CSDN联合极客时间,共同打造面向开发者的精品内容学习社区,助力成长!
更多推荐


 0
0 0
0- 0


 已为社区贡献1条内容

所有评论(0)