SpringBoot2 + Swagger2 2.9.2
我们提供Restful接口的时候,API文档是尤为的重要,它承载着对接口的定义,描述等。它还是和API消费方沟通的重要工具。在实际情况中由于接口和文档存放的位置不同,我们很难及时的去维护文档。个人在实际的工作中就遇到过很多接口更新了很久,但是文档却还是老版本的情况,其实在这个时候这份文档就已经失去了它存在的意义。而Swagger是目前我见过的最好的API文档生成工具,使用起来也很方便,还可以直接.
我们提供Restful接口的时候,API文档是尤为的重要,它承载着对接口的定义,描述等。它还是和API消费方沟通的重要工具。在实际情况中由于接口和文档存放的位置不同,我们很难及时的去维护文档。个人在实际的工作中就遇到过很多接口更新了很久,但是文档却还是老版本的情况,其实在这个时候这份文档就已经失去了它存在的意义。而Swagger是目前我见过的最好的API文档生成工具,使用起来也很方便,还可以直接调试我们的API。我们今天就来看下Swagger2与SpringBoot的结合。
准备:
'io.springfox:springfox-swagger2:2.9.2'
'io.springfox:springfox-swagger-ui:2.9.2'
Swagger配置:
/**
* @author TanChong
* create date 2019\6\10 0010
*/
@Configuration
@EnableSwagger2
@ConditionalOnExpression("${swagger.enable}")
public class Swagger2Config extends WebMvcConfigurationSupport {
@Value("${swagger.enable}") private boolean enable;
@Bean
public Docket createAccepterRestApi() {
return new Docket(DocumentationType.SWAGGER_2)
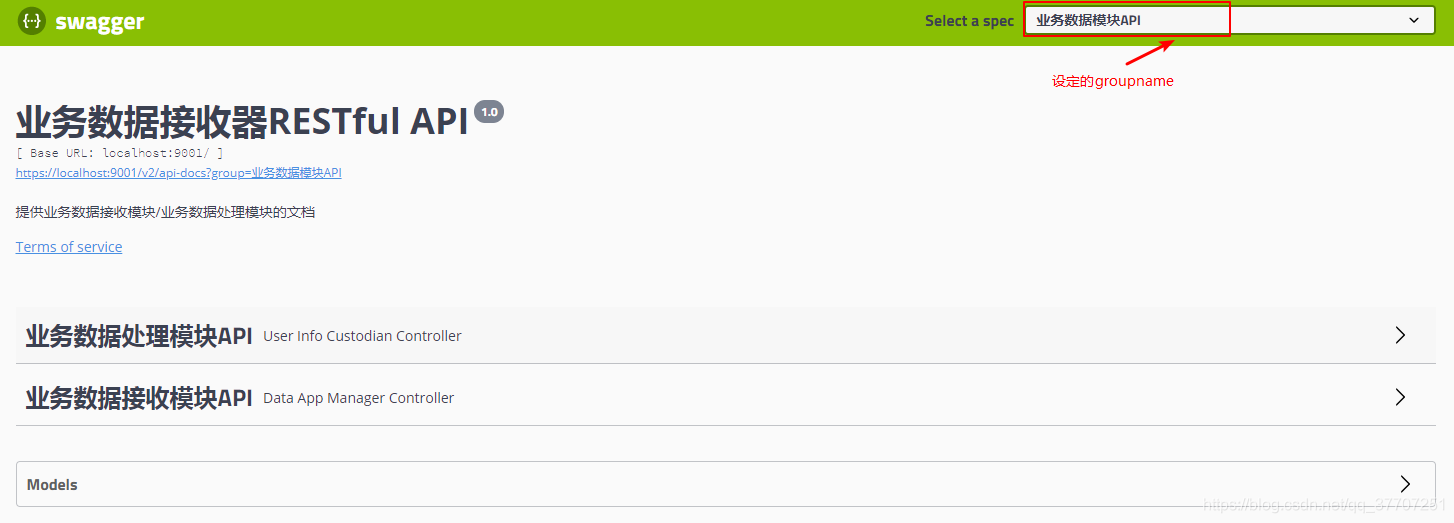
.groupName("业务数据模块API")//分组名,不指定默认为default
.select()
// .apis(RequestHandlerSelectors.withClassAnnotation(Api.class))
.apis(RequestHandlerSelectors.basePackage("cn.waner.kexin.business_receiver"))// 扫描的包路径
.paths(PathSelectors.any())// 定义要生成文档的Api的url路径规则
.build()
.apiInfo(apiInfo())// 设置swagger-ui.html页面上的一些元素信息
.enable(true);
}
private ApiInfo apiInfo() {
return new ApiInfoBuilder()
.title("业务数据接收器RESTful API")
.description("提供业务数据接收模块/业务数据处理模块的文档")
.termsOfServiceUrl("http://127.0.0.1:8080/")
.version("1.0")
.build();
}
//addResourceHandlers方法添加了两个资源处理程序,
//这段代码的主要作用是对Swagger UI的支持。(访问接口页面为空白时可加上)
@Override
protected void addResourceHandlers(ResourceHandlerRegistry registry) {
registry.addResourceHandler("swagger-ui.html")
.addResourceLocations("classpath:/META-INF/resources/");
registry.addResourceHandler("/webjars/**")
.addResourceLocations("classpath:/META-INF/resources/webjars/");
}
}API文档部分:
/**
 * @author TanChong
 * create date 2019\6\28 0028
 */
@RestController
@CrossOrigin
@Api(tags = "业务数据处理模块API")
@RequestMapping("/api/v1/user_info_custodian")
public class UserInfoCustodianController {

    private static final Logger LOGGER = LoggerFactory.getLogger(UserInfoCustodianController.class);
    private UserInfoCustodianService userInfoCustodianService;

    @Autowired
    public UserInfoCustodianController(UserInfoCustodianService userInfoCustodianService) {
        this.userInfoCustodianService = userInfoCustodianService;
    }

    @ApiOperation(value = "用户监听策略更新时响应")
    @ApiImplicitParams({
            @ApiImplicitParam(name = "configName",value = "策略匹配url", required = true),
            @ApiImplicitParam(name = "configUrl",value = "策略匹配url", required = true),
            @ApiImplicitParam(name = "assetsId",value = "资产ID", required = true)
    })
    @PostMapping("/unconventionality")
    public void unconventionalityCustodian(@RequestBody AppUserConfigParam appUserConfigParam){
        userInfoCustodianService.unconventionalityCustodian(appUserConfigParam);
    }
}
这个Controller里面多了很多新的注解,比如说@Api,@ApiOperation等,下面我们就来一一解释一下
@Api,这个注解是用在Controller类上面的,可以对Controller做必要的说明。
@ApiOperation,作用在具体的方法上,其实就是对一个具体的API的描述。
@ApiParam,对API参数的描述。
到这里,其实我们的Swagger就已经可以有效果了,让我们将项目运行起来先看看效果。访问https://localhost:port/swagger-ui.html即可。
Model
在上面的图中可以看到在页面的下方有一个Models的标签,这个就是我们API中出现的一些对象的文档,我们也可以通过注解来对这些对象中的字段做一些说明,以方便使用者理解。
/**
 * 策略模型参数
 * [ 为什么会存在这个模型? 别问 我就是想使用一下@RequestBody ]
 * @author TanChong
 * create date 2019\6\29 0029
 */
@ApiModel(description = "策略模型参数")
public class AppUserConfigParam {

    //策略名称
    @ApiModelProperty(notes = "策略名称") private String configName;
    // 策略匹配url
    @ApiModelProperty(notes = "策略匹配url") private String configUrl;
    // 资产id
    @ApiModelProperty(notes = "资产id") private String assetsId;

    public String getConfigName() {
        return configName;
    }

    public void setConfigName(String configName) {
        this.configName = configName;
    }

    public String getConfigUrl() {
        return configUrl;
    }

    public void setConfigUrl(String configUrl) {
        this.configUrl = configUrl;
    }

    public String getAssetsId() {
        return assetsId;
    }

    public void setAssetsId(String assetsId) {
        this.assetsId = assetsId;
    }

    @Override
    public String toString() {
        return "AppUserConfigParam{" +
                "configName='" + configName + '\'' +
                ", configUrl='" + configUrl + '\'' +
                ", assetsId='" + assetsId + '\'' +
                '}';
    }
}
误区:
可能会有很大像我一样粗心的猿,误以为model类只要添加了相关注解,在https://localhost:port/swagger-ui.html即可看到其详细信息,其实不然,只有当你controller中使用到了次model,swagger才会帮你处理。就如以上接口中只使用了AppUserConfigParam 所以我页面上只展示了AppUserConfigParam 这个model的详情

现在我们对上文中展示的controller做一点点小修改
/**
 * @author TanChong
 * create date 2019\6\28 0028
 */
@RestController
@CrossOrigin
@Api(tags = "业务数据处理模块API")
@RequestMapping("/api/v1/user_info_custodian")
public class UserInfoCustodianController {

    private static final Logger LOGGER = LoggerFactory.getLogger(UserInfoCustodianController.class);
    private UserInfoCustodianService userInfoCustodianService;

    @Autowired
    public UserInfoCustodianController(UserInfoCustodianService userInfoCustodianService) {
        this.userInfoCustodianService = userInfoCustodianService;
    }

    @ApiOperation(value = "用户监听策略更新时响应")
    @ApiImplicitParams({
            @ApiImplicitParam(name = "configName",value = "策略匹配url", required = true),
            @ApiImplicitParam(name = "configUrl",value = "策略匹配url", required = true),
            @ApiImplicitParam(name = "assetsId",value = "资产ID", required = true)
    })
    @PostMapping("/unconventionality")
    public void unconventionalityCustodian(@RequestBody AppUserConfigParam appUserConfigParam){
        userInfoCustodianService.unconventionalityCustodian(appUserConfigParam);
    }
    // 新加入的接口 // 别找了 改动在这里
    @ApiModelProperty(value = "添加用户监听数据")
    @PostMapping("/app_user")
    public void createAppUsers(@RequestBody AppUsers appUsers){

    }
}
使用到的Model:
/**
 * @author TanChong
 * create date 2019\6\28 0028
 */
@Document("app_users")
@ApiModel("描述")
public class AppUsers {

    @Id
    @ApiModelProperty("Objectid") private ObjectId id;

    @Field("config_id")
    @ApiModelProperty("策略ID") private ObjectId configId;

    @Field("data_app_id")
    @ApiModelProperty("业务数据ID") private ObjectId dataAppId;

    @Field("users_name")
    @ApiModelProperty("关键字") private String usersName;

    @Field("users_auth_body")
    @ApiModelProperty("策略主体") private String usersAuthBody;

    @Field("insert_time")
    @ApiModelProperty("数据插入时间") private Long insertTime;
}
现在我们重启项目再查看一下页面展示情况

好了文章到这里就结束了,有什么问题可以留言我们一起交流,觉得OK的话可以关注一下一起学习~_~

助力广东及东莞地区开发者,代码托管、在线学习与竞赛、技术交流与分享、资源共享、职业发展,成为松山湖开发者首选的工作与学习平台
更多推荐

 1
1 0
0- 0


 已为社区贡献6条内容

所有评论(0)