
Cas认证4.2.7版本完整部署流程(以及cas-server-support-oaut,cas-server-support-pac4j-webflow扩展)
一:拉取代码https://github.com/apereo/cas/releases/tag/v4.2.7点击Overlay下面的链接,然后选择合适的版本,我选择的是maven版本的,gradle版本的没有试,应该差不多,我的maven版本是3.6.0,然后点击download zip,提示一下,使用git clone的话,会下载gradle版本的解压文件后,找到pom文件...
一:拉取代码
https://github.com/apereo/cas/releases/tag/v4.2.7
点击Overlay下面的链接,然后选择合适的版本,我选择的是maven版本的,gradle版本的没有试,应该差不多,我的maven版本是3.6.0,然后点击download zip,
提示一下,使用git clone的话,会下载gradle版本的

解压文件后,找到pom文件,在pom文件的同级目录执行
1.1 打入两个扩展的包(没有要求这两个包的,这个步骤可以略过)
这两个扩展的文档地址,这个主要是oauth2.0,没有要求的可以不使用这两个包
在拉取到本地的文件的pom文件里打入
<dependency>
    <groupId>org.jasig.cas</groupId>
    <artifactId>cas-server-support-pac4j-webflow</artifactId>
    <version>${cas.version}</version>
</dependency>
<dependency>
<groupId>org.jasig.cas</groupId>
<artifactId>cas-server-support-oauth</artifactId>
<version>${cas.version}</version>
</dependency>1.2 mvn install
然后会生成target文件夹,里面有个cas.war就是我们需要的文件
二:实现https方式
应为cas单点登陆服务默认是使用https,所以我们要在本地生成证书,当然也可以修改配置文件使用http,后面我会粘贴一份文档,里面有详细的说明
生成秘钥库
keytool    -genkeypair   -alias    "root"   -keyalg    "RSA"    -keystore     "/opt/keystore/tomcat.keystore"
-alias 是我们自己设置的,可以设置为自己任意的名称
生成秘钥库的时候会让我们输入一个用户名,这个用户名一定要写成域名,然后等会儿还要在hosts文件里面映射到自己的ip地址上。这个步骤一定要记牢,不然后面配置cas客户端的话会回调失败
/opt/keystore/tomcat.keystore 是我们要生成的密钥库的位置及文件名称
生成密钥库会让我们设置密码,这个密码记下来,等会儿会用
使用秘钥库导出证书
keytool -export -trustcacerts -alias root -file /opt/keystore/root.cer -keystore /opt/keystore/tomcat.keystore
使用刚才的密钥库生成证书
alias 为生成密钥库时自己设置的名称
-file 是我们要生成证书的位置及名称
-keystore 是我们刚才生成的密钥库
将证书导入jdk   需要输入密码:changeit
keytool -import -trustcacerts -alias root -file /opt/keystore/root.cer -keystore /opt/jdk1.8.0_171/jre/lib/security/cacerts
将我们生成的的证书导入jdk中,会提示我们输入密码,密码为changeit
三:部署cas.war
3.1 启动https
解压tomcat7,并且开启https,在apache-tomcat-7.0.94/conf/server.xml大概在105行里面配置如下
<Connector port="443" protocol="org.apache.coyote.http11.Http11Protocol"
               maxThreads="150" SSLEnabled="true" scheme="https" secure="true"
               keystoreFile="/opt/keystore/tomcat.keystore" keystorePass="123456"
                clientAuth="false" sslProtocol="TLS" />
说明一下。443端口是https的默认端口,设置为443端口,如果使用其他的端口则需要在浏览器声明
keystoreFile 是我们的密钥库
keystorePass 是我们生成密钥库的时候设置的密码
测试
启动tomcat,访问https://127.0.0.1:443 成功访问tomcat就配置https成功
3.2 部署cas.war
首先解压我们下载好的tomcat,我使用的是tomcat7
将最开始解压的出啦的cas.war拉取到tomcat/webapps下,启动tomcat会自动生成一个cas文件夹
提示一下:启动tomcat在tomcat/bin
里面的catalina.sh startup.sh都是启动文件
catalina.sh 为前台启动 执行sh catalina.sh run
startup.sh 为后台启动 直接执行就行
cas4.2.7版本默认webapps下面的cas文件夹是没有cas的配置文件的,我们需要到一开始mvn install 生成的target中拉取
到\target\war\work\org.jasig.cas\cas-server-webapp\WEB-INF下面有cas.properties文件,复制到tapache-tomcat-7.0.94/webapps/cas/WEB-INF下面
我们自己复制的cas配置文件,cas系统默认不知道,我们需要自己声明
在cas/WEB-INF/spring-configuration/propertyFileConfigurer.xml里面的倒数第三行指定刚才的cas-properties的绝对路径

3.2.1 导入两个扩展的内容(如果没有要求导入这两个扩展,这个步骤也不用操作)
首先创建WEB-INF/spring-configuration/pac4jContext.xml文件
具体内容如下:
<?xml version="1.0" encoding="UTF-8"?>
<!--

    Licensed to Jasig under one or more contributor license
    agreements. See the NOTICE file distributed with this work
    for additional information regarding copyright ownership.
    Jasig licenses this file to you under the Apache License,
    Version 2.0 (the "License"); you may not use this file
    except in compliance with the License.  You may obtain a
    copy of the License at the following location:

      http://www.apache.org/licenses/LICENSE-2.0

    Unless required by applicable law or agreed to in writing,
    software distributed under the License is distributed on an
    "AS IS" BASIS, WITHOUT WARRANTIES OR CONDITIONS OF ANY
    KIND, either express or implied.  See the License for the
    specific language governing permissions and limitations
    under the License.

-->
<beans xmlns="http://www.springframework.org/schema/beans"
       xmlns:xsi="http://www.w3.org/2001/XMLSchema-instance"
       xmlns:p="http://www.springframework.org/schema/p"
       xmlns:util="http://www.springframework.org/schema/util"
       xsi:schemaLocation="http://www.springframework.org/schema/beans http://www.springframework.org/schema/beans/spring-beans.xsd
       http://www.springframework.org/schema/util http://www.springframework.org/schema/util/spring-util.xsd">

    <description>
        Log4J initialization.  Configuration options are sourced from cas.properties.  This allows deployers to externalize
        both cas.properties and log4j.xml, so that a single cas.war file can be deployed to multiple tiers or hosts without
        having to do any post configuration.  This approach helps to preserve configuration between upgrades.

        Deployers should not have to edit this file.
   </description>
<!--
    <bean id="log4jInitialization" class="org.springframework.beans.factory.config.MethodInvokingFactoryBean"
        p:targetClass="org.springframework.util.Log4jConfigurer" p:targetMethod="initLogging" p:arguments-ref="arguments"/>

    <util:list id="arguments">
       <value>${log4j.config.location:classpath:log4j.xml}</value>
       <value>${log4j.refresh.interval:60000}</value>
    </util:list>
-->
<bean id="facebook1" class="org.pac4j.oauth.client.FacebookClient">
  <property name="key" value="fbkey" />
  <property name="secret" value="fbsecret" />
  <property name="scope"
    value="email,user_likes,user_about_me,user_birthday,user_education_history,user_hometown" />
  <property name="fields"
    value="id,name,first_name,middle_name,last_name,gender,locale,languages,link,username,third_party_id,timezone,updated_time" />
</bean>

<bean id="twitter1" class="org.pac4j.oauth.client.TwitterClient">
  <property name="key" value="twkey" />
  <property name="secret" value="twsecret" />
</bean>

<bean id="caswrapper1" class="org.pac4j.oauth.client.CasOAuthWrapperClient">
  <property name="key" value="this_is_the_key" />
  <property name="secret" value="this_is_the_secret" />
  <property name="casOAuthUrl" value="http://mycasserver2/oauth2.0" />
</bean>

<bean id="cas1" class="org.pac4j.cas.client.CasClient">
  <property name="casLoginUrl" value="http://mycasserver2/login" />
</bean>
<!--
<bean id="myopenid1" class="org.pac4j.openid.client.MyOpenIdClient" />
-->
</beans>
还需要导入另外一个扩展
在apache-tomcat-7.0.94\webapps\cas\WEB-INF下的web.xml导入
<servlet-mapping>
  <servlet-name>cas</servlet-name>
  <url-pattern>/oauth2.0/*</url-pattern>
</servlet-mapping>
3.2.2 测试
先关闭tomcat 然后再重启tomcat
访问地址
这里的itheima.com是我在hosts文件里映射的
127.0.0.1 itheima.com 复制到hosts文件就好了
https://itheima.com:443/cas/login
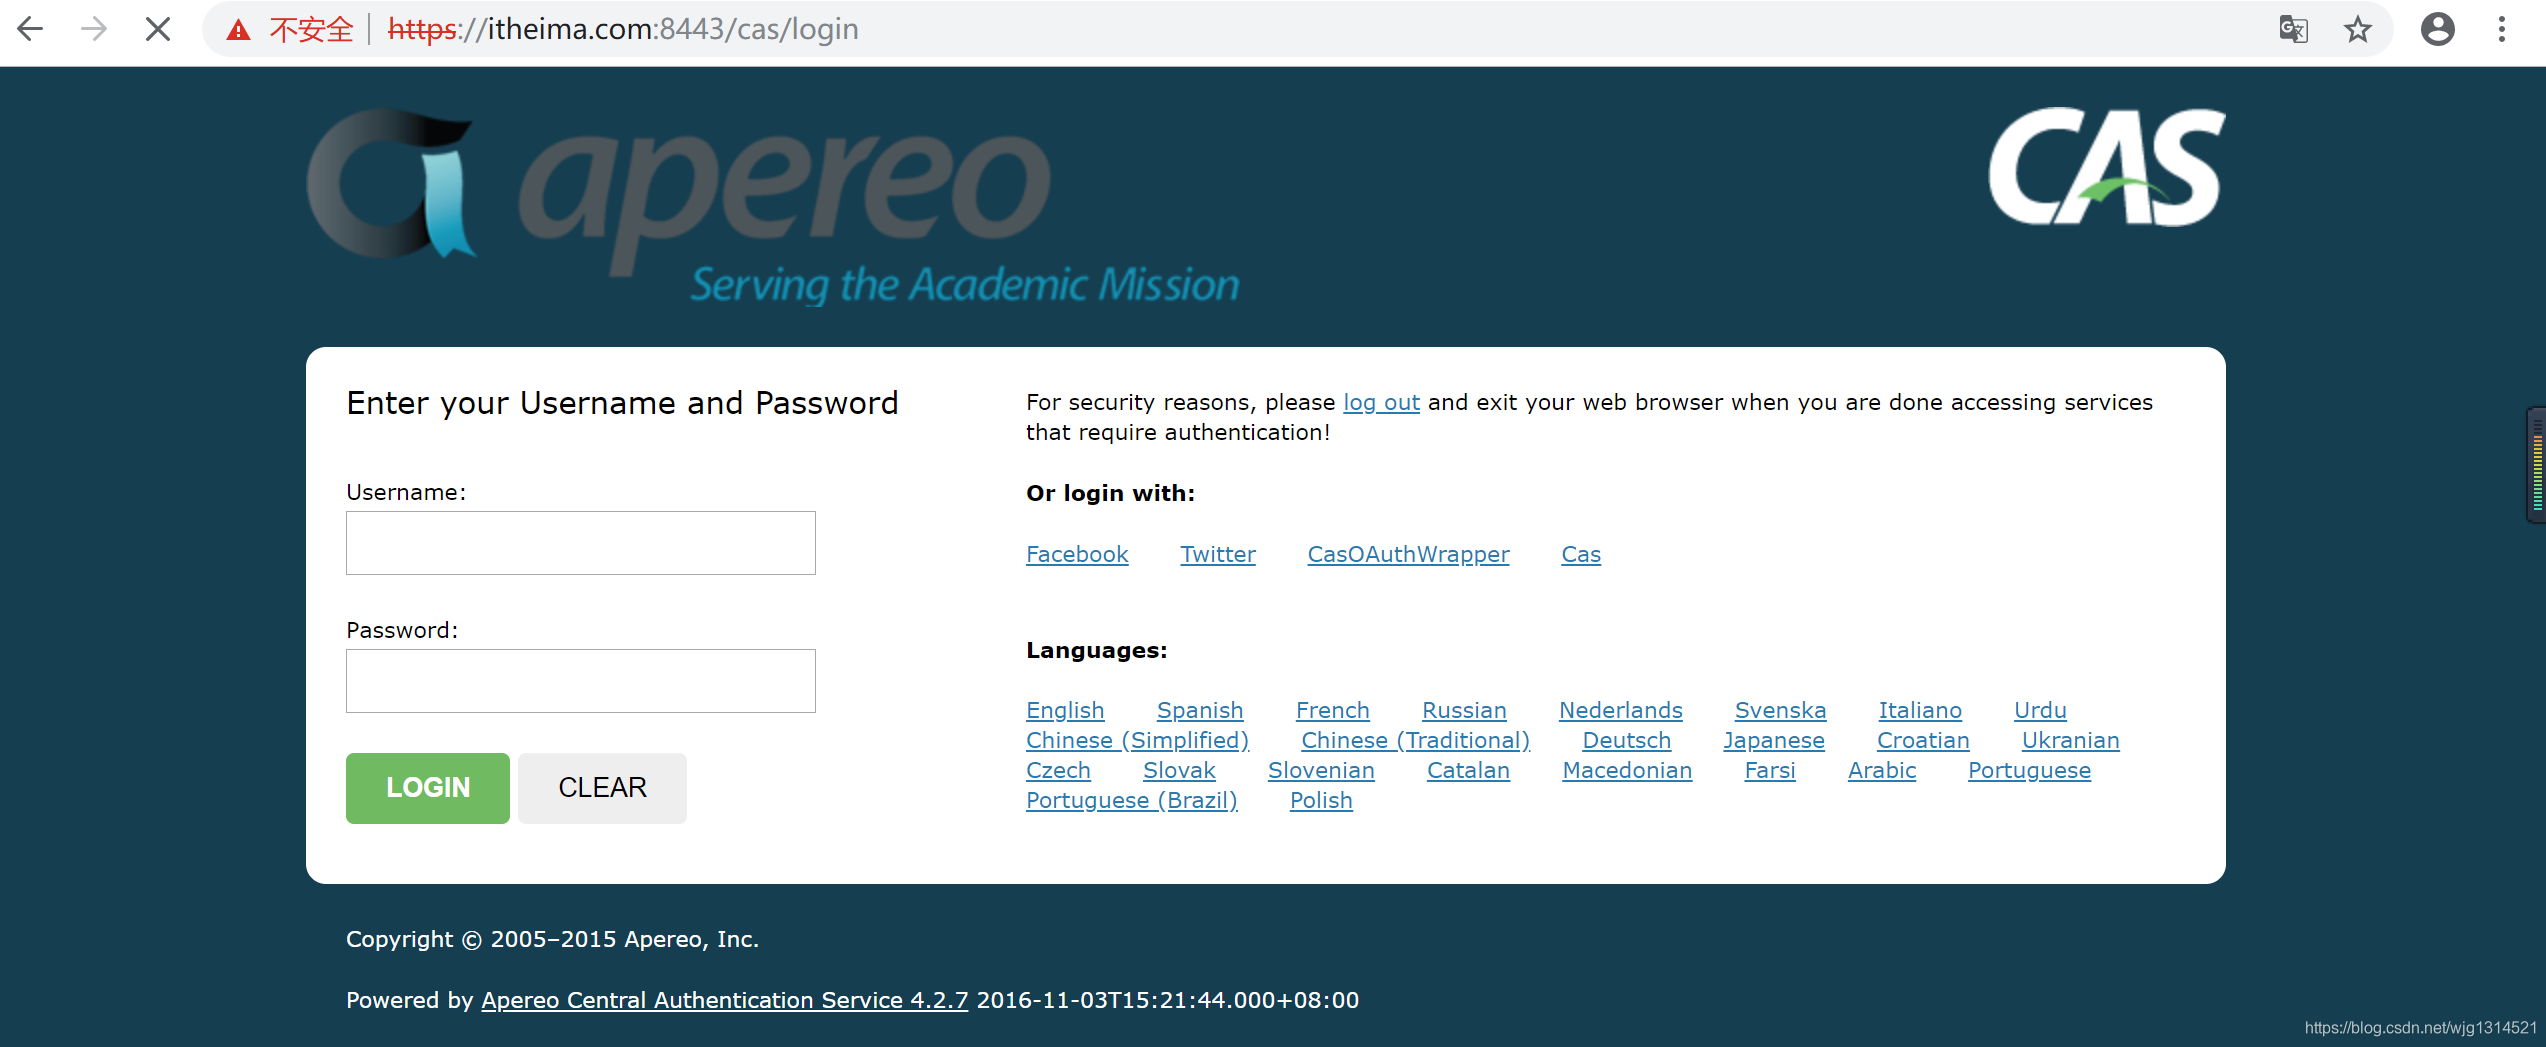
出现如上页面即为正确
默认登录是casuser Mellon ,不过我们需要连接数据库
3.3 配置数据库连接
找到cas/WEB_INFO/deploymentConfigContext.xml找到32行
![]()
注释掉或者删掉
配置数据源
<bean id="MD5PasswordEncoder" class="org.jasig.cas.authentication.handler.DefaultPasswordEncoder" autowire="byName">
<constructor-arg value="MD5"/>
</bean>
<bean id="queryDatabaseAuthenticationHandler" name="primaryAuthenticationHandler" class="org.jasig.cas.adaptors.jdbc.QueryDatabaseAuthenticationHandler">
<property name="passwordEncoder" ref="MD5PasswordEncoder"/>
</bean>
<alias name="dataSource" alias="queryDatabaseDataSource"/>
<bean id="dataSource"
class="com.mchange.v2.c3p0.ComboPooledDataSource"
p:driverClass="com.mysql.jdbc.Driver"
p:jdbcUrl="jdbc:mysql://127.0.0.1:3306/sso_test?useUnicode=true&characterEncoding=UTF-8&zeroDataTimeBehavior=convertToNull"
p:user="root"
p:password="123456"
p:initialPoolSize="6"
p:minPoolSize="6"
p:maxPoolSize="18"
p:maxIdleTimeExcessConnections="120"
p:checkoutTimeout="10000"
p:acquireIncrement="6"
p:acquireRetryAttempts="5"
p:acquireRetryDelay="2000"
p:idleConnectionTestPeriod="30"
p:preferredTestQuery="select 1"/>
我们在这里使用的是MD5加密
直接将以上代码粘贴到34行左右就行,修改为自己的数据库,并且修改为正确的用户名密码
导入相应的数据库驱动cas驱动

第二个好像不用添加,我没添加也没有报错,其他两个都可以在网上很容易找到,最好使用截图里的版本号
然后写cas登陆时验证的用户名密码的sql语句
找到apache-tomcat-7.0.94/webapps/cas/WEB-INF/cas.properties文件
再220行解除原先的注释并写成如下的
cas.jdbc.authn.query.sql=select password from tb_user where username=?
然后重启tomcat,应该就可以了
4.4 配置cas客户端
参考哔哩哔哩里面的视频吧,暂时不想写了,注意客户端的域名要跟自己生成秘钥库的时候设置的域名
https://www.bilibili.com/video/av46169726?from=search&seid=17118736836502468143
主要是第十七个视频,对着视频写,应该能写出来,我后面把我配置的客户端代码,和自己找的客户端的demo挂出来,
服务端搭建成功后,直接启动客户端,修改对应的ip和端口就好
在配置客户端的时候,如果客户端没有配置https体系,需要设置http,修该服务端的serverid
opt/apache-tomcat-7.0.94/webapps/cas/WEB-INF/classes/services/HTTPSandIMAPS-10000001.json
修改为 "serviceId" : "^(https|imaps|http)://.*",
https://blog.csdn.net/zzq900503/article/details/54910609#t1?tdsourcetag=s_pcqq_aiomsg

旨在为数千万中国开发者提供一个无缝且高效的云端环境,以支持学习、使用和贡献开源项目。
更多推荐


 1
1 0
0- 0


 已为社区贡献5条内容

所有评论(0)