
ESP8266使用MQTT
esp8266使用mqtt控制LED
arduino中使用MQTT
esp8266中使用MQTT协议
在此,会使用到arduinoIDE,esp8266(NodeMCU),一个热点。以及,我将使用node-red来发送数据做为mqtt的另一端。
并且,这里不涉及node-red的有关内容。暂时将其看做一个可以发送并且接收mqtt数据的黑箱。
MQTT协议
MQTT协议(Message Queuing Telemetry Transport),翻译过来就是遥信消息队列传输,设计的初始目的是为了极有限的内存设备和网络带宽很低的网络不可靠的通信,非常适合物联网通信。
mqtt协议只要可以把它理解为三端。
A端,B端,服务端
- 首先A端连接服务端,
然后B端也连接服务端。 - 接着,A端向服务端订阅一个 主题 假设叫"abab"
然后当B端发送消息给服务端时,B端也会按规定给发送的消息加个 主题 假设为"abab"
当A和B的主题一致时,“abab” == “abab”,A端就能收到B端发的消息。
机制可以简单地理解为订阅报纸。
就相当于我订阅"人民日报"。那么,报社就将人民日报给我。
如果我订阅"杭州日报",那么报社就将杭州日报给我。
当然,如果报社没有发行该报,那么我就什么都收不到。
mqtt协议有个特点,就是保密性低。只要我订阅了该名称,那么我就能收到其内容。
以及,只要A端和B端和服务端能够接入互联网,那么,A端和B端就能无限距离通信。
更深入地了解请百度
MQTT-ESP8266
以下的arduino中的mqtt-esp8266示例:
/*
 Basic ESP8266 MQTT example

 This sketch demonstrates the capabilities of the pubsub library in combination
 with the ESP8266 board/library.

 It connects to an MQTT server then:
  - publishes "hello world" to the topic "outTopic" every two seconds
  - subscribes to the topic "inTopic", printing out any messages
    it receives. NB - it assumes the received payloads are strings not binary
  - If the first character of the topic "inTopic" is an 1, switch ON the ESP Led,
    else switch it off

 It will reconnect to the server if the connection is lost using a blocking
 reconnect function. See the 'mqtt_reconnect_nonblocking' example for how to
 achieve the same result without blocking the main loop.

 To install the ESP8266 board, (using Arduino 1.6.4+):
  - Add the following 3rd party board manager under "File -> Preferences -> Additional Boards Manager URLs":
       http://arduino.esp8266.com/stable/package_esp8266com_index.json
  - Open the "Tools -> Board -> Board Manager" and click install for the ESP8266"
  - Select your ESP8266 in "Tools -> Board"

*/

#include <ESP8266WiFi.h>
#include <PubSubClient.h>

// Update these with values suitable for your network.

const char* ssid = "........";
const char* password = "........";
const char* mqtt_server = "broker.mqtt-dashboard.com";

WiFiClient espClient;
PubSubClient client(espClient);
long lastMsg = 0;
char msg[50];
int value = 0;

void setup() {
  pinMode(BUILTIN_LED, OUTPUT);     // Initialize the BUILTIN_LED pin as an output
  Serial.begin(115200);
  setup_wifi();
  client.setServer(mqtt_server, 1883);
  client.setCallback(callback);
}

void setup_wifi() {

  delay(10);
  // We start by connecting to a WiFi network
  Serial.println();
  Serial.print("Connecting to ");
  Serial.println(ssid);

  WiFi.begin(ssid, password);

  while (WiFi.status() != WL_CONNECTED) {
    delay(500);
    Serial.print(".");
  }

  Serial.println("");
  Serial.println("WiFi connected");
  Serial.println("IP address: ");
  Serial.println(WiFi.localIP());
}

void callback(char* topic, byte* payload, unsigned int length) {
  Serial.print("Message arrived [");
  Serial.print(topic);
  Serial.print("] ");
  for (int i = 0; i < length; i++) {
    Serial.print((char)payload[i]);
  }
  Serial.println();

  // Switch on the LED if an 1 was received as first character
  if ((char)payload[0] == '1') {
    digitalWrite(BUILTIN_LED, LOW);   // Turn the LED on (Note that LOW is the voltage level
    // but actually the LED is on; this is because
    // it is acive low on the ESP-01)
  } else {
    digitalWrite(BUILTIN_LED, HIGH);  // Turn the LED off by making the voltage HIGH
  }

}

void reconnect() {
  // Loop until we're reconnected
  while (!client.connected()) {
    Serial.print("Attempting MQTT connection...");
    // Attempt to connect
    if (client.connect("ESP8266Client")) {
      Serial.println("connected");
      // Once connected, publish an announcement...
      client.publish("outTopic", "hello world");
      // ... and resubscribe
      client.subscribe("inTopic");
    } else {
      Serial.print("failed, rc=");
      Serial.print(client.state());
      Serial.println(" try again in 5 seconds");
      // Wait 5 seconds before retrying
      delay(5000);
    }
  }
}
void loop() {

  if (!client.connected()) {
    reconnect();
  }
  client.loop();

  long now = millis();
  if (now - lastMsg > 2000) {
    lastMsg = now;
    ++value;
    snprintf (msg, 75, "hello world #%ld", value);
    Serial.print("Publish message: ");
    Serial.println(msg);
    client.publish("outTopic", msg);
  }
}
ssid为wifi名
password为wifi密码
mqtt_server为mqtt服务器(也就是前面所说的服务端,代码中已经填入的是官方的mqtt服务器,可以用,但是慢)
setup_wifi()作用就是连接wifi
callback()作用就是接收所订阅的消息(消息存在payload中)
reconnect()作用就是连接mqtt服务器,并且订阅主题
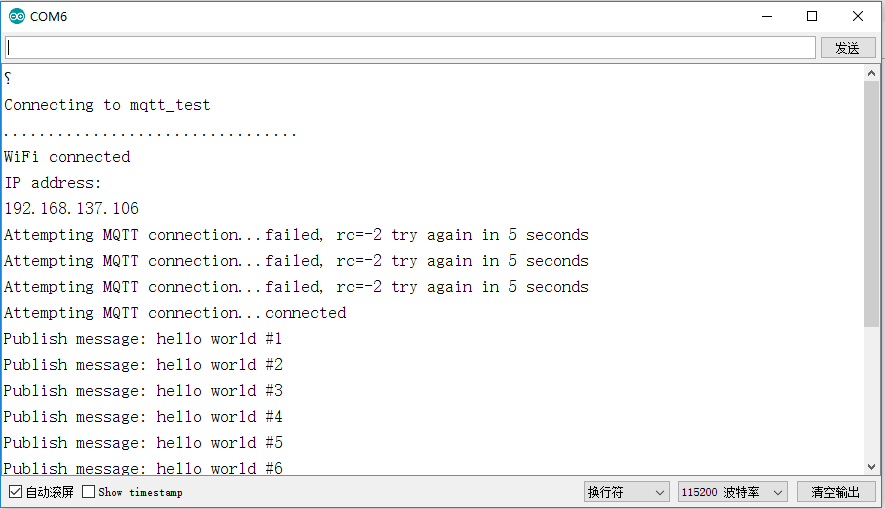
示例代码效果:
(上传前需要修改ssid,passw,mqtt_server)
从示例代码的Serial中可以看出,esp8266正在向服务端发送“hello world #1”的递增消息,从代码中可以看到,主题为“outTopic”

通过node-red连接mqtt服务端,订阅outTopic主题可以接收到esp8266的消息:
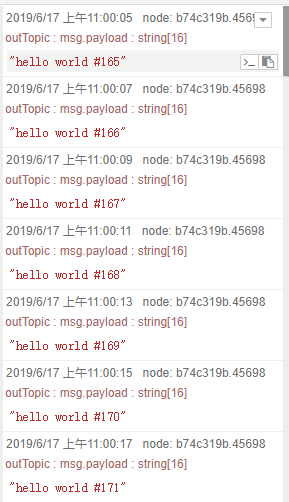
ps:在示例中,esp8266视为A端,node-red视为B端,我使用hivemq临时搭建的mqtt服务器视为服务端
·
相同的,通过node-red发布一个主题为“inTopic”的消息:

可以从Serial中看到,esp8266中也收到了由node-red中发布的消息。
Json格式说明
当要发送的数据变的繁多时,同时订阅多个主题就显得繁冗复杂。
这时候可以使用json格式打包数据。
JSON(JavaScript Object Notation) 是一种轻量级的数据交换格式,可以方便的传输不同用处的数据。
json格式按 键/值 对来存放,一个键,对应一个数据,通过键值对来存放。
假设有三个数据:
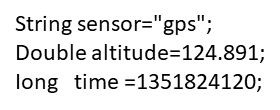
经过json打包后:

这样就能清晰的传输每个不同类型,不同作用的数据。
json格式详细介绍:http://www.json.org/json-zh.html
ArduinoJson:
在arduino中,也有json库:ArduinoJson
下面是json的一个示例:
// ArduinoJson - arduinojson.org
// Copyright Benoit Blanchon 2014-2018
// MIT License
//
// This example shows how to generate a JSON document with ArduinoJson.

#include <ArduinoJson.h>

void setup() {
  // Initialize Serial port
  Serial.begin(9600);
  while (!Serial) continue;

  // Memory pool for JSON object tree.
  //
  // Inside the brackets, 200 is the size of the pool in bytes.
  // Don't forget to change this value to match your JSON document.
  // Use arduinojson.org/assistant to compute the capacity.
  StaticJsonBuffer<200> jsonBuffer;

  // StaticJsonBuffer allocates memory on the stack, it can be
  // replaced by DynamicJsonBuffer which allocates in the heap.
  //
  // DynamicJsonBuffer  jsonBuffer(200);

  // Create the root of the object tree.
  //
  // It's a reference to the JsonObject, the actual bytes are inside the
  // JsonBuffer with all the other nodes of the object tree.
  // Memory is freed when jsonBuffer goes out of scope.
  JsonObject& root = jsonBuffer.createObject();

  // Add values in the object
  //
  // Most of the time, you can rely on the implicit casts.
  // In other case, you can do root.set<long>("time", 1351824120);
  root["sensor"] = "gps";
  root["time"] = 1351824120;

  // Add a nested array.
  //
  // It's also possible to create the array separately and add it to the
  // JsonObject but it's less efficient.
  JsonArray& data = root.createNestedArray("data");
  data.add(48.756080);
  data.add(2.302038);

  root.printTo(Serial);
  // This prints:
  // {"sensor":"gps","time":1351824120,"data":[48.756080,2.302038]}

  Serial.println();

  root.prettyPrintTo(Serial);
  // This prints:
  // {
  //   "sensor": "gps",
  //   "time": 1351824120,
  //   "data": [
  //     48.756080,
  //     2.302038
  //   ]
  // }
}

void loop() {
  // not used in this example
}

// See also
// --------
//
// The website arduinojson.org contains the documentation for all the functions
// used above. It also includes an FAQ that will help you solve any
// serialization problem.
// Please check it out at: https://arduinojson.org/
//
// The book "Mastering ArduinoJson" contains a tutorial on serialization.
// It begins with a simple example, like the one above, and then adds more
// features like serializing directly to a file or an HTTP request.
// Please check it out at: https://arduinojson.org/book/
其中的几个关键点:
创建对象:StaticJsonBuffer<200> jsonBuffer;
JsonObject& root = jsonBuffer.createObject();
设置键值: root[“sensor”] = “gps”;
root[“time”] = 1351824120;
JsonArray& data = root.createNestedArray(“data”);
data.add(48.756080);
data.add(2.302038);
提取打包好的json包:
root.printTo(Serial);
root.prettyPrintTo(Serial);
(当使用一个string的格式的变量作为参数时,json格式的包会存入该变量)
上传,测试:

发现,数据已经打包完毕。

旨在为数千万中国开发者提供一个无缝且高效的云端环境,以支持学习、使用和贡献开源项目。
更多推荐


 19
19 0
0- 0


 已为社区贡献1条内容

所有评论(0)