Android Studio实现用户登陆界面demo(xml实现)
##使用Android Studio 编写的第一个demo,使用布局文件—xml实现用户登录界面Step1:Android Studio 开发环境的搭建:1.安装JDK(1.8);2.安装Android studio (3.3.1) 包含 gradle、sdk manage 、avd manage ;3.使用sdk manage 下载安装 sdk;4.使用avd manages创...
·
使用Android Studio 编写的第一个demo,使用布局文件—xml实现用户登录界面
注:所建工程均为Android 6.0 所以只要是Android 6.0(包括6.0)以上的真机,模拟机都可以使用
Step1:Android Studio 开发环境的搭建:
1.安装JDK (1.8);
2.安装Android studio (3.3.1) 包含 gradle、sdk manage 、avd manage ;
3.使用sdk manage 下载安装 sdk;
4.使用avd manages 创建虚拟机
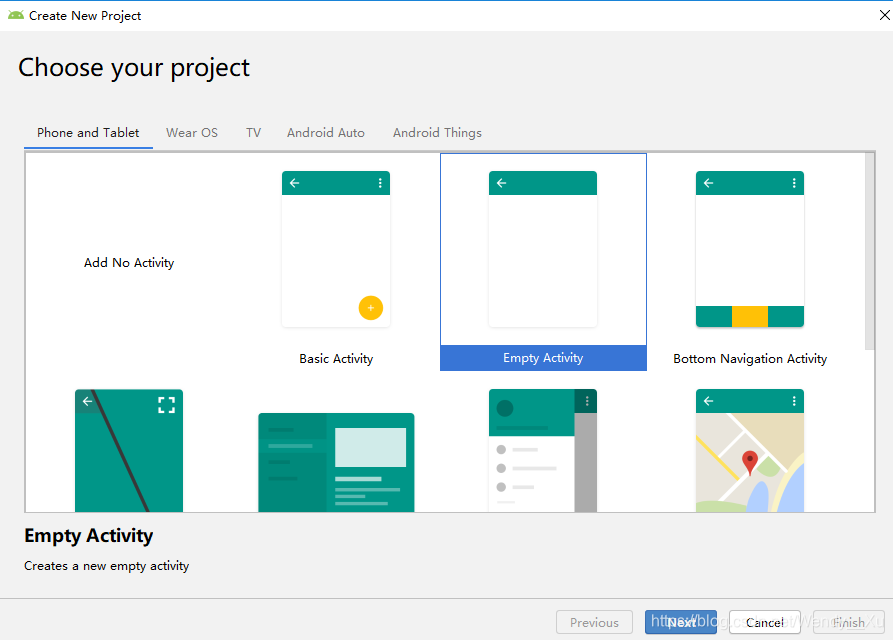
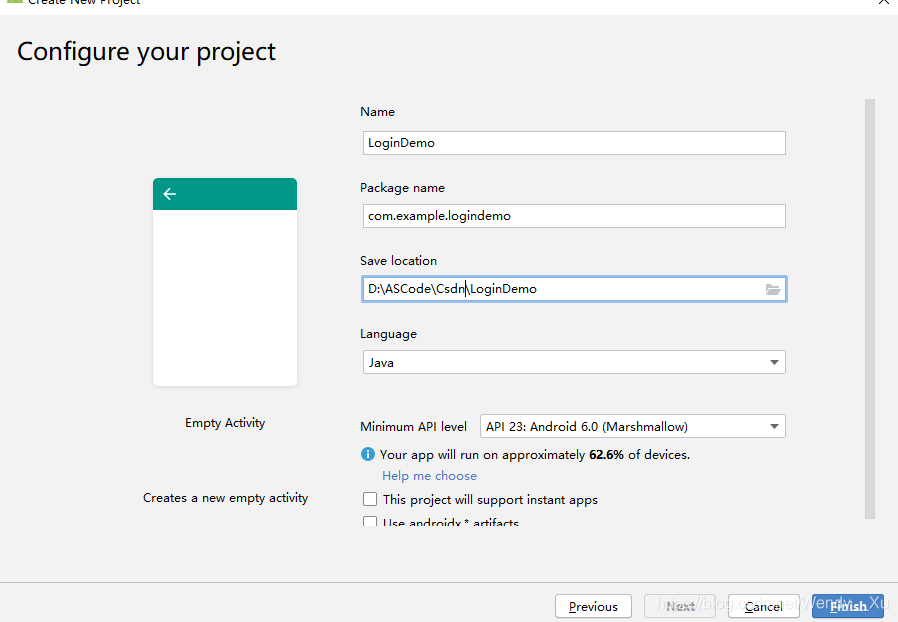
Step2: 新建工程项目Myapp2.0
1.在res/layout/activity_main.xml中编写布局内容:
<LinearLayout
    android:layout_width="match_parent"
    android:layout_height="match_parent"
    android:orientation="vertical"
    android:paddingLeft="55px"
    android:paddingRight="50px"
    tools:context=".MainActivity">
    <TextView
        android:id="@+id/message"
        android:layout_width="wrap_content"
        android:layout_height="wrap_content"
        android:layout_marginStart="@dimen/activity_horizontal_margin"
        android:layout_marginLeft="@dimen/activity_horizontal_margin"
        android:layout_marginTop="@dimen/activity_vertical_margin"
        android:text="Hello Word!"
        app:layout_constraintLeft_toLeftOf="parent"
        app:layout_constraintTop_toTopOf="parent" />
    <View
        android:layout_width="match_parent"
        android:layout_height="2px"
        android:layout_marginTop="16px"
        android:background="#000000" />
    <TextView
        android:layout_width="wrap_content"
        android:layout_height="wrap_content"
        android:textSize="28dp"
        android:layout_gravity="center_horizontal"
        android:layout_marginTop="20px"
        android:text="登陆界面" />
<LinearLayout
    android:layout_width="match_parent"
    android:layout_height="wrap_content"
    android:orientation="horizontal"
    >
    <EditText
        android:id="@+id/et1"
        android:layout_width="280dp"
        android:layout_height="wrap_content"
        android:layout_marginTop="30dp"
        android:paddingLeft="10dp"
        android:hint="请输入账号"
        android:inputType="text"/>
    <ImageView
        android:id="@+id/bt1"
        android:layout_width="25dp"
        android:layout_height="25dp"
        android:layout_marginTop="37dp"
        android:src="@drawable/delete" />
</LinearLayout>
    <LinearLayout
        android:layout_width="match_parent"
        android:layout_height="wrap_content"
        android:orientation="horizontal"
        android:paddingLeft="8px">
    <EditText
        android:id="@+id/et2"
        android:layout_width="280dp"
        android:layout_height="wrap_content"
        android:layout_marginTop="26dp"
        android:hint="请输入密码"
        android:inputType="textPassword" />
        <ImageView
            android:id="@+id/bt2"
            android:layout_width="25dp"
            android:layout_height="25dp"
            android:layout_marginTop="33dp"
            android:src="@drawable/delete" />
</LinearLayout>
        <Button
            android:id="@+id/btn_login"
            android:layout_width="match_parent"
            android:layout_height="48dp"
            android:background="@color/bbutton_danger_disabled_edge"
            android:layout_marginTop="30dp"
            android:text="登  陆"
            android:textSize="30dp"
            android:textColor="@color/bbutton_danger"/>
    <Button
    android:id="@+id/bbt1"
    android:layout_width="wrap_content"
    android:layout_height="wrap_content"
    android:textSize="15dp"
    android:layout_gravity="right"
    android:layout_marginTop="20px"
    android:background="@color/bbutton_danger"
    android:text="Adapter" />
    </LinearLayout>
2.创建一个Java class —ExitTextUtils用于封装清空输入框的内容 :
/**
 * 用于实现点击叉叉时  ,  清空输入框的内容
 */

 class EditTextUtils {

    public static void clearButtonListener(final EditText et, final View view) {

        // 取得et中的文字

        String etInputString = et.getText().toString();

        // 根据et中是否有文字进行X可见或不可见的判断

        if (TextUtils.isEmpty(etInputString)) {

            view.setVisibility(View.INVISIBLE);
        } else {

            view.setVisibility(View.VISIBLE);
        }

        //点击X时使et中的内容为空

        view.setOnClickListener(new View.OnClickListener() {

            @Override
            public void onClick(View view) {
                et.setText("");
                et.requestFocusFromTouch();
            }
        });
        //对et的输入状态进行监听
        et.addTextChangedListener(new TextWatcher() {
            @Override
            public void onTextChanged(CharSequence s, int start, int before, int count) {
            }
            @Override
            public void beforeTextChanged(CharSequence s, int start, int count, int after) {
            }
            @Override
            public void afterTextChanged(Editable s) {

                if (s.length() == 0) {
                    view.setVisibility(View.INVISIBLE);
                } else {
                    view.setVisibility(View.VISIBLE);
                }
            }
        });
    }
}
3.在MainActivity.java 里书写代码:
private TextView mTextMessage;
@Override
protected void onCreate(Bundle savedInstanceState) {
    super.onCreate(savedInstanceState);
    setContentView(R.layout.activity_main);
    EditText et1 = (EditText) findViewById(R.id.et1);
    EditText et2 = (EditText) findViewById(R.id.et2);
    View bt = findViewById(R.id.bt1);
    View iv = findViewById(R.id.bt2);
    EditTextUtils.clearButtonListener(et1, bt);
    EditTextUtils.clearButtonListener(et2, iv);

    Button btn1 = (Button) findViewById(R.id.bbt1);
    btn1.setOnClickListener(new View.OnClickListener(){
        @Override
        public void onClick(View v){
            //Intent是一种运行时绑定(run-time binding)机制,它能在程序运行过程中连接两个不同的组件,在存放资源代码的文件夹下下,
            Intent i = new Intent(MainActivity.this , Main2ActivityAdapterDemo.class);
            //启动
            startActivity(i);
            }
    });

    mTextMessage = (TextView) findViewById(R.id.message);
    BottomNavigationView navigation = (BottomNavigationView) findViewById(R.id.navigation);
    navigation.setOnNavigationItemSelectedListener(mOnNavigationItemSelectedListener);
}
4.布局使用到的资源:
自己建的用于存放自定义的文件 dimens.xml
<resources>
    <!-- Default screen margins, per the Android Design guidelines. -->
    <dimen name="activity_horizontal_margin">16dp</dimen>
    <dimen name="activity_vertical_margin">16dp</dimen>
    <dimen name="text_size_16">22dp</dimen>
    <dimen name="space_8">8</dimen>
    <dimen name="space_16">16</dimen>
    <dimen name="fab_margin">16dp</dimen>
</resources>
color.xml
<?xml version="1.0" encoding="utf-8"?>
<resources>
    <color name="colorPrimary">#008577</color>
    <color name="colorPrimaryDark">#00574B</color>
    <color name="colorAccent">#D81B60</color>
    <color name="main_gray">#CCCCCC</color>
    <color name="main_black">#000000</color>
    <color name="bbutton_danger_disabled_edge">#00CC33</color>
    <color name="bbutton_danger">#FFFFFF</color>
</resources>
截图


Step3:运行程序。。。截图如下:

**
下载地址:[LoginDemo.zip]

为开发者提供学习成长、分享交流、生态实践、资源工具等服务,帮助开发者快速成长。
更多推荐


 22
22 0
0- 0


 已为社区贡献1条内容

所有评论(0)