SpringCloud-Config 配置中心
Spring Cloud Config 是一个集中化外部配置的分布式系统.由服务端和客户端组成.它不依赖于注册中心.是以个独立的配置中心.当客户端启动时会向服务端发起请求, 服务端接收到请求之后,根据配置仓库的地址,将 git 上的文件克隆到本地的一个临时目录当中,这个目录是 git 的一个本地仓库目录,然后服务端读取本地文件返回给客户端.示例:configServer 工程添加依赖...
Spring Cloud Config 是一个集中化外部配置的分布式系统.由服务端和客户端组成.它不依赖于注册中心.是以个独立的配置中心.当客户端启动时会向服务端发起请求, 服务端接收到请求之后,根据配置仓库的地址,将 git 上的文件克隆到本地的一个临时目录当中,这个目录是 git 的一个本地仓库目录,然后服务端读取本地文件返回给客户端.
示例:
configServer 工程
添加依赖
        <dependency>
            <groupId>org.springframework.boot</groupId>
            <artifactId>spring-boot-starter-web</artifactId>
            <!--<exclusions>
                <exclusion>
                    <artifactId>spring-boot-starter-logging</artifactId>
                    <groupId>org.springframework.boot</groupId>
                </exclusion>
            </exclusions>-->
        </dependency>
        <dependency>
            <groupId>org.springframework.boot</groupId>
            <artifactId>spring-boot-starter-test</artifactId>
            <scope>test</scope>
        </dependency>
        <dependency>
            <groupId>org.springframework.boot</groupId>
            <artifactId>spring-boot-starter-actuator</artifactId>
        </dependency>
        <dependency>
            <groupId>org.springframework.boot</groupId>
            <artifactId>spring-boot-devtools</artifactId>
        </dependency>
        <dependency>
            <groupId>org.springframework.cloud</groupId>
            <artifactId>spring-cloud-config-server</artifactId>
        </dependency>
编写配置文件
spring:
  cloud:
    config:
      server:
        git:
          uri: https://gitee.com/belovehejian/springcloudMicroservice.git    #git服务器地址
          username: usernames  #git 服务器用户名
          password: passwords  #git 服务器密码
          search-paths: config-repo #搜索指定目录下的所有满足条件的配置文件
  application:
    name: config-server
server:
  port: 9090
启动类
@EnableConfigServer     /** 开启 springcloud config 服务功能 **/
@SpringBootApplication
public class ConfigServerApplication {
    public static void main(String[] args) {
        SpringApplication.run(ConfigServerApplication.class, args);
    }
}
然后在 git 仓库中创建目录 config-repo, 并且在该目录下创建 3 个文件

依次编辑每个文件, 在文件中添加不同的内容,比如我在 dev 文件当中添加如下:
cn:
  springcloud:
    book:
      config: I am the git configuration file from dev environment.Add more info
编写完成之后启动项目, 然后访问, http://localhost:9090/config-info/dev/master 可以看到如下输出, 表示 config server 搭建成功

这里简单学习下 configServer 读取远程配置文件之后的映射关系, 根据官方指示,
/{application}/{profile}[/{label}]
/{application}-{profile}.yml
/{label}/{application}-{profile}.yml
/{application}-{profile}.properties
/{label}/{application}-{profile}.properties
其中 application 是应用名, 可以理解为远程仓库上的文件名, profile 指的是对应激活的环境名, 如: dev, prod, test 等. label 指的是远程仓库的分支, 如果不写的话, 默认是 master
然后搭建 configCllient 工程
加入依赖:
<dependency>
            <groupId>org.springframework.cloud</groupId>
            <artifactId>spring-cloud-config-client</artifactId>
        </dependency>
        <dependency>
            <groupId>org.springframework.boot</groupId>
            <artifactId>spring-boot-configuration-processor</artifactId>
            <optional>true</optional>
        </dependency>
<dependency>
            <groupId>org.springframework.boot</groupId>
            <artifactId>spring-boot-starter-web</artifactId>
        </dependency>
        <dependency>
            <groupId>org.springframework.boot</groupId>
            <artifactId>spring-boot-starter-test</artifactId>
            <scope>test</scope>
        </dependency>
        <dependency>
            <groupId>org.springframework.boot</groupId>
            <artifactId>spring-boot-starter-actuator</artifactId>
        </dependency>
        <dependency>
            <groupId>org.springframework.boot</groupId>
            <artifactId>spring-boot-devtools</artifactId>
        </dependency>
编写配置文件 application.yml,
server:
  port: 9091
spring:
  application:
    name: config-client
编写配置文件 bootstrap.yml
spring:
  cloud:
    config:
      label: master #请求的 git 中的分支
      uri: http://localhost:9090/ #请求的 configServer 的地址
      name: config-info   #要请求的远程文件的名称, 可以写多个, 以 "," 隔开
      profile: dev  #代表哪个分支的文件, 例如: dev, test, prod 等
之所以这里要将内容分开成两个文件, 并且将 config 有关的信息放在 bootstrap.yml 中, 这与 加载顺序有关.
然后在编写实体类,实体类可以根据配置文件,将配置文件当中的值加载到实体类的变量当中:
@Component
@ConfigurationProperties(prefix = "cn.springcloud.book")    //加载指定配置前缀的值,.
public class ConfigInfoProperties {
    private String config;

    public String getConfig() {
        return config;
    }

    public void setConfig(String config) {
        this.config = config;
    }
}
编写对外提供访问的 controller
@RestController
public class ConfigClientController {

    @Autowired
    private ConfigInfoProperties configInfoProperties;

    @RequestMapping("/getConfigInfo")
    public String getConfigInfo() {
        return configInfoProperties.getConfig();
    }
}
编写程序主启动类
@SpringBootApplication
public class ConfigClientApplication {
    public static void main(String[] args) {
        SpringApplication.run(ConfigClientApplication.class, args);
    }
}
至此就编写完毕. 然后依次启动 configServer, configClient 工程, 然后访问: http://localhost:9093/getConfigInfo 可以看到如下输出

说明客户端可以通过配置中心来获取放置在远程服务器上的配置文件中的内容,
然后在 git 中修改文件内容, 例如将 config-info-dev.yml 文件的内容修改一下, 在末尾添加一些内容并且进行保存, 然后接着访问 http://localhost:9093/getConfigInfo ,发现获取到的内容竟然是修改之前的内容. 然后将服务重启,重启之后再次尝试访问, 发现获取到了修改之后的内容..这样有一个弊端,就是每次进行配置文件内容的修改之后, 都需要重启才能生效.很麻烦. 不过有解决的办法,一就是:手动刷新, 二就是利用 SpringCloud Bus 进行全自动刷新
手动刷新 config 配置
复制上面例子中的 configClient, 将项目名称改为 configClientRefresh.在原有的依赖中添加一个如下依赖:
<dependency>
            <groupId>org.springframework.boot</groupId>
            <artifactId>spring-boot-starter-security</artifactId>
        </dependency>
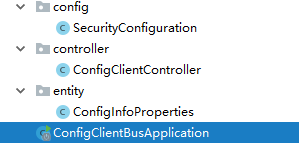
修改实体类 ConfigInfoProperties 为如下:
@Component
@RefreshScope   //被该注解注释的 bean 都是延迟加载的,只有在第一次被访问的时候,才会被初始化
public class ConfigInfoProperties {
    @Value("${cn.springcloud.book.config}")
    private String config;

    public String getConfig() {
        return config;
    }

    public void setConfig(String config) {
        this.config = config;
    }
}
修改 ConfigInfoController 为如下:
@RefreshScope
@RestController
public class ConfigClientController {

    @Autowired
    private ConfigInfoProperties configInfoProperties;

    @RequestMapping("/getConfigInfo")
    public String getConfigInfo() {
        System.out.println("当前 controller 实例信息: " + this);
        System.out.println("configInfoProperties 的实例信息为: " + configInfoProperties);
        return configInfoProperties.getConfig();
    }
}
添加安全配置类 SecurityConfiguration
@Configuration
public class SecurityConfiguration extends WebSecurityConfigurerAdapter {

    //主要作用是关闭端点的校验
    @Override
    protected void configure(HttpSecurity http) throws Exception {
        http.csrf().disable();
    }
}
将原有的 application.yml 配置文件更改为如下:
server:
  port: 9093
spring:
  application:
    name: config-client
management:
  endpoints:
    web:
      exposure:
        include: "*"  #开启所有端点
  endpoint:
    health:
      show-details: always  #总是显示详细信息
然后依次启动 configServer, configClientRefresh 工程, 然后访问 http://localhost:9093/getConfigInfo 可以看到能正常获取配置文件内容 (这里获取的是 config-info-dev.yml 文件内容):

然后在 git 中更新 config-info-dev.yml 文件内容, 在末尾处添加一些内容, 如:

然后再次访问 http://localhost:9093/getConfigInfo 发现获取到的还是未修改之前的内容.

这个时候我们进行手动刷新, 以POST的方式访问: http://localhost:9093/actuator/refresh 进行手动刷新, 然后再次访问: http://localhost:9093/getConfigInfo 发现获取到的内容是修改之后的最新内容了. 说明我们已经手动刷新成功

结合 Spring Cloud Bus, kafka, webHook 进行刷新
上例我们使用了手动刷新机制来进行刷新, 确实比重启要好很多了. 但是手动刷新的话, 要是服务有很多的时候, 忘记进行手动刷新了的话, 也会很麻烦.所以我们还有自动刷新的解决方法.那就是使用 Spring Cloud Bus 进行自动刷新.
简单说下过程: 当有 pull 等操作更新仓库的时候, WebHook 会远程 post 一个指定的地址, 通知 configServer 有新的更新,这个时候, configServer 会发送一条消息给 kafka, 然后kafka 会将这条消息广播给所有的 configClient, 这个时候所有configClient 会重新通过 configServer 去获取最新的内容. 实现全自动更新
新建configServerBus 工程,
添加依赖
<dependencies>
        <dependency>
            <groupId>org.springframework.boot</groupId>
            <artifactId>spring-boot-starter-web</artifactId>
        </dependency>
        <dependency>
            <groupId>org.springframework.boot</groupId>
            <artifactId>spring-boot-starter-test</artifactId>
            <scope>test</scope>
        </dependency>
        <dependency>
            <groupId>org.springframework.boot</groupId>
            <artifactId>spring-boot-starter-actuator</artifactId>
        </dependency>
        <dependency>
            <groupId>org.springframework.boot</groupId>
            <artifactId>spring-boot-devtools</artifactId>
        </dependency>
        <dependency>
            <groupId>org.springframework.cloud</groupId>
            <artifactId>spring-cloud-config-server</artifactId>
        </dependency>
        <dependency>
            <groupId>org.springframework.boot</groupId>
            <artifactId>spring-boot-starter-security</artifactId>
        </dependency>
        <dependency>
            <groupId>org.springframework.cloud</groupId>
            <artifactId>spring-cloud-starter-stream-kafka</artifactId>
        </dependency>
        <dependency>
            <groupId>org.springframework.cloud</groupId>
            <artifactId>spring-cloud-starter-bus-kafka</artifactId>
            <version>2.1.0.RELEASE</version>
            <scope>runtime</scope>
        </dependency>
        <dependency>
            <groupId>org.springframework.cloud</groupId>
            <artifactId>spring-cloud-bus</artifactId>
        </dependency>
    </dependencies>
配置文件 application.yml
management:
  endpoints:
    web:
      exposure:
        include: '*'  #开放所有端点
  endpoint:
    health:
      show-details: always  #总是显示详细信息
spring:
  cloud:
    config:
      server:
        git:
          uri: https://gitee.com/belovehejian/springcloudMicroservice.git    #git服务器地址
          username: belovehejian  #git 服务器用户名
          password: hejiang6375533  #git 服务器密码
          search-paths: config-repo #搜索指定目录下的所有满足条件的配置文件
    bus:
      refresh:
        enabled: true #开启刷新
  application:
    name: config-server
  kafka:
    bootstrap-servers: 139.199.178.65:9093  #服务器地址
    producer:
      #value-serializer: org.apache.kafka.common.serialization.StringSerializer  #键编码类
      #key-serializer: org.apache.kafka.common.serialization.StringSerializer    #值编码类
      retries: 0  #当大于0时,发送失败时会重试
    consumer:
      enable-auto-commit: true  #是否定期提交偏移量
      auto-offset-reset: earliest #如果kafka中没有初始偏移量,或者服务器上不存在偏移量应该怎么办. earliest:自动重置偏移到最早的偏移
      auto-commit-interval: 100ms #自动提交偏移量的频率
      #key-deserializer: org.apache.kafka.common.serialization.StringDeserializer  #键解码类
      #value-deserializer: org.apache.kafka.common.serialization.StringDeserializer  #值解码类
      group-id: refresh_topics  #消费者组ID

server:
  port: 9090
logging:
  level:
    com.cn.hj.chapter11: debug
主启动类:
@SpringBootApplication
@EnableConfigServer
public class ConfigServerBusApplication {
    public static void main(String[] args) {
        SpringApplication.run(ConfigServerBusApplication.class, args);
    }
}
security配置类:
//关闭端点的安全校验
@Configuration
public class SecurityConfiguration extends WebSecurityConfigurerAdapter {
    @Override
    protected void configure(HttpSecurity http) throws Exception {
        http.csrf().disable();
    }
}
编写 configClient 工程
添加依赖
<dependencies>
        <dependency>
            <groupId>org.springframework.boot</groupId>
            <artifactId>spring-boot-starter-web</artifactId>
        </dependency>
        <dependency>
            <groupId>org.springframework.boot</groupId>
            <artifactId>spring-boot-starter-test</artifactId>
            <scope>test</scope>
        </dependency>
        <dependency>
            <groupId>org.springframework.boot</groupId>
            <artifactId>spring-boot-starter-actuator</artifactId>
        </dependency>
        <dependency>
            <groupId>org.springframework.boot</groupId>
            <artifactId>spring-boot-devtools</artifactId>
        </dependency>
        <dependency>
            <groupId>org.springframework.cloud</groupId>
            <artifactId>spring-cloud-config-client</artifactId>
        </dependency>
        <dependency>
            <groupId>org.springframework.boot</groupId>
            <artifactId>spring-boot-starter-security</artifactId>
        </dependency>
        <dependency>
            <groupId>org.springframework.cloud</groupId>
            <artifactId>spring-cloud-starter-stream-kafka</artifactId>
        </dependency>
        <dependency>
            <groupId>org.springframework.cloud</groupId>
            <artifactId>spring-cloud-starter-bus-kafka</artifactId>
            <version>2.1.0.RELEASE</version>
            <scope>runtime</scope>
        </dependency>
        <dependency>
            <groupId>org.springframework.cloud</groupId>
            <artifactId>spring-cloud-bus</artifactId>
        </dependency>
    </dependencies>
配置文件 bootstrap.yml
spring:
  cloud:
    config:
      label: master #请求的 git 中的分支
      uri: http://localhost:9090/ #请求的 configServer 的地址
      name: config-info   #要请求的远程文件的名称, 可以写多个, 以 "," 隔开
      profile: dev  #代表哪个分支的文件, 例如: dev, test, prod 等
  kafka:
    bootstrap-servers: 139.199.178.65:9093  #服务器地址
management:
  endpoints:
    web:
      exposure:
        include: "*"
配置文件 application.yml
server:
  port: 9095
spring:
  application:
    name: config-bus-client
其他类文件内容与上例中的一模一样

编写完成之后启动 这两个工程, 然后访问 http://localhost:9095/getConfigInfo 可以看到输出, 然后修改 git 中 config-info-dev.yml 文件内容, 接着再次访问 http://localhost:9095/getConfigInfo 发现获取到的是未修改之前的内容, 这个时候,访问端点, http://localhost:9090/actuator/bus-refresh 可以看到 configServer 以及 configClient 两个工程的控制台都重新拉去了git上的文件. 然后在访问 http://localhost:9095/getConfigInfo 可以发现, 已经获取到了最新的文件内容.这个的好处就是, 所有的客户端都可以自动重新去拉取最新的文件内容.
全自动刷新
全自动刷新的话, 需要在码云的仓库中设置一下 WebHook , 我在设置完成之后, 发送指定的 post 请求的时候一直出现 请求超时 , 目前还没解决, 等解决了在添加这一块
更多推荐
 已为社区贡献1条内容


所有评论(0)