
Android 串口开发(一) 串口读写操作
开发串口程序首先要求你的设备需要支持串口通信,可以在设备上装一个App端的串口工具来检测一下链接:https://pan.baidu.com/s/11L4aZI9orBhbnztka6H1Og提取码:bvot或者在电脑端下载一个友善串口助手检测一下,一般在Android工控主板上面都会带有串口。首先我们是用到了谷歌开源的APIserialPort先贴出来下载地址http...
开发串口程序首先要求你的设备需要支持串口通信,可以在设备上装一个App端的串口工具来检测一下
设备必须Root!设备必须Root!设备必须Root!
链接:https://pan.baidu.com/s/11L4aZI9orBhbnztka6H1Og
提取码:bvot
或者在电脑端下载一个友善串口助手检测一下,一般在Android工控主板上面都会带有串口。
首先我们是用到了谷歌开源的API serialPort
先贴出来下载地址 https://github.com/cepr/android-serialport-api
第一步 配置环境
1、开发工具Android Studio
2、配置NDK(android NDK——搭建Android Studio的NDK环境_boolean的博客-CSDN博客_as安装ndk),网上教程很多,这里不做重点讲解,查看配置是否成功
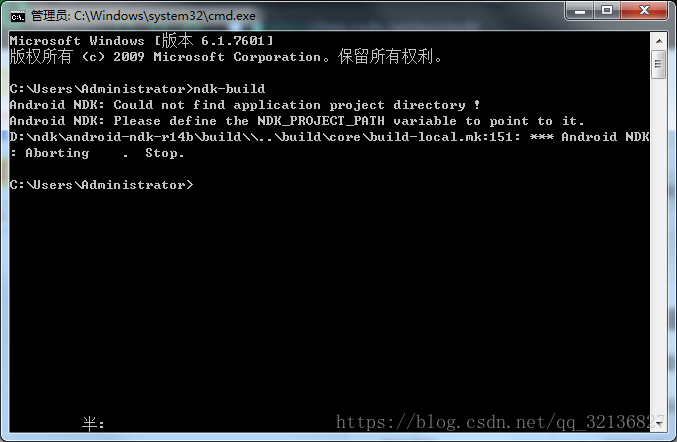
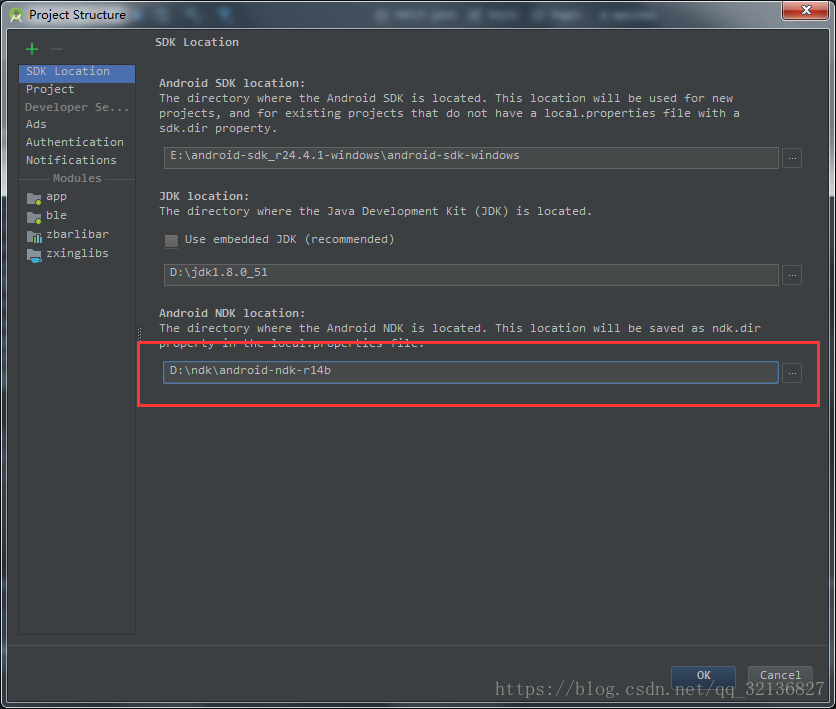
3、Android studio配置ndk
二、用开源库代码复制到自己项目里
1、如下图所示
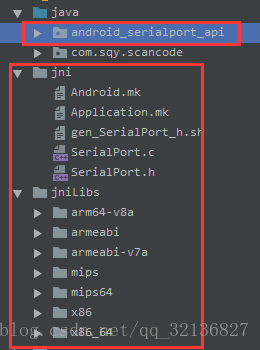
里面的操作类我做了重构,可能会跟开源里面的不一样,不过都是为了达到自己的需求嘛
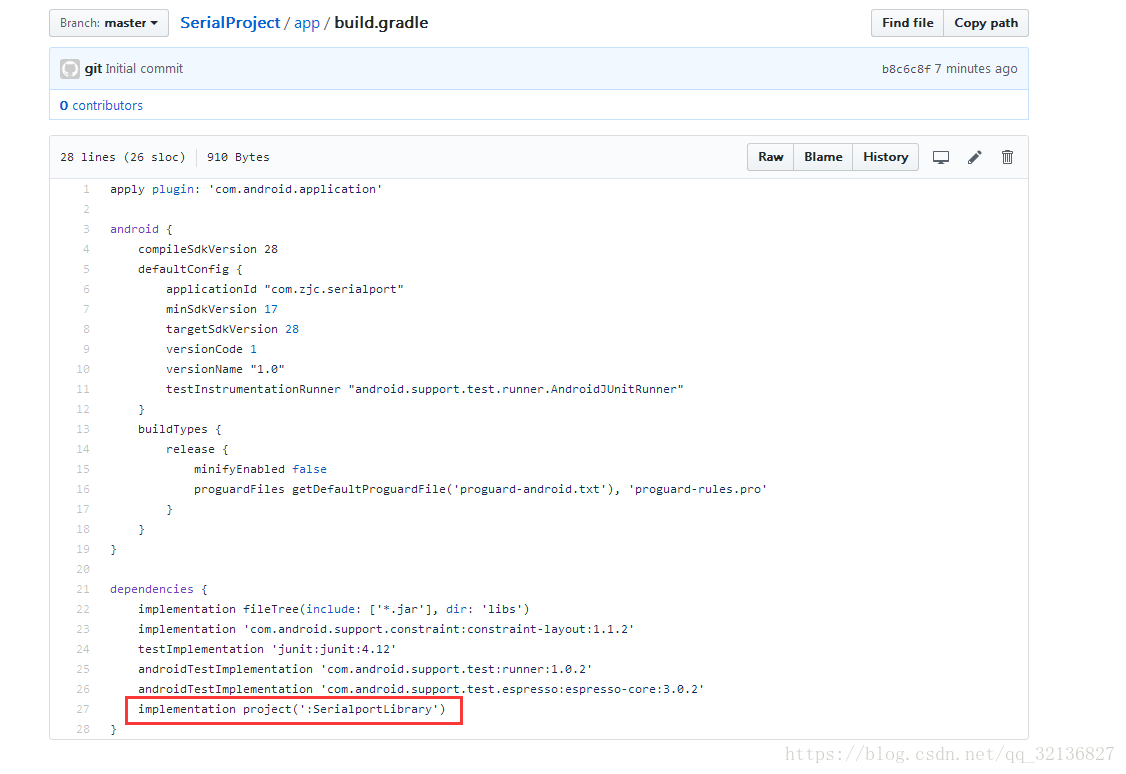
2、配置build-gridle
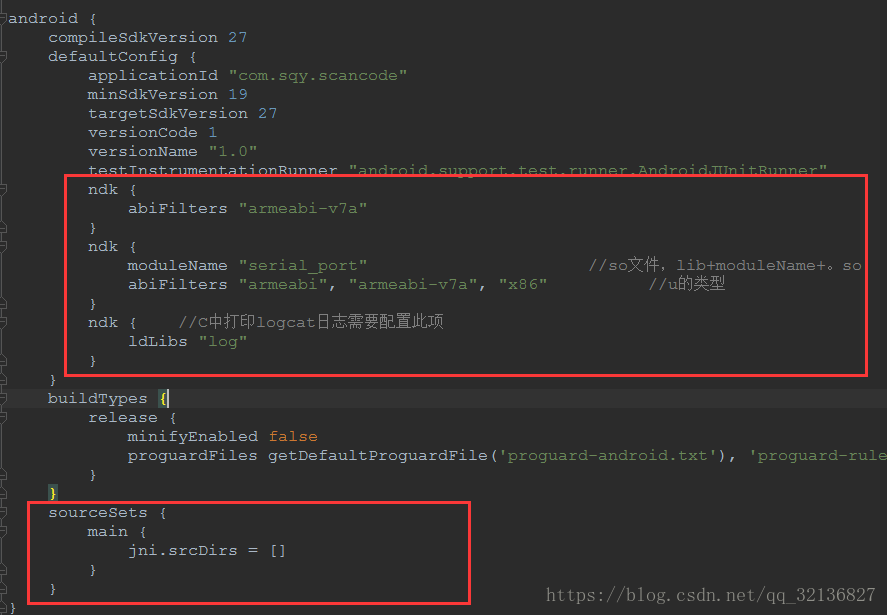
配置信息直接粘上去就可以了
在project目录下的gradle.properties文件内加上
Android.useDeprecatedNdk=true这句话 ,为了兼容新老版本ndk3、类的讲解
public class SerialPortFinder {
    public class Driver {
        public Driver(String name, String root) {
            mDriverName = name;
            mDeviceRoot = root;
        }

        private String mDriverName;
        private String mDeviceRoot;
        Vector<File> mDevices = null;

        public Vector<File> getDevices() {
            if (mDevices == null) {
                mDevices = new Vector<File>();
                File dev = new File("/dev");
                File[] files = dev.listFiles();
                int i;
                for (i = 0; i < files.length; i++) {
                    if (files[i].getAbsolutePath().startsWith(mDeviceRoot)) {
                        Log.d(TAG, "Found new device: " + files[i]);
                        mDevices.add(files[i]);
                    }
                }
            }
            return mDevices;
        }

        public String getName() {
            return mDriverName;
        }
    }

    private static final String TAG = "SerialPort";

    private Vector<Driver> mDrivers = null;

    Vector<Driver> getDrivers() throws IOException {
        if (mDrivers == null) {
            mDrivers = new Vector<Driver>();
            LineNumberReader r = new LineNumberReader(new FileReader("/proc/tty/drivers"));
            String l;
            while ((l = r.readLine()) != null) {
                // Issue 3:
                // Since driver name may contain spaces, we do not extract driver name with split()
                String drivername = l.substring(0, 0x15).trim();
                String[] w = l.split(" +");
                if ((w.length >= 5) && (w[w.length - 1].equals("serial"))) {
                    Log.d(TAG, "Found new driver " + drivername + " on " + w[w.length - 4]);
                    mDrivers.add(new Driver(drivername, w[w.length - 4]));
                }
            }
            r.close();
        }
        return mDrivers;
    }

    public String[] getAllDevices() {
        Vector<String> devices = new Vector<String>();
        // Parse each driver
        Iterator<Driver> itdriv;
        try {
            itdriv = getDrivers().iterator();
            while (itdriv.hasNext()) {
                Driver driver = itdriv.next();
                Iterator<File> itdev = driver.getDevices().iterator();
                while (itdev.hasNext()) {
                    String device = itdev.next().getName();
                    String value = String.format("%s (%s)", device, driver.getName());
                    devices.add(value);
                }
            }
        } catch (IOException e) {
            e.printStackTrace();
        }
        return devices.toArray(new String[devices.size()]);
    }

//获取设备上所有的串口节点
    public String[] getAllDevicesPath() {
        Vector<String> devices = new Vector<String>();
        // Parse each driver
        Iterator<Driver> itdriv;
        try {
            itdriv = getDrivers().iterator();
            while (itdriv.hasNext()) {
                Driver driver = itdriv.next();
                Iterator<File> itdev = driver.getDevices().iterator();
                while (itdev.hasNext()) {
                    String device = itdev.next().getAbsolutePath();
                    devices.add(device);
                }
            }
        } catch (IOException e) {
            e.printStackTrace();
        }
        return devices.toArray(new String[devices.size()]);
    }
}
这个类一般不用,不占主要作用,主要用于可以获取设备上的所有可用的串口节点,用来选择设置,根据需求添加
public class SerialPort {

    private static final String TAG = "SerialPort";
    private FileDescriptor mFd;
    private FileInputStream mFileInputStream;
    private FileOutputStream mFileOutputStream;

    public SerialPort(File device, int baudrate, int flags) throws SecurityException, IOException {

        //检查访问权限,如果没有读写权限,进行文件操作,修改文件访问权限
        if (!device.canRead() || !device.canWrite()) {
            try {
                //通过挂载到linux的方式,修改文件的操作权限
                Process su = Runtime.getRuntime().exec("/system/bin/su");
                String cmd = "chmod 777 " + device.getAbsolutePath() + "\n" + "exit\n";
                su.getOutputStream().write(cmd.getBytes());
                if ((su.waitFor() != 0) || !device.canRead() || !device.canWrite()) {
                    throw new SecurityException();
                }
            } catch (Exception e) {
                e.printStackTrace();
                throw new SecurityException();
            }
        }

        mFd = open(device.getAbsolutePath(), baudrate, flags);

        if (mFd == null) {
            Log.e(TAG, "native open returns null");
            throw new IOException();
        }

        mFileInputStream = new FileInputStream(mFd);
        mFileOutputStream = new FileOutputStream(mFd);
    }

    // Getters and setters
    public InputStream getInputStream() {
        return mFileInputStream;
    }

    public OutputStream getOutputStream() {
        return mFileOutputStream;
    }

    // JNI(调用java本地接口,实现串口的打开和关闭)
    /**
     * 串口有五个重要的参数:串口设备名,波特率,检验位,数据位,停止位
     * 其中检验位一般默认位NONE,数据位一般默认为8,停止位默认为1
     */
    /**
     * @param path     串口设备的绝对路径
     * @param baudrate 波特率
     * @param flags    校验位
     */
    private native static FileDescriptor open(String path, int baudrate, int flags);
    public native void close();

    static {//加载jni下的C文件库
        System.loadLibrary("serial_port");
    }
}
这个SerialPort类是开源的,没有经过修改,Android可以,里面的直接调用,native方法直接和C通信,我们做Android的不需要管
jni目录下放着c源码和h头文件,
jniLibs下面放的就是so库。
注意:因为用的谷歌原生so库,所以SerialPort类的包名一定要是android_serialport_api,如果想修改这个包名,就需要重新生成对应的so库
public class SerialPortUtil {

    public static String TAG = "SerialPortUtil";

    /**
     * 标记当前串口状态(true:打开,false:关闭)
     **/
    public static boolean isFlagSerial = false;

    public static SerialPort serialPort = null;
    public static InputStream inputStream = null;
    public static OutputStream outputStream = null;
    public static Thread receiveThread = null;
    public static String strData = "";
    public static Handler mHandler;

    /**
     * 打开串口
     */
    public static boolean open() {
        boolean isopen = false;
        if(isFlagSerial){
            LogUtils.e(TAG,"串口已经打开,打开失败");
            return false;
        }
        try {
            serialPort = new SerialPort(new File("/dev/ttyS3"), 115200, 0);
            inputStream = serialPort.getInputStream();
            outputStream = serialPort.getOutputStream();
            receive();
            isopen = true;
            isFlagSerial = true;
        } catch (IOException e) {
            e.printStackTrace();
            isopen = false;
        }
        return isopen;
    }

    /**
     * 关闭串口
     */
    public static boolean close() {
        if(isFlagSerial){
            LogUtils.e(TAG,"串口关闭失败");
            return false;
        }
        boolean isClose = false;
        LogUtils.e(TAG, "关闭串口");
        try {
            if (inputStream != null) {
                inputStream.close();
            }
            if (outputStream != null) {
                outputStream.close();
            }
            isClose = true;
            isFlagSerial = false;//关闭串口时,连接状态标记为false
        } catch (IOException e) {
            e.printStackTrace();
            isClose = false;
        }
        return isClose;
    }

    /**
     * 发送串口指令
     */
    public static void sendString(String data, Handler handler) {
        mHandler = handler;
        if (!isFlagSerial) {
            LogUtils.e(TAG, "串口未打开,发送失败" + data);
            return;
        }
        try {
            outputStream.write(ByteUtil.hex2byte(data));
            outputStream.flush();
            LogUtils.e(TAG, "sendSerialData:" + data);
        } catch (IOException e) {
            e.printStackTrace();
            LogUtils.e(TAG, "发送指令出现异常");
        }
    }

    /**
     * 接收串口数据的方法
     */
    public static void receive() {
        if (receiveThread != null && !isFlagSerial) {
            return;
        }
        receiveThread = new Thread() {
            @Override
            public void run() {
                while (isFlagSerial) {
                    try {
                        byte[] readData = new byte[32];
                        if (inputStream == null) {
                            return;
                        }
                        int size = inputStream.read(readData);
                        if (size > 0 && isFlagSerial) {
                            strData = ByteUtil.byteToStr(readData, size);
                            LogUtils.e(TAG, "readSerialData:" + strData);
                        }
                    } catch (IOException e) {
                        e.printStackTrace();
                    }
                }
            }
        };
        receiveThread.start();
    }
}
这个类就比较重要了,打开串口、关闭串口、读写操作,都在这个类里面写了详细的注释,另外下面在贴一个工具类出来
package com.sqy.scancode.util;

import android.graphics.Bitmap;
import android.graphics.BitmapFactory;
import android.util.Base64;

import java.io.FileInputStream;
import java.io.IOException;
import java.io.InputStream;

import Decoder.BASE64Decoder;
import Decoder.BASE64Encoder;

/**
 * Created by Administrator on 2018/6/15.
 */

public class ByteUtil {

    /**
     * 字符串转化成为16进制字符串
     *
     * @param s
     * @return
     */
    public static String strTo16(String s) {
        String str = "";
        for (int i = 0; i < s.length(); i++) {
            int ch = (int) s.charAt(i);
            String s4 = Integer.toHexString(ch);
            str = str + s4;
        }
        return str;
    }

    /**
     * 16进制转换成为string类型字符串
     *
     * @param s
     * @return
     */
    public static String hexStringToString(String s) {
        if (s == null || s.equals("")) {
            return null;
        }
        s = s.replace(" ", "");
        byte[] baKeyword = new byte[s.length() / 2];
        for (int i = 0; i < baKeyword.length; i++) {
            try {
                baKeyword[i] = (byte) (0xff & Integer.parseInt(s.substring(i * 2, i * 2 + 2), 16));
            } catch (Exception e) {
                e.printStackTrace();
            }
        }
        try {
            s = new String(baKeyword, "UTF-8");
            new String();
        } catch (Exception e1) {
            e1.printStackTrace();
        }
        return s;
    }

    /**
     * 向串口发送数据转为字节数组
     */
    public static byte[] hex2byte(String hex) {
        String digital = "0123456789ABCDEF";
        String hex1 = hex.replace(" ", "");
        char[] hex2char = hex1.toCharArray();
        byte[] bytes = new byte[hex1.length() / 2];
        byte temp;
        for (int p = 0; p < bytes.length; p++) {
            temp = (byte) (digital.indexOf(hex2char[2 * p]) * 16);
            temp += digital.indexOf(hex2char[2 * p + 1]);
            bytes[p] = (byte) (temp & 0xff);
        }
        return bytes;
    }

    /**
     * 接收到的字节数组转换16进制字符串
     */
    public static String bytes2HexString(byte[] b, int size) {
        String ret = "";
        for (int i = 0; i < size; i++) {
            String hex = Integer.toHexString(b[i] & 0xFF);
            if (hex.length() == 1) {
                hex = '0' + hex;
            }
            ret += hex.toUpperCase();
        }
        return ret;
    }

    public static String bytesToHexString(byte[] src) {
        StringBuilder stringBuilder = new StringBuilder("");
        if (src == null || src.length <= 0) {
            return null;
        }
        for (int i = 0; i < src.length; i++) {
            int v = src[i] & 0xFF;
            String hv = Integer.toHexString(v);
            if (hv.length() < 2) {
                stringBuilder.append(0);
            }
            stringBuilder.append(hv);
        }
        return stringBuilder.toString();
    }

    /**
     * 接收到的字节数组转换16进制字符串
     */
    public static String byteToStr(byte[] b, int size) {
        String ret = "";
        for (int i = 0; i < size; i++) {
            String hex = Integer.toHexString(b[i] & 0xFF);
            if (hex.length() == 1) {
                hex = '0' + hex;
            }
            ret += hex.toUpperCase();
        }
        return ret;
    }

    /**
     * BASE64码解密成图片
     */
    public static Bitmap Base64ToImage(String imgStr) { // 对字节数组字符串进行Base64解码并生成图片
        BASE64Decoder decoder = new BASE64Decoder();
        Bitmap bitmap = null;
        try {
            // Base64解码
            byte[] b = decoder.decodeBuffer(imgStr);
            for (int i = 0; i < b.length; ++i) {
                if (b[i] < 0) {// 调整异常数据
                    b[i] += 256;
                }
            }
            bitmap = BitmapFactory.decodeByteArray(b,0,b.length);
            return bitmap;
        } catch (Exception e) {
            LogUtils.e("TAG","解析异常");
            return bitmap;
        }
    }


    /**
     * 将图片转换为base64加密数据
     */
    public static String ImageToBase64(String imgFile) {
        InputStream in = null;
        byte[] data = null;
        try {
            in = new FileInputStream(imgFile);
            data = new byte[in.available()];
            in.read(data);
            in.close();
        } catch (IOException e) {
            LogUtils.e("TAG","加密异常");
            e.printStackTrace();
        }
        BASE64Encoder encoder = new BASE64Encoder();
        return encoder.encode(data);
    }

    /**
     * 计算CRC16校验码
     * 逐个求和
     *
     * @param bytes 字节数组
     * @return {@link String} 校验码
     * @since 1.0
     */
    public static String getCRC_16(byte[] bytes) {
        int CRC = 0x0000ffff;
        int POLYNOMIAL = 0x0000a001;
        int i, j;
        for (i = 0; i < bytes.length; i++) {
            CRC ^= ((int) bytes[i] & 0x000000ff);
            for (j = 0; j < 8; j++) {
                if ((CRC & 0x00000001) != 0) {
                    CRC >>= 1;
                    CRC ^= POLYNOMIAL;
                } else {
                    CRC >>= 1;
                }
            }
        }
        if (Integer.toHexString(CRC).toUpperCase().length() == 2) {
            return byteToStr(bytes, bytes.length) + "00" + Integer.toHexString(CRC).toUpperCase();
        } else if (Integer.toHexString(CRC).toUpperCase().length() == 3) {
            return byteToStr(bytes, bytes.length) + "0" + Integer.toHexString(CRC).toUpperCase();
        }
        return byteToStr(bytes, bytes.length) + Integer.toHexString(CRC).toUpperCase();
    }

    /**
     * 指令校验和,并取出后两位字节
     * */
    public static String getSum16(byte[] msg, int length) {
        long mSum = 0;
        byte[] mByte = new byte[length];

        /** 逐Byte添加位数和 */
        for (byte byteMsg : msg) {
            long mNum = ((long) byteMsg >= 0) ? (long) byteMsg : ((long) byteMsg + 256);
            mSum += mNum;
        } /** end of for (byte byteMsg : msg) */

        /** 位数和转化为Byte数组 */
        for (int liv_Count = 0; liv_Count < length; liv_Count++) {
            mByte[length - liv_Count - 1] = (byte) (mSum >> (liv_Count * 8) & 0xff);
        } /** end of for (int liv_Count = 0; liv_Count < length; liv_Count++) */
        return byteToStr(msg, length) + byteToStr(mByte, mByte.length).substring(byteToStr(mByte, mByte.length).length() - 4, byteToStr(mByte, mByte.length).length());
    }

}
4、demo下载地址 : https://github.com/z-jc/ScanCode 里面可能还会有一些别的功能,需要的话自行下载
5、另外再提供一个自己封装好的module,https://github.com/z-jc/SerialProject-master,app导入module
然后在activity内直接这样调用
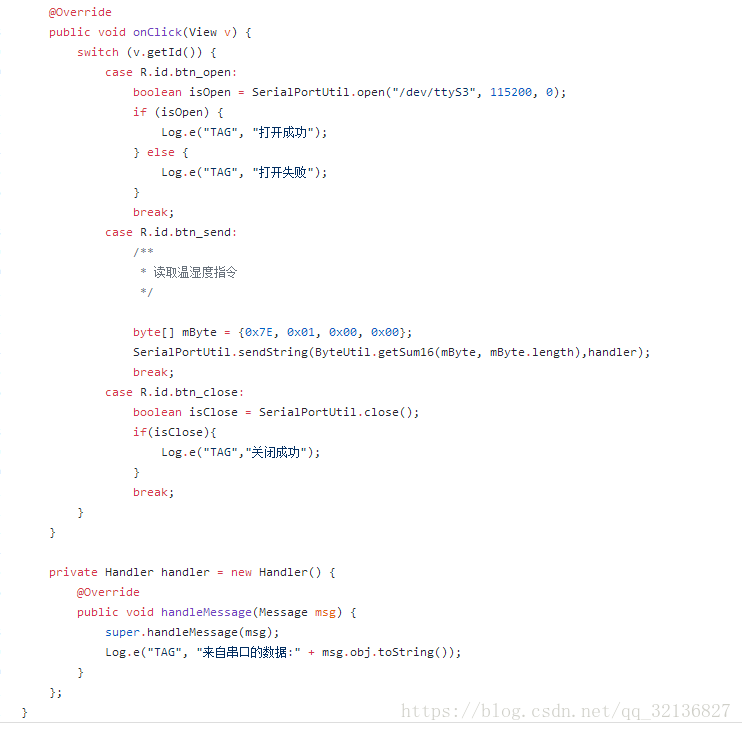
省心又省劲是不是,用到串口的项目可以直接当一个libray导入项目,不过需要检验的话还是得根据自己的校验方法来进行校验
以上全为原创,如有讲解不到之处,还请广大朋友指点一下

旨在为数千万中国开发者提供一个无缝且高效的云端环境,以支持学习、使用和贡献开源项目。
更多推荐


 14
14 0
0- 0


 已为社区贡献3条内容

所有评论(0)