vue项目使用tinymce
前言:之前没用过富文本编辑器,最近项目中要用到富文本编辑器,而且要能上传图片,编写表格,就只好各种查文档,百度搜,本来用的是vue-quill-editor,可惜这个编辑器不能编写表格(也可能只是我没找到编写表格的配置),之后又用了wangEditor,个人感觉这个不太好看,之后就接着搜富文本编辑器,搜到一篇文章--vue项目移植tinymce踩坑,2这篇文章里关于编辑器的配置,怎么上传图片都介绍
·
前言:
之前没用过富文本编辑器,最近项目中要用到富文本编辑器,而且要能上传图片,编写表格,就只好各种查文档,百度搜,本来用的是vue-quill-editor,可惜这个编辑器不能编写表格(也可能只是我没找到编写表格的配置),之后又用了wangEditor,个人感觉这个不太好看,之后就接着搜富文本编辑器,搜到一篇文章--vue项目移植tinymce踩坑,2这篇文章里关于编辑器的配置,怎么上传图片都介绍的比较详细。本文只是根据这篇文章的一点改进,方便直接复制粘贴使用
一、下载所需插件
- 首先直接 npm install tinymce -S
- 下载中文语言包,附上地址下载链接
- 把node_modules\tinymce下的skins文件夹和中文语言包解压后的文件夹放到项目根目录下
二、创建方便引用的富文本编辑器组件
话不多说直接上代码
创建组件editor.vue
<template>
  <textarea :id='id' :value='value'></textarea>
</template>

<script>
  // Import TinyMCE
  import tinymce from 'tinymce/tinymce'
  import 'tinymce/themes/modern/theme'
  import 'tinymce/plugins/advlist' // 这几条引入是因为我的导入不了,不知道为啥
  import 'tinymce/plugins/link'
  import 'tinymce/plugins/image'
  import 'tinymce/plugins/code'
  import 'tinymce/plugins/table'
  import 'tinymce/plugins/textcolor'
  import 'tinymce/plugins/paste'
  import 'tinymce/plugins/textcolor'
  import 'tinymce/plugins/colorpicker'
  const INIT = 0
  const CHANGED = 2
  // var EDITOR = null
  export default {
    props: {
      value: {
        type: String,
        editor: null,
        required: true
      },
      setting: {},
      url: { // 接口
        default: '',
        type: String
      },
      accept: { // 文件类型
        default: 'image/jpeg, image/png',
        type: String
      },
      maxSize: { // 大小
        default: 2097152,
        type: Number
      },
      withCredentials: {
        default: false,
        type: Boolean
      }
    },
    watch: {
      value: function(val) {
        console.log('init ' + val)
        if (this.status === INIT || tinymce.activeEditor.getContent() !== val) {
          tinymce.activeEditor.setContent(val)
        }
        this.status = CHANGED
      }
    },
    data() {
      return {
        status: INIT,
        id: 'editor-' + new Date().getMilliseconds()
      }
    },
    methods: {
    },
    mounted() {
      const _this = this
      const setting =
      {
        selector: '#' + _this.id,
        upload_image_url: '/upload/cloud', // 配置的上传图片的路由
        language: 'zh_CN',
        init_instance_callback: function(editor) {
          // EDITOR = editor
          console.log('Editor: ' + editor.id + ' is now initialized.')
          editor.on('input change undo redo', () => {
            var content = editor.getContent()
            _this.$emit('show', content)
          })
        },
        content_style: `
    *                         { padding:0; margin:0; }
    html, body                { height:100%; }
    img                       { max-width:100%; display:block;height:auto; }
    a                         { text-decoration: none; }
    iframe                    { width: 100%; }
    p                         { line-height:1.6; margin: 0px; }
    table                     { word-wrap:break-word; word-break:break-all; max-width:100%; border:none; border-color:#999; }
    .mce-object-iframe        { width:100%; box-sizing:border-box; margin:0; padding:0; }
    ul,ol                     { list-style-position:inside; }
  `,
        insert_button_items: 'image link | inserttable',
        paste_retain_style_properties: 'all',
        paste_word_valid_elements: '*[*]', // word需要它
        paste_data_images: true, // 粘贴的同时能把内容里的图片自动上传,非常强力的功能
        paste_convert_word_fake_lists: false, // 插入word文档需要该属性
        paste_webkit_styles: 'all',
        paste_merge_formats: true,
        nonbreaking_force_tab: false,
        paste_auto_cleanup_on_paste: false,
        'plugins': [
          'advlist link image',
          'code',
          'table textcolor paste textcolor colorpicker'
        ], // 配置
        'toolbar_items_size': 'small',
        'block_formats': 'Paragraph=p;Heading 1=h1;Heading 2=h2;Heading 3=h3;Heading 4=h4;Heading 5=h5;Heading 6=h6;',
        'toolbar1': 'table |insertfile undo redo | formatselect | link unlink | uploadimg image media', // 工具栏1
        'toolbar2': ' fontsizeselect | forecolor backcolor | fontselect bold italic underline strikethrough | alignleft aligncenter alignright alignjustify | outdent indent | removeformat', // 工具栏2
        // 图片上传
        images_upload_handler: function(blobInfo, success, failure) {
          // failure(blobInfo)
          // _this.$emit('on-ready', blobInfo.blob().size, blobInfo.blob())
          if (blobInfo.blob().size > _this.maxSize) {
            failure('文件体积过大')
          }
          if (_this.accept.indexOf(blobInfo.blob().type) >= 0) {
            uploadPic()
          } else {
            failure('图片格式错误')
          }
          function uploadPic() { // 发送请求
            const xhr = new XMLHttpRequest()
            const formData = new FormData()
            xhr.withCredentials = _this.withCredentials
            xhr.open('POST', _this.url)
            xhr.onload = function() {
              failure('上传---' + xhr.status)
              if (xhr.status !== 200) {
                // 抛出 'on-upload-fail' 钩子
                _this.$emit('on-upload-fail')
                failure('上传失败: ' + xhr.status)
                return
              }
              const json = JSON.parse(xhr.responseText)
              // 抛出 'on-upload-success' 钩子
              _this.$emit('on-upload-success', [
                json, success, failure
              ])
            }
            xhr.onerror = function() {
              _this.$emit('on-ready', '上传失败')
            }
            formData.append('file', blobInfo.blob())
            xhr.send(formData)
          }
        }
      }
      Object.assign(setting, _this.setting)

      tinymce.init(setting)
    },
    beforeDestroy: function() {
      tinymce.get(this.id).destroy()
    }
  }
</script>
三、其他组件引用
代码如下
<template>
  <div class="app-container calendar-list-container">
        <div style="margin:0 5%; width: 90%;">
          <editor
            class="editor"
            :value="content"
            :setting="editorSetting"
            @show="editors"
            :url              = "Url"
            :max-size         = "MaxSize"
            :accept           = "Accept"
            :with-credentials = "withCredentials"
            @on-upload-fail         = "onEditorReady"
            @on-upload-success= "onEditorUploadComplete"></editor>
        </div>
  </div>
</template>
<script type="text/ecmascript-6">
  import editor from './editor' // 根据editor.vue组件位置引入
  export default {
    data() {
      return {
        editorSetting: { // 配置富文本编辑器高
          height: 300
        },
        Url: 'http://localhost:9528/api/PublicTransaction-SYS-Web/upload/singleUpload', // 图片对应的上传地址
        MaxSize: 75765, // 文件大小
        Accept: 'image/jpeg, image/png', // 文件格式
        withCredentials: true,
        content: '' // 富文本编辑器双向绑定的内容
      }
    },
    components: { // 引入组件
      editor
    },
    methods: {
      editors(content) { // editor组件传过来的值赋给content
        console.log(content)
        this.content = content
      },
      onEditorReady(ins, ina) { // 上传失败的函数
        console.log('ins')
        console.log(ins)
        console.log(ina)
      },
      onEditorUploadComplete(json) { // 处理上传图片后返回数据,添加img标签到编辑框内
        console.log('json')
        console.log(json)
        console.log(json[0].data.filePath)
        this.content = this.content + '<img src=' + json[0].data.filePath + '>'
      }
    }
  }
</script>
<style scoped >

</style>
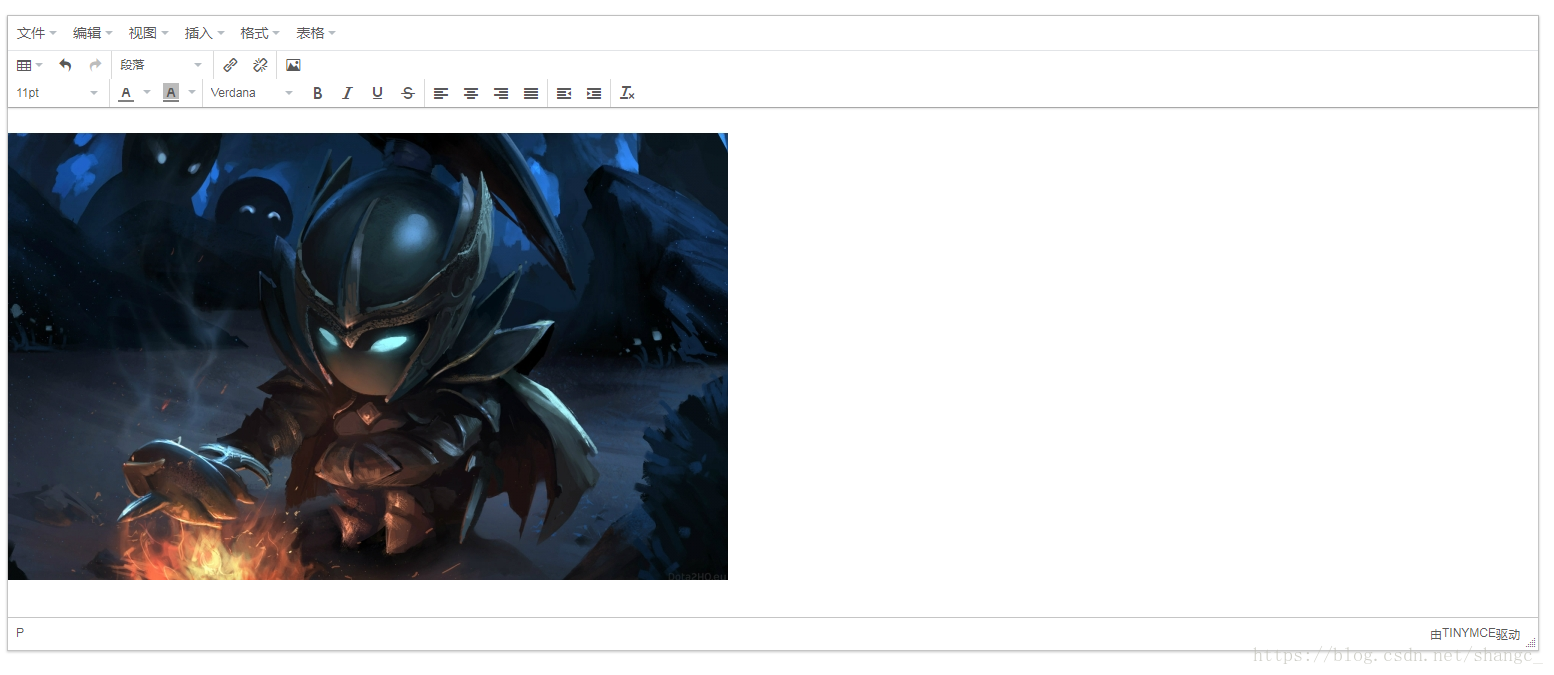
引入要给组件嵌套一个标签,否则右边会超出,很难看,最后附上成果图(右下角有一个像文本域一样的小三角,可以拉长显示区域),以后要用了复制粘贴就方便了

更多推荐
 已为社区贡献1条内容


所有评论(0)