android设置控件样式(边框颜色,圆角)和图片样式(圆角)
android设置控件样式(边框颜色,圆角)和图片样式(圆角)设置布局的背景为 圆角边框:<?xml version="1.0" encoding="utf-8"?><shape xmlns:android="http://schemas.android.com/apk/res/android"&
android设置控件样式(边框颜色,圆角)和图片样式(圆角)
设置布局的背景为 圆角边框:
<?xml version="1.0" encoding="utf-8"?>
<shape xmlns:android="http://schemas.android.com/apk/res/android">
    <solid android:color="@color/colorAccent" />
    <!-- 这里是设置为四周 也可以单独设置某个位置为圆角-->
    <corners android:topLeftRadius="5dp"
        android:topRightRadius="5dp"
        android:bottomRightRadius="5dp"
        android:bottomLeftRadius="5dp"/>
    <stroke android:width="1dp" android:color="#000000" />
</shape>
说明: solid为填充色 即内部的背景填充色 ,stroke 为边框 可以设置颜色和宽度
设置边框颜色:
在drawable中 新建一个button_edge.xml文件
<?xml version="1.0" encoding="UTF-8"?>
<layer-list xmlns:android="http://schemas.android.com/apk/res/android">
<!-- 边框颜色值 -->
<item>
      <shape>
            <solid android:color="#3bbaff" />
      </shape>
</item>

<!--这个是按钮边框设置为四周 并且宽度为1-->
<item
android:right="1dp"
android:left="1dp"
android:top="1dp"
android:bottom="1dp">
     <shape>
<!--这个是背景颜色-->
           <solid android:color="#ffffff" />
<!--这个是按钮中的字体与按钮内的四周边距-->
           <padding android:bottom="10dp"
                android:left="10dp"
                android:right="10dp"
                android:top="10dp" />
     </shape>
</item>
</layer-list>
使用:
android:background="@drawable/button_edge" 圆角按钮:(其实按钮还是方形的,只是将外围部分隐藏了而已)
在drawable中: 新建一个 button_circle_shape.xml文件
<?xml version="1.0" encoding="UTF-8"?>
<shape
    xmlns:android="http://schemas.android.com/apk/res/android"
    android:shape="rectangle">
    <!-- 填充的颜色 -->
    <solid android:color="#FFFFFF" />
    <!-- android:radius 弧形的半径 -->
    <!-- 设置按钮的四个角为弧形 -->
    <corners
    android:radius="5dip" />
    <!--也可单独设置-->
    <!-- <corners -->
   <!-- android:topLeftRadius="10dp"-->
   <!-- android:topRightRadius="10dp"-->
   <!-- android:bottomRightRadius="10dp"-->
  <!--  android:bottomLeftRadius="10dp"-->
 <!--   />  -->
        **设置文字padding**
    <!-- padding:Button里面的文字与Button边界的间隔 -->
    <padding
        android:left="10dp"
        android:top="10dp"
        android:right="10dp"
        android:bottom="10dp"
        />
</shape>
使用:
android:background="@drawable/shape" 设置圆角图片
1 简单的设置:(不能添加自定义图片 只能设置颜色和字体)
在drawable中 创建一个image_circle.xml图片
<?xml version="1.0" encoding="utf-8"?>
<shape xmlns:android="http://schemas.android.com/apk/res/android">
    <solid android:color="#FFFFFF" />
    <corners android:topLeftRadius="10dp"
        android:topRightRadius="10dp"
        android:bottomRightRadius="10dp"
        android:bottomLeftRadius="10dp"/>
</shape>
使用:
android:background="@drawable/image_circle" 但是这样的图片不能自定义添加 灵活性不好
2 通过Glide加载图片的时候进行转换
使用Glide的transform函数
Glide.with(MainActivity.this).load(croppedUri)
.transform(new GlideRectRound(MainActivity.this,6)).into(headIcon);
矩形圆角
GlideRectRound.java文件
import android.content.Context;
import android.content.res.Resources;
import android.graphics.Bitmap;
import android.graphics.BitmapShader;
import android.graphics.Canvas;
import android.graphics.Paint;
import android.graphics.RectF;
import android.util.Log;
import com.bumptech.glide.load.engine.bitmap_recycle.BitmapPool;
import com.bumptech.glide.load.resource.bitmap.BitmapTransformation;

/**
 * Created by SiHao on 2018/3/3.
 * Glide 的 圆角 图片 工具类
 */

public class GlideRectRound extends BitmapTransformation {
    private static float radius = 0f;
    // 构造方法1 无传入圆角度数 设置默认值为5

    public GlideRectRound(Context context) {
        this(context, 5);
    }

    // 构造方法2 传入圆角度数
    public GlideRectRound(Context context, int dp) {
        super(context);
        // 设置圆角度数
        radius = Resources.getSystem().getDisplayMetrics().density * dp;
    }

    // 重写该方法 返回修改后的Bitmap
    @Override
    protected Bitmap transform(BitmapPool pool, Bitmap toTransform, int outWidth, int outHeight) {
        return rectRoundCrop(pool,toTransform);
    }

    @Override
    public String getId() {
        Log.e("getID",getClass().getName() + Math.round(radius));
        return getClass().getName() + Math.round(radius);   // 四舍五入
    }


    private Bitmap rectRoundCrop(BitmapPool pool, Bitmap source){
        if (source == null) return null;
        Bitmap result = pool.get(source.getWidth(), source.getHeight(), Bitmap.Config.ARGB_8888); // ARGB_4444——代表4x4位ARGB位图,ARGB_8888——代表4x8位ARGB位图
        if (result == null) {
            result = Bitmap.createBitmap(source.getWidth(), source.getHeight(), Bitmap.Config.ARGB_8888);
        }
        Canvas canvas = new Canvas(result);
        Paint paint = new Paint();
        // setShader 对图像进行渲染
        // 子类之一 BitmapShader设置Bitmap的变换  TileMode 有CLAMP (取bitmap边缘的最后一个像素进行扩展),REPEAT(水平地重复整张bitmap)
        //MIRROR(和REPEAT类似,但是每次重复的时候,将bitmap进行翻转)
        paint.setShader(new BitmapShader(source, BitmapShader.TileMode.CLAMP, BitmapShader.TileMode.CLAMP));
        paint.setAntiAlias(true);   // 抗锯齿
        RectF rectF = new RectF(0f, 0f, source.getWidth(), source.getHeight());
        canvas.drawRoundRect(rectF, radius, radius, paint);
        return result;
    }
}
圆角:
import android.content.Context;
import android.graphics.Bitmap;
import android.graphics.BitmapShader;
import android.graphics.Canvas;
import android.graphics.Paint;

import com.bumptech.glide.load.engine.bitmap_recycle.BitmapPool;
import com.bumptech.glide.load.resource.bitmap.BitmapTransformation;

/**
 * Created by SiHao on 2018/3/3.
 * Glide圆形图片工具类
 */

public class GlideCircleBitmap extends BitmapTransformation{

    public GlideCircleBitmap(Context context) {
        super(context);
    }

    // 重写该方法 返回修改后的Bitmap
    @Override
    protected Bitmap transform(BitmapPool pool, Bitmap toTransform, int outWidth, int outHeight) {
        return circleCrop(pool, toTransform);
    }

    @Override
    public String getId() {
        return getClass().getName();
    }


    private static Bitmap circleCrop(BitmapPool pool, Bitmap source) {
        if (source == null) return null;
        // 边长取长宽最小值
        int size = Math.min(source.getWidth(), source.getHeight());
        int x = (source.getWidth() - size) / 2;
        int y = (source.getHeight() - size) / 2;

        // TODO this could be acquired from the pool too
        Bitmap squared = Bitmap.createBitmap(source, x, y, size, size);

        Bitmap result = pool.get(size, size, Bitmap.Config.ARGB_8888);// ARGB_4444——代表4x4位ARGB位图,ARGB_8888——代表4x8位ARGB位图
        if (result == null) {
            result = Bitmap.createBitmap(size, size, Bitmap.Config.ARGB_8888);
        }

        Canvas canvas = new Canvas(result);
        Paint paint = new Paint();
        // setShader 对图像进行渲染
        // 子类之一 BitmapShader设置Bitmap的变换  TileMode 有CLAMP (取bitmap边缘的最后一个像素进行扩展),REPEAT(水平地重复整张bitmap)
        //MIRROR(和REPEAT类似,但是每次重复的时候,将bitmap进行翻转)
        paint.setShader(new BitmapShader(squared, BitmapShader.TileMode.CLAMP, BitmapShader.TileMode.CLAMP));
        paint.setAntiAlias(true);// 抗锯齿
        // 半径取 size的一半
        float r = size / 2f;
        canvas.drawCircle(r, r, r, paint);
        return result;
    }
}
3 java代码方式动态处理
通过获取相应的bitmap资源 可以 drawable 可以 uril 资源
URI 的话要转为bitmap资源
URL url = new URL(String类型的字符串);    //将String类型的字符串转换为URL格式
holder.UserImage.setImageBitmap(BitmapFactory.decodeStream(url.openStream()));
然后在原图上设置新的图片
矩形圆角
//得到资源文件的BitMap
Bitmap image= BitmapFactory.decodeResource(getResources(),R.drawable.dog);
//创建RoundedBitmapDrawable对象
RoundedBitmapDrawable roundImg =RoundedBitmapDrawableFactory.create(getResources(),image);
//抗锯齿
roundImg.setAntiAlias(true);
//设置圆角半径
roundImg.setCornerRadius(30);
//设置显示图片
imageView.setImageDrawable(roundImg);
圆形:
//如果是圆的时候,我们应该把bitmap图片进行剪切成正方形, 然后再设置圆角半径为正方形边长的一半即可
  Bitmap image = BitmapFactory.decodeResource(getResources(), R.drawable.dog);
  Bitmap bitmap = null;
  //将长方形图片裁剪成正方形图片
  if (image.getWidth() == image.getHeight()) {
      bitmap = Bitmap.createBitmap(image, image.getWidth() / 2 - image.getHeight() / 2, 0, image.getHeight(), image.getHeight());
  } else {
      bitmap = Bitmap.createBitmap(image, 0, image.getHeight() / 2 - image.getWidth() / 2, image.getWidth(), image.getWidth());
  }
  RoundedBitmapDrawable roundedBitmapDrawable = RoundedBitmapDrawableFactory.create(getResources(), bitmap);
  //圆角半径为正方形边长的一半
  roundedBitmapDrawable.setCornerRadius(bitmap.getWidth() / 2);
  //抗锯齿
  roundedBitmapDrawable.setAntiAlias(true);
  imageView.setImageDrawable(roundedBitmapDrawable);
4 利用Google给出的PorterDuffXfermode,如下图 利用两层源图像Src和目标图像Dst(当然,其实这两层都是源图像,拼接得到的才叫目标图像 所以有些人把src叫做顶层,dst叫做底层)的叠加效果,实现不同图片样式的显示
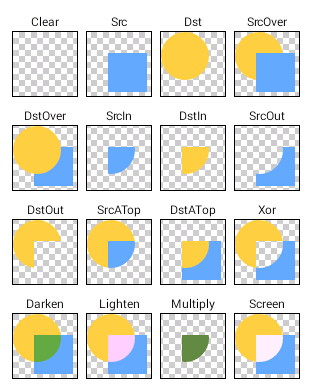
两个图片的叠加模式有16种,如下 对照上面的图更形象的感受:
PorterDuff.Mode.CLEAR
所绘制不会提交到画布上

PorterDuff.Mode.SRC
只显示SRC的图

PorterDuff.Mode.DST
只显示Dst的图

PorterDuff.Mode.SRC_OVER
都显示 只是若有叠加部分 显示SRC的内容

PorterDuff.Mode.DST_OVER
 都显示 只是若有叠加部分 显示DST的内容

PorterDuff.Mode.SRC_IN
只显示两层绘制的交集部分,并且显示SRC顶层部分

PorterDuff.Mode.DST_IN
只显示两层绘制的交集部分,并且显示DST底层部分

PorterDuff.Mode.SRC_OUT
取两层的并集减去SRC的部分


PorterDuff.Mode.DST_OUT
取两层的并集减去DST的部分


PorterDuff.Mode.SRC_ATOP
显示DST底层并且把SRC层和DST层的交集部分显示为SRC层


PorterDuff.Mode.DST_ATOP
显示SRC顶层并且把SRC层和DST层的交集部分显示为DST层


PorterDuff.Mode.XOR
取两个层的非交集部分

PorterDuff.Mode.DARKEN
显示两层,并且把交集部分的进行对应像素的比较,取较暗值,如果色值相同则进行混合

PorterDuff.Mode.LIGHTEN
显示两层,并且把交集部分的进行对应像素的比较,取较亮值,如果色值相同则进行混合

PorterDuff.Mode.MULTIPLY
 查看每个通道中的颜色信息,并将基色与混合色复合。结果色总是较暗的颜色,任何颜色与黑色复合产生黑色,任何颜色与白色复合保持不变,当用黑色或白色以外的颜色绘画时,绘画工具绘制的连续描边产生逐渐变暗的颜色

PorterDuff.Mode.SCREEN
保留两个图层中较白的部分,较暗的部分被遮盖;当一层使用了滤色(屏幕)模式时,图层中纯黑的部分变成完全透明,纯白部分完全不透明,其他的颜色根据颜色级别产生半透明的效果

为开发者提供学习成长、分享交流、生态实践、资源工具等服务,帮助开发者快速成长。
更多推荐


 24
24 0
0- 0


 已为社区贡献3条内容

所有评论(0)