Python_06_CGI编程
Python高级编程之CGI先来个效果图:如果第1行,注释符号与!之间 多了一个空格的话,就会报错500,并且怎么也找不到错误!当然,还是可以通过查看apache错误日记,找到错误原因哈/private/var/log/apache2/error_log #!/usr/bin/env python Apache支持CGI配置下面就来详细说明配置的...
Python高级编程之CGI
先来个效果图:

如果第1行,注释符号与!之间 多了一个空格的话,就会报错500,并且怎么也找不到错误!
当然,还是可以通过查看apache错误日记,找到错误原因哈
/private/var/log/apache2/error_log
#!/usr/bin/env python
Apache支持CGI配置
下面就来详细说明配置的过程。
找到安装Apache的目录/private/etc/apache2/httpd.conf,并对httpd.conf配置文件进行修改,
具体如下:
(1)加载cgi模块
158行附近去掉注释:
#LoadModule cgi_module libexec/apache2/mod_cgi.so
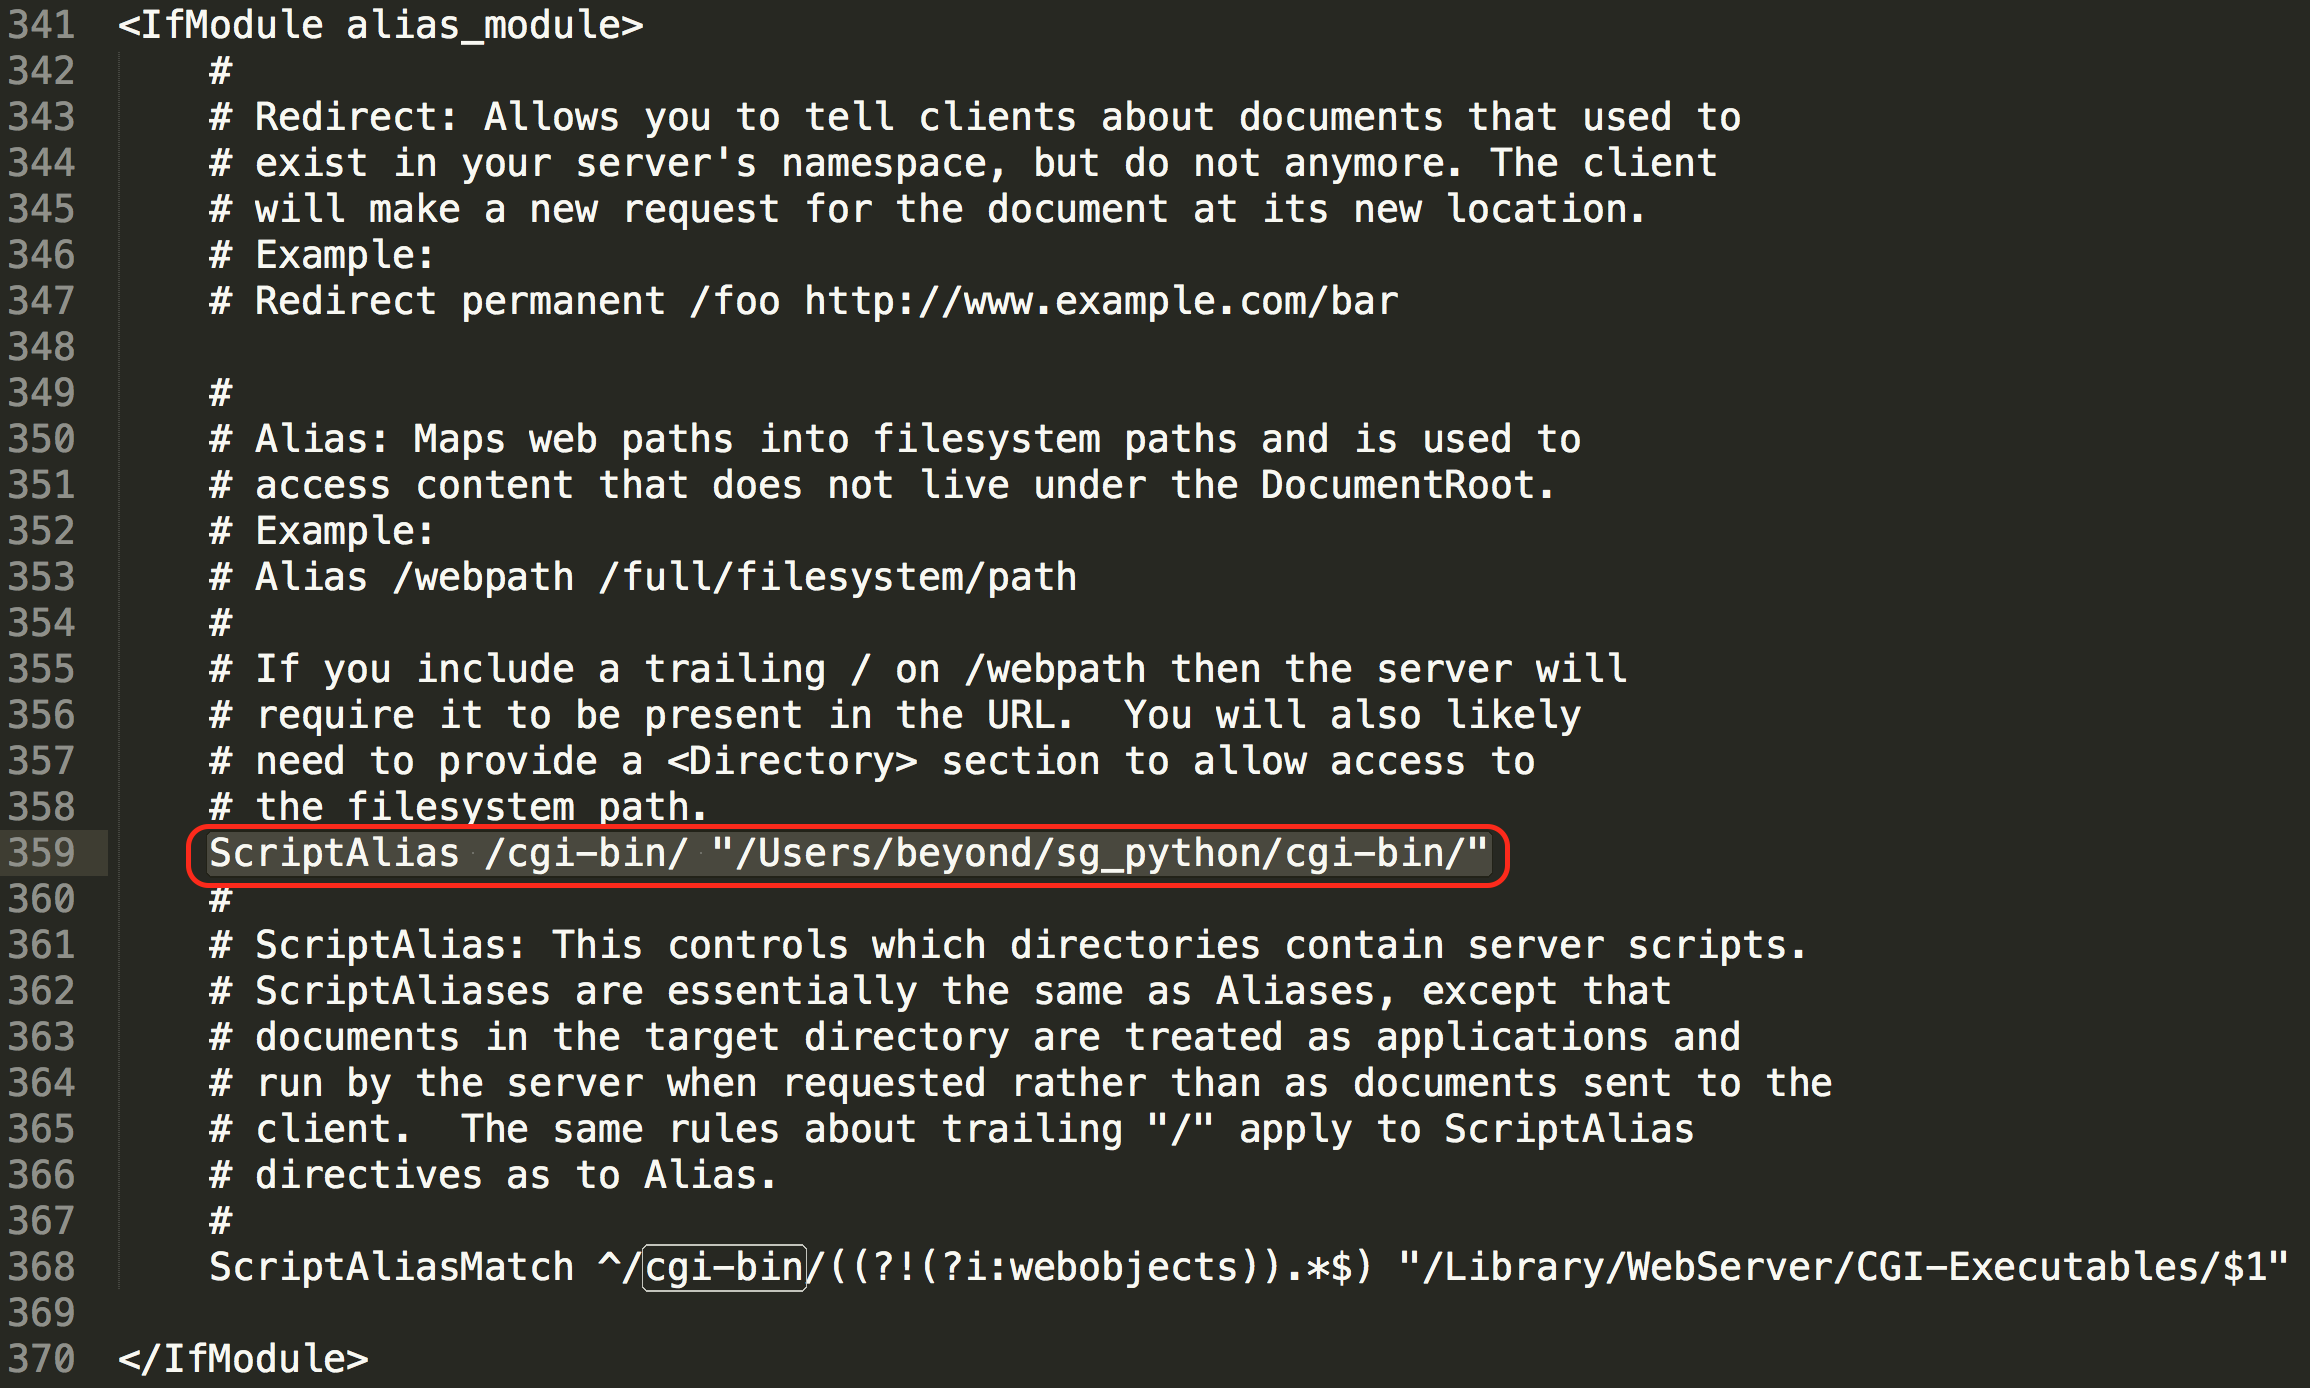
(2)设置cgi脚本文件路径为自己的文件夹
注:后面必须带反斜杠
ScriptAlias /cgi-bin/ "/Users/beyond/sg_python/cgi-bin/"
注意这里路径末尾一定要加/,否则apache是无法打到该路径下的文件的。
PS:在alias_module中设置别名对应的路径,建议别名设置在ScriptAliasMatch之上,示例图片如下:
(3)设置cgi路径的访问权限
大概在httpd.conf 220行:
<Directory />
AllowOverride none
Require all denied
</Directory>
将上面的内容全部修改为下面的内容:
| 1 2 3 4 5 6 |
|
示例图片如下:

(4)设置apache可解释python的cgi脚本文件
大概在httpd.conf的433行:
#AddHandler cgi-script .cgi
去掉注释,将其修改为:
| 1 |
|
加上.pl .py后,就可以解释python的脚本文件了,
如果你需要解释shell的脚本文件,可以添加.pl,其它的类似。
OK,完成上面的4步之后,CGI配置就算完成了。不过在配置完成之后,我们需要重启一下Apache服务:
sudo apachectl restart
3.添加CGI脚本文件
(1)创建cgi脚本文件
在/Users/beyond/sg_python/cgi-bin/目录下添加下面一个文件,并命名为cgi_1.py:
| 1 2 3 4 5 6 7 8 9 10 11 12 13 |
|
注意#!/usr/bin/env python一定要加上,且#后面不能有空格!!!否则会出现500错误提示。
(2)设置cgi脚本文件的文件权限为755
chmod 755 cgi_1.py
此步非常非常重要,如果忘记这步,无论你怎么找配置文件也找不出错误,就算看代码也不会发现有错误,然后通过浏览器访问时会一直显示500错误,所以一定要记得该步操作啊!
HTTP头部
hello.py文件内容中的" Content-type:text/html\r\n\r\n"即为HTTP头部的一部分,它会发送给浏览器告诉浏览器文件的内容类型。
注意:\r\n\r\n必不可少,否则500错误
HTTP头部的格式如下:
HTTP 字段名: 字段内容

例如
Content-type: text/html\r\n\r\n
以下表格介绍了CGI程序中HTTP头部经常使用的信息:
| 头 | 描述 |
|---|---|
| Content-type: | 请求的与实体对应的MIME信息。例如: Content-type:text/html |
| Expires: Date | 响应过期的日期和时间 |
| Location: URL | 用来重定向接收方到非请求URL的位置来完成请求或标识新的资源 |
| Last-modified: Date | 请求资源的最后修改时间 |
| Content-length: N | 请求的内容长度 |
| Set-Cookie: String | 设置Http Cookie |
CGI环境变量
所有的CGI程序都接收以下的环境变量,这些变量在CGI程序中发挥了重要的作用:
| 变量名 | 描述 |
|---|---|
| CONTENT_TYPE | 这个环境变量的值指示所传递来的信息的MIME类型。目前,环境变量CONTENT_TYPE一般都是:application/x-www-form-urlencoded,他表示数据来自于HTML表单。 |
| CONTENT_LENGTH | 如果服务器与CGI程序信息的传递方式是POST,这个环境变量即使从标准输入STDIN中可以读到的有效数据的字节数。这个环境变量在读取所输入的数据时必须使用。 |
| HTTP_COOKIE | 客户机内的 COOKIE 内容。 |
| HTTP_USER_AGENT | 提供包含了版本数或其他专有数据的客户浏览器信息。 |
| PATH_INFO | 这个环境变量的值表示紧接在CGI程序名之后的其他路径信息。它常常作为CGI程序的参数出现。 |
| QUERY_STRING | 如果服务器与CGI程序信息的传递方式是GET,这个环境变量的值即使所传递的信息。这个信息经跟在CGI程序名的后面,两者中间用一个问号'?'分隔。 |
| REMOTE_ADDR | 这个环境变量的值是发送请求的客户机的IP地址,例如上面的192.168.1.67。这个值总是存在的。而且它是Web客户机需要提供给Web服务器的唯一标识,可以在CGI程序中用它来区分不同的Web客户机。 |
| REMOTE_HOST | 这个环境变量的值包含发送CGI请求的客户机的主机名。如果不支持你想查询,则无需定义此环境变量。 |
| REQUEST_METHOD | 提供脚本被调用的方法。对于使用 HTTP/1.0 协议的脚本,仅 GET 和 POST 有意义。 |
| SCRIPT_FILENAME | CGI脚本的完整路径 |
| SCRIPT_NAME | CGI脚本的的名称 |
| SERVER_NAME | 这是你的 WEB 服务器的主机名、别名或IP地址。 |
| SERVER_SOFTWARE | 这个环境变量的值包含了调用CGI程序的HTTP服务器的名称和版本号。例如,上面的值为Apache/2.2.14(Unix) |
以下是一个简单的CGI脚本输出CGI的环境变量:
注意:千万要记得修改权限为755,否则永远500错误
#!/usr/bin/env python
# -*- coding: UTF-8 -*-

# 千万要记得chmod 755 cgi_2.py
import os
print "Content-Type:text/html\r\n\r\n"

print '<table border="3">'
print '<tr>'
print '<th>key</th>'
print '<th>value</th>'
print '</tr>'
for param in os.environ.keys():
    print '<tr><td>%s</td><td>%s</td></tr>' % (param,os.environ[param])

print '</table>'
输出结果如下:
| key | value |
|---|---|
| CONTEXT_DOCUMENT_ROOT | /Users/beyond/sg_python/cgi-bin/ |
| SERVER_SOFTWARE | Apache/2.4.25 (Unix) PHP/5.6.30 |
| CONTEXT_PREFIX | /cgi-bin/ |
| SERVER_SIGNATURE | |
| REQUEST_METHOD | GET |
| PATH_INFO | / |
| SERVER_PROTOCOL | HTTP/1.1 |
| QUERY_STRING | |
| PATH | /usr/bin:/bin:/usr/sbin:/sbin |
| HTTP_USER_AGENT | Mozilla/5.0 (Macintosh; Intel Mac OS X 10_12_5) AppleWebKit/537.36 (KHTML, like Gecko) Chrome/63.0.3239.84 Safari/537.36 |
| HTTP_CONNECTION | keep-alive |
| SERVER_NAME | localhost |
| REMOTE_PORT | 60026 |
| PATH_TRANSLATED | /Library/WebServer/Documents/index.html.en |
| SERVER_PORT | 80 |
| SERVER_ADDR | ::1 |
| DOCUMENT_ROOT | /Library/WebServer/Documents |
| VERSIONER_PYTHON_PREFER_32_BIT | no |
| SCRIPT_FILENAME | /Users/beyond/sg_python/cgi-bin/cgi_2.py |
| SERVER_ADMIN | you@example.com |
| HTTP_HOST | localhost |
| SCRIPT_NAME | /cgi-bin/cgi_2.py |
| HTTP_UPGRADE_INSECURE_REQUESTS | 1 |
| HTTP_CACHE_CONTROL | max-age=0 |
| REQUEST_URI | /cgi-bin/cgi_2.py/ |
| HTTP_ACCEPT | text/html,application/xhtml+xml,application/xml;q=0.9,image/webp,image/apng,*/*;q=0.8 |
| GATEWAY_INTERFACE | CGI/1.1 |
| REMOTE_ADDR | ::1 |
| HTTP_ACCEPT_LANGUAGE | zh-CN,zh;q=0.9,en;q=0.8 |
| REQUEST_SCHEME | http |
| __CF_USER_TEXT_ENCODING | 0x46:0:0 |
| VERSIONER_PYTHON_VERSION | 2.7 |
| HTTP_ACCEPT_ENCODING | gzip, deflate, br |
CGI编程之GET POST请求
GET和POST方法
浏览器客户端通过两种方法向服务器传递信息,这两种方法就是 GET 方法和 POST 方法。

使用GET方法传输数据
GET方法发送编码后的用户信息到服务端,数据信息包含在请求页面的URL上,以"?"号分割, 如下所示:

http://www.test.com/cgi-bin/hello.py?key1=value1&key2=value2
有关 GET 请求的其他一些注释:
GET 请求可被缓存
GET 请求保留在浏览器历史记录中
GET 请求可被收藏为书签
GET 请求不应在处理敏感数据时使用
GET 请求有长度限制
GET 请求只应当用于取回数据
简单的url实例:GET方法
以下是一个简单的URL,使用GET方法向hello_get.py程序发送两个参数:
#last name is given name,means family name
/cgi-bin/hello_get.py?first_name=bruce&last_name=Lee
以下为hello_get.py文件的代码:

#coding=utf-8
#!/usr/bin/python

# CGI处理模块
import cgi, cgitb

# 创建 FieldStorage 的实例化
form = cgi.FieldStorage()

# 获取数据
first_name = form.getvalue('first_name')
last_name  = form.getvalue('last_name')

print "Content-type:text/html\r\n\r\n"
print "<html>"
print "<head>"
print "<title>Hello - Second CGI Program</title>"
print "</head>"
print "<body>"
print "<h2>Hello %s %s</h2>" % (first_name, last_name)
print "</body>"
print "</html>"
浏览器请求输出结果:

Hello Bruce Lee
简单的表单实例:GET方法
以下是一个通过HTML的表单使用GET方法向服务器发送两个数据,提交的服务器脚本同样是hello_get.py文件,代码如下:

<form action="/cgi-bin/hello_get.py" method="get">
First Name: <input type="text" name="first_name">  <br />

Last Name: <input type="text" name="last_name" />
<input type="submit" value="Submit" />
</form>
使用POST方法传递数据
使用POST方法向服务器传递数据是更安全可靠的,像一些敏感信息如用户密码等需要使用POST传输数据。

以下同样是hello_get.py ,它也可以处理浏览器提交的POST表单数据:

#coding=utf-8
#!/usr/bin/python

# 引入 CGI 模块
import cgi, cgitb

# 创建 FieldStorage 实例
form = cgi.FieldStorage()

# 获取表单数据
first_name = form.getvalue('first_name')
last_name  = form.getvalue('last_name')

print "Content-type:text/html\r\n\r\n"
print "<html>"
print "<head>"
print "<title>Hello - Second CGI Program</title>"
print "</head>"
print "<body>"
print "<h2>Hello %s %s</h2>" % (first_name, last_name)
print "</body>"
print "</html>"
以下为表单通过POST方法向服务器脚本hello_get.py提交数据:

<form action="/cgi-bin/hello_get.py" method="post">
First Name: <input type="text" name="first_name"><br />
Last Name: <input type="text" name="last_name" />

<input type="submit" value="Submit" />
</form>
通过CGI程序传递checkbox数据
checkbox用于提交一个或者多个选项数据,HTML代码如下:

<form action="/cgi-bin/checkbox.cgi" method="POST" target="_blank">
<input type="checkbox" name="maths" value="on" /> Maths
<input type="checkbox" name="physics" value="on" /> Physics
<input type="submit" value="Select Subject" />
</form>
以下为 checkbox.cgi 文件的代码:

#coding=utf-8
#!/usr/bin/python

# 引入 CGI 处理模块
import cgi, cgitb

# 创建 FieldStorage的实例
form = cgi.FieldStorage()

# 接收字段数据
if form.getvalue('maths'):
   math_flag = "ON"
else:
   math_flag = "OFF"

if form.getvalue('physics'):
   physics_flag = "ON"
else:
   physics_flag = "OFF"

print "Content-type:text/html\r\n\r\n"
print "<html>"
print "<head>"
print "<title>Checkbox - Third CGI Program</title>"
print "</head>"
print "<body>"
print "<h2> CheckBox Maths is : %s</h2>" % math_flag
print "<h2> CheckBox Physics is : %s</h2>" % physics_flag
print "</body>"
print "</html>"
通过CGI程序传递Radio数据
Radio只向服务器传递一个数据,HTML代码如下:

<form action="/cgi-bin/radiobutton.py" method="post" target="_blank">
<input type="radio" name="subject" value="maths" /> Maths
<input type="radio" name="subject" value="physics" /> Physics
<input type="submit" value="Select Subject" />
</form>
radiobutton.py 脚本代码如下:

#coding=utf-8
#!/usr/bin/python

# Import modules for CGI handling
import cgi, cgitb

# Create instance of FieldStorage
form = cgi.FieldStorage()

# Get data from fields
if form.getvalue('subject'):
   subject = form.getvalue('subject')
else:
   subject = "Not set"

print "Content-type:text/html\r\n\r\n"
print "<html>"
print "<head>"
print "<title>Radio - Fourth CGI Program</title>"
print "</head>"
print "<body>"
print "<h2> Selected Subject is %s</h2>" % subject
print "</body>"
print "</html>"
通过CGI程序传递 Textarea 数据
Textarea向服务器传递多行数据,HTML代码如下:

<form action="/cgi-bin/textarea.py" method="post" target="_blank">
<textarea name="textcontent" cols="40" rows="4">
Type your text here...
</textarea>
<input type="submit" value="Submit" />
</form>
textarea.cgi脚本代码如下:

#coding=utf-8
#!/usr/bin/python

# Import modules for CGI handling
import cgi, cgitb

# Create instance of FieldStorage
form = cgi.FieldStorage()

# Get data from fields
if form.getvalue('textcontent'):
   text_content = form.getvalue('textcontent')
else:
   text_content = "Not entered"

print "Content-type:text/html\r\n\r\n"
print "<html>"
print "<head>";
print "<title>Text Area - Fifth CGI Program</title>"
print "</head>"
print "<body>"
print "<h2> Entered Text Content is %s</h2>" % text_content
print "</body>"
通过CGI程序传递下拉数据
HTML下拉框代码如下:

<form action="/cgi-bin/dropdown.py" method="post" target="_blank">
<select name="dropdown">
<option value="Maths" selected>Maths</option>
<option value="Physics">Physics</option>
</select>
<input type="submit" value="Submit"/>
</form>
dropdown.py 脚本代码如下所示:

#coding=utf-8
#!/usr/bin/python

# Import modules for CGI handling
import cgi, cgitb

# Create instance of FieldStorage
form = cgi.FieldStorage()

# Get data from fields
if form.getvalue('dropdown'):
   subject = form.getvalue('dropdown')
else:
   subject = "Not entered"

print "Content-type:text/html\r\n\r\n"
print "<html>"
print "<head>"
print "<title>Dropdown Box - Sixth CGI Program</title>"
print "</head>"
print "<body>"
print "<h2> Selected Subject is %s</h2>" % subject
print "</body>"
print "</html>"
CGI编程之Cookie的设置Cookie方法
注意:Cookie的设置必须放在 "Content-type:text/html\r\n\r\n"之前。
CGI中使用Cookie
在http协议一个很大的缺点就是不作用户身份的判断,这样给编程人员带来很大的不便,

而cookie功能的出现弥补了这个缺憾。
所有cookie就是在客户访问脚本的同时,通过客户的浏览器,在客户硬盘上写入纪录数据 ,当下次客户访问脚本时取回数据信息,从而达到身份判别的功能,cookie常用在密码判断中 。


cookie的语法
http cookie的发送是通过http头部来实现的,他早于文件的传递,头部set-cookie的语法如下:

Set-cookie:name=name;expires=date;path=path;domain=domain;secure
name=name: 需要设置cookie的值(name不能使用";"和","号),有多个name值时用";"分隔例如:name1=name1;name2=name2;name3=name3。???Excuse Me???
expires=date: cookie的有效期限,格式: expires="Wdy,DD-Mon-YYYY HH:MM:SS"
path=path: 设置cookie支持的路径,如果path是一个路径,则cookie对这个目录下的所有文件及子目录生效,例如: path="/cgi-bin/",如果path是一个文件,则cookie指对这个文件生效,例如:path="/cgi-bin/cookie.cgi"。
domain=domain: 对cookie生效的域名,例如:domain="www.baidu.com"
secure: 如果给出此标志,表示cookie只能通过SSL协议的https服务器来传递。
cookie的接收是通过设置环境变量HTTP_COOKIE来实现的,CGI程序可以通过检索该变量获取cookie信息。
Cookie设置
Cookie的设置非常简单,cookie会在http头部单独发送。以下实例在cookie中设置了UserNoID 和 expires:
#!/usr/bin/env python
# -*- coding: UTF-8 -*-
#Cookie Set
# 千万要记得chmod 755 cgi_5.py
# COOKIE设置必须在Content-type之前
print "Set-Cookie:UserNoID=beyond;expires=Tuesday, 29-Jan-2019 13:59:40 GMT;domain=localhost;path=/"
print "Content-type:text/html;charset=utf-8\r\n"
print "<html>"
print "<head>"
print "<title>Cookie</title>"
print "</head>"
print "<body>"
print "<h2>Cookie set </h2>"
print "</body>"
print "</html>"
iyu注意:Cookie的设置必须放在 "Content-type:text/html\r\n\r\n"之前。
CGI编程之Cookie的获取Cookie方法
检索Cookie信息
Cookie信息检索页非常简单,Cookie信息存储在CGI的环境变量HTTP_COOKIE中,存储格式如下:
key1=value1;key2=value2;key3=value3....
以下是一个简单的CGI检索cookie信息的程序:
#!/usr/bin/env python
# -*- coding: UTF-8 -*-
from os import environ
import cgi,cgitb
#Cookie get

# 千万要记得chmod 755 cgi_6.py

print "Content-Type:text/html\r\n\r\n"
cookieStr = environ['HTTP_COOKIE']
cookieArr = cookieStr.split(";")
for oneCookie in cookieArr:
	oneCookieTrimed = oneCookie.strip()
	(key,value) = oneCookieTrimed.split("=")
	if key == 'UserNoID':
		userID = value
	if key == 'Expires':
		expiresTime = value
print "userID:%s,expiresTime:%s" % (userID,expiresTime)
CGI编程之文件上传
HTML设置上传文件的表单需要设置enctype 属性为multipart/form-data,
upload.html 代码如下所示:
<!DOCTYPE html>
<html>
<head>
<meta http-equiv="content-type" content="text/html;charset=utf-8">
</head>
<body>

<form enctype="multipart/form-data" action="/cgi-bin/cgi_7.py" method="post" target="_blank">
<p>Choose File:<input type="file" name="choosefile" /></p>
<p><input type="submit" value="Upload" /></p>
</form>


</body>
</html>
cgi_7.py接收上传的文件并写到当前目录下的代码如下:
#!/usr/bin/env python
# -*- coding: UTF-8 -*-
import cgi, os
import cgitb; cgitb.enable()
form = cgi.FieldStorage()
fileModel = form['choosefile']
msg = '未闻花名vwhm.net教程网'
if fileModel.filename:
	tmpFileNameStr = os.path.basename(fileModel.filename)
	msg = tmpFileNameStr
	# 保存到当前目录
	desFilePath = tmpFileNameStr
	try:
		open(desFilePath,'wb').write(fileModel.file.read())
		msg = 'file "'+desFilePath+'" was successful uploaded'
	except Exception as e:
		msg = str(e)
else:
	msg = "no file uploaded"

print "Content-Type:text/html\r\n\r\n"
print "--->:",msg
print "<html>"
print "<head>"
print "<title>CGI</title>"
print """
<meta name="viewport" content="width=device-width,
initial-scale=1.0, maximum-scale=1.0,minimum-scale=1.0,user-scalable=0" />
"""
print "</head>"
print "<body>"
print "<h2>this is website by python</h2>"
print "</body>"
print "</html>"
注意:写到其他目录时,可能遇到权限拒绝
--->: [Errno 13] Permission denied: 'abc.txt'
终极解决办法:
将欲写入文件的目录的权限改成777
chmod -R 777 /Users/beyond/python/cgi-bin

如果你使用的系统是Unix/Linux,你必须替换文件分隔符,在window下只需要使用open()语句即可:???Excuse Me???
fn = os.path.basename(fileitem.filename.replace("\\", "/" ))
CGI编程之文件下载
#!/usr/bin/env python
# -*- coding: UTF-8 -*-

# 千万要记得chmod 755 cgi_9.py
#\r\n必不可少
print "Content-Disposition: attachment; filename='a123.txt'\r\n"
foo = open("a123.txt","rb")
strs = foo.read()
print strs
foo.close()
PS:附 关于httpd.conf权限的说明:
#
# Deny access to the entirety of your server's filesystem. You must
# explicitly permit access to web content directories in other
# <Directory> blocks below.
#
<Directory "/Users/beyond/sg_python/">
   AllowOverride None
   Options +ExecCGI
   Order allow,deny
   Allow from all
</Directory>
关于AllowOverride None:
AllowOverride从字面上解释是允许覆盖的意思,即Apache允许另一配置文件覆盖现有配置文件。

我们通常利用Apache的rewrite模块对URL进行重写,rewrite规则会写在 .htaccess 文件里。但要使 apache 能够正常的读取.htaccess 文件的内容,就必须对.htaccess 所在目录进行配置。

从安全性考虑,根目录的AllowOverride属性一般都配置成不允许任何Override,即:

< Directory />
AllowOverride None
< /Directory>
在 AllowOverride 设置为 None 时, .htaccess 文件将被完全忽略。当此指令设置为 All 时,所有具有 “.htaccess” 作用域的指令都允许出现在 .htaccess 文件中。
关于Options +ExecCGI的说明:
Options指令是Apache配置文件中一个比较常见也比较重要的指令,
Options指令可以在Apache服务器核心配置(server config)、虚拟主机配置(virtual host)、特定目录配置(directory)以及.htaccess文件中使用。

Options指令的主要作用是控制特定目录将启用哪些服务器特性。

Options指令常见的配置示例代码如下:

<Directory />
#指定根目录"/" 启用Indexes、FollowSymLinks两种特性。
    Options Indexes FollowSymLinks
    AllowOverride all
    Order allow,deny
    Allow from all
</Directory>

Options指令的完整语法为:Options [+|-]option [[+|-]option] ...。
简而言之,Options指令后可以附加指定多种服务器特性,特性选项之间以空格分隔。

下面我们来看看Options指令后可以附加的特性选项的具体作用及含义(Apache配置中的内容均不区分大小写):

All
表示除MultiViews之外的所有特性。这也是Options指令的默认设置。

None
表示不启用任何的服务器特性。

FollowSymLinks
服务器允许在此目录中使用符号连接。如果该配置选项位于<Location>配置段中,将会被忽略。

Indexes
如果输入的网址对应服务器上的一个文件目录,而此目录中又没有DirectoryIndex指令(例如:DirectoryIndex index.html index.php),那么服务器会返回由mod_autoindex模块生成的一个格式化后的目录列表,并列出该目录下的所有文件


MultiViews
允许使用mod_negotiation模块提供内容协商的"多重视图"。
简而言之,如果客户端请求的路径可能对应多种类型的文件,
那么服务器将根据客户端请求的具体情况自动选择一个最匹配客户端要求的文件。

例如,在服务器站点的file文件夹下中存在名为hello.jpg和hello.html的两个文件,
此时用户输入Http://localhost/file/hello,如果在file文件夹下并没有hello子目录,那么服务器将会尝试在file文件夹下查找形如hello.*的文件,然后根据用户请求的具体情况返回最匹配要求的hello.jpg或者hello.html。

SymLinksIfOwnerMatch
服务器仅在符号连接与目标文件或目录的所有者具有相同的用户ID时才使用它。
简而言之,只有当符号连接和符号连接指向的目标文件或目录的所有者是同一用户时,才会使用符号连接。
如果该配置选项位于<Location>配置段中,将会被忽略。

ExecCGI
允许使用mod_cgi模块执行CGI脚本。

Includes
允许使用mod_include模块提供的服务器端包含功能。

IncludesNOEXEC
允许服务器端包含,但禁用"#exec cmd"和"#exec cgi"。
但仍可以从ScriptAlias目录使用"#include virtual"虚拟CGI脚本。

此外,Options指令语法允许在配置选项前加上符号"+"或者"-":

实际上,Apache允许在一个目录配置中设置多个Options指令。
不过,一般来说,如果一个目录被多次设置了Options,则指定特性数量最多的一个Options指令会被完全接受(其它的被忽略),而各个Options指令之间并不会合并。
但是如果我们在可选配置项前加上了符号"+"或"-",那么表示该可选项将会被合并。
所有前面加有"+"号的可选项将强制覆盖当前的可选项设置,而所有前面有"-"号的可选项将强制从当前可选项设置中去除。

你可以参考下面的例子:

#示例1
<Directory /web/file>
Options Indexes FollowSymLinks
</Directory>

<Directory /web/file/image>
Options Includes
</Directory>

#目录/web/file/image只会被设置Includes特性


#示例2
<Directory /web/file>
Options Indexes FollowSymLinks
</Directory>

<Directory /web/file/image>
Options +Includes -Indexes
</Directory>

#目录/web/file/image将会被设置Includes、FollowSymLinks两种特性

备注1:混合使用前面带"+"/"-"和前面不带"+"/"-"的同一可选项,可能会导致出现意料之外的结果。

备注2:使用-IncludesNOEXEC或-Includes时,不论前面如何设置,都会完全禁用服务器端包含。
关于权限Allow,Deny和Order:
先根据Order 看是先Allow还是先Deny,然后再去读相应的规则
详细说明如下:
给指定的文件夹配置对应的访问权限是Apache配置中的基础应用,也是Apacher的必备技能之一。

在Apache配置文件中,给指定目录设置基本的访问权限,主要是靠Allow、Deny、Order三个指令的配合使用来实现的。

1.Allow指令

Allow指令的作用与其英文单词的含义一致,用于设置允许访问当前目录(及其子目录)或文件的用户范围。例如,Allow from all表示允许所有用户访问。下面,我们参考更多的例子,以帮助理解(Deny与Order用法一致):

<Directory /web>
#只允许IP为123.10.10.2的用户访问/web目录
Allow from 123.10.10.2
</Directory>
<Directory /web>
#只允许IP以10.10开头的用户访问/web目录
Allow from 10.10
</Directory>
<Directory /web>
#只允许域名为365mini.com的用户访问
Allow from 365mini.com
</Directory>
2.Deny指令

同样的,Deny指令的作用就是「Deny(拒绝)」,用于设置拒绝访问当前目录或文件的用户范围。例如,Deny from all表示拒绝所有用户访问。

3.Order指令

在Apache的配置文件中,Order指令用于控制Allow指令和Deny指令的生效顺序。例如,Order Allow,Deny表示当前配置段中的Allow指令先生效,Deny指令后生效。

在Apache中,Allow指令和Deny指令在同一配置段中都可以有多条。不过,对于Allow和Deny指令而言,如果先生效的指令与后生效的指令的作用范围存在冲突,则起冲突的作用范围部分以后生效的指令为准。

下面,我们同样参考几个具体的例子以帮助大家理解:

<Directory /web>
Order Allow,Deny
Allow from all
Deny from 112.2.10.2
#先允许所有用户访问,再拒绝112.2.10.2
#总结:允许除IP为112.2.10.2外的所有用户访问
</Directory>
<Directory /web>
Order Allow,Deny
Deny from 112.2.10.2
Allow from all
#先允许所有用户访问,再拒绝112.2.10.2
#总结:允许除IP为112.2.10.2外的所有用户访问
#(即使Deny指令在Allow指令之前,但是根据Order Allow,Deny语句,仍然先看Allow,再看Deny)
</Directory>
<Directory /web>
Order Deny,Allow
Deny from 112.2.10.2
Allow from all
Deny from 123.10.10.1
#先拒绝112.2.10.2访问
#再拒绝123.10.10.1访问
#最后允许所有用户访问
#总结:允许所有用户访问
#(即使Allow指令在Deny指令前,但是根据Order Deny,Allow语句,仍然先看Deny,再看Allow)
</Directory>
H

CSDN联合极客时间,共同打造面向开发者的精品内容学习社区,助力成长!
更多推荐


 0
0 0
0- 0


 已为社区贡献6条内容

所有评论(0)