前端框架Vue(2)——Vue-Router 路由跳转
1、最简单:html+js全在一个文件中<!DOCTYPE html><html lang="en"><head><meta charset="UTF-8"><title>动态路由匹配</title><script src="https://unpkg.com/vue/dist/vue.js"></script><script src="https://u
·
1、最简单:html+js全在一个文件中
<!DOCTYPE html>
<html lang="en">
<head>
    <meta charset="UTF-8">
    <title>动态路由匹配</title>
    <script src="https://unpkg.com/vue/dist/vue.js"></script>
    <script src="https://unpkg.com/vue-router/dist/vue-router.js"></script>
</head>
<body>
    <div id="app">
        <h1>Hello App!</h1>
        <p>
            <!-- 使用router-link 组件来导航 -->
            <!-- 通过传入 'to' 属性指定链接 -->
            <!-- <router-link>默认会渲染成一个a标签 -->
            <router-link to="/foo">GO TO FOO</router-link>
            <router-link to="/bar">GO TO BAR</router-link>
        </p>
        <!-- 路由出口 -->
        <!-- 路由匹配到的组件将会被渲染到这里 -->
        <router-view></router-view>
    </div>
<script>
    // 1、定义组件
    const Foo = {template:'<div>foo</div>'};
    const Bar = {template:'<div>bar</div>'};
    // 2、定义路由
    // 每一个路由映射一个组件
  const routes = [
    {path:'/foo',component:Foo},
    {path:'/bar',component:Bar}
  ]
    // 3、创建router实例,然后传'routes'配置
    const router = new VueRouter({
        routes
    });

    // 4、创建和挂载根实例
    const app = new Vue({
        router
    }).$mount('#app');
</script>
</body>
</html>
2、命名路由 用name属性链接地址
<!DOCTYPE html>
<html lang="en">
<head>
  <meta charset="UTF-8">
  <title>命名路由</title>
  <script src="https://unpkg.com/vue/dist/vue.js"></script>
  <script src="https://unpkg.com/vue-router/dist/vue-router.js"></script>
</head>
<body>
<div id="app">
  <h1>Hello App!</h1>
  <p>
    <!-- 使用router-link 组件来导航 -->
    <!-- 通过传入 'to' 属性指定链接 -->
    <!-- <router-link>默认会渲染成一个a标签 -->
    <router-link :to="{name:'user',params:{id:123}}">GO TO FOO</router-link>
    <router-link :to="{name:'user',params:{id:456}}">GO TO BAR</router-link>
  </p>
  <!-- 路由出口 -->
  <!-- 路由匹配到的组件将会被渲染到这里 -->
  <router-view></router-view>
</div>
<script>
  // 1、定义组件
  const Foo = {template:'<div>foo</div>'};
  const Bar = {template:'<div>bar</div>'};
  const User = {
    template:'<div>User {{$route.params.id}}</div>',
  }
  // 2、定义路由
  // 每一个路由映射一个组件


  // 3、创建router实例,然后传'routes'配置
  const router = new VueRouter({
    routes:[
      {
        path:'/user/:id',
        name:'user',
        component: User
      }
    ]
  });

  // 4、创建和挂载根实例
  const app = new Vue({
    router
  }).$mount('#app');
</script>
</body>
</html>
3、嵌套路由
<!DOCTYPE html>
<html lang="en">
<head>
  <meta charset="UTF-8">
  <title>路由嵌套</title>
  <script src="https://unpkg.com/vue/dist/vue.js"></script>
  <script src="https://unpkg.com/vue-router/dist/vue-router.js"></script>
</head>
<body>
<div id="app">
  <h1>Hello App!</h1>
  <p>
    <!-- 使用router-link 组件来导航 -->
    <!-- 通过传入 'to' 属性指定链接 -->
    <!-- <router-link>默认会渲染成一个a标签 -->
    <router-link to="/user/foo/profile">GO TO FOO</router-link>
    <router-link to="/user/bar/posts">GO TO BAR</router-link>
  </p>
  <!-- 路由出口 -->
  <!-- 路由匹配到的组件将会被渲染到这里 -->
  <router-view></router-view>
</div>
<script>
  // 1、定义组件
  /*const Foo = {template:'<div>foo</div>'};
   const Bar = {template:'<div>bar</div>'};*/
  const User = {
    template:'<div class="user">' +
    '<h2>User {{$route.params.id}}</h2>' +
    '<router-view></router-view>' +
    '</div>'
  }
  const UserProfile = {
    template:'<div>profile</div>'
  }
  const UserPosts = {
    template:'<div>posts</div>'
  }
  // 2、定义路由
  // 每一个路由映射一个组件


  // 3、创建router实例,然后传'routes'配置
  const router = new VueRouter({
    routes:[
      {path:'/user/:id',component: User,
        children:[
          {
            //当/user/:id/profile匹配成功
            //UserProfile会被渲染在User的<router-view>
            path:'profile',
            component:UserProfile
          },
          {
            path:'posts',
            component:UserPosts
          }
        ]
      }
    ]
  });

  // 4、创建和挂载根实例
  const app = new Vue({
    router
  }).$mount('#app');
</script>
</body>
</html>
4、命名视图
<!DOCTYPE html>
<html lang="en">
<head>
  <meta charset="UTF-8">
  <title>命名视图</title>
  <script src="https://unpkg.com/vue/dist/vue.js"></script>
  <script src="https://unpkg.com/vue-router/dist/vue-router.js"></script>
</head>
<body>
<div id="app">
    <h1>Hello Views!</h1>
    <ul>
      <li>
        <router-link to="/">/</router-link>
      </li>
      <li>
        <router-link to="/other">/other</router-link>
      </li>
    </ul>
    <router-view class="view one"></router-view>
    <router-view class="view two" name="a"></router-view>
    <router-view class="view three" name="b"></router-view>
</div>
<script>
  const Header = {template:'<div>头部</div>'}
  const Section = {template:'<div>中间部分</div>'}
  const Footer = {template:'<div>尾部</div>'}

  const router = new VueRouter({
      mode:'history',
      routes:[
        {
            path:'/',
            //redirect:'/other',//重定向
            components:{
                default:Header,
                a:Section,
                b:Footer
            }
        },
        {
            path:'/other',
            components:{
                default:Footer,
                a:Section,
                b:Header
            }
        }
      ]
  })

  new Vue({
      router,
      el:'#app'
  })
</script>
</body>
</html>
*当使用 Vue-cli 时如何进行 vue-router 路由跳转
如果没有使用vue-cli开发环境,请移步
http://blog.csdn.net/docallen/article/details/68490256
项目目录结构:
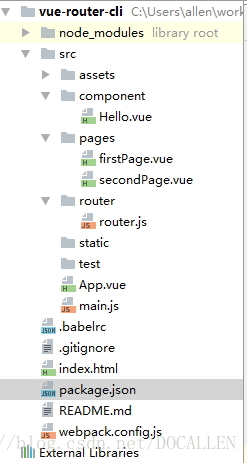
1、npm 安装 vue-router
cnpm install vue-router --save2、首先建上图结构中的3个组件,写点内容即可
3、配置 router.js 文件
import Vue from 'vue'
import VueRouter from 'vue-router'
import Hello from '../component/Hello.vue'
import firstPage from '../pages/firstPage.vue'
import secondPage from '../pages/secondPage.vue'

Vue.use(VueRouter)

export default new VueRouter({
  routes:[
    {
      path:'/',
      name:'Hello',
      component:Hello
    },
    {
      path:'/first',
      name:'first',
      component:firstPage
    },
    {
      path:'/second',
      name:'second',
      component:secondPage
    }
  ]
})
4、修改 APP.vue 中的 template
<template>
  <div id="app">
    <img src="./assets/logo.png">
    <div class="nav-list">
      <router-link class="nav-item" to="/">首页</router-link>
      <router-link class="nav-item" to="/first">页面一</router-link>
      <router-link class="nav-item" to="/second">页面二</router-link>
    </div>
    <div>
      <router-view></router-view>
    </div>
  </div>
</template>
5、修改 main.js
引入router.js
import router from './router/router.js'修改 Vue 实例
new Vue({
  el: '#app',
  router,
  render: h => h(App)
})
同时感谢 李洪威 的好文 附上链接 https://segmentfault.com/a/1190000008557578

前往低代码交流专区
更多推荐


 0
0 0
0- 0


 已为社区贡献6条内容

所有评论(0)