
Spring框架中的Quartz学习使用
Spring框架中的Quartz使用:首先简单介绍下Quartz,它是一个完全由Java编写的开源作业调度框架,为在Java应用程序中进行作业调度提供了简单却强大的机制,相当于java.util.Timer,但是比Timer多了很多的功能:1.持久性作业,就是保持调度定时的状态;2.作业管理,对调度作业进行有效的管理;3.类Corn的定时支持,可以用Corn的方式来执行作业;4
一键AI生成摘要,助你高效阅读
问答
·
Spring框架中的Quartz使用:
首先简单介绍下Quartz,它是一个完全由Java编写的开源作业调度框架,为在Java应用程序中进行作业调度提供了简单却强大的机制,相当于java.util.Timer,但是比Timer多了很多的功能:
1.持久性作业,就是保持调度定时的状态;
2.作业管理,对调度作业进行有效的管理;
3.类Corn的定时支持,可以用Corn的方式来执行作业;
4.线程处理模型 Timer是单线程作业的,但是Quartz支持线程缓冲池。
在Spring中可以很方便的使用Quartz来实现定时任务等功能,我先介绍一下不使用Spring的Quartz实现,主要就是讲解Schedule(任务调度器),Job(作业任务)和Trigger(触发器)三者的关系。具体的体系结构从网上copy过来,讲的比较详细:
●Job:是一个接口,只有一个方法void execute(JobExecutionContext context),开发者实现该接口定义运行任务,JobExecutionContext类提供了调度上下文的各种信息。
●JobDetail:Quartz在每次执行Job时,都重新创建一个Job实例,所以它不直接接受一个Job的实例,相反它接收一个Job实现类,以便运行时通过newInstance()的反射机制实例化Job。因此需要通过一个类来描述Job的实现类及其它相关的静态信息,如Job名字、描述、关联监听器等信息,JobDetail承担了这一角色。
●Trigger:是一个类,描述触发Job执行的时间触发规则。主要有SimpleTrigger和CronTrigger这两个子类。当仅需触发一次或者以固定时间间隔周期执行,SimpleTrigger是最适合的选择;而CronTrigger则可以通过Cron表达式定义出各种复杂时间规则的调度方案:如每早晨9:00执行,周一、周三、周五下午5:00执行等。
●Scheduler:代表一个Quartz的独立运行容器,Trigger和JobDetail可以注册到Scheduler中,两者在Scheduler中拥有各自的组及名称,组及名称是Scheduler查找定位容器中某一对象的依据,Trigger的组及名称必须唯一,JobDetail的组和名称也必须唯一(但可以和Trigger的组和名称相同,因为它们是不同类型的)。Scheduler定义了多个接口方法,允许外部通过组及名称访问和控制容器中Trigger和JobDetail。
Scheduler可以将Trigger绑定到某一JobDetail中,这样当Trigger触发时,对应的Job就被执行。一个Job可以对应多个Trigger,但一个Trigger只能对应一个Job。可以通过SchedulerFactory创建一个Scheduler实例。Scheduler拥有一个SchedulerContext,它类似于ServletContext,保存着Scheduler上下文信息,Job和Trigger都可以访问SchedulerContext内的信息。SchedulerContext内部通过一个Map,以键值对的方式维护这些上下文数据,SchedulerContext为保存和获取数据提供了多个put()和getXxx()的方法。可以通过Scheduler# getContext()获取对应的SchedulerContext实例。
(在Srping3.0版本后,使用Quartz需要加入依赖:
1.第一种方式,需要继承JobBean,并重写executeInternal(JobExecutionContext context),然后配置spring-quratz.xml文件,里配置三部分:1.任务调用类;2.任务调用方式;3.任务调用工厂:
2.第二种方式,不需要继承基类,这样仍然是pojo,而是在spring-quratz.xml配置文件中,配置包装类,其他两个配置与上述一样:
特殊字符的含义,见下表:
Cron表达式举例:
"30 * * * * ?" 每半分钟触发任务
"30 10 * * * ?" 每小时的10分30秒触发任务
"30 10 1 * * ?" 每天1点10分30秒触发任务
"30 10 1 20 * ?" 每月20号1点10分30秒触发任务
"30 10 1 20 10 ? *" 每年10月20号1点10分30秒触发任务
"30 10 1 20 10 ? 2011" 2011年10月20号1点10分30秒触发任务
"30 10 1 ? 10 * 2011" 2011年10月每天1点10分30秒触发任务
"30 10 1 ? 10 SUN 2011" 2011年10月每周日1点10分30秒触发任务
"15,30,45 * * * * ?" 每15秒,30秒,45秒时触发任务
"15-45 * * * * ?" 15到45秒内,每秒都触发任务
"15/5 * * * * ?" 每分钟的每15秒开始触发,每隔5秒触发一次
"15-30/5 * * * * ?" 每分钟的15秒到30秒之间开始触发,每隔5秒触发一次
"0 0/3 * * * ?" 每小时的第0分0秒开始,每三分钟触发一次
"0 15 10 ? * MON-FRI" 星期一到星期五的10点15分0秒触发任务
"0 15 10 L * ?" 每个月最后一天的10点15分0秒触发任务
"0 15 10 LW * ?" 每个月最后一个工作日的10点15分0秒触发任务
"0 15 10 ? * 5L" 每个月最后一个星期四的10点15分0秒触发任务
"0 15 10 ? * 5#3" 每个月第三周的星期四的10点15分0秒触发任务
上述若有不对,欢迎拍砖指出!
首先简单介绍下Quartz,它是一个完全由Java编写的开源作业调度框架,为在Java应用程序中进行作业调度提供了简单却强大的机制,相当于java.util.Timer,但是比Timer多了很多的功能:
1.持久性作业,就是保持调度定时的状态;
2.作业管理,对调度作业进行有效的管理;
3.类Corn的定时支持,可以用Corn的方式来执行作业;
4.线程处理模型 Timer是单线程作业的,但是Quartz支持线程缓冲池。
在Spring中可以很方便的使用Quartz来实现定时任务等功能,我先介绍一下不使用Spring的Quartz实现,主要就是讲解Schedule(任务调度器),Job(作业任务)和Trigger(触发器)三者的关系。具体的体系结构从网上copy过来,讲的比较详细:
●Job:是一个接口,只有一个方法void execute(JobExecutionContext context),开发者实现该接口定义运行任务,JobExecutionContext类提供了调度上下文的各种信息。
●JobDetail:Quartz在每次执行Job时,都重新创建一个Job实例,所以它不直接接受一个Job的实例,相反它接收一个Job实现类,以便运行时通过newInstance()的反射机制实例化Job。因此需要通过一个类来描述Job的实现类及其它相关的静态信息,如Job名字、描述、关联监听器等信息,JobDetail承担了这一角色。
●Trigger:是一个类,描述触发Job执行的时间触发规则。主要有SimpleTrigger和CronTrigger这两个子类。当仅需触发一次或者以固定时间间隔周期执行,SimpleTrigger是最适合的选择;而CronTrigger则可以通过Cron表达式定义出各种复杂时间规则的调度方案:如每早晨9:00执行,周一、周三、周五下午5:00执行等。
●Scheduler:代表一个Quartz的独立运行容器,Trigger和JobDetail可以注册到Scheduler中,两者在Scheduler中拥有各自的组及名称,组及名称是Scheduler查找定位容器中某一对象的依据,Trigger的组及名称必须唯一,JobDetail的组和名称也必须唯一(但可以和Trigger的组和名称相同,因为它们是不同类型的)。Scheduler定义了多个接口方法,允许外部通过组及名称访问和控制容器中Trigger和JobDetail。
Scheduler可以将Trigger绑定到某一JobDetail中,这样当Trigger触发时,对应的Job就被执行。一个Job可以对应多个Trigger,但一个Trigger只能对应一个Job。可以通过SchedulerFactory创建一个Scheduler实例。Scheduler拥有一个SchedulerContext,它类似于ServletContext,保存着Scheduler上下文信息,Job和Trigger都可以访问SchedulerContext内的信息。SchedulerContext内部通过一个Map,以键值对的方式维护这些上下文数据,SchedulerContext为保存和获取数据提供了多个put()和getXxx()的方法。可以通过Scheduler# getContext()获取对应的SchedulerContext实例。
下面简单的helloword代码感受一下Quartz的工作流程:
package quartz;

import java.util.Date;

import org.quartz.Job;
import org.quartz.JobExecutionContext;
import org.quartz.JobExecutionException;

public class HelloWord implements Job{

	//实现自己的定时方法
	public void execute(JobExecutionContext arg0) throws JobExecutionException {
		System.out.println("hello world " + new Date());
	}

}
package quartz;

import java.util.Date;

import org.quartz.JobBuilder;
import org.quartz.JobDetail;
import org.quartz.Scheduler;
import org.quartz.SchedulerException;
import org.quartz.Trigger;
import org.quartz.TriggerBuilder;
import org.quartz.impl.StdSchedulerFactory;


public class SimpleExample {

	public static void main(String[] args) throws SchedulerException{

		SimpleExample example=new SimpleExample();
		example.run();
	}

	public  void run() throws SchedulerException {

		//获取scheduler实例
		Scheduler scheduler=StdSchedulerFactory.getDefaultScheduler();
		scheduler.start();

		//当前时间
		Date runTime=new Date();

		//定义一个 job 对象并绑定我们写的  HelloWord 类
        // 真正执行的任务并不是Job接口的实例,而是用反射的方式实例化的一个JobDetail实例
		JobDetail job=JobBuilder.newJob(HelloWord.class).withIdentity("job1","group1").build();

		// 定义一个触发器,startAt方法定义了任务应当开始的时间 .即下一个整数分钟执行
		Trigger trigger=TriggerBuilder.newTrigger().withIdentity("trigger1","group1").startAt(runTime).build();

		// 将job和Trigger放入scheduler
		scheduler.scheduleJob(job, trigger);

		//启动
		scheduler.start();

		try {
			Thread.sleep(100);
		} catch (InterruptedException e) {
			e.printStackTrace();
			scheduler.shutdown();
		}

	}
}
(在Srping3.0版本后,使用Quartz需要加入依赖:
<dependency>
<span style="white-space:pre">	</span><groupId>org.springframework</groupId>
	<artifactId>spring-context-support</artifactId>
	<version>3.2.8.RELEASE</version>
</dependency>1.第一种方式,需要继承JobBean,并重写executeInternal(JobExecutionContext context),然后配置spring-quratz.xml文件,里配置三部分:1.任务调用类;2.任务调用方式;3.任务调用工厂:
<pre name="code" class="java">package spring.demo.pojo;

import org.quartz.JobExecutionContext;
import org.quartz.JobExecutionException;
import org.springframework.scheduling.quartz.QuartzJobBean;


//继承QuartzJobBean,并重写executeInternal方法
public class QuartzTask extends QuartzJobBean{

	private int timeout;
	private static int i = 0;

	//调度工厂实例化后,经过timeout时间开始执行调度
	public void setTimeout(int timeout) {
		this.timeout = timeout;
	}

	@Override
	protected void executeInternal(JobExecutionContext context)
			throws JobExecutionException {
		System.out.println("task running..."+ ++i + "进行中...");
	}

}
<!-- 配置任务类 -->
	<bean id="quartzTask" class="org.springframework.scheduling.quartz.JobDetailBean">
		<property name="name" value="exampleJob"></property>
		<property name="quartzClass" value="spring.demo.pojo.QuartzTask"></property>
		<property name="jobDataAsMap">
			<map>
				<entry key="timeout" value="0" />
			</map>
		</property>
	</bean>
<!-- 调度触发器方式 -->
<bean id="cronTriggerBean"
class="org.springframework.scheduling.quartz.CronTriggerBean">
<property name="jobDetail">
<ref bean="quartzTask" />
</property>
<!-- cron表达式 -->
<property name="cronExpression">
<value>10,15,20,25,30,35,40,45,50,55 * * * * ?</value>
</property>
</bean><!-- 调度工厂 -->
<bean id="SpringJobSchedulerFactoryBean"
class="org.springframework.scheduling.quartz.SchedulerFactoryBean">
<property name="triggers">
<list>
<ref bean="cronTriggerBean" />
</list>
</property>
</bean>2.第二种方式,不需要继承基类,这样仍然是pojo,而是在spring-quratz.xml配置文件中,配置包装类,其他两个配置与上述一样:
package spring.demo.pojo;

public class QuartzJob {

	public void work(){
		System.out.println("work running...");
	}
}
<pre name="code" class="html"><!-- 包装工作类 -->
	<bean id="quartzJob" class="spring.demo.pojo.QuartzJob"></bean>
	<bean id="jobTask"
		class="org.springframework.scheduling.quartz.MethodInvokingJobDetailFactoryBean">
		<!-- 需要包装的类,即调度类 -->
		<property name="targetObject">
			<ref bean="quartzJob" />
		</property>
		<!-- 调用类中的方法 -->
		<property name="targetMethod">
			<!-- 具体的方法 -->
			<value>work</value>
		</property>
	</bean>
<!-- 调度触发器方式 -->
<bean id="cronTriggerBean"
class="org.springframework.scheduling.quartz.CronTriggerFactoryBean">
<property name="jobDetail">
<ref bean="jobTask"/>
</property>
<!-- cron表达式 -->
<property name="cronExpression">
<value>10,15,20,25,30,35,40,45,50,55 * * * * ?</value>
</property>
</bean><!-- 调度工厂 -->
<bean id="SpringJobSchedulerFactoryBean"
class="org.springframework.scheduling.quartz.SchedulerFactoryBean">
<property name="triggers">
<list>
<ref bean="cronTriggerBean" />
</list>
</property>
</bean>1.xmlns添加:
xmlns:task="http://www.springframework.org/schema/task"2.xsi:schemaLocation添加:
http://www.springframework.org/schema/task http://www.springframework.org/schema/task/spring-task-3.1.xsd <task:annotation-driven/>package spring.demo.service;
import org.springframework.context.support.ClassPathXmlApplicationContext;
import org.springframework.scheduling.annotation.Scheduled;
import org.springframework.stereotype.Service;
@Service
public class QuartzService {
@Scheduled(cron = "0/2 * * * * *")
public void process() {
System.out.println("job run...");
}
public static void main(String[] args) throws InterruptedException {
ClassPathXmlApplicationContext context = new ClassPathXmlApplicationContext("applicationContext.xml");
while (true) {
System.out.println("main running...");
Thread.sleep(10000);
}
}
}
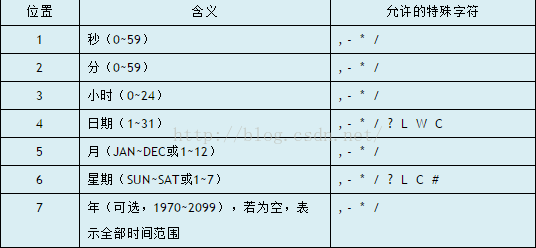
Cron表达式包含6个必要组件和一个可选组件,如下表所示:
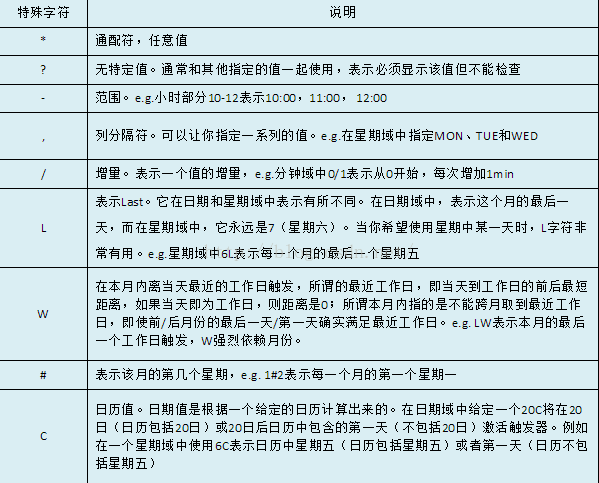
特殊字符的含义,见下表:
Cron表达式举例:
"30 * * * * ?" 每半分钟触发任务
"30 10 * * * ?" 每小时的10分30秒触发任务
"30 10 1 * * ?" 每天1点10分30秒触发任务
"30 10 1 20 * ?" 每月20号1点10分30秒触发任务
"30 10 1 20 10 ? *" 每年10月20号1点10分30秒触发任务
"30 10 1 20 10 ? 2011" 2011年10月20号1点10分30秒触发任务
"30 10 1 ? 10 * 2011" 2011年10月每天1点10分30秒触发任务
"30 10 1 ? 10 SUN 2011" 2011年10月每周日1点10分30秒触发任务
"15,30,45 * * * * ?" 每15秒,30秒,45秒时触发任务
"15-45 * * * * ?" 15到45秒内,每秒都触发任务
"15/5 * * * * ?" 每分钟的每15秒开始触发,每隔5秒触发一次
"15-30/5 * * * * ?" 每分钟的15秒到30秒之间开始触发,每隔5秒触发一次
"0 0/3 * * * ?" 每小时的第0分0秒开始,每三分钟触发一次
"0 15 10 ? * MON-FRI" 星期一到星期五的10点15分0秒触发任务
"0 15 10 L * ?" 每个月最后一天的10点15分0秒触发任务
"0 15 10 LW * ?" 每个月最后一个工作日的10点15分0秒触发任务
"0 15 10 ? * 5L" 每个月最后一个星期四的10点15分0秒触发任务
"0 15 10 ? * 5#3" 每个月第三周的星期四的10点15分0秒触发任务
上述若有不对,欢迎拍砖指出!

旨在为数千万中国开发者提供一个无缝且高效的云端环境,以支持学习、使用和贡献开源项目。
更多推荐


 1
1 0
0- 0


 已为社区贡献1条内容

所有评论(0)