
【spring】spring reference doc4.3.1 研读 <一>元数据配置以及Environment
1. spring 核心技术 1.1 IoC 容器 ★ Spring IoC 容器 和 Bean IoC : 控制反转 也被称作 DI : 依赖注入
part Ⅲ . spring 核心技术
1 . IoC 容器
1.1 Spring IoC 容器 和 Bean
★ IoC : 控制反转 也被称作 DI : 依赖注入
对象定义他的依赖 是通过 :其他依赖对象 作为该对象构造函数的参数,作为工厂方法的参数 或者 是在这个对象被创建或者从一个工厂方法返回后 再设置属性。 这些 bean 被容器创建时 容器就注入这些依赖 。而这些过程通常相对于之前都是反转的。 bean 本身直接通过类构造器 控制 着实例化 , 控制着bean 的依赖的位置 。类似于 服务定位器模式的一种机制 。
★ Ioc 主要依赖的 包 及其类主要作用:
org.springframework.beans
org.springframework.contextorg.springframework.beans.factory.BeanFactoryApplicationContext 提供了更多 的企业应用的特定功能 (国际化,事件发布,AOP)
org.springframework.context.ApplicationContext //BeanFactory 的子接口
1.2 容器 总览
ApplicationContext 接口代表了 Spring IoC 容器 ,负责 Beans 的 实例化 , 配置 和 装配 。 容器通过 读取 配置元数据 来获取如何去实例化,配置和装配 . ApplicationContext 提供了集中实现 。 在独立的应用中 ,如下的几个实现类很常见 :
ClassPathXmlApplicationContext   //读取利用传统的 XML的方式创建的元数据的配置 ,现在还可以利用 java 注解或者 java 代码以及少量的XML方式
FileSystemXmlApplicationContext how spring works :
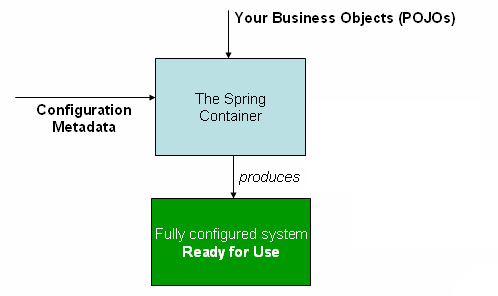
1.2.1 配置元数据
从图中可看出, Spring IOC 容器是 通过配置元数据的方式运行生产的,配置的元数据 代表了作为一个 应用开发者告诉 Spring 容器 去实例化,配置和装载 。
★ 元数据几种配置方法 :
① XML :最基本的配置方法 <beans> <bean>
② Java 注解 :spring 2.5 引入
③ Java 代码 : spring 3.0 开始 (实现0配置) @Configuration @Bean
★ 基于 XML 方法:
形如:
<beans>
          <bean id="" class="">                 //  id 唯一代表 此 bean 的身份  , class 定义 bean 的类型
           <!--这里写 bean 的配置 和相关引用-->
          </bean>
           <!--  可以无限定义bean   ...-->
</beans>
spring 原始的 Xml 配置元数据方法比较繁琐,通常分层定义 XML :dao 定义 XML, service 定义 XML ,在 service 的 XML 中注入 dao 的 XML中配置的 dao 元数据 。比较古老很少再使用 。
栗子 :
dao.xml
<?xml version="1.0" encoding="UTF-8"?>
<beans xmlns="http://www.springframework.org/schema/beans"
    xmlns:xsi="http://www.w3.org/2001/XMLSchema-instance"
    xsi:schemaLocation="http://www.springframework.org/schema/beans
        http://www.springframework.org/schema/beans/spring-beans.xsd">

    <bean id="accountDao"
        class="org.springframework.samples.jpetstore.dao.jpa.JpaAccountDao">
        <!-- additional collaborators and configuration for this bean go here -->
    </bean>

    <bean id="itemDao" class="org.springframework.samples.jpetstore.dao.jpa.JpaItemDao">
        <!-- additional collaborators and configuration for this bean go here -->
    </bean>

    <!-- more bean definitions for data access objects go here -->

</beans>
service.xml
<?xml version="1.0" encoding="UTF-8"?>
<beans xmlns="http://www.springframework.org/schema/beans"
    xmlns:xsi="http://www.w3.org/2001/XMLSchema-instance"
    xsi:schemaLocation="http://www.springframework.org/schema/beans
        http://www.springframework.org/schema/beans/spring-beans.xsd">

    <!-- services -->

    <bean id="petStore" class="org.springframework.samples.jpetstore.services.PetStoreServiceImpl">
        <property name="accountDao" ref="accountDao"/>
        <property name="itemDao" ref="itemDao"/>
        <!-- additional collaborators and configuration for this bean go here -->
    </bean>

    <!-- more bean definitions for services go here -->

</beans>
使用
// create and configure beans
ApplicationContext context =
    new ClassPathXmlApplicationContext(new String[] {"services.xml", "daos.xml"});

// retrieve configured instance
PetStoreService service = context.getBean("petStore", PetStoreService.class);

// use configured instance
List<String> userList = service.getUsernameList();
整合多个XML的元数据配置 import
<beans>
            <import resource="service.xml"/>
            <bean id="" class="" />
             <bean id="" class="" />
</beans>
在 配置文件中加入如下配置
<context:annotation-config/>@Required
@ Autowired
@Resource
★ 基于 Java 代码 配置
@Configuration : 标注在 类上 ,代表这个类的主要目的是作为一个bean定义的资源。 类似于 xml 中的 <beans ></beans>
@Bean : 标注在方法上, 表示 一个方法实例化,配置和初始化一个被 Spring IoC 容器 管理的新对象 ,类似于 Spring 的 <beans/> 中的 <bean/>,可以用在被 @Component 注解的类的 方法上 。 通常和 @Configuration 一起使用
栗子 :
Hello.java
package com.vastio.springjava;

/**
 * Created by xlch on 2016/4/24.
 */
public class Hello {

    private String name;

    public String getName() {
        return name;
    }

    public void setName(String name) {
        this.name = name;
    }

    public Hello(String name) {
        this.name = name;
    }

    public void sayHello(String name){
        System.out.println(name+" : hello");
    }
}
HelloService.java
package com.vastio.springjava;

import org.springframework.context.annotation.Bean;
import org.springframework.context.annotation.Configuration;

/**
 * Created by xlch on 2016/4/24.
 */
@Configuration
public class HelloService {

    private String name;

    @Bean
    public Hello hello(){
        return new Hello(name);
    }
}
HelloTest.java
两种方法 :
package com.vastio.springjava;

import org.junit.Test;
import org.springframework.context.ApplicationContext;
import org.springframework.context.annotation.AnnotationConfigApplicationContext;

/**
 * Created by xlch on 2016/4/24.
 */
public class HelloTest {

    @Test
    public void helloTest(){
        ApplicationContext context = new AnnotationConfigApplicationContext(HelloService.class);//可同时注册多个,用逗号隔开
        Hello hello = context.getBean(Hello.class);
        hello.sayHello("xlchen");

    }

    @Test
    public void test(){
        AnnotationConfigApplicationContext context = new AnnotationConfigApplicationContext();
        context.register(HelloService.class);//可以注册多个  ,这里也可以不注册,直接  contex.scan("com.vastio.springjava");
        context.refresh();
        Hello hello = context.getBean(Hello.class);
        hello.sayHello("xiaoming");

    }
}
开启扫描 的两种方法 :
在注解 @Configuration 同时开启扫描 ,使用 @ComponentScan(basePackage = "") 注解 ,将寻找包路径下被 注解 的类 并且在 spring 容器中 注册成 bean
@Configuration
@ComponentScan(basePackage = "com.vastio")
public class HelloService {

}

//等价于xml 中的
<beans>
       <context:component-scan base-package="com.vastio" />
</beans>
在java 文件中可以通过以下方式
//。。。。
context.scan("要扫描的包名");
1.3 Bean 总览
★ bean 定义属性介绍
class           :指定 需要实例化的bean
name            :id / name
          使用别名  <alias name="fromName" alias="toName"/>
scope
constructor arguments
properties
autowiring mode
lazy-initialization mode
initialization method
destruction method
1.3.1 持久化 beans
★ 使用构造器持久化
<bean id="exampleBean" class="examples.ExampleBean"/>

<bean name="anotherExample" class="examples.ExampleBeanTwo"/>
★ 使用静态工厂方法持久化
<bean id="clientService"
    class="examples.ClientService"
    factory-method="createInstance"/>
ClientService.java
public class ClientService {
    private static ClientService clientService = new ClientService();
    private ClientService() {}

    public static ClientService createInstance() { //必须是静态的
        return clientService;
    }
}
★ 使用一个实例化的工厂方法持久化
<!-- the factory bean, which contains a method called createInstance() -->
<bean id="serviceLocator" class="examples.DefaultServiceLocator">
    <!-- inject any dependencies required by this locator bean -->
</bean>

<!-- the bean to be created via the factory bean -->
<bean id="clientService"
    factory-bean="serviceLocator"
    factory-method="createClientServiceInstance"/>
DefaultServiceLocator.java
public class DefaultServiceLocator {

    private static ClientService clientService = new ClientServiceImpl();
    private DefaultServiceLocator() {}

    public ClientService createClientServiceInstance() {
        return clientService;
    }
}
1.4 Dependencies
1.4.1 DI (依赖注入 Dependency injection) : 也叫 Ioc (控制反转)
★ 两种依赖注入 :
★ ★ 基于构造器的依赖注入
栗子 :
public class SimpleMovieLister {

    // the SimpleMovieLister has a dependency on a MovieFinder
    private MovieFinder movieFinder;

    // a constructor so that the Spring container can inject a MovieFinder
    public SimpleMovieLister(MovieFinder movieFinder) {
        this.movieFinder = movieFinder;
    }

    // business logic that actually uses the injected MovieFinder is omitted...

}
如果不能编译,加上注解 : @ConstructorProperties (JDK 注解)
package examples;

public class ExampleBean {

    // Fields omitted

    @ConstructorProperties({"years", "ultimateAnswer"})
    public ExampleBean(int years, String ultimateAnswer) {
        this.years = years;
        this.ultimateAnswer = ultimateAnswer;
    }

}
<bean id="exampleBean" class="examples.ExampleBean">
<!-- constructor injection using the nested ref element -->
<constructor-arg>
<ref bean="anotherExampleBean"/>
</constructor-arg>
<!-- constructor injection using the neater ref attribute -->
<constructor-arg ref="yetAnotherBean"/>
<constructor-arg type="int" value="1"/>
</bean>
<bean id="anotherExampleBean" class="examples.AnotherBean"/>
<bean id="yetAnotherBean" class="examples.YetAnotherBean"/>public class ExampleBean {
private AnotherBean beanOne;
private YetAnotherBean beanTwo;
private int i;
public ExampleBean(
AnotherBean anotherBean, YetAnotherBean yetAnotherBean, int i) {
this.beanOne = anotherBean;
this.beanTwo = yetAnotherBean;
this.i = i;
}
} ★ ★ 基于 Setter 的依赖注入
public class SimpleMovieLister {

    // the SimpleMovieLister has a dependency on the MovieFinder
    private MovieFinder movieFinder;

    // a setter method so that the Spring container can inject a MovieFinder
    public void setMovieFinder(MovieFinder movieFinder) {
        this.movieFinder = movieFinder;
    }

    // business logic that actually uses the injected MovieFinder is omitted...

}
<bean id="exampleBean" class="examples.ExampleBean">
<!-- setter injection using the nested ref element -->
<property name="beanOne">
<ref bean="anotherExampleBean"/>
</property>
<!-- setter injection using the neater ref attribute -->
<property name="beanTwo" ref="yetAnotherBean"/>
<property name="integerProperty" value="1"/>
</bean>
<bean id="anotherExampleBean" class="examples.AnotherBean"/>
<bean id="yetAnotherBean" class="examples.YetAnotherBean"/>
1.5 Bean scopes ( Bean 的 作用域)
★ 几种作用域 :
★★ singleton (默认) : 一个 bean对于每个 Spring Ioc 容器都只是定义了一个对象 ,即 spring 容器 只存在一个共享的 Bean 实例 。 适用于无状态的 bean,非线程安全的
<!-- the following is equivalent, though redundant (singleton scope is the default) -->
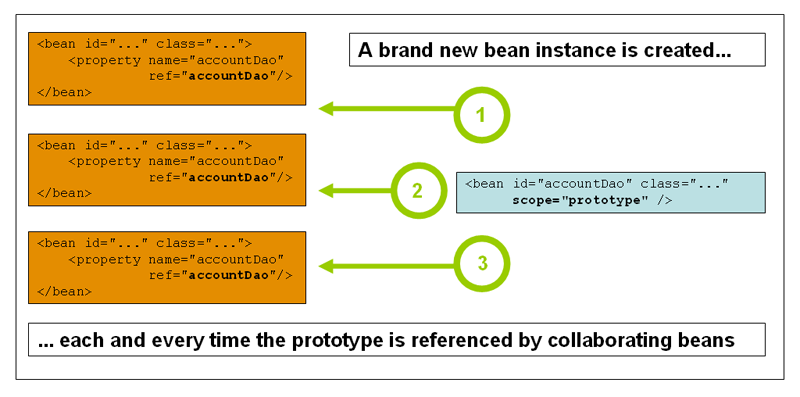
<bean id="accountService" class="com.foo.DefaultAccountService" scope="singleton"/> ★★ prototype : 一个 bean 可以被 定义成 任意多个 对象实例 ,即每次请求这个 bean 都会 创建一个新的实例 。适用于有状态的 bean 。多线程
仅 web应用中可用 ,根据servlet 版本的不同需要在web.xml中配置 监听器 /过滤器 :
★★ request
<bean id="loginAction" class="com.foo.LoginAction" scope="request"/>或者使用注解
@RequestScope
@Component
public class LoginAction {
    // ...
}
★★ session
@SessionScope
@Component
public class UserPreferences {
    // ...
}
★★ globalSession
★★ application
@ApplicationScope
@Component
public class AppPreferences {
    // ...
}
★★ websocket
不同作用域之间调用需要使用代理,配置如下 :
<bean id="userPreferences" class="com.foo.UserPreferences" scope="session">
    <aop:scoped-proxy/>
</bean>

<bean id="userManager" class="com.foo.UserManager">
    <property name="userPreferences" ref="userPreferences"/>
</bean>
singleton 图解 :

prototype 图解
可自定义 Scope : 略
1.6 自定义 Spring 的 nature
1.6.1 Lifecycle callbacks : 略
1.6.2 ApplicationContextAware 和 BeanNameAware
org.springframework.context.ApplicationContextAware<pre name="code" class="java">org.springframework.beans.factory.BeanNameAware当 ApplicationContext ( Ioc 容器) 创建了一个对象实例,该实例实现了 ApplicationContextAware 接口 ,该实例 提供一个 ApplicaitonContext 的引用。
栗子 :
/**
*<pre name="code" class="java">通过调用该类的 getBean() 方法 可以获取spring 容器中管理的 Bean 。
该类需要 spring 管理
@Servicepublic final class SpringContext implements ApplicationContextAware {private static ApplicationContext applicationContext;@Overridepublic void setApplicationContext(ApplicationContext applicationContext) {SpringContext.applicationContext = applicationContext;}public static ApplicationContext getApplicationContext() {return applicationContext;}public static Object getBean(String beanName) {return applicationContext.getBean(beanName);}public static <T>T getBean(String beanName , Class<T>clazz) {return applicationContext.getBean(beanName , clazz);}}
可以使用编程方式检索其它beans。有时这种能力是有用的;然而,通常你应该避免,因为它捆绑了Spring的代码并且不符合控制反转的风格。ApplicationContext提供访问文件资源、发布应用事件和访问MessageSource的其它方法
从Spring 2.5开始,自动注入是获取ApplicationContext引用的另一种选择。“传统的”constructor和byType自动注入模式能为构造函数参数或setter方法参数提供ApplicationContext类型的依赖注入。更多灵活性,包括能够自动注入字段和多个参数方法,使用新的基于注解的自动注入特性。如果你这么做,ApplicationContext可以自动注入到字段、构造函数参数或方法参数。 当 ApplicationContext ( Ioc 容器) 创建了一个类,该类实现了 BeanNameAware 接口 ,该类提供了和定义相关对象的 name引用。
1.6.3 其他感知 (Aware)接口
除了ApplicationContextAware和BeanNameAware,Spring支持一系列Aware接口,允许beans告诉容器它们需要某一基础设施依赖。大多数重要的Aware接口总结如下——一般情况下,名称是依赖类型的很好的表示:
| 名称 | 依赖注入 |
| ApplicationContextAware | 声明ApplicationContext |
| ApplicationEventPublisherAware | 封装ApplicationContext的事件发布者 |
| BeanClassLoaderAware | 用于加载Bean类的类加载器 |
| BeanFactoryAware | 声明BeanFactory |
| BeanNameAware | 声明Bean的名称 |
| BootstrapContextAware | 容器中运行的资源适配器BootstrapContext。通常只在JCA感知ApplicationContext中有效 |
| LoadTimeWeaverAware | 定义在加载时间处理类定义的weaver |
| MessageSourceAware | 解析消息的配置策略(提供参数化和国际化) |
| NotificationPublisherAware | Spring JMX通知发布者 |
| PortletConfigAware | 当前容器运行的PortletConfig。只在web感知的Spring ApplicationContext中有效 |
| PortletContextAware | 当前容器运行的PortletContext。只在web感知的Spring ApplicationContext中有效 |
| ResourceLoaderAware | 底层访问资源的配置加载器 |
| ServletConfigAware | 当前容器运行的ServletConfig。只在web感知的Spring ApplicationContext中有效 |
| ServletContextAware | 当前容器运行的ServletContext。只在web感知的Spring ApplicationContext中有效 |
请再次注意,使用这些接口的代码会与Spring API捆绑,不符合控制反转风格。
1.7 Bean 定义的继承 :相当于 Class 中的继承,这个是通过 <bean> </bean> 继承 。 略
1.8 容器的其他扩展点 :
使用 BeanPostProcessor 自定义 Beans
使用 BeanFactoryPostProcessor 自定义配置元数据
Customizing instantiation logic with a FactoryBean
1.9 基于注解的容器配置
★ 注解注入是在 XML 注入之前执行 , 因此如果同时使用者两种注入方式 , XML 注入的配置会覆盖 注解注入的配置 。
<context:annotation-config/> //查找 应用上下文中已经定义的 Bean 上的注解1.9.1 @Required :注解在 Bean 的 属性的 set 方法上
public class SimpleMovieLister {

    private MovieFinder movieFinder;

    @Required
    public void setMovieFinder(MovieFinder movieFinder) {
        this.movieFinder = movieFinder;
    }

    // ...

}
★ ★ 该注解表明 : 被该注解注解的 bean 的 属性必须被填充,不能为空,否则抛出异常
1.9.2 @Autowired : 可以注解在构造函数上(参数可以是多个参数,可以是集合,Map) ,字段上,set方法上 .默认是必须要被填充的,当然也可以进行如下配置
public class SimpleMovieLister {

    private MovieFinder movieFinder;

    @Autowired(required=false)
    public void setMovieFinder(MovieFinder movieFinder) {
        this.movieFinder = movieFinder;
    }

    // ...

}
★★ 可以使用该注解直接注解spring中众所周知的解析依赖的接口 ,(包括他们的延伸接口),如下
org.springframework.beans.factory.BeanFactory
org.springframework.context.ApplicationContext
org.springframework.core.env.Environment
org.springframework.core.io.ResourceLoader
org.springframework.context.ApplicationEventPublisher
org.springframework.context.MessageSource
1.9.3 @Primary : 基于注解的有规则的自动注入 XML 中可通过 primary = "true"设置
★★ 该注解用于当定义了多个相同类型的Bean (即同一个class属性),而@Autowired 是通过类型注入,这时会造成选择的问题,注解后即选择注解的Bean
栗子 :
注册多个 Bean
@Configuration
public class MovieConfiguration {

    @Bean
    @Primary
    public MovieCatalog firstMovieCatalog() { ... }

    @Bean
    public MovieCatalog secondMovieCatalog() { ... }

    // ...

}
注入Bean ,这时会注入firstMovieCatalog
public class MovieRecommender {

    @Autowired
    private MovieCatalog movieCatalog;

    // ...

}
1.9.4 @Qualifier : 和 primary 功能相似 ,该注解是为相同类型的 Bean 定义参数加以区分,这样就可以选择不同的bean 。
1.9.5 @Resource :JSR-250 规范中的注解 :可注解在字段上或者 set 方法上
栗子:
public class SimpleMovieLister {

    private MovieFinder movieFinder;

    @Resource(name="myMovieFinder") //可自定义名称,默认为字段名
    public void setMovieFinder(MovieFinder movieFinder) {
        this.movieFinder = movieFinder;
    }

}
1.9.6 @PostConstruct @PreDestrory : JSR-250 生命周期注解
1.10 路径扫描和 组件管理
1.10.1 @Component 和 更多固定的注解
@Repository    :  数据层 / DAO 标注
@Service         :服务层类标注
@Controller      :控制层类标注
@Component   : 通用的注解用于标注spring 管理的组件 ,而其他的 repository ,service ,controller 则相对于是细化的
1.10.2 元注解
spring 的许多注解可以用作元注解 ,如 @Component 用作 @Service 的元注解
@Target(ElementType.TYPE)
@Retention(RetentionPolicy.RUNTIME)
@Documented
@Component // Spring will see this and treat @Service in the same way as @Component
public @interface Service {

    // ....
}
1.10.3 自动检测类 以及注册 Bean 定义
使用 @Service 、@Repository、@Autowired 等注解可以自动检测 Bean 定义并 注入,但是必须进行 组件扫描,如下 :
javaConfig 中 可使用如下注解
@Configuration
@ComponentScan(basePackages = "org.example")
public class AppConfig  {
    ...
}
XML 中则如下扫描
<?xml version="1.0" encoding="UTF-8"?>
<beans xmlns="http://www.springframework.org/schema/beans"
    xmlns:xsi="http://www.w3.org/2001/XMLSchema-instance"
    xmlns:context="http://www.springframework.org/schema/context"
    xsi:schemaLocation="http://www.springframework.org/schema/beans
        http://www.springframework.org/schema/beans/spring-beans.xsd
        http://www.springframework.org/schema/context
        http://www.springframework.org/schema/context/spring-context.xsd">

    <context:component-scan base-package="org.example"/>

</beans>
★★ <context:component-scan> 中 包括了 <context :annotation-config> 定义的功能 ,两者区别可参看 : 中文版 英文版
1.10.4 使用自定义过滤器自定义扫描
可选的 Filter 如下
| Filter Type | Example Expression | Description |
|---|---|---|
| annotation (default) |
| An annotation to be present at the type level in target components. |
| assignable |
| A class (or interface) that the target components are assignable to (extend/implement). |
| aspectj |
| An AspectJ type expression to be matched by the target components. |
| regex |
| A regex expression to be matched by the target components class names. |
| custom |
| A custom implementation of the |
栗子:
java config 配置
@Configuration
@ComponentScan(basePackages = "org.example",
        includeFilters = @Filter(type = FilterType.REGEX, pattern = ".*Stub.*Repository"),
        excludeFilters = @Filter(Repository.class))
public class AppConfig {
    ...
}
XML 配置
<beans>
    <context:component-scan base-package="org.example">
        <context:include-filter type="regex"
                expression=".*Stub.*Repository"/>
        <context:exclude-filter type="annotation"
                expression="org.springframework.stereotype.Repository"/>
    </context:component-scan>
</beans>
1.10.5 在 components 内定义 Bean 元数据
@Component
public class FactoryMethodComponent {

    @Bean
    @Qualifier("public")
    public TestBean publicInstance() {
        return new TestBean("publicInstance");
    }

    public void doWork() {
        // Component method implementation omitted
    }

}
1.10.6 命名 自动检测
spring 默认通过 BeanNameGenerator 提供命名策略,当然也可以通过实现该接口自定义策略 。
@Service("myMovieLister") //自定义 Bean 的名称
public class SimpleMovieLister {
    // ...
}
1.10.7 为自动检测的 组件提供作用域 :@Scope
@Scope("prototype")
@Repository
public class MovieFinderImpl implements MovieFinder {
    // ...
}
1.10.8 注解提供资格分类 元数据 @Qualifier :用以区分相同类型的Bean
@Component
@Qualifier("Action")
public class ActionMovieCatalog implements MovieCatalog {
    // ...
}
1.11 使用 JSR 330 标准注解 (spring 3.0)
★★ 前提是必须导入相关的 jar 包 。Maven 导入方式如下
<dependency>
    <groupId>javax.inject</groupId>
    <artifactId>javax.inject</artifactId>
    <version>1</version>
</dependency>
1.11.1 @Inject : 代替@Autowired , 可以标注 字段 ,方法 , 构造函数
import javax.inject.Inject;
import javax.inject.Named;

public class SimpleMovieLister {

    private MovieFinder movieFinder;

    @Inject  //@Named  相同类型bean 的资格区分
    public void setMovieFinder(@Named("main") MovieFinder movieFinder) {
        this.movieFinder = movieFinder;
    }

    // ...
}
import javax.inject.Inject;
import javax.inject.Named;
public class SimpleMovieLister {
private MovieFinder movieFinder;
@Inject //@Named 相同类型bean 的资格区分
public void setMovieFinder(@Named("main") MovieFinder movieFinder) {
this.movieFinder = movieFinder;
}
// ...
}1.11.2 @Named : 代替 @Component
import javax.inject.Inject;
import javax.inject.Named;

@Named("movieListener") // 也可以不指定名称
public class SimpleMovieLister {

    private MovieFinder movieFinder;

    @Inject
    public void setMovieFinder(MovieFinder movieFinder) {
        this.movieFinder = movieFinder;
    }

    // ...
}
★★ JSR 330 注解不可以作为元数据自定义注解 ,不同于spring 中提供的注解。
Spring 提供的注解和 JSR 330 注解的对比如下图
| Spring | javax.inject.* | javax.inject restrictions / comments |
|---|---|---|
| @Autowired | @Inject |
|
| @Component | @Named | JSR-330 does not provide a composable model, just a way to identify named components. |
| @Scope("singleton") | @Singleton | The JSR-330 default scope is like Spring’s |
| @Qualifier | @Qualifier / @Named |
|
| @Value | - | no equivalent |
| @Required | - | no equivalent |
| @Lazy | - | no equivalent |
| ObjectFactory | Provider |
|
1.12 基于 java 的容器配置
1.12.1 基础概念 : @Configuration @Bean
@Configuration :注解 class,主要目的是作为 Bean 定义的 源 ,类似于 XML 中的<beans>
@Bean  : 用于 实例化,配置,和初始化一个被 Spring Ioc 容器管理的对象 ,类似于XML 中 的 <bean>
★★ Full 和 lite (完整版和 精简版) ,被 @Configuration 注解的类称为Full ,没有被 @Configuration 注解的 类称为 lite mode :差异在于 Full mode 中定义的Bean 可以互相依赖引用 , 而 lite mode 中定义的 Bean 不容易依赖另一个 Bean
1.12.2 使用 AnnotationConfigApplicationContext 实例化 Spring Ioc 容器 (始于 Spring 3.0) ,非 web的独立的应用上下文中使用
该类是 ApplicationContext 的实现类 ,不仅可以 接受 @Configuration , @Component 作为注入方式,还支持JSR 330的注解 作为 注入。
栗子 : 构造器注册 :
public static void main(String[] args) {
    ApplicationContext ctx = new AnnotationConfigApplicationContext(MyServiceImpl.class, Dependency1.class, Dependency2.class);
    MyService myService = ctx.getBean(MyService.class);
    myService.doStuff();
}
使用 register 方法注册 :
public static void main(String[] args) {
    AnnotationConfigApplicationContext ctx = new AnnotationConfigApplicationContext();
    ctx.register(AppConfig.class, OtherConfig.class);
    ctx.register(AdditionalConfig.class);
    ctx.refresh();
    MyService myService = ctx.getBean(MyService.class);
    myService.doStuff();
}
扫描的注解实现
@Configuration
@ComponentScan(basePackages = "com.acme")
public class AppConfig  {
    ...
}public static void main(String[] args) {
AnnotationConfigApplicationContext ctx = new AnnotationConfigApplicationContext();
ctx.scan("com.acme");
ctx.refresh();
MyService myService = ctx.getBean(MyService.class);
}Web应用支持的 AnnotationConfigWebApplicationContext , 若使用基于 java config 的 web.xml 的示例配置如下 :
<web-app>
    <!-- Configure ContextLoaderListener to use AnnotationConfigWebApplicationContext
        instead of the default XmlWebApplicationContext -->
    <context-param>
        <param-name>contextClass</param-name>
        <param-value>
            org.springframework.web.context.support.AnnotationConfigWebApplicationContext
        </param-value>
    </context-param>

    <!-- Configuration locations must consist of one or more comma- or space-delimited
        fully-qualified @Configuration classes. Fully-qualified packages may also be
        specified for component-scanning -->
    <context-param>
        <param-name>contextConfigLocation</param-name>
        <param-value>com.acme.AppConfig</param-value>
    </context-param>

    <!-- Bootstrap the root application context as usual using ContextLoaderListener -->
    <listener>
        <listener-class>org.springframework.web.context.ContextLoaderListener</listener-class>
    </listener>

    <!-- Declare a Spring MVC DispatcherServlet as usual -->
    <servlet>
        <servlet-name>dispatcher</servlet-name>
        <servlet-class>org.springframework.web.servlet.DispatcherServlet</servlet-class>
        <!-- Configure DispatcherServlet to use AnnotationConfigWebApplicationContext
            instead of the default XmlWebApplicationContext -->
        <init-param>
            <param-name>contextClass</param-name>
            <param-value>
                org.springframework.web.context.support.AnnotationConfigWebApplicationContext
            </param-value>
        </init-param>
        <!-- Again, config locations must consist of one or more comma- or space-delimited
            and fully-qualified @Configuration classes -->
        <init-param>
            <param-name>contextConfigLocation</param-name>
            <param-value>com.acme.web.MvcConfig</param-value>
        </init-param>
    </servlet>

    <!-- map all requests for /app/* to the dispatcher servlet -->
    <servlet-mapping>
        <servlet-name>dispatcher</servlet-name>
        <url-pattern>/app/*</url-pattern>
    </servlet-mapping>
</web-app>
Bean 相关注解(回调生命周期) ,当然也可以直接在 bean 方法中调用 init 方法
public class Foo {
    public void init() {
        // initialization logic
    }
}

public class Bar {
    public void cleanup() {
        // destruction logic
    }
}

@Configuration
public class AppConfig {

    @Bean(initMethod = "init")
    public Foo foo() {
        return new Foo();
    }

    @Bean(destroyMethod = "cleanup")
    public Bar bar() {
        return new Bar();
    }

}
使用 @Scope 指定 作用域
使用 @Bean(name="")自定义 bean 命名 ,可以以数组的形式直接指定多个 @Bean(name={"","",""})
使用 @Description("") 为 bean 添加描述信息
1.12.3 基于 JAVA 配置文件的组成
使用 @Import 注解 加载已配置的 Bean 定义 ,这样注册一个 class 就可以调用其他class 内的 bean
@Configuration
public class ConfigA {

     @Bean
    public A a() {
        return new A();
    }

}

@Configuration
@Import(ConfigA.class)
public class ConfigB {

    @Bean
    public B b() {
        return new B();
    }

}
public static void main(String[] args) {
ApplicationContext ctx = new AnnotationConfigApplicationContext(ConfigB.class);
// now both beans A and B will be available...
A a = ctx.getBean(A.class);
B b = ctx.getBean(B.class);
}XML 和 java 混合 的配置方法 :
★ 以 XML 为中心 :需要在 XML 文件中 扫描 java Configuration 所在的目录
★ 以 class 为中心 : 使用 @ImportResource() 导入 XML 文件
@Configuration
@ImportResource("classpath:/com/acme/properties-config.xml")
public class AppConfig {

    @Value("${jdbc.url}")
    private String url;

    @Value("${jdbc.username}")
    private String username;

    @Value("${jdbc.password}")
    private String password;

    @Bean
    public DataSource dataSource() {
        return new DriverManagerDataSource(url, username, password);
    }

}
properties-config.xml
<beans>
<context:property-placeholder location="classpath:/com/acme/jdbc.properties"/>
</beans>jdbc.url=jdbc:hsqldb:hsql://localhost/xdb
jdbc.username=sa
jdbc.password=
1.13 Environment 抽象
Environment 是 容器中两个主要应用环境 : profiles 和 properties 的抽象集成 。
profile 是一个 被命名的,有逻辑的一组 Bean ,这些 Bean会被容器注册如果该profile 是 active 。 Bean 可以通过 XML 的形式或者注解的方式分配给 profile.Environment 负责决定 当前哪一个 profile是活跃的。
propeties 可能源于各种配置文件 , Environment 为 用户提供 方便的接口配置 资源文件以及解析资源文件
1.13.1 Bean 定义 Profiles
可以用于解决不同生产环境下配置不同的问题
@Profile 注解 : 可以定义在类上,也可以定义在方法上 。可以做为元数据自定义注解 ,默认使用 @Profile("default")
开发环境的数据库连接
@Configuration
@Profile("dev")
public class StandaloneDataConfig {

    @Bean
    public DataSource dataSource() {
        return new EmbeddedDatabaseBuilder()
            .setType(EmbeddedDatabaseType.HSQL)
            .addScript("classpath:com/bank/config/sql/schema.sql")
            .addScript("classpath:com/bank/config/sql/test-data.sql")
            .build();
    }
}
生产环境的数据库连接
@Configuration
@Profile("production")
public class JndiDataConfig {

    @Bean(destroyMethod="")
    public DataSource dataSource() throws Exception {
        Context ctx = new InitialContext();
        return (DataSource) ctx.lookup("java:comp/env/jdbc/datasource");
    }
}1.13.2 XML bean 定义 profiels
开发环境
<beans profile="dev"
    xmlns="http://www.springframework.org/schema/beans"
    xmlns:xsi="http://www.w3.org/2001/XMLSchema-instance"
    xmlns:jdbc="http://www.springframework.org/schema/jdbc"
    xsi:schemaLocation="...">

    <jdbc:embedded-database id="dataSource">
        <jdbc:script location="classpath:com/bank/config/sql/schema.sql"/>
        <jdbc:script location="classpath:com/bank/config/sql/test-data.sql"/>
    </jdbc:embedded-database>
</beans>
生产环境
<beans profile="production"
    xmlns="http://www.springframework.org/schema/beans"
    xmlns:xsi="http://www.w3.org/2001/XMLSchema-instance"
    xmlns:jee="http://www.springframework.org/schema/jee"
    xsi:schemaLocation="...">

    <jee:jndi-lookup id="dataSource" jndi-name="java:comp/env/jdbc/datasource"/>
</beans>激活一个 bean 的方法 :
非 web 应用
AnnotationConfigApplicationContext ctx = new AnnotationConfigApplicationContext();
ctx.getEnvironment().setActiveProfiles("dev");
ctx.register(SomeConfig.class, StandaloneDataConfig.class, JndiDataConfig.class);
ctx.refresh();
也可以通过 web.xml中的 spring.profiles.active 属性声明 ,然后通过 系统的环境变量 ,JVM 系统属性,servlet 上下文参数等 ,还可以是 JDBI 中的实体。 在 spring-test 中可以通过 注解 @ActiveProfiles 声明
web.xml : 声明默认的 profiles, 可以通过其他方式传入参数
 <context-param>
        <param-name>spring.profiles.default</param-name>
        <param-value>${RUN_ENV}</param-value>    //该参数可以通过系统环境变量,JVM参数,Servlet 上下文参数 . 如 JVM的  JAVA_OPTS = -DRUN_EVN=dev
    </context-param>
1.13.3 PropertySource 抽象
1.13.4 @PropertySource 注解 :提供一个方便的声明机制 为 Sping Environment 增加 一个 PropertySource
@Configuration
@PropertySource("classpath:/com/myco/app.properties")  //若 classpath 中 ${}有占位符 ,切占位符存在于 environment中则会被替换
public class AppConfig {                //  app.properties 中包含键值对 , testbean.name=myTestBean
    @Autowired
    Environment env;

    @Bean
    public TestBean testBean() {
        TestBean testBean = new TestBean();
        testBean.setName(env.getProperty("testbean.name"));
        return testBean;
    }
}
可以这样使用占位符
<beans>
    <import resource="com/bank/service/${customer}-config.xml"/>
</beans>

权威|前沿|技术|干货|国内首个API全生命周期开发者社区
更多推荐
 0
0 0
0- 0


 已为社区贡献1条内容

所有评论(0)