
OpenClaw-在RockyLinux8.10上安装部署
OpenClaw(昵称“小龙虾AI”)是一款开源的、可私有化部署的AI智能体(AI Agent)。与传统的聊天AI不同,它不仅能对话,还能真正“动手”执行任务,例如自动整理邮件、管理日程、操作浏览器、编写并执行代码等,充当你的24小时数字员工。本文将指导你在RockyLinux 8上完成部署。
1.简介
OpenClaw(昵称“小龙虾AI”)是一款开源的、可私有化部署的AI智能体(AI Agent)。与传统的聊天AI不同,它不仅能对话,还能真正“动手”执行任务,例如自动整理邮件、管理日程、操作浏览器、编写并执行代码等,充当你的24小时数字员工。本文将指导你在RockyLinux 8上完成部署。
2.系统环境准备
首先,更新系统并启用必要的软件仓库。
|
[root@openclaw ~]# dnf update -y [root@openclaw ~]# dnf install epel-release -y [root@openclaw ~]# dnf config-manager --set-enabled powertools |
安装基础开发工具和依赖库:
|
[root@openclaw ~]# dnf groupinstall "Development Tools" -y [root@openclaw ~]# dnf install git curl wget cmake -y |
3.安装核心依赖Node.js和pnpm
OpenClaw基于Node.js构建,我们需要安装推荐版本。
3.1安装Node.js 22LTS
RockyLinux 8默认仓库的Node.js版本过旧,我们使用Nodesource官方源安装最新LTS版本。
|
[root@openclaw ~]# curl -fsSL https://rpm.nodesource.com/setup_22.x | sudo bash - |
|
2026-03-11 17:00:36 - Cleaning up old repositories... 2026-03-11 17:00:36 - Old repositories removed 2026-03-11 17:00:36 - Supported architecture: x86_64 2026-03-11 17:00:36 - Added N|Solid repository for LTS version: 22.x 2026-03-11 17:00:36 - dnf available, updating... Node.js Packages for Linux RPM based distros - x86_64 383 kB/s | 884 kB 00:02 Last metadata expiration check: 0:00:01 ago on Wed 11 Mar 2026 05:00:38 PM CST. Metadata cache created. N|Solid Packages for Linux RPM based distros - x86_64 257 kB/s | 586 kB 00:02 Metadata cache created. 2026-03-11 17:00:42 - Repository is configured and updated. 2026-03-11 17:00:42 - You can use N|solid Runtime as a node.js alternative 2026-03-11 17:00:42 - To install N|solid Runtime, run: dnf install nsolid -y 2026-03-11 17:00:42 - Run 'dnf install nodejs -y' to complete the installation. |
|
[root@openclaw ~]# dnf install nodejs -y |
|
Installed: nodejs-2:22.22.1-1nodesource.x86_64 python3-pip-9.0.3-24.el8.rocky.0.noarch python3-setuptools-39.2.0-9.el8_10.noarch python36-3.6.8-39.module+el8.10.0+1910+234ad790.x86_64 Complete! |
|
[root@openclaw ~]# node --version |
|
v22.22.1 |
|
[root@openclaw ~]# npm --version |
|
10.9.4 |
3.2安装pnpm
pnpm是OpenClaw官方推荐的包管理器,相比npm更快更高效。
|
[root@openclaw ~]# npm install -g pnpm |
|
added 1 package in 8s 1 package is looking for funding run `npm fund` for details npm notice npm notice New major version of npm available! 10.9.4 -> 11.11.0 npm notice Changelog: https://github.com/npm/cli/releases/tag/v11.11.0 npm notice To update run: npm install -g npm@11.11.0 npm notice |
|
[root@openclaw ~]# pnpm --version |
|
10.32.1 |
4.部署OpenClaw
官方提供了一键安装脚本,可以自动完成下载和基础配置,这是最推荐的方式。
4.1执行一键安装脚本
在终端中运行以下命令:
|
[root@openclaw ~]# curl -fsSL https://openclaw.ai/install.sh | bash |
注意:如果国内访问较慢,可以尝试使用镜像源,安装过程自动启动向导,向导逐个配置参考后面表格,如
|
[root@openclaw ~]# curl -fsSL https://open-claw.org.cn/install-cn.sh | bash |
|
· 正在从 Gitee 克隆 OpenClaw CN... Cloning into '/root/openclaw-cn'... remote: Enumerating objects: 123405, done. remote: Counting objects: 100% (70/70), done. remote: Compressing objects: 100% (65/65), done. remote: Total 123405 (delta 21), reused 19 (delta 4), pack-reused 123335 (from 1) Receiving objects: 100% (123405/123405), 170.30 MiB | 13.06 MiB/s, done. Resolving deltas: 100% (87238/87238), done. OpenClaw CN - 安装 中国社区 https://open-claw.org.cn/ ✓ 仓库根目录: /root/openclaw-cn ✓ 系统: linux ✓ 已检测到 Node.js v22.22.1 ✓ 已检测到 pnpm · 已将 ~/.local/bin 加入 /root/.bashrc · 安装依赖 (pnpm install)... Scope: all 35 workspace projects Lockfile is up to date, resolution step is skipped Packages: +972 。。。。。。 · 正在启动初始化... 🦞 OpenClaw 2026.2.23-cn (0409297) — Your config is valid, your assumptions are not. ▄▄▄▄▄▄▄▄▄▄▄▄▄▄▄▄▄▄▄▄▄▄▄▄▄▄▄▄▄▄▄▄▄▄▄▄▄▄▄▄▄▄▄▄▄▄▄▄▄▄▄▄ ██░▄▄▄░██░▄▄░██░▄▄▄██░▀██░██░▄▄▀██░████░▄▄▀██░███░██ ██░███░██░▀▀░██░▄▄▄██░█░█░██░█████░████░▀▀░██░█░█░██ ██░▀▀▀░██░█████░▀▀▀██░██▄░██░▀▀▄██░▀▀░█░██░██▄▀▄▀▄██ ▀▀▀▀▀▀▀▀▀▀▀▀▀▀▀▀▀▀▀▀▀▀▀▀▀▀▀▀▀▀▀▀▀▀▀▀▀▀▀▀▀▀▀▀▀▀▀▀▀▀▀▀ 🦞 OPENCLAW 🦞 ┌ OpenClaw onboarding │ ◇ Security ──────────────────────────────────────────────────────────────────────────────╮ │ │ │ Security warning — please read. │ │ │ │ OpenClaw is a hobby project and still in beta. Expect sharp edges. │ │ This bot can read files and run actions if tools are enabled. │ │ A bad prompt can trick it into doing unsafe things. │ │ │ │ If you’re not comfortable with basic security and access control, don’t run OpenClaw. │ │ Ask someone experienced to help before enabling tools or exposing it to the internet. │ │ │ │ Recommended baseline: │ │ - Pairing/allowlists + mention gating. │ │ - Sandbox + least-privilege tools. │ │ - Keep secrets out of the agent’s reachable filesystem. │ │ - Use the strongest available model for any bot with tools or untrusted inboxes. │ │ │ │ Run regularly: │ │ openclaw security audit --deep │ │ openclaw security audit --fix │ │ │ │ Must read: https://docs.openclaw.ai/gateway/security │ │ │ ├─────────────────────────────────────────────────────────────────────────────────────────╯ │ ◇ I understand this is powerful and inherently risky. Continue? │ Yes │ ◇ Onboarding mode │ QuickStart │ ◇ QuickStart ─────────────────────────╮ │ │ │ Gateway port: 18789 │ │ Gateway bind: Loopback (127.0.0.1) │ │ Gateway auth: Token (default) │ │ Tailscale exposure: Off │ │ Direct to chat channels. │ │ │ ├──────────────────────────────────────╯ │ ◇ Model/auth provider │ Skip for now │ ◇ Filter models by provider │ All providers │ ◇ Default model │ Keep current (default: anthropic/claude-opus-4-6) │ ◇ Model check ───────────────────────────────────────────────────────────────────────────╮ │ │ │ No auth configured for provider "anthropic". The agent may fail until credentials are │ │ added. │ │ │ ├─────────────────────────────────────────────────────────────────────────────────────────╯ │ ◇ Channel status ────────────────────────────╮ │ │ │ Telegram: not configured │ │ WhatsApp: not configured │ │ Discord: not configured │ │ IRC: not configured │ │ Google Chat: not configured │ │ Slack: not configured │ │ Signal: not configured │ │ iMessage: not configured │ │ Feishu: install plugin to enable │ │ Google Chat: install plugin to enable │ │ Nostr: install plugin to enable │ │ Microsoft Teams: install plugin to enable │ │ Mattermost: install plugin to enable │ │ Nextcloud Talk: install plugin to enable │ │ Matrix: install plugin to enable │ │ BlueBubbles: install plugin to enable │ │ LINE: install plugin to enable │ │ Zalo: install plugin to enable │ │ Zalo Personal: install plugin to enable │ │ Synology Chat: install plugin to enable │ │ Tlon: install plugin to enable │ │ │ ├─────────────────────────────────────────────╯ │ ◇ How channels work ───────────────────────────────────────────────────────────────────────╮ │ │ │ DM security: default is pairing; unknown DMs get a pairing code. │ │ Approve with: openclaw pairing approve
|
系统会启动一个交互式的配置向导。根据你目前的部署阶段(刚解决编译问题,准备让“小龙虾”跑起来),以下是针对每个选项的推荐选择和选择理由,帮助你快速完成初始化:
|
配置步骤 |
推荐选择 |
建议理由 |
|
1. 风险确认 ("I understand this is powerful and inherently risky. Continue?") |
Yes |
OpenClaw 拥有执行脚本、读写文件等高级权限,这是它的核心能力。既然已经决定部署,直接确认即可。 |
|
2. 向导模式 ("Onboarding mode") |
QuickStart (快速开始) |
快速开始会使用大多数默认配置,让你以最少的步骤启动服务。高级模式会暴露每一个细节,适合有经验的用户后续慢慢调整,现在先选 QuickStart。 |
|
3. 模型/认证提供商 ("Model/auth provider") |
Skip for now (暂时跳过) |
按照我们之前的规划,你是要对接本地 Ollama 的。Ollama 的配置方式比较特殊,通常不在此处的提供商列表中(如 Anthropic/OpenAI),所以选择跳过,后续通过配置文件或 Web UI 单独添加。 |
|
4. 按提供商筛选模型 ("Filter models by provider") |
All providers (保持默认) |
既然上一步跳过了,这一步通常不会出现,或者保持默认即可。 |
|
5. 默认模型 ("Default model") |
Keep current (保持当前) |
同样,因为还没配置模型,这里保持默认值即可。 |
|
6. 消息平台 ("Select channel") |
Skip for now (暂时跳过) |
这一步是配置 Telegram、WhatsApp 等外部聊天软件的。现在先专注于核心功能,让“小龙虾”在本地跑起来,后续想接入了随时可以配置。 |
|
7. 配置 Skills(技能) ("Configure skills now?") |
No (或 Skip for now) |
Skills 是给 AI 配备的特殊工具(如浏览器控制、文件编辑等)。初次运行可以先不安装,等核心功能正常后再按需添加,避免安装过程复杂化。如果向导提示这是“推荐的”,也可以选 Yes,它会安装一些基础本地工具,影响不大。 |
|
8. 技能安装的 Node 包管理器 ("Preferred node manager for skill installs") |
npm |
如果上一步选了 Yes,这里会询问用哪个管理器。我们系统里已经装好了 npm 和 pnpm,选择 npm最稳定可靠。 |
|
9. 安装缺失的技能依赖 ("Install missing skill dependencies") |
Skip for now |
同样,如果上一步选了 No,这里会自动跳过。 |
|
10. API 密钥设置 ("API Key Settings") |
No / Skip |
这通常指第三方服务的密钥(如搜索引擎、Notion 等)。为了保持精简,全部选 No 跳过,后续需要时再配置。 |
|
11. 网关服务 ("Gateway Service") |
Install / Reinstall |
这是必须的一步!选择安装为系统服务(systemd),这样 OpenClaw 就能在后台 7x24 小时运行,即使你退出了 SSH 也不会中断。 |
|
12. 启用 Hooks(钩子) ("Enable hooks?") |
全选 / 默认 |
Hooks 是一些在特定事件发生时自动执行的脚本。建议保持默认勾选,能获得更好的系统兼容性和自动化体验。 |
|
13. 孵化方式 ("How to hatch your bot?") |
Open the Web UI |
选择web ui。完成向导后,可以通过浏览器访问,你可以直接在那里和你的“小龙虾”进行第一次对话。 |
4.2加载环境变量
脚本安装完成后,可能需要重新加载Shell配置文件或重启终端,才能使 openclaw 命令生效。
|
[root@openclaw ~]# source ~/.bashrc |
或者如果你使用zsh,则 source ~/.zshrc
4.3验证安装
运行以下命令检查是否安装成功。
|
[root@openclaw ~]# openclaw --version |
|
2026.2.23-cn |
|
[root@openclaw ~]# openclaw doctor # 运行环境健康检查,确保所有依赖正常 |
|
🦞 OpenClaw 2026.2.23-cn (0409297) — Less clicking, more shipping, fewer "where did that file go" moments. ▄▄▄▄▄▄▄▄▄▄▄▄▄▄▄▄▄▄▄▄▄▄▄▄▄▄▄▄▄▄▄▄▄▄▄▄▄▄▄▄▄▄▄▄▄▄▄▄▄▄▄▄ ██░▄▄▄░██░▄▄░██░▄▄▄██░▀██░██░▄▄▀██░████░▄▄▀██░███░██ ██░███░██░▀▀░██░▄▄▄██░█░█░██░█████░████░▀▀░██░█░█░██ ██░▀▀▀░██░█████░▀▀▀██░██▄░██░▀▀▄██░▀▀░█░██░██▄▀▄▀▄██ ▀▀▀▀▀▀▀▀▀▀▀▀▀▀▀▀▀▀▀▀▀▀▀▀▀▀▀▀▀▀▀▀▀▀▀▀▀▀▀▀▀▀▀▀▀▀▀▀▀▀▀▀ 🦞 OPENCLAW 🦞 ┌ OpenClaw doctor │ ◇ Update OpenClaw from git before running doctor? │ Yes │ ◇ Update ───────────────────────────────────────────────╮ │ │ │ Running update (fetch/rebase/build/ui:build/doctor)… │ │ │ ├────────────────────────────────────────────────────────╯ │ ◇ Update result ───────────╮ │ │ │ Status: skipped │ │ Mode: git │ │ Root: /root/openclaw-cn │ │ Reason: dirty │ │ │ ├───────────────────────────╯ │ ◇ State integrity ───────────────────────────────────────────────────────────────╮ │ │ │ - OAuth dir not present (~/.openclaw/credentials). Skipping create because no │ │ WhatsApp/pairing channel config is active. │ │ │ ├─────────────────────────────────────────────────────────────────────────────────╯ │ ◇ Security ─────────────────────────────────╮ │ │ │ - No channel security warnings detected. │ │ - Run: openclaw security audit --deep │ │ │ ├────────────────────────────────────────────╯ │ ◇ Skills status ────────────╮ │ │ │ Eligible: 3 │ │ Missing requirements: 48 │ │ Blocked by allowlist: 0 │ │ │ ├────────────────────────────╯ │ ◇ Plugins ──────╮ │ │ │ Loaded: 4 │ │ Disabled: 32 │ │ Errors: 0 │ │ │ ├────────────────╯ │ ◇ Agents: main (default) Heartbeat interval: 30m (main) Session store (main): /root/.openclaw/agents/main/sessions/sessions.json (0 entries) │ ◇ Memory search ───────────────────────────────────────────────────────────────────────────╮ │ │ │ Memory search is enabled but no embedding provider is configured. │ │ Semantic recall will not work without an embedding provider. │ │ Gateway memory probe for default agent is not ready: No API key found for provider │ │ "openai". Auth store: /root/.openclaw/agents/main/agent/auth-profiles.json (agentDir: │ │ /root/.openclaw/agents/main/agent). Configure auth for this agent (openclaw agents add │ │ ) or copy auth-profiles.json from the main agentDir. │ │ │ │ No API key found for provider "google". Auth store: │ │ /root/.openclaw/agents/main/agent/auth-profiles.json (agentDir: │ │ /root/.openclaw/agents/main/agent). Configure auth for this agent (openclaw agents add │ │ ) or copy auth-profiles.json from the main agentDir. │ │ │ │ No API key found for provider "voyage". Auth store: │ │ /root/.openclaw/agents/main/agent/auth-profiles.json (agentDir: │ │ /root/.openclaw/agents/main/agent). Configure auth for this agent (openclaw agents add │ │ ) or copy auth-profiles.json from the main agentDir. │ │ │ │ No API key found for provider "mistral". Auth store: │ │ /root/.openclaw/agents/main/agent/auth-profiles.json (agentDir: │ │ /root/.openclaw/agents/main/agent). Configure auth for this agent (openclaw agents add │ │ ) or copy auth-profiles.json from the main agentDir. │ │ │ │ Fix (pick one): │ │ - Set OPENAI_API_KEY, GEMINI_API_KEY, VOYAGE_API_KEY, or MISTRAL_API_KEY in your │ │ environment │ │ - Configure credentials: openclaw configure │ │ - For local embeddings: configure agents.defaults.memorySearch.provider and local model │ │ path │ │ - To disable: openclaw config set agents.defaults.memorySearch.enabled false │ │ │ │ Verify: openclaw memory status --deep │ │ │ ├───────────────────────────────────────────────────────────────────────────────────────────╯ Run "openclaw doctor --fix" to apply changes. │ └ Doctor complete. |
5.初始化与基础配置
安装完成后,需要进行初始化设置,包括创建管理员账户、配置API密钥等。
5.1运行初始化向导
本实验未重新运行向导
|
[root@openclaw ~]# openclaw onboard |
根据提示操作:
设置管理员密码。
配置模型提供商(如后续步骤中的Ollama或云服务商API Key)。
绑定消息通道(如Telegram、企业微信等,可跳过后续再配)。
5.2安装为系统服务(可选)
为了让OpenClaw在后台7x24小时稳定运行,建议将其安装为systemd服务。
|
[root@openclaw ~]# openclaw gateway install --force |
|
🦞 OpenClaw 2026.2.23-cn (0409297) — iMessage green bubble energy, but for everyone. Installed systemd service: /root/.config/systemd/user/openclaw-gateway.service Previous unit backed up to: /root/.config/systemd/user/openclaw-gateway.service.bak 从输出看,OpenClaw 网关服务已经成功安装为用户级 systemd 服务(路径在 /root/.config/systemd/user/)。这意味着你需要使用 systemctl --user 来管理它,而不是 sudo systemctl。 |
|
[root@openclaw ~]# systemctl --user start openclaw-gateway [root@openclaw ~]# systemctl --user enable openclaw-gateway [root@openclaw ~]# systemctl --user status openclaw-gateway |
|
● openclaw-gateway.service - OpenClaw Gateway (v2026.2.23-cn) Loaded: loaded (/root/.config/systemd/user/openclaw-gateway.service; enabled; vendor preset: enabled) Active: active (running) since Fri 2026-03-13 11:39:00 CST; 6min ago Main PID: 1372 (openclaw) Tasks: 18 (limit: 50660) Memory: 356.1M CGroup: /user.slice/user-0.slice/user@0.service/openclaw-gateway.service ├─1372 openclaw └─1381 openclaw-gateway Mar 13 11:39:05 openclaw node[1381]: 2026-03-13T03:39:05.576Z [gateway] listening on ws://127.0.0.1:18789, ws://[::1]:18789 (PID 1381) Mar 13 11:39:05 openclaw node[1381]: 2026-03-13T03:39:05.578Z [gateway] log file: /tmp/openclaw/openclaw-2026-03-13.log Mar 13 11:39:05 openclaw node[1381]: 2026-03-13T03:39:05.612Z [browser/server] Browser control listening on http://127.0.0.1:18791/ (auth=token) Mar 13 11:39:06 openclaw node[1381]: 2026-03-13T03:39:06.194Z [hooks:loader] Registered hook: boot-md -> gateway:startup Mar 13 11:39:06 openclaw node[1381]: 2026-03-13T03:39:06.198Z [hooks:loader] Registered hook: bootstrap-extra-files -> agent:bootstrap Mar 13 11:39:06 openclaw node[1381]: 2026-03-13T03:39:06.201Z [hooks:loader] Registered hook: command-logger -> command Mar 13 11:39:06 openclaw node[1381]: 2026-03-13T03:39:06.213Z [hooks:loader] Registered hook: session-memory -> command:new, command:reset Mar 13 11:39:06 openclaw node[1381]: 2026-03-13T03:39:06.214Z [hooks] loaded 4 internal hook handlers Mar 13 11:39:07 openclaw node[1381]: 2026-03-13T03:39:07.988Z [bonjour] gateway name conflict resolved; newName="openclaw (2)" Mar 13 11:39:07 openclaw node[1381]: 2026-03-13T03:39:07.991Z [bonjour] gateway hostname conflict resolved; newHostname="openclaw-(2)" |
5.3开放防火墙端口
OpenClaw的Web管理面板默认运行在 18789 端口。如果你需要从外部访问,需要在防火墙中放行此端口。
|
[root@openclaw ~]# firewall-cmd --permanent --add-port=18789/tcp [root@openclaw ~]# firewall-cmd --reload |
5.4验证服务
|
[root@openclaw ~]# netstat -ntlp |
|
Active Internet connections (only servers) Proto Recv-Q Send-Q Local Address Foreign Address State PID/Program name tcp 0 0 127.0.0.1:18789 0.0.0.0:* LISTEN 1381/openclaw-gatew tcp 0 0 127.0.0.1:18791 0.0.0.0:* LISTEN 1381/openclaw-gatew tcp 0 0 127.0.0.1:18792 0.0.0.0:* LISTEN 1381/openclaw-gatew tcp 0 0 0.0.0.0:22 0.0.0.0:* LISTEN 894/sshd tcp6 0 0 ::1:18789 :::* LISTEN 1381/openclaw-gatew tcp6 0 0 :::22 :::* LISTEN 894/sshd |
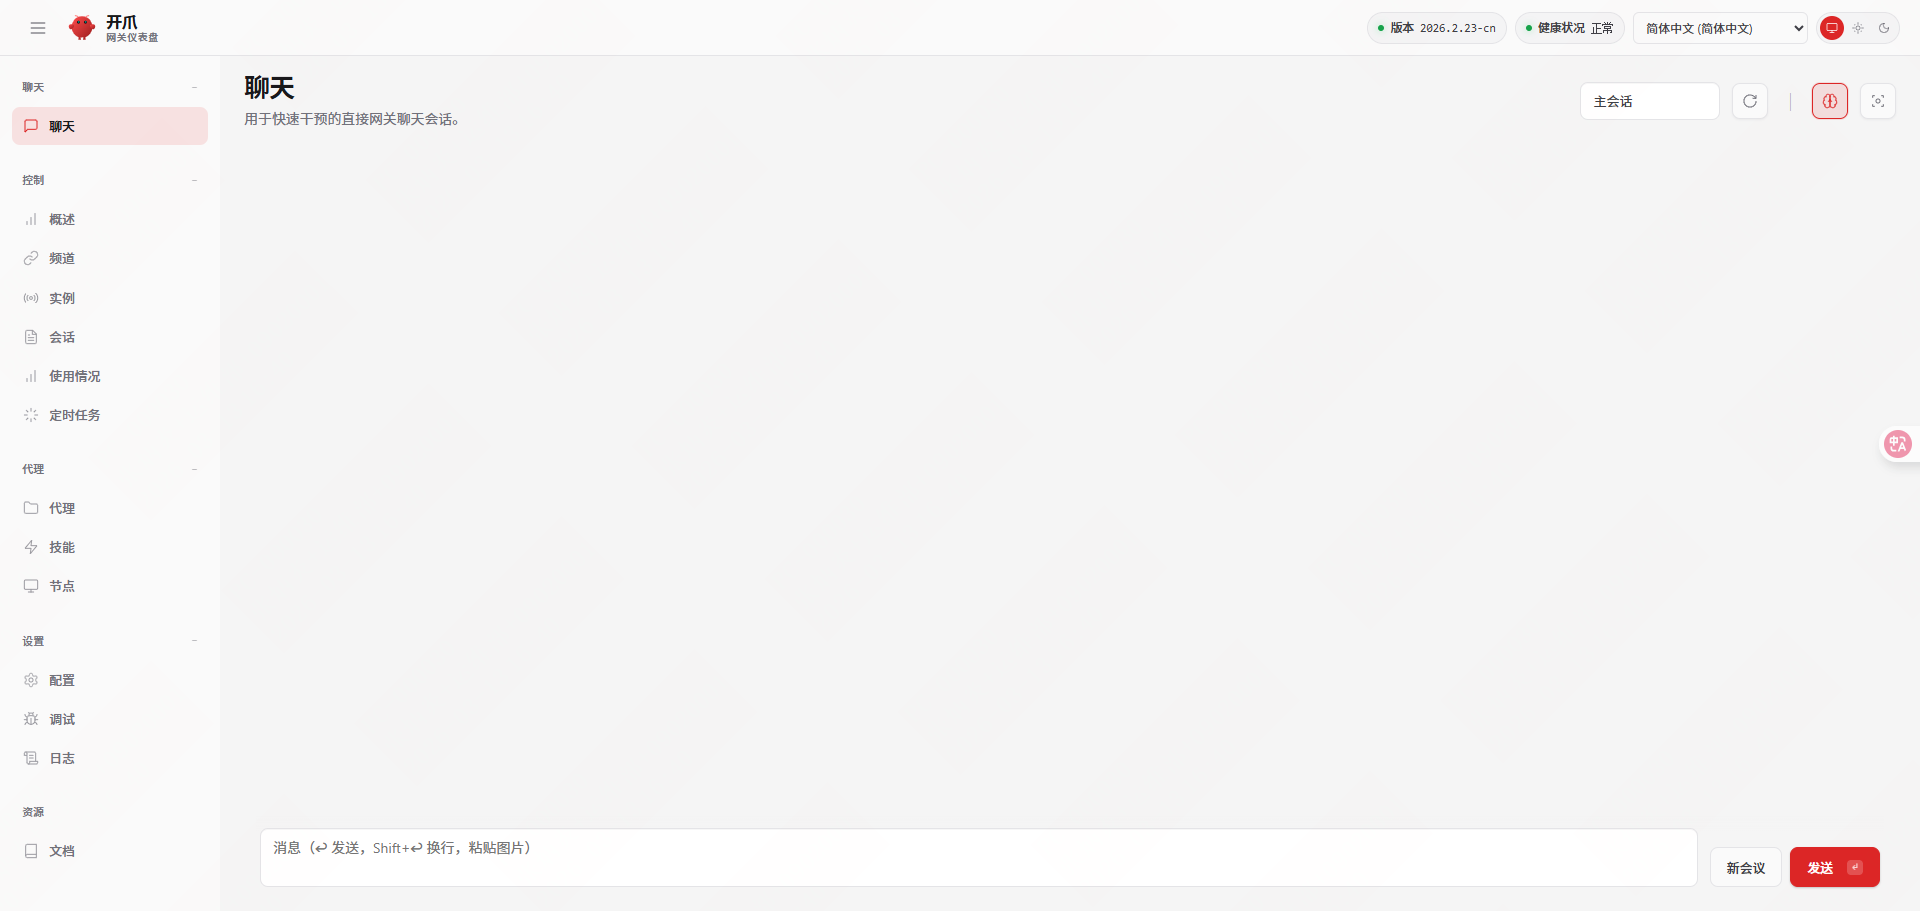
访问 Web 管理界面:
在本地浏览器访问 http://:18789。如果是第一次访问,页面会显示一个带有 Token 的完整地址(例如 http://127.0.0.1:18789/#token=xxxxx),复制到浏览器地址栏打开即可。
注意:如果你的服务器在云端,需要在本地终端执行一条 SSH 隧道命令才能访问:如果从远程访问需要转发,可以选择一个不同的本地端口
安装过程中关于dashboard的信息:
|
◇ Dashboard ready ────────────────────────────────────────────────────────────────╮ │ │ │ Dashboard link (with token): │ │ http://127.0.0.1:18789/#token=ba2dfbaaf758f9eb18358cd7529214a95ab03ef993226f00 │ │ Copy/paste this URL in a browser on this machine to control OpenClaw. │ │ No GUI detected. Open from your computer: │ │ ssh -N -L 18789:127.0.0.1:18789 root@10.9.254.75 │ │ Then open: │ │ http://localhost:18789/#token=ba2dfbaaf758f9eb18358cd7529214a95ab03ef993226f00 │ │ Docs: │ |
远程客户端本地操作
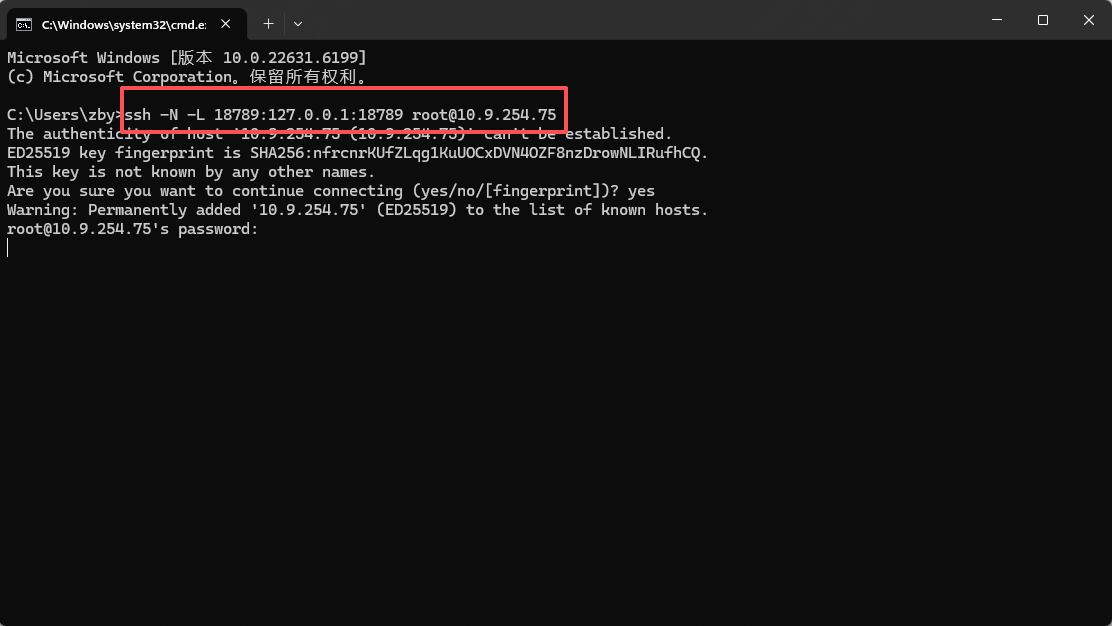
http://127.0.0.1:18789/#token=ba2dfbaaf758f9eb18358cd7529214a95ab03ef993226f00
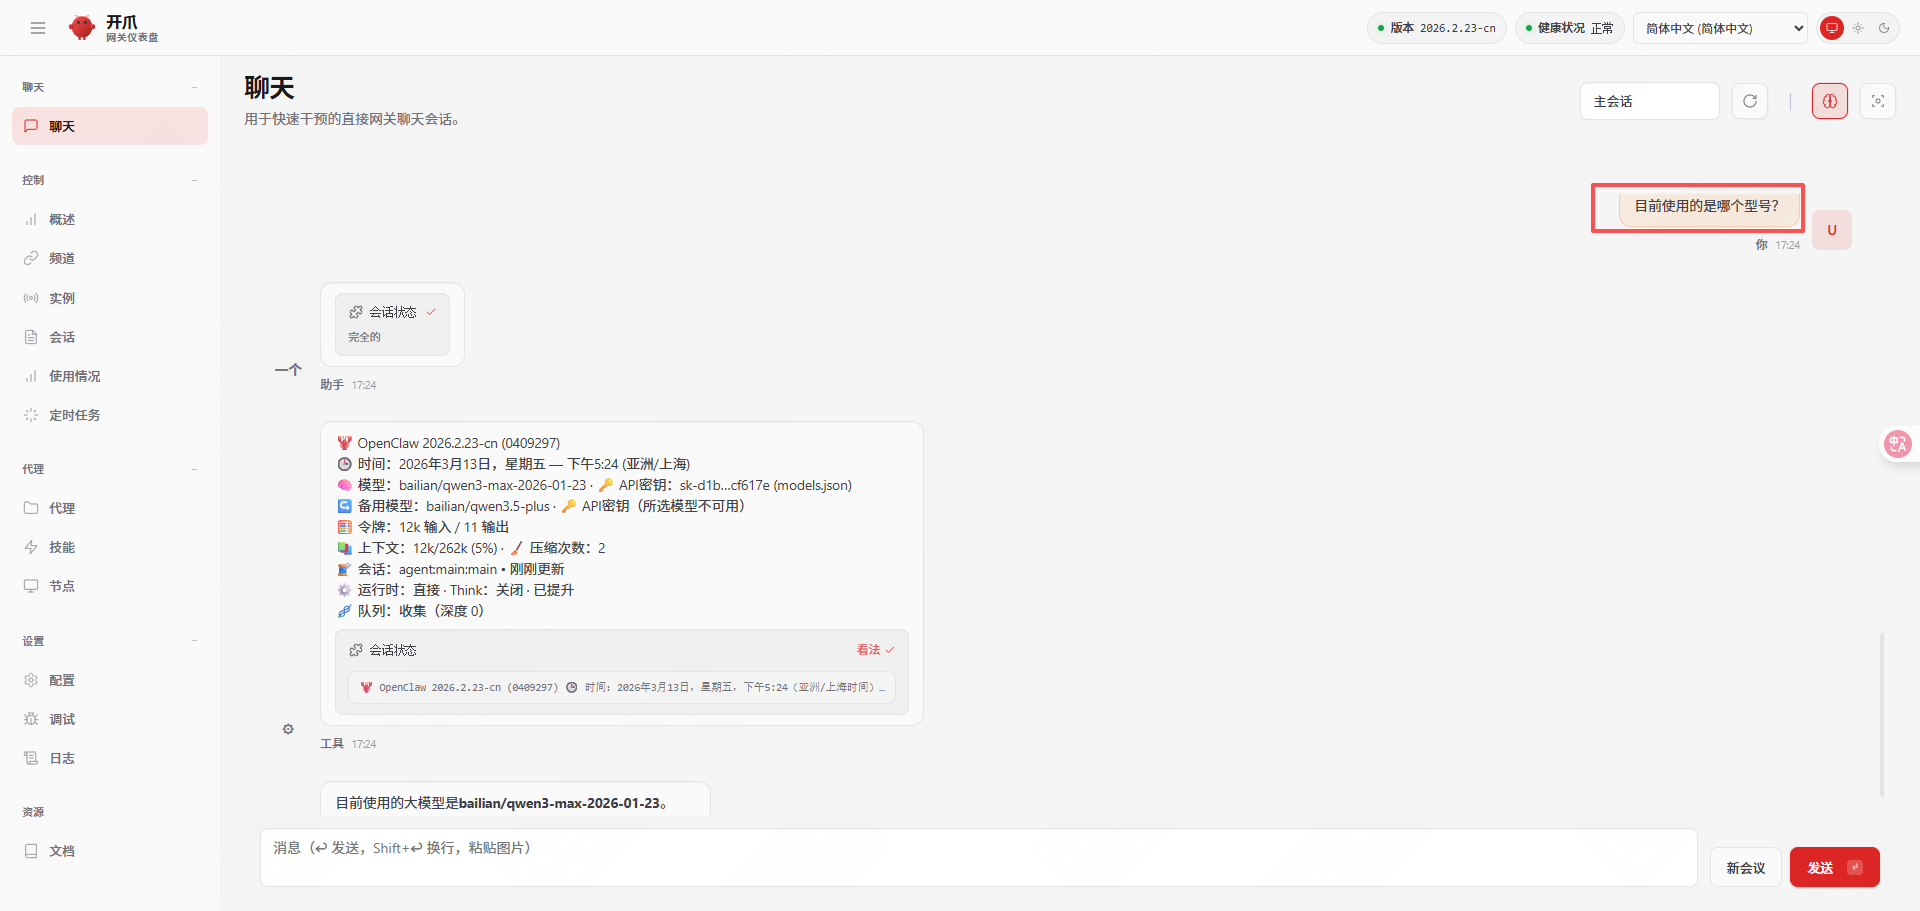
5.5对接阿里云千问大模型
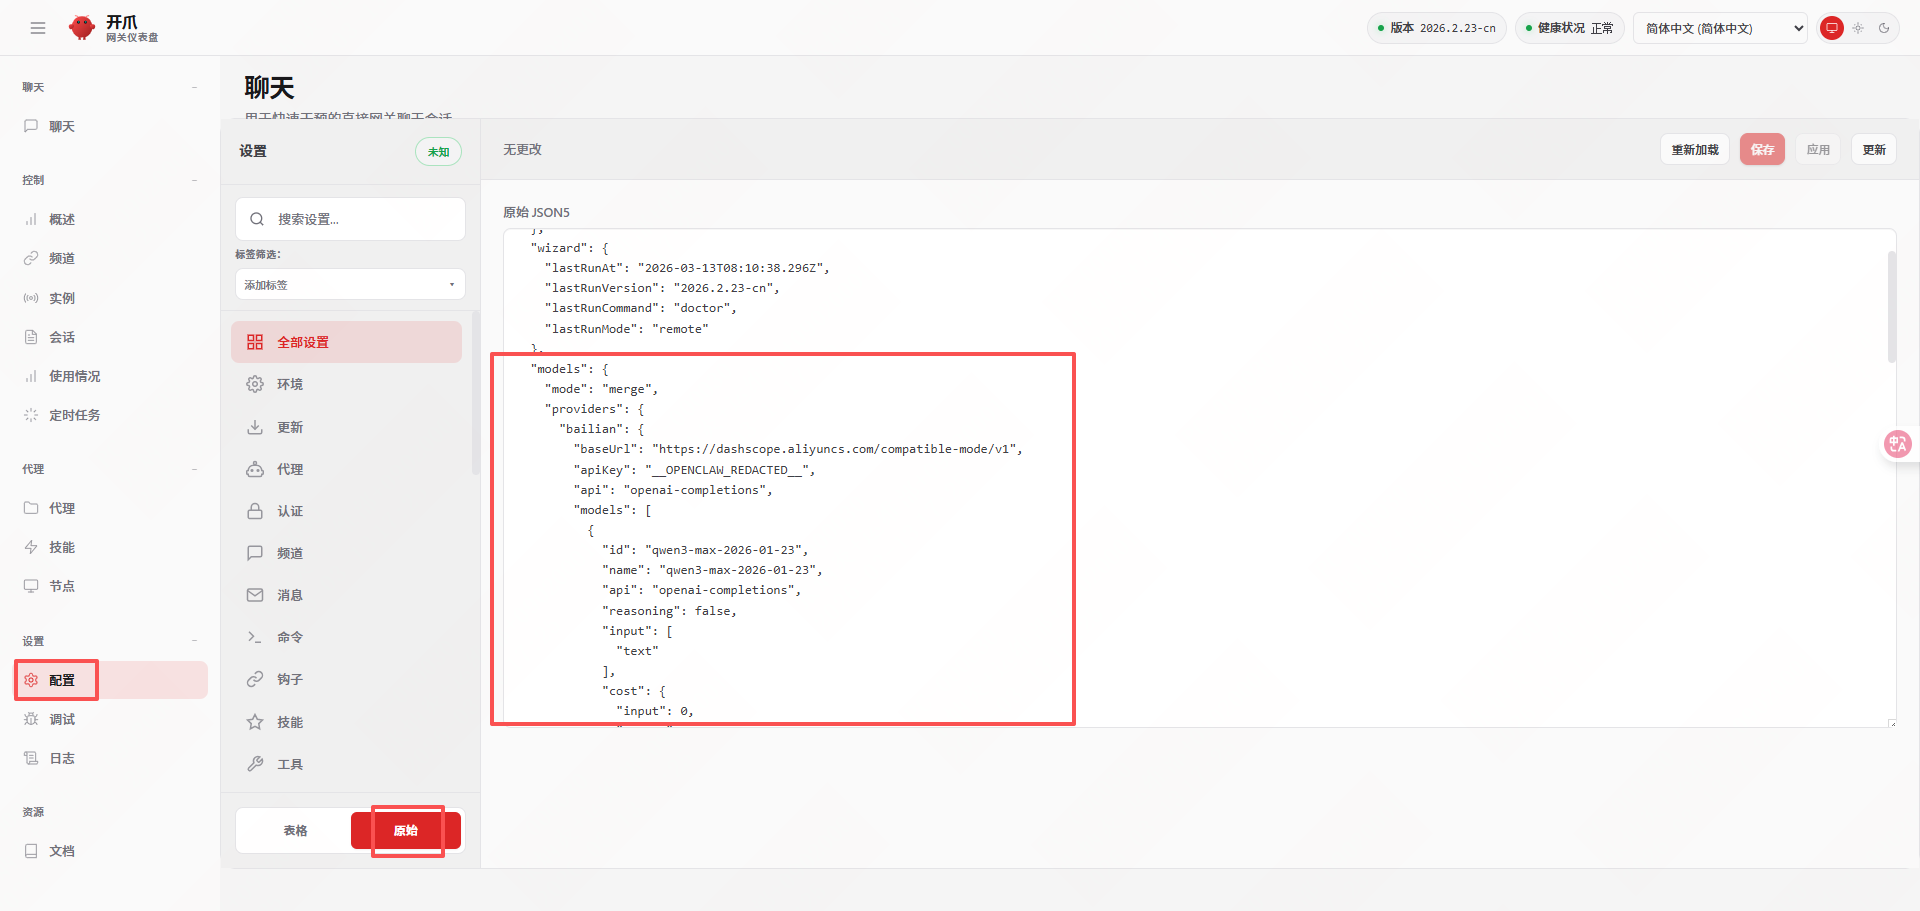
|
{ "models": { "mode": "merge", "providers": { "bailian": { "baseUrl": "https://dashscope-intl.aliyuncs.com/compatible-mode/v1", "apiKey": "DASHSCOPE_API_KEY", #替换api key "api": "openai-completions", "models": [ { "id": "qwen3-max-2026-01-23", "name": "qwen3-max-2026-01-23", "reasoning": false, "input": ["text"], "contextWindow": 262144, "maxTokens": 65536 } ] } } }, "agents": { "defaults": { "model": { "primary": "bailian/qwen3-max-2026-01-23" } } } } |
|
[root@openclaw ~]# openclaw doctor --non-interactive #配置过程 [root@openclaw ~]# openclaw doctor --fix [root@openclaw ~]# openclaw gateway restart |
|
🦞 OpenClaw 2026.2.23-cn (0409297) — Give me a workspace and I'll give you fewer tabs, fewer toggles, and more oxygen. Restarted systemd service: openclaw-gateway.service |
6.运维与日常管理
6.1服务管理
如果已经将OpenClaw安装为系统服务,可以通过systemd进行管理。
|
sudo systemctl --user start|stop|restart|status openclaw-gateway |
6.2版本更新
OpenClaw迭代很快,定期更新可以获取新功能和修复。更新方法很简单
|
# 1. 停止服务 sudo systemctl --user stop openclaw-gateway # 2. 执行更新命令 openclaw update # 3. 重启服务 sudo systemctl --user start openclaw-gateway |
6.3日志查看
当遇到问题时,日志是最重要的排错依据。
|
# 查看实时日志 openclaw logs --follow # 或者查看 systemd 的日志 journalctl -u openclaw-gateway -f |
6.4备份
主要需要备份配置文件和用户数据。
|
# 默认配置和数据目录通常在 ~/.config/openclaw 和 ~/.local/share/openclaw tar -czvf openclaw_backup_$(date +%Y%m%d).tar.gz ~/.config/openclaw ~/.local/share/openclaw |
7.常用命令速查
|
命令分类 |
命令 |
作用 |
|
环境与诊断 |
openclaw --version |
查看版本 |
|
openclaw doctor |
全面检查环境健康度 |
|
|
openclaw status |
查看总体运行状态 |
|
|
服务管理 |
openclaw gateway start|stop|restart |
启动/停止/重启网关服务 |
|
openclaw gateway install |
安装为系统服务 |
|
|
openclaw logs --follow |
实时跟踪日志 |
|
|
配置与初始化 |
openclaw onboard |
运行初始化配置向导 |
|
openclaw config set |
设置配置项 |
|
|
openclaw config get |
查看配置项 |
|
|
模型与通道 |
openclaw models list |
列出可用模型 |
|
openclaw models set |
切换默认模型 |
|
|
openclaw channels list |
列出已配置的消息通道 |
|
|
openclaw channels login --channel |
登录并配置指定消息通道 |
|
|
维护与更新 |
openclaw update |
更新OpenClaw到最新版 |
|
openclaw plugins list |
查看已安装插件 |

小龙虾开发者社区是 CSDN 旗下专注 OpenClaw 生态的官方阵地,聚焦技能开发、插件实践与部署教程,为开发者提供可直接落地的方案、工具与交流平台,助力高效构建与落地 AI 应用
更多推荐
 40
40 0
0- 0


 已为社区贡献1条内容

所有评论(0)