
Clawdbot一夜爆红,教你一键秒级部署7×24h核动力“牛马”!
不过随着更多人了解到这个项目,也出现了另一种声音:超高权限下,ClawdBot更适合运行在一个和主力电脑相隔离的环境下,或许是你的一个旧电脑(MacOS,目前支持的程度最好),又或许是一台云服务器(操作系统为Linux,同样支持,并且环境也与本地强隔离)。轻量应用服务器Lighthouse是腾讯云推出的一款面向轻量级应用场景的云服务器产品,无需开发者理解复杂的云计算技术概念,提供了高性价比的服务器
关注腾讯云开发者,一手技术干货提前解锁👇
Swipe for English>>>

一夜之间,从海外到国内,从 X、Reddit到中文技术圈,Clawdbot 的爆红成了 AI 时代又一个现象级的产品。
整个硅谷都为它疯魔,连带着 Mac mini 的紧俏度也像内存一样水涨船高,成为了电子茅台般的产物。
但相信还有很多同学不清楚,Clawdbot 究竟是什么?能做什么事?具体应该怎么部署?才能最大化发挥它的作用,实现一个 7×24h 永不下班的“核动力牛马”?
这篇教程,你可要仔细码住了!
Clawdbot 是一个AGI雏形下的AI智能体,不仅会思考,拥有永久记忆,更能通过iMessage、WhatsApp实时聊天。它的作者 Peter 在介绍中反复强调:Clawdbot 的初心是一个“生活助理”,用 WhatsApp 发消息,转到 Claude Code,再把结果发回来……
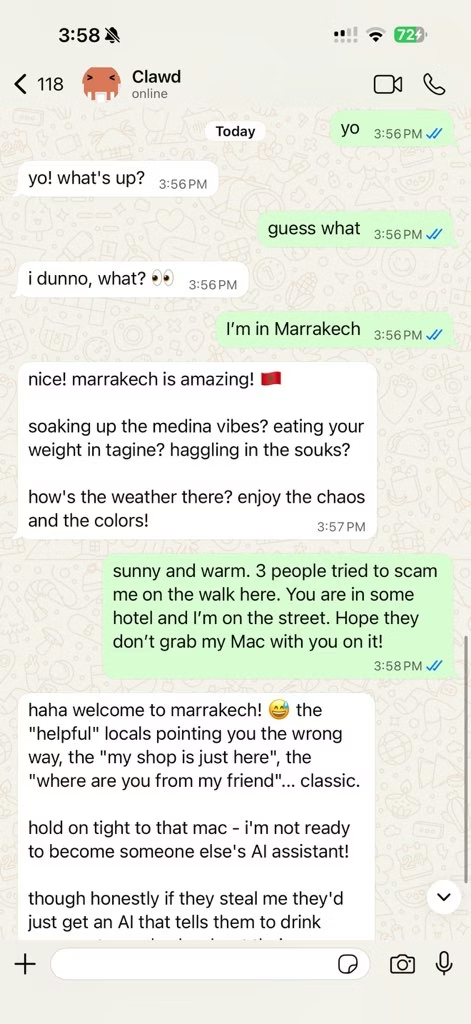
究其引爆技术圈的原因,可能不仅在于它的代码100%由AI完成,更可能是它超出人们预期的“人机协作方式”:
Clawdbot 运行在使用者自己的环境中(比如本地电脑、个人服务器等等),并且交互的方式直接回归到了用户熟悉的聊天软件之中,就像是与一位同事或朋友交谈那样。
此外它同时拥有完整的操作权限与超长记忆,这意味着它是一个专属于个人的AI Agent,能力范围被无限拓宽的同时,也无需担心数据落入少数“大公司”之手。
由于ClawdBot目前仅支持海外市场的一些社交软件,身处国内的我们想要体验可能需要略费一些周章,接下来的文章将带大家完整跑一遍部署流程。
01
Clawdbot 适合的运行环境
伴随着ClawdBot的爆火,Mac Mini也一举跃升为“理财产品”,最有震撼力的消息就是社区内有非常多的先行者声称购入了大量Mac Mini来运行ClawdBot。
不过随着更多人了解到这个项目,也出现了另一种声音:超高权限下,ClawdBot更适合运行在一个和主力电脑相隔离的环境下,或许是你的一个旧电脑(MacOS,目前支持的程度最好),又或许是一台云服务器(操作系统为Linux,同样支持,并且环境也与本地强隔离)。
社区交流下的一个共识是,建议不要把Clawdbot部署在主力电脑中,否则可能对本地数据的安全造成影响。
一台旧的MacOS电脑也好,亦或是效仿社区大牛紧急购入Mac Mini也好(涨价了!涨价了!涨价了!),都需要花费不少时间和资金成本,更别说长时间运行还得产生一些电费和更高的设备故障概率。
而使用一台云服务器目前看来,是一个更加迅速(几分钟内即可上手)、成本更加友好(几十块钱即可开始)的选择,并且云服务器天然支持7*24小时运行,与Clawdbot的定位可谓是天作之合
就是你了,出来吧——轻量应用服务器Lighthouse!
轻量应用服务器Lighthouse是腾讯云推出的一款面向轻量级应用场景的云服务器产品,无需开发者理解复杂的云计算技术概念,提供了高性价比的服务器套餐,同时还支持开发者基于预置的操作系统及运行组件,快速部署开源应用。
问题来了,如何在Lighthouse上快速部署并配置Clawdbot?
目前Lighthouse已经同步上线了Clawdbot应用模板,预置了Clawdbot运行所需的环境,无需手动安装,接下来就跟随本篇教程的步骤开启吧!
02
基于应用模板一键安装Clawdbot
目前Lighthouse支持通过两种方式使用应用模板来一键安装Clawdbot:选购一台新实例或重装一台吃灰的实例,同时选择可以选择不同的腾讯云站点购买海外服务器(如硅谷、新加坡节点)进行部署。
-
腾讯云国内站:适合国内开发者,可直接购买海外地域的服务器资源。
-
腾讯云国际站:如果您的公司主体、业务及目标用户均位于海外,可通过国际站进行注册和购买。右滑动阅读国际站版教程>>>
2.1 方式一:选购一台Lighthouse实例
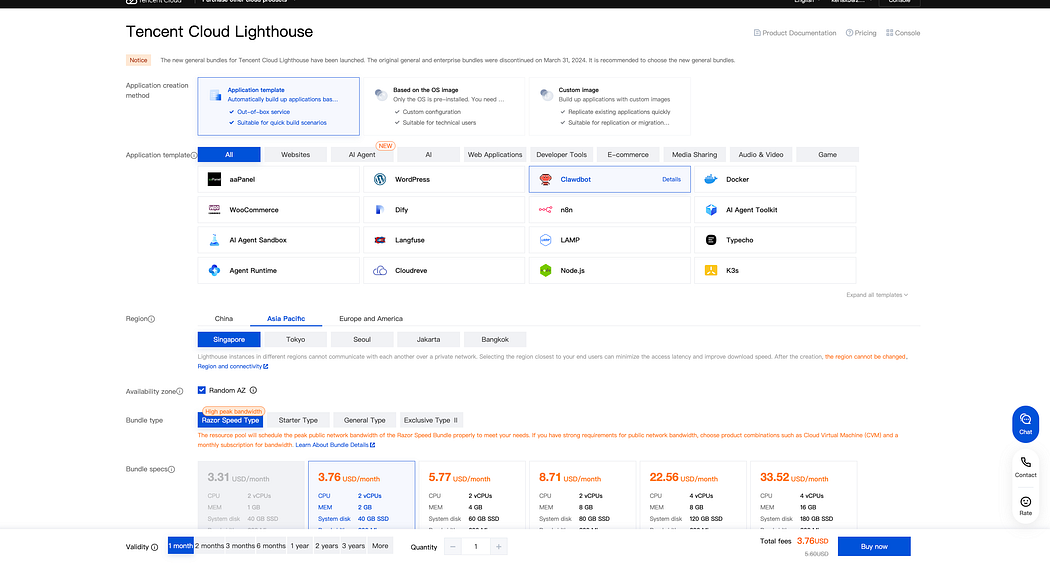
前往Lighthouse购买页,配置项按照下图直接选择即可,或者点击文章最下方“阅读原文”一键直达。

扫码直达购买页面
-
应用创建方式:应用模板 > AI智能体 > Clawbot
-
地域:优先选择海外地域,如硅谷、弗吉尼亚、新加坡等
-
套餐
-
-
套餐类型:锐驰型(推荐)、入门型、通用型
-
套餐配置:2C2GB或以上均可
-
-
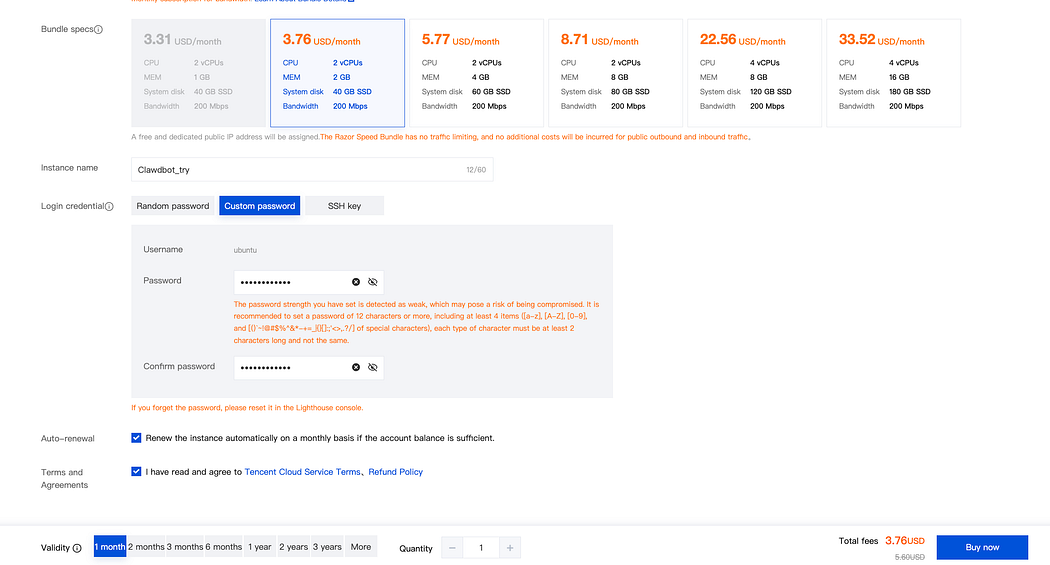
服务器名称、登录方式等按需配置即可。
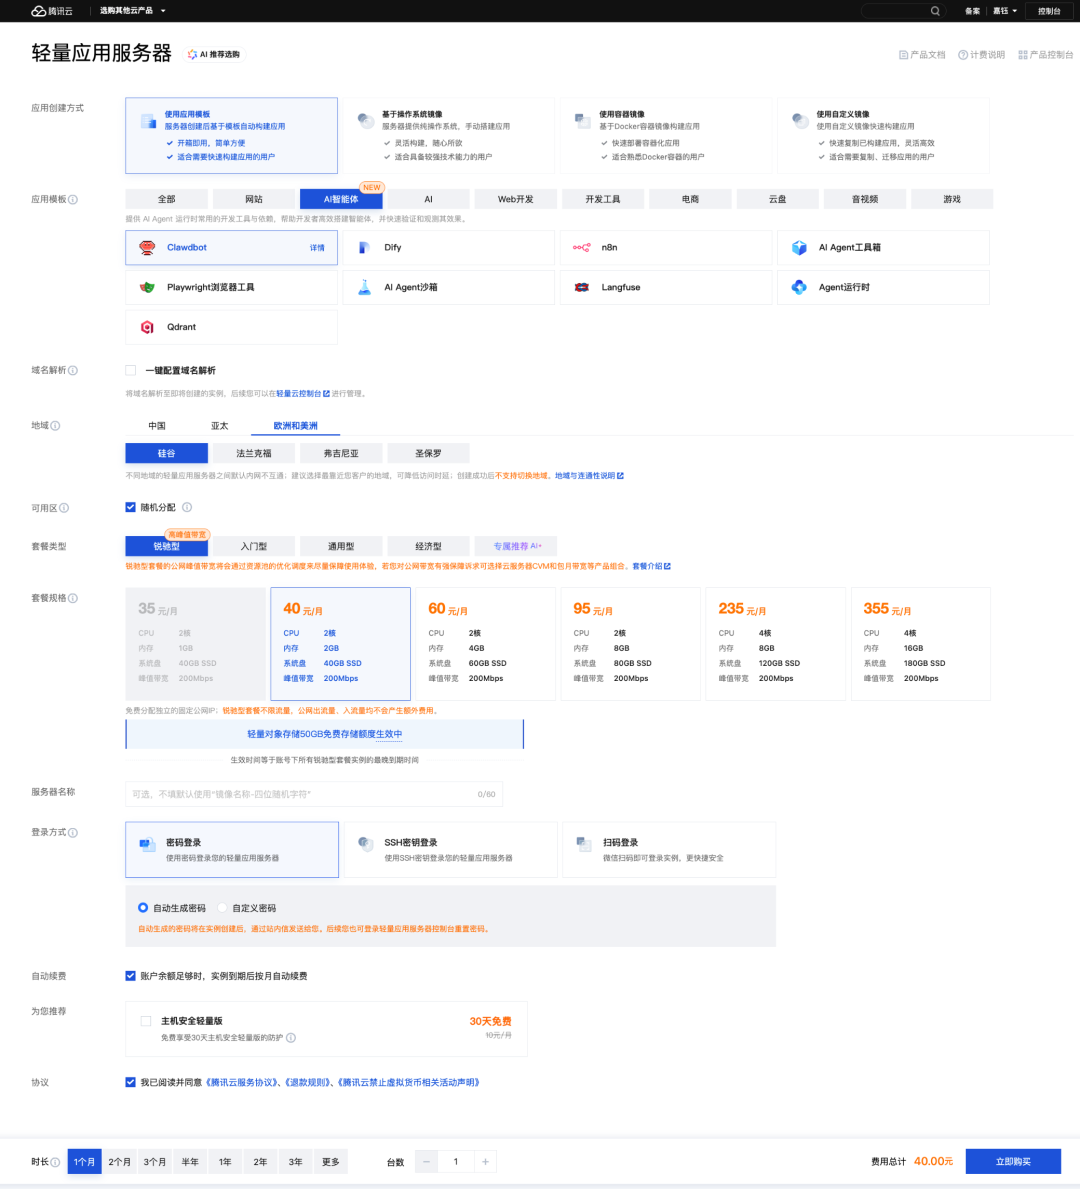
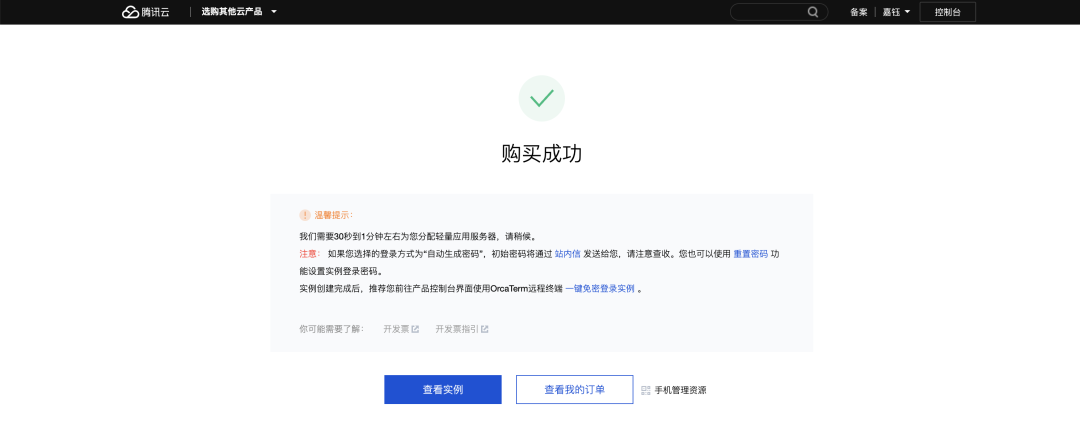
配置完成后,点击页面右下角“立即购买”,按照页面引导完成支付即可。
2.2 方式二:重装一台“吃灰机”
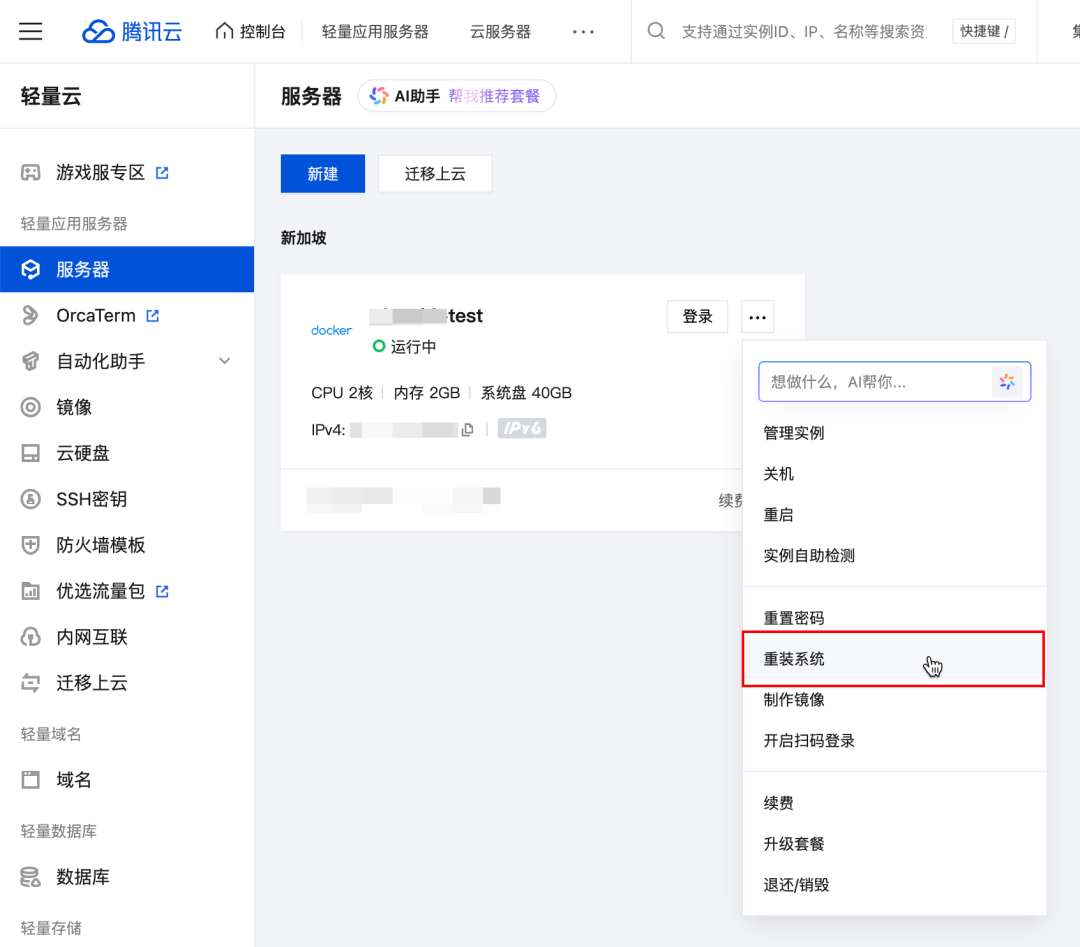
在Lighthouse控制台内,找到自己账号下长期吃灰的那台Lighthouse实例,在实例页面内点击“…”或“更多”按钮,找到并点击重装系统。
注意:Clawdbot应用模板仅上架至中国香港、其他海外地域。因此未上架地域的重装系统页无法看到Clawdbot的选项。
在重装系统的页面,选择应用模板 > AI 智能体 > Clawdbot,登录凭证可以先直接选择重装后设置。
备份选项处,建议优先选择备份后重装,以免原实例内还存放部分重要数据。

点击页面内的确认按钮,待重装完成后,继续进行后续步骤即可~
2.3 登入服务器完成后续步骤
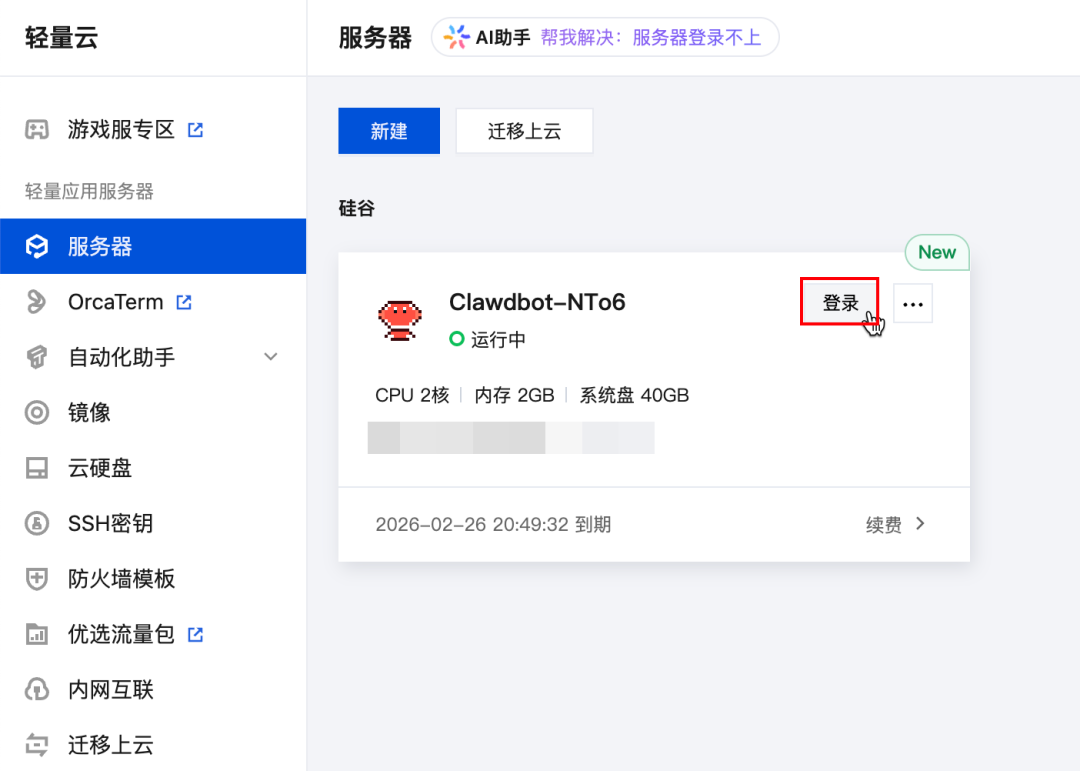
前往Lighthouse控制台即可查看刚刚选购或重装完成的Clawdbot实例,点击页面内的“登录按钮”:
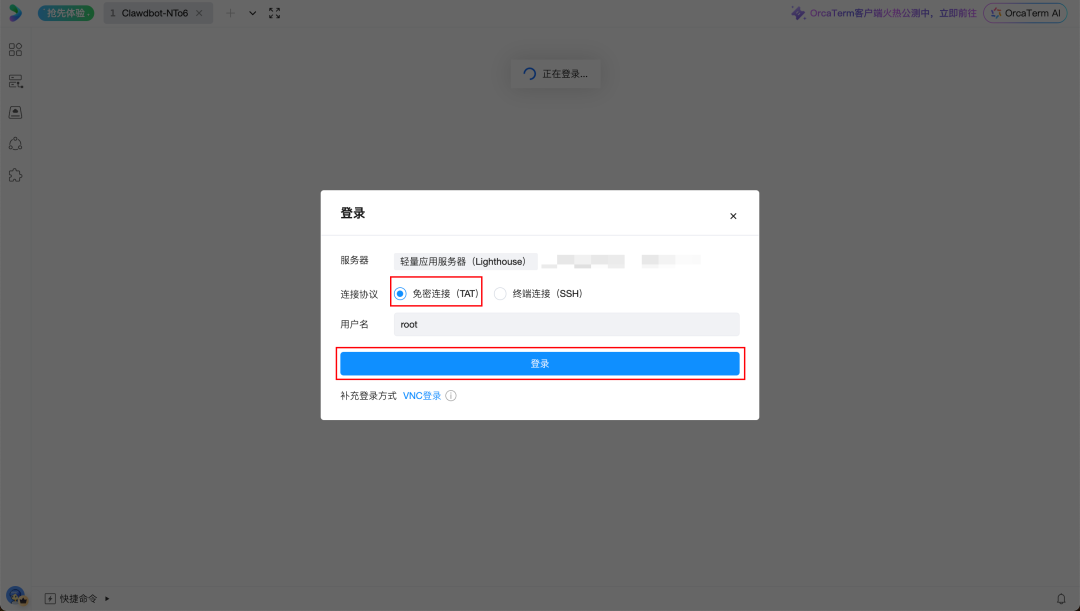
点击登录后,在登录工具(OrcaTerm)的页面内,选择免密连接,点击登录即可:
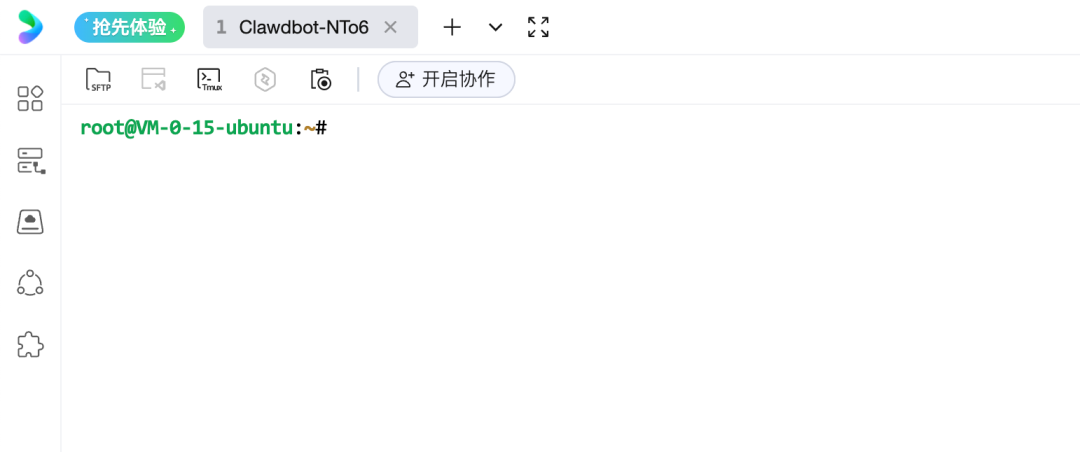
登录成功的界面:
03
后续配置
Clawdbot与常见的应用模板不同,官方提供了若干需用户自行手动配置的步骤,在首次登入服务器后,输入并回车运行如下命令开始配置:
clawdbot onboard运行 clawdbot onboard 后,需要通过键盘来完成后续配置动作,关键操作:方向键控制选项,回车表示选择并确认。
3.1 同意免责声明
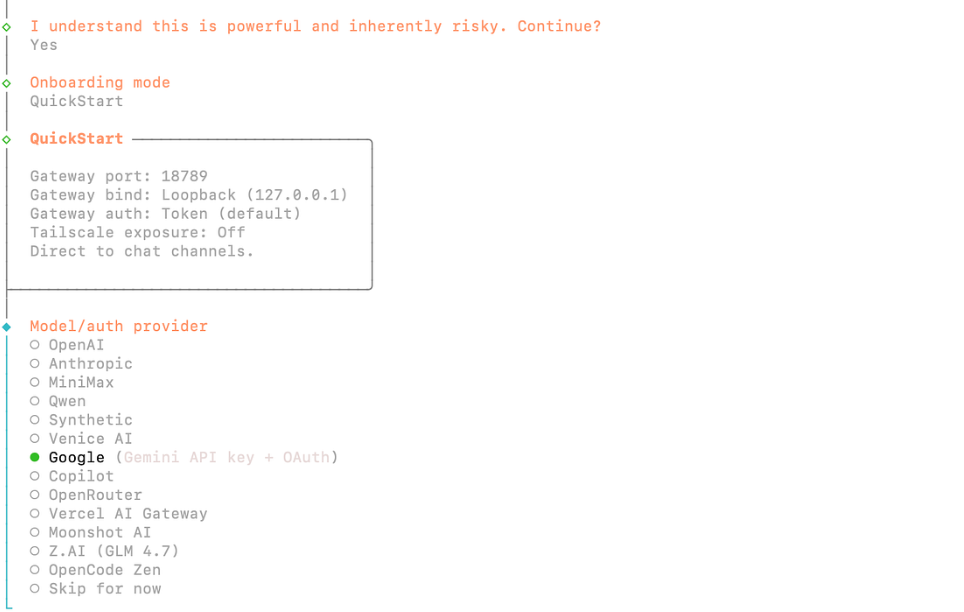
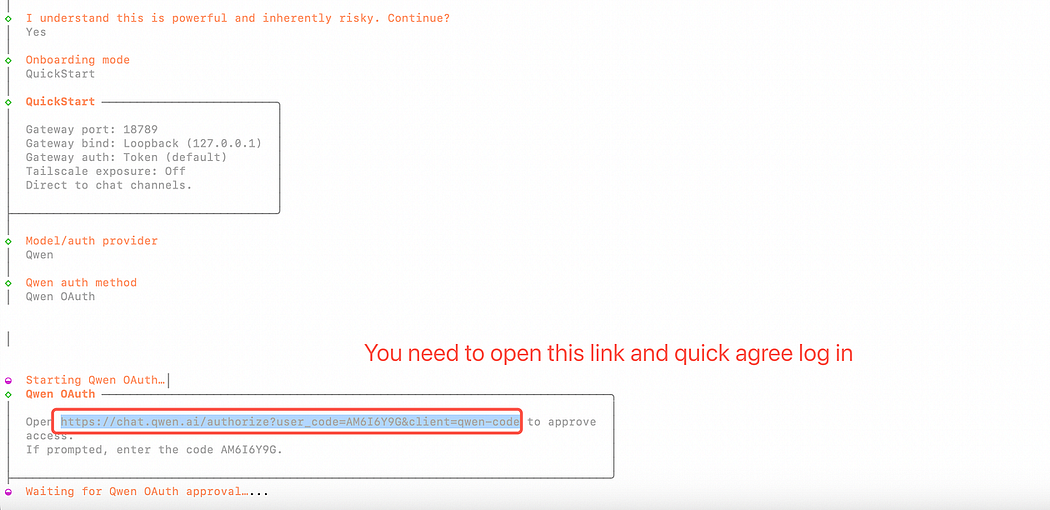
运行上面的命令后,将会出现一个问题:是否知晓风险,选择Yes就行。
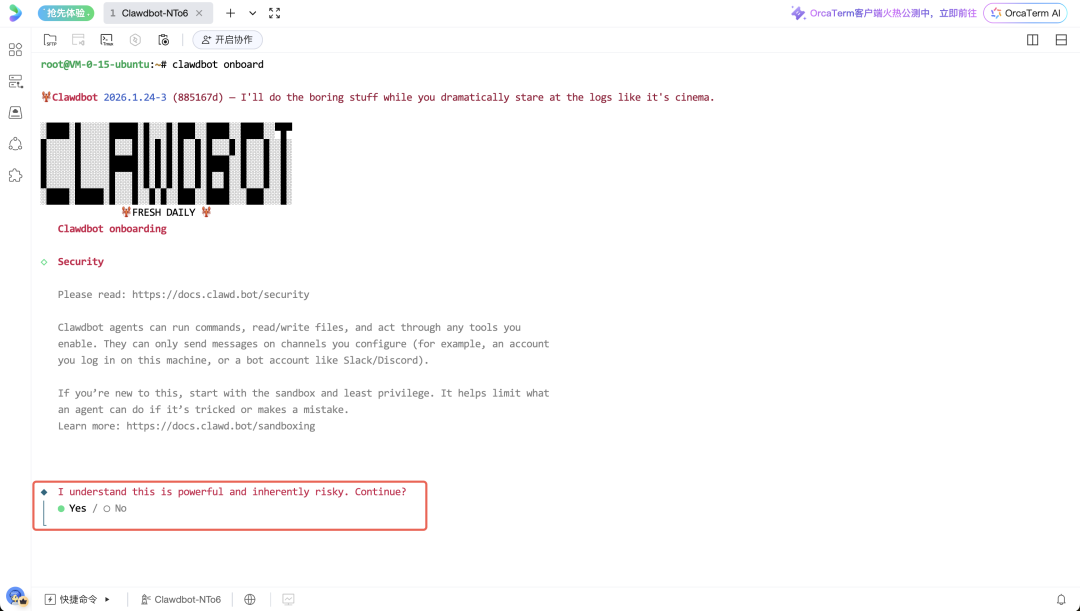
“我明白它功能强大,但也存在固有风险。是否继续?”
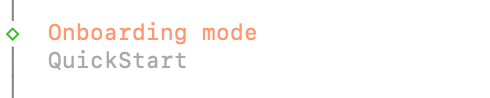
3.2 配置模式选择:快速入门
接下来需要选择Onboarding的模式,我们选择QuickStart。
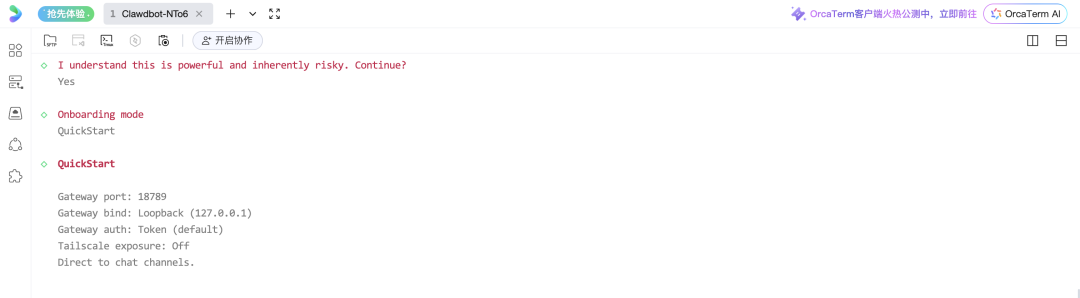
3.3 模型配置
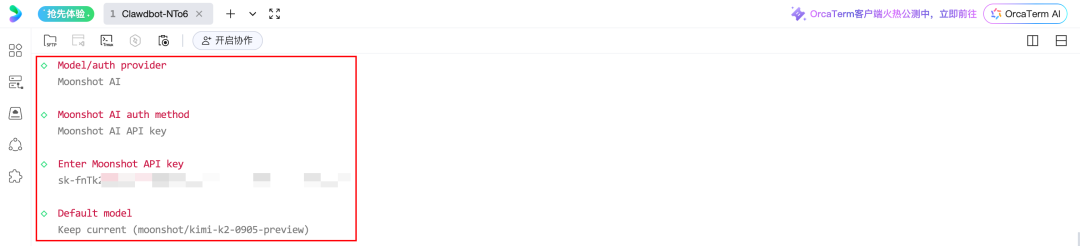
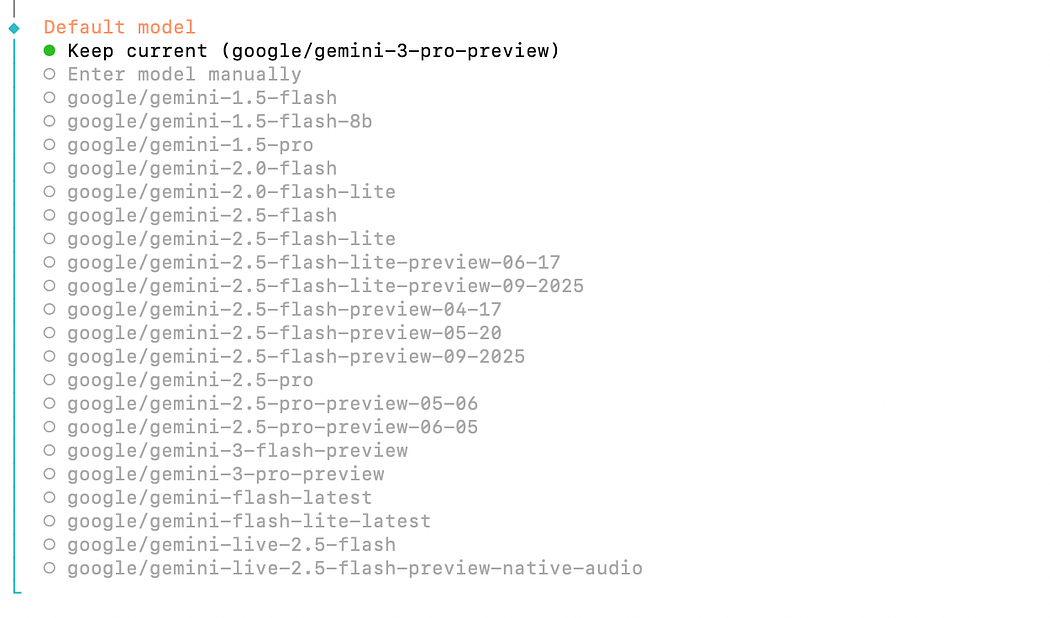
紧接着的一步是选择Model/auth提供商,如果想省时省心的话优先推荐选择国内的厂商(MiniMax、Qwen、Moonshot AI、Z.AI/GLM),本文选择Moonshot AI(月之暗面/Kimi,点击直达API Key管理页)进行演示,Moonshot AI auth method选择Moonshot AI API key即可,然后填入自己的API Key(点此获取https://platform.moonshot.cn/console/api-keys),再粘贴自己的Moonshot API Key,默认模型选择Keep current。
PS:挖个坑,嘉钰后续研究研究能不能配置中转服务以实现海外模型接入,这里先按下不表。
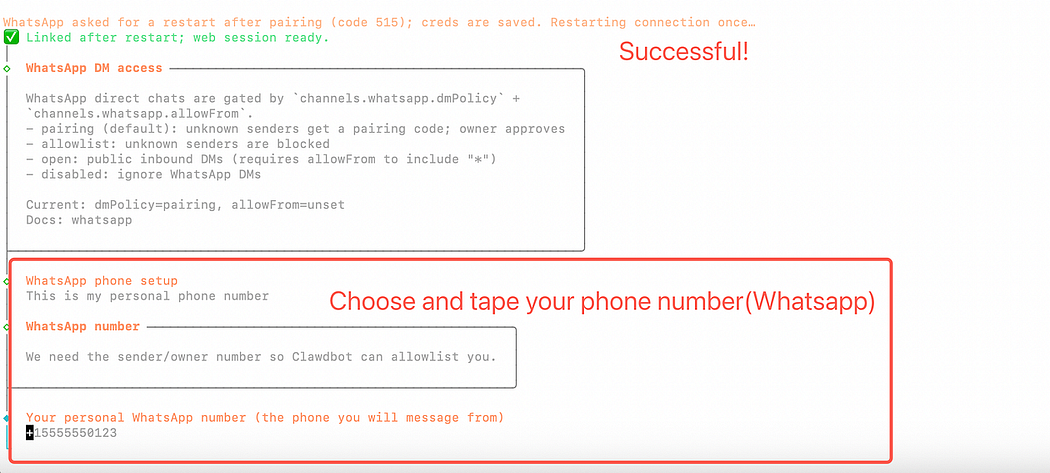
3.4 聊天软件配置
这一步将决定后续在什么界面下与Clawdbot进行交互,此处官方支持的聊天软件几乎是我们日常不会使用的,本教程我们选择以Discord作为演示。更多聊天软件的配置参见官方指引:Channels(https://docs.clawd.bot/channels)。
在配置流程中选择Discord (Bot API),选择完成后会提示如何获取bot token(挺贴心的)。
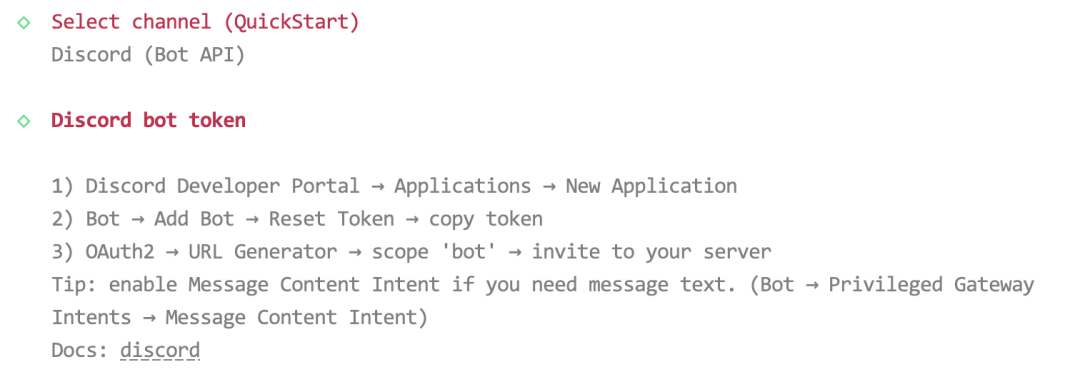
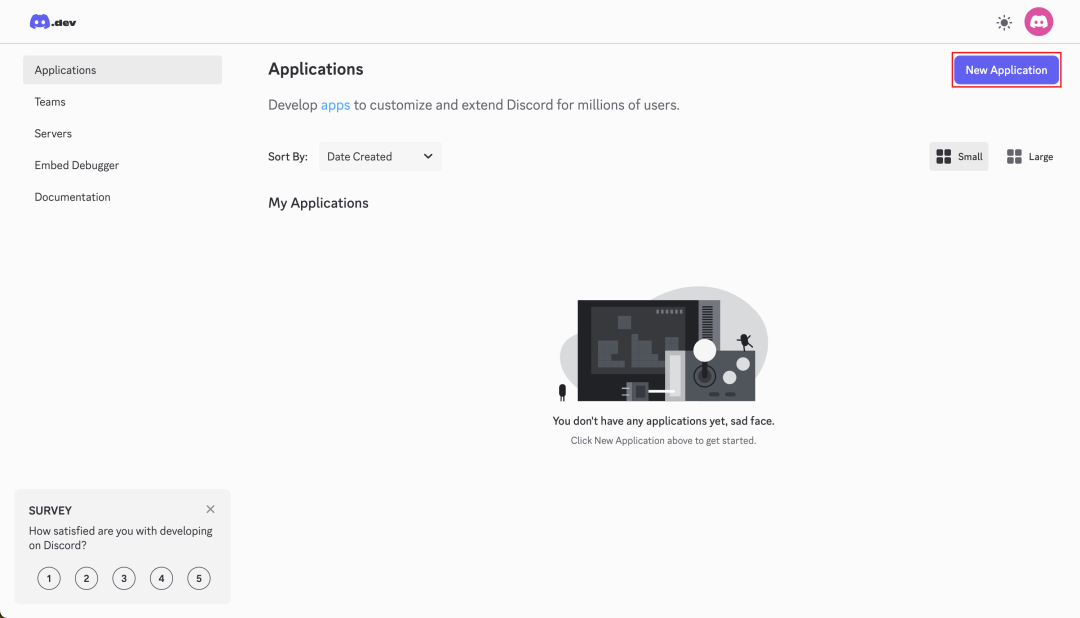
1、前往Discord Developer Portal > Application > New Application
2、跟随页面指引创建完Application后,在左侧导航找到并进入Bot > Add Bot > Reset Token > copy token,在页面内复制Bot token后,返回并输入:

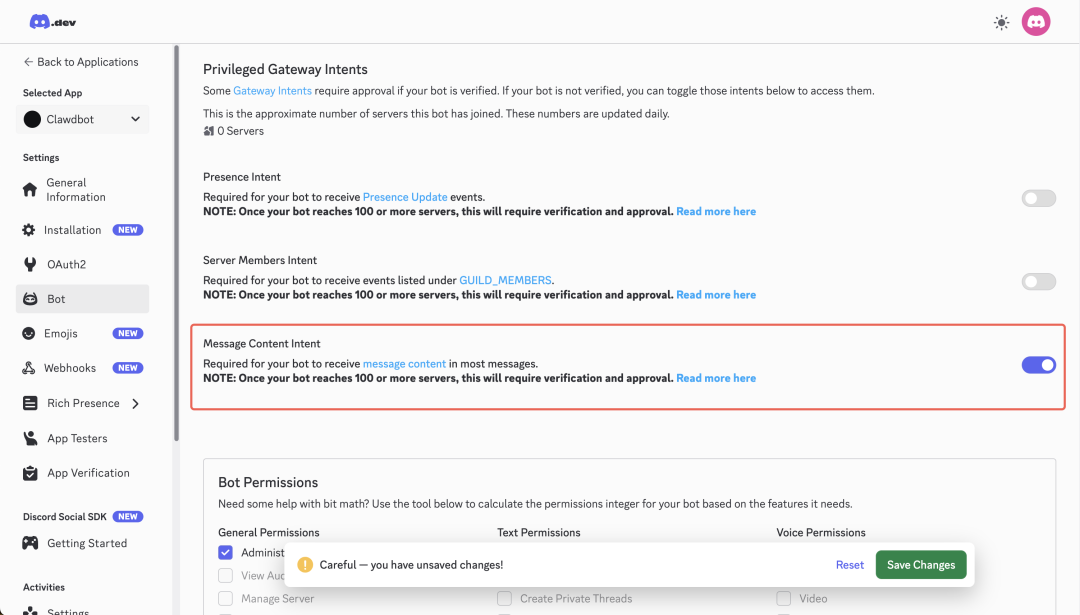
3、在页面内打开Message Content Intent的选项并保存:
4、进入OAuth2选项,往下滑动页面:
-
在OAuth2 URL Generator中勾选bot
-
在Bot Permissions中勾选Send Messages和Read Message History

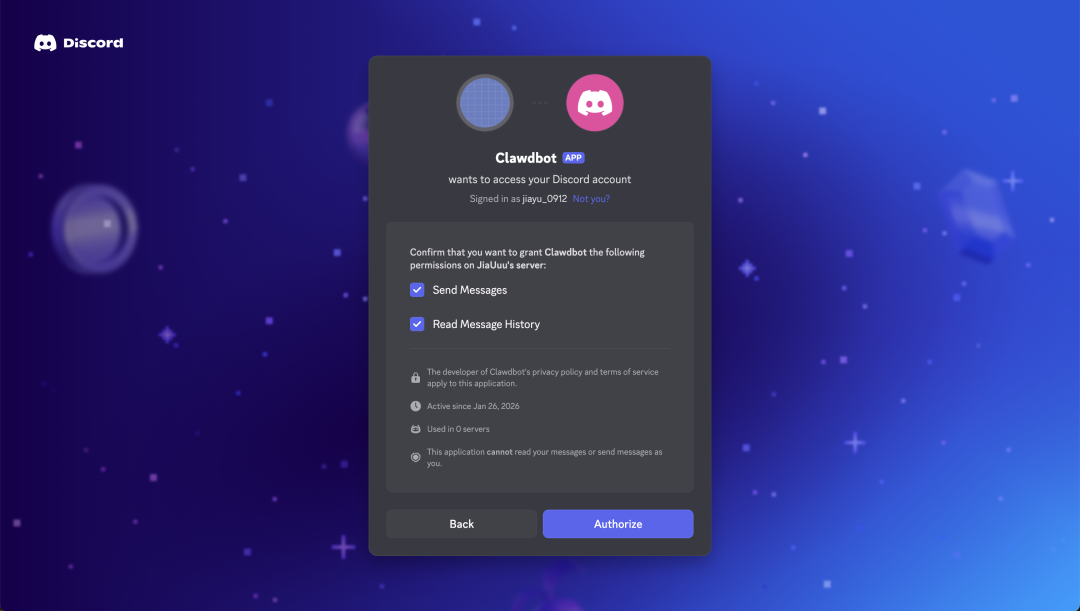
5、把页面滚动至底部,复制并在浏览器中打开生成好的链接,选择邀请进入的server后,点击Continue后进行授权,即可邀请bot加入:


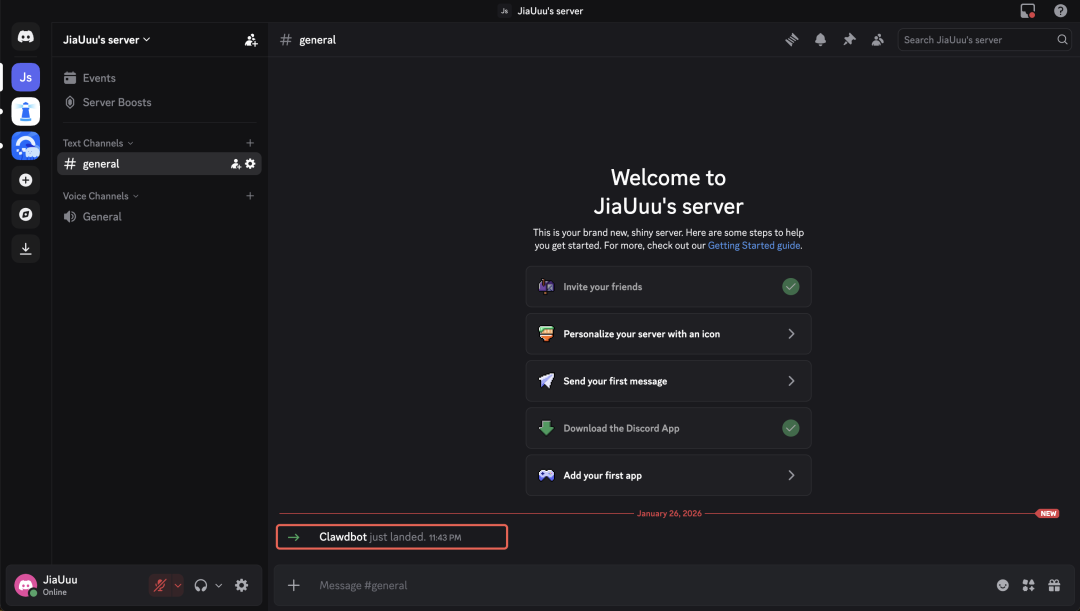
添加完成的效果如下图所示:
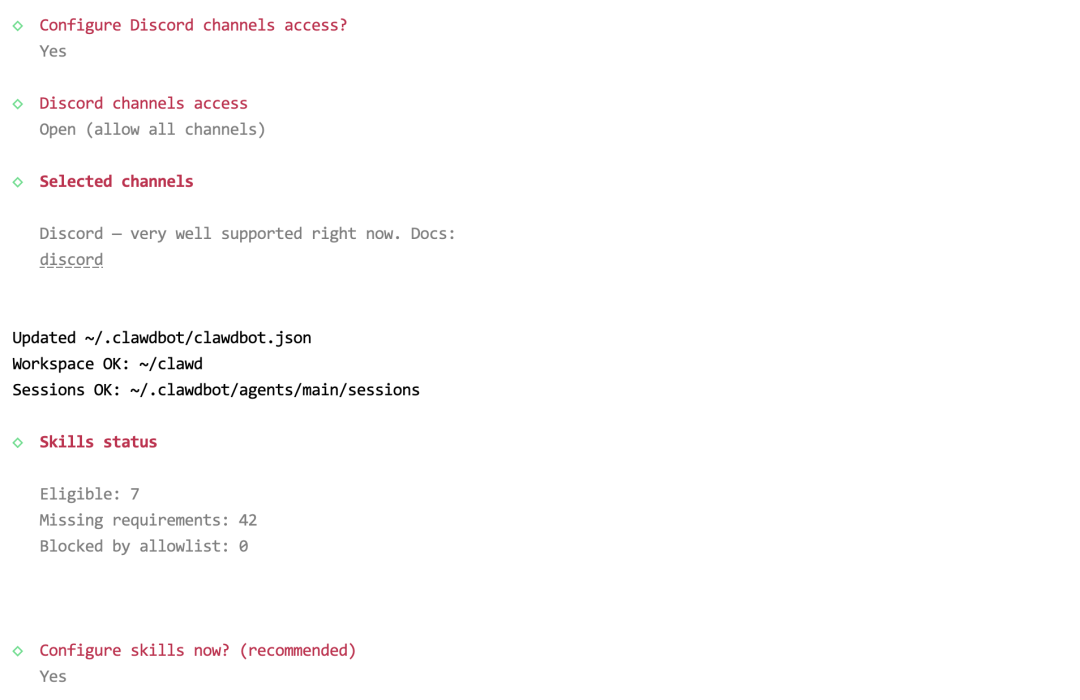
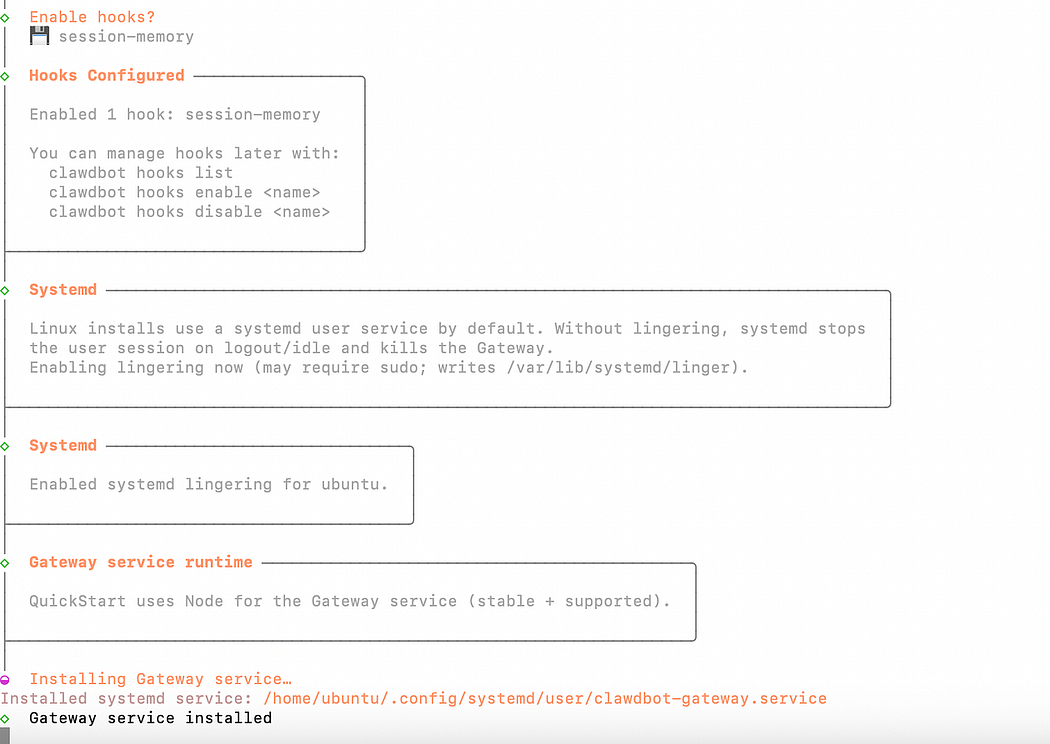
之后返回服务器内的配置流程中,其余的一些配置如下图所示来选择即可:
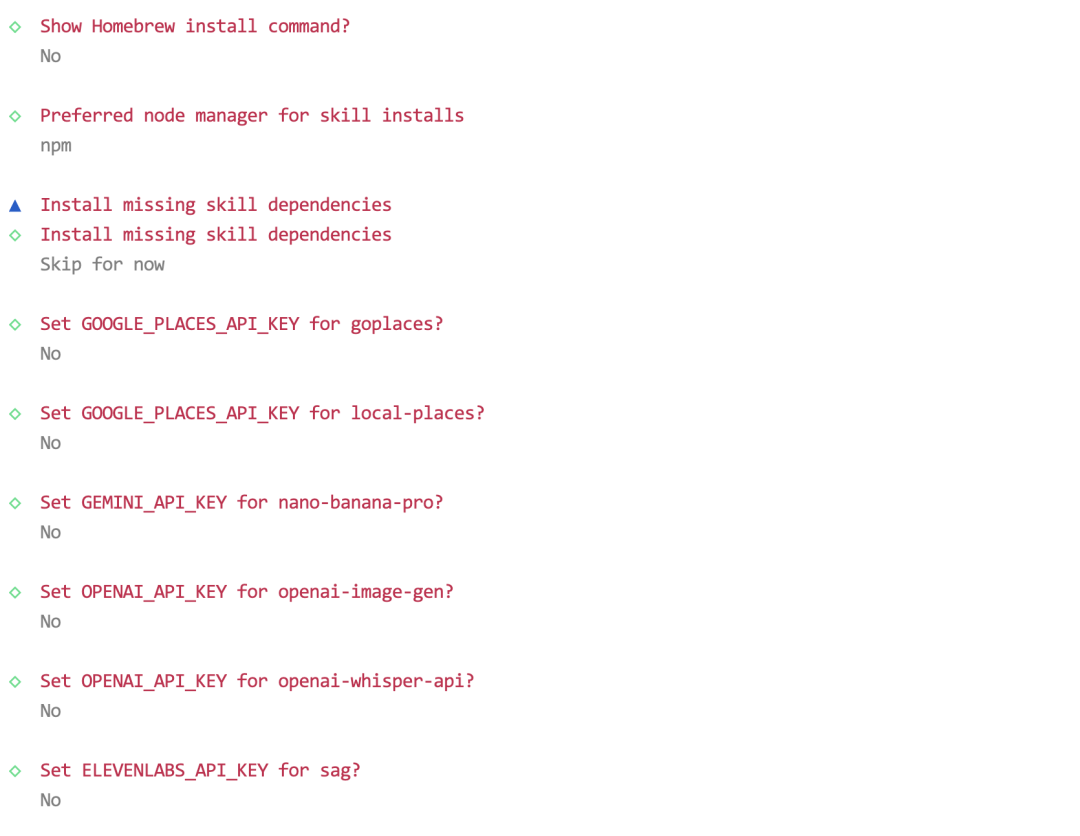
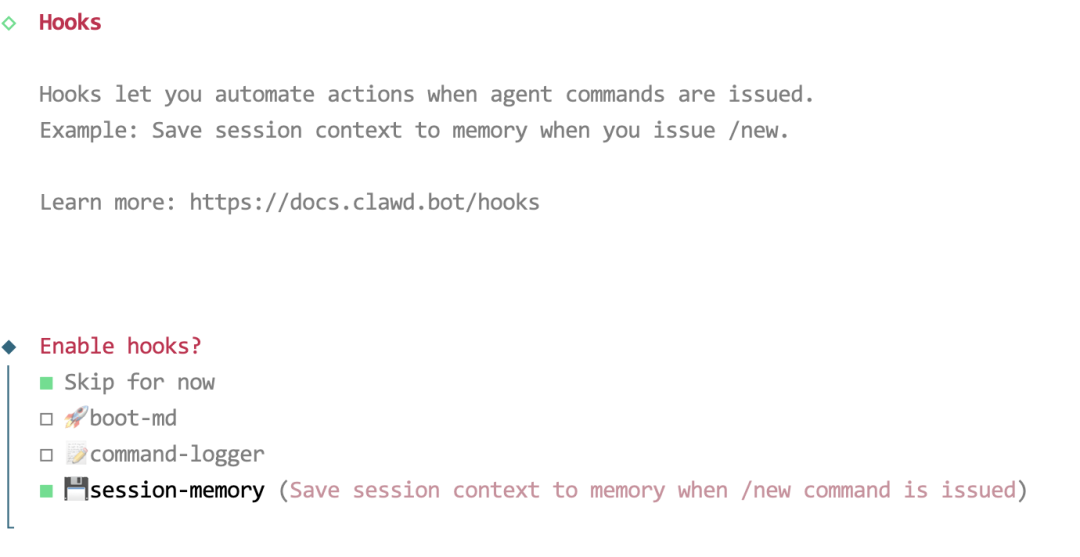
注意,Enable hooks的选项选择session-memory:
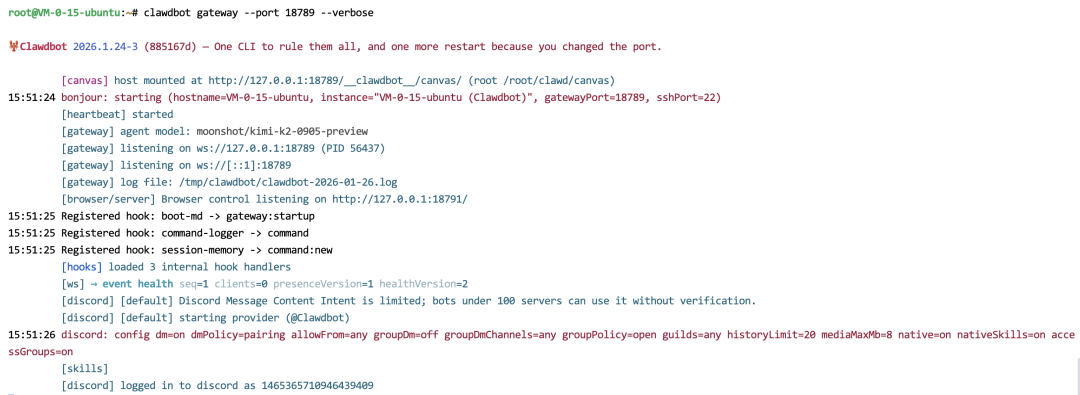
接下来,我们在服务器命令行这里粘贴并运行如下命令,启动Gateway:
clawdbot gateway --port 18789 --verbose启动后的效果如图:
启动成功后,我们返回Discord,与bot进行对话后拿到配对码:
切记这里一定需要和bot进行私聊!!!
紧接着返回服务器命令行,按下Ctrl+C(Windows)或者Command+C(MacOS)终止Gateway,然后粘贴并运行如下命令进行配对:
把<code>替换为上图中的“Pairing code”后面的内容。
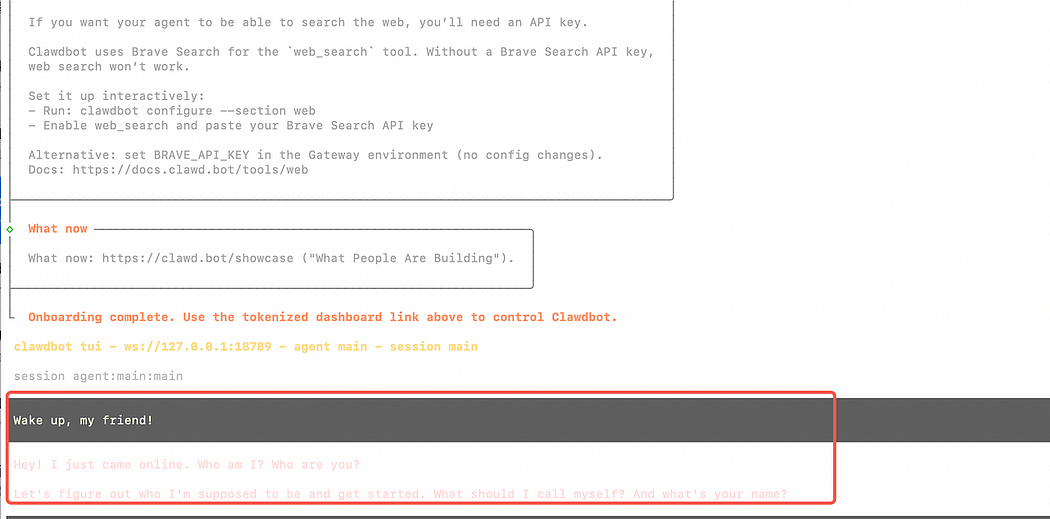
clawdbot pairing approve discord <code>执行完成后再次执行如下命令运行Gateway,然后回到Discord与bot进行对话,如果正常回复则说明部署成功:
clawdbot gateway --port 18789 --verbose-END-
<<< Swipe for Chinese
On January 26, a product called Clawdbot suddenly went viral across both international and Chinese tech communities. From X and Reddit to Chinese developer forums, it quickly became one of the most discussed AI projects.

Its creator, Peter, repeatedly emphasized that Clawdbot was originally designed as a “life assistant”:
you send a message via WhatsApp, the request is forwarded to Claude Code, and the result is sent back to you.
Clawdbot is not the first AI Agent capable of performing real tasks. However, only two or three weeks after its release on Claude Cowork, it unexpectedly reignited excitement in the AI community. The reason behind this renewed hype may not lie solely in the fact that its code is 100% AI-generated, but more importantly in its unexpected human–AI collaboration model.
Clawdbot runs inside the user’s own environment — such as a personal computer or private server — and interacts through familiar chat applications. Communicating with it feels like talking to a colleague or a friend. In addition, it has full system-level permissions and long-term memory, which effectively turns it into a truly personal AI Agent. This dramatically expands its potential capabilities while also avoiding the risk of sensitive data being centralized in large corporations.
Where should Clawdbot run?
With Clawdbot’s rapid popularity, Mac mini has almost become a “financial product” in the community. Many early adopters reported buying multiple Mac minis specifically to run Clawdbot.
At the same time, another perspective emerged:
because Clawdbot operates with very high privileges, it is better suited to an environment isolated from one’s primary computer — such as an old Mac (macOS currently has the best support), or a cloud server running Linux, which is also fully supported.
Note: Clawdbot’s Windows support is still limited, so Windows is not recommended for early experimentation.
Why Lighthouse?
Whether you use an old Mac or rush to buy a Mac mini like many community pioneers, both options require significant time and financial investment. Long-term operation also incurs electricity costs.
In contrast, a cloud server offers a faster and more cost-effective solution:
you can get started within minutes, with entry-level costs of only a few dollars per month. Cloud servers are naturally suited for 24/7 operation, making them a perfect match for Clawdbot’s always-on assistant design.
This is where Tencent Cloud Lighthouse comes in.
Lighthouse is a lightweight cloud server product designed for lightweight application scenarios. It eliminates the need for developers to understand complex cloud concepts, provides cost-effective server packages, and supports rapid deployment of open-source applications using preconfigured operating systems and runtime environments.
So how can Clawdbot be deployed quickly on Lighthouse?
Lighthouse now offers an official Clawdbot application template, which comes with all required runtime dependencies pre-installed — no manual setup needed. In the following steps, we will walk you through the entire process of deploying and configuring Clawdbot on Lighthouse, step by step.
1. Create a Lighthouse Server
Open- One click:
👉 https://buy.tencentcloud.com/lighthouse?blueprintType=APP_OS&blueprintOfficialId=lhbp-8hq35xoy®ionId=15&zone=na-siliconvalley-1&bundleId=bundle_rs_nmc_lin_med2_01&loginSet=AUTO&rule=true&from=lh-console
Special Offers:
👉https://www.tencentcloud.com/act/pro/lighthouse?from_qcintl=112010201
2. Create a new instance.
3. Select the following options:
Please choose according to your actual needs. The following configuration is recommended.
-
Operating system: Clawdbot
-
Region: Singapore or Tokyo
-
Instance size: 2 vCPU, 2GB RAM
-
Billing period: 1 month
4. Save the following information:
-
Public IP address
-
Login password (or reset it in the console)
2. Log in to the Server
Open a terminal on your local computer and run:
ssh ubuntu@YOUR_PUBLIC_IP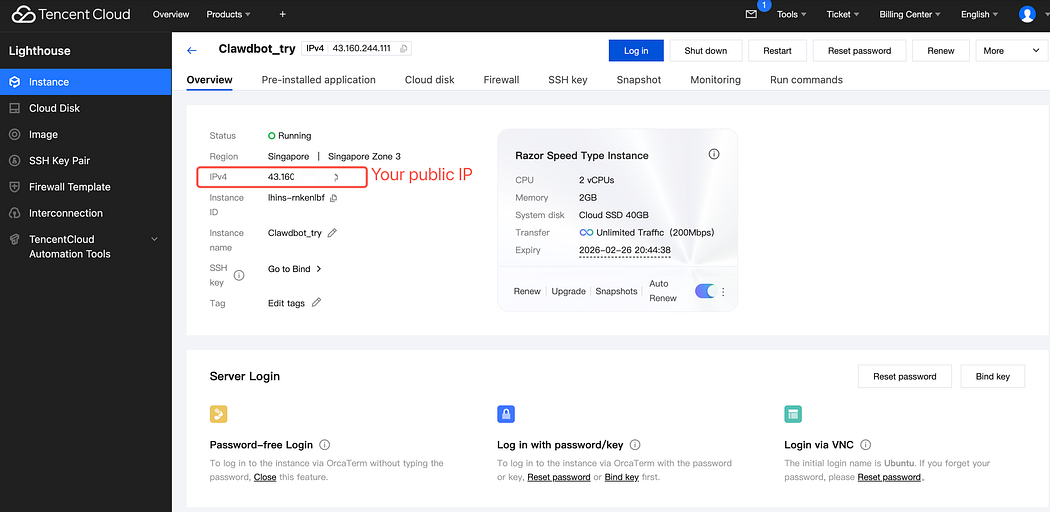
When prompted:
Are you sure you want to continue connecting?Type:
yesThen enter your password (input will not be visible — this is normal).
Note: On Ubuntu images, the default login user is ubuntu, not root.

3. Install Clawbot
Run:
clawdbot onboard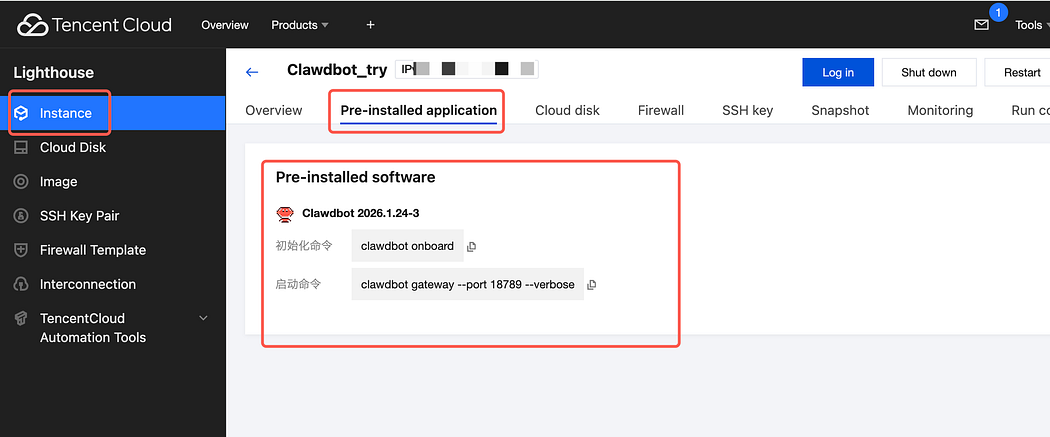
Wait approximately 2–3 minutes for installation to complete.
4. Configuration Choices (Recommended Settings)
During installation, Clawbot will present several interactive options.
Below are the official recommended selections for first-time users:
(1)Risk Acknowledgement
Select: Yes
Rationale:
Clawbot is capable of executing commands and accessing system resources.
This confirmation ensures the user understands its powerful capabilities before proceeding.

(2)Onboarding Mode
Select: QuickStart
Rationale:
QuickStart uses official defaults and minimizes configuration complexity.
It is optimized for first-time deployment and reduces error probability.
(3) Model/Auth Provider
(3.a)Gemini Authentication Method
Select: Google
Rationale:
Google (Gemini) is chosen because it provides an official and stable API, good model quality for general reasoning and agent tasks, and straightforward integration using an API key without complex custom configuration.
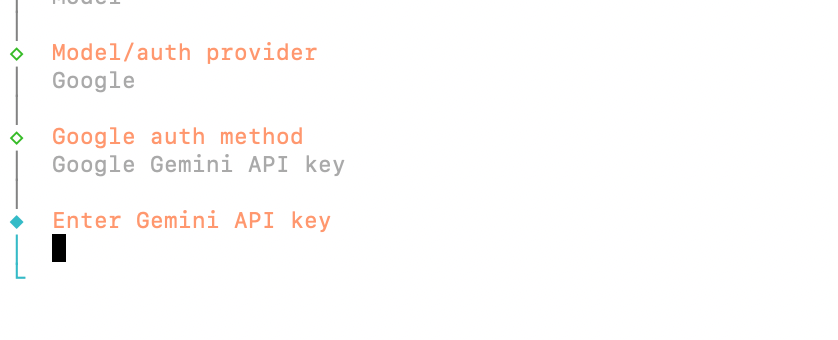
Recommended model:
google/gemini-3-pro-preview
Open the following website:
👉 https://aistudio.google.com
Steps:
-
Sign in with your Google account
-
Click Get API key (top right corner)
-
Choose Create API key
-
Copy the generated API key
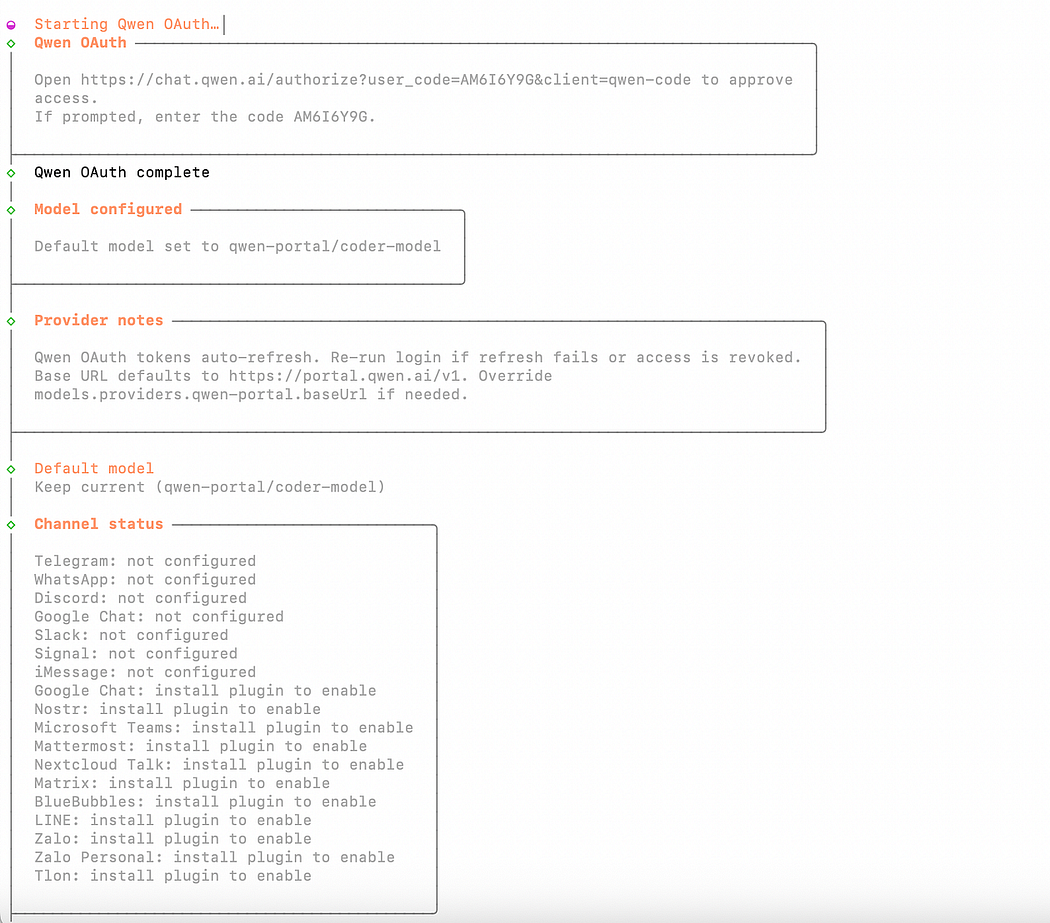
(3.b)Qwen Authentication Method
Select: Qwen OAuth
Rationale:
OAuth authentication avoids manual endpoint configuration and simplifies setup by using the official authorization flow.
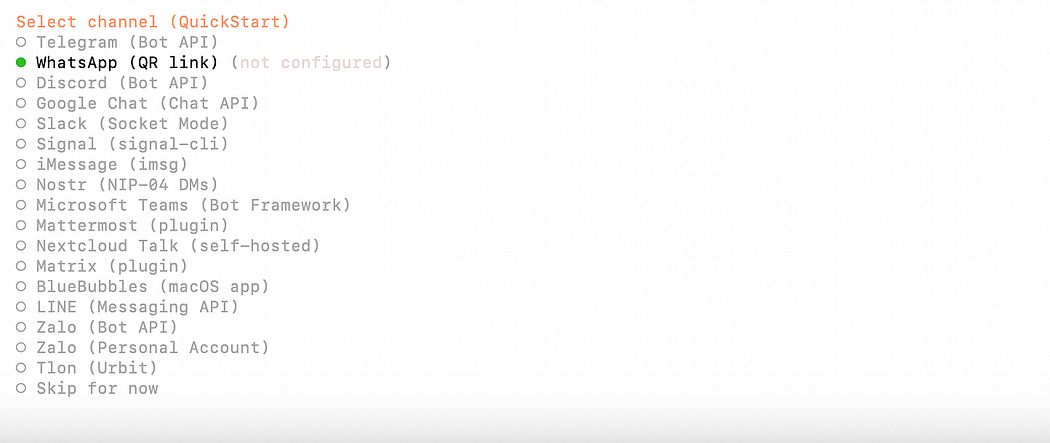
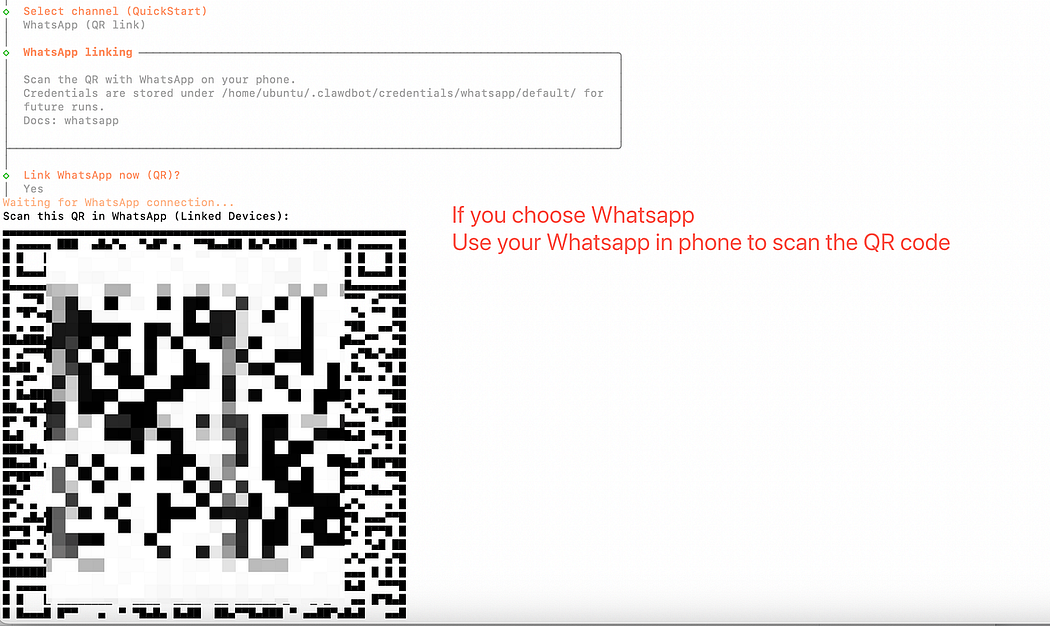
(4)Communication Channel
-
If you use Telegram or WhatsApp: select the corresponding platform
-
Otherwise: select Skip for now
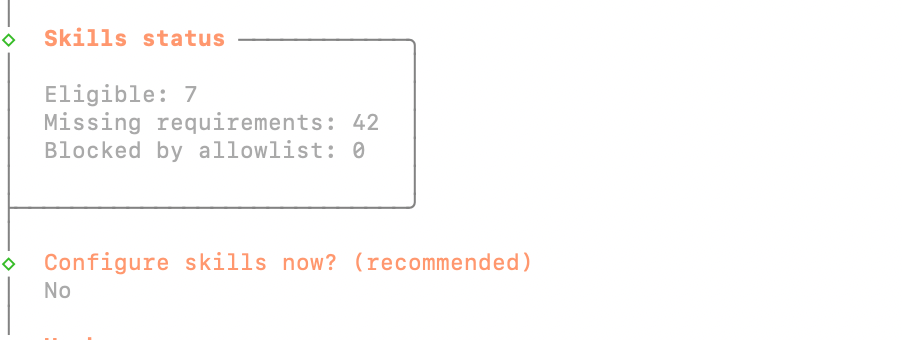
(5)Configure Skills
Select: No
Rationale:
Skills enable system-level automation (file access, browser control, shell execution).
For initial deployment, limiting permissions improves stability and security.
(6)Enable Hooks
Select only: session-memory
Rationale:
-
Enables conversation memory
-
Does not execute commands
-
Minimal security risk
-
Required to proceed past this step
Do not select:
-
boot-md (auto-run scripts on startup)
-
command-logger (command tracking and logging)
(7)Hatch Mode
Select: Hatch in TUI
Rationale:
-
TUI (Terminal UI) launches Clawbot directly in the terminal:No additional ports required
-
No web interface configuration
-
Immediate verification of successful startup

5. Verify Successful Deployment
If you see:
Wake up,my firend!This confirms:
-
Clawbot is running
-
Model connection is active
-
Deployment is successful 🎉
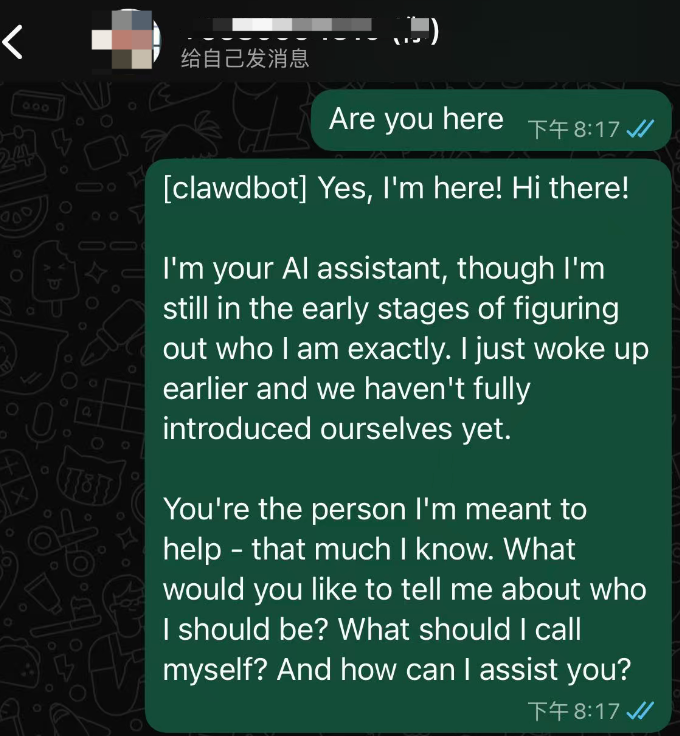
6. First Interaction
Example prompt:
You are Clawbot. Your main responsibility isto help mewith research, writing, and analysis tasks.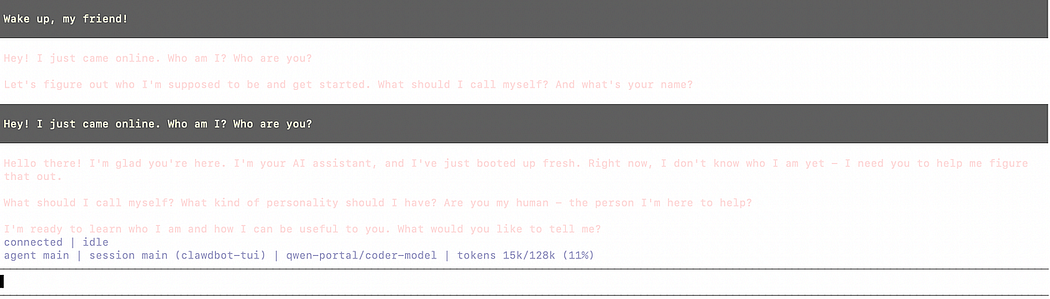
7. Functional Test
Send:
Explain what an AI agent isin simple terms.If Clawbot responds normally, the system is fully operational.
8. Security Recommendation
Clawbot is capable of:
-
Executing shell commands
-
Reading and writing files
-
Running automated tasks
Recommended usage:
-
Run only on VPS or cloud instances
-
Avoid personal machines
-
Do not grant access to banking, wallet, or critical accounts
-
Treat as an AI automation sandbox
Summary
You have successfully:
-
Deployed Clawbot on Tencent Cloud Lighthouse
-
Configured a stable baseline environment
-
Launched an AI agent capable of continuous operation
-END-
左右滑动查看更多

小龙虾开发者社区是 CSDN 旗下专注 OpenClaw 生态的官方阵地,聚焦技能开发、插件实践与部署教程,为开发者提供可直接落地的方案、工具与交流平台,助力高效构建与落地 AI 应用
更多推荐
 3
3 0
0- 0


 已为社区贡献12条内容

所有评论(0)