微信小程序小白易入门基础教程1
尺寸单位拿以上的需求去实现不同宽度的页面适配假设page375px利用一个属性calc属性CSS和wxss 都支持一个属性750和rpx中间不要留空格运算符的两边也不要留空格view{*/
微信小程序
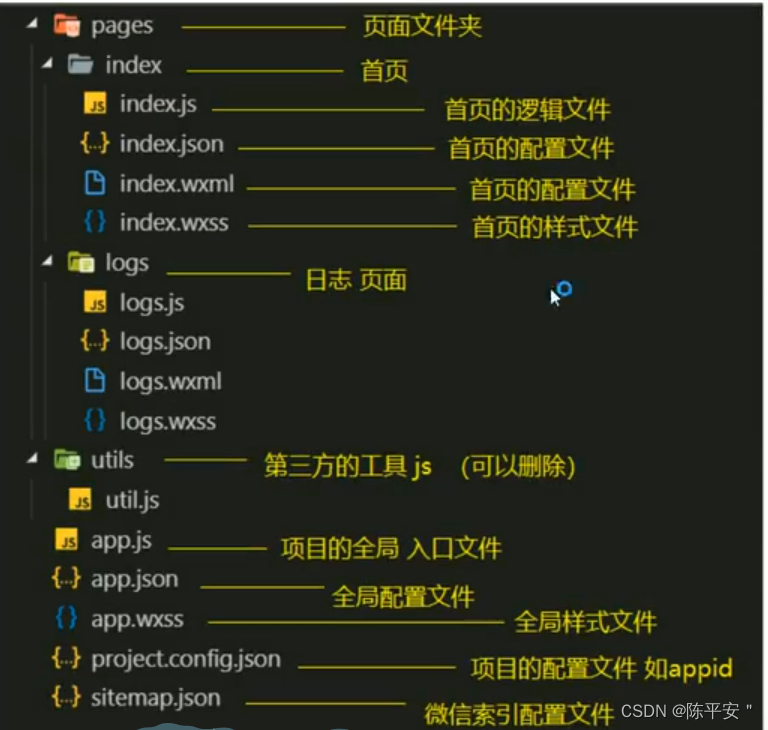
基本结构

页面配置
页面配置
app.json 中的部分配置,也支持对单个页面进行配置,可以在页面对应的 .json 文件来对本页面的表现进行配置。
页面中配置项在当前页面会覆盖 app.json 中相同的配置项(样式相关的配置项属于 app.json 中的 window 属性,但这里不需要额外指定 window 字段),具体的取值和含义可参考全局配置文档中说明。
文件内容为一个 JSON 对象,有以下属性:
配置项
| 属性 | 类型 | 默认值 | 描述 | 最低版本 |
|---|---|---|---|---|
| navigationBarBackgroundColor | HexColor | #000000 | 导航栏背景颜色,如 #000000 | |
| navigationBarTextStyle | string | white | 导航栏标题颜色,仅支持 black / white | |
| navigationBarTitleText | string | 导航栏标题文字内容 | ||
| navigationStyle | string | default | 导航栏样式,仅支持以下值: default 默认样式 custom 自定义导航栏,只保留右上角胶囊按钮。 | iOS/Android 微信客户端 7.0.0,Windows 微信客户端不支持 |
| backgroundColor | HexColor | #ffffff | 窗口的背景色 | |
| backgroundTextStyle | string | dark | 下拉 loading 的样式,仅支持 dark / light | |
| backgroundColorTop | string | #ffffff | 顶部窗口的背景色,仅 iOS 支持 | 微信客户端 6.5.16 |
| backgroundColorBottom | string | #ffffff | 底部窗口的背景色,仅 iOS 支持 | 微信客户端 6.5.16 |
| enablePullDownRefresh | boolean | false | 是否开启当前页面下拉刷新。 详见 Page.onPullDownRefresh | |
| onReachBottomDistance | number | 50 | 页面上拉触底事件触发时距页面底部距离,单位为px。 详见 Page.onReachBottom | |
| pageOrientation | string | portrait | 屏幕旋转设置,支持 auto / portrait / landscape 详见 响应显示区域变化 | 2.4.0 (auto) / 2.5.0 (landscape) |
| disableScroll | boolean | false | 设置为 true 则页面整体不能上下滚动。 只在页面配置中有效,无法在 app.json 中设置 | |
| usingComponents | Object | 否 | 页面自定义组件配置 | 1.6.3 |
| initialRenderingCache | string | 页面初始渲染缓存配置,支持 static / dynamic | 2.11.1 | |
| style | string | default | 启用新版的组件样式 | 2.10.2 |
| singlePage | Object | 否 | 单页模式相关配置 | 2.12.0 |
| restartStrategy | string | homePage | 重新启动策略配置 | 2.8.0 |
- 注:并不是所有
app.json中的配置都可以在页面覆盖或单独指定,仅限于本文档包含的选项。 - 注:iOS/Android 客户端 7.0.0 以下版本,
navigationStyle只在app.json中生效。
配置示例
{
  "navigationBarBackgroundColor": "#ffffff",
  "navigationBarTextStyle": "black",
  "navigationBarTitleText": "微信接口功能演示",
  "backgroundColor": "#eeeeee",
  "backgroundTextStyle": "light"
}
数据绑定
<!--字符串-->

<view>{{msg}}</view>

<!--数字类型-->

<view>{{num}}</view>

<!--bool类型-->

<view> 是否{{isGirl}}</view>

<!--object类型-->

<view> {{person.age}}</view>

<view> {{person.height}}</view>

<view> {{person.name}}</view>

<view data-="num">自定义属性</view>


<view>

<checkbox checked="{{ischecked}}"></checkbox>

</view>
js
 data: {
     msg:"hello ",
     num:"1000",
     isGirl:false,
     person:{
       age:18,
       height:1.75,
       weight:200,
       name:"wagn"
     }
   },
     ischecked:false
运算表达式
列表循环和对象
列表循环
wx:for=“{{数组或者对象}}”
wx: for item=" 循环项的名称”wx: for - index=" 循环项的索引”
1 wx:for=“{{数组或者对象}}” Wx: for- item=“循环项的名称” wX: for- index=”循环项的索引”
2 wx:key=“唯一 的值"用来提高列表渲染的性能
1 wx:key 绑定一个普通的字符串的时候那么这个字符串名称肯定是循环数组中的对象的唯一 属性
2 wx:key =”*this" 就表示你的数组是一个普通的数组 *this 表示是循环项
[1,2,3,44, 5]
[“1”,“222”,“adfdf”]
3当出现数组的嵌套循环的时候尤其要注意 以下绑定的名称不要重名
wx:for - item=" item" Wx: for- index=" index"
4默认情况下我们不写
wX: for- item=" item" wx: for- index=" index"
小程序也会把循环项的名称和索引的名称item 和index
只有一层循环的话
( wx:for-item=“item” wx:for-index=“index”) 可以省略
 <view wx:for="{{list}}"
   wx:for-item="item"
   wx:for-index="index"
   wx:key="id">
索引{{index}}
数值{{item.name}}
</view>
对象循环
1 wx:for=“{{对象}}” wx:for- item="对象的值” wx: for- index=“对象的属性”
2循环对象的时候最好把item和index的名称都修改一下
wx: for- item=“value”
Wx: for- index=“key”
代码
<view wx:for="{{person}}" wx:for-item="value" wx:for-index="key">
属性{{key}}
值{{value}}
</view>


 person:{
       age:18,
       height:1.75,
       weight:200,
       name:"wagn"
     },
条件渲染
11条件渲染
1 wx:if=“{{true/false}}”
2 if
,else,if else
wx:if
wx:elif
wx:else
<view wx:if="{{true}}">显示</view>
<view wx:else="{{false}}">隐藏</view>
<view wx:elif>no</view>
hidden
什么场景下用哪个
1当标签不是频繁的切换显示优先使用wx:if
直接把标签从页面结构给移除掉
2当标签频繁的切换显示的时候优先使用_ hidden
通过添加样式的方式来切换显示
<view hidden="{{true}}">134</view>


<view
 hidden style="display:flex">123</view>
</view>
事件绑定
// pages/demo03/demo03.js
Page({

  /**
   * 页面的初始数据
   */
  data: {
    num:0
  },
    handleinput(e){
      this.setData({
        num:e.detail.value
      })
    },
    handletap(e){
      //获取自定义属性operaction
     const {operaction} = e.currentTarget.dataset;
     console.log(operaction);
     this.setData({
      num:this.data.num + operaction
    })
    }


})
小程序事件绑定
需要给input标签绑定input事件
绑定关键字bindinput
2如何获取输入框的值
通过事件源对象来获取
e. detail. value
3把输入框的值赋值到data当中
不能直接
1 this. data . num=e . detail. value
2 this . num=e . detail . value
正确的写法
this. setData({
num:e . detail. value
})
4需要加入一个点击事件
1 bindtap
2无法在小程序当中的事件中直接传参
3通过自定义属性的方式来传递参数
4事件源中获取自定义属性
rpx
尺寸单位
拿以上的需求去实现不同宽度的页面适配
page px = 750 rpx
1px=750rpx/page
100px=750rpx*100/page
假设
page
375px
利用一个属性calc属性
CSS和wxss 都支持一个属性
750和rpx中间不要留空格
运算符的两边也不要留空格
view{
  /* width: 200rpx; */
  height: 200rpx;
  font-size: 40rex;
  background-color: #454659;
  width:calc(750rpx * 100 / 375px);
}
样式导⼊
wxss中直接就⽀持,样式导⼊功能。
也可以和 less中的导⼊混⽤。
使⽤ @import
语句可以导⼊外联样式表,只⽀持相对路径
⼩程序中使⽤less
原⽣⼩程序不⽀持 less
,其他基于⼩程序的框架⼤体都⽀持,如 wepy mpvue , taro
等。
但是仅仅因为⼀个less功能,⽽去引⼊⼀个框架,肯定是不可取的。因此可以⽤以下⽅式来实现
\1. 编辑器是 vscode
\2. 安装插件 easy less
\3. 在vs code的设置中加⼊如下,配置

\4. 在要编写样式的地⽅,新建 less
⽂件,如 index.less
,然后正常编辑即可。
常见组件
布局组件
view,text,rich,text,button,image,navigator,icon,swiper,radio,checkbox
view
代替 原来的 div 标签
swiper
默认宽度 100% ⾼度 150px

<swiper autoplay interval="1000" circular indicator-dots="ture" indicator-active-color="pink">

<swiper-item><image mode="widthFix" src="./img/lun.jpg/"/></swiper-item>
<swiper-item><image mode="widthFix" src="./img/lun-1.png/"/></swiper-item>
<swiper-item><image mode="widthFix" src="./img/lun-2.jpg/"/></swiper-item>
</swiper>
navigator
导航组件
默认换行

open-type 有效值
navigate 有返回
redirect无返回

rich-text 富文本标签
类似v-html
nodes属性
使用
demo07.wxml
1.标签字符串
<rich-text nodes="<img
src="https://developers.weixin.qq.com/miniprogram/assets/images/head_global_z_@all.p
ng" alt="">"></rich-text>
2.对象数组
<rich-text nodes="{{nodes}}"></rich-text>
demo07.js
data: {
nodes: [{
name: 'div',
attrs: {
class: 'div_class',
style: 'line-height: 60px; color: red;'
},
children: [{
type: 'text',
text: 'Hello World!'
}]
}]
}
icon
<view class="group">
  <block wx:for="{{iconSize}}">
    <icon type="success" size="{{item}}"/>
  </block>
</view> <view class="group">
  <block wx:for="{{iconType}}">
    <icon type="{{item}}" size="40"/>
  </block>
</view> <view class="group">
  <block wx:for="{{iconColor}}">
    <icon type="success" size="40" color="{{item}}"/>
  </block>
</view>
data: {
       iconSize: [20, 30, 40, 50, 60, 70],
       iconType: [
         'success', 'success_no_circle', 'info', 'warn', 'waiting', 'cancel',
   'download', 'search', 'clear'
      ],
       iconColor: [
         'red', 'orange', 'yellow', 'green', 'rgb(0,255,255)', 'blue', 'purple'
      ],
    },
lass=“group”>
data: {
iconSize: [20, 30, 40, 50, 60, 70],
iconType: [
‘success’, ‘success_no_circle’, ‘info’, ‘warn’, ‘waiting’, ‘cancel’,
‘download’, ‘search’, ‘clear’
],
iconColor: [
‘red’, ‘orange’, ‘yellow’, ‘green’, ‘rgb(0,255,255)’, ‘blue’, ‘purple’
],
},
更多推荐
 已为社区贡献1条内容


所有评论(0)