
使用Mediapipe实现CPU上的实时人脸检测(每秒30帧)
对计算机视觉和人脸检测感兴趣吗?在这个初学者指南中,我们将探讨如何使用Mediapipe和Python进行实时人脸检测。了解如何利用Mediapipe和Python这一强大组合,在CPU上以惊人的30帧每秒的速度检测人脸。让我们开始吧。照片已检测到人脸关于Mediapipe的一点介绍Mediapipe是一个用于构建跨平台、可定制的实时和流媒体机器学习解决方案的开源框架。它可用于执行各种计算机视觉任
对计算机视觉和人脸检测感兴趣吗?在这个初学者指南中,我们将探讨如何使用Mediapipe和Python进行实时人脸检测。了解如何利用Mediapipe和Python这一强大组合,在CPU上以惊人的30帧每秒的速度检测人脸。让我们开始吧。
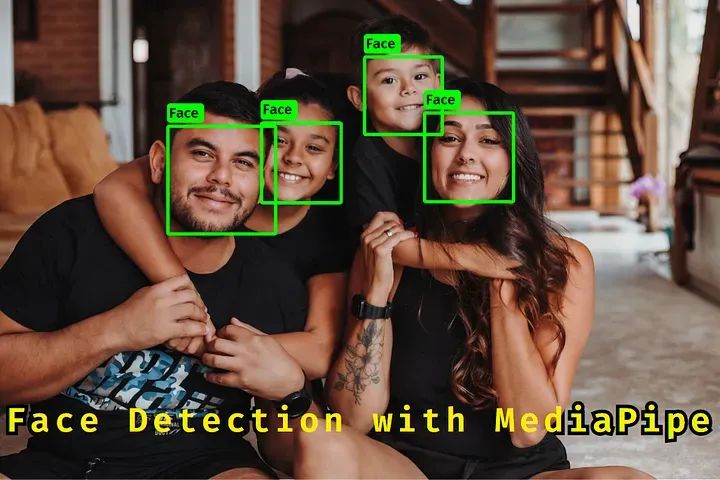
照片已检测到人脸
关于Mediapipe的一点介绍
Mediapipe是一个用于构建跨平台、可定制的实时和流媒体机器学习解决方案的开源框架。它可用于执行各种计算机视觉任务,如人脸检测[在这里是案例]、姿势估计和物体跟踪。Mediapipe适用于Android、iOS、桌面和嵌入式设备,更多信息可以在这里找到。
搭建开发环境
首先,您需要安装Python,可以在这里找到。然后,您可以使用Python包管理器pip来安装所需的模块/包,如Mediapipe。接下来,您可以选择适合您编码的IDE。这是我为计算机视觉设置的环境,如果您想尝试一下。
您可以使用以下命令在终端中安装Mediapipe模块:
pip install mediapipe随着Mediapipe的安装,还会安装其他多个模块/库,因为这些模块/库对于Mediapipe是必需的,例如OpenCV,用于计算机视觉和图像处理等。在这里,我们将使用OpenCV来从网络摄像头获取视频流,以便在帧/图像中检测人脸。
让我们来捕获摄像头的视频流
以下是一个脚本,该脚本从摄像头获取视频流并显示窗口,还计算每秒帧数(fps)并显示在窗口上,这样以后比较原始摄像头的反馈和带有人脸检测的反馈就会更容易了。
import cv2 as cv  # Import the OpenCV library
import time  # Import the time library


# Create a VideoCapture object called cap
cap = cv.VideoCapture(1)


# Start the timer
start_time = time.time()


# Initialize the frame counter
frame_counter = 0


# This is an infinite loop that will continue to run until the user presses the `q` key
while True:


    # Increment the frame counter
    frame_counter += 1


    # Read a frame from the webcam
    ret, frame = cap.read()


    # If the frame was not successfully captured, break out of the loop
    if ret is False:
        break


    # Calculate the FPS
    fps = frame_counter / (time.time() - start_time)


    # Display the FPS on the frame
    cv.putText(frame, f"FPS: {fps:.3f}", (30, 30), cv.FONT_HERSHEY_PLAIN, 1.5, (0, 255, 255), 2, cv.LINE_AA)


    # Display the frame on the screen
    cv.imshow("frame", frame)


    # Check if the user has pressed the `q` key, if yes then close the program.
    key = cv.waitKey(1)
    if key == ord("q"):
        break


# Release the VideoCapture object
cap.release()


# Close all open windows
cv.destroyAllWindows()
运行上述脚本以测试您的网络摄像头是否正常工作:
 摄像头反馈
摄像头反馈
让我们来探讨人脸检测系统
导入/Python模块
首先,我们需要导入模块:
导入cv2作为cv,这是计算机视觉/图像处理,将帮助我们在使用上述代码访问网络摄像头时处理图像。
时间模块导入时间用于跟踪时间以计算FPS。
MediaPipe用于人脸检测,这是我们的主要模块,它有不同的模型用于不同的解决方案,如人脸检测、地标检测、姿势估计等。
最后一个导入是NumPy,用于科学计算,在这里我们将对数组进行乘法运算,NumPy使事情变得更容易,由于NumPy是用Python和C编写的,所以它比其他模块更快。NumPy核心库是用Python编写的,但一些性能关键的部分是用C编写的。这使得NumPy既快速又易于使用。
import cv2 as cv
import time
import mediapipe as mp
import numpy as np
配置人脸检测模型
mp_face_detection = mp.solutions.face_detection
with mp_face_detection.FaceDetection(model_selection=1, min_detection_confidence=0.5) as face_detector:
这里的代码初始化了来自Mediapipe的人脸检测模型,有多个预训练模型可用,但我们在这里选择了人脸检测模型。
创建人脸检测对象/配置模型
with mp_face_detection.FaceDetection(model_selection=1, min_detection_confidence=0.5) as face_detector:在这里,我们使用上下文管理器语句打开人脸检测模型,并用两个参数进行配置,model_selection和min_detection_confidence,model_selection允许我们从多个可用模型中进行选择,其中一个非常快但在检测方面不准确,另一个模型在检测方面更可靠,检测速度(fps)较低,如果您的PC更偏向高端,两者之间几乎看不到任何区别,除了检测部分,我选择了模型一,相当准确。model_selection=1。另一个参数是min_detection_confidence=0.5,它指定模型显示结果的信心水平。在这里,我设置了0.5,这意味着模型对其是否是人脸有50%的确定性,然后它将返回这些结果。
处理图像/帧并从Mediapipe获取原始数据
当图像传递给Mediapipe进行处理/人脸检测时,建议更改图像的颜色格式,因为OpenCV格式是BGR(蓝、绿、红),而mediapipe接受的是RGB,这相当简单,只需将图像/帧传递给cv.cvtColor(image,cv.COLOR_BGR2RGB)函数,它将将其转换为RGB格式。
rgb_frame = cv.cvtColor(frame, cv.COLOR_BGR2RGB)它处理rgb_frame[图像]并将结果作为数据返回,您可以这样提取results.detections的数据,这只是图像或帧中检测到的所有人脸的列表,每个检测到的人脸都有3个数据点。
results = face_detector.process(rgb_frame)在提取数据之前,我们必须检查是否检测到了人脸,我们可以通过if来实现,然后我们可以在if块中提取所有数据。如果results.detections:
提取数据
label_id face.label_id 始终为零,我不知道原因。
score face.score 置信度分数,显示它是源头还是面部。其值在0到1.0之间。
face_location_data face.location_data # 提示面部在图像中的位置或坐标,进一步分为两个数据点,面部边界框和面部关键点。
面部边界框数据
relative_bounding_box = face_location_data.relative_bounding_box 在图像/帧中的人脸边界框的归一化值有四个点。
xmin = relative_bounding_box.xmin # 人脸边界框右上角的X坐标。
ymin = relative_bounding_box.ymin # 人脸边界框右上角的Y坐标。
width = relative_bounding_box.width # 边界框的宽度。
height = relative_bounding_box.height # 人脸边界框的高度。
# checking if face is present in detection or not.
if results.detections:
# looping through all the detection/faces
for face in results.detections:
# extracting the relative bounding box data
# converting normalize coordinate into pixel coordinate
# use numpy multiply function to multiple width and heigh of face to corresponding values.
face_react = np.multiply(
[
face.location_data.relative_bounding_box.xmin,
face.location_data.relative_bounding_box.ymin,
face.location_data.relative_bounding_box.width,
face.location_data.relative_bounding_box.height,
],
[frame_width, frame_height, frame_width, frame_height],
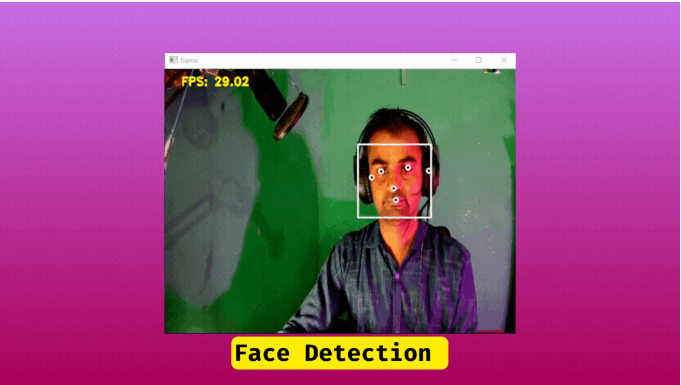
).astype(int)绘制人脸边界框和置信度分数在人脸右上角。
# Draw the rectangle to each face.
cv.rectangle(frame, face_react, color=(255, 255, 255), thickness=2)
# draw the score on the top right corner of rectangle.
cv.putText(frame,f" Face {face.score[0]*100:.1f}",face_react[:2],cv.FONT_HERSHEY_DUPLEX,0.4,(0, 255, 0),1,cv.LINE_AA)
人脸关键点/特征点
这是人脸的六个基本关键点[特征点],face.location_data.relative_keypoints中的每个值都有x和y值/归一化坐标,您可以通过访问数据face.location_data.relative_keypoints.x, face.location_data.relative_keypoints.y来获取它们。由于有多个值,您可以使用for循环轻松迭代每个关键点。
所有这些值都根据人脸图像的宽度和高度进行了规范化,我们需要通过将它们与图像的宽度和高度相乘来将它们转换为像素坐标。
# Getting the all face landmarks through list-comprehension and  store in numpy array.
key_points = np.array([(p.x, p.y) for p in face.location_data.relative_keypoints])


# convert normalize values into pixel coordinates, and turn them into integers
key_points_coords = np.multiply(key_points,[frame_width,frame_height],).astype(int)
绘制人脸边界框和关键点
在这里,我们遍历每个关键点,并在每个点上绘制一个圆。
# Looping through each key_points_coords and draw a circle.
for p in key_points_coords:
    cv.circle(frame, p, 4, (255, 255, 255), 2)
    cv.circle(frame, p, 2, (0, 0, 0), -1)
以下是完整的源代码:
import time
import cv2 as cv
import mediapipe as mp
import numpy as np
mp_face_detection = mp.solutions.face_detection
cap = cv.VideoCapture(0)
with mp_face_detection.FaceDetection(model_selection=1, min_detection_confidence=0.5) as face_detector:
    frame_counter = 0
    fonts = cv.FONT_HERSHEY_PLAIN
    start_time = time.time()
    while True:
        frame_counter += 1
        ret, frame = cap.read()
        if ret is False:
            break
        rgb_frame = cv.cvtColor(frame, cv.COLOR_BGR2RGB)


        results = face_detector.process(rgb_frame)
        frame_height, frame_width, c = frame.shape
        if results.detections:
            for face in results.detections:
                face_react = np.multiply(
                    [
                        face.location_data.relative_bounding_box.xmin,
                        face.location_data.relative_bounding_box.ymin,
                        face.location_data.relative_bounding_box.width,
                        face.location_data.relative_bounding_box.height,
                    ],
                    [frame_width, frame_height, frame_width, frame_height]).astype(int)

                cv.rectangle(frame, face_react, color=(255, 255, 255), thickness=2)
                key_points = np.array([(p.x, p.y) for p in face.location_data.relative_keypoints])
                key_points_coords = np.multiply(key_points,[frame_width,frame_height]).astype(int)
                for p in key_points_coords:
                    cv.circle(frame, p, 4, (255, 255, 255), 2)
                    cv.circle(frame, p, 2, (0, 0, 0), -1)

        fps = frame_counter / (time.time() - start_time)
        cv.putText(frame,f"FPS: {fps:.2f}",(30, 30),cv.FONT_HERSHEY_DUPLEX,0.7,(0, 255, 255),2,)
        cv.imshow("frame", frame)
        key = cv.waitKey(1)
        if key == ord("q"):
            break
    cap.release()
    cv.destroyAllWindows()
人脸检测
最后的思考
总的来说,MediaPipe的人脸检测功能为需要进行面部分析的任何项目提供了丰富的信息。通过其先进的算法和神经网络,MediaPipe能够检测各种面部特征,如眼睛、鼻子、嘴巴,甚至是面部关键点。这些信息可以用于各种应用。虽然理解提供的各种数据点可能需要一些时间,但由于数据的准确性可以极大地提升任何面部分析项目的成功,因此这些努力是值得的。
· END ·
HAPPY LIFE

本文仅供学习交流使用,如有侵权请联系作者删除

旨在为数千万中国开发者提供一个无缝且高效的云端环境,以支持学习、使用和贡献开源项目。
更多推荐


 17
17 0
0- 0


 已为社区贡献11条内容

所有评论(0)