

Zabbix之部署
zabbix 是一个基于 Web 界面的提供分布式系统监视以及网络监视功能的企业级的开源解决方案zabbix 能监视各种网络参数,保证服务器系统的安全运营;并提供灵活的通知机制以让系统管理员快速定位/解决存在的各种问题zabbix 由 2 部分构成,zabbix server 与可选组件 zabbix agent。通过 C/S 模式采集数据,通过 B/S 模式在 Web 端展示和配置。
Zabbix 6.0
一.Zabbix介绍
1.zabbix 的含义
- zabbix 是一个基于 Web 界面的提供分布式系统监视以及网络监视功能的企业级的开源解决方案
- zabbix 能监视各种网络参数,保证服务器系统的安全运营;并提供灵活的通知机制以让系统管理员快速定位/解决存在的各种问题
- zabbix 由 2 部分构成,zabbix server 与可选组件 zabbix agent。通过 C/S 模式采集数据,通过 B/S 模式在 Web 端展示和配置
- zabbix server 可以通过 zabbix agent,SNMP协议,端口监视等方法提供对远程服务器/网络状态的监视,数据收集等功能,它可以运行在 Linux 等平台上
- zabbix agent 需要安装在被监视的目标服务器上,它主要完成对硬件信息或与操作系统有关的内存,CPU 等信息的收集
2.zabbix 的监控原理
- zabbix agent 安装在被监控的主机上,zabbix agent 负责定期收集客户端本地各项数据,并发送至 zabbix server 端,zabbix server 收到数据后, 将数据存储到数据库中,用户基于 Zabbix Web 可以看到数据在前端展现图像。当 zabbix 监控某个具体的项目, 该项目会设置一个触发器阈值, 当被监控的指标超过该触发器设定的阈值,会进行一些必要的动作,动作包括:发送信息(邮件、微信、短信)、发送命令(shell 命令、reboot、restart、 install 等)
二.关于Zabbix 6.0 新特性
1.Zabbix server高可用防止硬件故障或计划维护期的停机:
- 原生选择加入HA群集配置
- 定义一个或多个备用节点
- 实时监控Zabbix server群集节点的状态
- 不需要外部工具即可将Zabbix server配置为HA群集模式
2.Zabbix 6.0 LTS新增Kubernetes监控功能在Kubernetes系统从多个维度采集指标
- Kubernetes节点和pods的自动发现和监控
- 无代理方式采集Kubernetes pods和节点的信息
- 获取Kubernetes节点主机高水平信息
3.Zabbix 6.0 功能组件
(1)Zabbix Server
- zabbix 服务端守护进程,是 Zabbix 软件的核心组件,Zabbix Agent 向其报告可用性、系统完整性信息和统计信息
- Zabbix Server 也是存储所有配置信息、统计信息和操作信息的核心存储库
- Zabbix Server 也是 Zabbix 监控系统的告警中心。在监控的系统中出现任何异常,将发出通知给管理员
- 基本的 Zabbix Server 的功能分解成为三个不同的组件。他们是:Zabbix server、Web 前端、数据库
- Zabbix 的所有配置信息都存储在 Server 和 Web 前端进行交互的数据库中。例如,当你通过 Web 前端(或者API)新增一个监控项时, 它会被添加到数据库的监控项表里。然后,Zabbix server 以每分钟一次的频率查询监控项表中的有效项,接着将它存储在 Zabbix server 中的缓存里。 这就是为什么 Zabbix 前端所做的任何更改需要花费两分钟左右才能显示在最新的数据段的原因
(2)数据库
(3)Web 界面
- Web 界面是 Zabbix Server 的一部分,用于实现展示和配置的界面。通常(但不一定)和 Zabbix server 运行在同一台物理机器上
- 基于 Apache/Nginx + PHP 实现,早期只支持 LAMP 架构,从 Zabbix5.0 开始支持 LNMP
(4)Zabbix Agent
- 客户端守护进程,部署在被监控目标上,用于主动监控本地资源和应用程序,并将收集的数据发送给 Zabbix Server。从 Zabbix5.0 开始支技 Zabbix Agent2
(5)Zabbix Proxy
- zabbix 分布式代理守护进程,可以代替 Zabbix Server 采集性能和可用性数据。Zabbix Proxy 在 Zabbix 的部署是可选部分
- Zabbix Proxy 的部署可以很好的分担单个 Zabbix Server 的负载
- 通常监控大于 500 台主机时使用,需要进行分布式监控架构部署
(6)Java Gateway
- Zabbix 要监控 Tomcat 服务或其它 JAVA 程序(比例 Elasticsearch、ZooKeeper),需要使用 Java Gateway 做为代理,才能从 JAVA 程序中获取数据
三.Zabbix 6.0 部署
-
系统:CentOS 7 不支持 yum 方式安装 Zabbix 6.0 服务端
-
安装方式:Zabbix 服务端采用编译安装的方式,zabbix 客户端采用 yum 安装的方式
1.部署 zabbix 服务端
(1)关闭 selinux 与防火墙
systemctl disable --now firewalld
setenforce 0
hostnamectl set-hostname zbx-server
[root@localhost ~]# systemctl disable --now firewalld
Removed symlink /etc/systemd/system/multi-user.target.wants/firewalld.service.
Removed symlink /etc/systemd/system/dbus-org.fedoraproject.FirewallD1.service.
[root@localhost ~]# setenforce 0
[root@localhost ~]# hostnamectl set-hostname zbx-server
2.部署 Nginx + PHP 环境并测试
(1)安装 nginx
cd /etc/yum.repos.d/
vim nginx.repo
[nginx]
name=nginx repo
baseurl=http://nginx.org/packages/centos/$releasever/$basearch/
gpgcheck=1
enabled=1
gpgkey=https://nginx.org/keys/nginx_signing.key
module_hotfixes=true
yum install -y nginx
[root@localhost ~]# cd /etc/yum.repos.d/
[root@localhost yum.repos.d]# vim nginx.repo
[root@localhost yum.repos.d]# mount /dev/sr0 /mnt
mount: /dev/sr0 写保护,将以只读方式挂载
[root@localhost yum.repos.d]# yum install -y nginx
已加载插件:fastestmirror, langpacks
Determining fastest mirrors
 * base: mirrors.bupt.edu.cn
 * extras: mirrors.bfsu.edu.cn
 * updates: mirrors.bupt.edu.cn
base                                                                                                                                    | 3.6 kB  00:00:00
extras                                                                                                                                  | 2.9 kB  00:00:00
nginx                                                                                                                                   | 2.9 kB  00:00:00
updates
......
(2)安装 php
curl -o /etc/yum.repos.d/CentOS-Base.repo http://mirrors.aliyun.com/repo/Centos-7.repo
yum install -y epel-release
rpm -Uvh https://mirror.webtatic.com/yum/el7/webtatic-release.rpm
yum -y install php72w php72w-cli php72w-common php72w-devel php72w-embedded php72w-gd php72w-mbstring php72w-pdo php72w-xml php72w-fpm php72w-mysqlnd php72w-opcache php72w-ldap php72w-bcmath
[root@localhost yum.repos.d]# curl -o /etc/yum.repos.d/CentOS-Base.repo http://mirrors.aliyun.com/repo/Centos-7.repo
  % Total    % Received % Xferd  Average Speed   Time    Time     Time  Current
                                 Dload  Upload   Total   Spent    Left  Speed
100  2523  100  2523    0     0    342      0  0:00:07  0:00:07 --:--:--   655
[root@localhost yum.repos.d]# yum install -y epel-release
已加载插件:fastestmirror, langpacks
Loading mirror speeds from cached hostfile
 * base: mirrors.aliyun.com
 * extras: mirrors.aliyun.com
 * updates: mirrors.aliyun.com
base                                                                                                                                    | 3.6 kB  00:00:00
extras                                                                                                                                  | 2.9 kB  00:00:00
updates
.....
[root@localhost yum.repos.d]# rpm -Uvh https://mirror.webtatic.com/yum/el7/webtatic-release.rpm
获取https://mirror.webtatic.com/yum/el7/webtatic-release.rpm
警告:/var/tmp/rpm-tmp.k5zWmJ: 头V4 RSA/SHA1 Signature, 密钥 ID 62e74ca5: NOKEY
准备中...                          ################################# [100%]
正在升级/安装...
   1:webtatic-release-7-3             ################################# [100%]
[root@localhost yum.repos.d]# yum -y install php72w php72w-cli php72w-common php72w-devel php72w-embedded php72w-gd php72w-mbstring php72w-pdo php72w-xml php72w-fpm php72w-mysqlnd php72w-opcache php72w-ldap php72w-bcmath
已加载插件:fastestmirror, langpacks
Loading mirror speeds from cached hostfile
 * base: mirrors.aliyun.com
 * epel: mirrors.bfsu.edu.cn
 * extras: mirrors.aliyun.com
 * updates: mirrors.aliyun.com
(3)修改 nginx 配置
vim /etc/nginx/conf.d/default.conf
server {
  listen 80;
  server_name zbx.kgc.com;
  root /var/www/zbx;

  location / {
    index index.php;
  }

  location ~ \.php$ {
    fastcgi_pass 127.0.0.1:9000;
    fastcgi_index index.php;
    fastcgi_param SCRIPT_FILENAME /var/www/zbx$fastcgi_script_name;
    include fastcgi_params;
  }
}
(4)修改 php 配置
vim /etc/php-fpm.d/www.conf
user = nginx
group = nginx
vim /etc/php.ini
max_execution_time = 300		# 368行
max_input_time = 600			# 378行
post_max_size = 80M				# 656行
date.timezone = Asia/Shanghai	# 877行
(5)创建目录和测试文件
mkdir -p /var/www/zbx
vim /var/www/zbx/index.php
  <?php
  phpinfo();
  ?>
(6)启动服务
systemctl enable --now nginx php-fpm
(7)测试访问(hosts解析)
修改 C:\Windows\System32\drivers\etc\hosts
192.168.80.20 moonlight
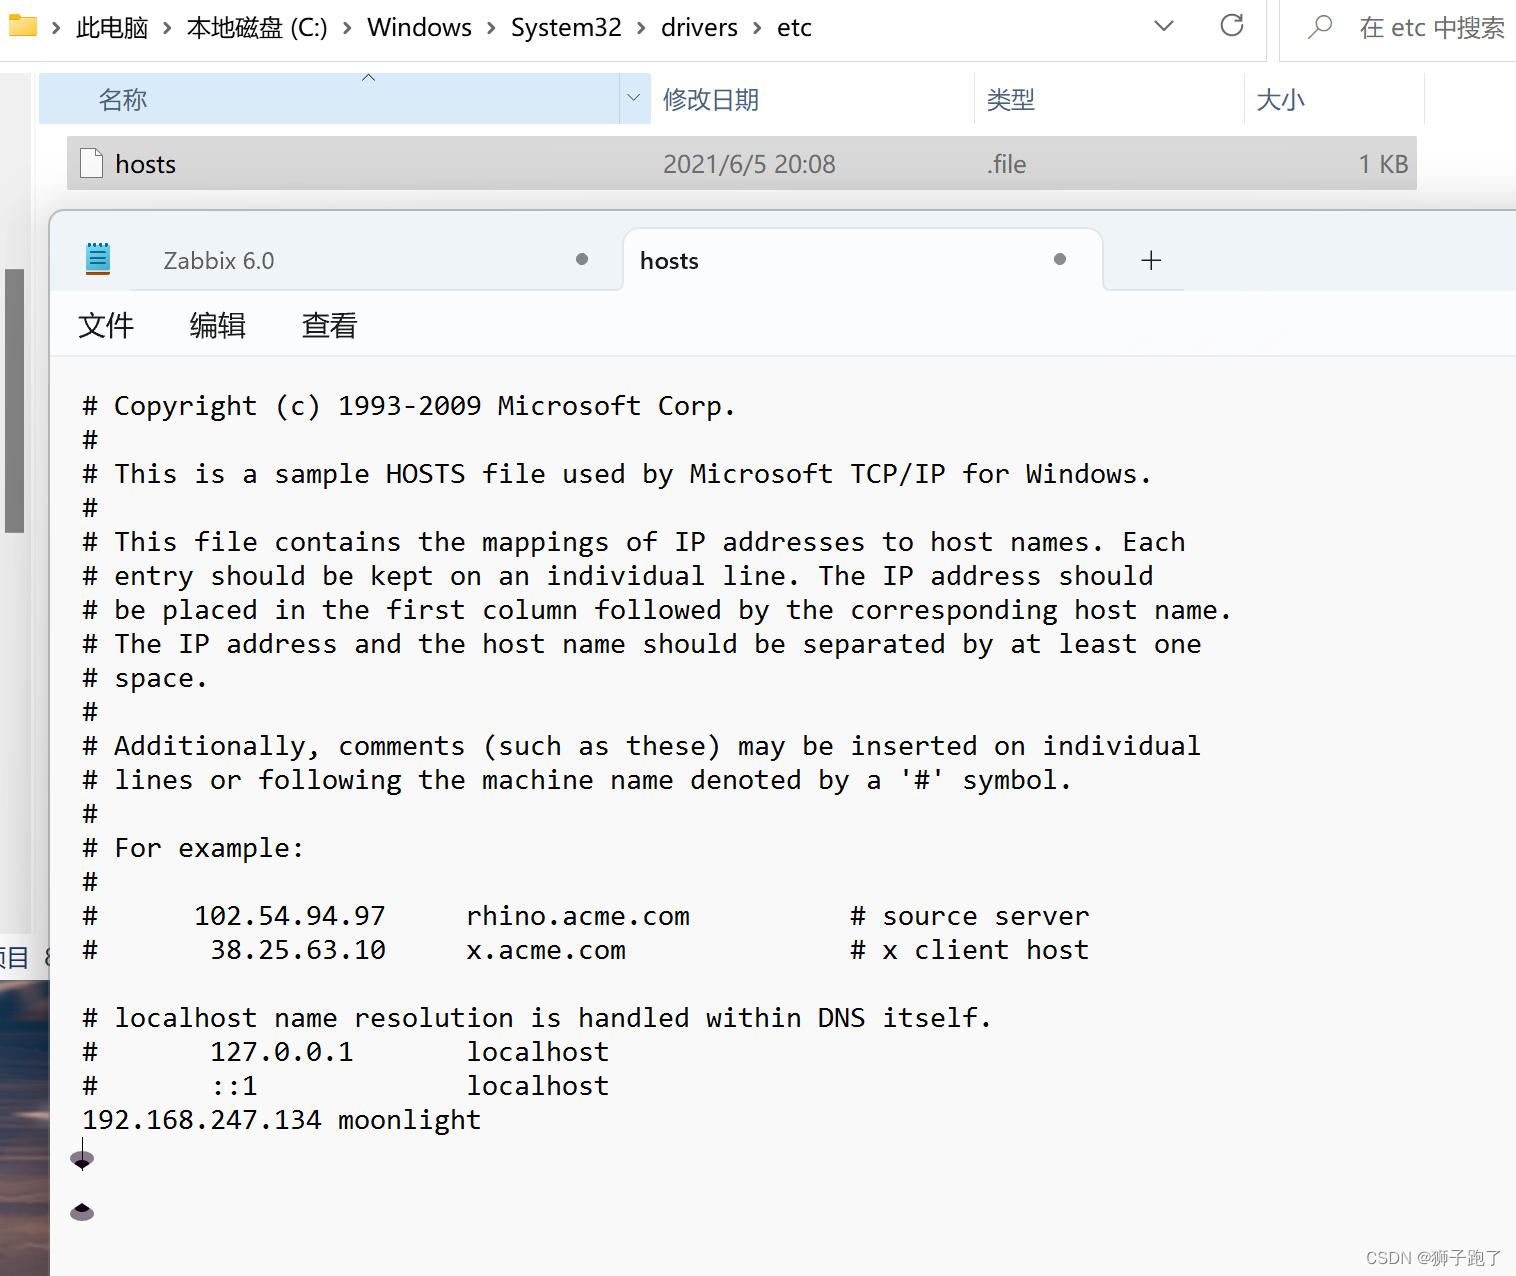
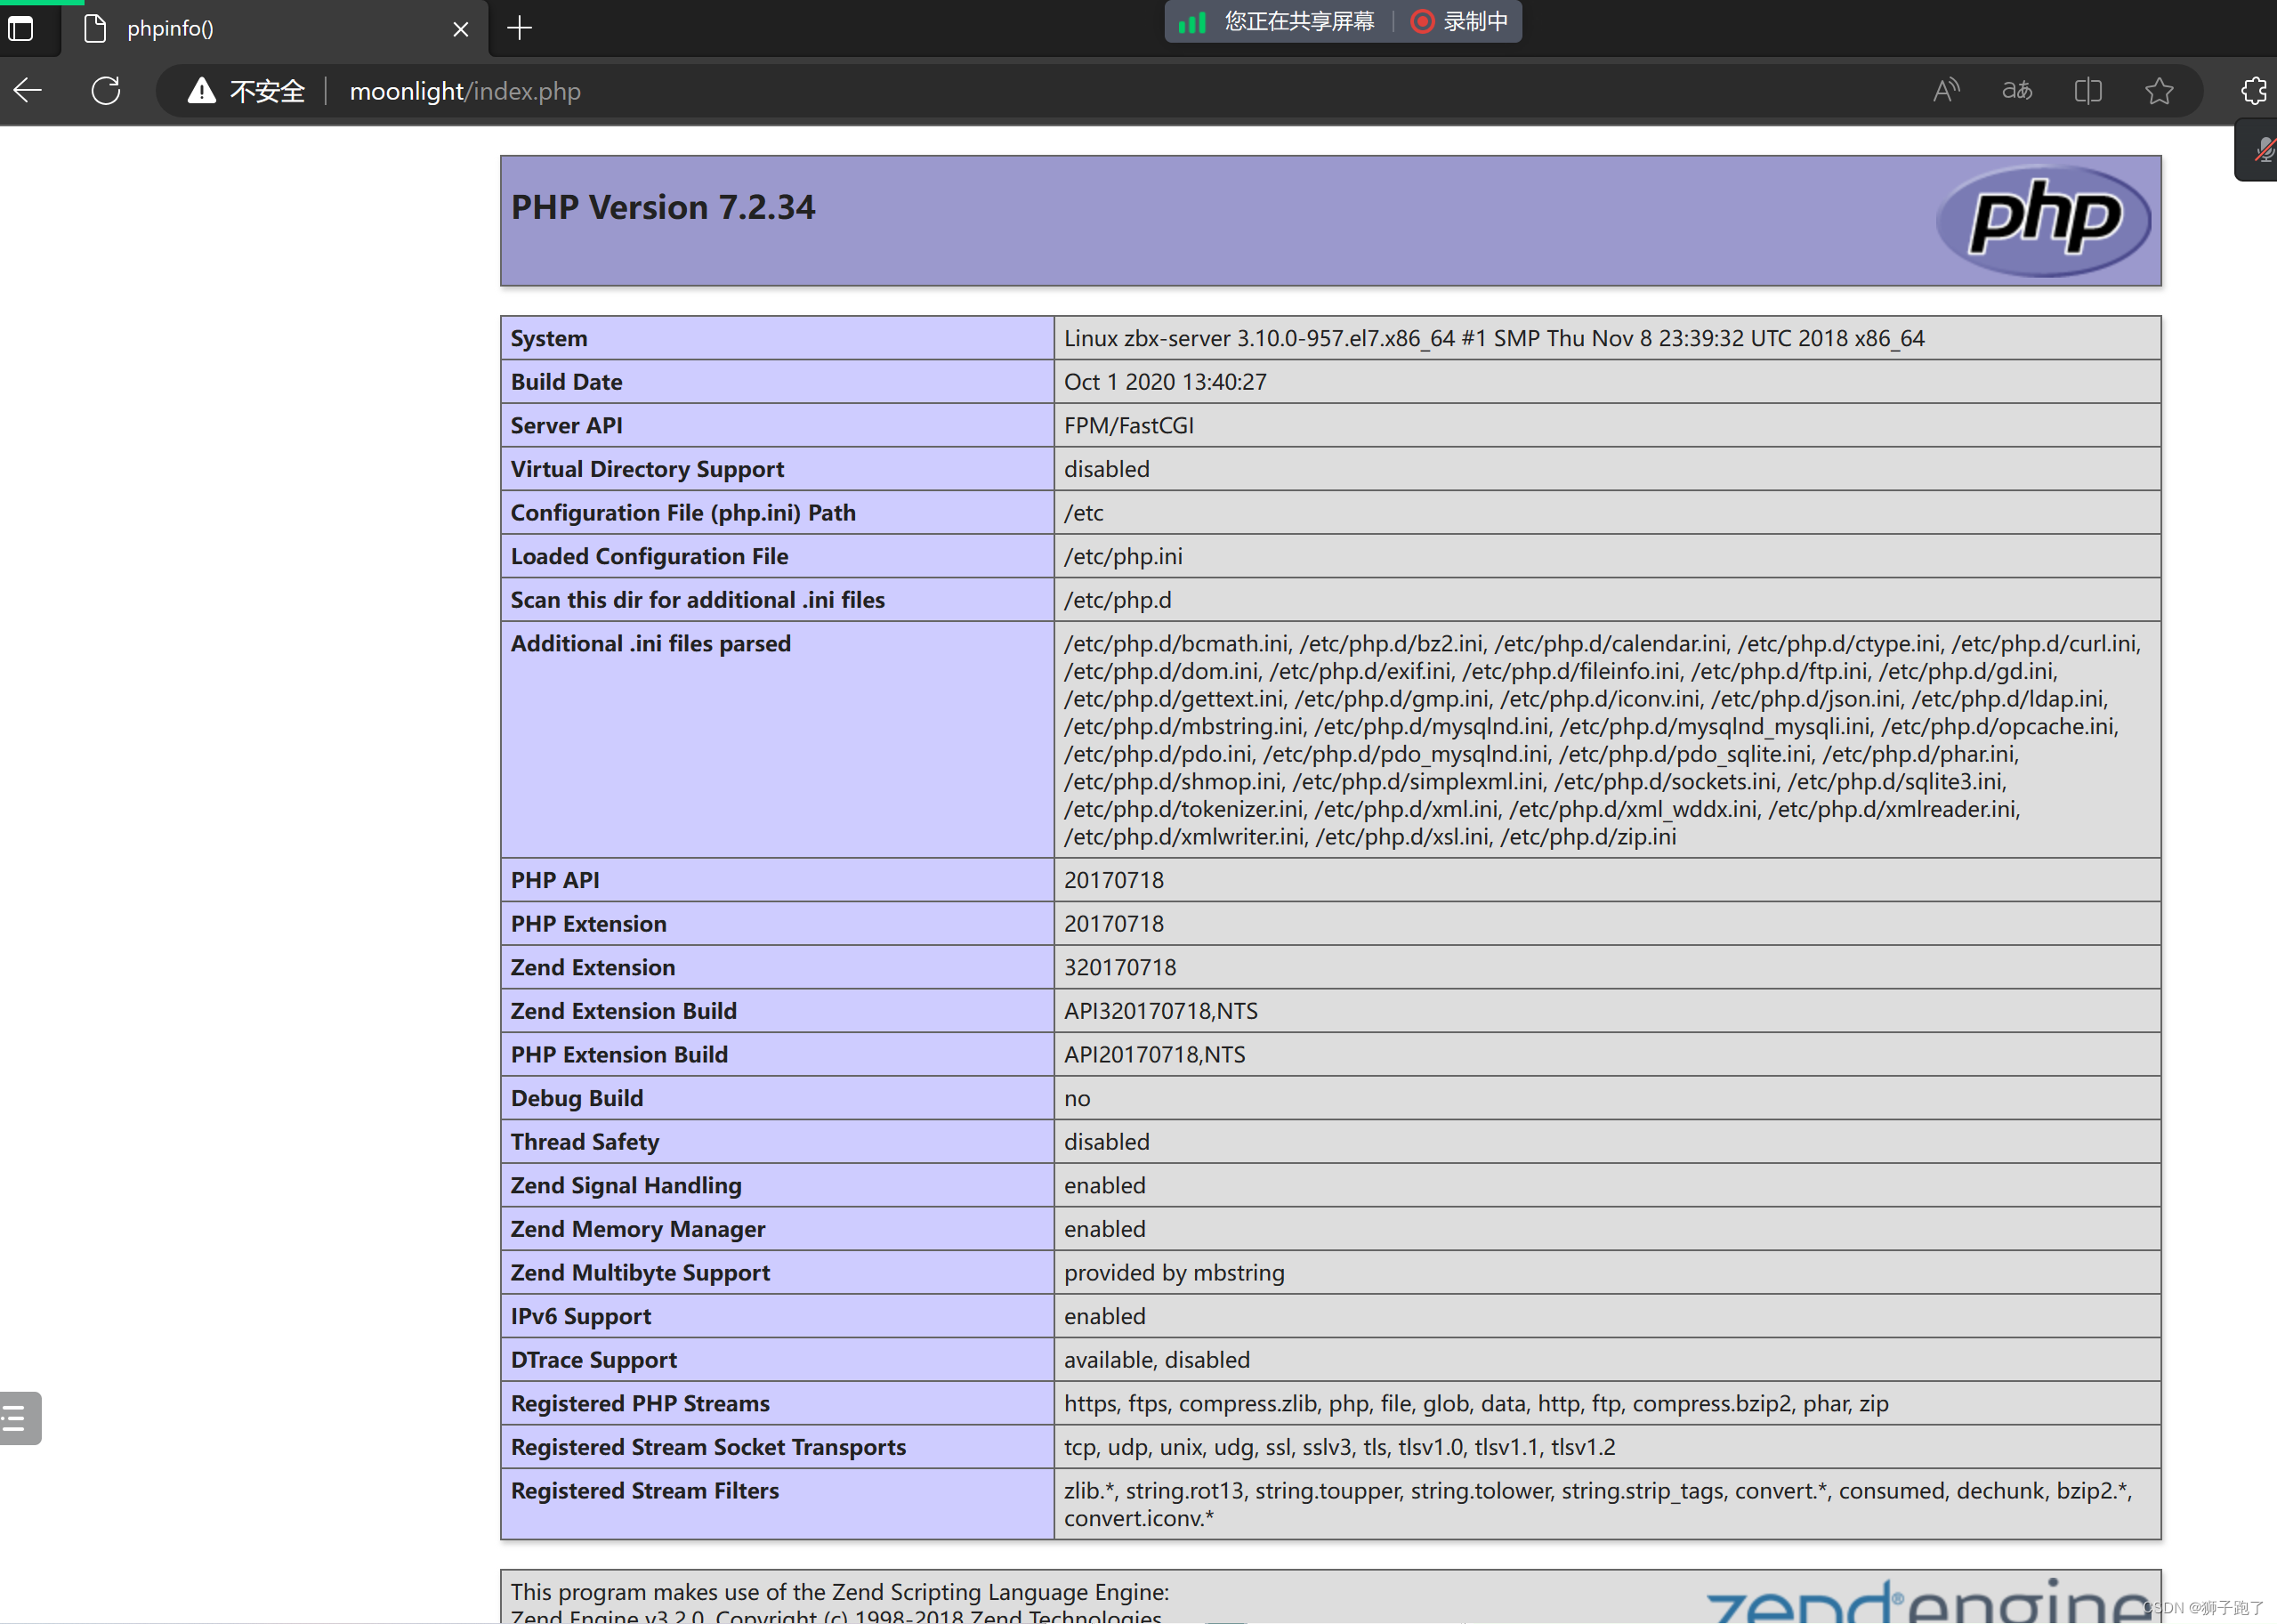
(8)浏览器访问:http://moonlight/index.php
3.部署数据库,要求 MySQL 5.7 或 Mariadb 10.5 及以上版本
(1)配置 Mariadb yum源
cd /etc/yum.repos.d/
vim mariadb.repo
  [mariadb]
  name = MariaDB
  baseurl = http://mirrors.aliyun.com/mariadb/yum/10.5/centos7-amd64/
  gpgkey = http://mirrors.aliyun.com/mariadb/yum/RPM-GPG-KEY-MariaDB
  gpgcheck = 1
  enabled=1
  EOF
yum install -y mariadb-server mariadb
systemctl enable --now mariadb
[root@localhost conf.d]# cd /etc/yum.repos.d/
[root@localhost yum.repos.d]# vim mariadb.repo
[root@localhost yum.repos.d]# yum install -y mariadb-server mariadb
已加载插件:fastestmirror, langpacks
Loading mirror speeds from cached hostfile
 * base: mirrors.aliyun.com
 * epel: ftp.yz.yamagata-u.ac.jp
 * extras: mirrors.aliyun.com
 * updates: mirrors.aliyun.com
mariadb
......
[root@localhost yum.repos.d]# systemctl enable --now mariadb
Created symlink from /etc/systemd/system/multi-user.target.wants/mariadb.service to /usr/lib/systemd/system/mariadb.service.
(2)初始化数据库
mysql_secure_installation
    分别输入 回车 -> n -> Y (设置root密码,如abc123) -> 后面一路 Y
mysql -u root -pabc123
[root@localhost yum.repos.d]# mysql_secure_installation
NOTE: RUNNING ALL PARTS OF THIS SCRIPT IS RECOMMENDED FOR ALL MariaDB
      SERVERS IN PRODUCTION USE!  PLEASE READ EACH STEP CAREFULLY!
In order to log into MariaDB to secure it, we'll need the current
password for the root user. If you've just installed MariaDB, and
haven't set the root password yet, you should just press enter here.
Enter current password for root (enter for none):
OK, successfully used password, moving on...
Setting the root password or using the unix_socket ensures that nobody
can log into the MariaDB root user without the proper authorisation.
You already have your root account protected, so you can safely answer 'n'.
Switch to unix_socket authentication [Y/n] n
 ... skipping.
You already have your root account protected, so you can safely answer 'n'.
Change the root password? [Y/n] y
New password:
Re-enter new password:
Password updated successfully!
Reloading privilege tables..
 ... Success!
By default, a MariaDB installation has an anonymous user, allowing anyone
to log into MariaDB without having to have a user account created for
them.  This is intended only for testing, and to make the installation
go a bit smoother.  You should remove them before moving into a
production environment.
Remove anonymous users? [Y/n] y
 ... Success!
Normally, root should only be allowed to connect from 'localhost'.  This
ensures that someone cannot guess at the root password from the network.

Disallow root login remotely? [Y/n] y
 ... Success!
By default, MariaDB comes with a database named 'test' that anyone can
access.  This is also intended only for testing, and should be removed
before moving into a production environment.
Remove test database and access to it? [Y/n] y
 - Dropping test database...
 ... Success!
 - Removing privileges on test database...
 ... Success!
Reloading the privilege tables will ensure that all changes made so far
will take effect immediately.
Reload privilege tables now? [Y/n] y
 ... Success!
Cleaning up...
All done!  If you've completed all of the above steps, your MariaDB
installation should now be secure.
Thanks for using MariaDB!
[root@localhost yum.repos.d]# mysql -u root -pabc123
Welcome to the MariaDB monitor.  Commands end with ; or \g.
Your MariaDB connection id is 11
Server version: 10.5.21-MariaDB MariaDB Server
......
(3)创建数据库并指定字符集
CREATE DATABASE zabbix character set utf8 collate utf8_bin;
MariaDB [(none)]> CREATE DATABASE zabbix character set utf8 collate utf8_bin;
Query OK, 1 row affected (0.002 sec)
(4)创建 zabbix 数据库用户并授权
GRANT all ON zabbix.* TO 'zabbix'@'localhost' IDENTIFIED BY 'zabbix';
GRANT all ON zabbix.* TO 'zabbix'@'%' IDENTIFIED BY 'zabbix';
flush privileges;
MariaDB [(none)]> GRANT all ON zabbix.* TO 'zabbix'@'localhost' IDENTIFIED BY 'zabbix';
Query OK, 0 rows affected (0.001 sec)
MariaDB [(none)]> GRANT all ON zabbix.* TO 'zabbix'@'%' IDENTIFIED BY 'zabbix';
Query OK, 0 rows affected (0.002 sec)
MariaDB [(none)]> flush privileges;
Query OK, 0 rows affected (0.001 sec)
MariaDB [(none)]> quit
Bye
(5)向数据库导入 zabbix 数据(上传源码包 zabbix-6.0.13.tar.gz 到 /opt 目录)
cd /opt
tar xf zabbix-6.0.13.tar.gz
ls /opt/zabbix-6.0.13/database/mysql
  data.sql  double.sql  history_pk_prepare.sql  images.sql  Makefile.am  Makefile.in  schema.sql
[root@localhost yum.repos.d]# cd /opt
[root@localhost opt]# tar xf zabbix-6.0.13.tar.gz
[root@localhost opt]# ls /opt/zabbix-6.0.13/database/mysql
data.sql  double.sql  history_pk_prepare.sql  images.sql  Makefile.am  Makefile.in  schema.sql
(6)按照顺利导入数据库
cd /opt/zabbix-6.0.13/database/mysql
mysql -uroot -pabc123 zabbix < schema.sql
mysql -uroot -pabc123 zabbix < images.sql
mysql -uroot -pabc123 zabbix < data.sql
mysql -uroot -pabc123 zabbix < double.sql
mysql -uroot -pabc123 zabbix < history_pk_prepare.sql
[root@localhost opt]# cd /opt/zabbix-6.0.13/database/mysql
[root@localhost mysql]# mysql -uroot -pabc123 zabbix < schema.sql
[root@localhost mysql]# mysql -uroot -pabc123 zabbix < images.sql
[root@localhost mysql]# mysql -uroot -pabc123 zabbix < data.sql
[root@localhost mysql]# mysql -uroot -pabc123 zabbix < double.sql
[root@localhost mysql]# mysql -uroot -pabc123 zabbix < history_pk_prepare.sql
4.编译安装 zabbix Server 服务端
(1)安装依赖包,创建 zabbix 用户
yum install -y mysql-devel pcre-devel openssl-devel zlib-devel libxml2-devel  net-snmp-devel net-snmp libssh2-devel OpenIPMI-devel libevent-devel openldap-devel libcurl-devel fping gcc gcc-c++ make
useradd -s /sbin/nologin -M zabbix
[root@localhost mysql]# yum install -y mysql-devel pcre-devel openssl-devel zlib-devel libxml2-devel net-snmp-devel net-snmp libssh2-devel OpenIPMI-devel libevent-devel openldap-devel libcurl-devel fping gcc gcc-c++ make
已加载插件:fastestmirror, langpacks
Loading mirror speeds from cached hostfile
 * base: mirrors.aliyun.com
 * epel: ftp.riken.jp
 * extras: mirrors.aliyun.com
 * updates: mirrors.aliyun.com
......
[root@localhost mysql]# useradd -s /sbin/nologin -M zabbix
(2)编译安装
cd /opt/zabbix-6.0.13/
./configure \
  --sysconfdir=/etc/zabbix/ \
  --enable-server \
  --with-mysql \
  --with-net-snmp \
  --with-libxml2 \
  --with-ssh2 \
  --with-openipmi \
  --with-zlib \
  --with-libpthread \
  --with-libevent \
  --with-openssl \
  --with-ldap \
  --with-libcurl \
  --with-libpcre
make install
[root@localhost mysql]# cd /opt/zabbix-6.0.13/
[root@localhost zabbix-6.0.13]# ./configure \
> --sysconfdir=/etc/zabbix/ \
> --enable-server \
> --with-mysql \
> --with-net-snmp \
> --with-libxml2 \
> --with-ssh2 \
> --with-openipmi \
> --with-zlib \
> --with-libpthread \
> --with-libevent \
> --with-openssl \
> --with-ldap \
> --with-libcurl \
> --with-libpcre
checking for a BSD-compatible install... /usr/bin/install -c
checking whether build environment is sane... yes
checking for a thread-safe mkdir -p... /usr/bin/mkdir -p
......
[root@localhost zabbix-6.0.13]# make install
Making install in src
make[1]: 进入目录“/opt/zabbix-6.0.13/src”
Making install in libs
make[2]: 进入目录“/opt/zabbix-6.0.13/src/libs”
Making install in zbxcrypto
......
(3)检查版本
zabbix_server --version
zabbix_server zabbix-6.0.13
[root@localhost zabbix-6.0.13]# zabbix_server --version
zabbix_server (Zabbix) 6.0.13
Revision fdfa8cef9ce 1 February 2023, compilation time: Jul  5 2023 16:29:24
Copyright (C) 2023 Zabbix SIA
License GPLv2+: GNU GPL version 2 or later <https://www.gnu.org/licenses/>.
This is free software: you are free to change and redistribute it according to
the license. There is NO WARRANTY, to the extent permitted by law.
This product includes software developed by the OpenSSL Project
for use in the OpenSSL Toolkit (http://www.openssl.org/).
Compiled with OpenSSL 1.0.2k-fips  26 Jan 2017
Running with OpenSSL 1.0.2k-fips  26 Jan 2017
[root@localhost zabbix-6.0.13]# zabbix_server zabbix-6.0.13
zabbix_server [1225]: invalid parameter "zabbix-6.0.13"
(4)修改 zabbix server 配置文件,修改数据库的密码
vim /etc/zabbix/zabbix_server.conf
......
LogFile=/var/log/zabbix_server.log		# 38行,指定 zabbix 日志路径
DBPassword=zabbix					# 123行,指定 zabbix 数据库的密码
(5)准备 systemctl 服务管理文件
cd /usr/lib/systemd/system/
vim zabbix-server.service
  [Unit]
  Description=Zabbix Server with MySQL DB
  After=syslog.target network.target mysqld.service

  [Service]
  Type=simple
  ExecStart=/usr/local/sbin/zabbix_server -f
  User=zabbix

  [Install]
  WantedBy=multi-user.target

touch /var/log/zabbix_server.log
chown zabbix.zabbix var/log/zabbix_server.log
systemctl daemon-reload
systemctl enable --now zabbix-server
netstat -lntp | grep 10051			#zabbix_server 默认监听 10051 端口
[root@localhost system]# touch /var/log/zabbix_server.log
[root@localhost system]# chown zabbix.zabbix /var/log/zabbix_server.log
[root@localhost system]# systemctl daemon-reload
[root@localhost system]# systemctl enable --now zabbix-server
[root@localhost system]# netstat -lntp | grep 10051
tcp        0      0 0.0.0.0:10051           0.0.0.0:*               LISTEN      8630/zabbix_server
5.部署 Web 前端,进行访问
cp -r /opt/zabbix-6.0.13/ui/* /var/www/zbx
chown -R nginx.nginx /var/www/zbx
[root@localhost system]# cp -r /opt/zabbix-6.0.13/ui/* /var/www/zbx
cp:是否覆盖"/var/www/zbx/index.php"? y
[root@localhost system]# chown -R nginx.nginx /var/www/zbx
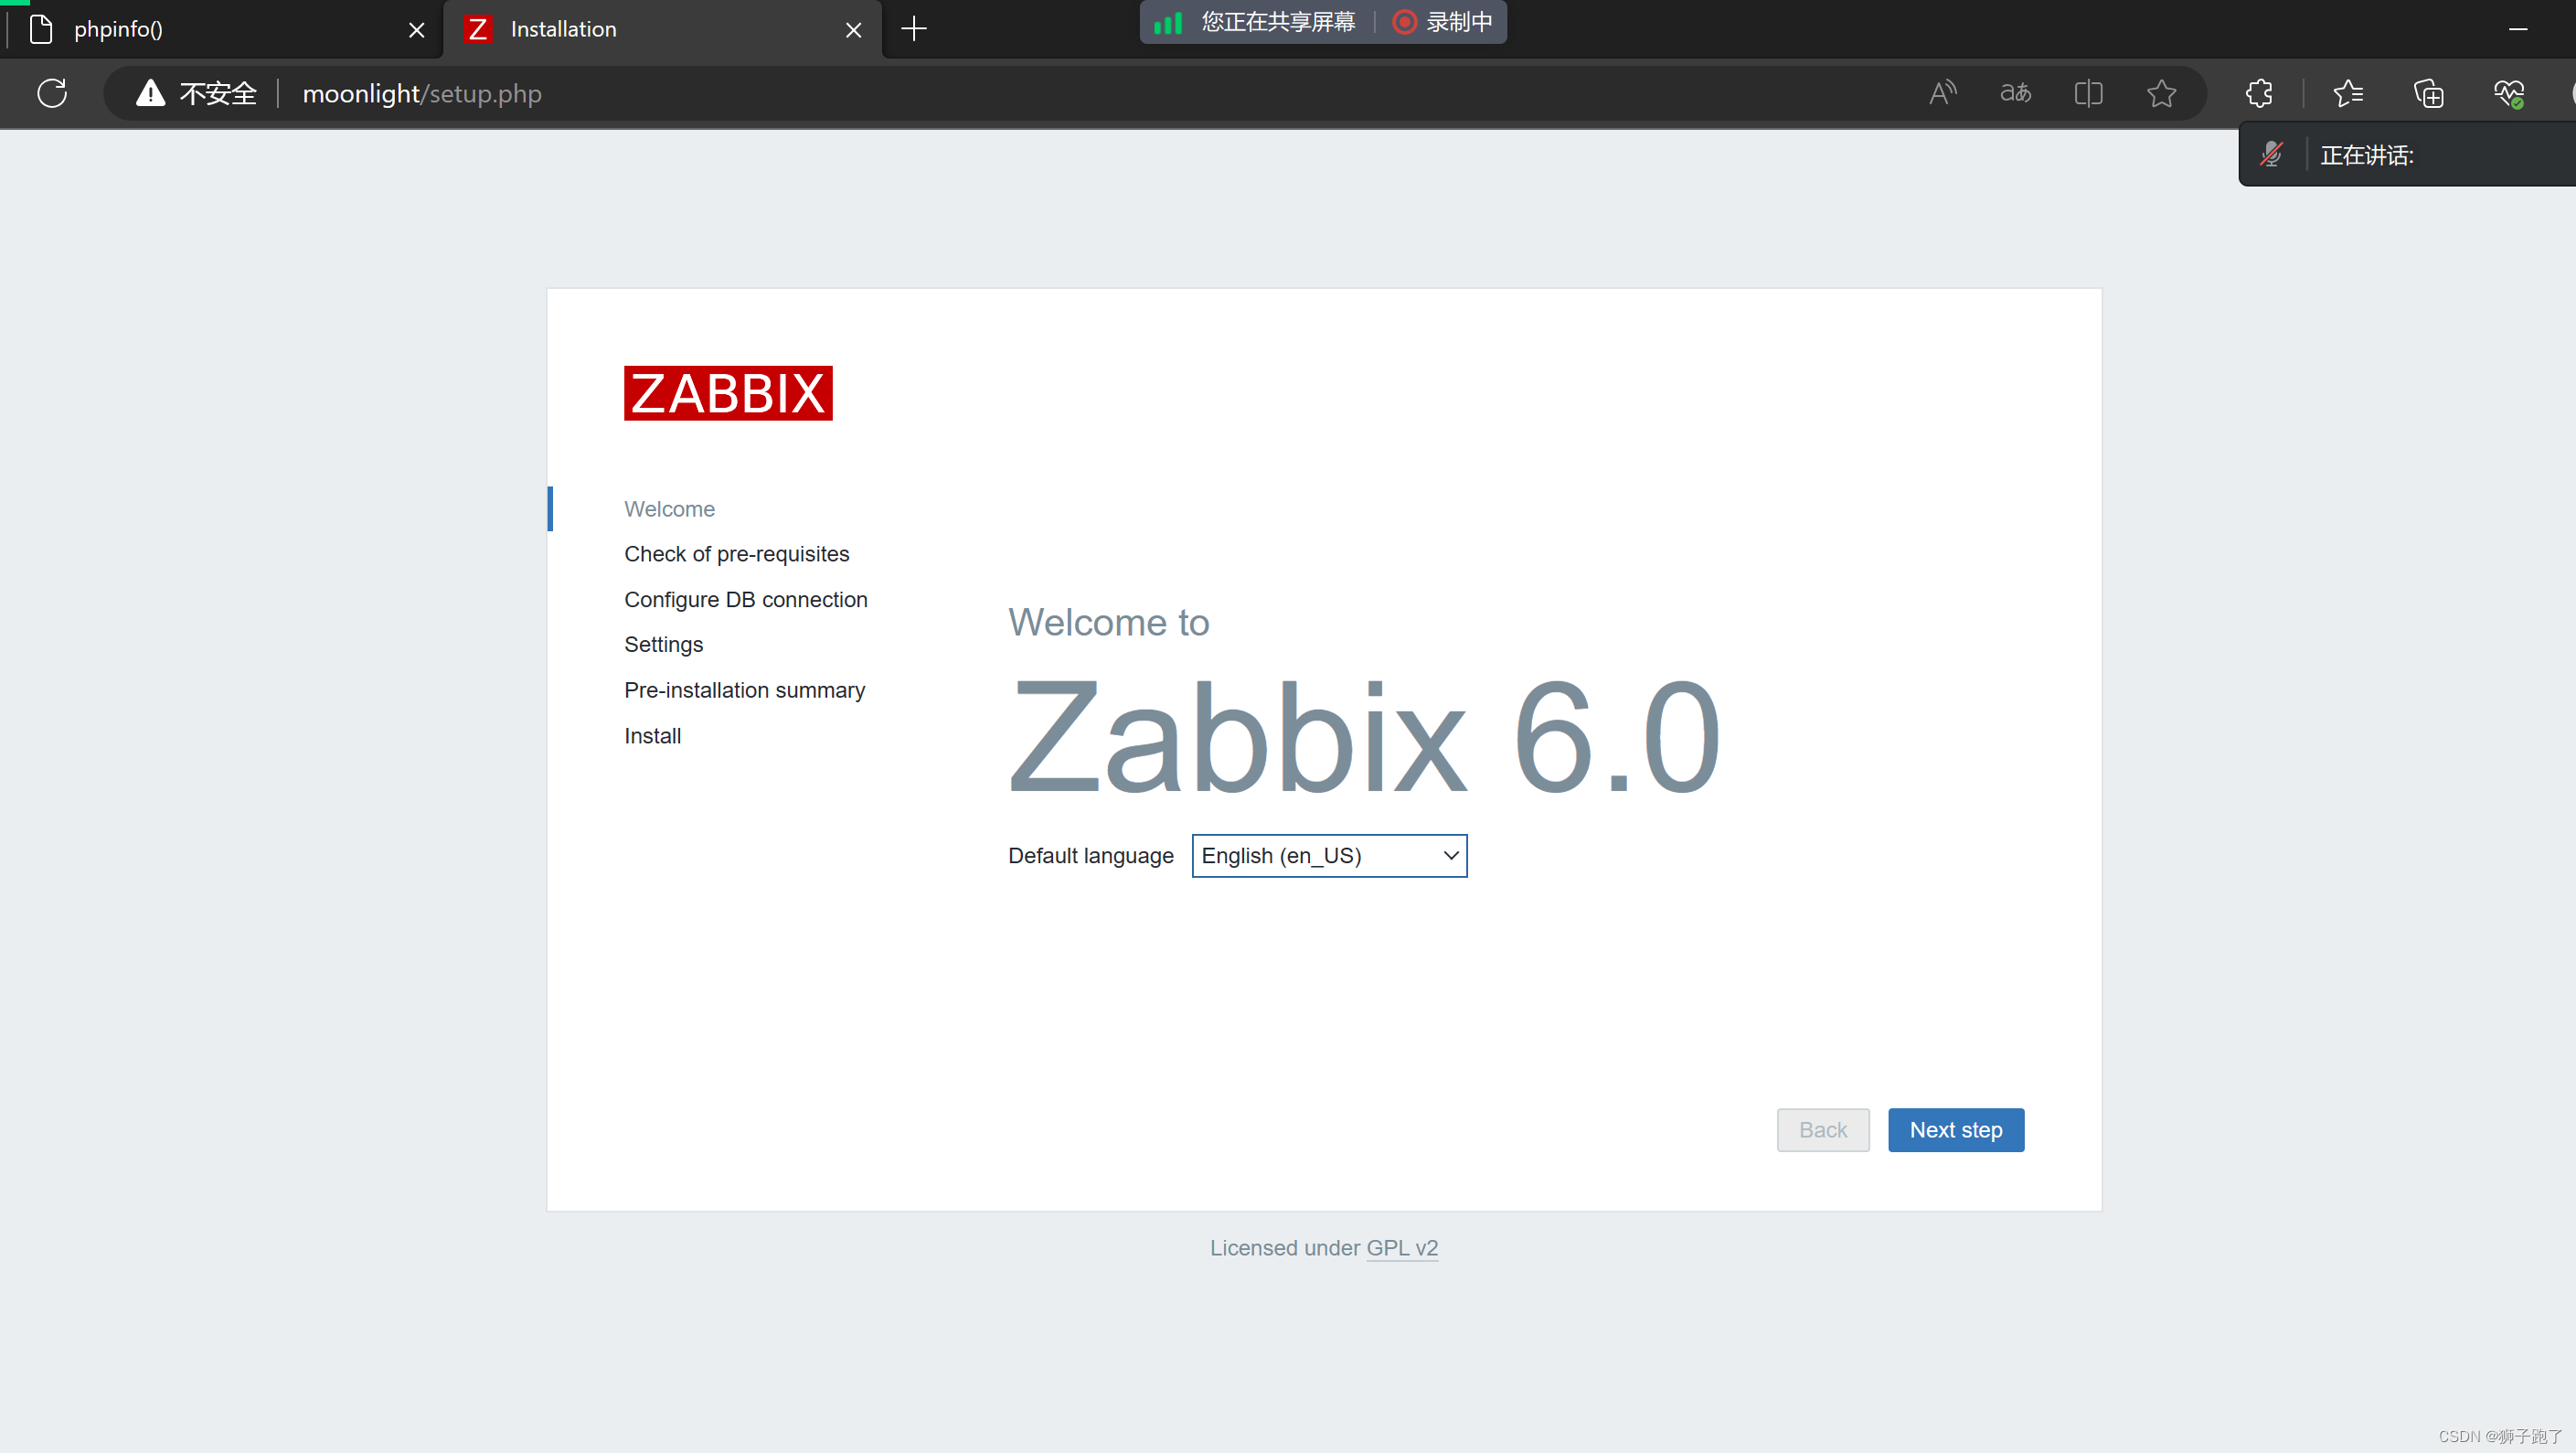
(1)浏览器访问:http://moonlight/ (使用电脑里的浏览器访问)
- 【Default language】选择 Chinese(zh_CN),点击下一步
- 【密码】输入 zabbix,点击下一步
- 【Zabbix主机名称】输入 Zabbix-监控
- 【默认时区】选择 Asia/Shanghai,点击下一步
(2)安装完成后,默认的登录账号和密码为:Admin/zabbix

6.安装 zabbix 客户端,实现 zabbix 服务端自我监控
rpm -ivh https://repo.zabbix.com/zabbix/6.0/rhel/7/x86_64/zabbix-release-6.0-4.el7.noarch.rpm
sed -i 's#https://repo.zabbix.com#https://mirrors.aliyun.com/zabbix#' /etc/yum.repos.d/zabbix.repo
[root@localhost system]# rpm -ivh https://repo.zabbix.com/zabbix/6.0/rhel/7/x86_64/zabbix-release-6.0-4.el7.noarch.rpm
获取https://repo.zabbix.com/zabbix/6.0/rhel/7/x86_64/zabbix-release-6.0-4.el7.noarch.rpm
警告:/var/tmp/rpm-tmp.4vErH5: 头V4 RSA/SHA512 Signature, 密钥 ID a14fe591: NOKEY
准备中...                          ################################# [100%]
正在升级/安装...
   1:zabbix-release-6.0-4.el7         ################################# [100%]
[root@localhost system]# sed -i 's#https://repo.zabbix.com#https://mirrors.aliyun.com/zabbix#' /etc/yum.repos.d/zabbix.repo
(1)zabbix 5.0 版本开始采用 golang 语言开发的新版本客户端 agent2
yum install -y zabbix-agent2
systemctl enable --now zabbix-agent2
netstat -lntp | grep 10050			#客户端 zabbix_agent2 默认监听 10050 端口
[root@localhost system]# yum install -y zabbix-agent2
已加载插件:fastestmirror, langpacks
Loading mirror speeds from cached hostfile
 * base: mirrors.aliyun.com
 * epel: ftp.iij.ad.jp
 * extras: mirrors.aliyun.com
 * updates: mirrors.aliyun.com
 ......
[root@localhost system]# systemctl enable --now zabbix-agent2
Created symlink from /etc/systemd/system/multi-user.target.wants/zabbix-agent2.service to /usr/lib/systemd/system/zabbix-agent2.service.
[root@localhost system]# netstat -lntp | grep 10050
tcp6       0      0 :::10050                :::*                    LISTEN      14758/zabbix_agent2
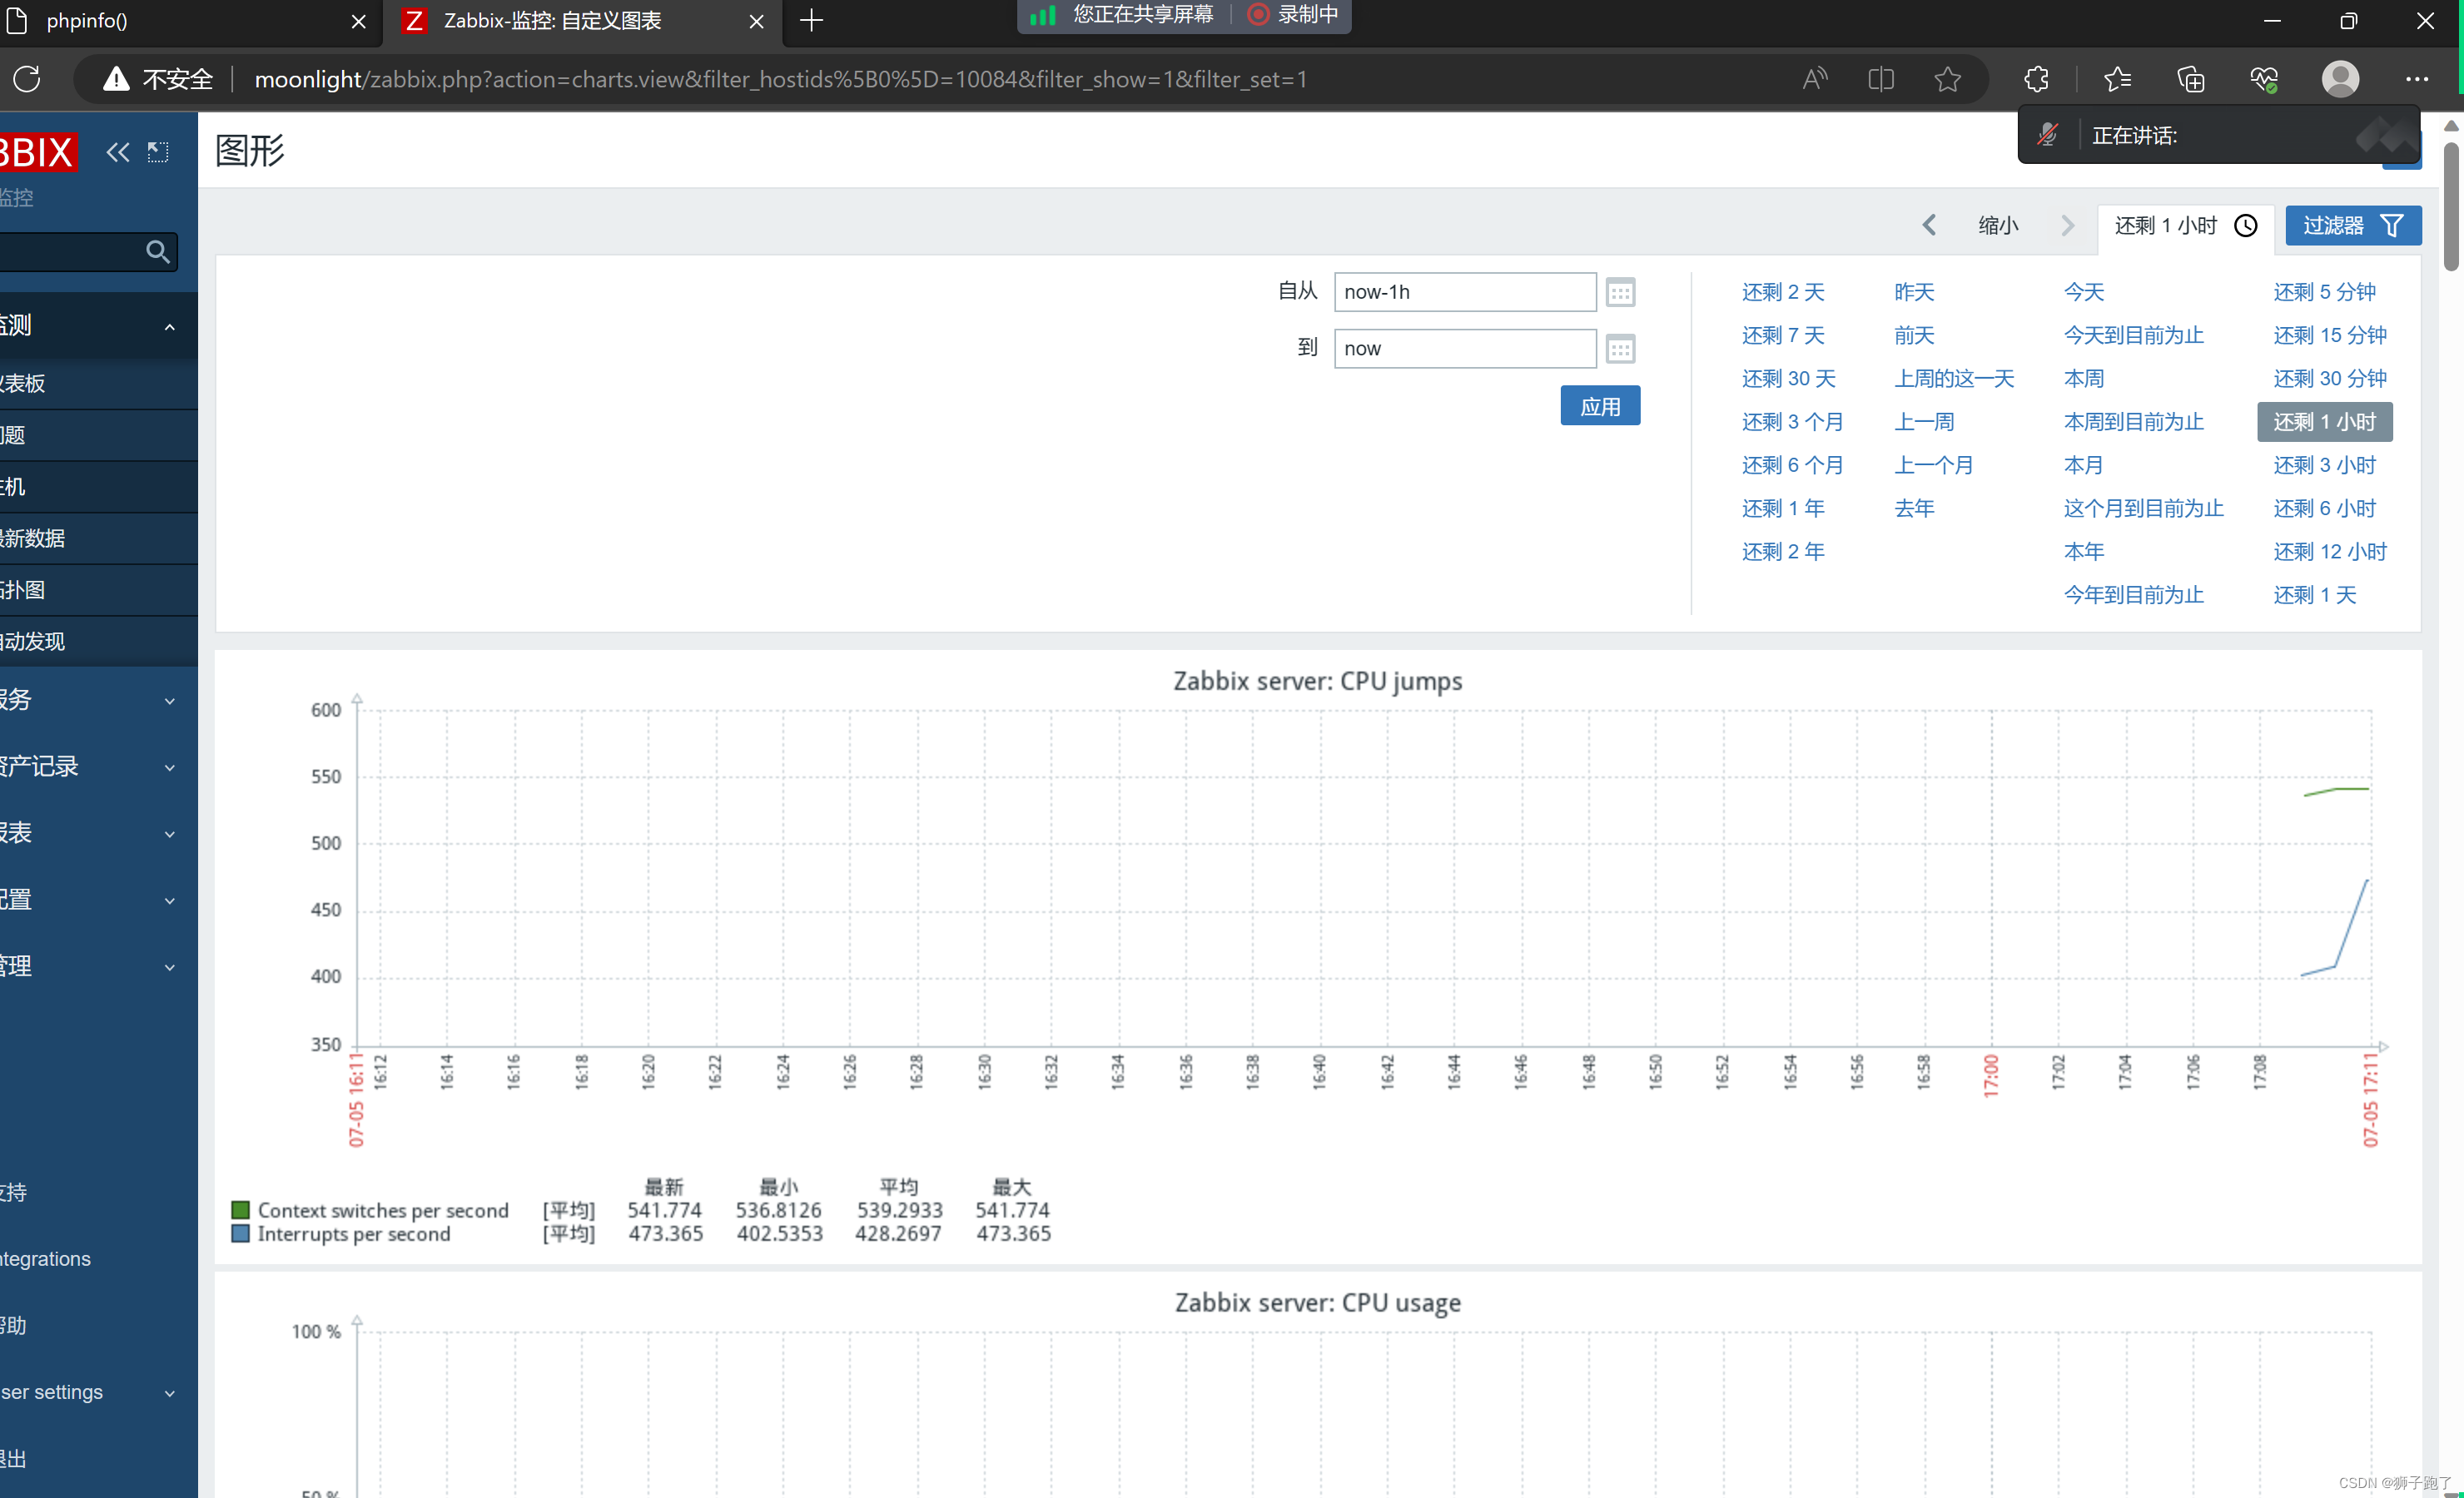
7.解决 zabbix-server Web页面中文乱码问题
yum install -y wqy-microhei-fonts
\cp -f /usr/share/fonts/wqy-microhei/wqy-microhei.ttc /var/www/zbx/assets/fonts/DejaVuSans.ttf
[root@localhost system]# yum install -y wqy-microhei-fonts
已加载插件:fastestmirror, langpacks
Loading mirror speeds from cached hostfile
 * base: mirrors.aliyun.com
 * epel: ftp.riken.jp
 * extras: mirrors.aliyun.com
 * updates: mirrors.aliyun.com
软件包 wqy-microhei-fonts-0.2.0-0.12.beta.el7.noarch 已安装并且是最新版本
无须任何处理
[root@localhost system]# \cp -f /usr/share/fonts/wqy-microhei/wqy-microhei.ttc /var/www/zbx/assets/fonts/DejaVuSans.ttf
- 最后刷新浏览器页面

旨在为数千万中国开发者提供一个无缝且高效的云端环境,以支持学习、使用和贡献开源项目。
更多推荐


 2
2 0
0- 0


 已为社区贡献1条内容

所有评论(0)