

Git 基础及开发流程学习笔记
学习基本的 Git 命令,并了解原理,在遇到 Git 相关问题时,能自行排查并解决了解研发流程中的基本概念和规范,学会正确的使用 Git。
文章目录
学习目标
-
学习基本的 Git 命令,并了解原理,在遇到 Git 相关问题时,能自行排查并解决
-
了解研发流程中的基本概念和规范,学会正确的使用 Git
1. Git 基础使用
2.1 Git 目录结构
初始化仓库
使用 git init 命令初始化一个 Git 仓库
mkdir study
cd study
git init
tree .git
此时仓库的结构如下
.git/
├── HEAD
├── branches
├── config
├── description
├── hooks
│   ├── commit-msg
├── info
│   └── exclude
├── objects
│   ├── info
│   └── pack
└── refs
    ├── heads
    └── tags
Git Config
Git 的配置有三种级别,分别为 global, system 和 local
其中 local 级别最低,global 级别最高,不同级别的配置可能会出现冲突,低级别的配置会覆盖高级别的配置
可以通过 git config --global 命令对 global 级别进行配置,其余同理
常见 Git 配置
用户名配置
git config --global user.name "xxx"
git config --global user.email "xxx@xxxx.xx"
Instead of 配置
git config --global url."https://".insteadOf "git://"
把 git:// 替换成 https:// 方便使用 https 协议
Git 命令别名配置
git config --global alias.cin "commit --amend --no-edit"
把 commit --amend --no-edit 命令替换成 cin,更方便使用
2.2 Git Remote
添加 Remote
添加 Remote 命令格式为 git remote add [shortname] [url]
git remote add origin_ssh git@github.com:git/git.git
git remote add origin_http https://github.com/git/git.git
查看 Remote
git remote -v
此时结果如下
origin_http     https://github.com/git/git.git (fetch)
origin_http     https://github.com/git/git.git (push)
origin_ssh      git@github.com:git/git.git (fetch)
origin_ssh      git@github.com:git/git.git (push)
2.2.1 HTTP Remote
URL:http://github.com/git/git.git
一般情况下不建议使用 HTTP 方式进行连接远程仓库,因为不安全
2.2.1 SSH Remote
URL:git@github.com:git/git.git
免密配置
SSH 可以通过公私钥的机制,将生成公钥存放在服务端,从而实现免密访问
目前的 Key 的类型四种,分别是dsa, rsa, ecdsa 和 ed25519
默认使用的是 rsa,由于一些安全问题,不推荐使用dsa和rsa,优先推荐使用 ed25519
生成新的 SSH Key 并添加到 GitHub
打开终端,运行以下命令
ssh-keygen -t ed25519 -C "your_email@example.com"
按回车三次
输出内容 Your public key has been saved in /root/.ssh/id_ed25519.pub
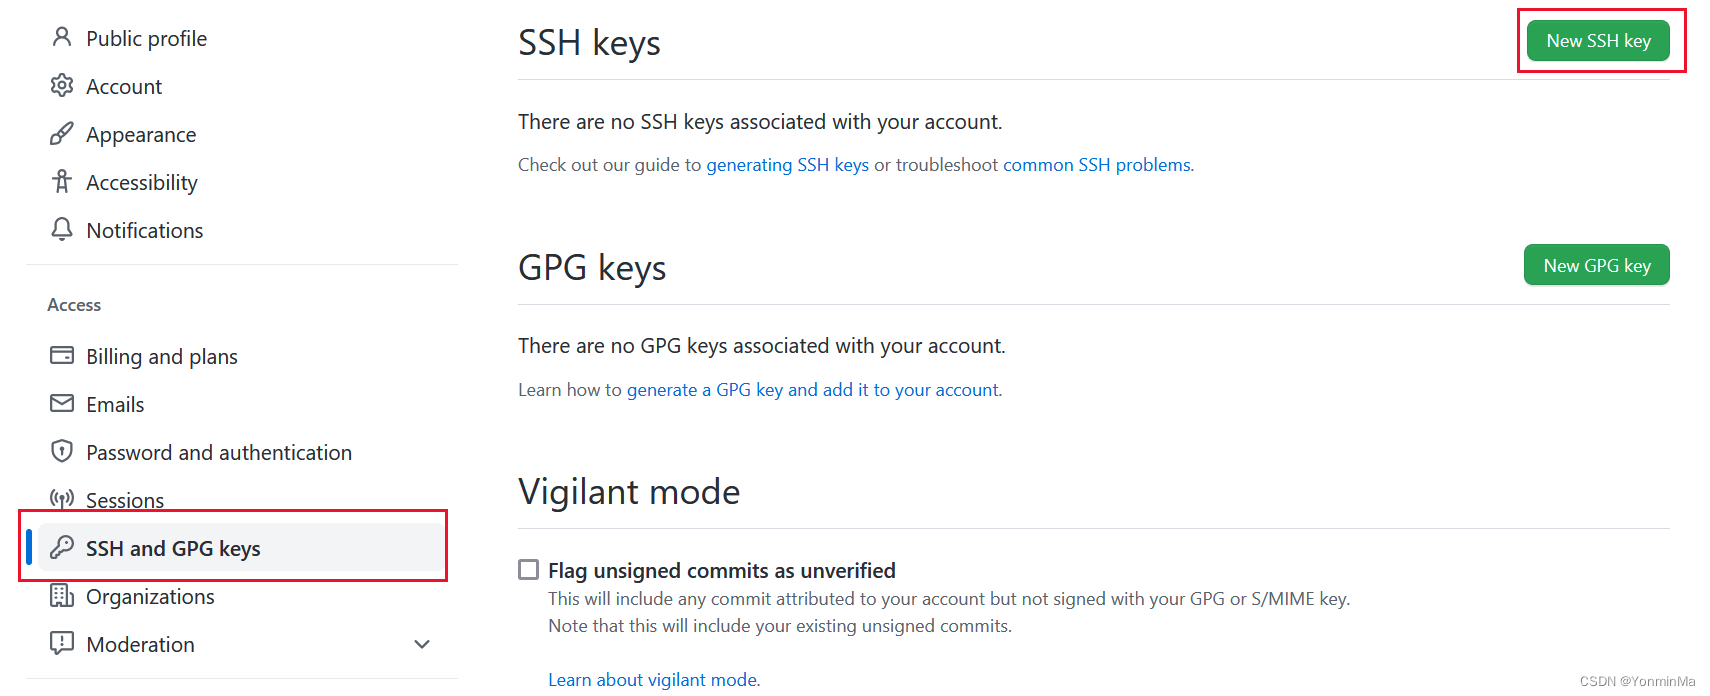
再通过执行 cat /root/.ssh/id_ed25519.pub 查看 SSH Key 并复制
打开 GitHub,进入 Setting 界面,找到以下位置进行 添加 SSH Key
运行 ssh -T git@github.com,你可能会看到这样的提示:
The authenticity of host 'github.com (20.205.243.166)' can't be established.
ED25519 key fingerprint is SHA256:+DiY3wvvV6TuJJhbpZisF/zLDA0zPMSvHdkr4UvCOqU.
This key is not known by any other names
Are you sure you want to continue connecting (yes/no/[fingerprint])?
输入 yes 回车
如果看到 Permission denied (publickey) 说明SSH Key 添加失败,需要重新生成 SSH Key 或者添加 SSH Key
如果看到 You've successfully authenticated, but GitHub does not provide shell access 说明添加成功
需要注意的是
- 一台电脑只需要一个 SSH key
- 一个 SSH key 可以访问你的所有仓库
- 如果换了电脑,则在新电脑上重新生成一个 SSH key,并上传到 GitHub 上
- 如果把 Key 从电脑上删除了,重新生成一个 Key 并上传到 GitHub 上即可
2.3 Git Add
使用 vim readme.md 命令创建一个文件,内容任意
此时使用 git status 查看当前状态
On branch master

No commits yet

Untracked files:
  (use "git add <file>..." to include in what will be committed)
        readme.md

nothing added to commit but untracked files present (use "git add" to track)
使用 git add . 将当前目录下所有的新文件添加到暂存区,再使用 git status 命令查看当前状态
On branch master

No commits yet

Changes to be committed:
  (use "git rm --cached <file>..." to unstage)
        new file:   readme.md
使用 tree .git/ 查看 Git 结构
.git/
├── HEAD
├── branches
├── config
├── description
├── hooks
│   ├── commit-msg
├── index
├── info
│   └── exclude
├── objects
│   ├── 55
│   │   └── 7db03de997c86a4a028e1ebd3a1ceb225be238
│   ├── info
│   └── pack
└── refs
    ├── heads
    └── tags
可见与原先相比在 objects 目录下多了一个文件夹
使用 git cat-file -p 557db03de997c86a4a028e1ebd3a1ceb225be238 可直接查看其内容,输出结果为 readme.md 文件中的内容
2.4 Git Commit
使用 git commit -m "add readme" 命令将暂存区中的文件提交
再使用 tree .git/ 命令查看 Git 结构
.git/
├── COMMIT_EDITMSG
├── HEAD
├── branches
├── config
├── description
├── hooks
│   ├── commit-msg
├── index
├── info
│   └── exclude
├── logs
│   ├── HEAD
│   └── refs
│       └── heads
│           └── master
├── objects
│   ├── 3a
│   │   └── 3aff7fa9639da674465c43fac565c1291f952b
│   ├── 43
│   │   └── 5f11f5c636d179325a9dcecada5d997192ae70
│   ├── 55
│   │   └── 7db03de997c86a4a028e1ebd3a1ceb225be238
│   ├── info
│   └── pack
└── refs
    ├── heads
    │   └── master
    └── tags
可见在 objects 目录下又增加了两个文件,分别使用 git cat-file -p 查看两个文件的内容
# git cat-file -p 3a3aff7fa9639da674465c43fac565c1291f952b
100644 blob 557db03de997c86a4a028e1ebd3a1ceb225be238    readme.md

# git cat-file -p 435f11f5c636d179325a9dcecada5d997192ae70
tree 3a3aff7fa9639da674465c43fac565c1291f952b
author xxx <xxx@xxxx.xx> 1675429966 +0800
committer xxx <xxx@xxxx.xx> 1675429966 +0800

add readme
2.5 Objects
commit, tree, blob 在 Git 中统一称为 Object,其中
Blob
储存文件内容
Tree
储存文件目录信息
Commit
储存提交信息,一个 Commit 对应唯一版本的代码
- 通过 Commit 可以寻找到 Tree 信息,每个 Commit 都会储存对应的 Tree ID
- 通过 Tree 储存的信息,获取到对应的目录树信息
- 从 Tree 获取的目录树信息中得到 Blob 的 ID,再通过 Blob ID 获取对应的文件内容
2.6 Refs
在 .git/refs/heads 目录下保存着分支文件 refs,其中 ref 的内容便是对应的 Commit ID,可以将 ref 当做指针,通过指向对应的 Commit 来表示当前 Ref 对应的版本
需要注意的是 refs/heads 前缀表示的是 分支 (Branch),refs/tags 前缀表示的是 标签
Branch
分支一般用于开发阶段,是可以不断添加 Commit 进行迭代的
可以通过 git checkout -b test 创建一个新分支 test
Tag
Tag 一般表示一个稳定版本,指向的 Commit 一般不会变更
可以通过 git tag v0.0.1 生成 tag v0.0.1
2. Git 开发流程
2.1 分支管理工作流
| 分支管理工作流 | 特点 |
|---|---|
| Git Flow | 分支类型丰富,规范严格 |
| GitHub Flow | 只有主干分支和开发分支,规则简单 |
| GitLab Flow | 在主干分支和开发分支之上构建环境分支,版本分支,满足不同发布或环境的需要 |
2.2 代码合并
Fast-Forward Merge
使用下面命令进行操作
新建一个 feature 分支,并对文件作出更改
git checkout -b feature
将变更添加并提交
git add .
git commit -m "update readme"
使用 git checkout master 将当前分支切换到 master 分支,再使用 git merge feature --ff-only 命令将 feature 分支和 master 分支进行 Fast-Forward Merge
git checkout master
git merge feature --ff-only
使用此合并方式不会产生 merge 节点,合并后保持一个线性历史。如果 target branch 有了更新,则需要进行 rebase 操作更新 source branch,将 source branch 变基 (rebase)到 target branch 最新提交的节点上后才可以进行并入
Fast-Forward Merge 示意图如下
Three-Way Merge
此合并方式与 Fast-Forward Merge 相比仅需要将 git merge feature --ff-only 改为 git merge feature --no-ff
使用此方法进行合并分支会产生一个新的 merge 节点
Three-Way Merge 示意图如下

瓜分20万奖金 获得内推名额 丰厚实物奖励 易参与易上手
更多推荐

 1
1 0
0- 0


 已为社区贡献1条内容

所有评论(0)