
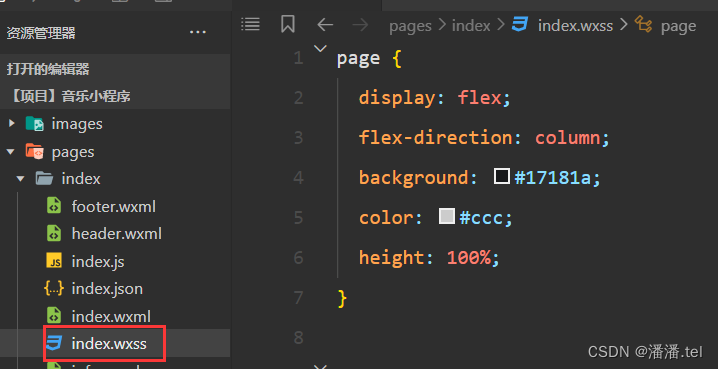
微信小程序中实现——【音乐播放器】
微信小程序实现音乐播放器
一键AI生成摘要,助你高效阅读
问答
·
一、学习目标
1、掌握swiper组件、scroll-view组件的使用
2、掌握image组件的使用
3、掌握音频API的使用
4、掌握slider组件的使用
二、开发前的准备
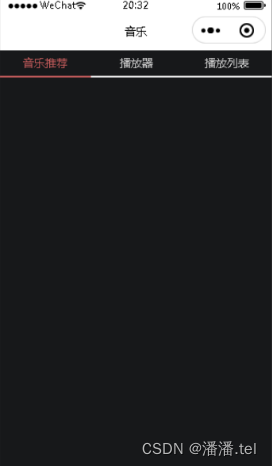
音乐小程序项目效果展示:

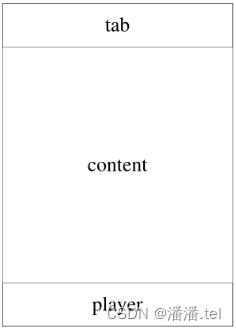
1、页面结构图
tab导航栏
content内容区
player音乐播放控件
2、项目初始化
开发者工具创建空白项目:
{"pages:["pages/index/index"
]
}
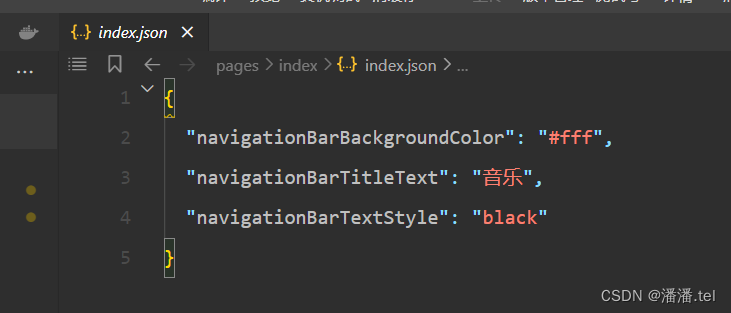
“navigationBarBackgroudColor”:"#fff,
“navigationBartitletext”:“音乐,”
“navigationBarBackgroudColor”:“black”,
3、 任务分析
标签页和页面info.wxml、play.wxml、palylist.wxml
4、 前导知识
swiper组件编写滑动页面结构
<swiper>
<swiper-item style="background:#ccc">0</swiper-item>
<swiper-item style="background:#ddd">1</swiper-item>
<swiper-item style="background:#eee">2</swiper-item>
</swiper-item>
swiper组件编写滑动页面结构index.wxml:
<swiper current-item-id="c">
< swiper-item item-id="a"> <image
src= "https://assets.lexus.com.cn/images/index/kv/2880x1480. newes. 1.jpg?x-Oss-
process=image/resize,w. 1898/quality.q. 80" mode= "widthFix" > </image> </swiper-item>
<swiper-item item-id="b"> <image src= https://assets.exus.com.cn/images/models/s/s -kv-1 2880.jpg?x-oss-
process=image/resize,w. 1898/quality.q. 80" mode= "widthFix" > </image> </swiper-item>
<swiper-item item-id="c"> <image src="https://assets.lexus.com.cn/images/index/kv/ux. 300e-kv-1-2880.jpg?x-
oss-process= image/resize,w 1898/quality,q 80" mode="widthFix"> </image> </swiper-item>
</swiper>
swiper组件编写滑动页面结构index.wxss:
image{
width:100%;
}
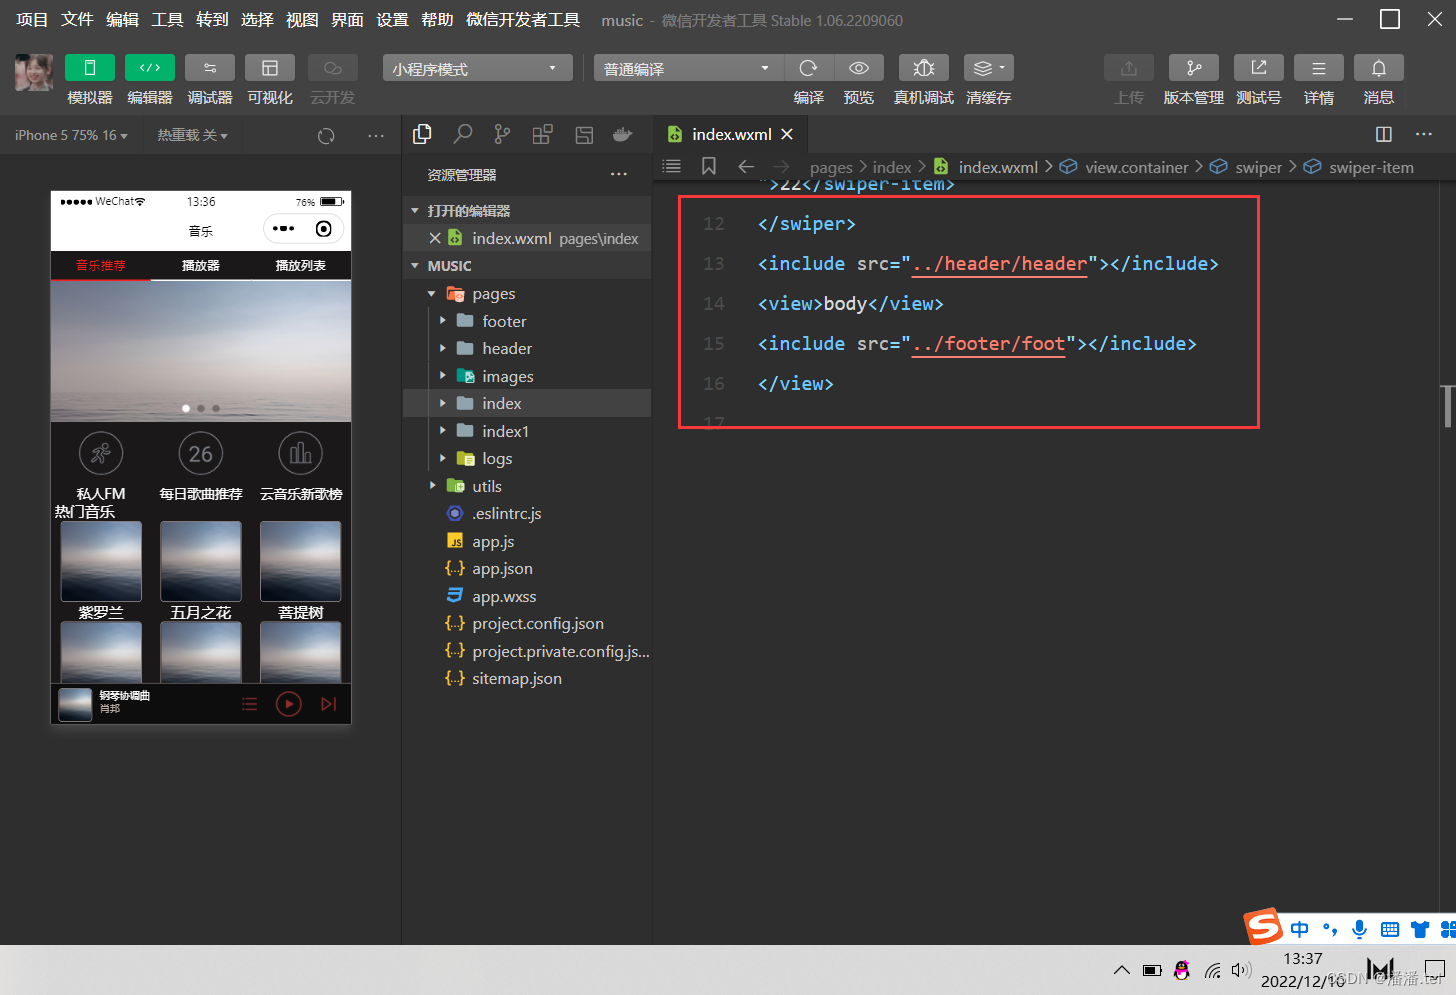
include主要用途:
1、将代码拆分到多个文件中,可以更方便地查找代码。
2、将代码公共部分抽取出来。通过外部文件引入。
<include src="header.wxml />
<view>body</view>
<include src="footer.wxml " />
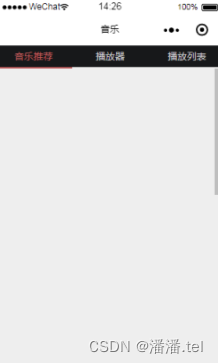
三、标签页切换
1、页面和样式:
<view class="tab>
<view class="tab-item">音乐推荐</view>
</view>
<!---内容区域--->
<view class="content"></view>
<!---底部播放器--->
<view class="player"></view>
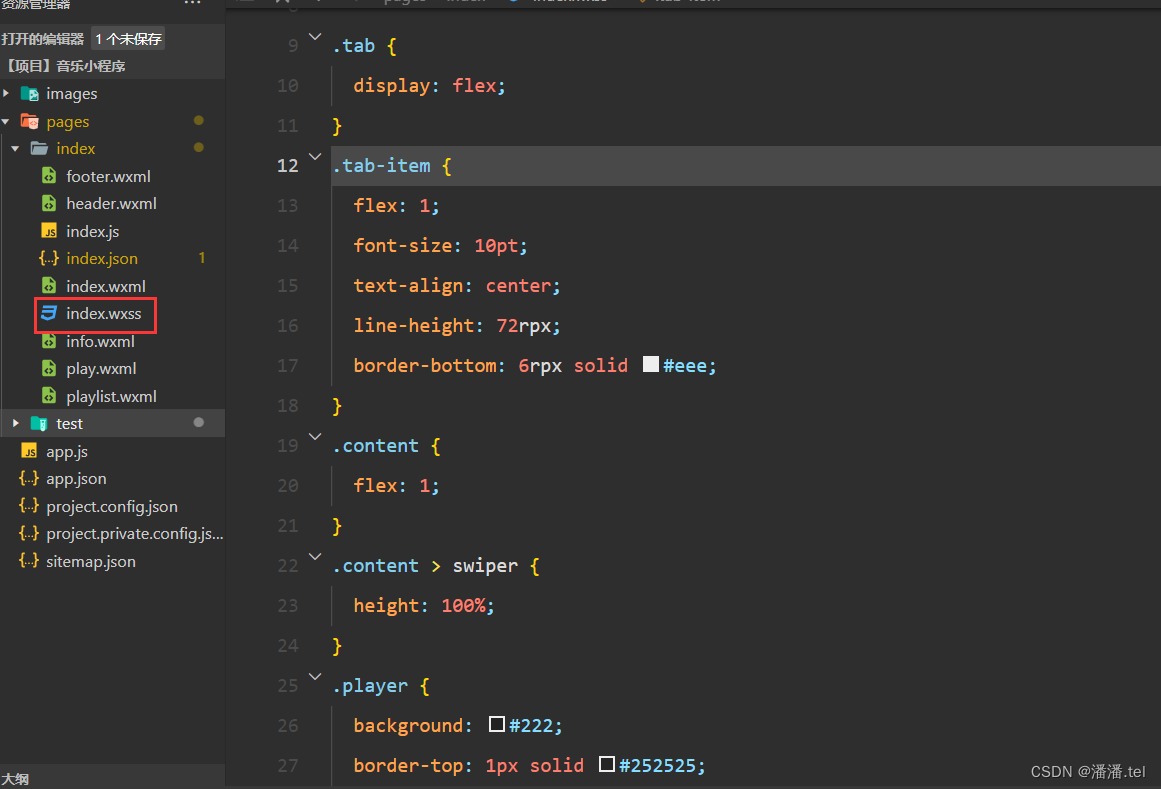
2、音乐小程序基础页面和样式:
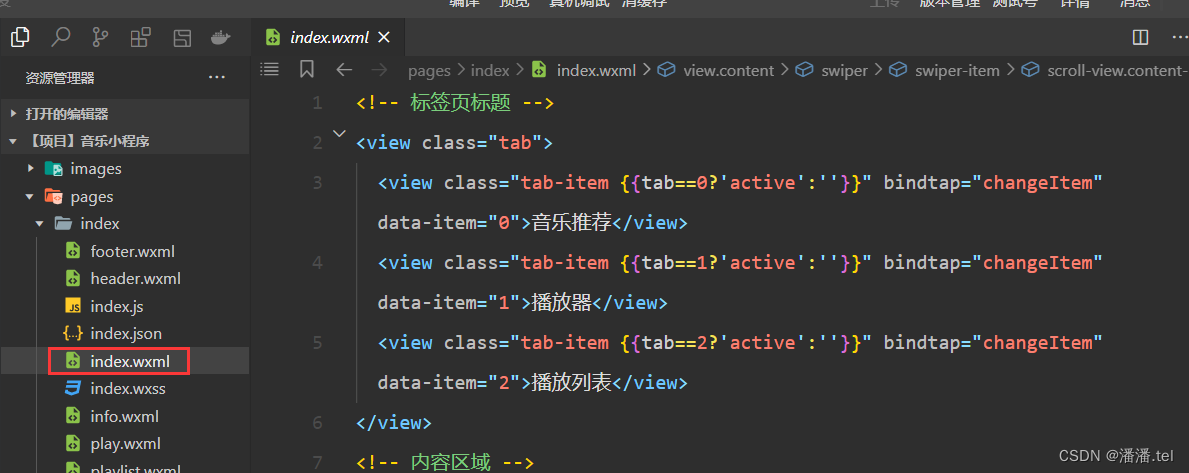
<!--标签页标题-->
<view class=" tab">
<view class= "tab-item {{tab==0? active':' }}" bindtap=”changeItem"
data-item= "0" >音乐推荐< /view>
<view class=”tab item {{tab== 1? actie':"}}" bindtap=”changeItem”
data-item="1" >播放器< /view>
<view class=”tab item {{tab== 2? actie':"}}" bindtap=”changeItem”
data-item= "2" >播放列表< /view>
< /view>
页面和样式:
3、页面和样式tab导航的样式:
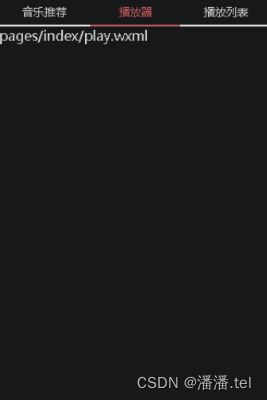
tab导航效果:
4、测试页面info.wxml、page.wxml、play.wxml文件:
<view style= "background:#ddd; color:#000; h
eight:100%"> play </view>
<view style= "background:#ccc; color:#000; he
ight:100%" > info< /view>
<view style= "background:#eee; color:#00O; he
ight:100%" > playlist</view>
实现标签页切换
单击导航栏选项卡实现标签页切换:
<view class="tab-item {{tab==0?'a
ctive':'}}"
bindtap=" changeltem" data-item
="0">
音乐推荐< /view>
changeltem: function(e) {
this.setData({
item: e.target.dataset.item,
tab:e.target.dataset.item
}},
标签页切换样式
.tab -item.active {
color: #c25b5b;
border- bottom-color: #c25b5b;
5、通过滚动时间切换页面效果
< swiper current= "{item}" bindchange="c
hangeTab">
< swiper- item>
<include src = ../index/info" > </include>
</swiper-item>
< swiper- item>
<include src= ../index/play" > </include>
</swiper-item>
< swiper- item>
<include src=”./index/playlist" > </include>
</swiper-item>
</swiper>
(一)滚动事件
change Tab: function(e) {
this.setData({
tab: e.detail.current
.tab-item.active {
color: #c25b5b;
border- bottom-color: #c25b5b;}
(二)通过滚动事件切换页面效果:
四、音乐推荐
1、scroll-view组件的属性及说明:
< scroll-view scroll-x scroll-y style="hei
ght:200px" bindscroll- "scroll">
<view style ="width:200%;height:400p
x;background:#ccc" > </view>
</scroll-view>
scroll: function(e) {
console.log(e.detail)
},
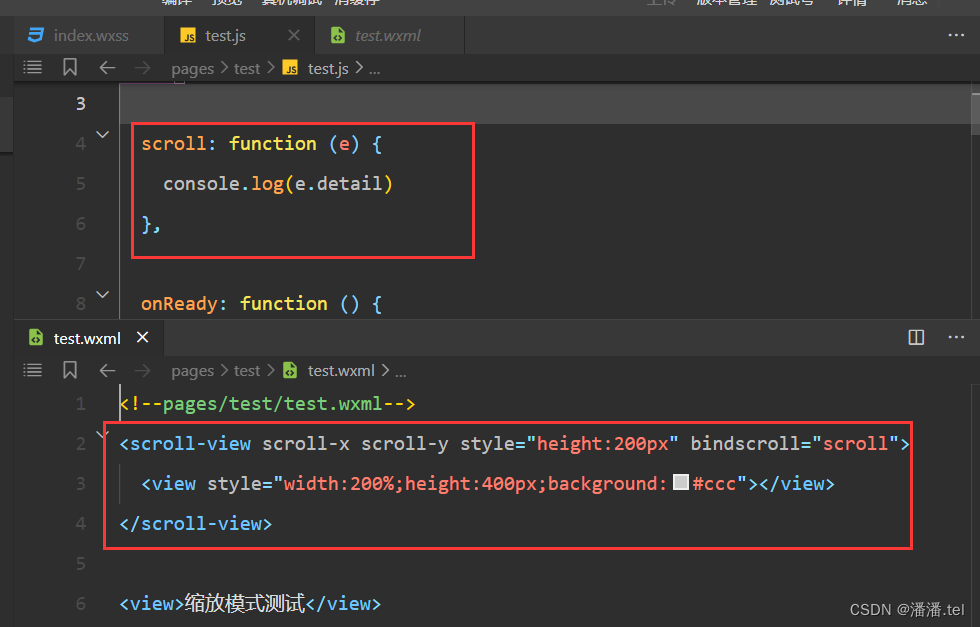
2、image组件缩放模式和裁剪模式测试:
内容区域滚动
(一)scroll-view组件:
< scroll-view class= "content-info" scroll-y>
<view style= "background:#eee;height:10
00px" > </view>
<view>已到达底部< /view>
< /scroll-view>
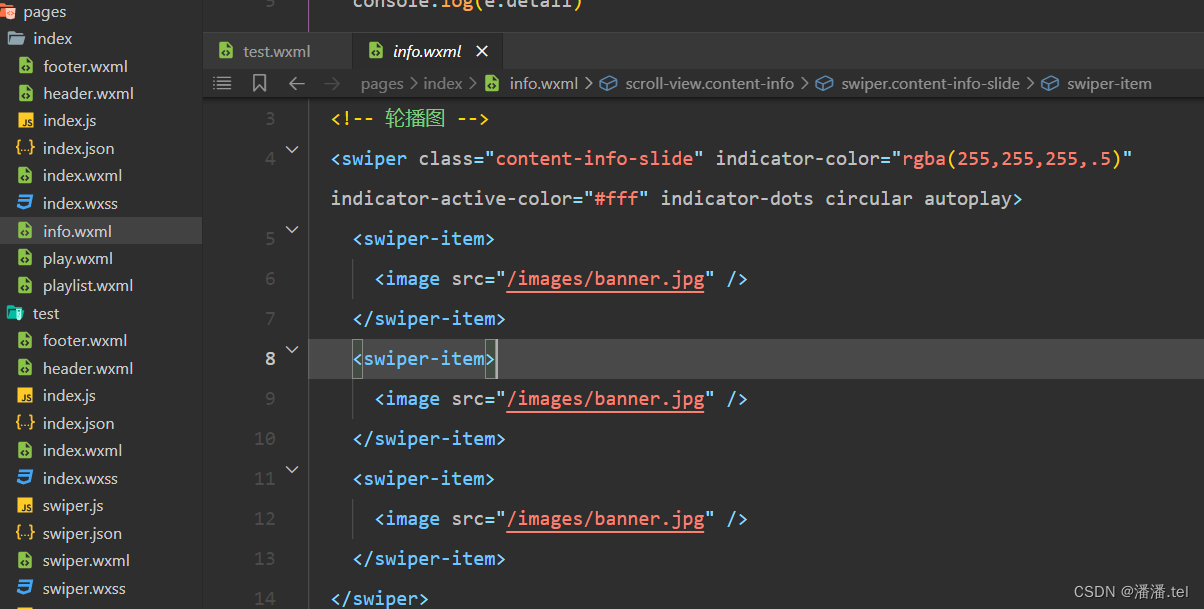
3、swiper组件实现轮播图:
<swiper class="content-info-slide" indicator-color="rgba(255,255,255,.5)" indicator-active-color="#fff" indicator-dots circular autoplay>
    <swiper-item>
      <image src="/images/banner.jpg" />
    </swiper-item>
    <swiper-item>
      <image src="/images/banner.jpg" />
    </swiper-item>
    <swiper-item>
      <image src="/images/banner.jpg" />
    </swiper-item>
  </swiper>
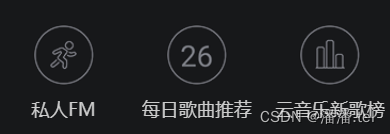
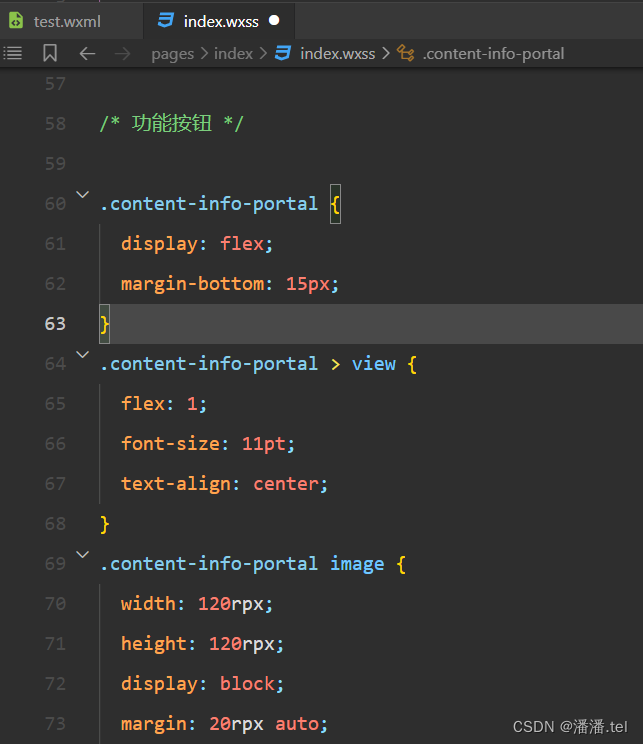
4、flex布局实现功能按钮:
<view class="content-info-portal">
    <view>
      <image src="/images/04.png" />
      <text>私人FM</text>
    </view>
(一)flex布局实现功能按钮:
.content-info-portal {
  display: flex;
  margin-bottom: 15px;
}
.content-info-portal > view {
  flex: 1;
  font-size: 11pt;
  text-align: center;
}
.content-info-portal image {
  width: 120rpx;
  height: 120rpx;
  display: block;
  margin: 20rpx auto;
}
(二)flex布局实现页面布局:
  <view class="content-info-list">
    <view class="list-title">推荐歌曲</view>
    <view class="list-inner">
      <view class="list-item">
        <image src="/images/cover.jpg" />
        <view>紫罗兰</view>
      </view>
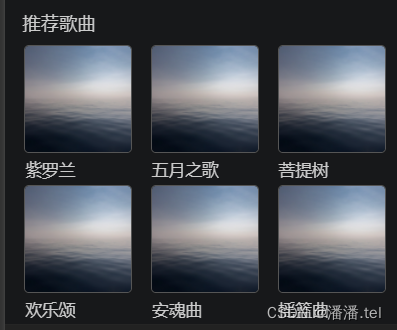
热门音乐
.content-info-list > .list-inner > .list-item {
  flex: 1;
}
.content-info-list > .list-inner > .list-item > image {
  display: block;
  width: 200rpx;
  height: 200rpx;
  margin: 0 auto;
  border-radius: 10rpx;
  border: 1rpx solid #555;
}
.content-info-list > .list-inner > .list-item > view {
  width: 200rpx;
  margin: 10rpx auto;
  font-size: 10pt;
}

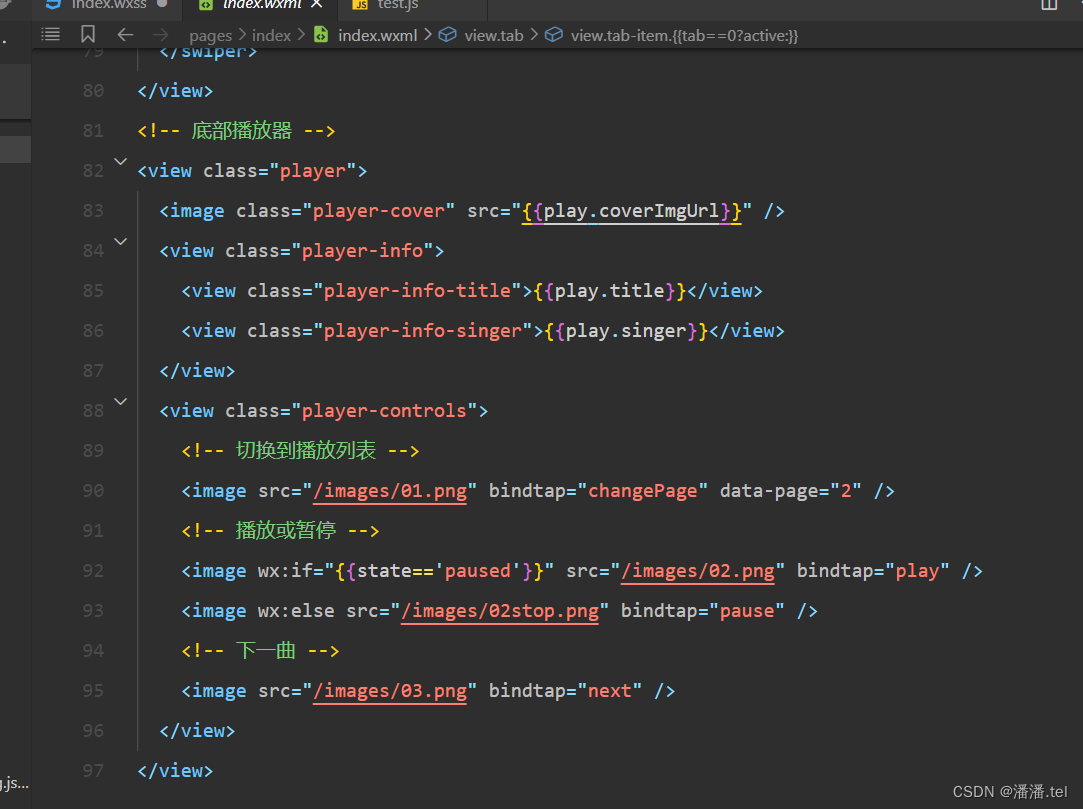
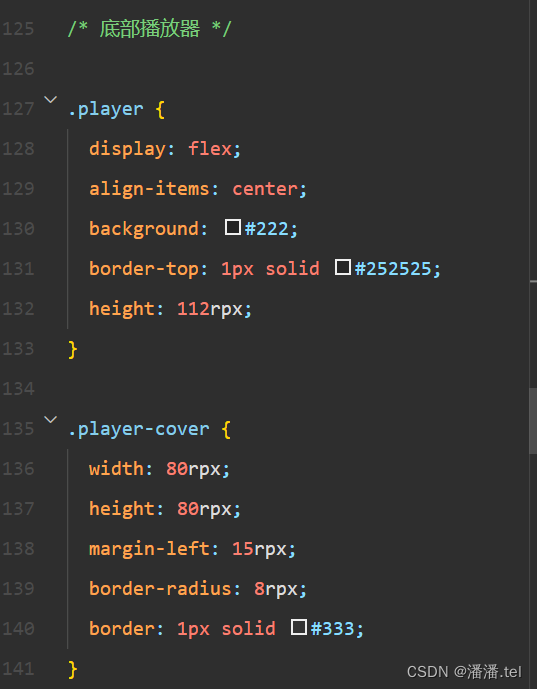
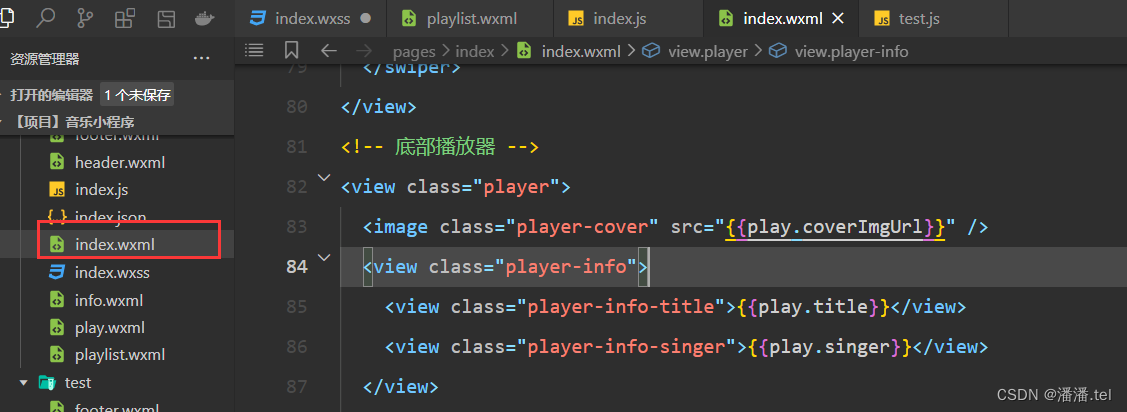
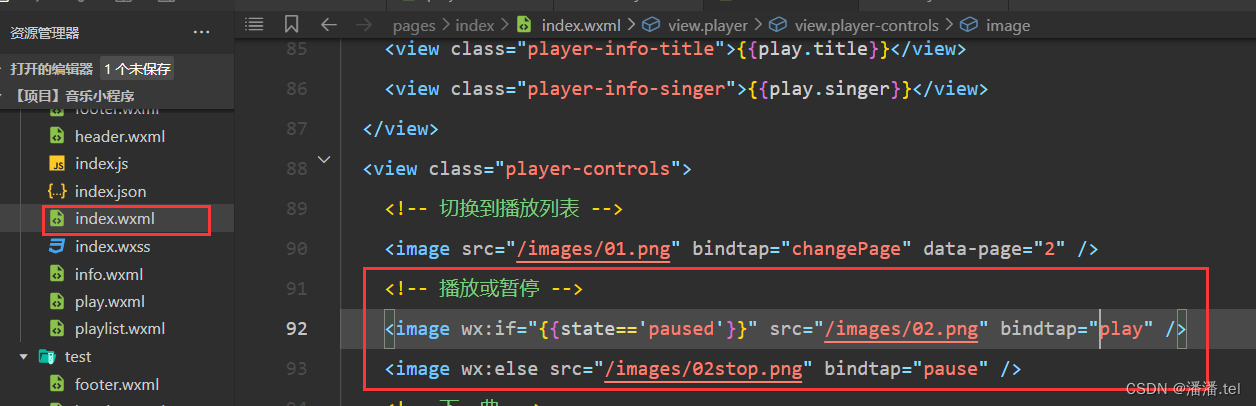
5、index页面底部播放
<!-- 底部播放器 -->
<view class="player">
  <image class="player-cover" src="{{play.coverImgUrl}}" />
  <view class="player-info">
    <view class="player-info-title">{{play.title}}</view>
    <view class="player-info-singer">{{play.singer}}</view>
  </view>
  <view class="player-controls">
    <!-- 切换到播放列表 -->
    <image src="/images/01.png" bindtap="changePage" data-page="2" />
    <!-- 播放或暂停 -->
    <image wx:if="{{state=='paused'}}" src="/images/02.png" bindtap="play" />
    <image wx:else src="/images/02stop.png" bindtap="pause" />
    <!-- 下一曲 -->
    <image src="/images/03.png" bindtap="next" />
  </view>
</view>

.player {
  display: flex;
  align-items: center;
  background: #222;
  border-top: 1px solid #252525;
  height: 112rpx;
}

.player-cover {
  width: 80rpx;
  height: 80rpx;
  margin-left: 15rpx;
  border-radius: 8rpx;
  border: 1px solid #333;
}
.player-info {
  flex: 1;
  font-size: 10pt;
  line-height: 38rpx;
  margin-left: 20rpx;
  padding-bottom: 8rpx;
}

.player-info-singer {
  color: #888;
}

.player-controls image {
  width: 80rpx;
  height: 80rpx;
  margin-right: 15rpx;
}

五、播放器
1、audioctx对象声明的方式:
var audioctx = wx.createInnerAudioContext();
(一)innerAudioContext案例使用:
onReady: function() {
var audioCtx = wx.createInnerAudioContext(
audioCtx.src = htt.:/....x.o.
audioCtx.onPlay(function() {
console.log('开始播放')
})
...
},
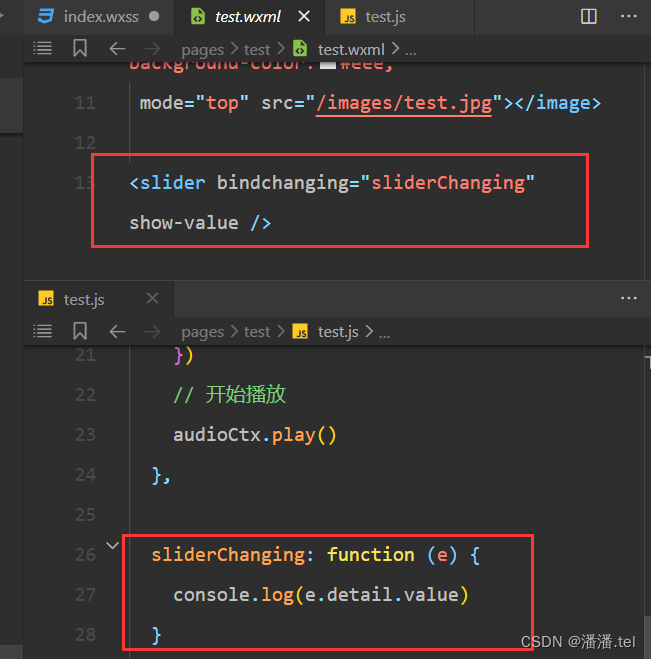
(二)slider组件的使用:
<slider bindchanging = "sliderChangeing" show-value />
sliderChanging:function(e){
console.log(e.detail.value)
},
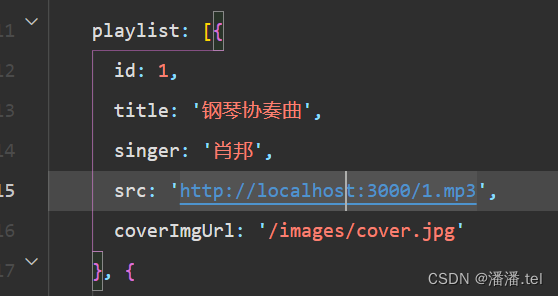
(三)音乐播放列表和音乐状态数据:
   playlist: [{
      id: 1,
      title: '钢琴协奏曲',
      singer: '肖邦',
      src: 'http://localhost:3000/1.mp3',
      coverImgUrl: '/images/cover.jpg'
    },
(四)实现音乐播放功能
音乐播放逻辑代码:
 audioCtx: null,
  onReady: function() {
    this.audioCtx = wx.createInnerAudioContext()
    // 默认选择第1曲
    this.setMusic(0)
    var that = this
    // 播放进度检测
    this.audioCtx.onError(function() {
      console.log('播放失败:' + that.audioCtx.src)
    })
    // 播放完成自动换下一曲
    this.audioCtx.onEnded(function() {
      that.next()
    })
    // 自动更新播放进度
    this.audioCtx.onPlay(function() {})
    this.audioCtx.onTimeUpdate(function() {
      that.setData({
        'play.duration': formatTime(that.audioCtx.duration),
        'play.currentTime': formatTime(that.audioCtx.currentTime),
        'play.percent': that.audioCtx.currentTime / that.audioCtx.duration * 100
      })
    })
    // 格式化时间
    function formatTime(time) {
      var minute = Math.floor(time / 60) % 60;
      var second = Math.floor(time) % 60
      return (minute < 10 ? '0' + minute : minute) + ':' + (second < 10 ? '0' + second : second)
    }
  },
  // 音乐播放
  setMusic: function(index) {
    var music = this.data.playlist[index]
    this.audioCtx.src = music.src
    this.setData({
      playIndex: index,
      'play.title': music.title,
      'play.singer': music.singer,
      'play.coverImgUrl': music.coverImgUrl,
      'play.currentTime': '00:00',
      'play.duration': '00:00',
      'play.percent': 0
    })
  },
(五)底部播放器的结构代码:
<!-- 底部播放器 -->
<view class="player">
  <image class="player-cover" src="{{play.coverImgUrl}}" />
  <view class="player-info">
    <view class="player-info-title">{{play.title}}</view>
    <view class="player-info-singer">{{play.singer}}</view>
  </view>
底部播放器的样式代码:
.player {
  display: flex;
  align-items: center;
  background: #222;
  border-top: 1px solid #252525;
  height: 112rpx;
}

(六)底部播放器暂停/播放按钮控制歌曲:
   <image wx:if="{{state=='paused'}}" src="/images/02.png" bindtap="play" />
    <image wx:else src="/images/02stop.png" bindtap="pause" />
(七)实现播放器切换下一曲歌曲:
<image src="/images/03.png" bindtap="next" />
 next: function() {
    var index = this.data.playIndex >= this.data.playlist.length - 1 ? 0 : this.data.playIndex + 1
    this.setMusic(index)
    if (this.data.state === 'running') {
      this.play()
    }
  },
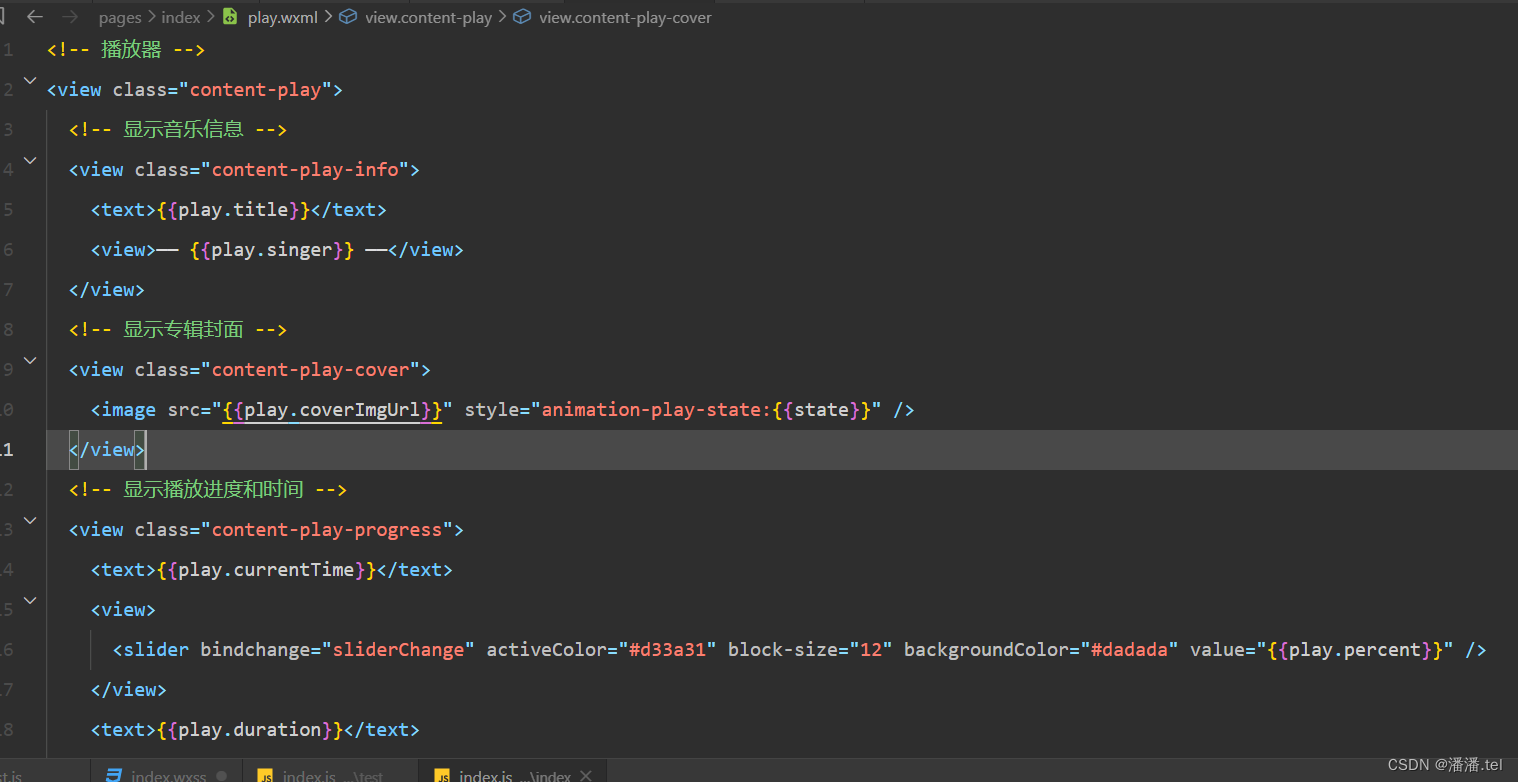
(八)播放器页面结构代码:
<view class="content-play">
  <!-- 显示音乐信息 -->
  <view class="content-play-info">
    <text>{{play.title}}</text>
    <view>—— {{play.singer}} ——</view>
  </view>
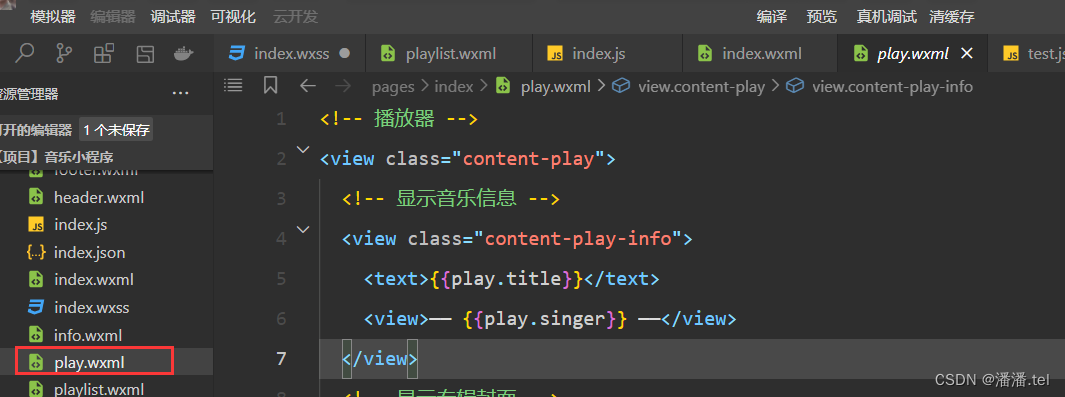
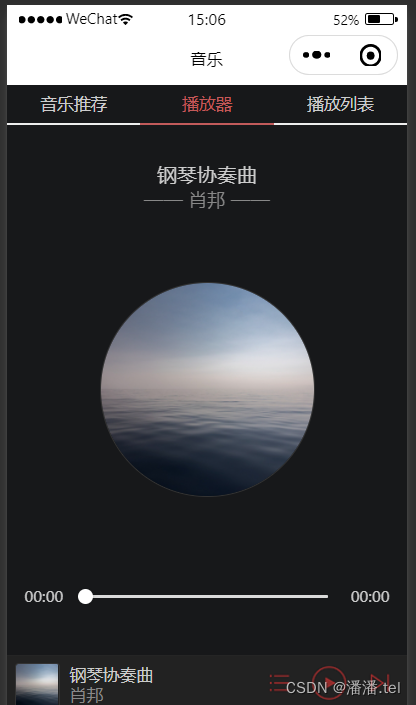
六、播放器
<!-- 播放器 -->
<view class="content-play">
  <!-- 显示音乐信息 -->
  <view class="content-play-info">
    <text>{{play.title}}</text>
    <view>—— {{play.singer}} ——</view>
  </view>
  <!-- 显示专辑封面 -->
  <view class="content-play-cover">
    <image src="{{play.coverImgUrl}}" style="animation-play-state:{{state}}" />
  </view>
  <!-- 显示播放进度和时间 -->
  <view class="content-play-progress">
    <text>{{play.currentTime}}</text>
    <view>
      <slider bindchange="sliderChange" activeColor="#d33a31" block-size="12" backgroundColor="#dadada" value="{{play.percent}}" />
    </view>
    <text>{{play.duration}}</text>
  </view>
</view>
1、播放器样式1
.content-play {
  display: flex;
  justify-content: space-around;
  flex-direction: column;
  height: 100%;
  text-align: center;
}

.content-play-info > view {
  color: #888;
  font-size: 11pt;
}

2、通过CSS3动画实现海报的旋转功能:
  <!-- 显示专辑封面 -->
  <view class="content-play-cover">
    <image src="{{play.coverImgUrl}}" style="animation-play-state:{{state}}" />
  </view>

3、播放器页面下方的滑块结构:
<slider bindchange="sliderChange" activeColor="#d33a31" block-size="12" backgroundColor="#dadada" value="{{play.percent}}" />

3、显示音乐的播放进度:
  onReady: function() {
    this.audioCtx = wx.createInnerAudioContext()
    // 默认选择第1曲
    this.setMusic(0)
    var that = this
    // 播放进度检测
    this.audioCtx.onError(function() {
      console.log('播放失败:' + that.audioCtx.src)
    })
    // 播放完成自动换下一曲
    this.audioCtx.onEnded(function() {
      that.next()
    })
4、控制进度条的长度控制歌曲播放进度:
< slider
bindchange= "sliderChange"
activeColor= " #d33a31
block- size=”12"
backgroundColor= " #dadada"
value= "{{play.percent}}" />
sliderChange: function(e) {
var second = e.detail.value
*
this.audioCtx.duration / 100
this.audioCtx.seek(second)
},
控制进度条的长度控制歌曲播放进度:
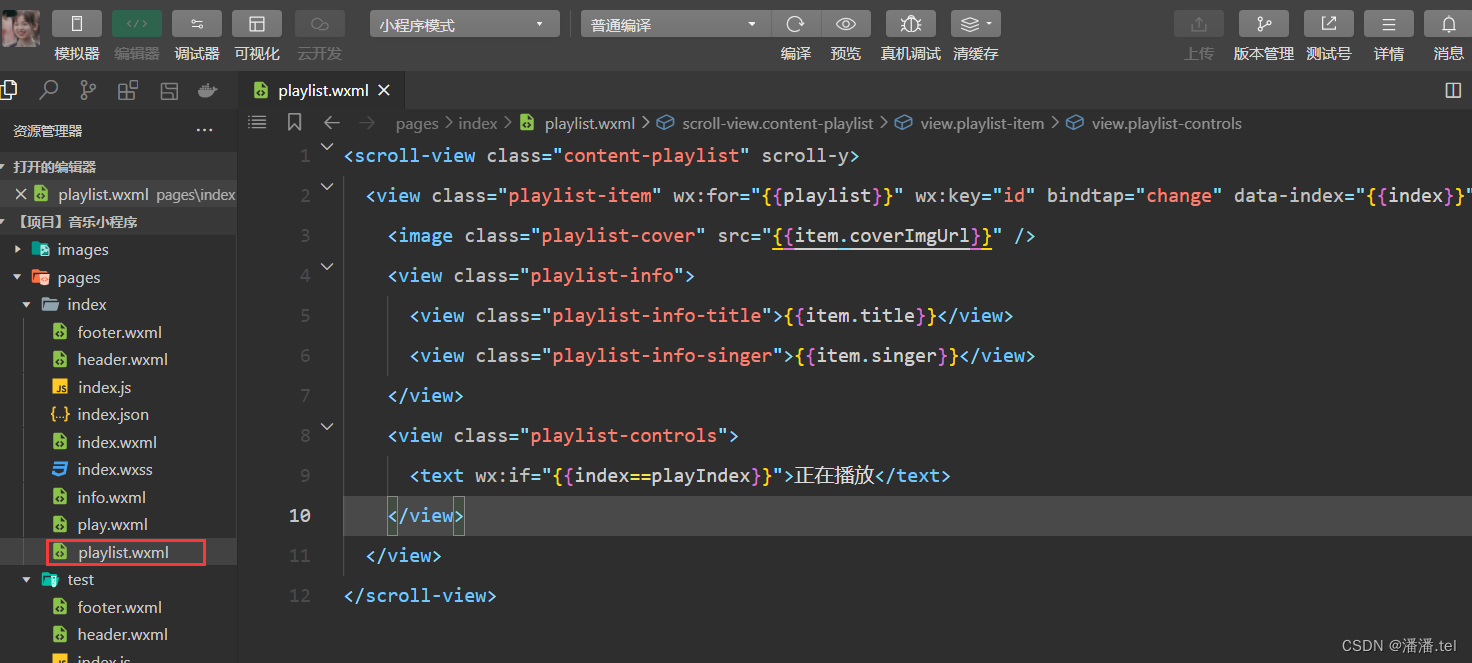
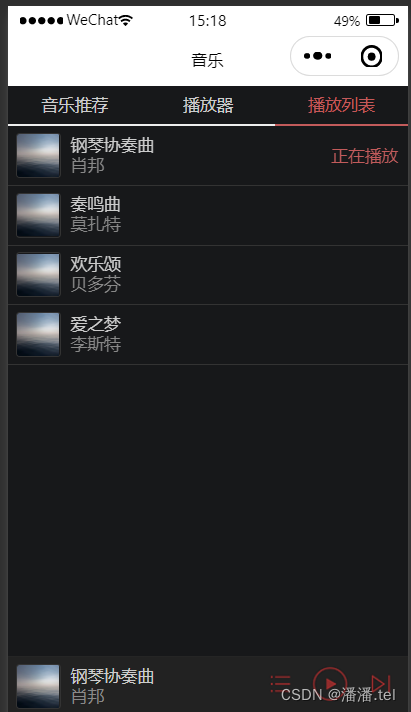
<scroll-view class="content-playlist" scroll-y>
  <view class="playlist-item" wx:for="{{playlist}}" wx:key="id" bindtap="change" data-index="{{index}}">
    <image class="playlist-cover" src="{{item.coverImgUrl}}" />
    <view class="playlist-info">
      <view class="playlist-info-title">{{item.title}}</view>
      <view class="playlist-info-singer">{{item.singer}}</view>
    </view>
    <view class="playlist-controls">
      <text wx:if="{{index==playIndex}}">正在播放</text>
    </view>
  </view>
</scroll-view>
七、播放列表
1、控制进度条的长度控制歌曲播放进度:
.playlist-item {
display: flex;
align-items:
center;
border- bottom: 1rpx solid #333;
height: 112rpx;
}
...
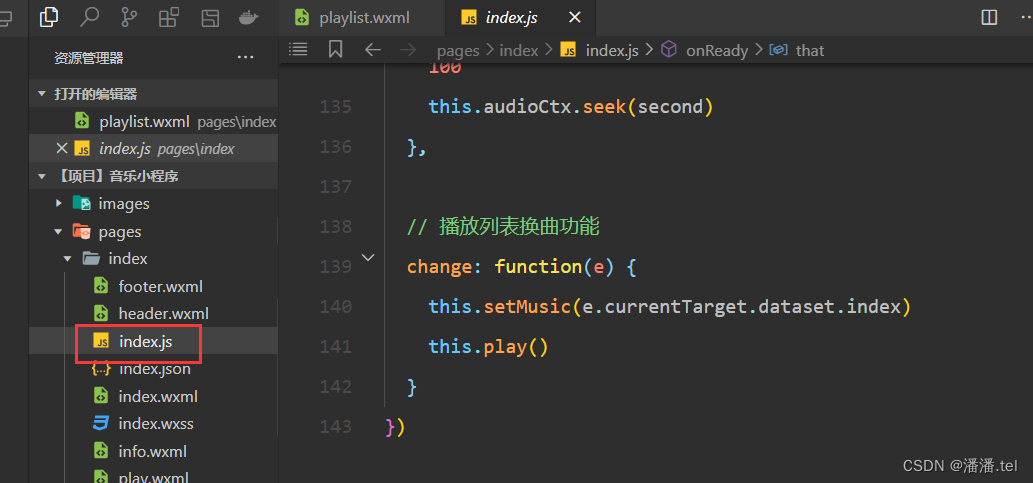
2、实现换曲功能:
change:function(e){
this.setMusic(e.currentTarget.dateset.index)
this.play()
},

旨在为数千万中国开发者提供一个无缝且高效的云端环境,以支持学习、使用和贡献开源项目。
更多推荐


 37
37 0
0- 0


 已为社区贡献1条内容

所有评论(0)