ASP.NET身份验证和授权,使用cookie和Claims认证
本文基于asp.net core mvc(.net6)的项目。配置在Program.cs类中1、添加 AddAuthentication 和 AddCookie 方法的身份验证中间件服务var builder = WebApplication.CreateBuilder(args);//身份验证,设置身份验证方式为 Cookie 验证(网页应用程序只适合用 cookie)builder.Servi
·
本文基于asp.net core mvc(.net6)的项目。
配置
在Program.cs类中
1、添加 AddAuthentication 和 AddCookie 方法的身份验证中间件服务
var builder = WebApplication.CreateBuilder(args);

//身份验证,设置身份验证方式为 Cookie 验证(网页应用程序只适合用 cookie)
builder.Services.AddAuthentication(CookieAuthenticationDefaults.AuthenticationScheme//默认身份验证方案
).AddCookie(CookieAuthenticationDefaults.AuthenticationScheme, options =>
{
    options.LoginPath = "/Login/Index";//如果没有找到用户信息,就跳转到指定的action
    options.AccessDeniedPath = "/Books/Index";//不被允许访问的地址(角色权限不足),跳转到该地址
});
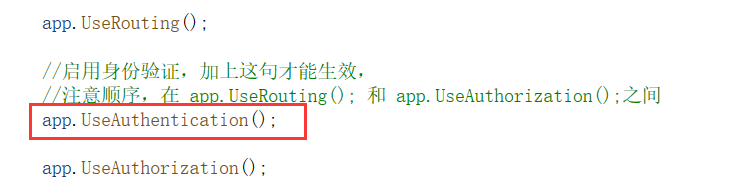
2、启用身份验证,注意位置是在app.UseRouting(); 和 app.UseAuthorization();之间
app.UseAuthentication();
控制器
1.新建一个控制器,添加以下引用
using Microsoft.AspNetCore.Authentication;
using Microsoft.AspNetCore.Authentication.Cookies;
using Microsoft.AspNetCore.Mvc;
using System.Security.Claims;
2.登入
[HttpPost]
        public async Task<IActionResult> Index(string name, string pwd)
        {
            var user = _context.Users.FirstOrDefault(u => u.Name == name && u.Pwd == pwd);
            if (user != null)
            {
                List<Claim> claims = new()
                {
                    //特别注意这一行,如果不设置那么 HttpContext.User.Identity.Name 将为 null
                    new Claim(ClaimTypes.NameIdentifier, user.Id.ToString()),//用户唯一标识
                    new Claim(ClaimTypes.Name, user.Name),//用户名
                    new Claim(ClaimTypes.Role,user.Jurisdiction.ToString()),//用户角色,可用于权限管理
                    //下面这几行随意,根据需要添加
                    new Claim("UserName", user.Name)
                };
                ClaimsPrincipal principal = new(new ClaimsIdentity(claims, "User"));
                HttpContext.SignInAsync(CookieAuthenticationDefaults.AuthenticationScheme, principal, new AuthenticationProperties
                {
                    ExpiresUtc = DateTime.UtcNow.AddMinutes(30),//过期时间:30分钟
                }).Wait();
                var userInfo = HttpContext.User;
                return base.Redirect("/Books/Index");
            }
            else
            {
                ViewBag.Msg = "用户名或密码错误";
            }
            return await Task.FromResult<IActionResult>(View());
        }
3.登出
public async Task<IActionResult> Logout()
        {
            await HttpContext.SignOutAsync(CookieAuthenticationDefaults.AuthenticationScheme);
            return RedirectToAction("", "");//重定向的地址
        }
添加标记
1、去你需要授权的控制器前加上标签[Authorize]

如图所示可以放在整个控制器前面,这样整个控制器的内容都需要登陆后才能访问,也可放在第二个箭头index方法前面,那样就是只控制那一个方法所在的页面。
2、除了登录授权之外还可进行权限控制,如下图所示添加[Authorize(Roles =“0”)],这样所登录用户的角色权限不够时也是不能访问该控制器所属页面的。

视图页使用claims里所存储的值:@User.FindFirstValue(“UserName”)

收集资料学习过程中认识了Claims认证、ASP.NETIdentity验证、ABP框架,感兴趣的伙伴也可以搜索一下加深了解,有错误或不足之处还望指出。

腾讯云面向开发者汇聚海量精品云计算使用和开发经验,营造开放的云计算技术生态圈。
更多推荐
 1
1 0
0- 0


 已为社区贡献1条内容

所有评论(0)